深度学习:python动物识别系统 YOLOv5 数据分析 可视化 Django框架 pytorch 深度学习 ✅
博主介绍:✌全网粉丝10W+,前互联网大厂软件研发、集结硕博英豪成立软件开发工作室,专注于计算机相关专业项目实战6年之久,累计开发项目作品上万套。凭借丰富的经验与专业实力,已帮助成千上万的学生顺利毕业,选择我们,就是选择放心、选择安心毕业✌
> 🍅想要获取完整文章或者源码,或者代做,拉到文章底部即可与我联系了。🍅点击查看作者主页,了解更多项目!
🍅感兴趣的可以先收藏起来,点赞、关注不迷路,大家在毕设选题,项目以及论文编写等相关问题都可以给我留言咨询,希望帮助同学们顺利毕业 。🍅
1、毕业设计:2026年计算机专业毕业设计选题汇总(建议收藏)✅
2、最全计算机专业毕业设计选题大全(建议收藏)✅
1、项目介绍
技术栈: Python语言 YOLOv5 torch 深度学习、coco数据集、Django框架
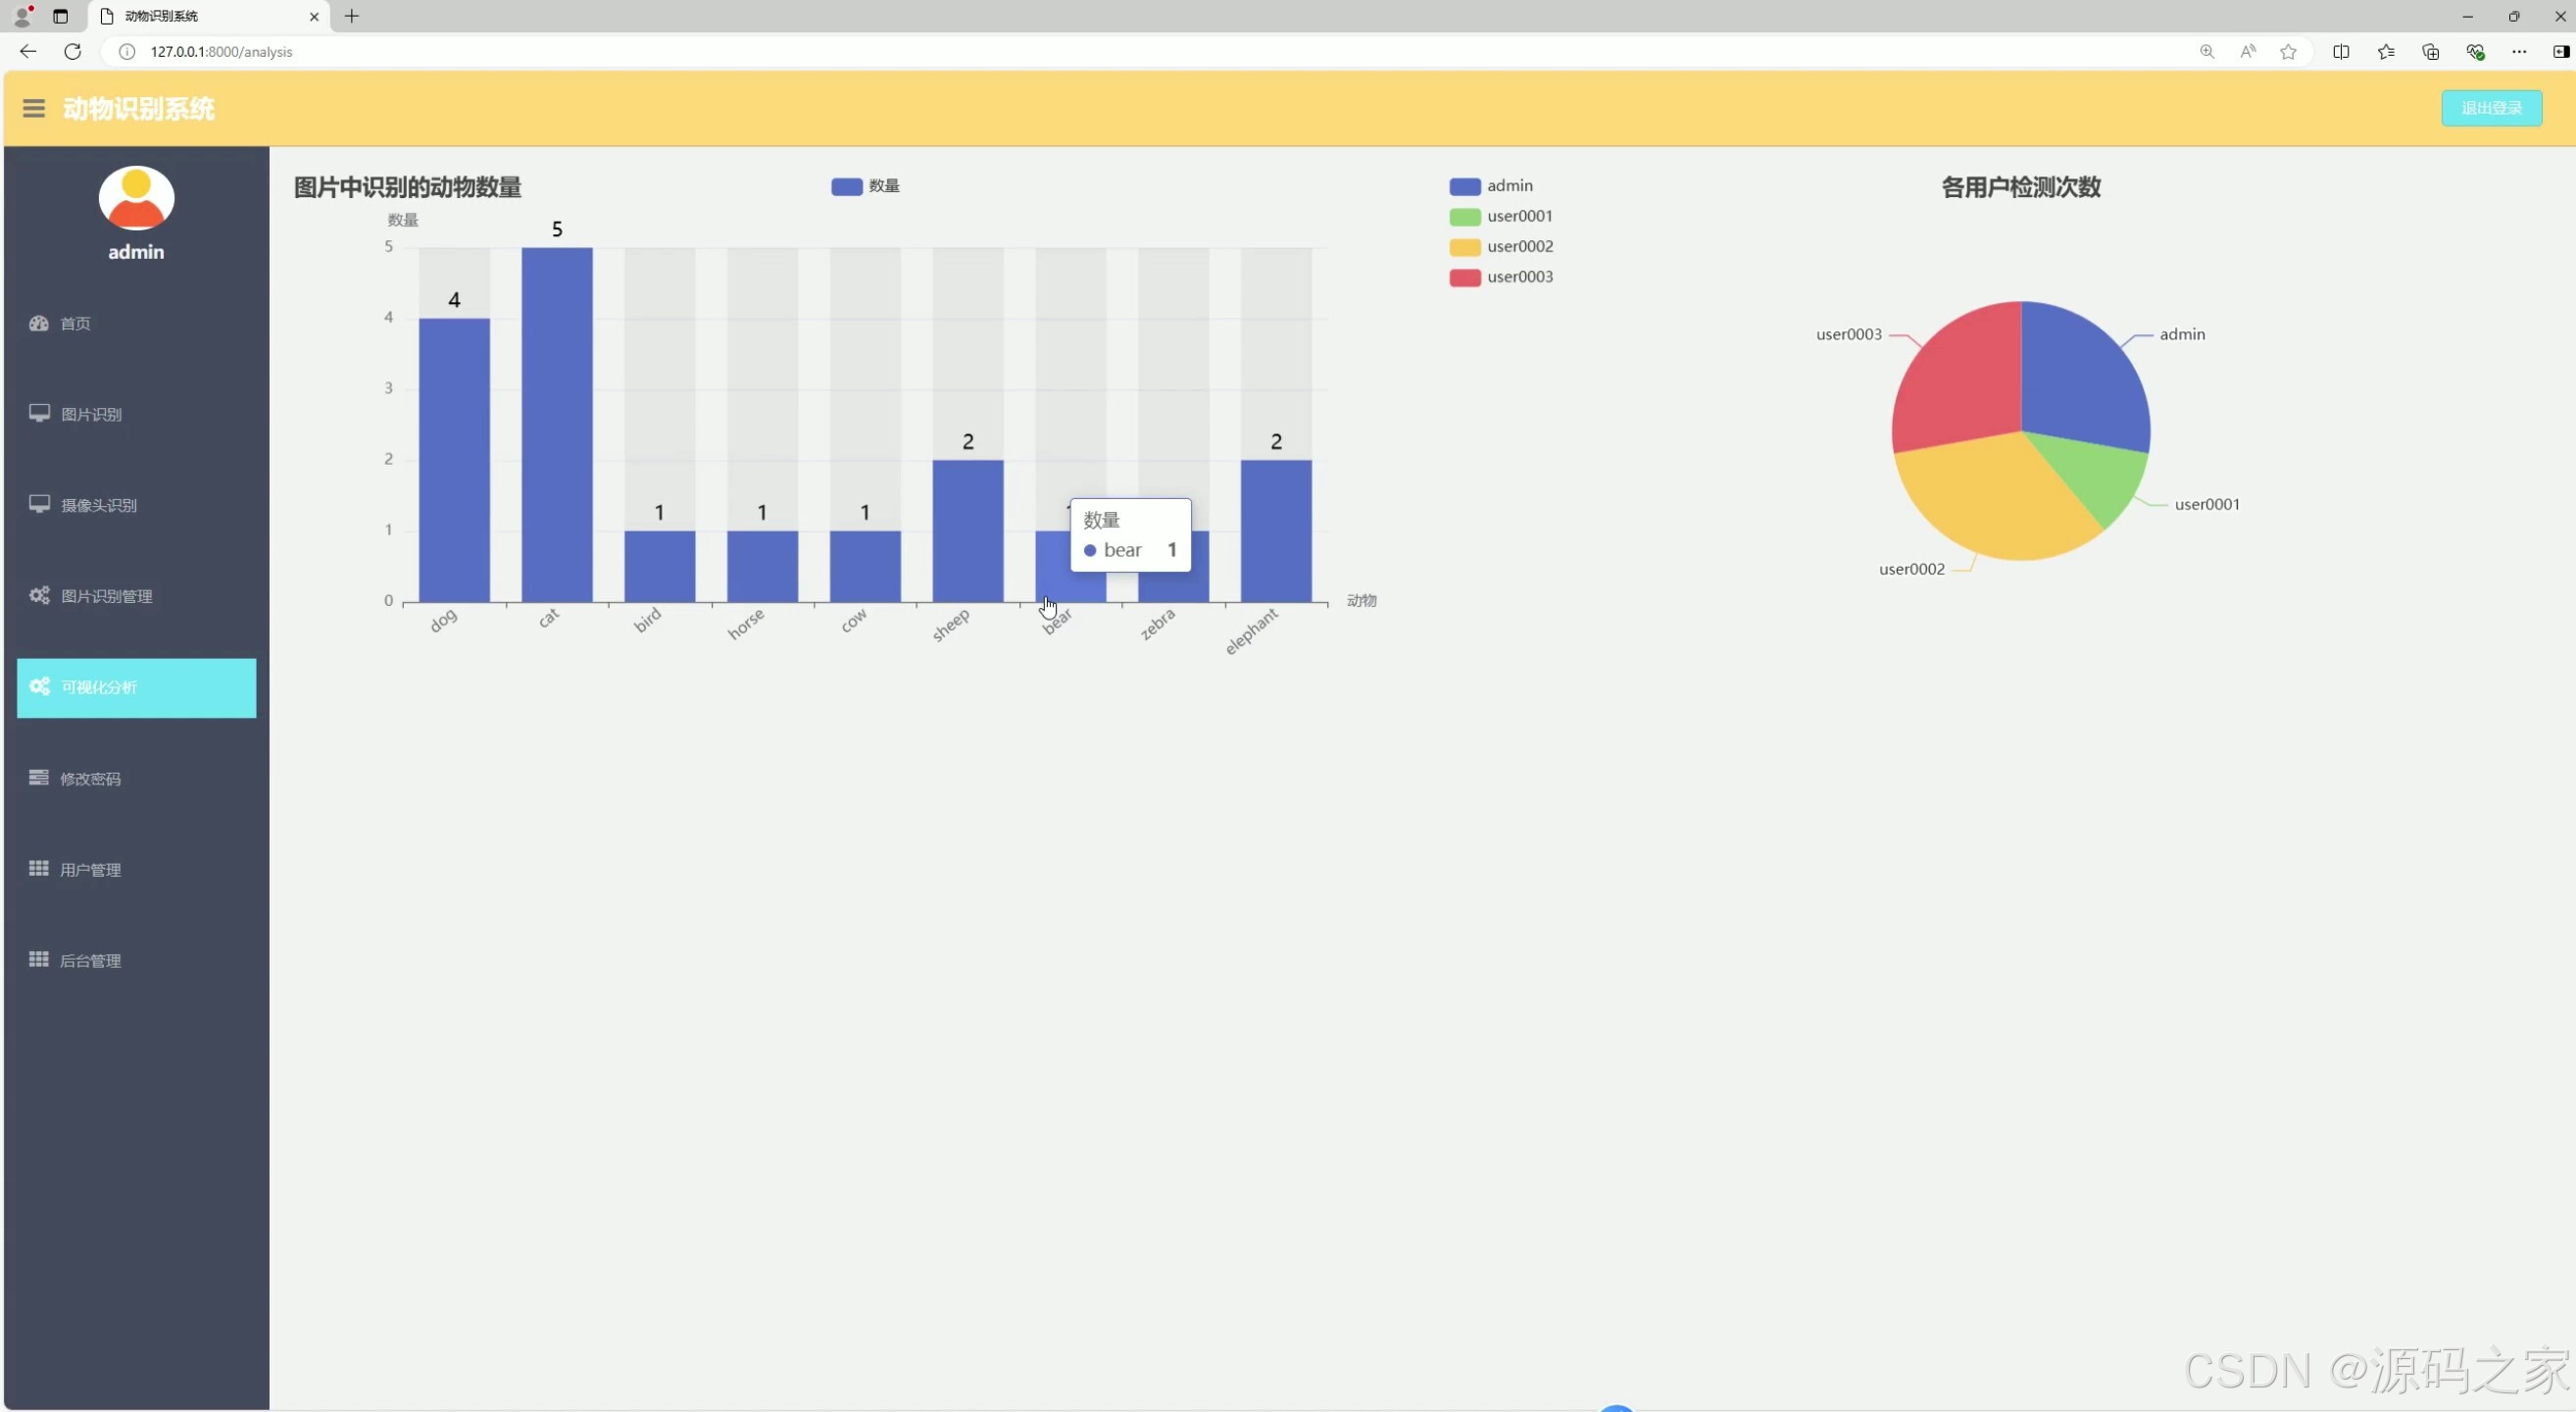
‘bird’: ‘鸟’, ‘cat’: ‘猫’, ‘dog’: ‘狗’, ‘horse’: ‘马’, ‘sheep’: ‘羊’, ‘cow’: ‘牛’, ‘elephant’: ‘大象’, ‘bear’: ‘熊’, ‘zebra’: ‘斑马’, ‘giraffe’: ‘长颈鹿’
2、项目界面
(1)数据分析可视化—统计
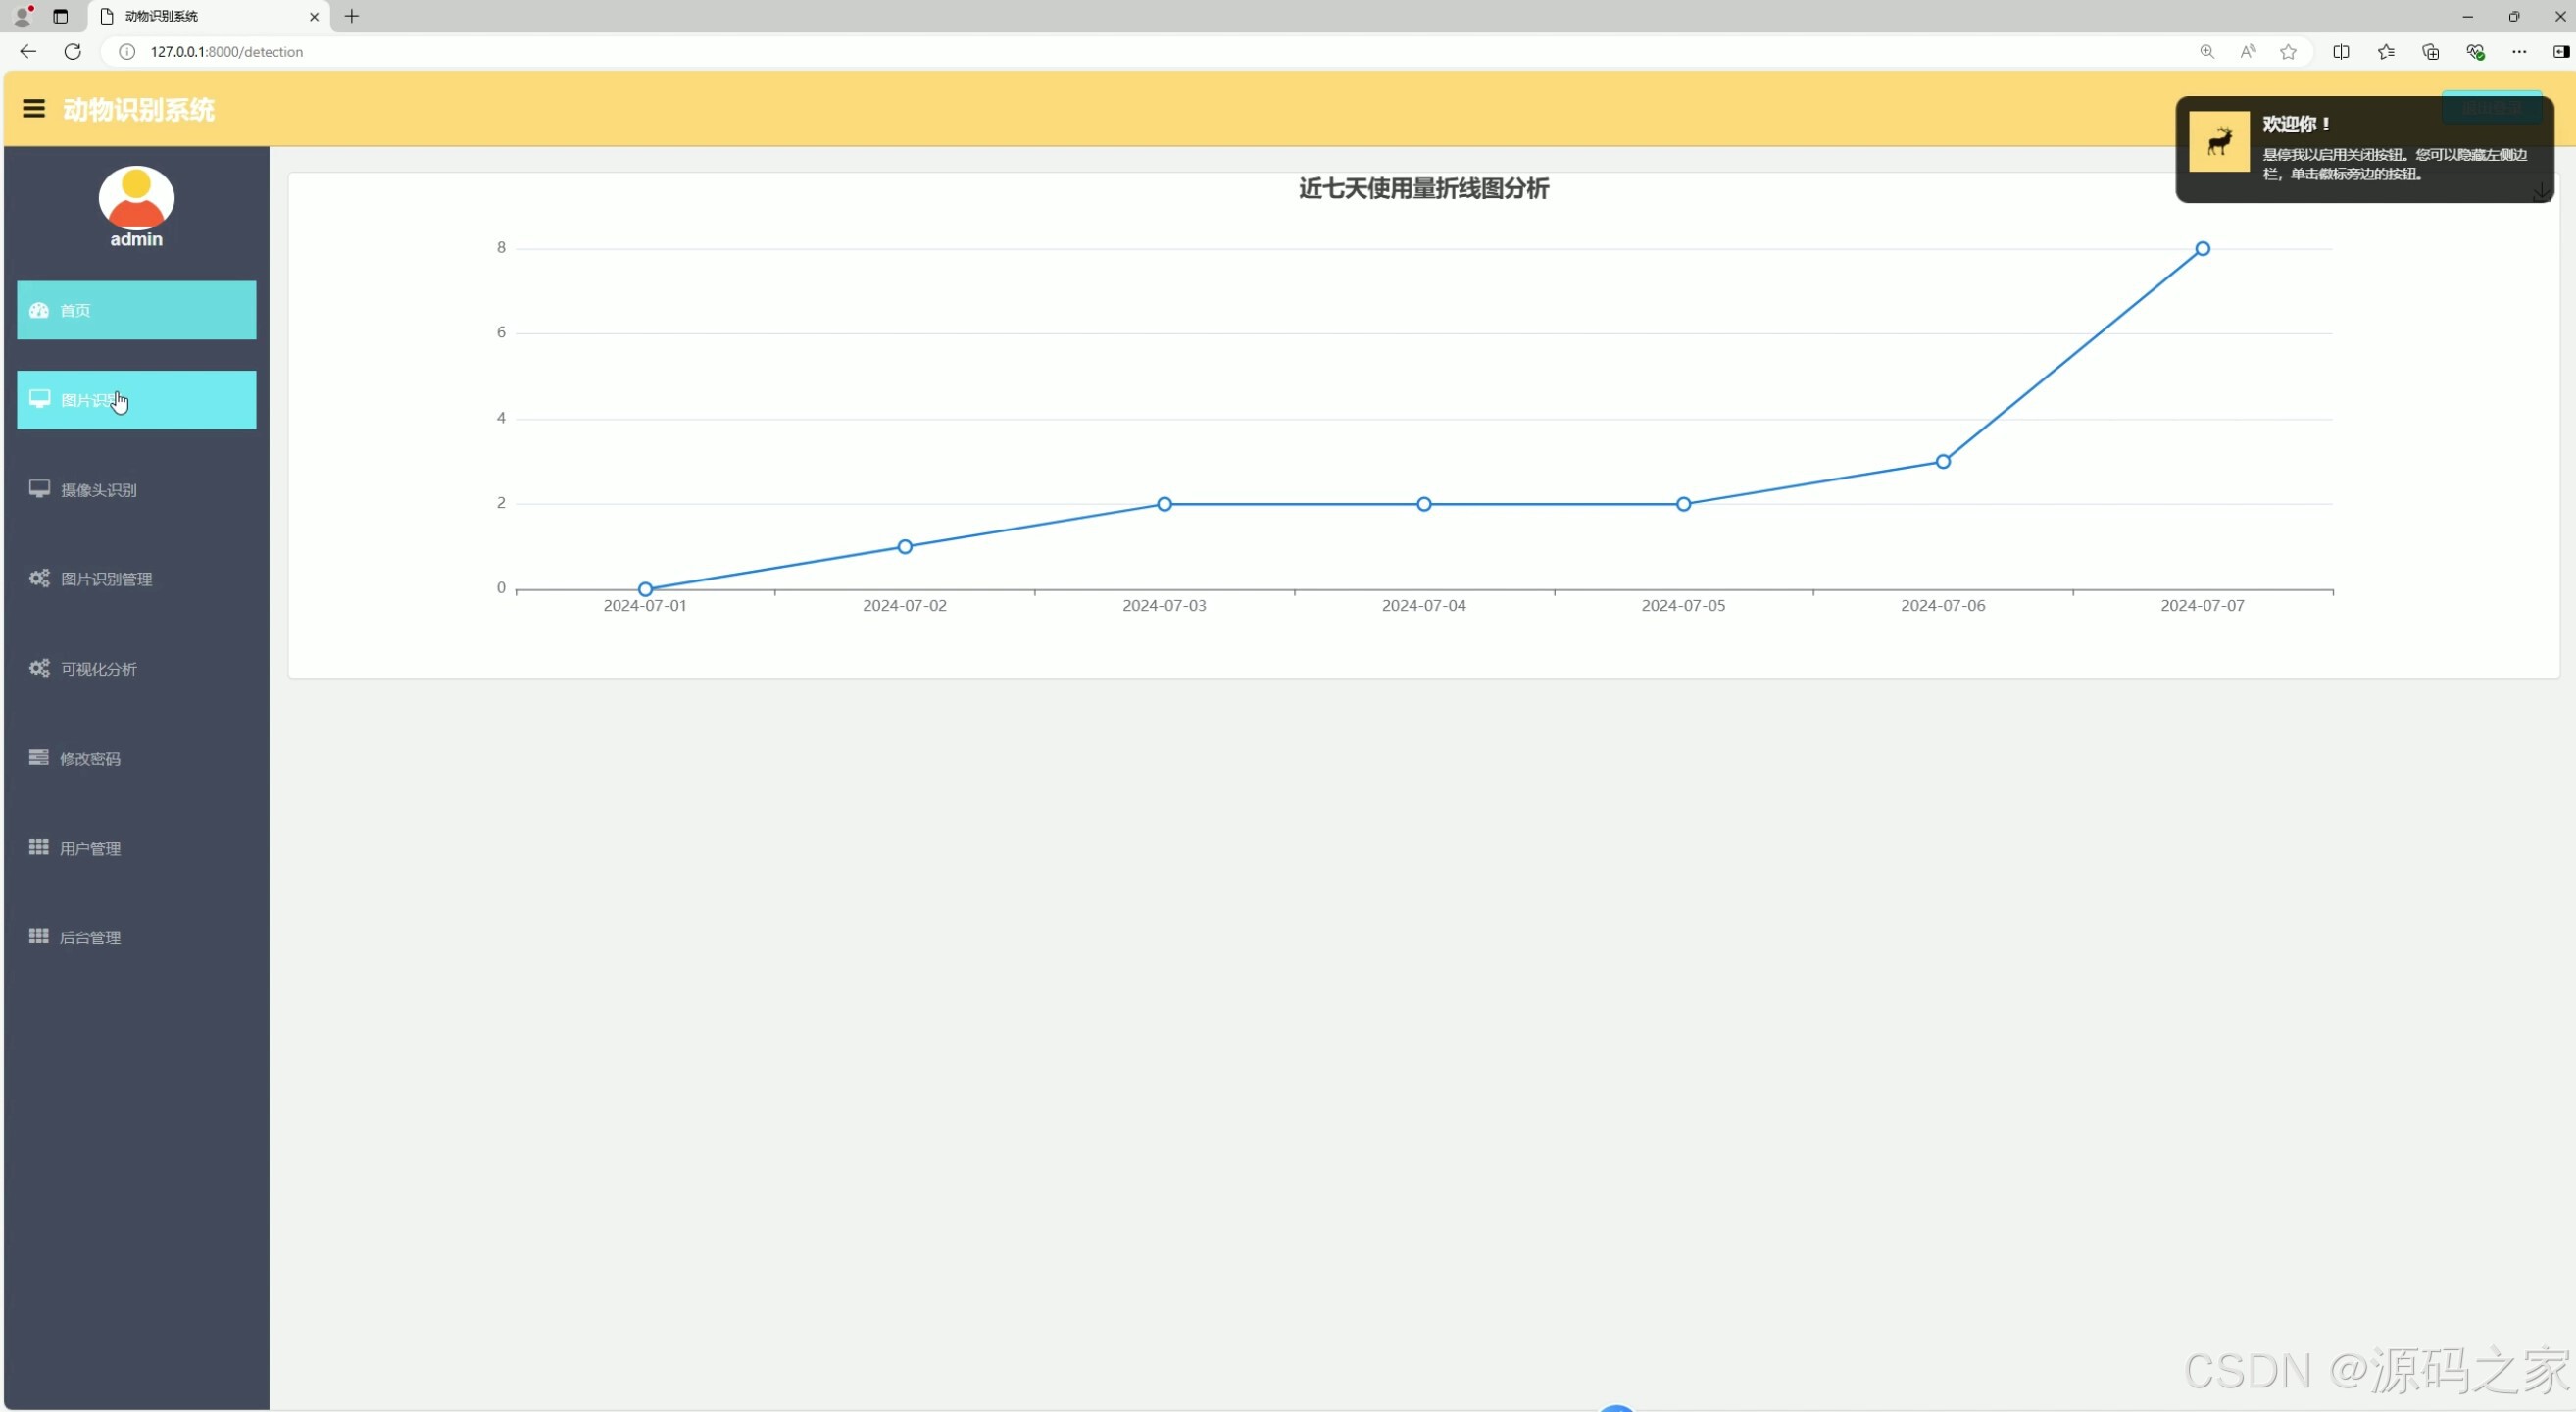
(2)使用记录
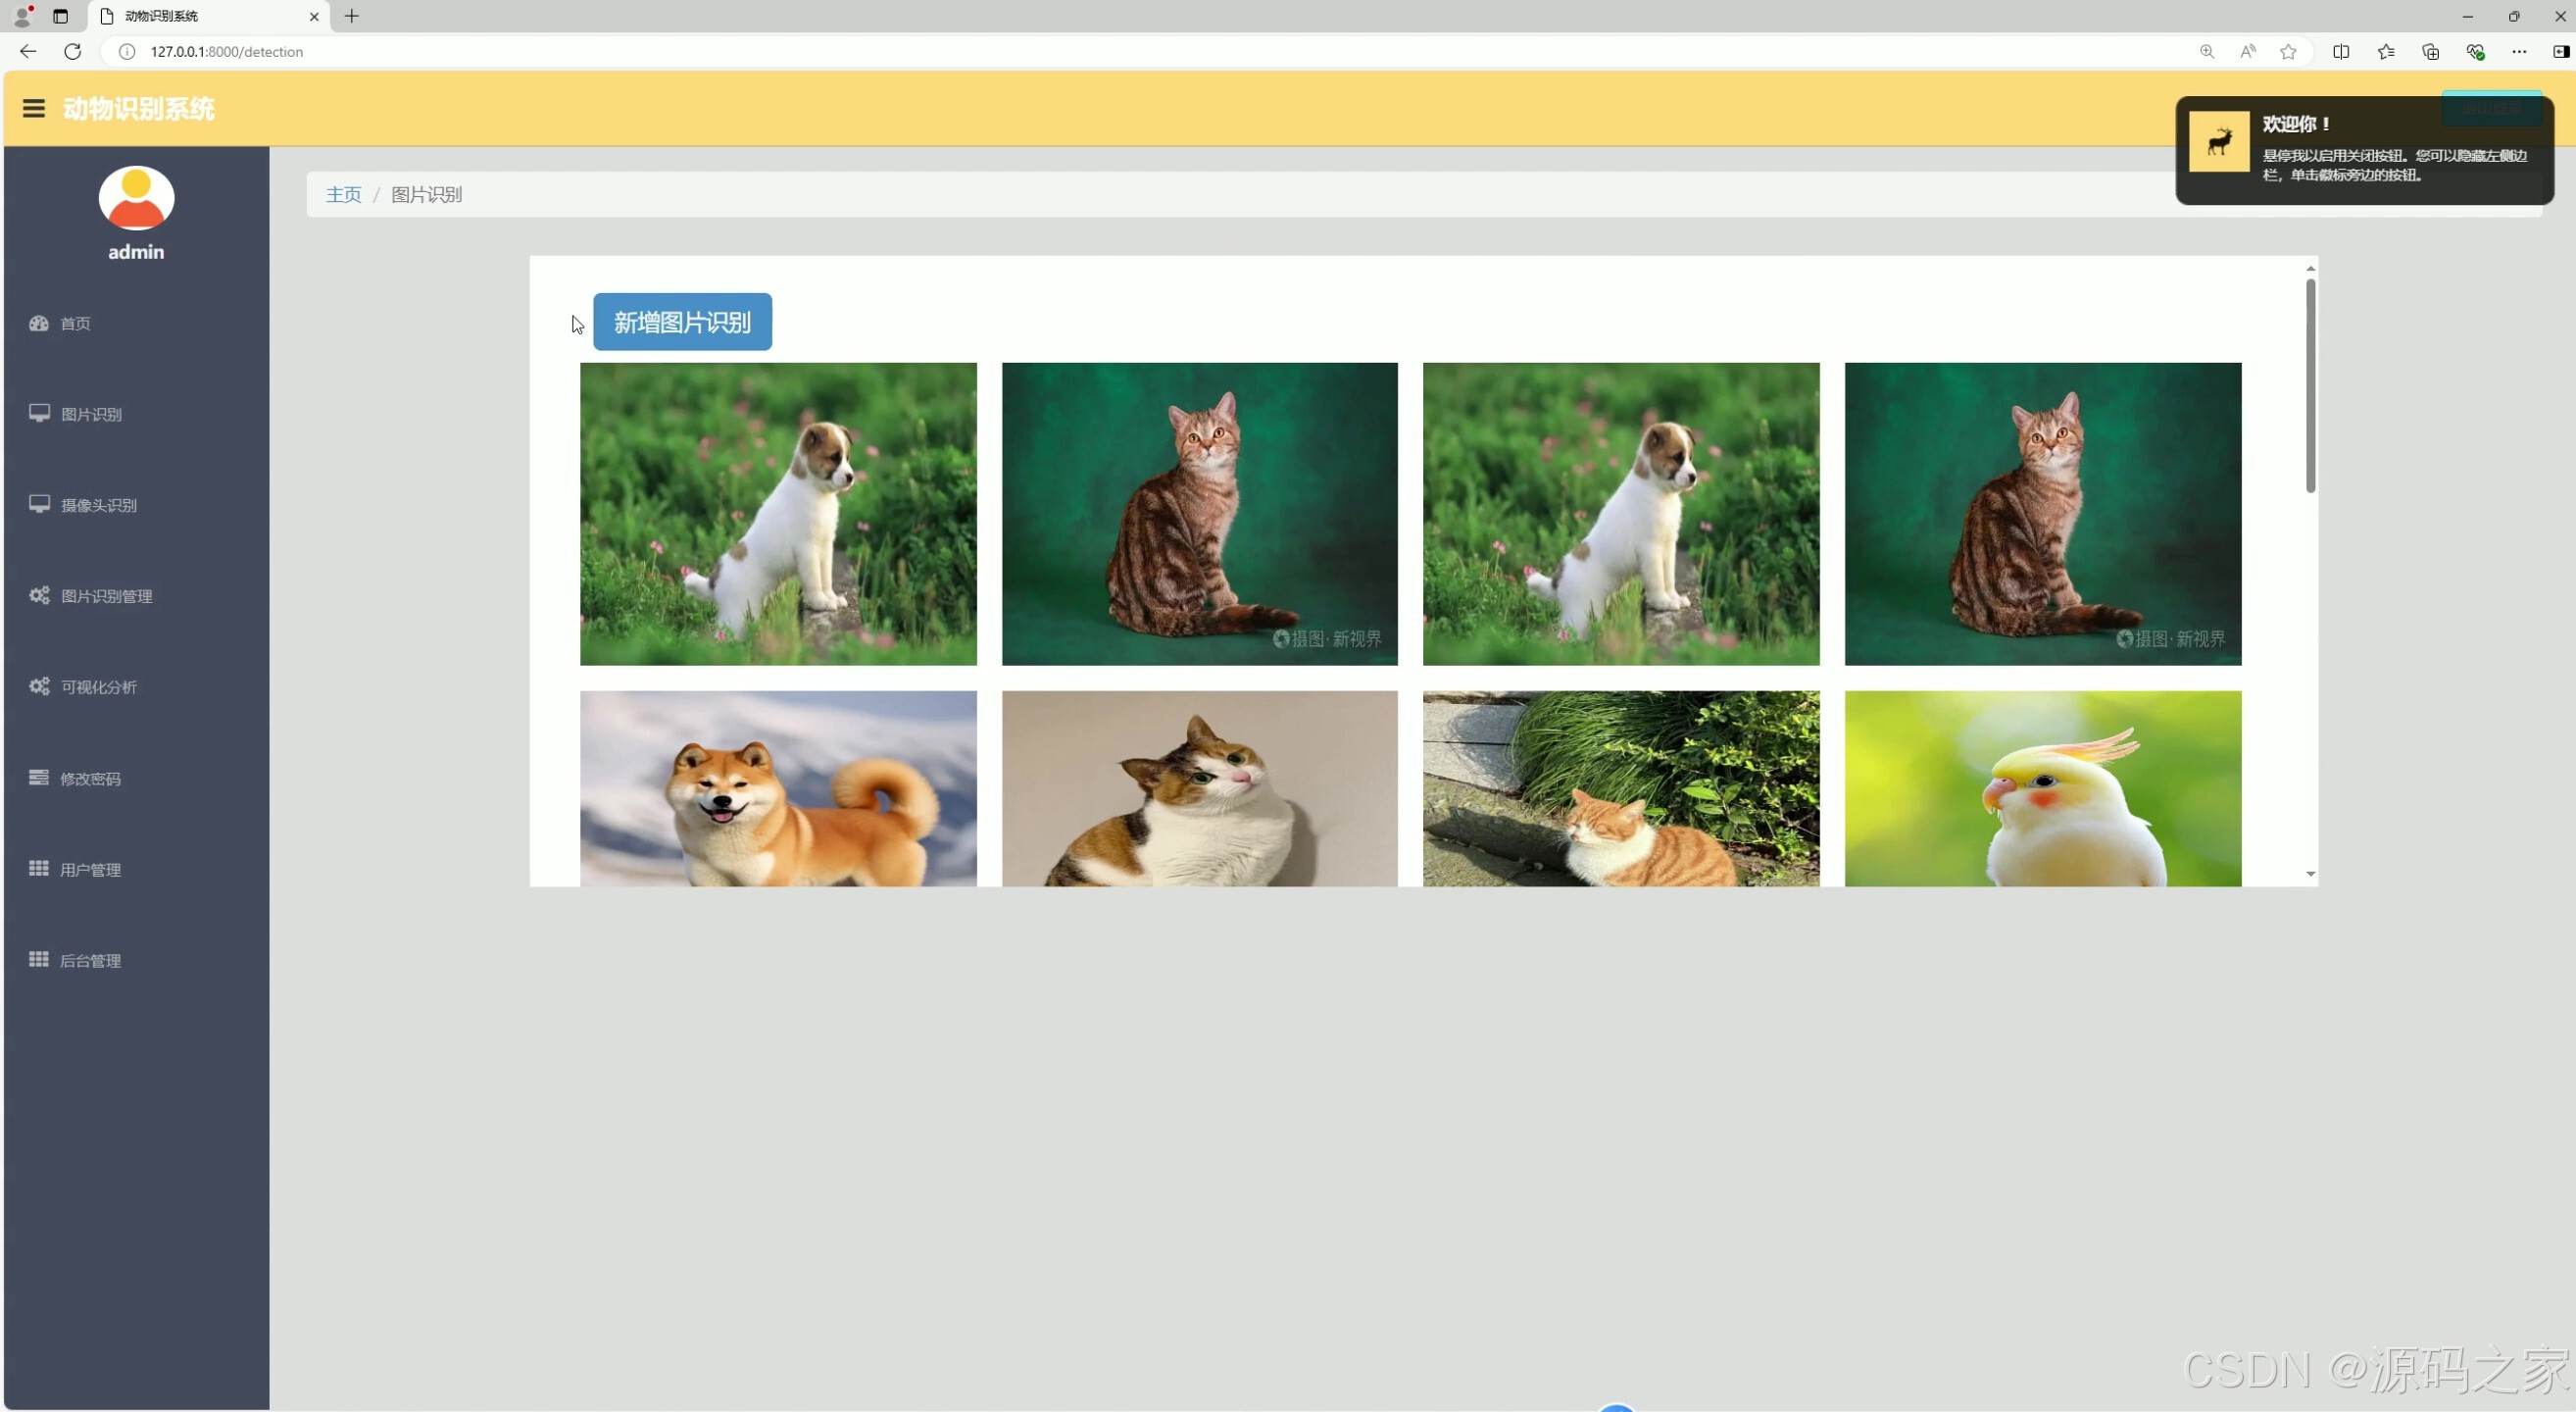
(3)识别界面
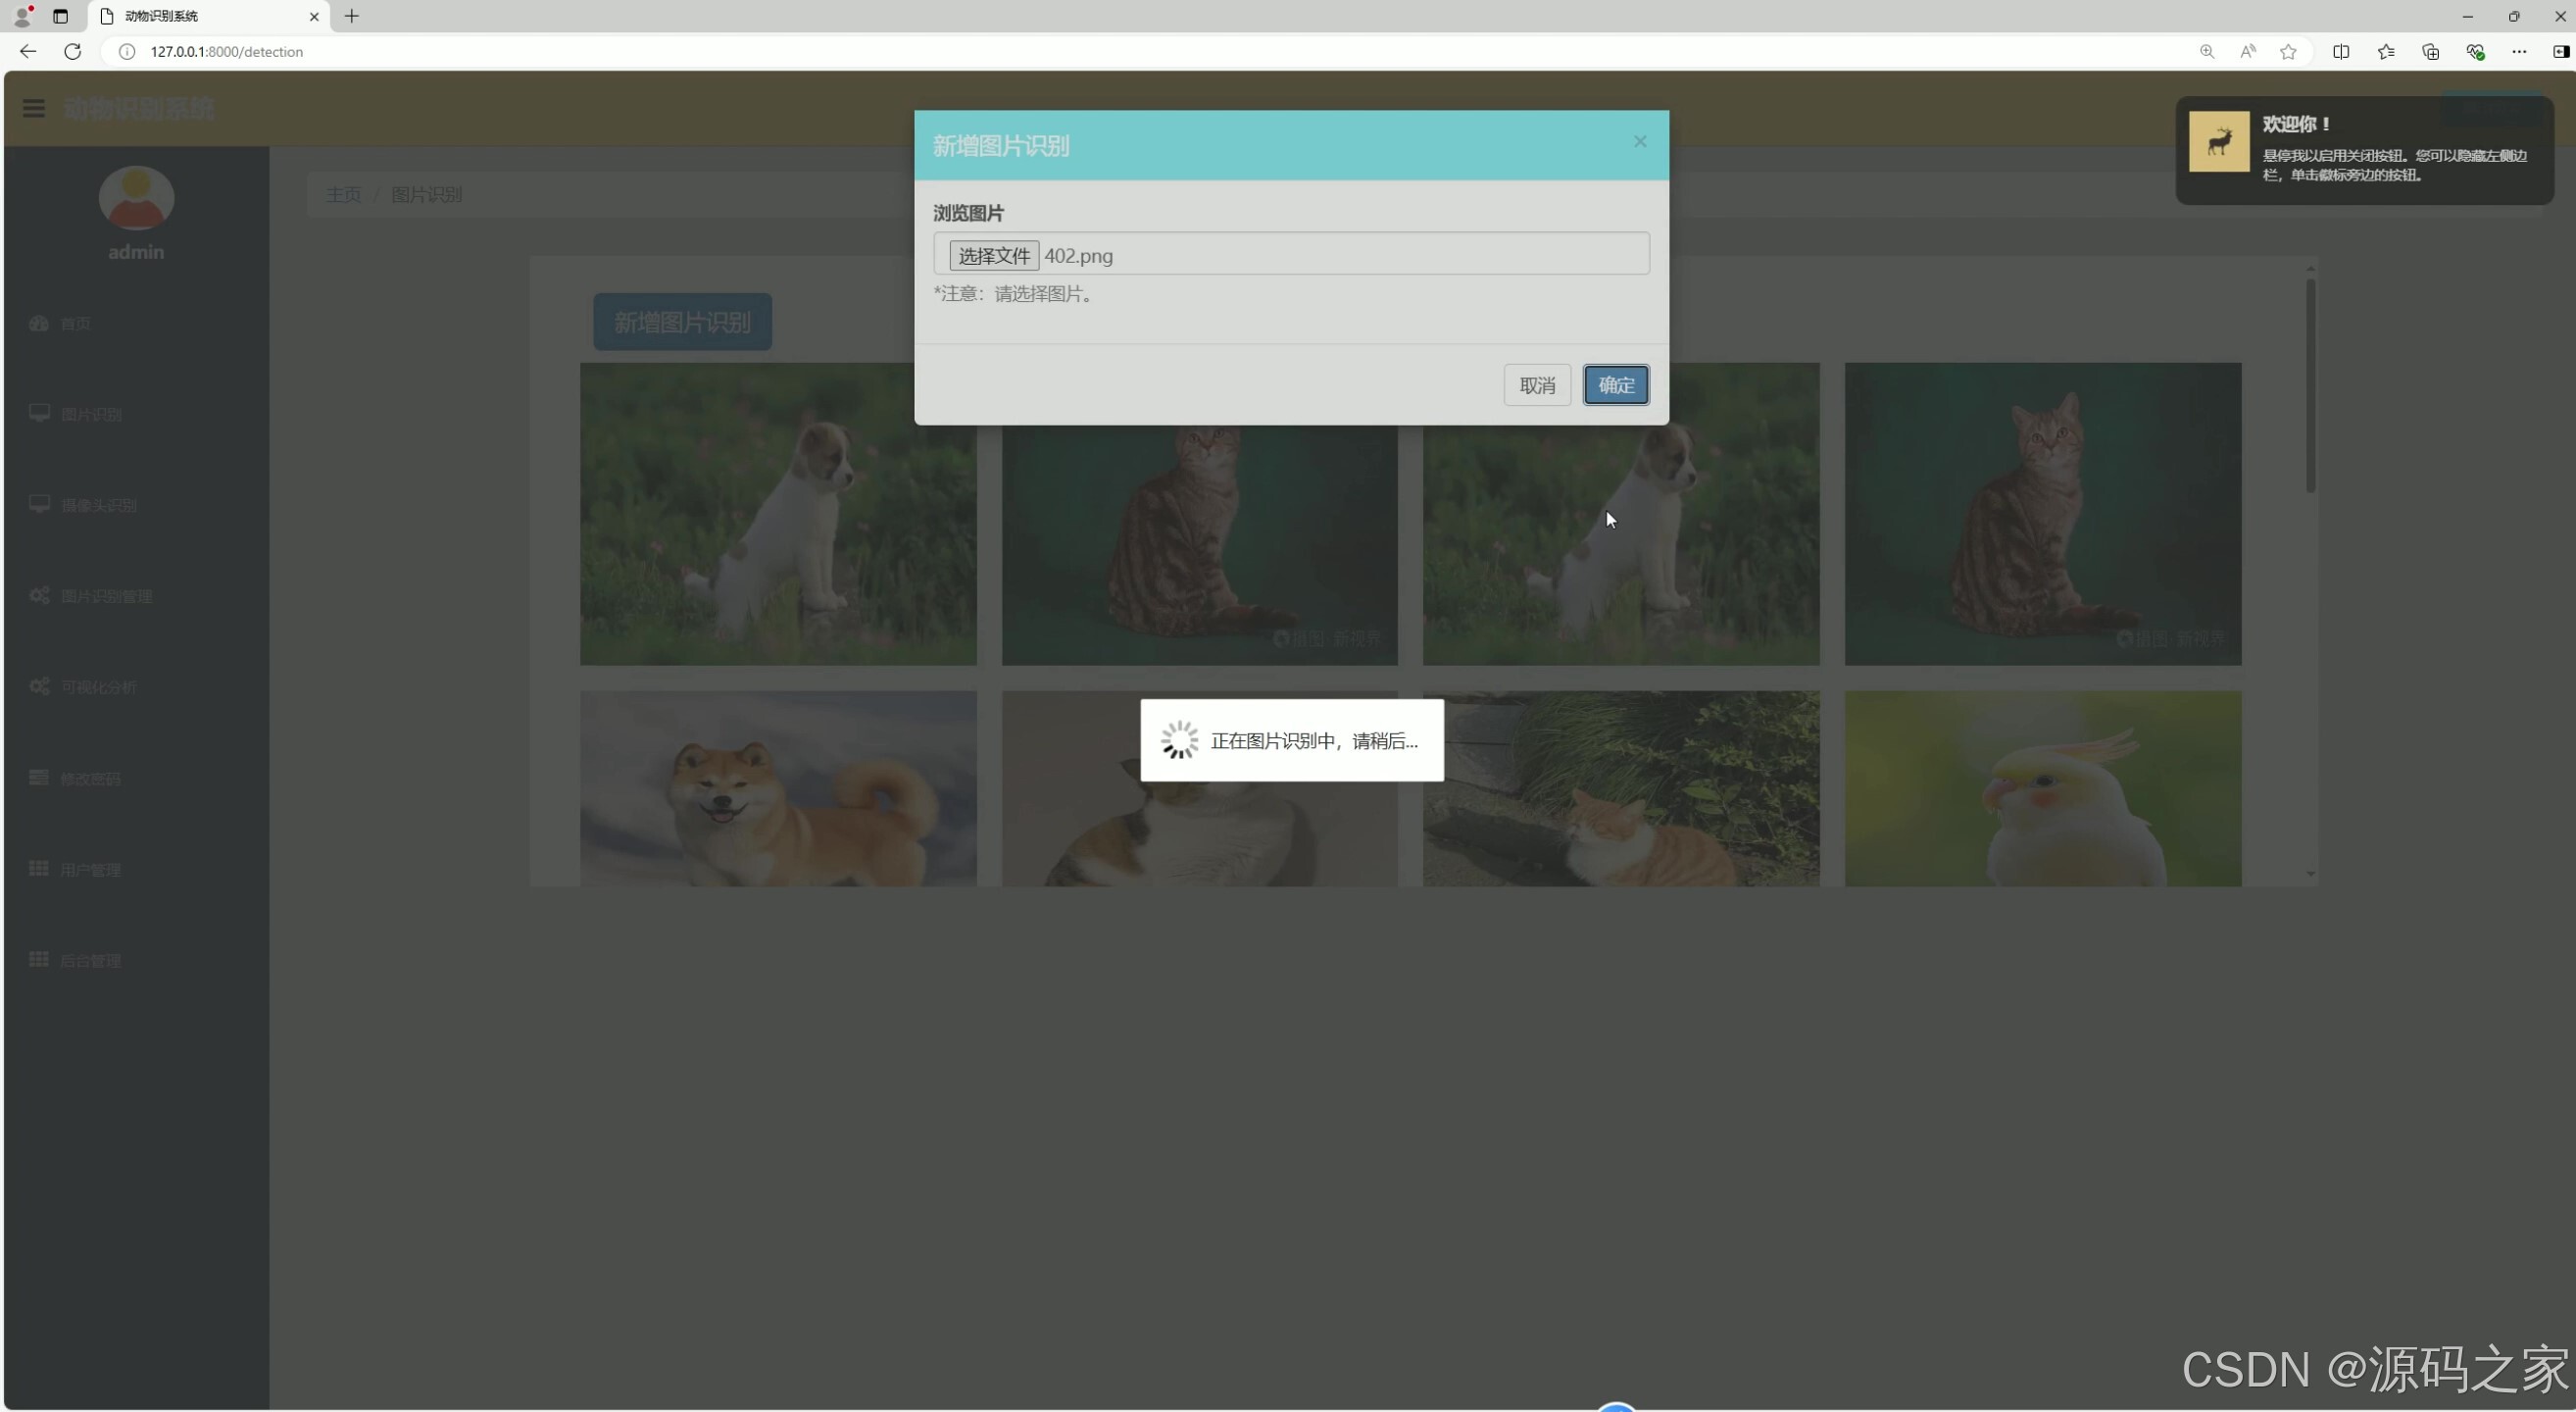
(4)上传图片检测
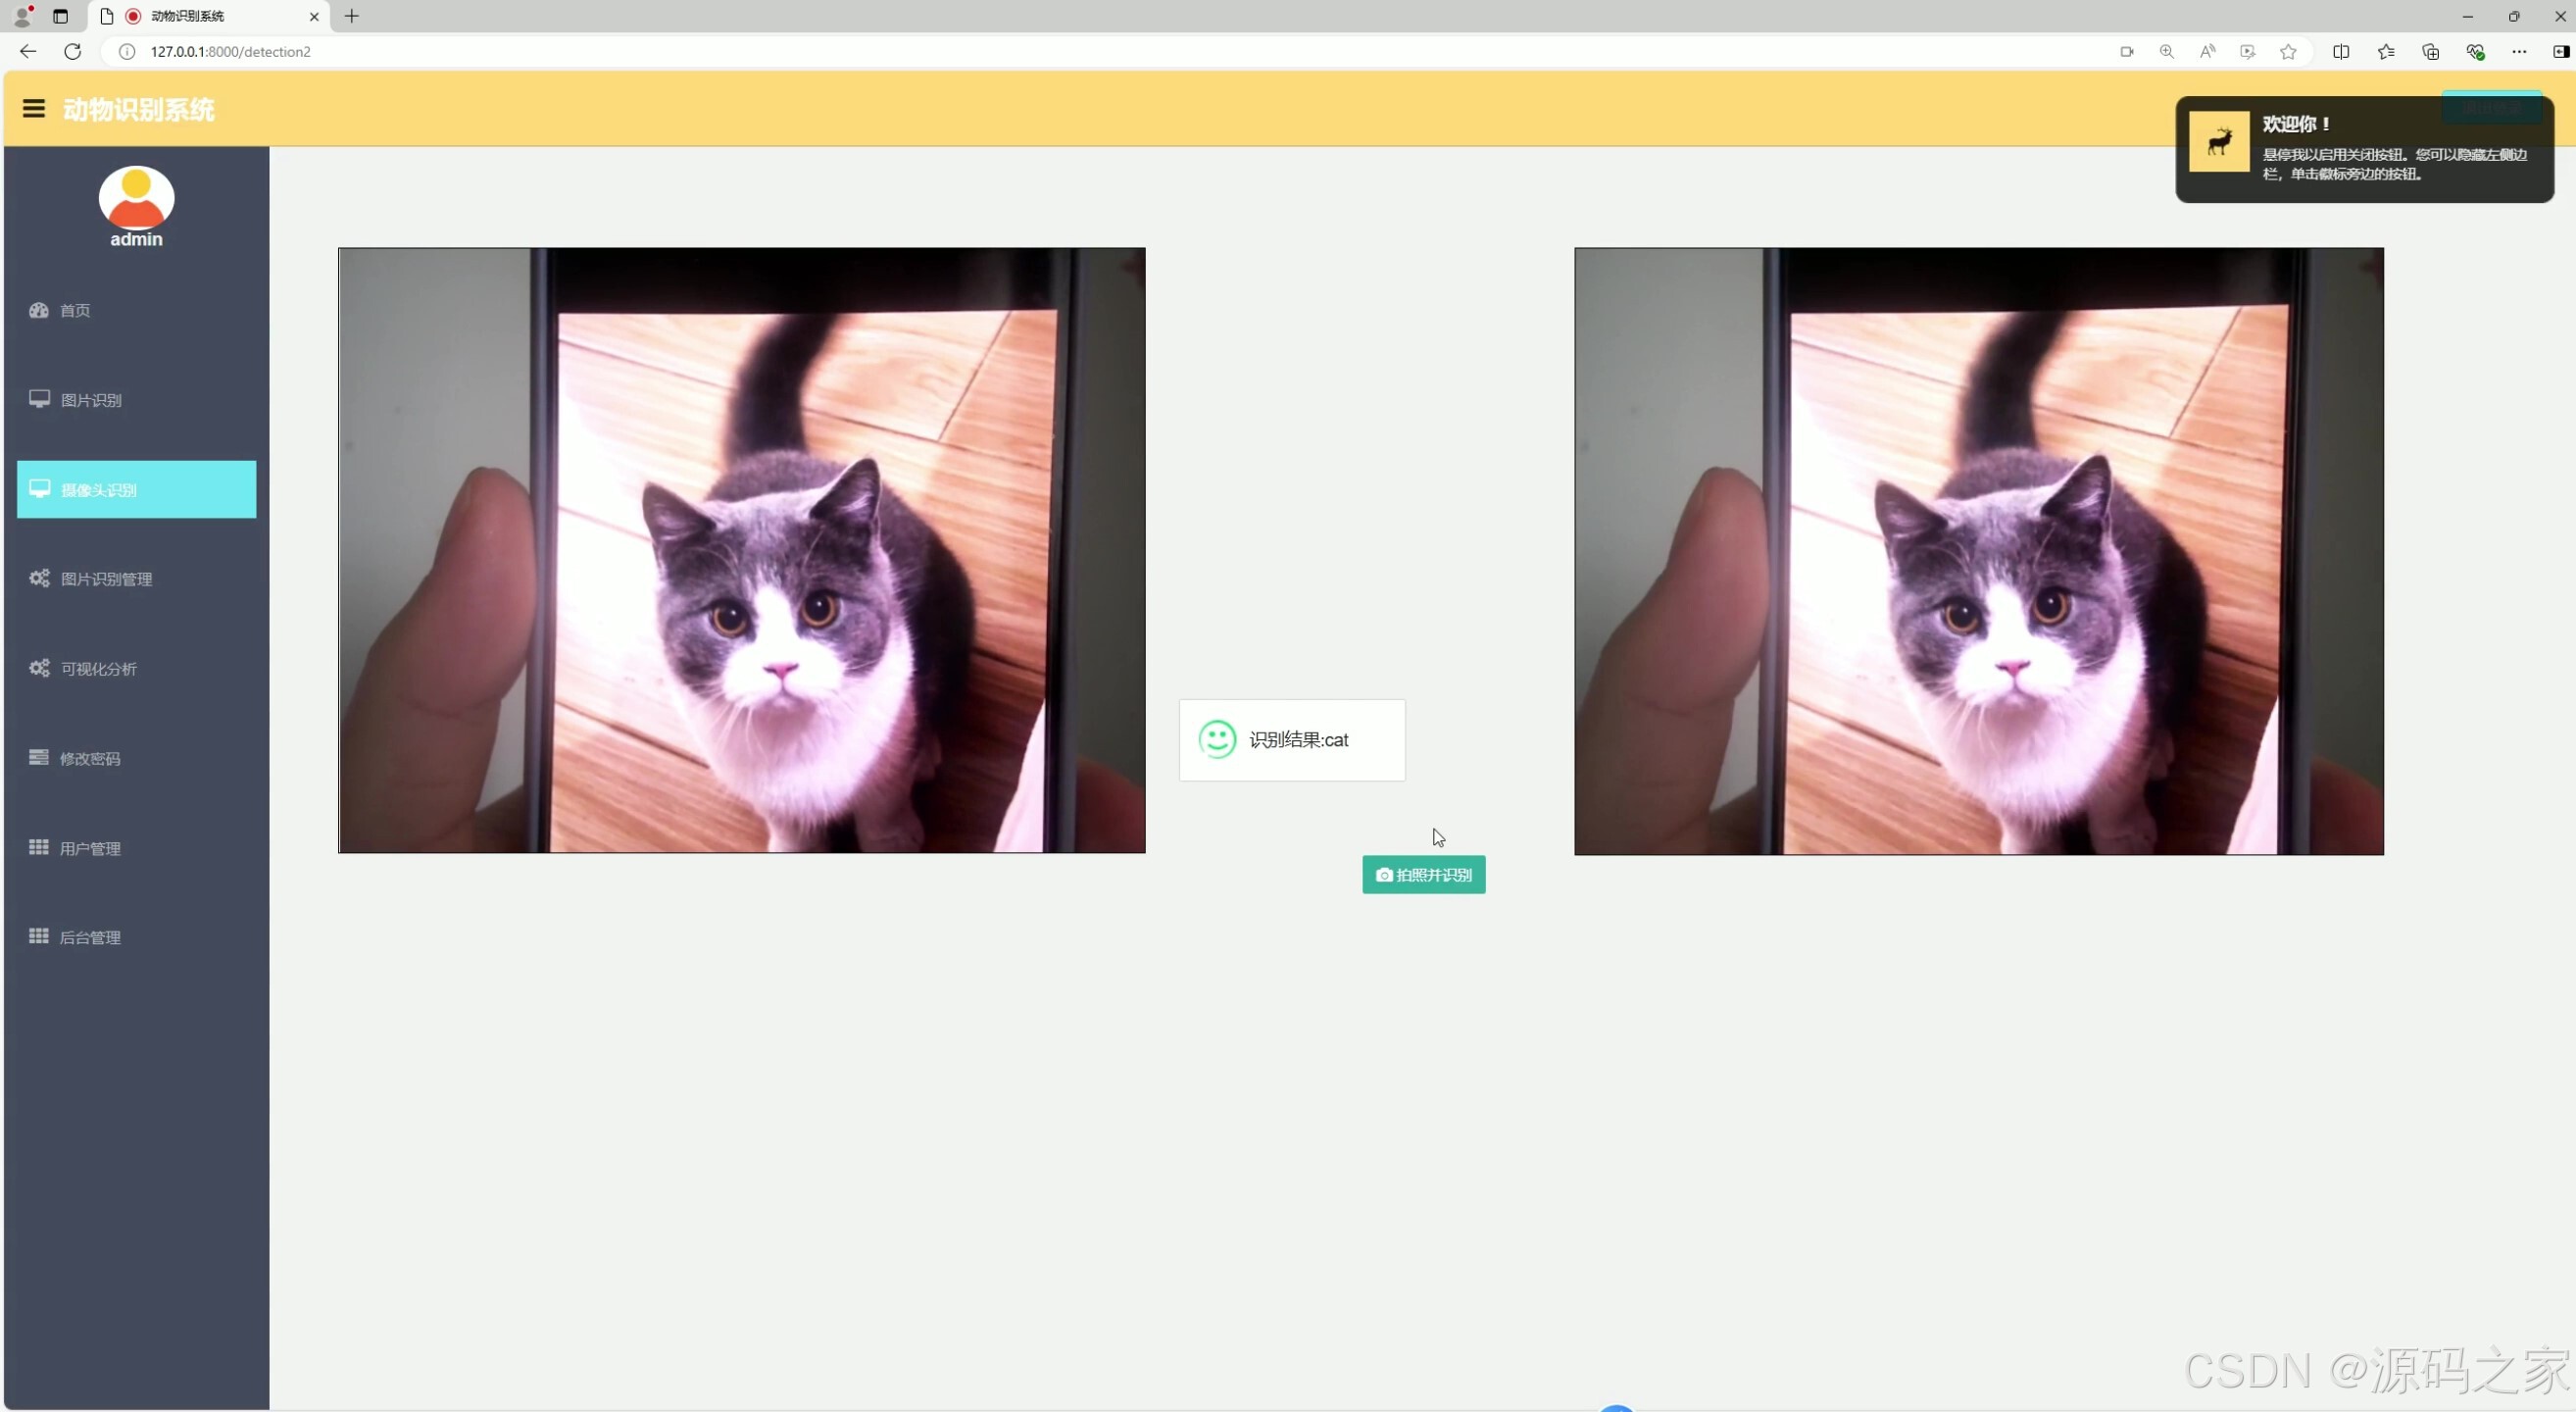
(5)摄像头实时检测识别结果
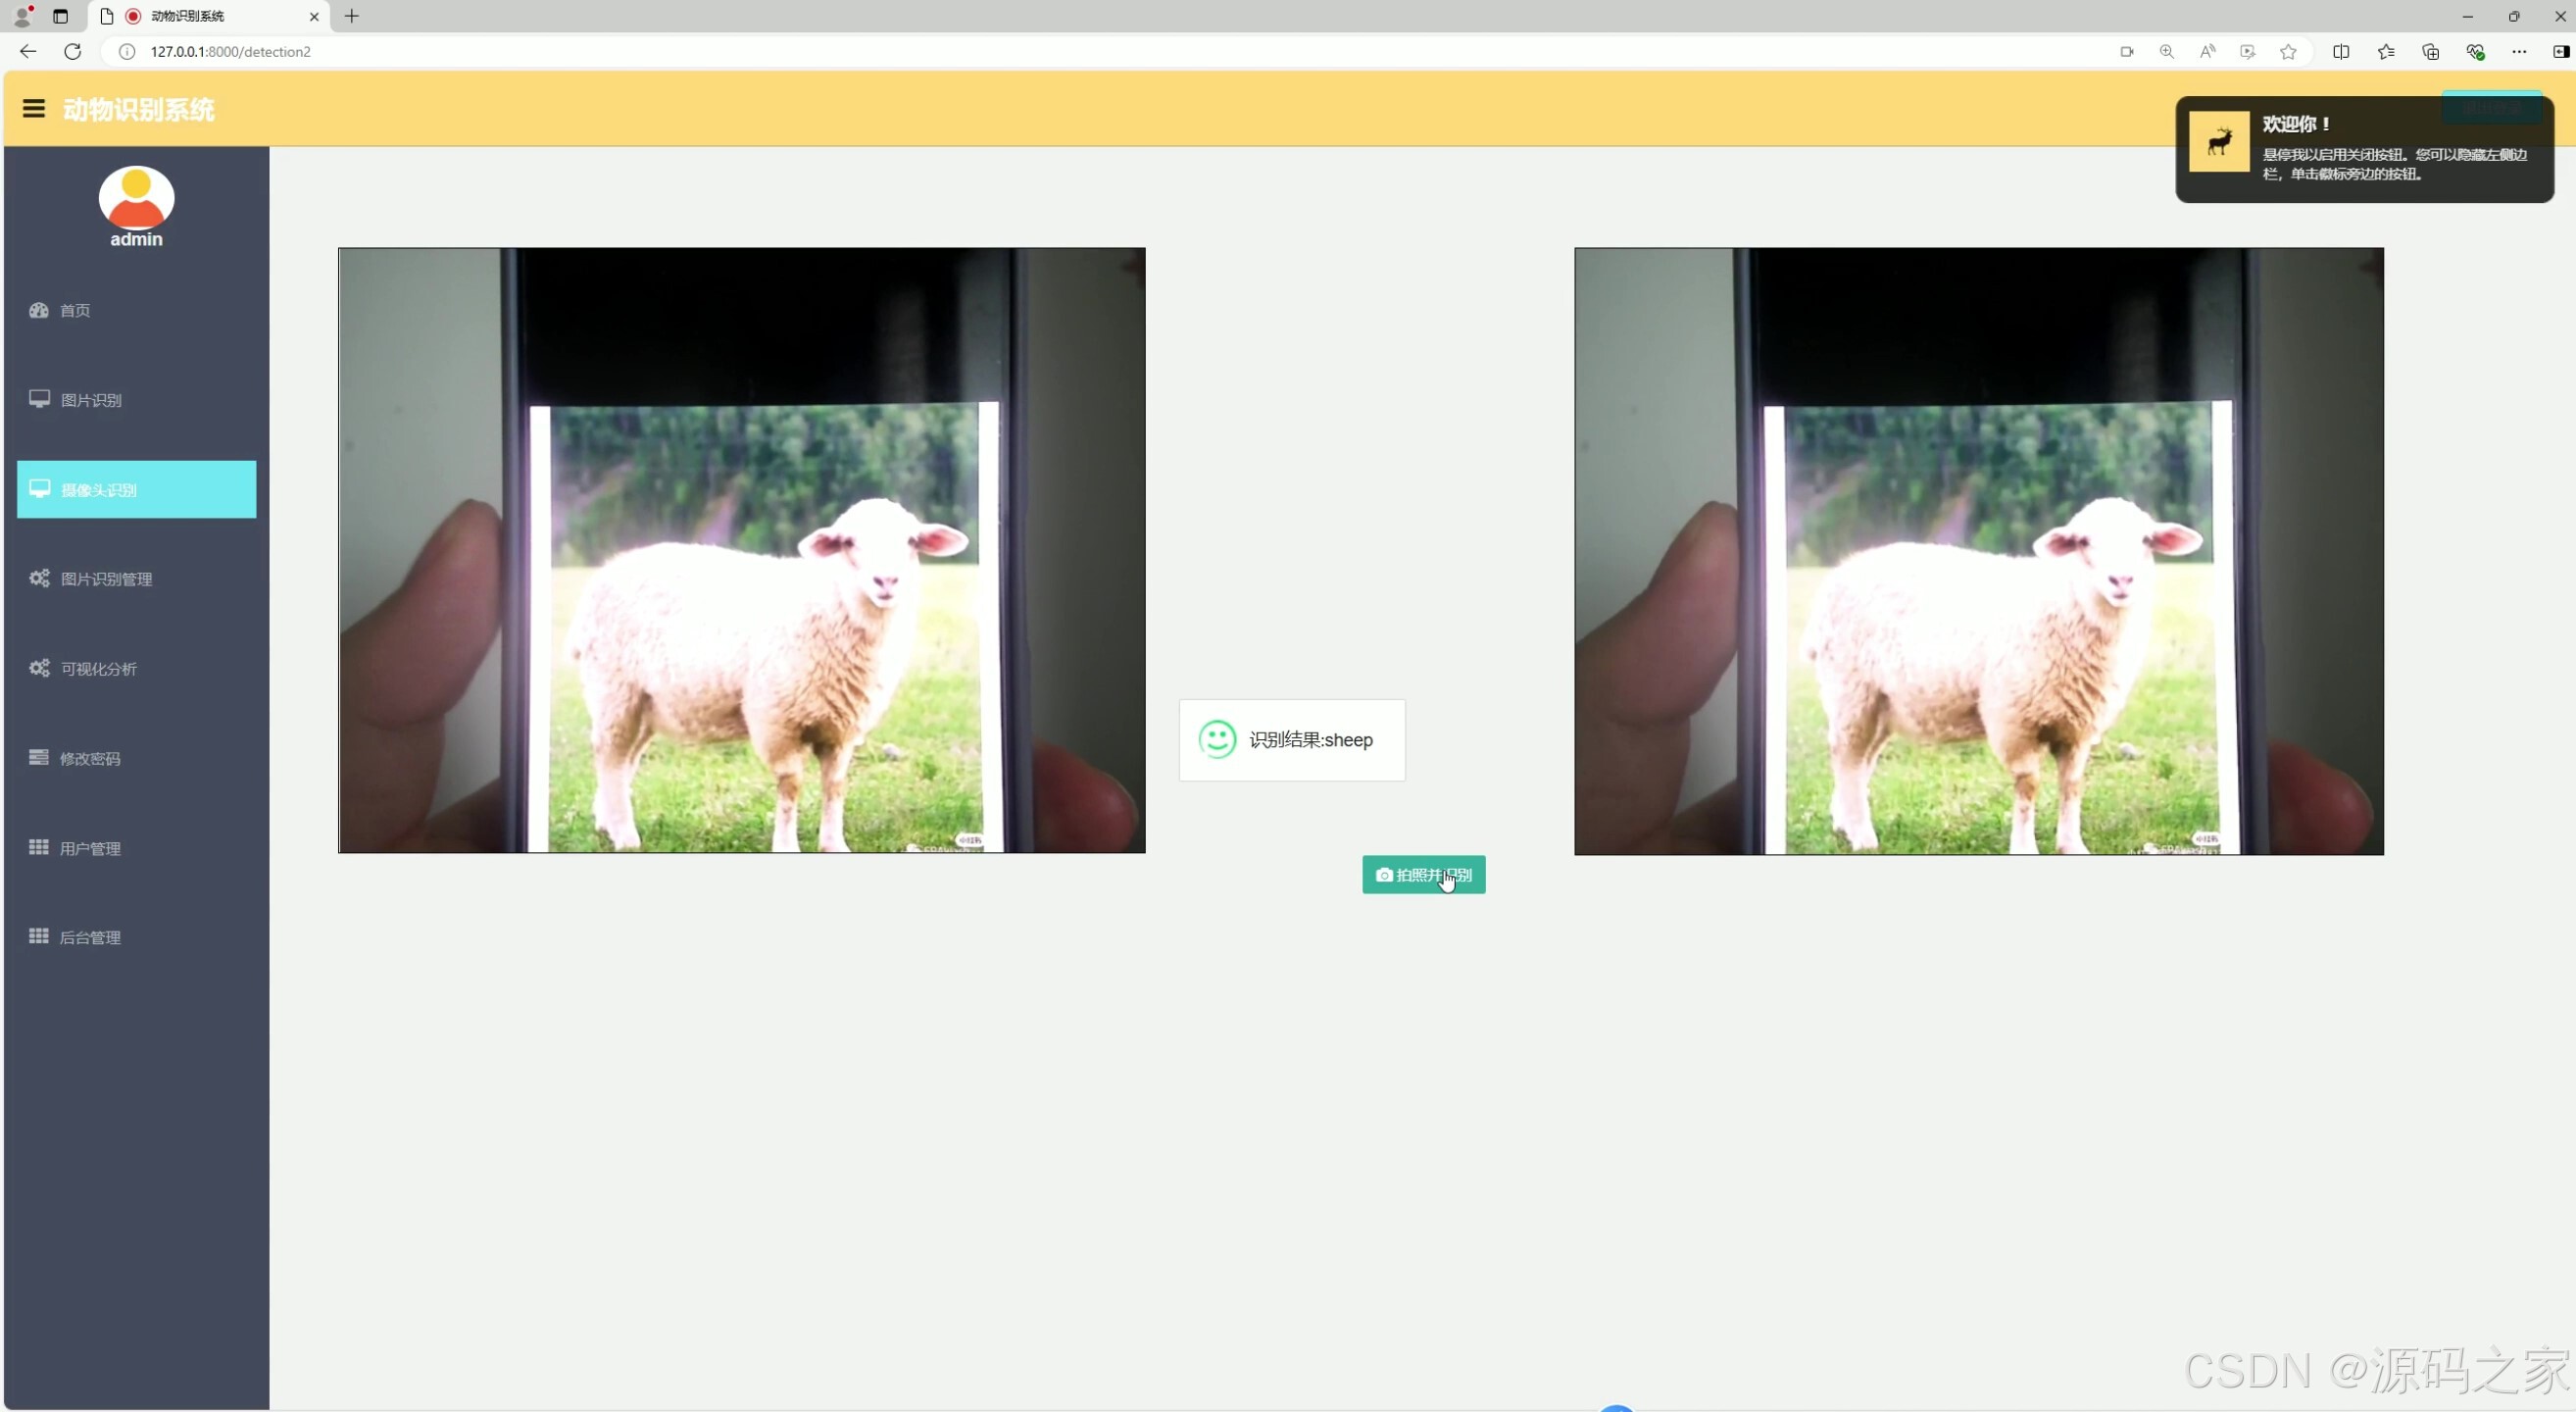
(6)摄像头实时检测识别结果
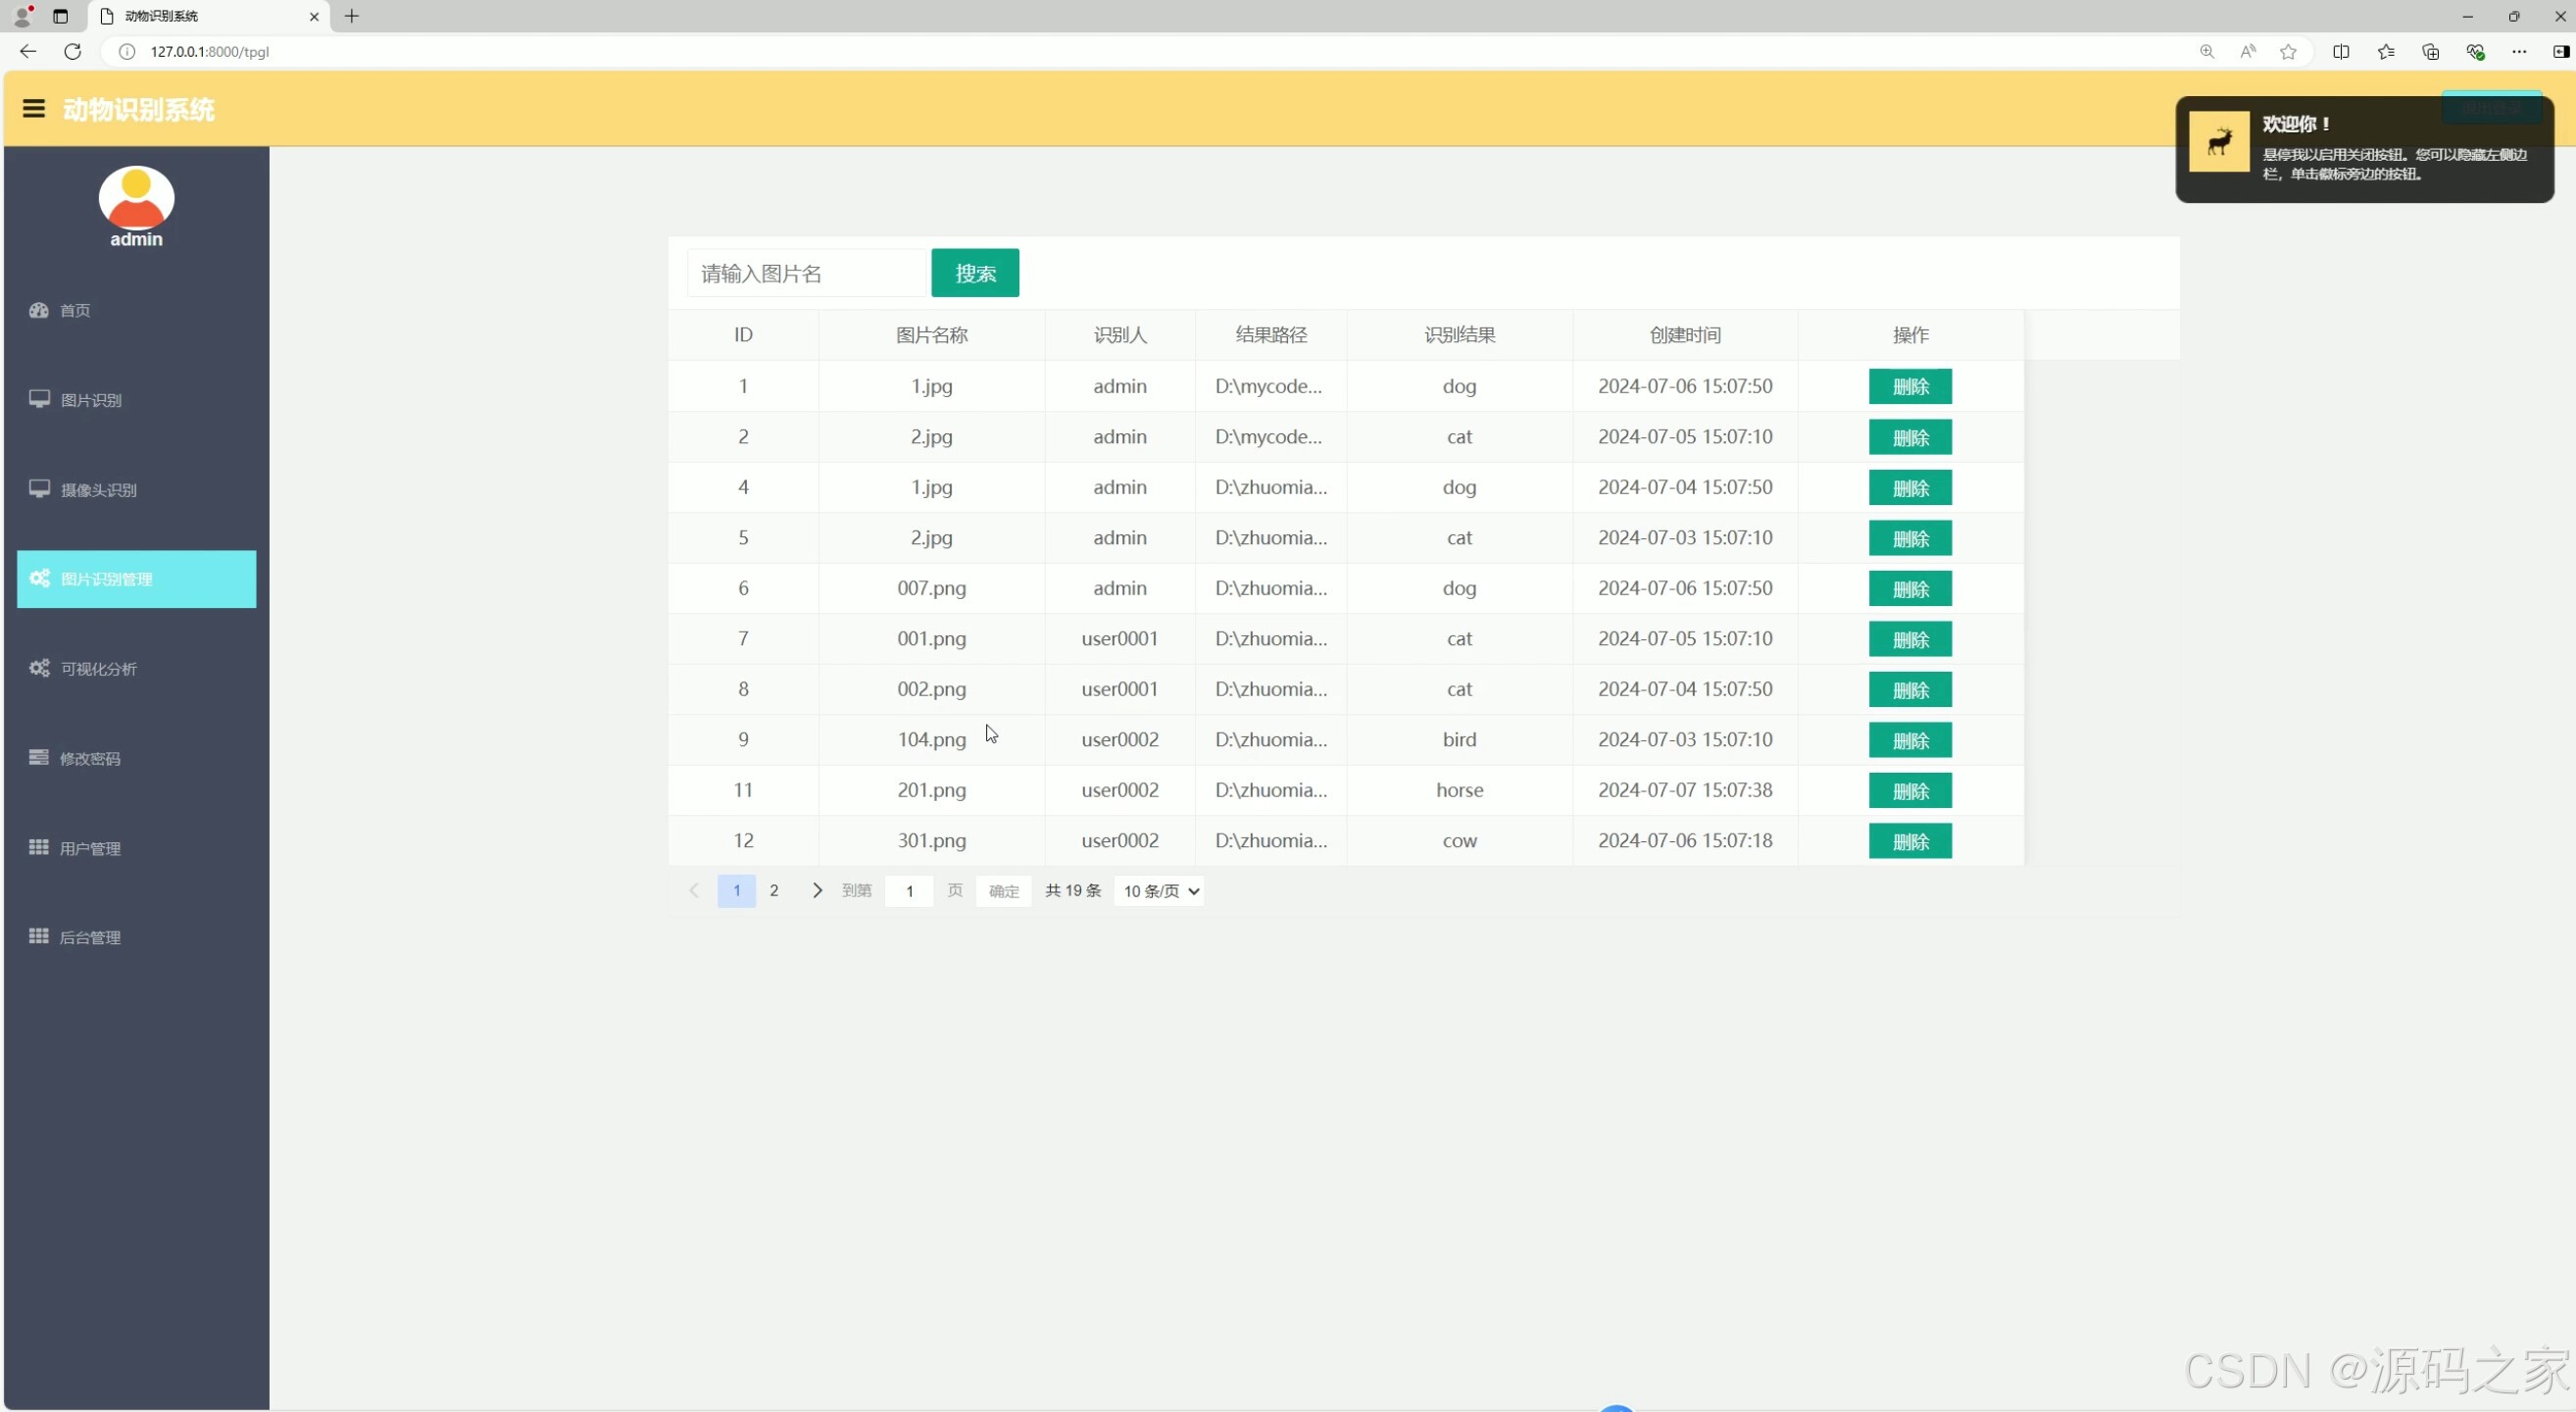
(7)识别记录
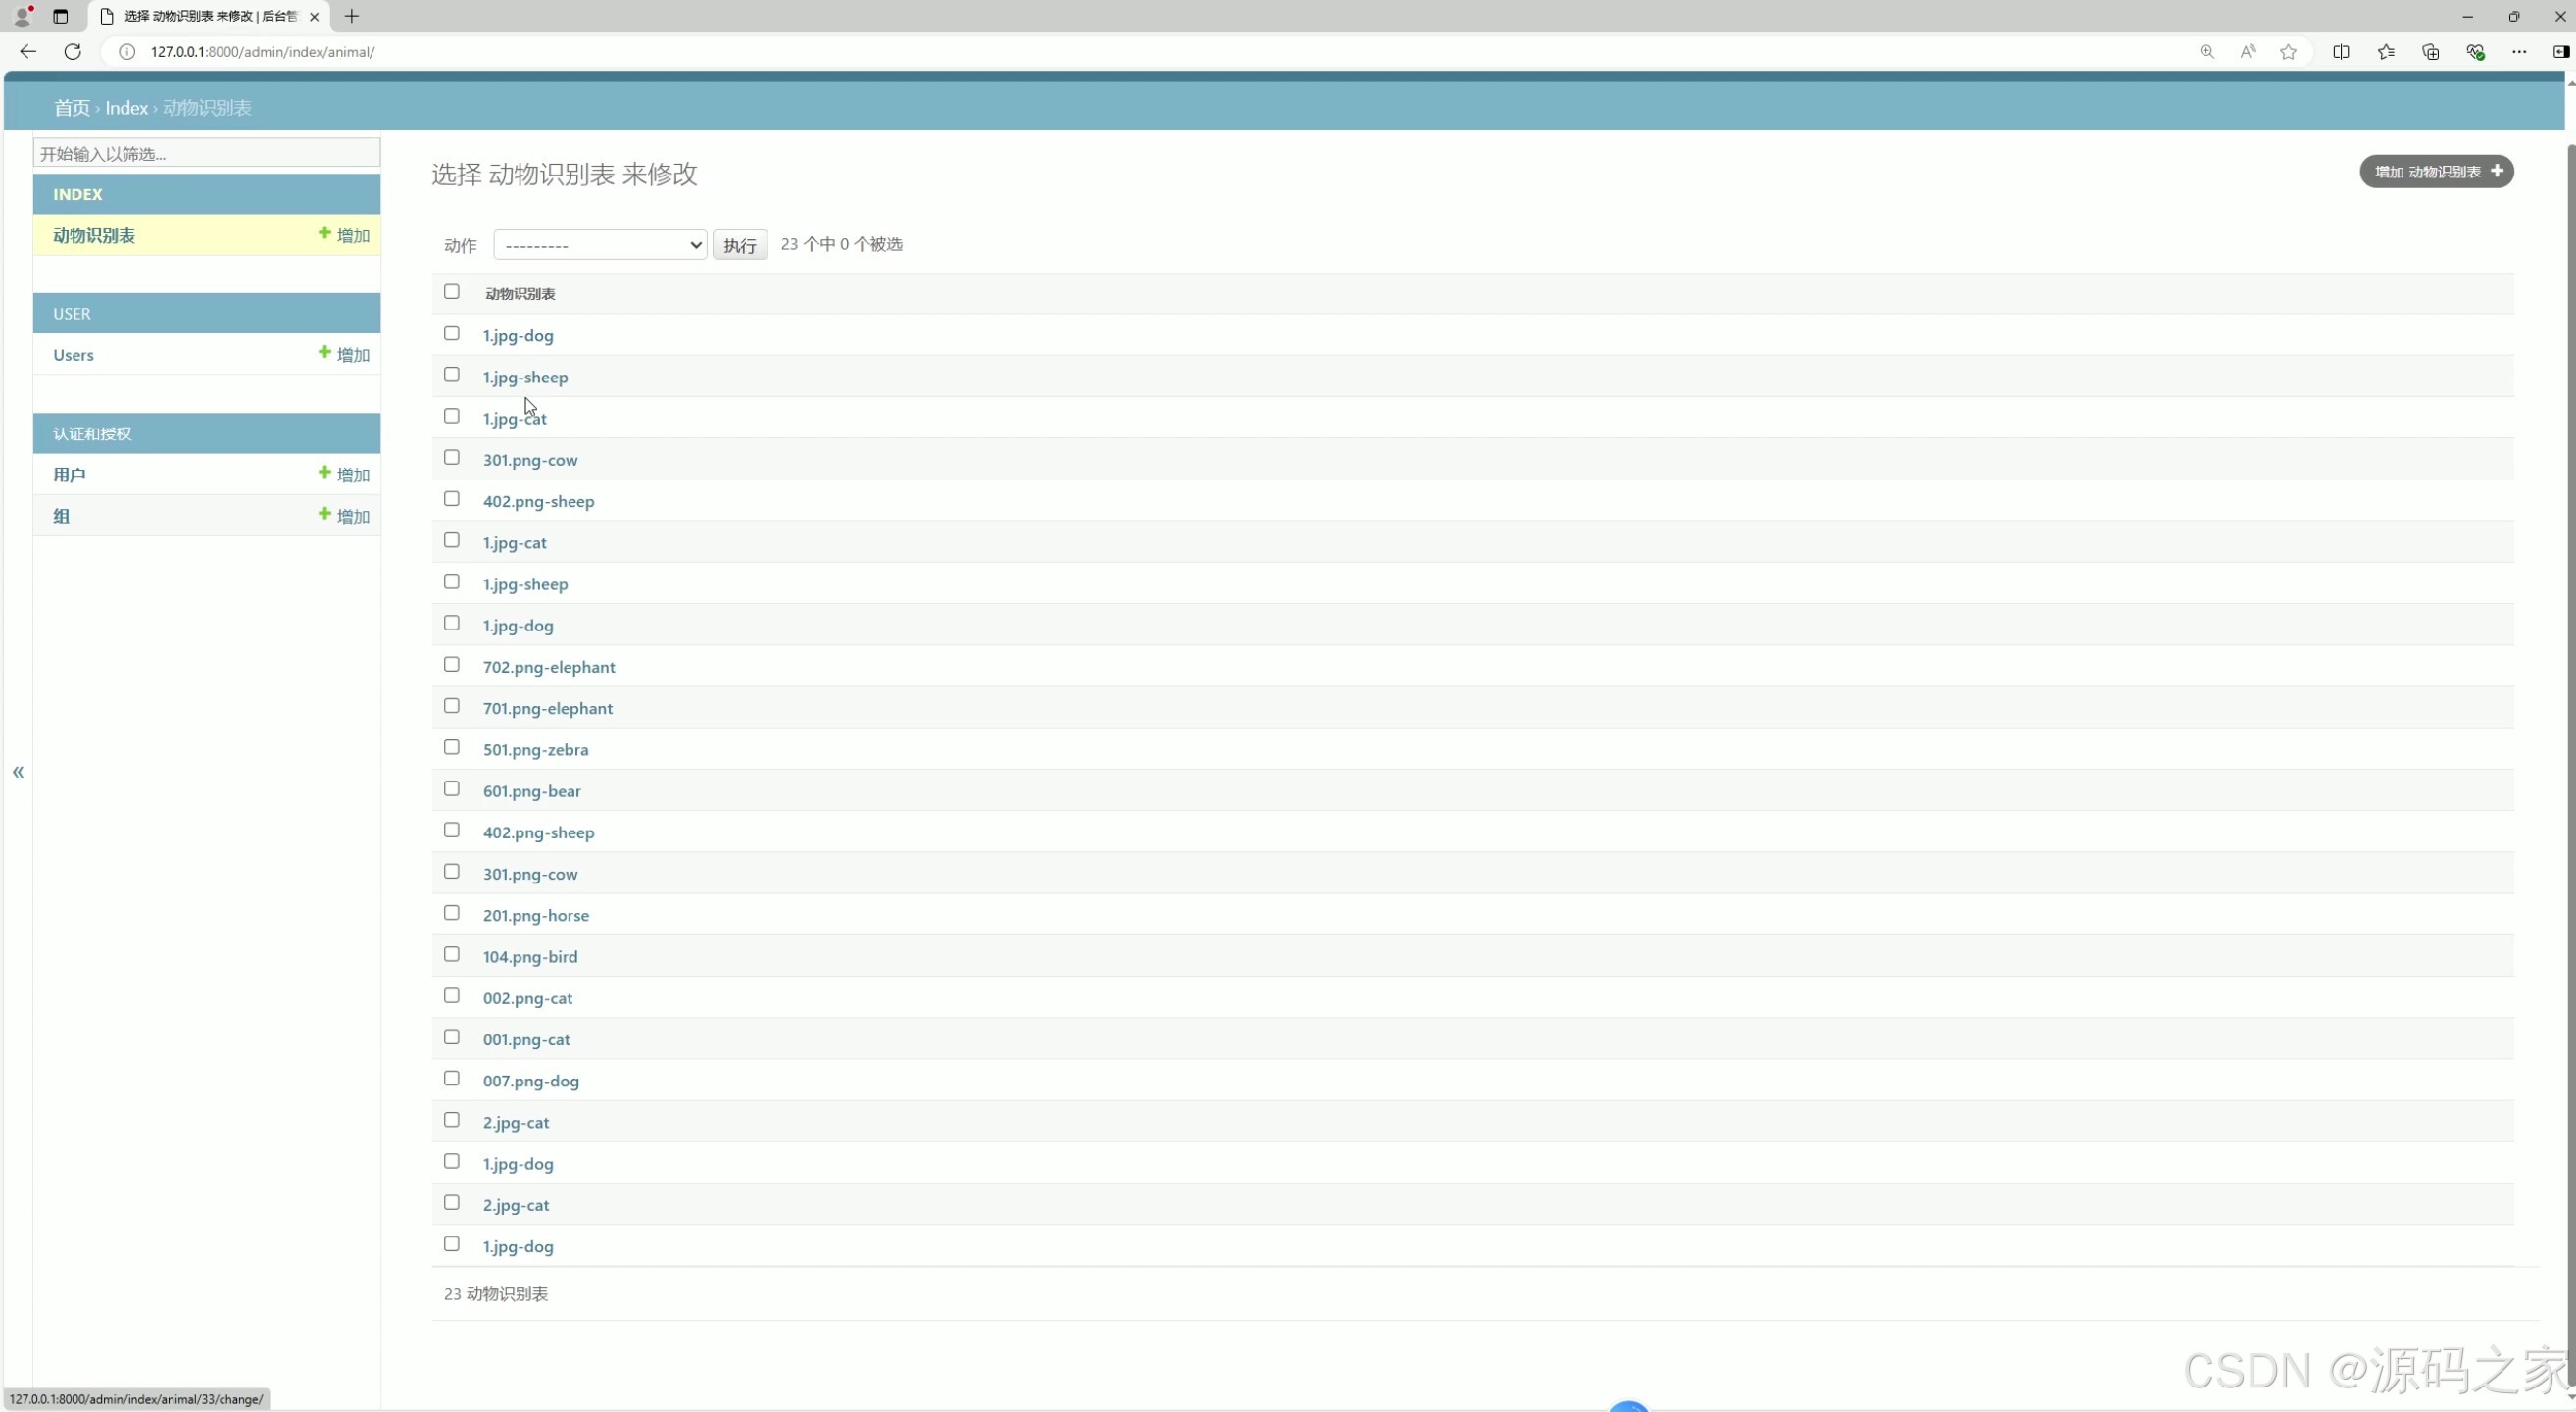
(8)后台管理
(9)注册登录
3、项目说明
一、检测模块:
index/yolov5_master/detect.py
这段代码是一个使用YOLOv5模型进行图像中对象检测的函数实现,具体来说,它完成了以下几个关键步骤:
(1)环境设置:
使用select_device(‘’)来选择合适的设备(CPU或GPU),并设置是否使用半精度浮点数(half)以加速计算(如果设备不是CPU)。
加载YOLOv5模型权重文件(yolov5s.pt),这通常是一个预训练的模型,用于检测图像中的对象。
(2)准备模型:
检查并设置输入图像的尺寸(imgsz),确保它与模型的stride兼容。
如果在GPU上运行,将模型转换为半精度浮点数(如果half为True)。
(3)数据加载:
使用LoadImages类(通常来自YOLOv5的datasets.py)来加载输入路径(input_path)中的图像。这个类可以处理文件夹、视频文件或图像列表。
(4)模型预测:
对每张图像进行预处理(转换为Tensor,归一化等),然后使用加载的模型进行预测。
使用非极大值抑制(NMS)来过滤预测结果中的重叠框,只保留最可能的检测结果。
(5)结果可视化与保存:
遍历每个检测结果,使用plot_one_box函数(通常也是YOLOv5库的一部分)在原始图像上绘制边界框和类别标签。
将带有检测结果的图像保存到指定的save_path。注意,这里有一个问题:cv2.imwrite(save_path, im0)被放在了循环内部,并且每次检测到对象后都会执行,这意味着只有最后一个检测到的对象会被绘制在最终保存的图像上。
如果希望保存所有检测到的图像,应该将保存操作放在循环外部或修改逻辑以保存每个检测步骤的结果。
(6)返回检测到的类别:
函数最后返回最后一个检测到的对象的类别标签(如果有的话)。如果没有检测到任何对象,则不会返回任何内容(或返回空字符串,取决于label1的初始值)。
4、核心代码
import argparse
import os.path
import sys
from pathlib import Path
import cv2
import torch
from numpy import random
work_dir = os.path.dirname(os.path.abspath(__file__))
sys.path.insert(0,work_dir)
from models.experimental import attempt_load
from utils.datasets import LoadStreams, LoadImages
from utils.general import check_img_size, check_requirements, check_imshow, non_max_suppression, apply_classifier, \scale_coords, xyxy2xywh, strip_optimizer, set_logging, increment_path
from utils.plots import plot_one_box
from utils.torch_utils import select_device, load_classifier, time_synchronizeddef detect(input_path, save_path):device = select_device('')half = device.type != 'cpu'model_path = os.path.join(work_dir, 'weights/yolov5s.pt')model = attempt_load(model_path, map_location=device)stride = int(model.stride.max()) # model strideimgsz = check_img_size(640, s=stride) # check img_sizeif half:model.half()dataset = LoadImages(input_path, img_size=imgsz, stride=stride)# Get names and colorsnames = model.module.names if hasattr(model, 'module') else model.namescolors = [[random.randint(0, 255) for _ in range(3)] for _ in names]# 预测if device.type != 'cpu':model(torch.zeros(1, 3, imgsz, imgsz).to(device).type_as(next(model.parameters()))) # run oncefor path, img, im0s, vid_cap in dataset:img = torch.from_numpy(img).to(device)img = img.half() if half else img.float() # uint8 to fp16/32img /= 255.0 # 0 - 255 to 0.0 - 1.0if img.ndimension() == 3:img = img.unsqueeze(0)pred = model(img, augment=False)[0]pred = non_max_suppression(pred, 0.25, 0.45, classes=None, agnostic=False)for i, det in enumerate(pred): # detections per imagelabel1 = ''p, s, im0, frame = path, '', im0s, getattr(dataset, 'frame', 0)if len(det):det[:, :4] = scale_coords(img.shape[2:], det[:, :4], im0.shape).round()for *xyxy, conf, cls in reversed(det):label1 = f'{names[int(cls)]}'plot_one_box(xyxy, im0, label=label1, color=colors[int(cls)], line_thickness=3,imgname=dataset.imgname)cv2.imwrite(save_path, im0)return label1def main(input_path,save_path):with torch.no_grad():label = detect(input_path,save_path)return labelif __name__ == '__main__':main('data/images/7.jpg','1.jpg')🍅✌感兴趣的可以先收藏起来,点赞关注不迷路,想学习更多项目可以查看主页,大家在毕设选题,项目编程以及论文编写等相关问题都可以给我留言咨询,希望可以帮助同学们顺利毕业!🍅✌
5、源码获取方式
🍅由于篇幅限制,获取完整文章或源码、代做项目的,拉到文章底部即可看到个人联系方式。🍅
点赞、收藏、关注,不迷路,下方查看👇🏻获取联系方式👇🏻