redis实战篇day04
这一张大部分redis的实战应用,有关高并发那些考虑的较少
目录
1.达人探店
1.1发布探店笔记
1.2查看探店笔记
1.3点赞功能
2 好友关注
2.1 关注和取消关注
2.2 共同关注
2.3 Feed流实现方案
2.4推送到粉丝收件箱编辑
2.5 实现分页查询收邮箱
3 附近商户
3.1 GEO数据结构的基本用法
3.2 导入店铺数据到GEO
3.3 实现附近商户功能
4 用户签到
4.1 BitMap功能演示
4.2 实现签到功能
4.3 签到统计
5.UV统计-HyperLogLog
总结:
1.达人探店
1.1发布探店笔记
探店笔记类似点评网站的评价,往往是图文结合。对应的表有两个:
tb_blog:探店笔记表,包含笔记中的标题、文字、图片等
tb_blog_comments:其他用户对探店笔记的评价
上传接口
这里用了本地上传,一般我们会用到阿里云的oss对象存储,在外卖里有用到
@Slf4j
@RestController
@RequestMapping("upload")
public class UploadController {@PostMapping("blog")public Result uploadImage(@RequestParam("file") MultipartFile image) {try {// 获取原始文件名称String originalFilename = image.getOriginalFilename();// 生成新文件名String fileName = createNewFileName(originalFilename);// 保存文件image.transferTo(new File(SystemConstants.IMAGE_UPLOAD_DIR, fileName));// 返回结果log.debug("文件上传成功,{}", fileName);return Result.ok(fileName);} catch (IOException e) {throw new RuntimeException("文件上传失败", e);}}}
BlogController
@RestController
@RequestMapping("/blog")
public class BlogController {@Resourceprivate IBlogService blogService;@PostMappingpublic Result saveBlog(@RequestBody Blog blog) {//获取登录用户UserDTO user = UserHolder.getUser();blog.setUpdateTime(user.getId());//保存探店博文blogService.saveBlog(blog);//返回idreturn Result.ok(blog.getId());}
}
1.2查看探店笔记
实现查看发布探店笔记的接口
BlogServiceImpl
package com.hmdp.service.impl;import com.baomidou.mybatisplus.extension.plugins.pagination.Page;
import com.hmdp.dto.Result;
import com.hmdp.entity.Blog;
import com.hmdp.entity.User;
import com.hmdp.mapper.BlogMapper;
import com.hmdp.service.IBlogService;
import com.baomidou.mybatisplus.extension.service.impl.ServiceImpl;
import com.hmdp.service.IUserService;
import com.hmdp.utils.SystemConstants;
import org.springframework.stereotype.Service;import javax.annotation.Resource;
import java.util.List;/*** <p>*  服务实现类* </p>** @author 虎哥* @since 2021-12-22*/
@Service
public class BlogServiceImpl extends ServiceImpl<BlogMapper, Blog> implements IBlogService {@Resourceprivate IUserService userService;@Overridepublic Result queryBlogById(Long id) {//1.查询blogBlog blog=getById(id);if(blog==null){return Result.fail("笔记不存在");}// 查询用户queryBlogUser(blog);return Result.ok(blog);}@Overridepublic Result queryHotBlog(Integer current) {// 根据用户查询Page<Blog> page =query().orderByDesc("liked").page(new Page<>(current, SystemConstants.MAX_PAGE_SIZE));// 获取当前页数据List<Blog> records = page.getRecords();// 查询用户records.forEach(this::queryBlogUser);return Result.ok(records);}private void queryBlogUser(Blog blog) {Long userId = blog.getUserId();User user = userService.getById(userId);blog.setName(user.getNickName());blog.setIcon(user.getIcon());}
}
1.3点赞功能
初始代码
@GetMapping("/likes/{id}")
public Result queryBlogLikes(@PathVariable("id") Long id) {//修改点赞数量blogService.update().setSql("liked = liked +1 ").eq("id",id).update();return Result.ok();
}
问题分析:这种方式会导致一个用户无限点赞,明显是不合理的
造成这个问题的原因是,我们现在的逻辑,发起请求只是给数据库+1,所以才会出现这个问题
完善点赞功能
需求:
-
同一个用户只能点赞一次,再次点击则取消点赞
-
如果当前用户已经点赞,则点赞按钮高亮显示(前端已实现,判断字段Blog类的isLike属性)
实现步骤:
-
给Blog类中添加一个isLike字段,标示是否被当前用户点赞
-
修改点赞功能,利用Redis的set集合判断是否点赞过,未点赞过则点赞数+1,已点赞过则点赞数-1
-
修改根据id查询Blog的业务,判断当前登录用户是否点赞过,赋值给isLike字段
-
修改分页查询Blog业务,判断当前登录用户是否点赞过,赋值给isLike字段
为什么采用set集合:
因为我们的数据是不能重复的
代码不再给出
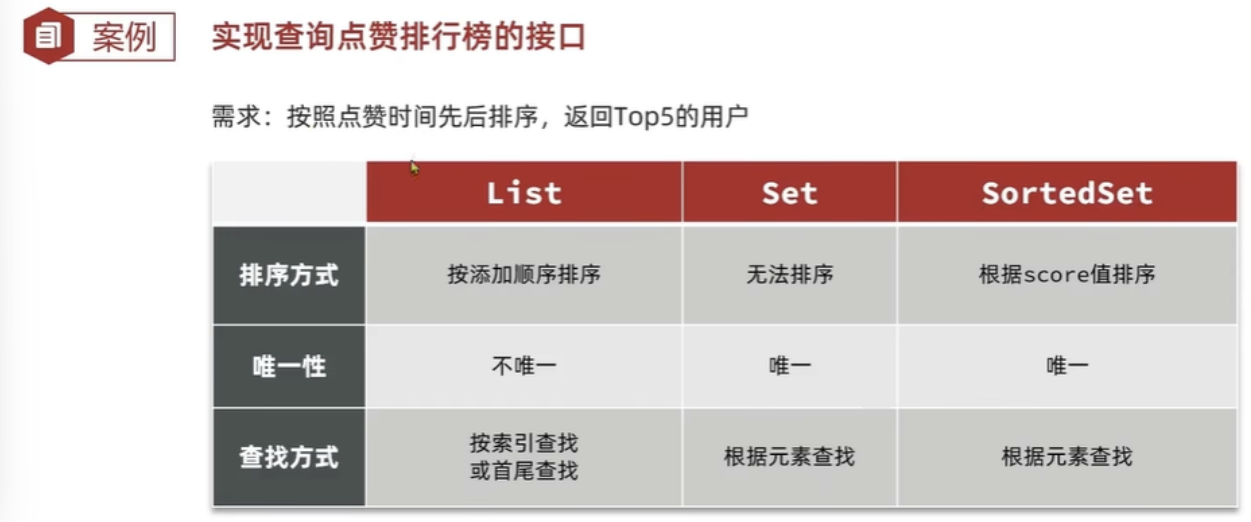
点赞排行榜
在探店笔记的详情页面,应该把给该笔记点赞的人显示出来,比如最早点赞的TOP5,形成点赞排行榜:
之前的点赞是放到set集合,但是set集合是不能排序的,所以这个时候,咱们可以采用一个可以排序的set集合,就是咱们的sortedSet
修改代码
BlogServiceImpl
@Overridepublic Result likeBlog(Long id) {// 1.获取登录用户Long userId = UserHolder.getUser().getId();// 2.判断当前登录用户是否已经点赞String key = BLOG_LIKED_KEY + id;Double score = stringRedisTemplate.opsForZSet().score(key, userId.toString());if (score == null) {// 3.如果未点赞,可以点赞// 3.1.数据库点赞数 + 1boolean isSuccess = update().setSql("liked = liked + 1").eq("id", id).update();// 3.2.保存用户到Redis的set集合 zadd key value scoreif (isSuccess) {stringRedisTemplate.opsForZSet().add(key, userId.toString(), System.currentTimeMillis());}} else {// 4.如果已点赞,取消点赞// 4.1.数据库点赞数 -1boolean isSuccess = update().setSql("liked = liked - 1").eq("id", id).update();// 4.2.把用户从Redis的set集合移除if (isSuccess) {stringRedisTemplate.opsForZSet().remove(key, userId.toString());}}return Result.ok();}private void isBlogLiked(Blog blog) {// 1.获取登录用户UserDTO user = UserHolder.getUser();if (user == null) {// 用户未登录,无需查询是否点赞return;}Long userId = user.getId();// 2.判断当前登录用户是否已经点赞String key = "blog:liked:" + blog.getId();Double score = stringRedisTemplate.opsForZSet().score(key, userId.toString());blog.setIsLike(score != null);}BlogController
@GetMapping("/likes/{id}")
public Result queryBlogLikes(@PathVariable("id") Long id) {return blogService.queryBlogLikes(id);
}
BlogService
@Override
public Result queryBlogLikes(Long id) {String key = BLOG_LIKED_KEY + id;// 1.查询top5的点赞用户 zrange key 0 4Set<String> top5 = stringRedisTemplate.opsForZSet().range(key, 0, 4);if (top5 == null || top5.isEmpty()) {return Result.ok(Collections.emptyList());}// 2.解析出其中的用户idList<Long> ids = top5.stream().map(Long::valueOf).collect(Collectors.toList());String idStr = StrUtil.join(",", ids);// 3.根据用户id查询用户 WHERE id IN ( 5 , 1 ) ORDER BY FIELD(id, 5, 1)List<UserDTO> userDTOS = userService.query().in("id", ids).last("ORDER BY FIELD(id," + idStr + ")").list().stream().map(user -> BeanUtil.copyProperties(user, UserDTO.class)).collect(Collectors.toList());// 4.返回return Result.ok(userDTOS);
2 好友关注
2.1 关注和取消关注
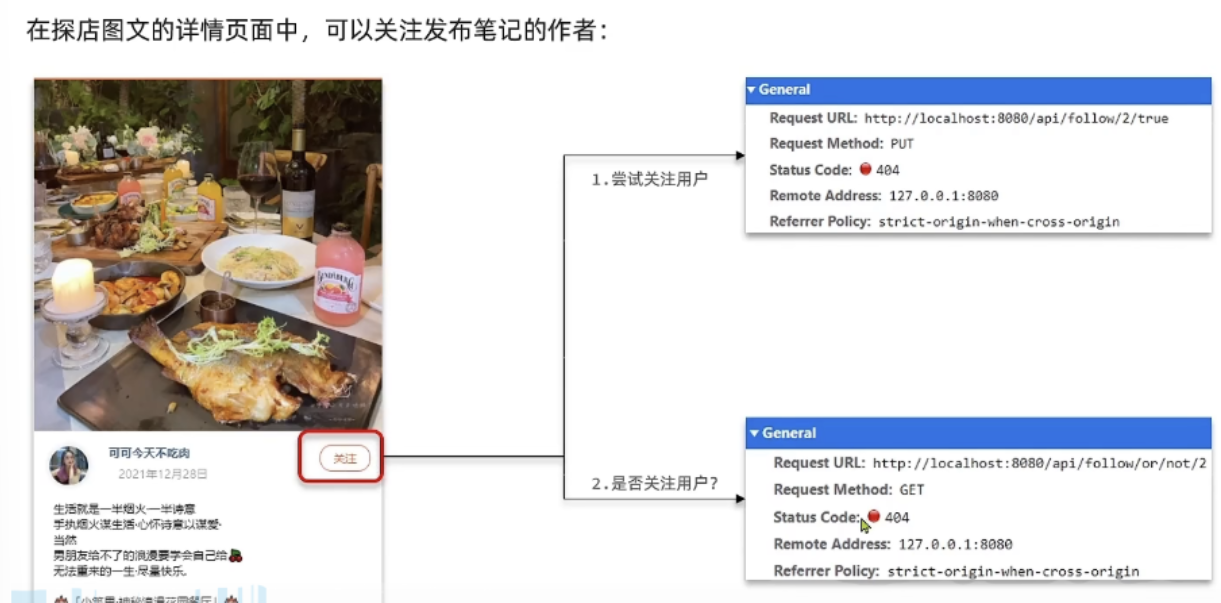
实现思路:
需求:基于该表数据结构,实现两个接口:
-
关注和取关接口
-
判断是否关注的接口
关注是User之间的关系,是博主与粉丝的关系,数据库中有一张tb_follow表来标示: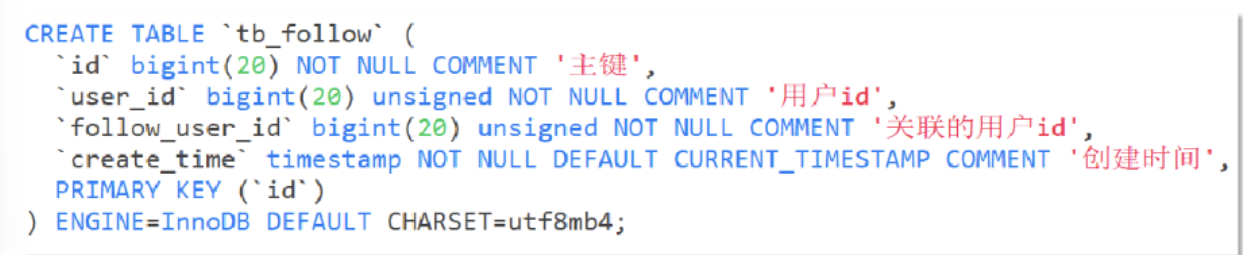 FollowController
//关注
@PutMapping("/{id}/{isFollow}")
public Result follow(@PathVariable("id") Long followUserId, @PathVariable("isFollow") Boolean isFollow) {return followService.follow(followUserId, isFollow);
}
//取消关注
@GetMapping("/or/not/{id}")
public Result isFollow(@PathVariable("id") Long followUserId) {return followService.isFollow(followUserId);
}
FollowService
取消关注service
@Override
public Result isFollow(Long followUserId) {// 1.获取登录用户Long userId = UserHolder.getUser().getId();// 2.查询是否关注 select count(*) from tb_follow where user_id = ? and follow_user_id = ?Integer count = query().eq("user_id", userId).eq("follow_user_id", followUserId).count();// 3.判断return Result.ok(count > 0);}关注service@Overridepublic Result follow(Long followUserId, Boolean isFollow) {// 1.获取登录用户Long userId = UserHolder.getUser().getId();String key = "follows:" + userId;// 1.判断到底是关注还是取关if (isFollow) {// 2.关注,新增数据Follow follow = new Follow();follow.setUserId(userId);follow.setFollowUserId(followUserId);boolean isSuccess = save(follow);} else {// 3.取关,删除 delete from tb_follow where user_id = ? and follow_user_id = ?remove(new QueryWrapper<Follow>().eq("user_id", userId).eq("follow_user_id", followUserId));}return Result.ok();}
2.2 共同关注
想要去看共同关注的好友,需要首先进入到这个页面,这个页面会发起两个请求
1、去查询用户的详情
2、去查询用户的笔记
以上两个功能和共同关注没有什么关系,大家可以自行将笔记中的代码拷贝到idea中就可以实现这两个功能了,我们的重点在于共同关注功能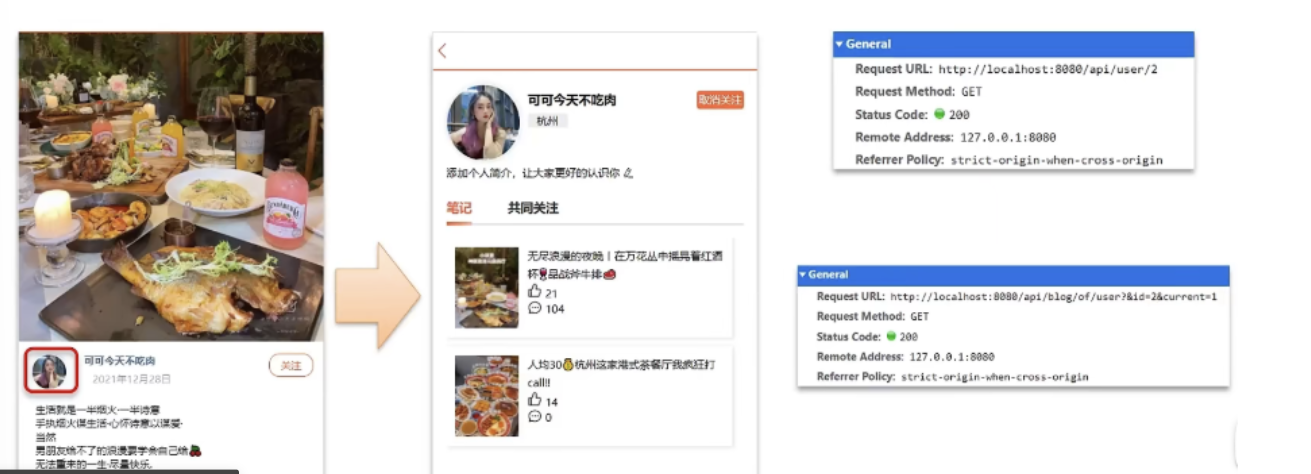 UserController
// UserController 根据id查询用户
@GetMapping("/{id}")
public Result queryUserById(@PathVariable("id") Long userId){// 查询详情User user = userService.getById(userId);if (user == null) {return Result.ok();}UserDTO userDTO = BeanUtil.copyProperties(user, UserDTO.class);// 返回return Result.ok(userDTO);
}
BlogController
// BlogController  根据id查询博主的探店笔记
@GetMapping("/of/user")
public Result queryBlogByUserId(@RequestParam(value = "current", defaultValue = "1") Integer current,@RequestParam("id") Long id) {// 根据用户查询Page<Blog> page = blogService.query().eq("user_id", id).page(new Page<>(current, SystemConstants.MAX_PAGE_SIZE));// 获取当前页数据List<Blog> records = page.getRecords();return Result.ok(records);
}
接下来我们来看看共同关注如何实现:
需求:利用Redis中恰当的数据结构,实现共同关注功能。在博主个人页面展示出当前用户与博主的共同关注呢。
当然是使用我们之前学习过的set集合咯,在set集合中,有交集并集补集的api,我们可以把两人的关注的人分别放入到一个set集合中,然后再通过api去查看这两个set集合中的交集数据。
我们先来改造当前的关注列表
改造原因是因为我们需要在用户关注了某位用户后,需要将数据放入到set集合中,方便后续进行共同关注,同时当取消关注时,也需要从set集合中进行删除
FollowServiceImpl
@Override
public Result follow(Long followUserId, Boolean isFollow) {// 1.获取登录用户Long userId = UserHolder.getUser().getId();String key = "follows:" + userId;// 1.判断到底是关注还是取关if (isFollow) {// 2.关注,新增数据Follow follow = new Follow();follow.setUserId(userId);follow.setFollowUserId(followUserId);boolean isSuccess = save(follow);if (isSuccess) {// 把关注用户的id,放入redis的set集合 sadd userId followerUserIdstringRedisTemplate.opsForSet().add(key, followUserId.toString());}} else {// 3.取关,删除 delete from tb_follow where user_id = ? and follow_user_id = ?boolean isSuccess = remove(new QueryWrapper<Follow>().eq("user_id", userId).eq("follow_user_id", followUserId));if (isSuccess) {// 把关注用户的id从Redis集合中移除stringRedisTemplate.opsForSet().remove(key, followUserId.toString());}}return Result.ok();
}
@Override
public Result followCommons(Long id) {// 1.获取当前用户Long userId = UserHolder.getUser().getId();String key = "follows:" + userId;// 2.求交集String key2 = "follows:" + id;Set<String> intersect = stringRedisTemplate.opsForSet().intersect(key, key2);if (intersect == null || intersect.isEmpty()) {// 无交集return Result.ok(Collections.emptyList());}// 3.解析id集合List<Long> ids = intersect.stream().map(Long::valueOf).collect(Collectors.toList());// 4.查询用户List<UserDTO> users = userService.listByIds(ids).stream().map(user -> BeanUtil.copyProperties(user, UserDTO.class)).collect(Collectors.toList());return Result.ok(users);
}2.3 Feed流实现方案
当我们关注了用户后,这个用户发了动态,那么我们应该把这些数据推送给用户,这个需求,其实我们又把他叫做Feed流,关注推送也叫做Feed流,直译为投喂。为用户持续的提供“沉浸式”的体验,通过无限下拉刷新获取新的信息。
对于传统的模式的内容解锁:我们是需要用户去通过搜索引擎或是其他的方式去解锁想要看的内容
 对于新型的Feed流的的效果:不需要我们用户再去推送信息,而是系统分析用户到底想要什么,然后直接把内容推送给用户,从而使用户能够更加的节约时间,不用主动去寻找
Feed流的实现有两种模式:
Feed流产品有两种常见模式: Timeline:不做内容筛选,简单的按照内容发布时间排序,常用于好友或关注。例如朋友圈
-
优点:信息全面,不会有缺失。并且实现也相对简单
-
缺点:信息噪音较多,用户不一定感兴趣,内容获取效率低
智能排序:利用智能算法屏蔽掉违规的、用户不感兴趣的内容。推送用户感兴趣信息来吸引用户
-
优点:投喂用户感兴趣信息,用户粘度很高,容易沉迷
-
缺点:如果算法不精准,可能起到反作用 本例中的个人页面,是基于关注的好友来做Feed流,因此采用Timeline的模式。该模式的实现方案有三种:
我们本次针对好友的操作,采用的就是Timeline的方式,只需要拿到我们关注用户的信息,然后按照时间排序即可
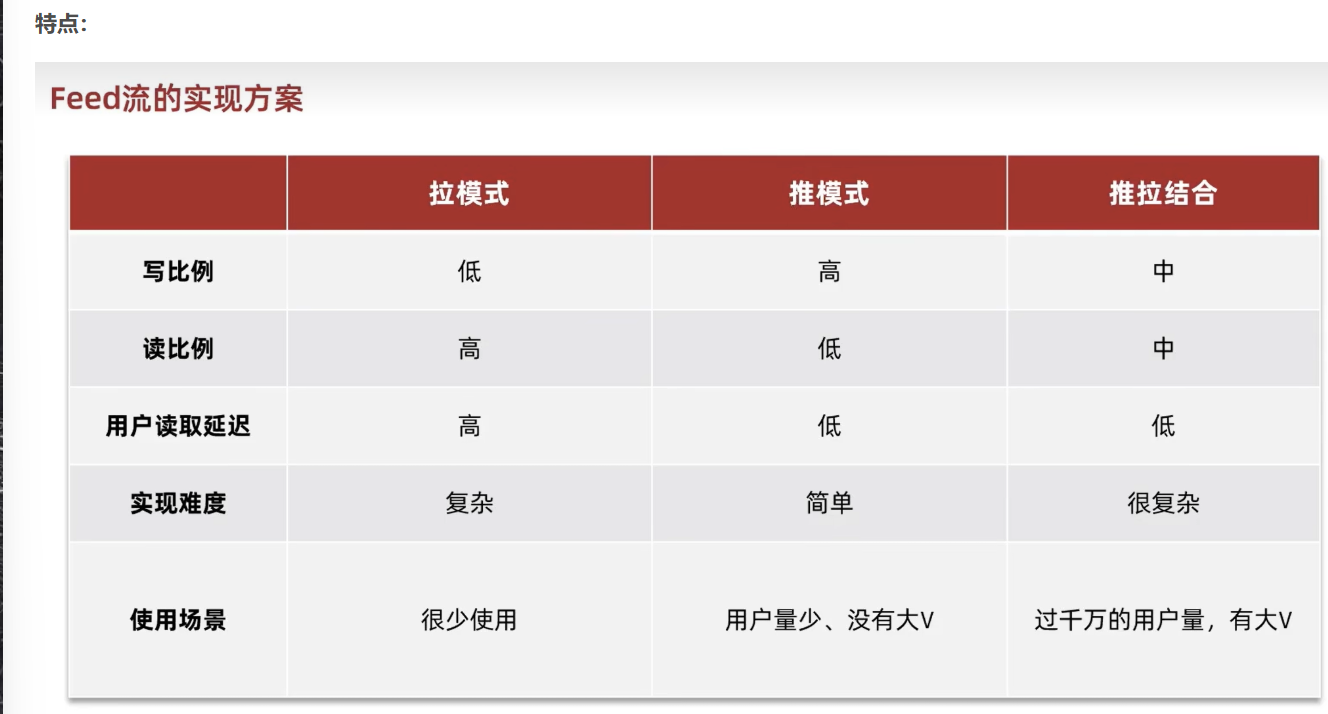
,因此采用Timeline的模式。该模式的实现方案有三种:
-
拉模式
-
推模式
-
推拉结合
拉模式:也叫做读扩散
该模式的核心含义就是:当张三和李四和王五发了消息后,都会保存在自己的邮箱中,假设赵六要读取信息,那么他会从读取他自己的收件箱,此时系统会从他关注的人群中,把他关注人的信息全部都进行拉取,然后在进行排序
优点:比较节约空间,因为赵六在读信息时,并没有重复读取,而且读取完之后可以把他的收件箱进行清楚。
缺点:比较延迟,当用户读取数据时才去关注的人里边去读取数据,假设用户关注了大量的用户,那么此时就会拉取海量的内容,对服务器压力巨大。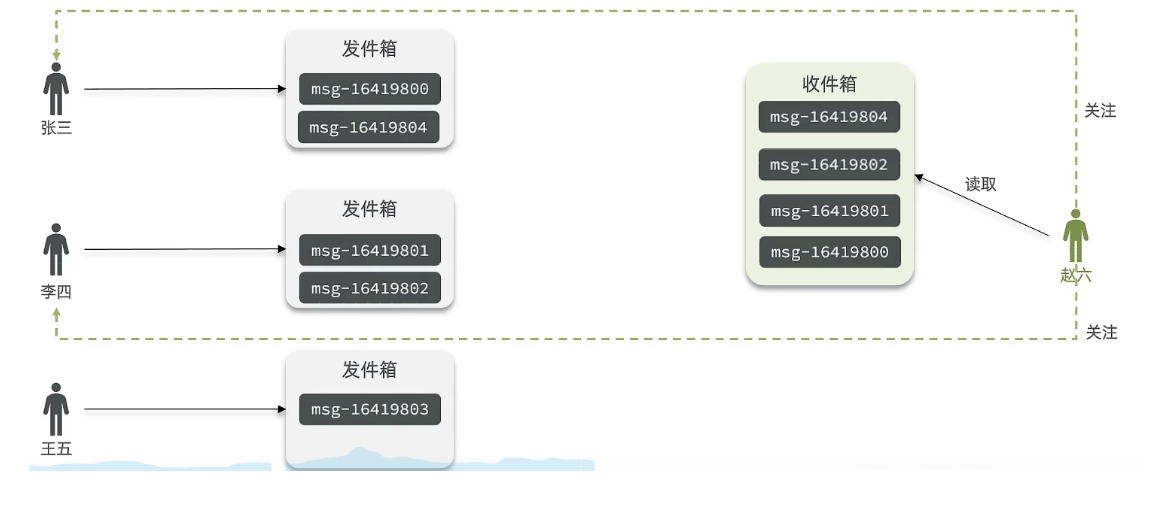
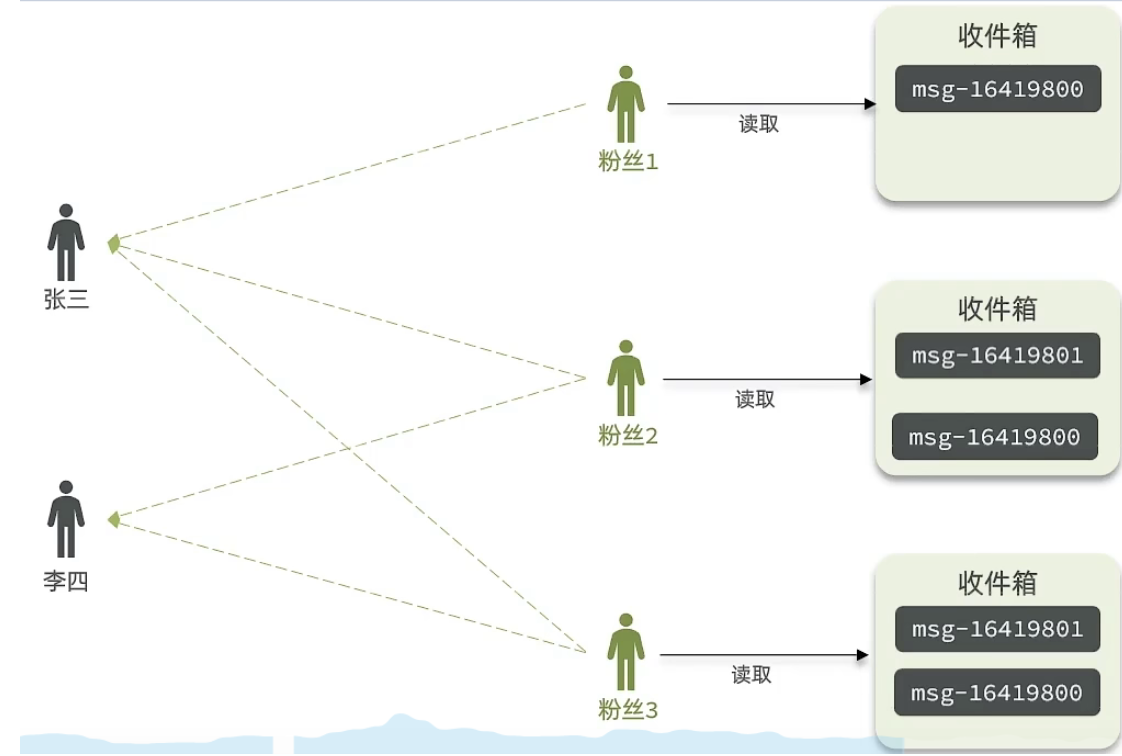
推模式:也叫做写扩散。
推模式是没有写邮箱的,当张三写了一个内容,此时会主动的把张三写的内容发送到他的粉丝收件箱中去,假设此时李四再来读取,就不用再去临时拉取了
优点:时效快,不用临时拉取
缺点:内存压力大,假设一个大V写信息,很多人关注他, 就会写很多分数据到粉丝那边去
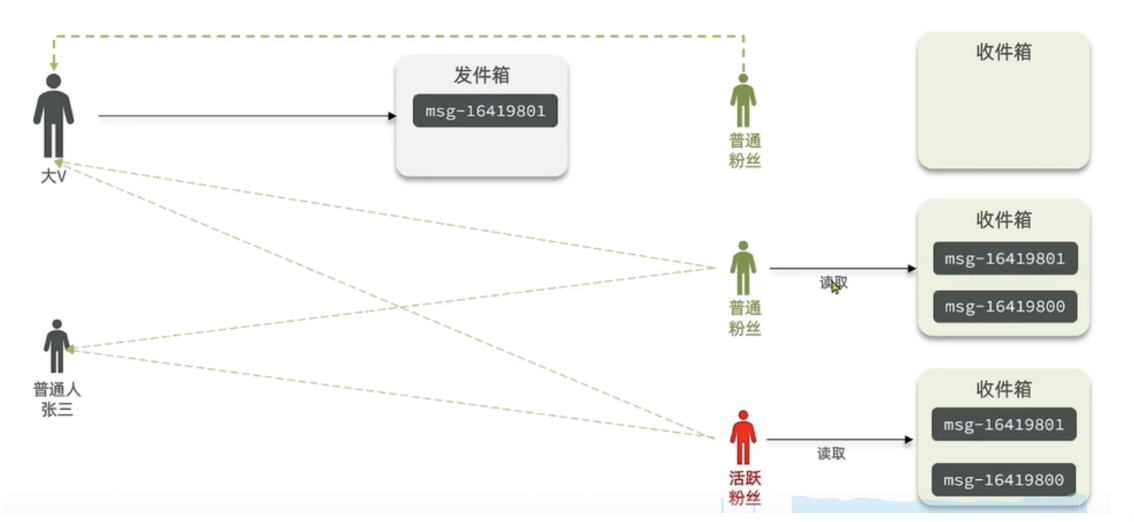
推拉结合模式:也叫做读写混合,兼具推和拉两种模式的优点。
推拉模式是一个折中的方案,站在发件人这一段,如果是个普通的人,那么我们采用写扩散的方式,直接把数据写入到他的粉丝中去,因为普通的人他的粉丝关注量比较小,所以这样做没有压力,如果是大V,那么他是直接将数据先写入到一份到发件箱里边去,然后再直接写一份到活跃粉丝收件箱里边去,现在站在收件人这端来看,如果是活跃粉丝,那么大V和普通的人发的都会直接写入到自己收件箱里边来,而如果是普通的粉丝,由于他们上线不是很频繁,所以等他们上线时,再从发件箱里边去拉信息。
 2.4推送到粉丝收件箱
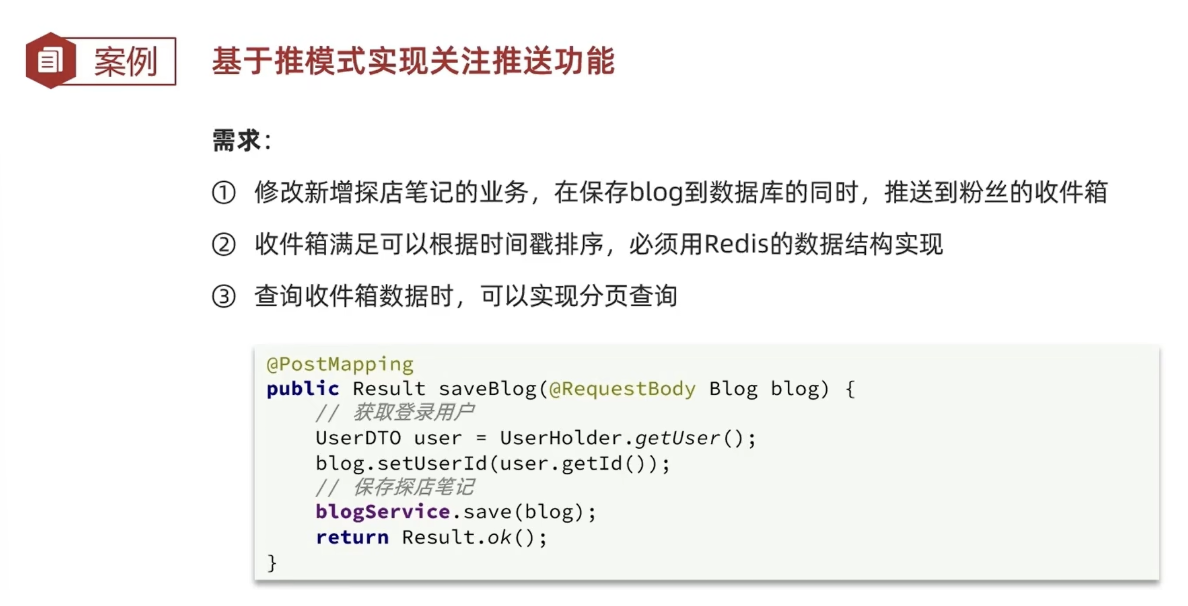
2.5 实现分页查询收邮箱
需求:在个人主页的“关注”卡片中,查询并展示推送的Blog信息:
具体操作如下:
1、每次查询完成后,我们要分析出查询出数据的最小时间戳,这个值会作为下一次查询的条件
2、我们需要找到与上一次查询相同的查询个数作为偏移量,下次查询时,跳过这些查询过的数据,拿到我们需要的数据
综上:我们的请求参数中就需要携带 lastId:上一次查询的最小时间戳 和偏移量这两个参数。
这两个参数第一次会由前端来指定,以后的查询就根据后台结果作为条件,再次传递到后台。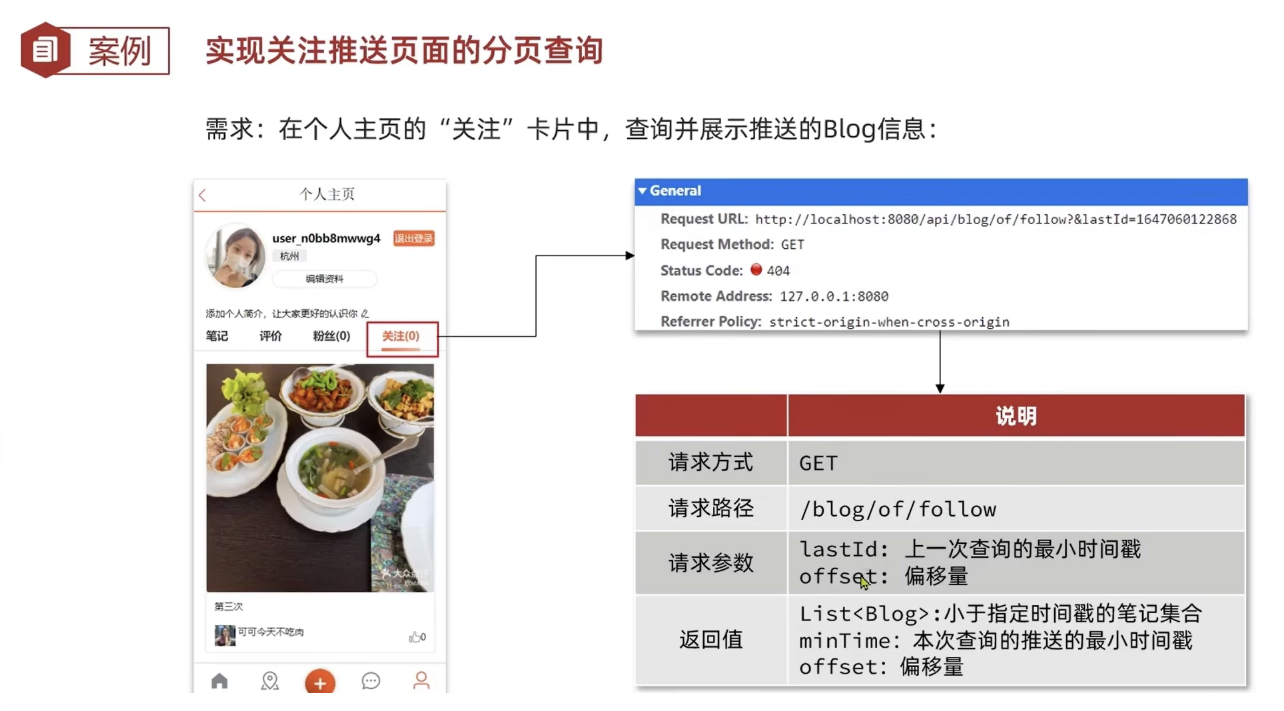

定义出来具体的返回值实体类
@Data
public class ScrollResult {private List<?> list;private Long minTime;private Integer offset;
}
BlogController
注意:RequestParam 表示接受url地址栏传参的注解,当方法上参数的名称和url地址栏不相同时,可以通过RequestParam 来进行指定
@GetMapping("/of/follow")
public Result queryBlogOfFollow(@RequestParam("lastId") Long max, @RequestParam(value = "offset", defaultValue = "0") Integer offset){return blogService.queryBlogOfFollow(max, offset);
}
BlogServiceImpl
@Override
public Result queryBlogOfFollow(Long max, Integer offset) {// 1.获取当前用户Long userId = UserHolder.getUser().getId();// 2.查询收件箱 ZREVRANGEBYSCORE key Max Min LIMIT offset countString key = FEED_KEY + userId;Set<ZSetOperations.TypedTuple<String>> typedTuples = stringRedisTemplate.opsForZSet().reverseRangeByScoreWithScores(key, 0, max, offset, 2);// 3.非空判断if (typedTuples == null || typedTuples.isEmpty()) {return Result.ok();}// 4.解析数据:blogId、minTime(时间戳)、offsetList<Long> ids = new ArrayList<>(typedTuples.size());long minTime = 0; // 2int os = 1; // 2for (ZSetOperations.TypedTuple<String> tuple : typedTuples) { // 5 4 4 2 2// 4.1.获取idids.add(Long.valueOf(tuple.getValue()));// 4.2.获取分数(时间戳)long time = tuple.getScore().longValue();if(time == minTime){os++;}else{minTime = time;os = 1;}}os = minTime == max ? os : os + offset;// 5.根据id查询blogString idStr = StrUtil.join(",", ids);List<Blog> blogs = query().in("id", ids).last("ORDER BY FIELD(id," + idStr + ")").list();for (Blog blog : blogs) {// 5.1.查询blog有关的用户queryBlogUser(blog);// 5.2.查询blog是否被点赞isBlogLiked(blog);}// 6.封装并返回ScrollResult r = new ScrollResult();r.setList(blogs);r.setOffset(os);r.setMinTime(minTime);return Result.ok(r);
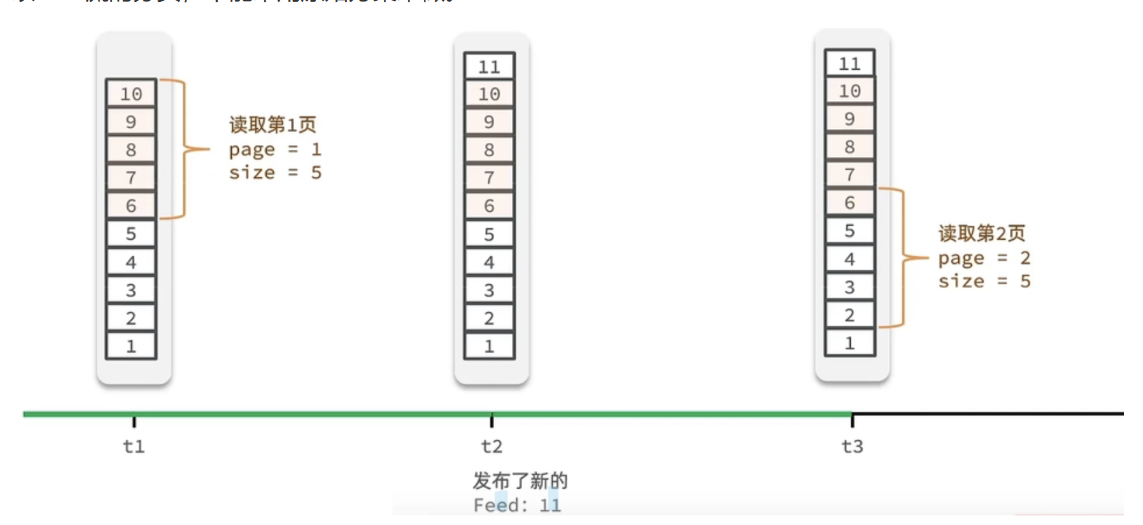
}传统分页
实现原理:使用
LIMIT offset, size(MySQL)或ROWNUM(Oracle)等。SQL示例:
sql
-- 获取第6页,每页10条数据 (offset = (6-1)*10 = 50) SELECT * FROM table_name ORDER BY id LIMIT 50, 10;关键参数:
pageNum:当前页码。
pageSize:每页大小。
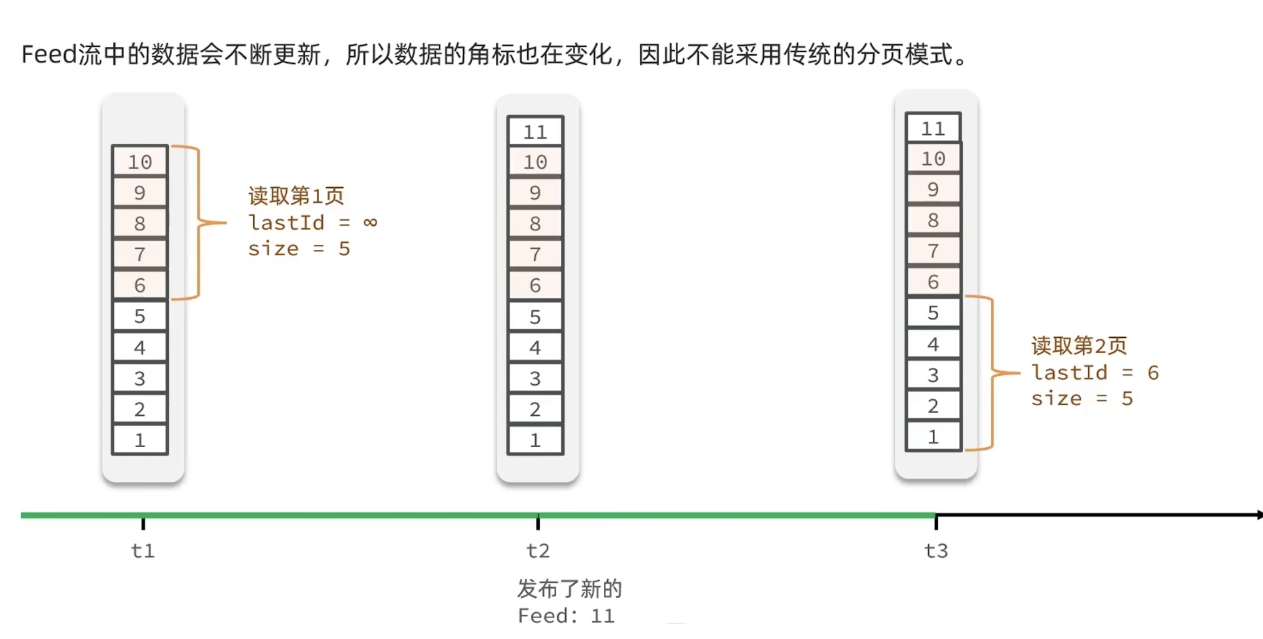
offset:计算得出,表示从第几条开始。滚动分页
实现原理:使用一个“游标”(Cursor)来标记当前位置,然后查询这个游标之后或之前的 N 条数据。
SQL示例:
sql
-- 假设上一次最后一条数据的id是50,获取接下来的10条 SELECT * FROM table_name WHERE id > 50 ORDER BY id LIMIT 10;关键参数:
cursor:游标,通常是上一页最后一条数据的某个唯一、有序的字段值(如ID、创建时间)。
size:每页大小。
特性 传统分页(偏移分页) 滚动分页(游标分页) 核心原理 LIMIT offset, sizeWHERE id > cursor LIMIT size性能 随 offset增大而线性下降常数级,高性能,与深度无关 数据一致性 差,在数据增删时会出现重复/丢失 好,提供连续的数据流视图 用户体验 适合跳页,有明确页码 适合连续浏览,无限下拉 适用场景 后台管理、电商列表、搜索引擎 社交Feed流、消息时间线、日志流 实现复杂度 简单,插件(如PageHelper)支持完善 需要前后端配合,后端需返回游标
3 附近商户
3.1 GEO数据结构的基本用法
GEO就是Geolocation的简写形式,代表地理坐标。Redis在3.2版本中加入了对GEO的支持,允许存储地理坐标信息,帮助我们根据经纬度来检索数据。常见的命令有:
| 命令 | 功能 |
| GEOADD: | 添加一个地理空间信息,包含:经度(longitude)、纬度(latitude)、值(member) |
| GEODIST | 计算指定的两个点之间的距离并返回 |
| GEOHASH | 将指定member的坐标转为hash字符串形式并返回 |
| GEOPOS: | 返回指定member的坐标 |
| GEORADIUS | 指定圆心、半径,找到该圆内包含的所有member,并按照与圆心之间的距离排序后返回。6.以后已废弃 |
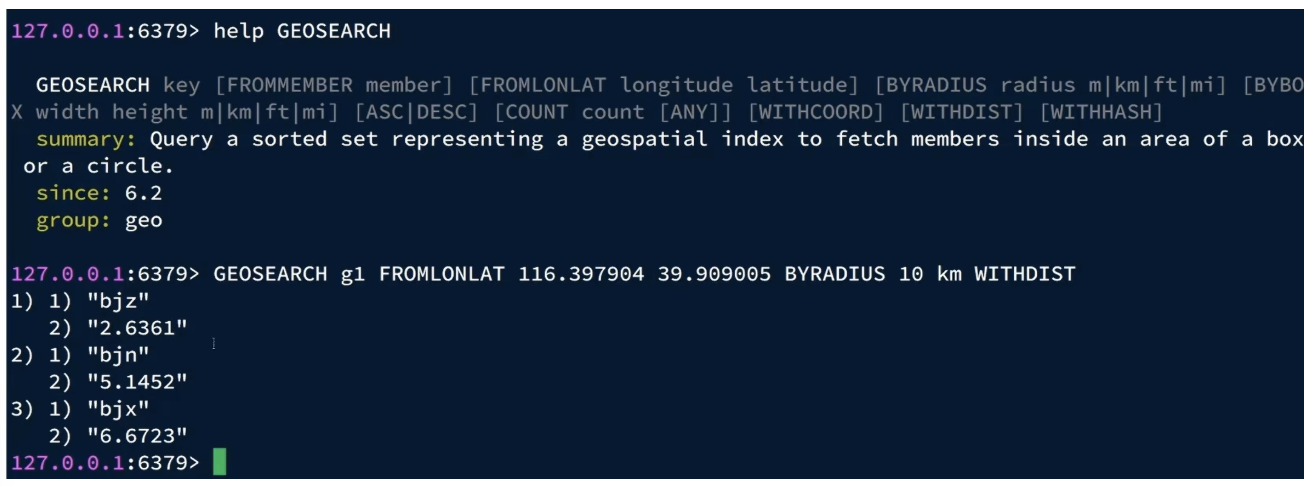
| GEOSEARCH | 在指定范围内搜索member,并按照与指定点之间的距离排序后返回。范围可以是圆形或矩形。6.2.新功能 |
| GEOSEARCHSTORE | 与GEOSEARCH功能一致,不过可以把结果存储到一个指定的key。 6.2.新功能 |
GEO的基本用法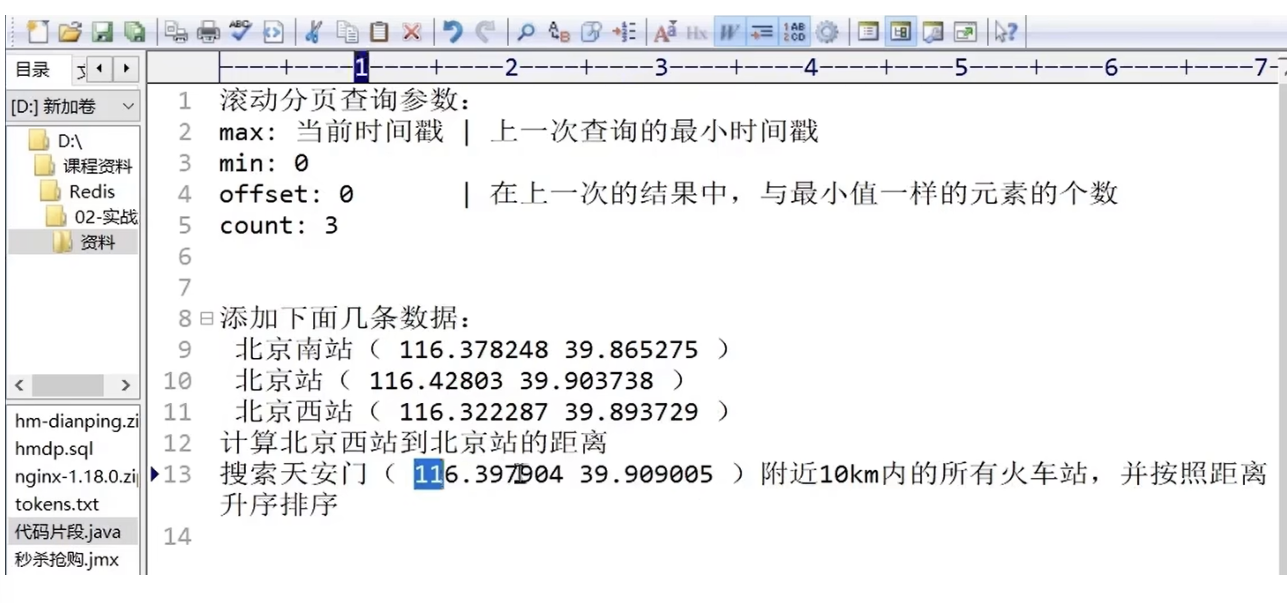
 3.2 导入店铺数据到GEO
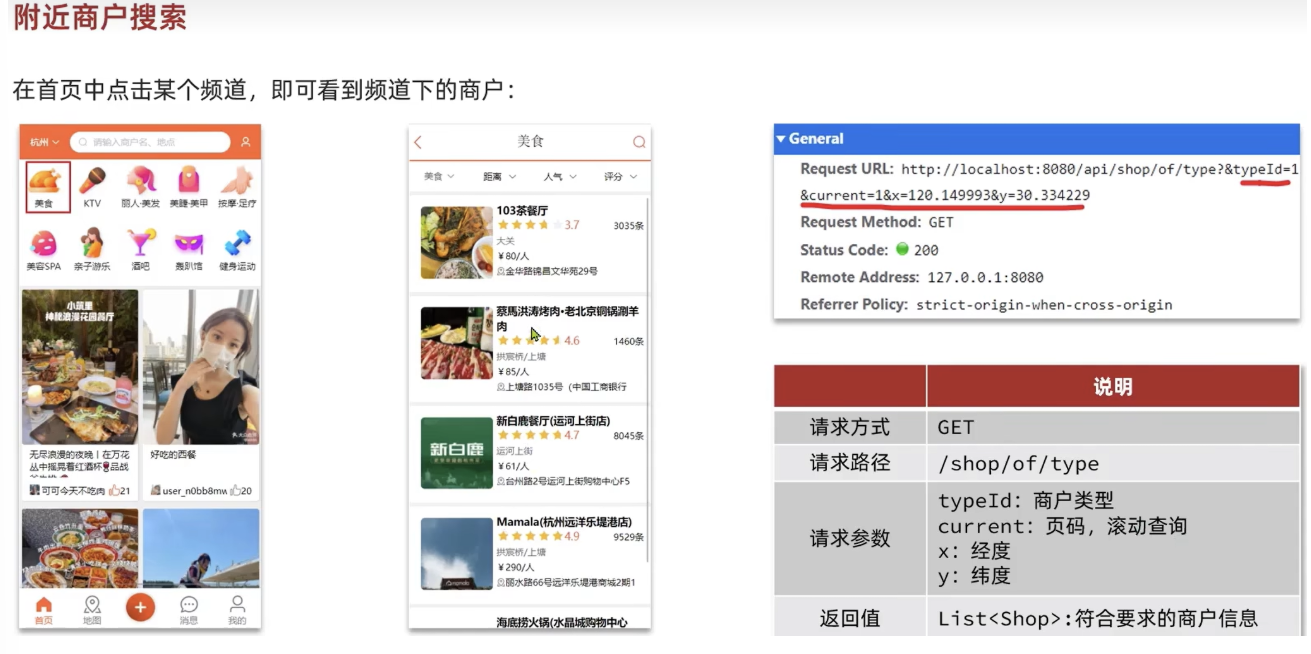 当我们点击美食之后,会出现一系列的商家,商家中可以按照多种排序方式,我们此时关注的是距离,这个地方就需要使用到我们的GEO,向后台传入当前app收集的地址(我们此处是写死的) ,以当前坐标作为圆心,同时绑定相同的店家类型type,以及分页信息,把这几个条件传入后台,后台查询出对应的数据再返回。
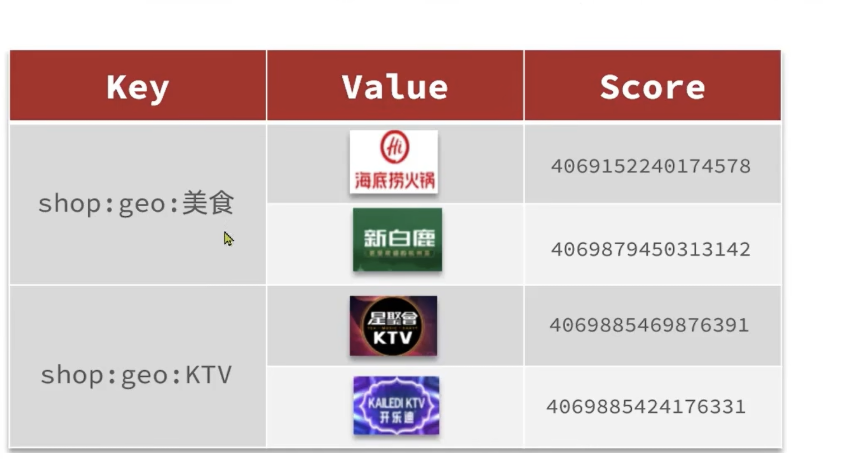
我们要做的事情是:将数据库表中的数据导入到redis中去,redis中的GEO,GEO在redis中就一个menber和一个经纬度,我们把x和y轴传入到redis做的经纬度位置去,但我们不能把所有的数据都放入到menber中去,毕竟作为redis是一个内存级数据库,如果存海量数据,redis还是力不从心,所以我们在这个地方存储他的id即可。
但是这个时候还有一个问题,就是在redis中并没有存储type,所以我们无法根据type来对数据进行筛选,所以我们可以按照商户类型做分组,类型相同的商户作为同一组,以typeId为key存入同一个GEO集合中即可
HmDianPingApplicationTests
@Test
void loadShopData() {// 1.查询店铺信息List<Shop> list = shopService.list();// 2.把店铺分组,按照typeId分组,typeId一致的放到一个集合Map<Long, List<Shop>> map = list.stream().collect(Collectors.groupingBy(Shop::getTypeId));// 3.分批完成写入Redisfor (Map.Entry<Long, List<Shop>> entry : map.entrySet()) {// 3.1.获取类型idLong typeId = entry.getKey();String key = SHOP_GEO_KEY + typeId;// 3.2.获取同类型的店铺的集合List<Shop> value = entry.getValue();List<RedisGeoCommands.GeoLocation<String>> locations = new ArrayList<>(value.size());// 3.3.写入redis GEOADD key 经度 纬度 memberfor (Shop shop : value) {// stringRedisTemplate.opsForGeo().add(key, new Point(shop.getX(), shop.getY()), shop.getId().toString());locations.add(new RedisGeoCommands.GeoLocation<>(shop.getId().toString(),new Point(shop.getX(), shop.getY())));}stringRedisTemplate.opsForGeo().add(key, locations);}
}
3.3 实现附近商户功能
SpringDataRedis的2.3.9版本并不支持Redis 6.2提供的GEOSEARCH命令,因此我们需要提示其版本,修改自己的POM
第一步:导入pom
<dependency><groupId>org.springframework.boot</groupId><artifactId>spring-boot-starter-data-redis</artifactId><exclusions><exclusion><artifactId>spring-data-redis</artifactId><groupId>org.springframework.data</groupId></exclusion><exclusion><artifactId>lettuce-core</artifactId><groupId>io.lettuce</groupId></exclusion></exclusions>
</dependency>
<dependency><groupId>org.springframework.data</groupId><artifactId>spring-data-redis</artifactId><version>2.6.2</version>
</dependency>
<dependency><groupId>io.lettuce</groupId><artifactId>lettuce-core</artifactId><version>6.1.6.RELEASE</version>
</dependency>
第二步:
ShopController
@GetMapping("/of/type")
public Result queryShopByType(@RequestParam("typeId") Integer typeId,@RequestParam(value = "current", defaultValue = "1") Integer current,@RequestParam(value = "x", required = false) Double x,@RequestParam(value = "y", required = false) Double y
) {return shopService.queryShopByType(typeId, current, x, y);
}
ShopServiceImpl
@Overridepublic Result queryShopByType(Integer typeId, Integer current, Double x, Double y) {// 1.判断是否需要根据坐标查询if (x == null || y == null) {// 不需要坐标查询,按数据库查询Page<Shop> page = query().eq("type_id", typeId).page(new Page<>(current, SystemConstants.DEFAULT_PAGE_SIZE));// 返回数据return Result.ok(page.getRecords());}// 2.计算分页参数int from = (current - 1) * SystemConstants.DEFAULT_PAGE_SIZE;int end = current * SystemConstants.DEFAULT_PAGE_SIZE;// 3.查询redis、按照距离排序、分页。结果:shopId、distanceString key = SHOP_GEO_KEY + typeId;GeoResults<RedisGeoCommands.GeoLocation<String>> results = stringRedisTemplate.opsForGeo() // GEOSEARCH key BYLONLAT x y BYRADIUS 10 WITHDISTANCE.search(key,GeoReference.fromCoordinate(x, y),new Distance(5000),RedisGeoCommands.GeoSearchCommandArgs.newGeoSearchArgs().includeDistance().limit(end));// 4.解析出idif (results == null) {return Result.ok(Collections.emptyList());}List<GeoResult<RedisGeoCommands.GeoLocation<String>>> list = results.getContent();if (list.size() <= from) {// 没有下一页了,结束return Result.ok(Collections.emptyList());}// 4.1.截取 from ~ end的部分List<Long> ids = new ArrayList<>(list.size());Map<String, Distance> distanceMap = new HashMap<>(list.size());list.stream().skip(from).forEach(result -> {// 4.2.获取店铺idString shopIdStr = result.getContent().getName();ids.add(Long.valueOf(shopIdStr));// 4.3.获取距离Distance distance = result.getDistance();distanceMap.put(shopIdStr, distance);});// 5.根据id查询ShopString idStr = StrUtil.join(",", ids);List<Shop> shops = query().in("id", ids).last("ORDER BY FIELD(id," + idStr + ")").list();for (Shop shop : shops) {shop.setDistance(distanceMap.get(shop.getId().toString()).getValue());}// 6.返回return Result.ok(shops);}4 用户签到
4.1 BitMap功能演示
存储大量数据:BitMap(位图)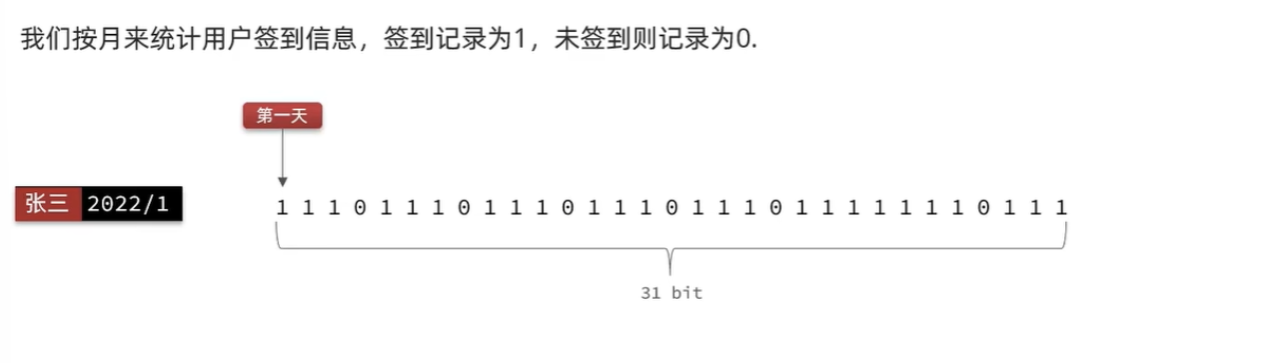
BitMap的操作命令有
| 命令 | 功能 |
| SETBIT | 向指定位置(offset)存入一个0或1 |
| GETBIT | 获取指定位置(offset)的bit值 |
| BITCOUNT | 统计BitMap中值为1的bit位的数量 |
| BITFIELD | 操作(查询、修改、自增)BitMap中bit数组中的指定位置(offset)的值 |
| BITFIELD_RO | 获取BitMap中bit数组,并以十进制形式返回 |
| BITOP | 将多个BitMap的结果做位运算(与 、或、异或) |
| BITPOS | 查找bit数组中指定范围内第一个0或1出现的位置 |
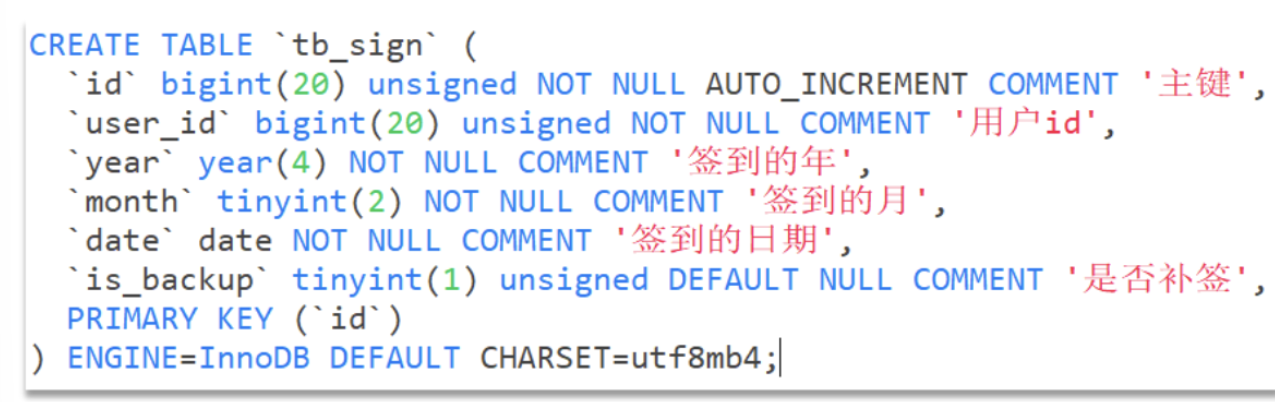
4.2 实现签到功能
要实现签到接口,将当前用户当天的签到信息存储到 Redis 中,可采用以下方案:
使用年月作为 Bitmap 的键,将签到信息存储在 Bitmap 中。每次签到时,将对应位置的值从 0 改为 1,表示该天已签到;若值为 0,则表示未签到。
虽然接口未传递日期参数,但后端代码可通过系统时间自动获取当前日期,据此确定签到的具体日期,并更新 Redis 中相应的位置。这样无需前端传递日期参数,直接在后端处理即可。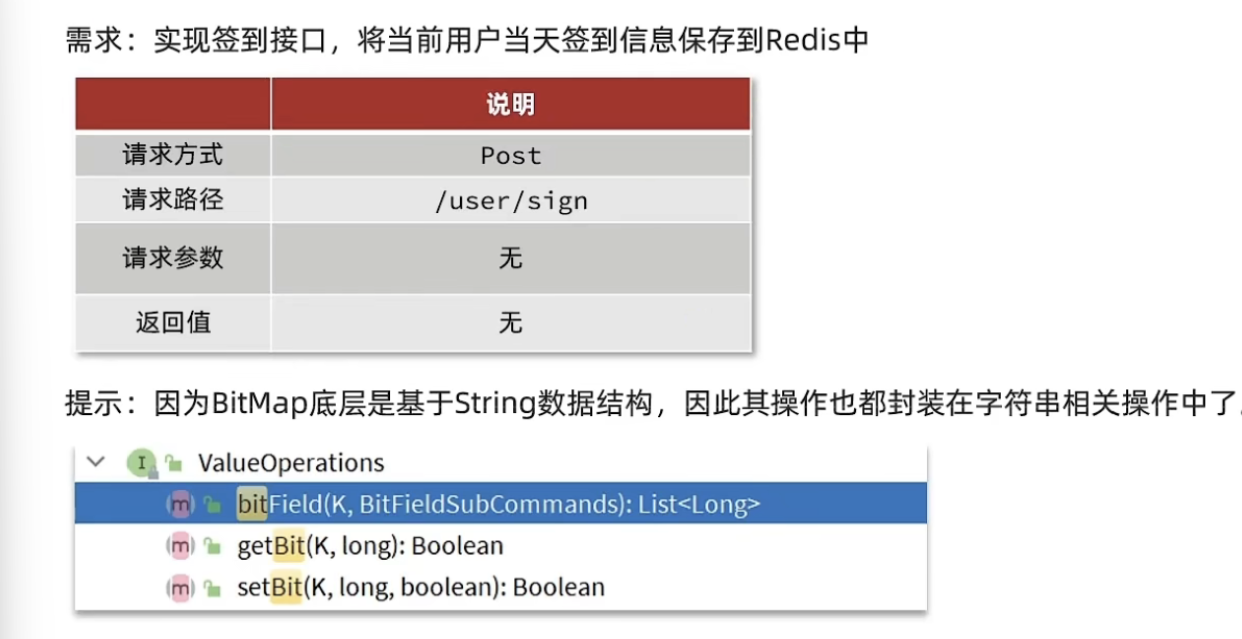 UserController
@PostMapping("/sign")public Result sign(){return userService.sign();}UserServiceImpl
@Override
public Result sign() {// 1.获取当前登录用户Long userId = UserHolder.getUser().getId();// 2.获取日期LocalDateTime now = LocalDateTime.now();// 3.拼接keyString keySuffix = now.format(DateTimeFormatter.ofPattern(":yyyyMM"));String key = USER_SIGN_KEY + userId + keySuffix;// 4.获取今天是本月的第几天int dayOfMonth = now.getDayOfMonth();// 5.写入Redis SETBIT key offset 1stringRedisTemplate.opsForValue().setBit(key, dayOfMonth - 1, true);return Result.ok();
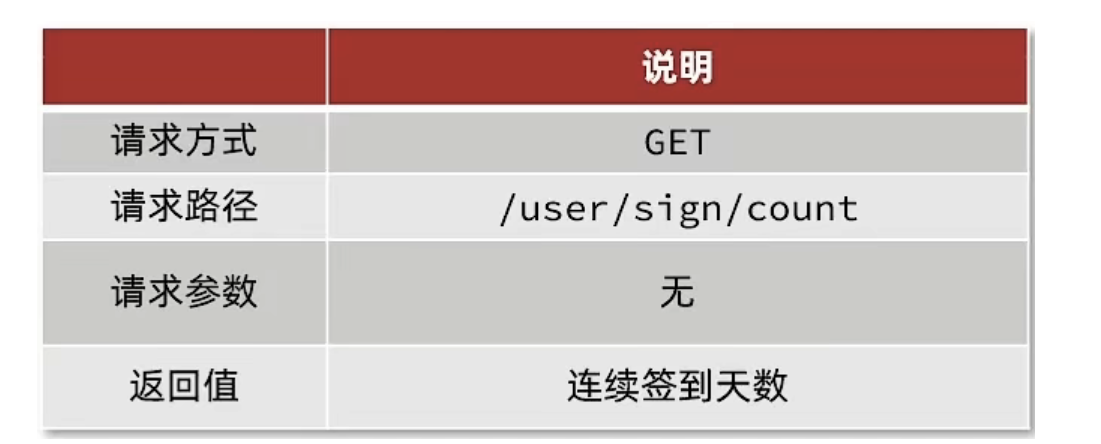
}4.3 签到统计
问题1:连续签到天数的定义
连续签到天数是指从最后一次签到的那一天开始,往前数直到遇到第一次未签到的那一天为止,这中间签到的总天数。要统计当前用户在本月的连续签到天数,可以按照以下步骤进行:
1. 获取当前用户本月的签到数据:
- 使用 Redis 的 BITFIELD 命令获取从月初到当前日期的所有签到记录。
- 假设今天是10号,那么获取1号到10号的签到数据。
2. 定义一个计数器:
- 初始化一个计数器 count 为0,用于记录连续签到的天数。
3. 从当前日期向前遍历:
- 从当前日期开始,逐天检查签到记录,直到遇到未签到的那一天为止。
- 每遇到一个签到的记录(即该位为1),计数器加1。
4.. 返回计数器的值:
- 最终计数器的值即为连续签到天数。
问题2:如何得到本月到今天为止的所有签到数据
使用 Redis 的
BITFIELD命令获取从月初到当前日期的所有签到记录(统计1的个数)
问题3:如何从后向前遍历每个bit位
1. 获取签到记录:
- 使用 BITFIELD 命令获取签到记录,结果是一个十进制数字。
- 假设返回的数字是 num。
2. 遍历每一位:
- 从最低位开始,逐位检查是否为1。
- 使用位运算 num & 1 检查最低位是否为1。
- 如果为1,计数器加1,并右移一位继续检查下一个位。
- 如果为0,结束循环。
 UserController
@GetMapping("/sign/count")
public Result signCount(){return userService.signCount();
}
UserServiceImpl
@Override
public Result signCount() {// 1.获取当前登录用户Long userId = UserHolder.getUser().getId();// 2.获取日期LocalDateTime now = LocalDateTime.now();// 3.拼接keyString keySuffix = now.format(DateTimeFormatter.ofPattern(":yyyyMM"));String key = USER_SIGN_KEY + userId + keySuffix;// 4.获取今天是本月的第几天int dayOfMonth = now.getDayOfMonth();// 5.获取本月截止今天为止的所有的签到记录,返回的是一个十进制的数字 BITFIELD sign:5:202203 GET u14 0List<Long> result = stringRedisTemplate.opsForValue().bitField(key,BitFieldSubCommands.create().get(BitFieldSubCommands.BitFieldType.unsigned(dayOfMonth)).valueAt(0));if (result == null || result.isEmpty()) {// 没有任何签到结果return Result.ok(0);}Long num = result.get(0);if (num == null || num == 0) {return Result.ok(0);}// 6.循环遍历int count = 0;while (true) {// 6.1.让这个数字与1做与运算,得到数字的最后一个bit位  // 判断这个bit位是否为0if ((num & 1) == 0) {// 如果为0,说明未签到,结束break;}else {// 如果不为0,说明已签到,计数器+1count++;}// 把数字右移一位,抛弃最后一个bit位,继续下一个bit位num >>>= 1;}return Result.ok(count);
}
5.UV统计-HyperLogLog
首先我们搞懂两个概念:
-
UV:全称Unique Visitor,也叫独立访客量,是指通过互联网访问、浏览这个网页的自然人。1天内同一个用户多次访问该网站,只记录1次。
-
PV:全称Page View,也叫页面访问量或点击量,用户每访问网站的一个页面,记录1次PV,用户多次打开页面,则记录多次PV。往往用来衡量网站的流量。
通常来说UV会比PV大很多,所以衡量同一个网站的访问量,我们需要综合考虑很多因素,所以我们只是单纯的把这两个值作为一个参考值
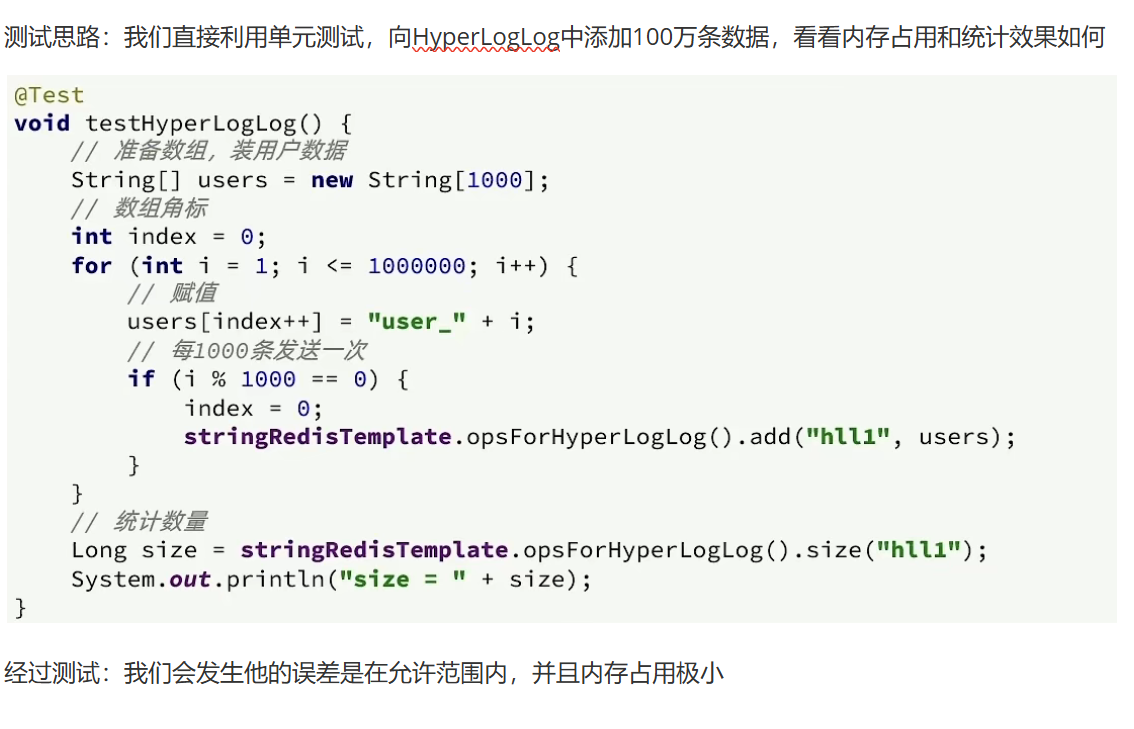
UV统计在服务端做会比较麻烦,因为要判断该用户是否已经统计过了,需要将统计过的用户信息保存。但是如果每个访问的用户都保存到Redis中,数据量会非常恐怖,那怎么处理呢?
Hyperloglog(HLL)是从Loglog算法派生的概率算法,用于确定非常大的集合的基数,而不需要存储其所有值。相关算法原理大家可以参考:https://juejin.cn/post/6844903785744056333#heading-0 Redis中的HLL是基于string结构实现的,单个HLL的内存永远小于16kb,内存占用低的令人发指!作为代价,其测量结果是概率性的,有小于0.81%的误差。不过对于UV统计来说,这完全可以忽略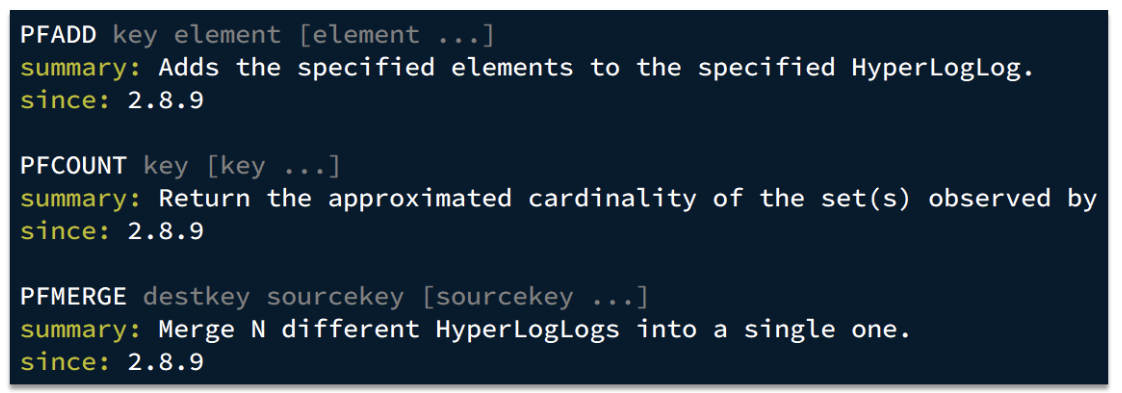
总结:
实战篇到此结束!!!!!!!