AWS实现S3配置私钥以及上传
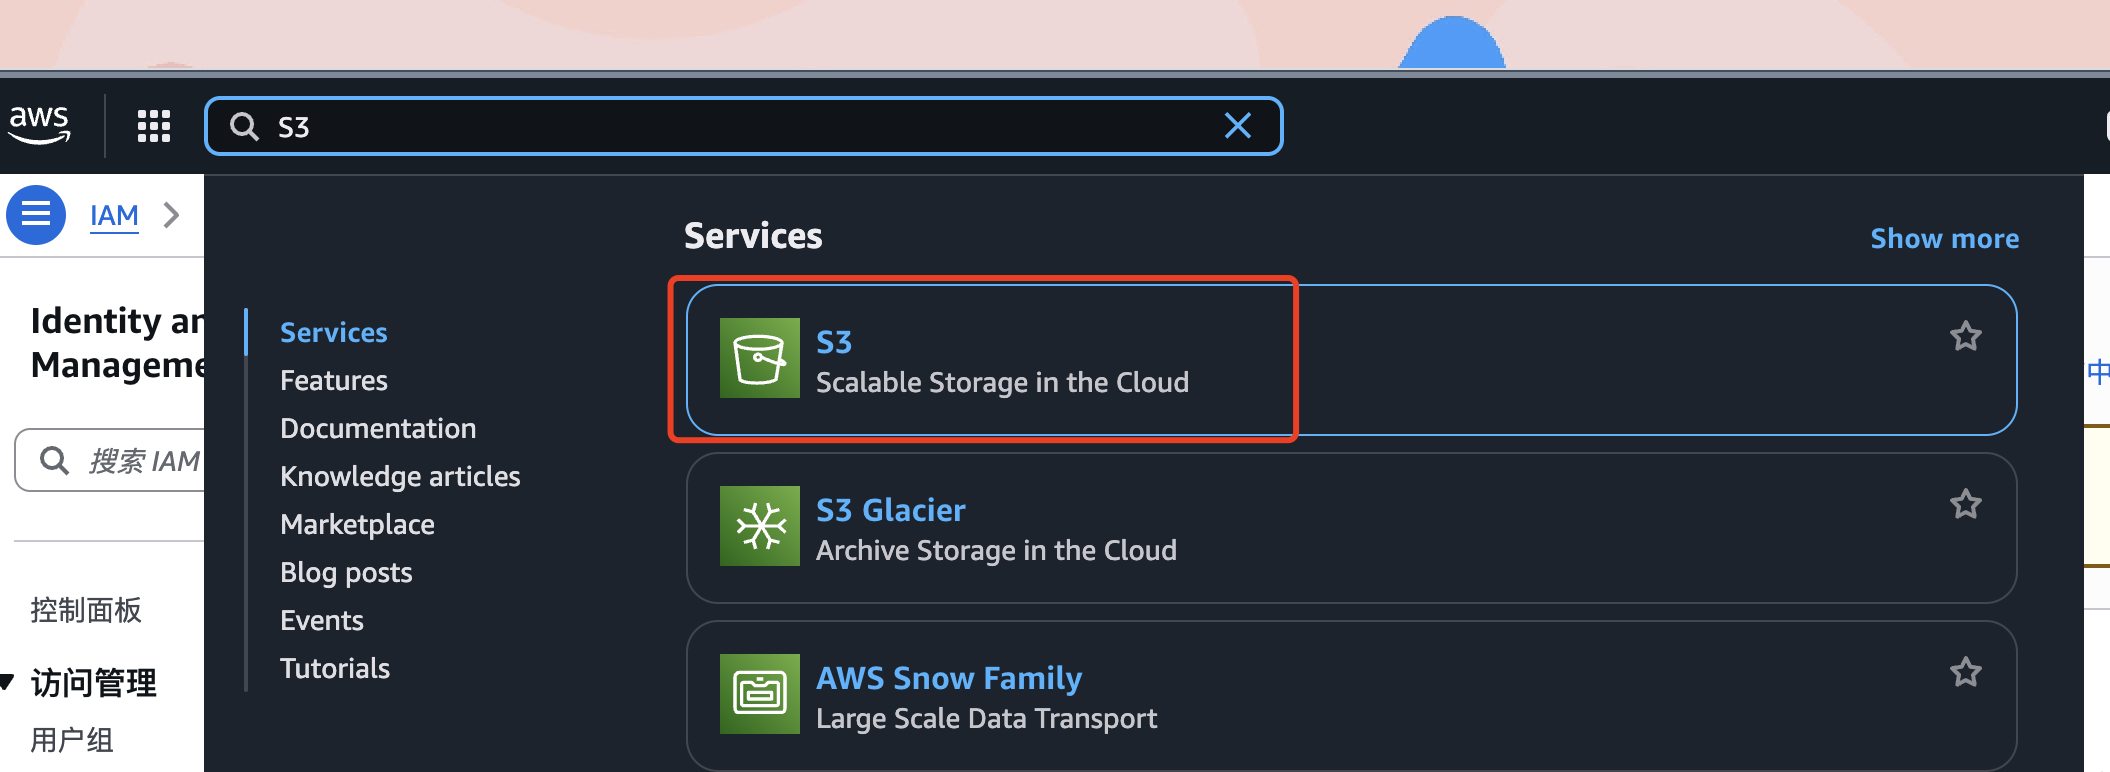
1、首先登录到亚马逊控制台,在上面搜索S3服务。
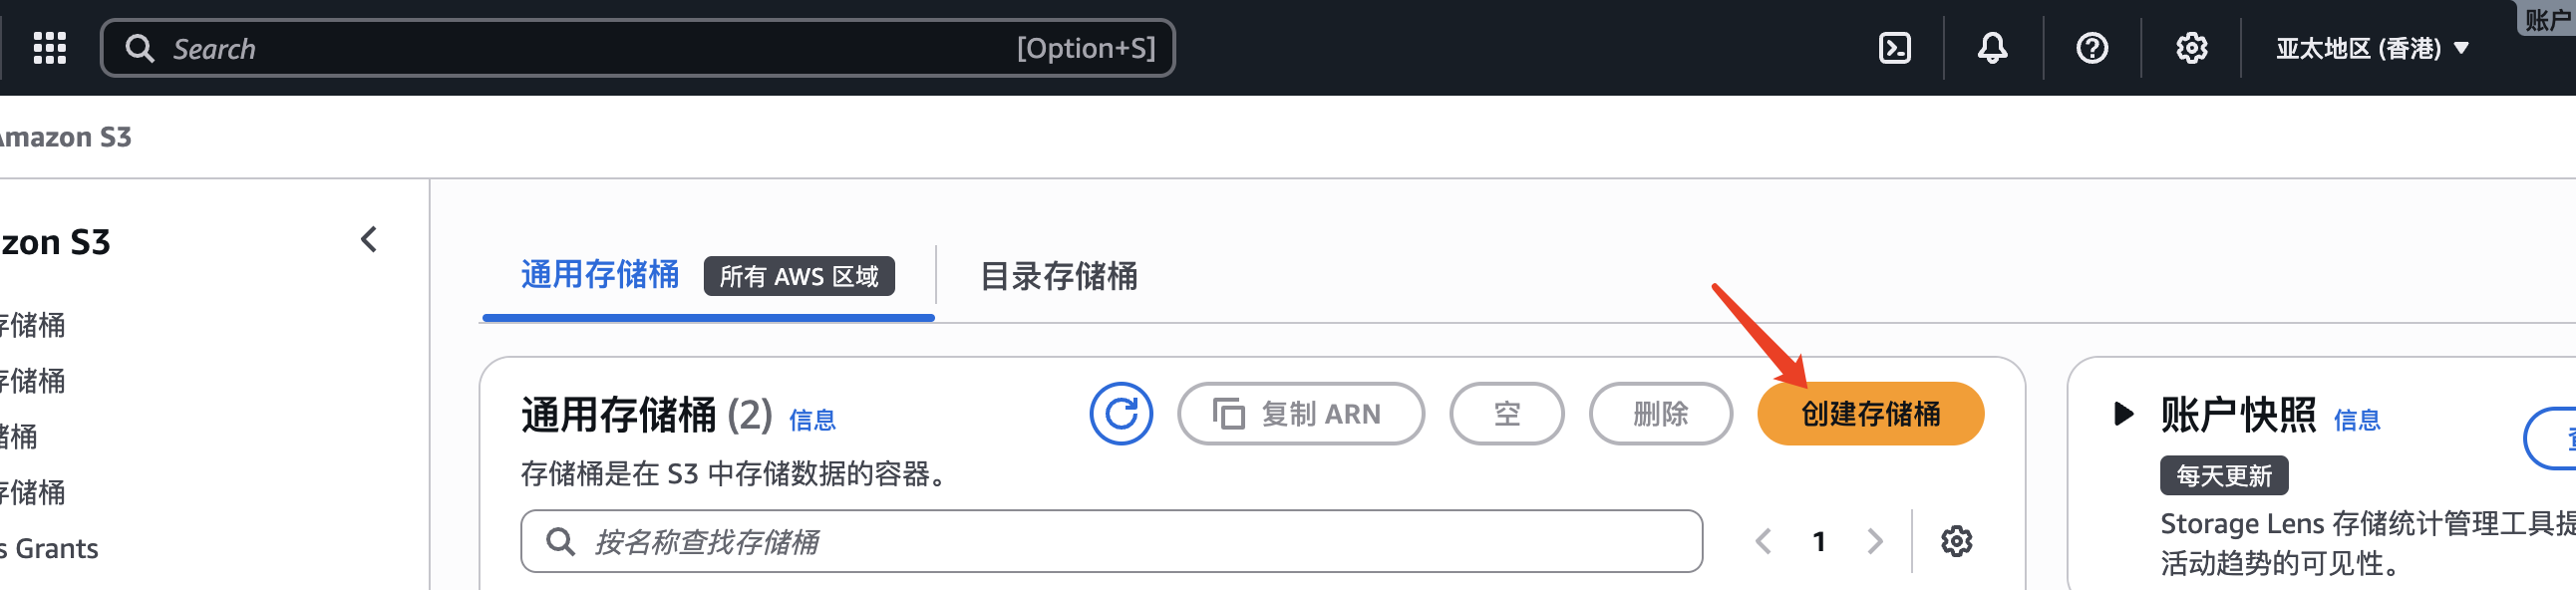
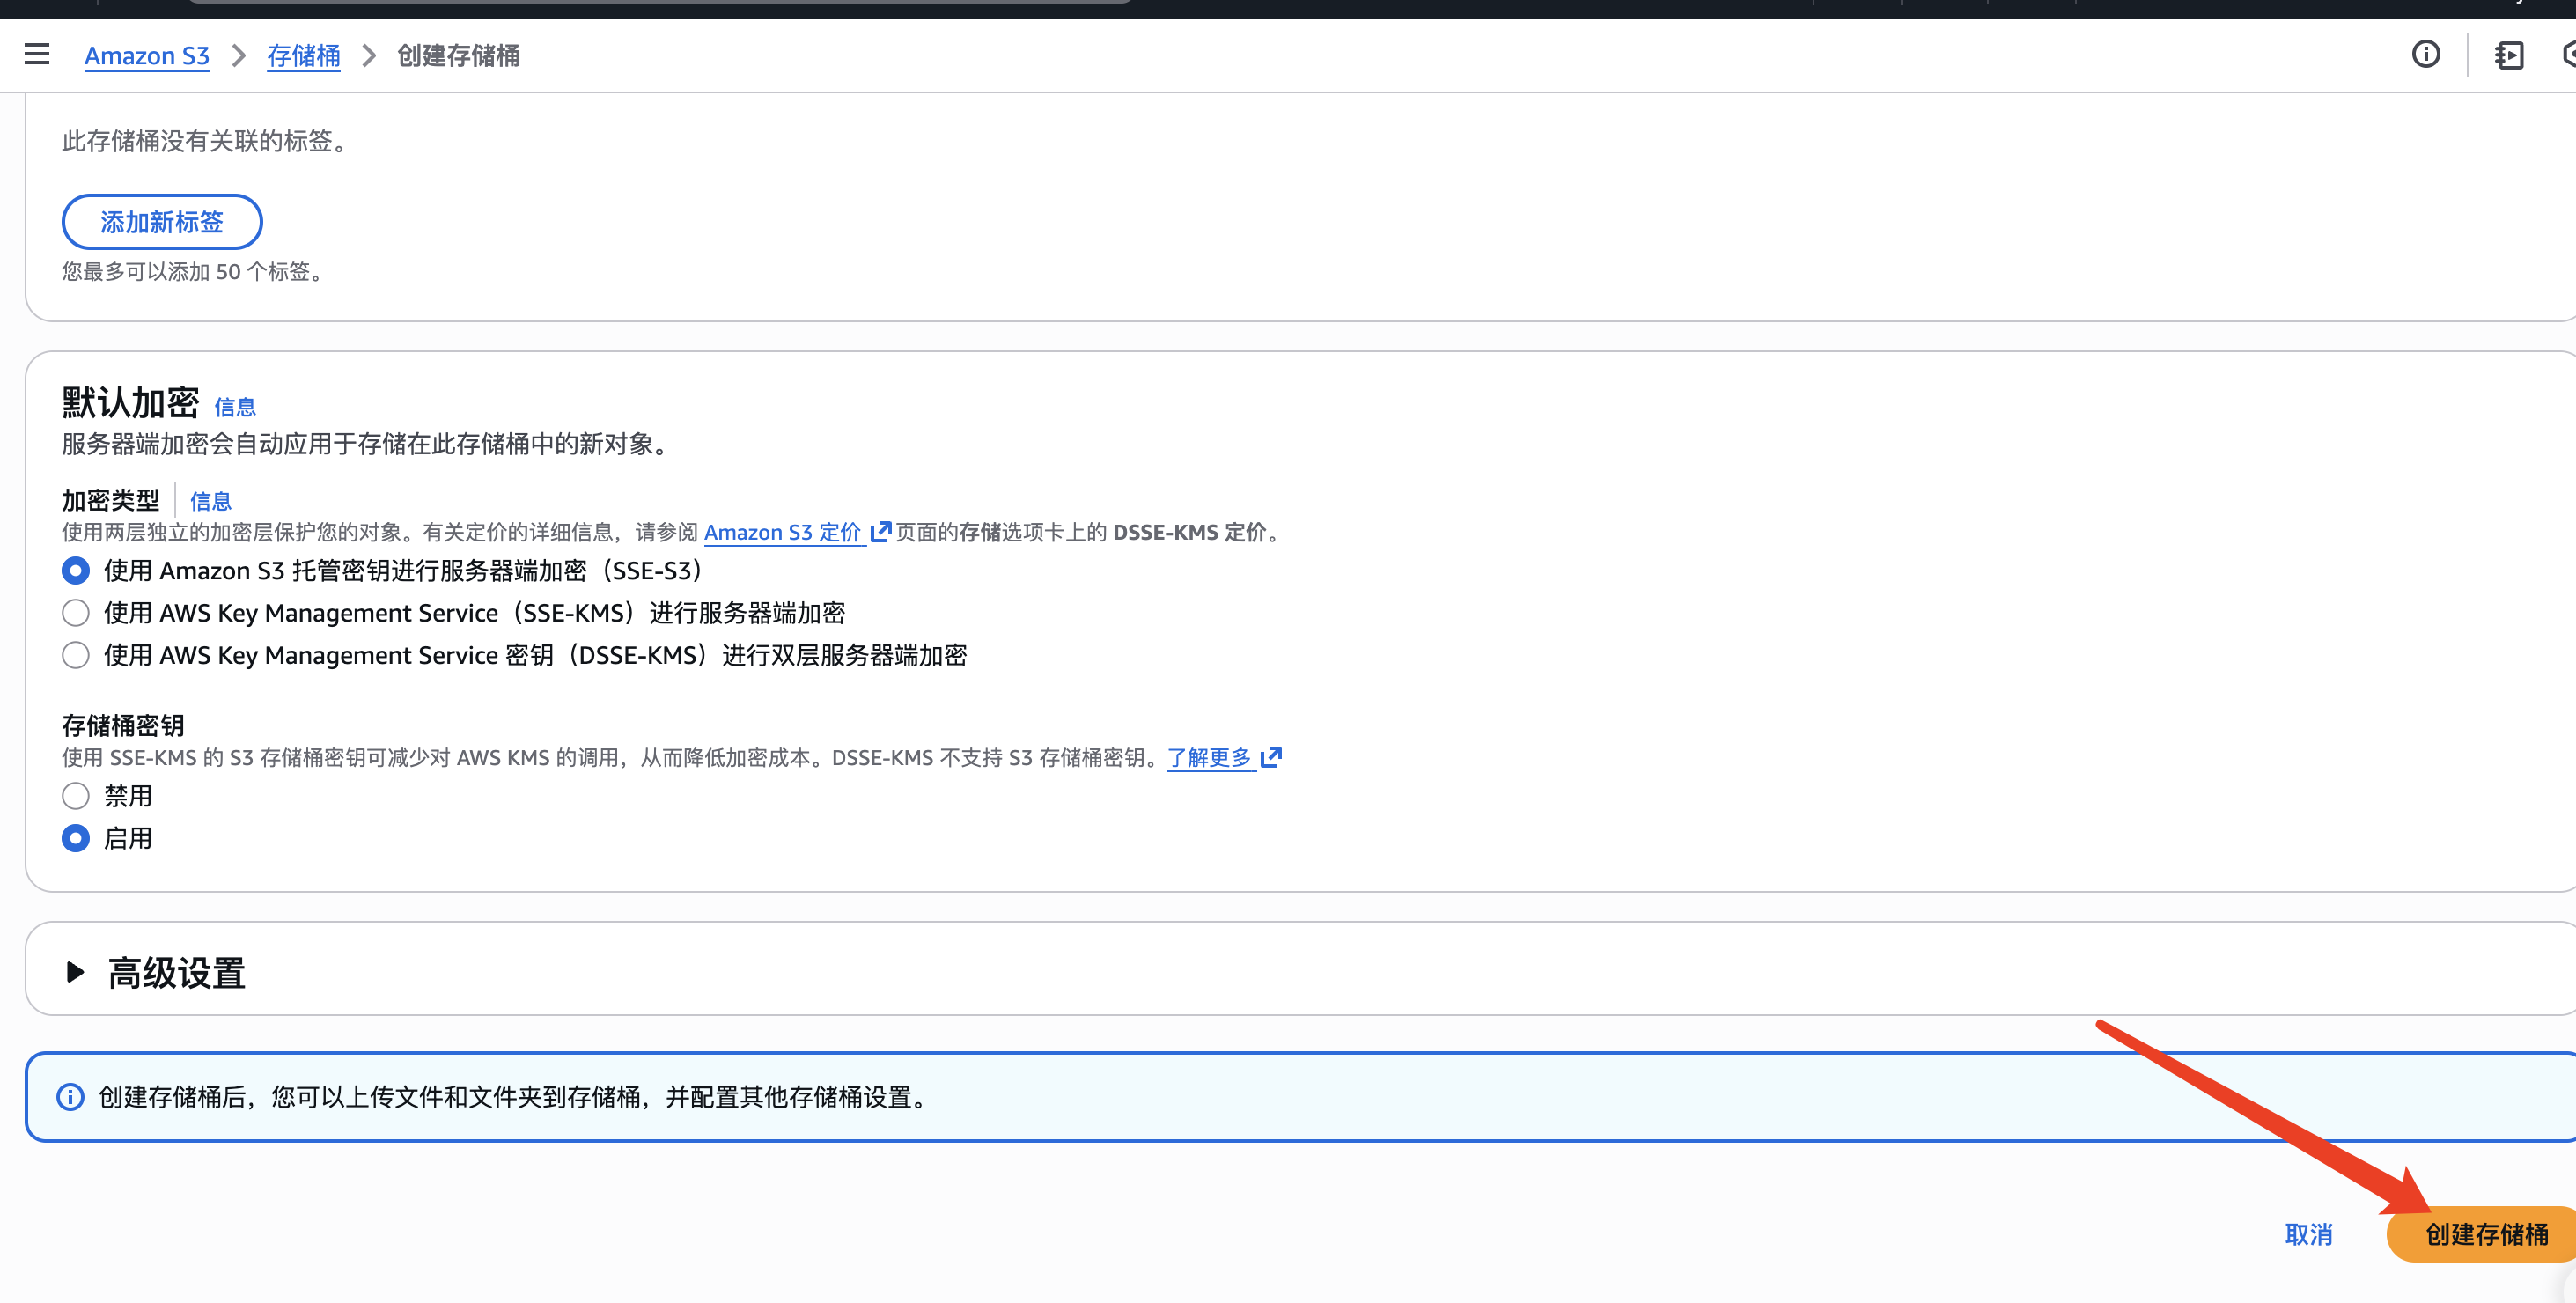
2、创建对象涌,取个名字,然后其他全部用默认的就直接创建就好了。
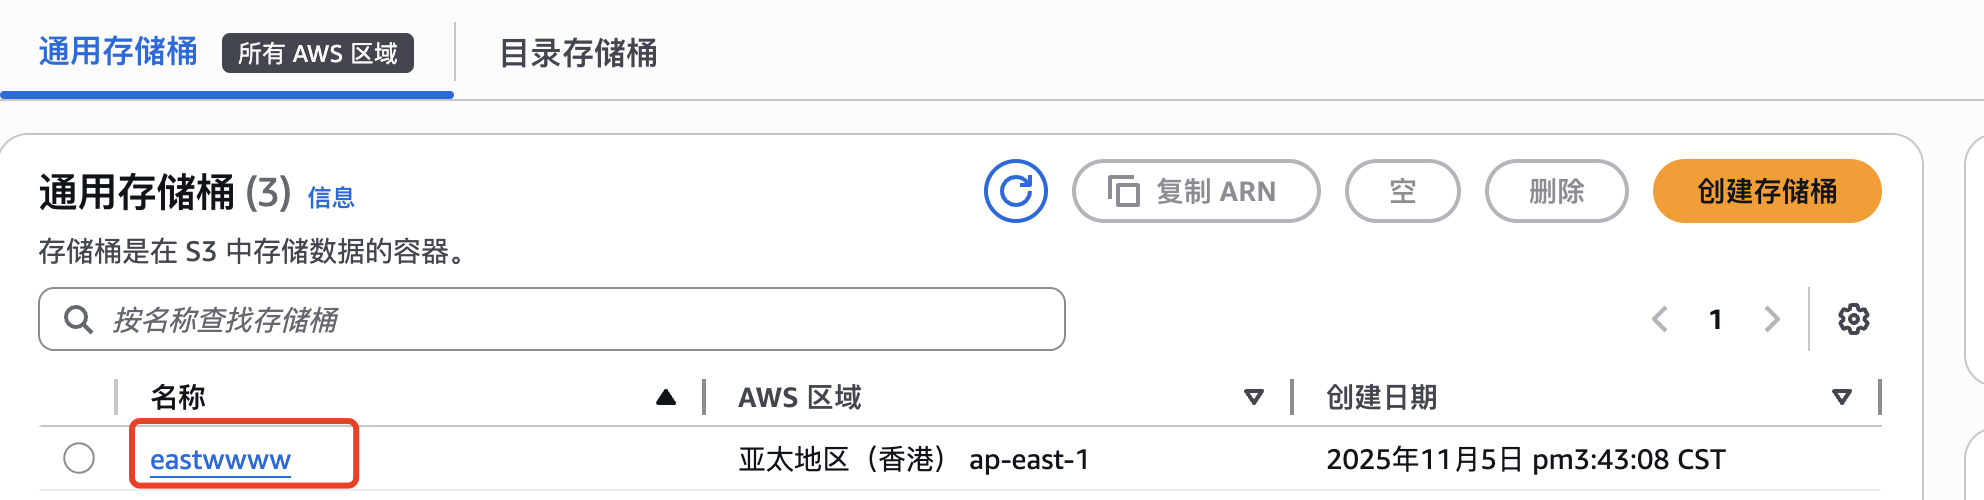
3:创建成功,我们在桶里面创建一个文件夹,叫filetest吧,还要注意一下这里的AWS区域,等会配置用的到,咱们这里的是香港 ap-east-1.
4:在权限里面配置策略

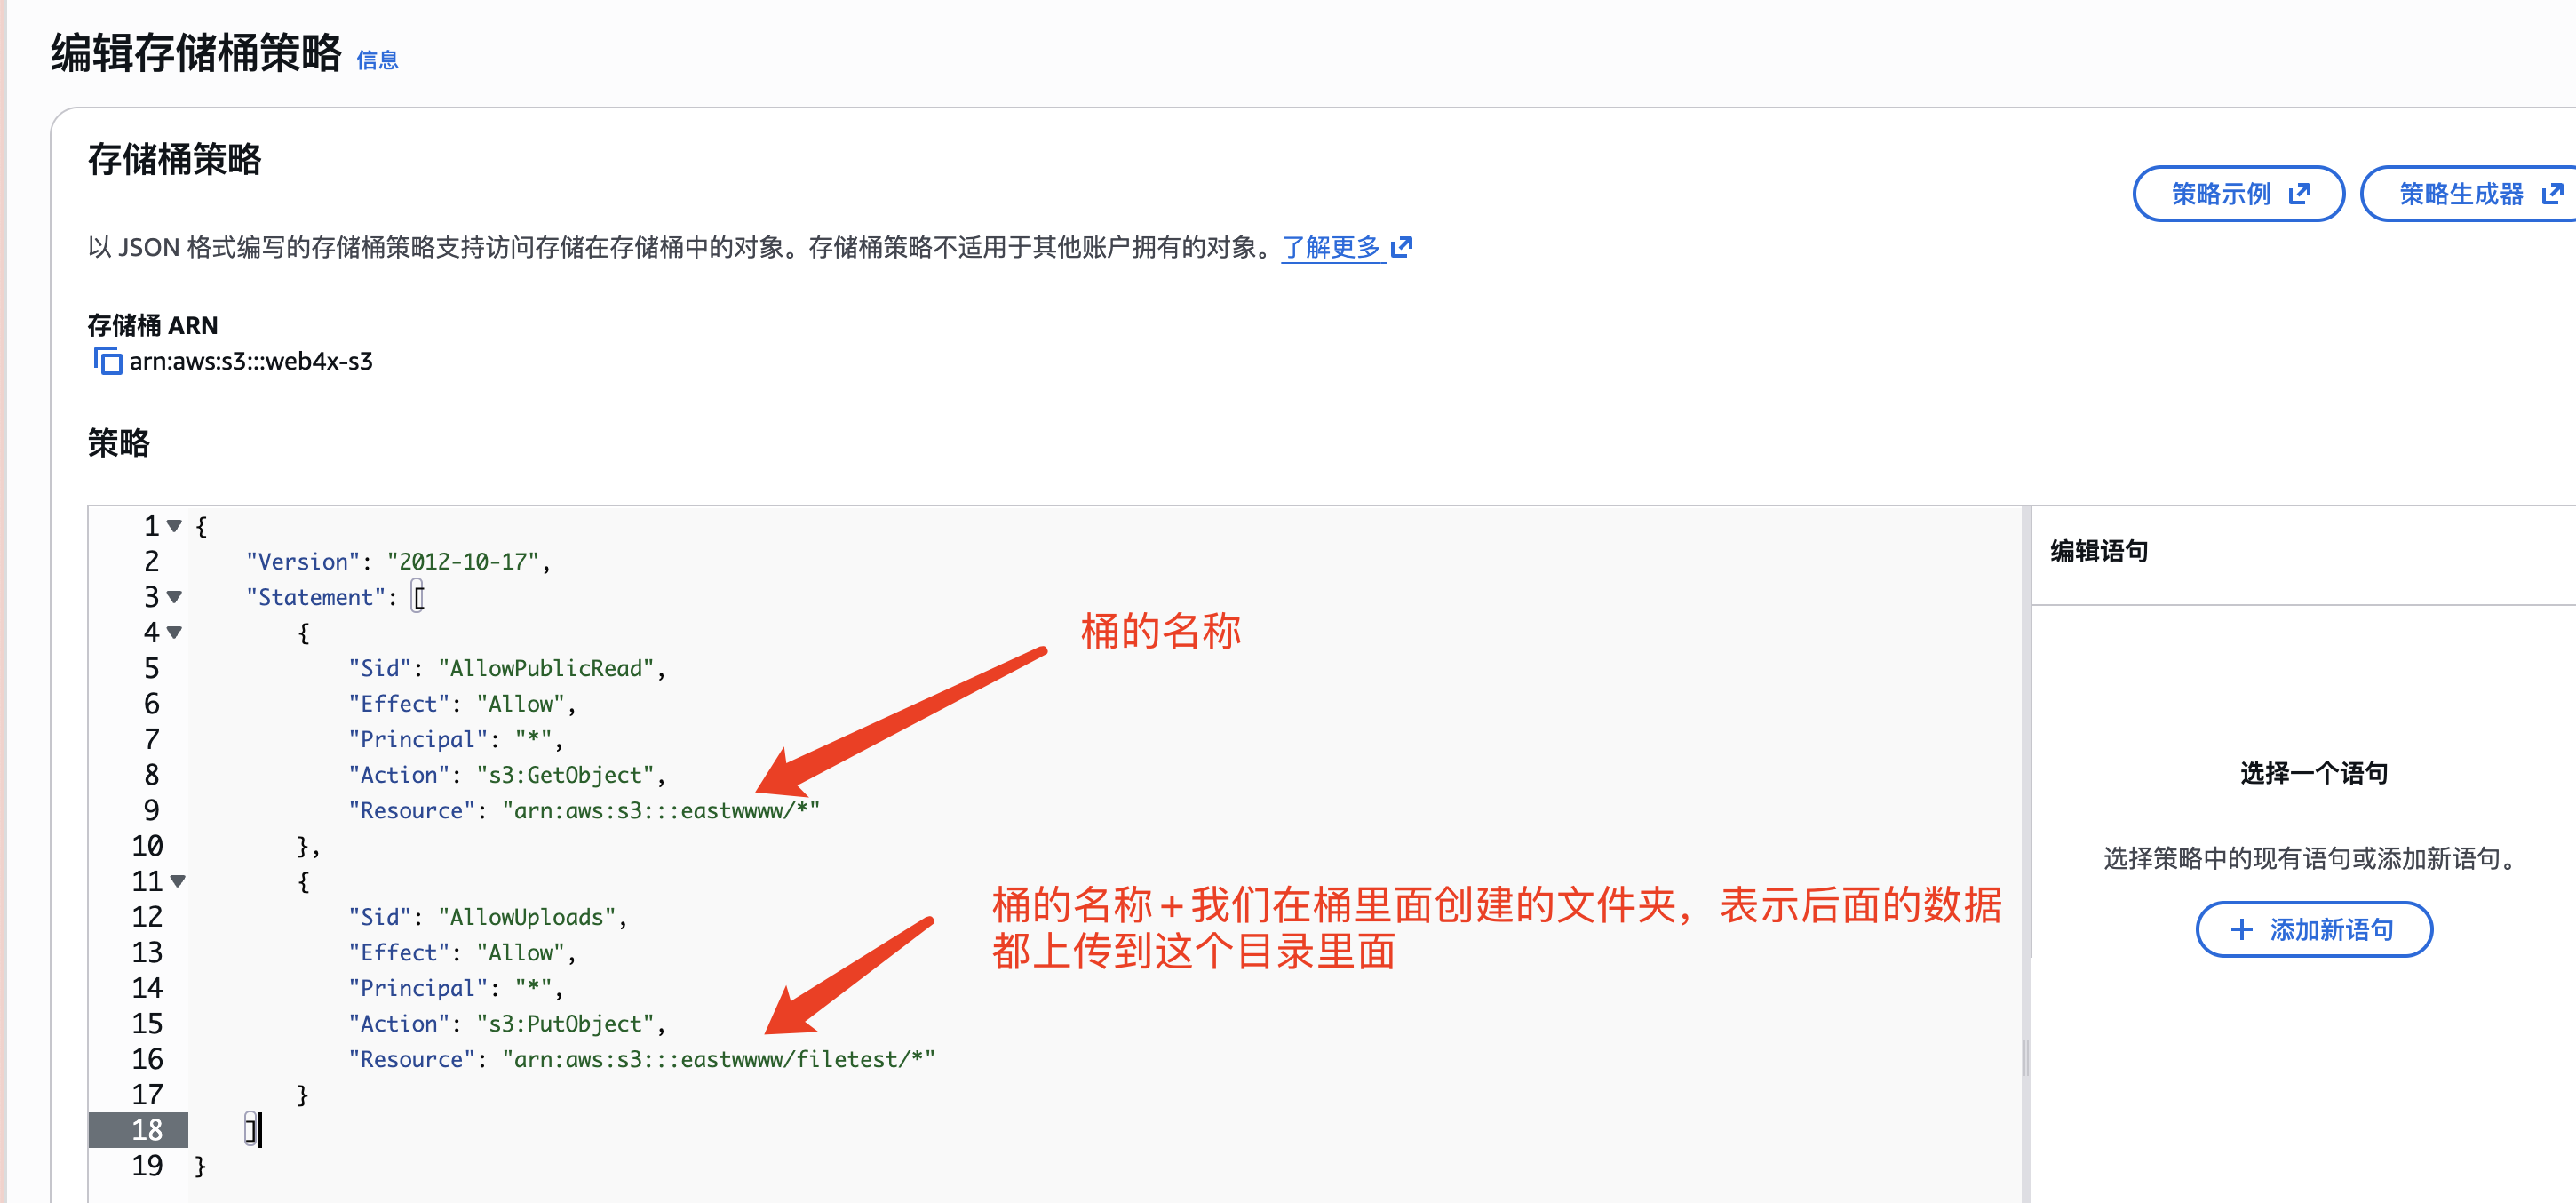
{"Version": "2012-10-17","Statement": [{"Sid": "AllowPublicRead","Effect": "Allow","Principal": "*","Action": "s3:GetObject","Resource": "arn:aws:s3:::桶的名称/*"},{"Sid": "AllowUploads","Effect": "Allow","Principal": "*","Action": "s3:PutObject","Resource": "arn:aws:s3:::桶的名称/文件夹目录/*"}]
}
5:策略配置完成以后往下拉,然后配置跨源资源共享(CORS)
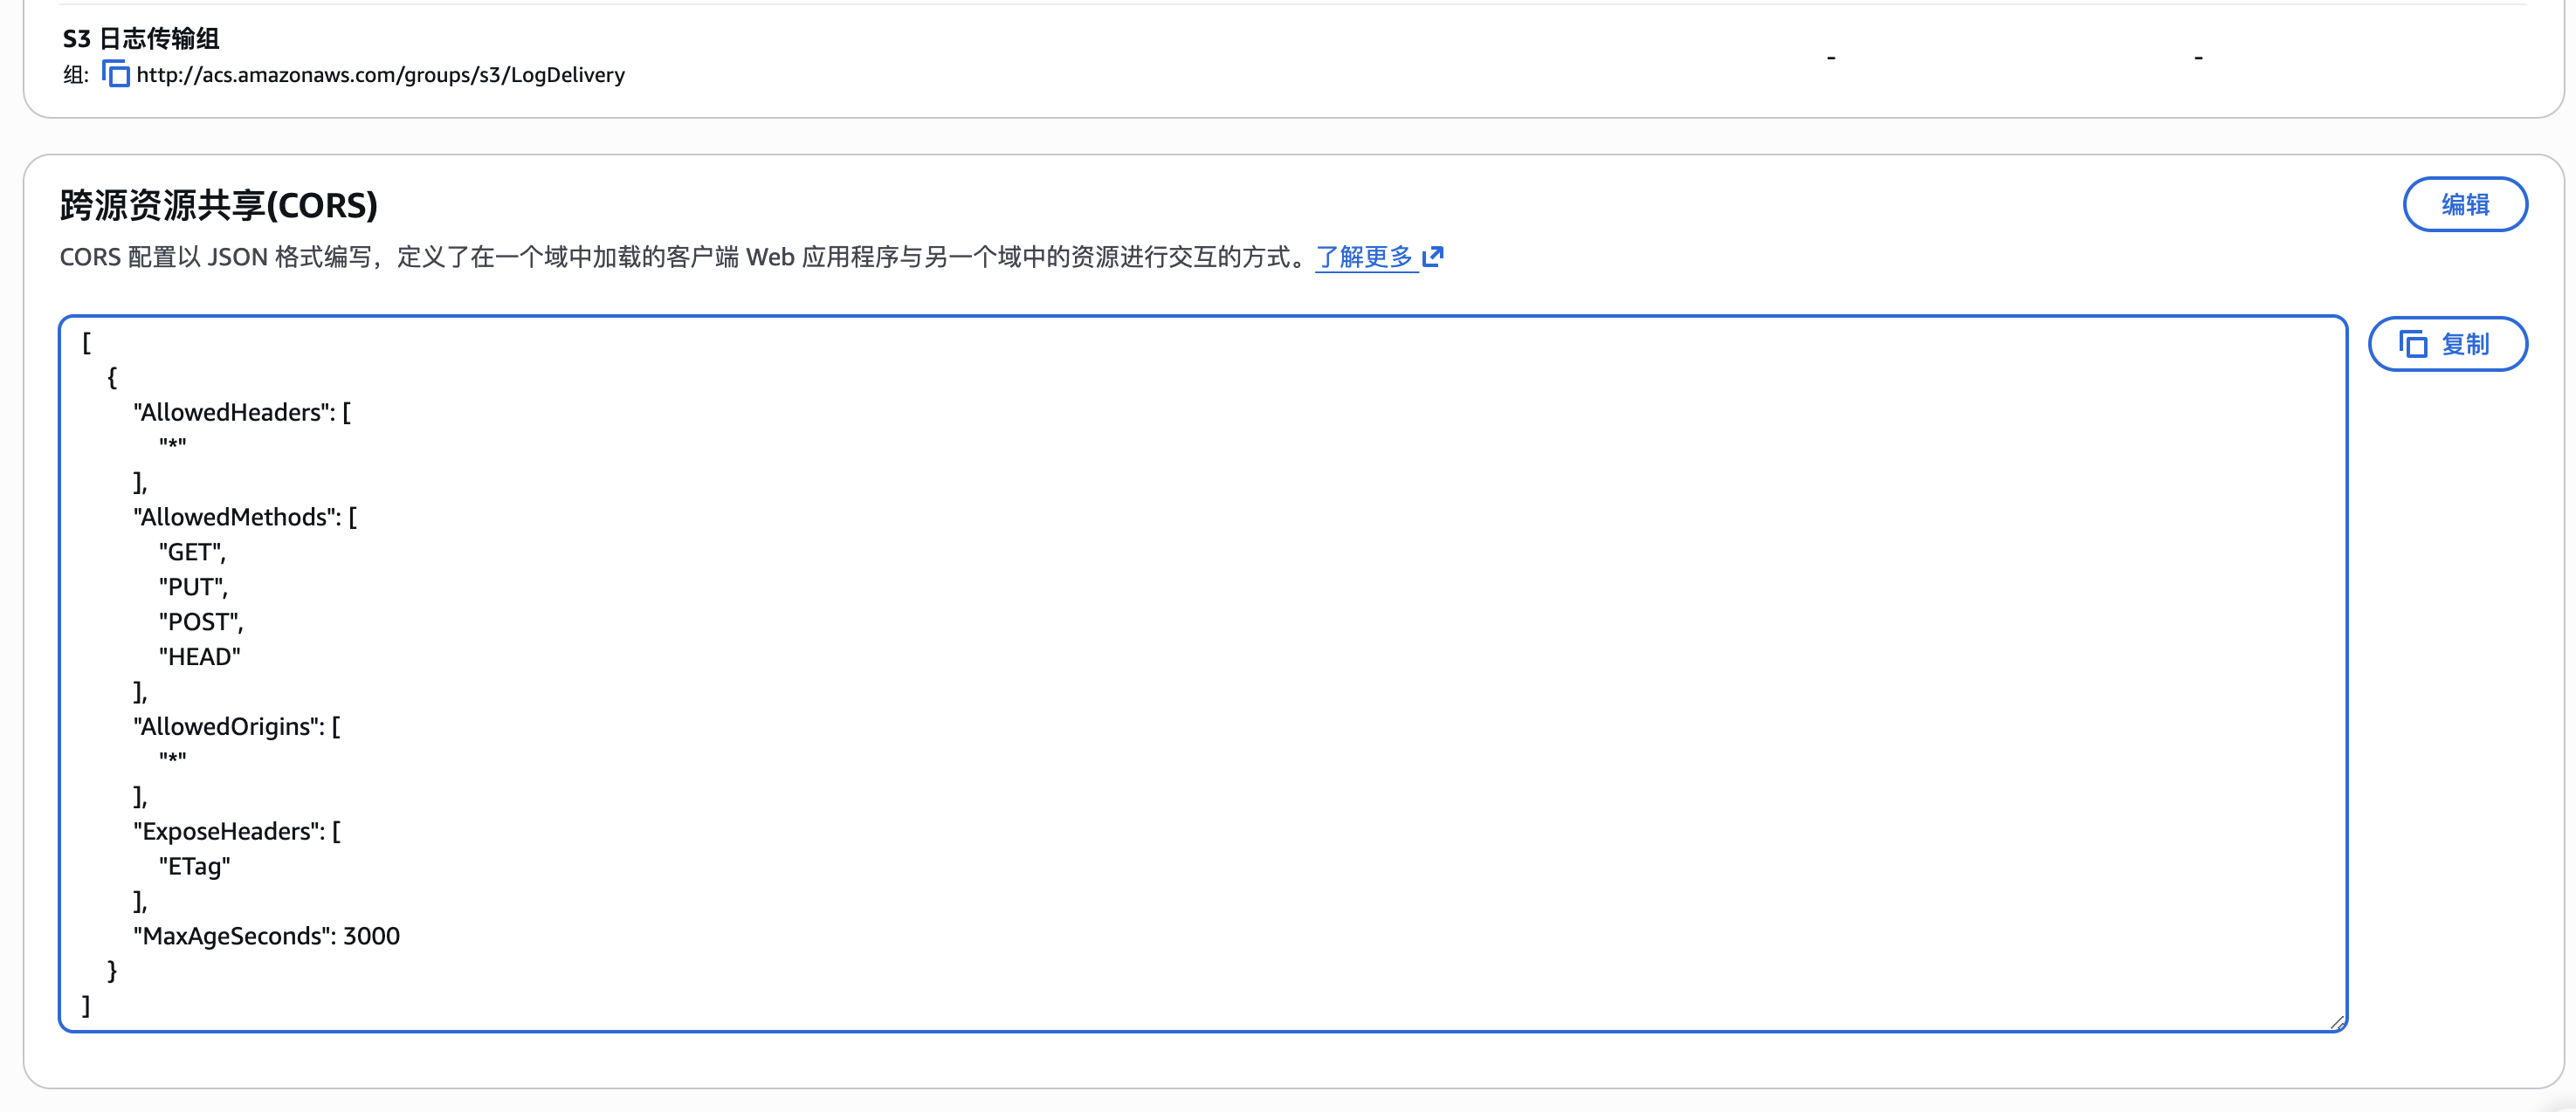
[{"AllowedHeaders": ["*"],"AllowedMethods": ["GET","PUT","POST","HEAD"],"AllowedOrigins": ["*"],"ExposeHeaders": ["ETag"],"MaxAgeSeconds": 3000}
]
GET = ✅ 允许查看
别人可以从你的 S3 读取文件
比如:在网页上显示你存的图片
PUT = ✅ 允许上传/修改
别人可以上传新文件到你的 S3
比如:用户上传头像到你的网站
POST = ✅ 允许提交
别人可以通过表单提交文件
比如:网页表单直接上传到 S3
HEAD = ✅ 允许查看信息
别人可以查看文件基本信息(不下载内容)
比如:检查文件大小、类型
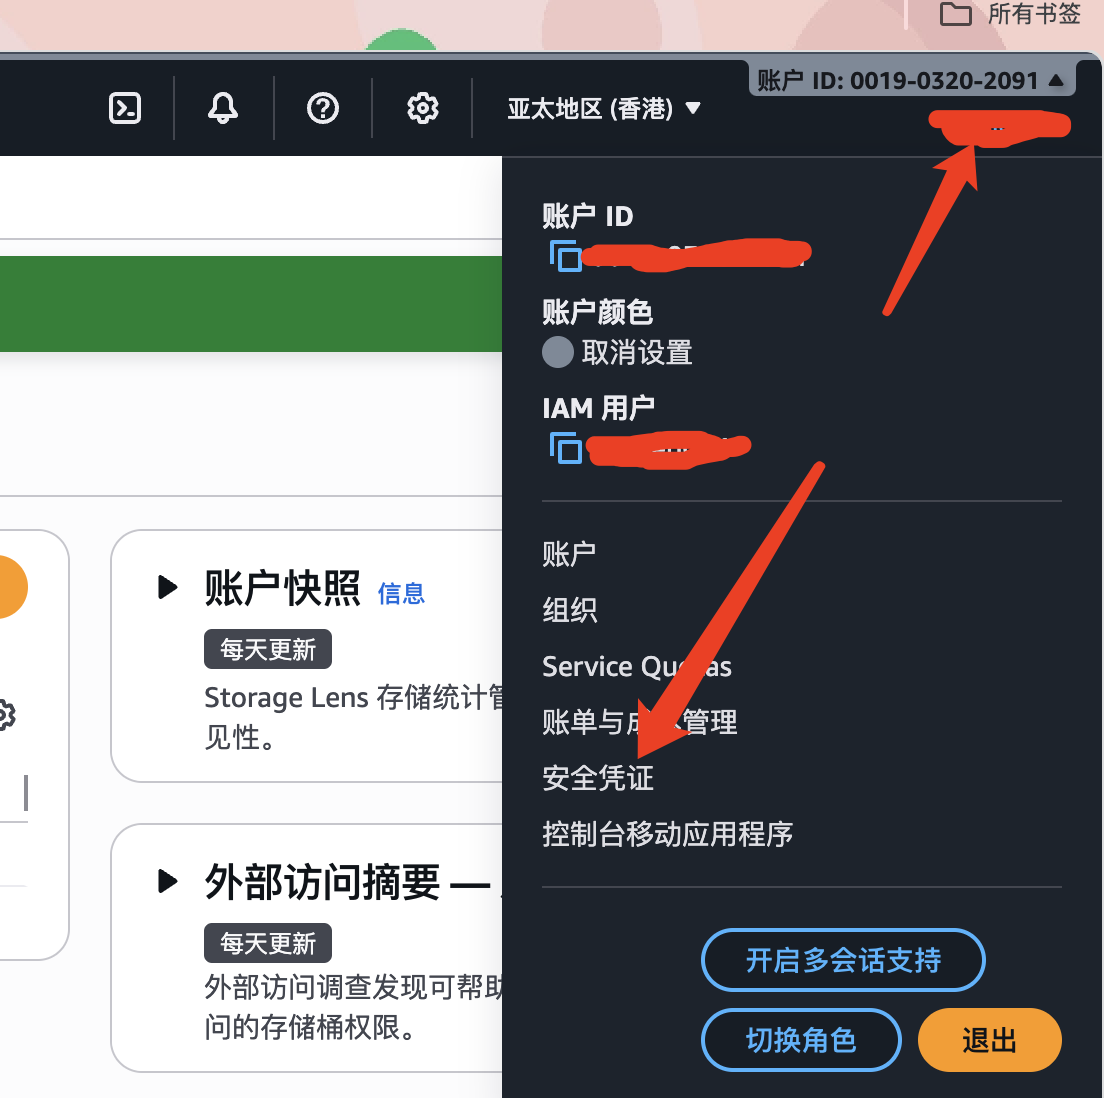
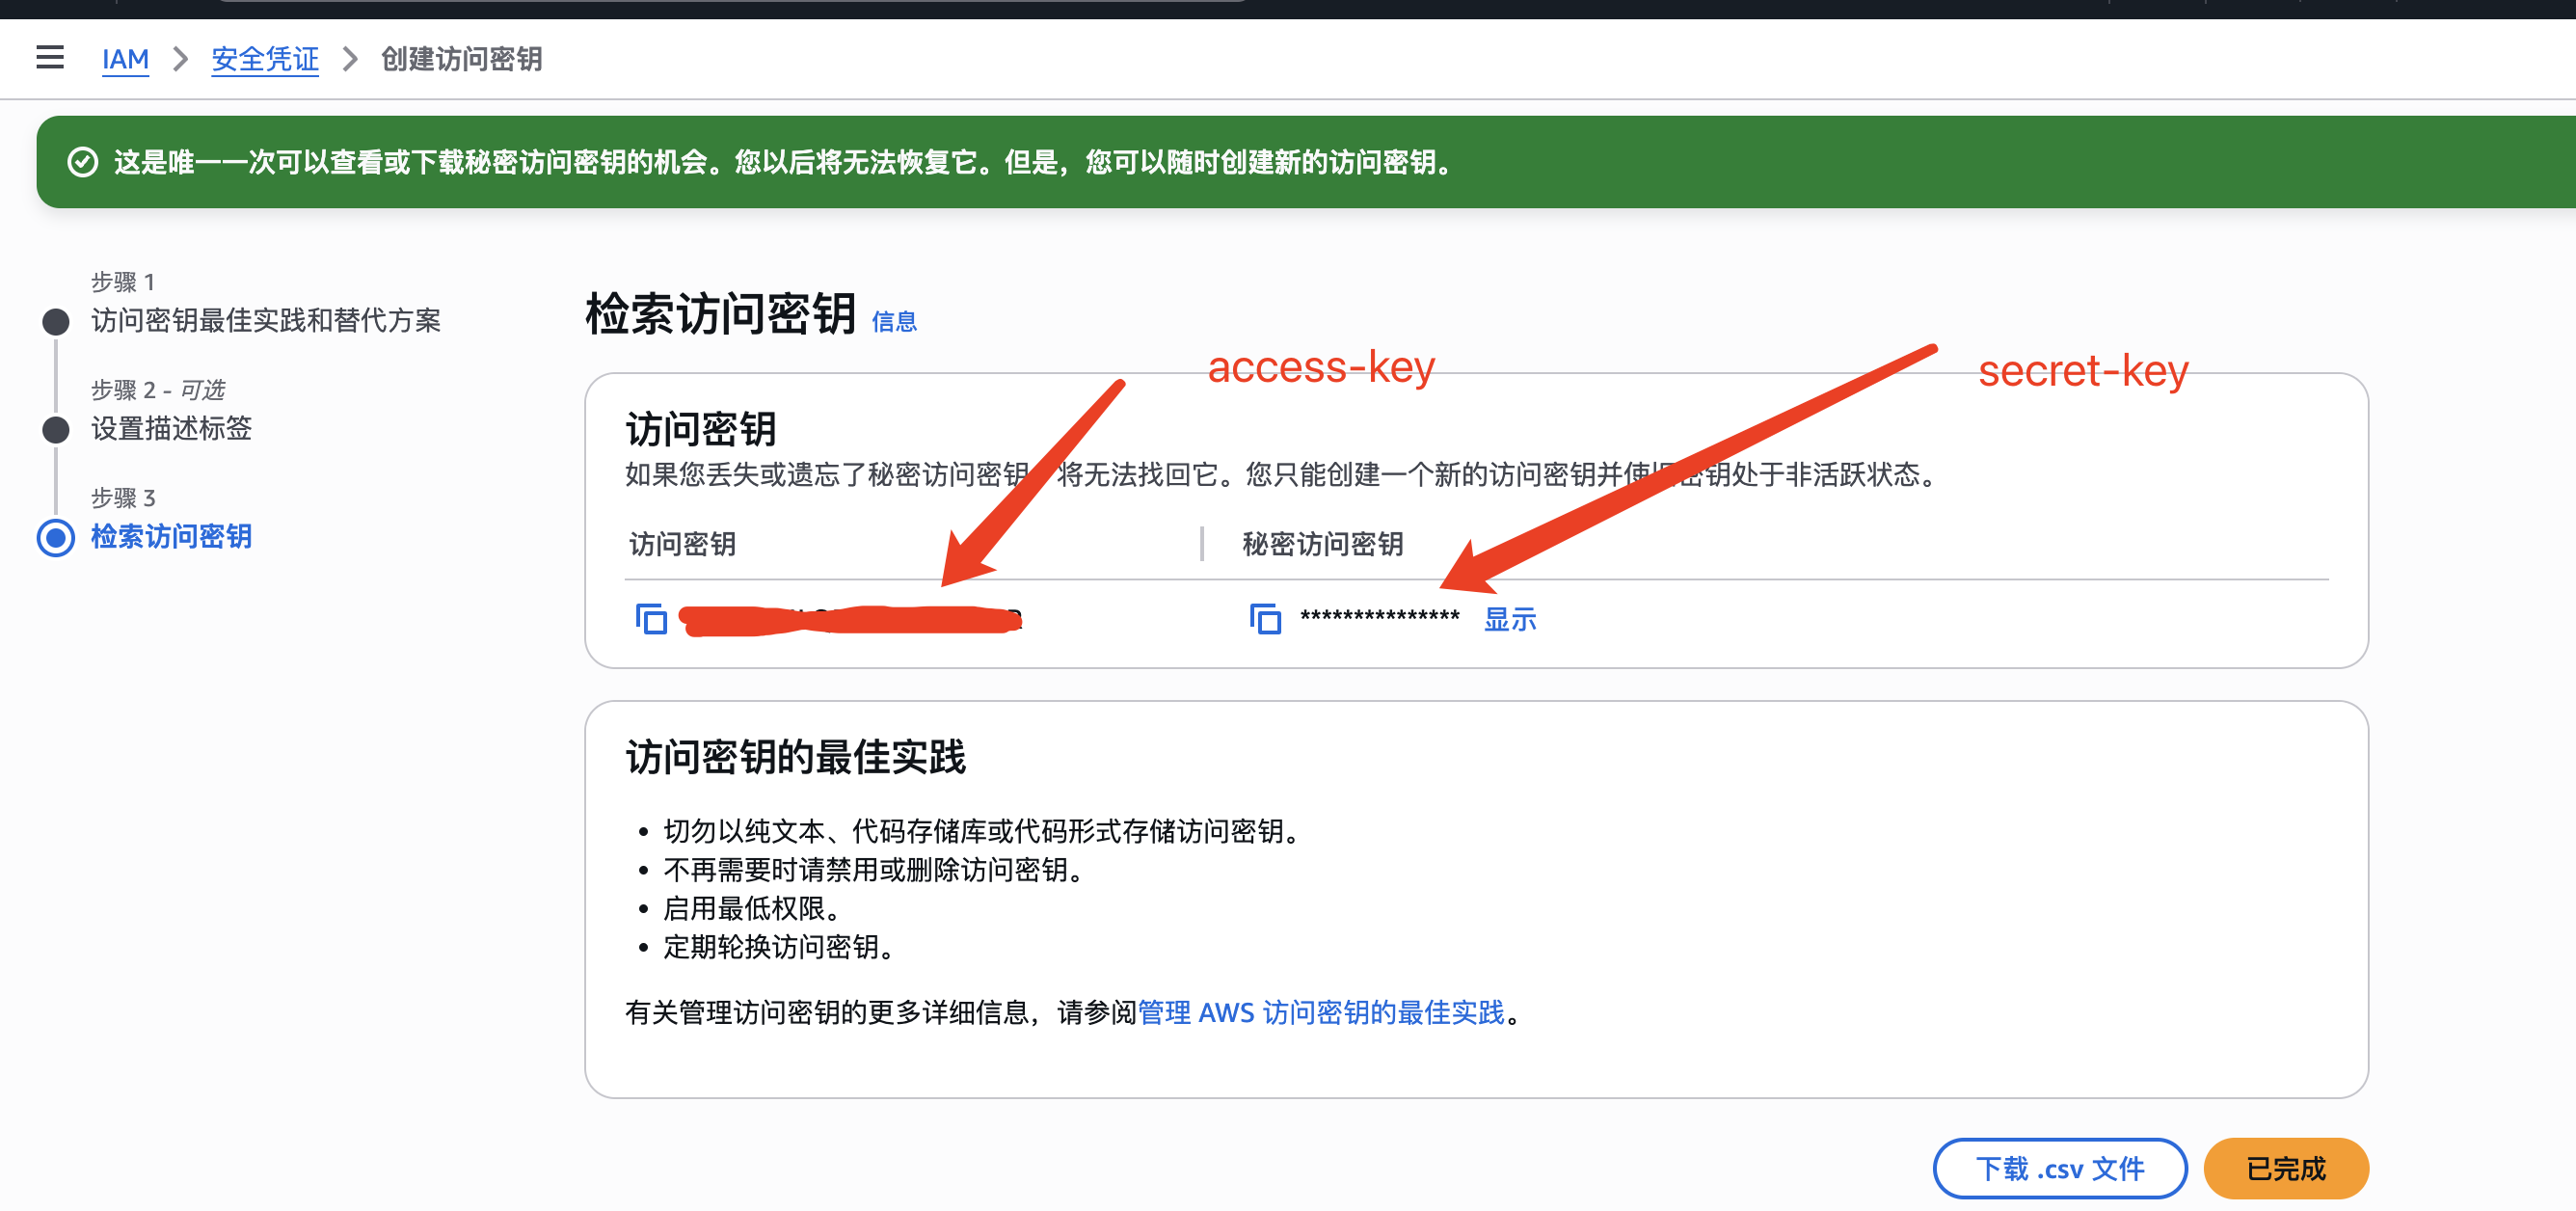
6:创建访问密钥,点击右上角用户名,选择安全凭证。创建访问密码。
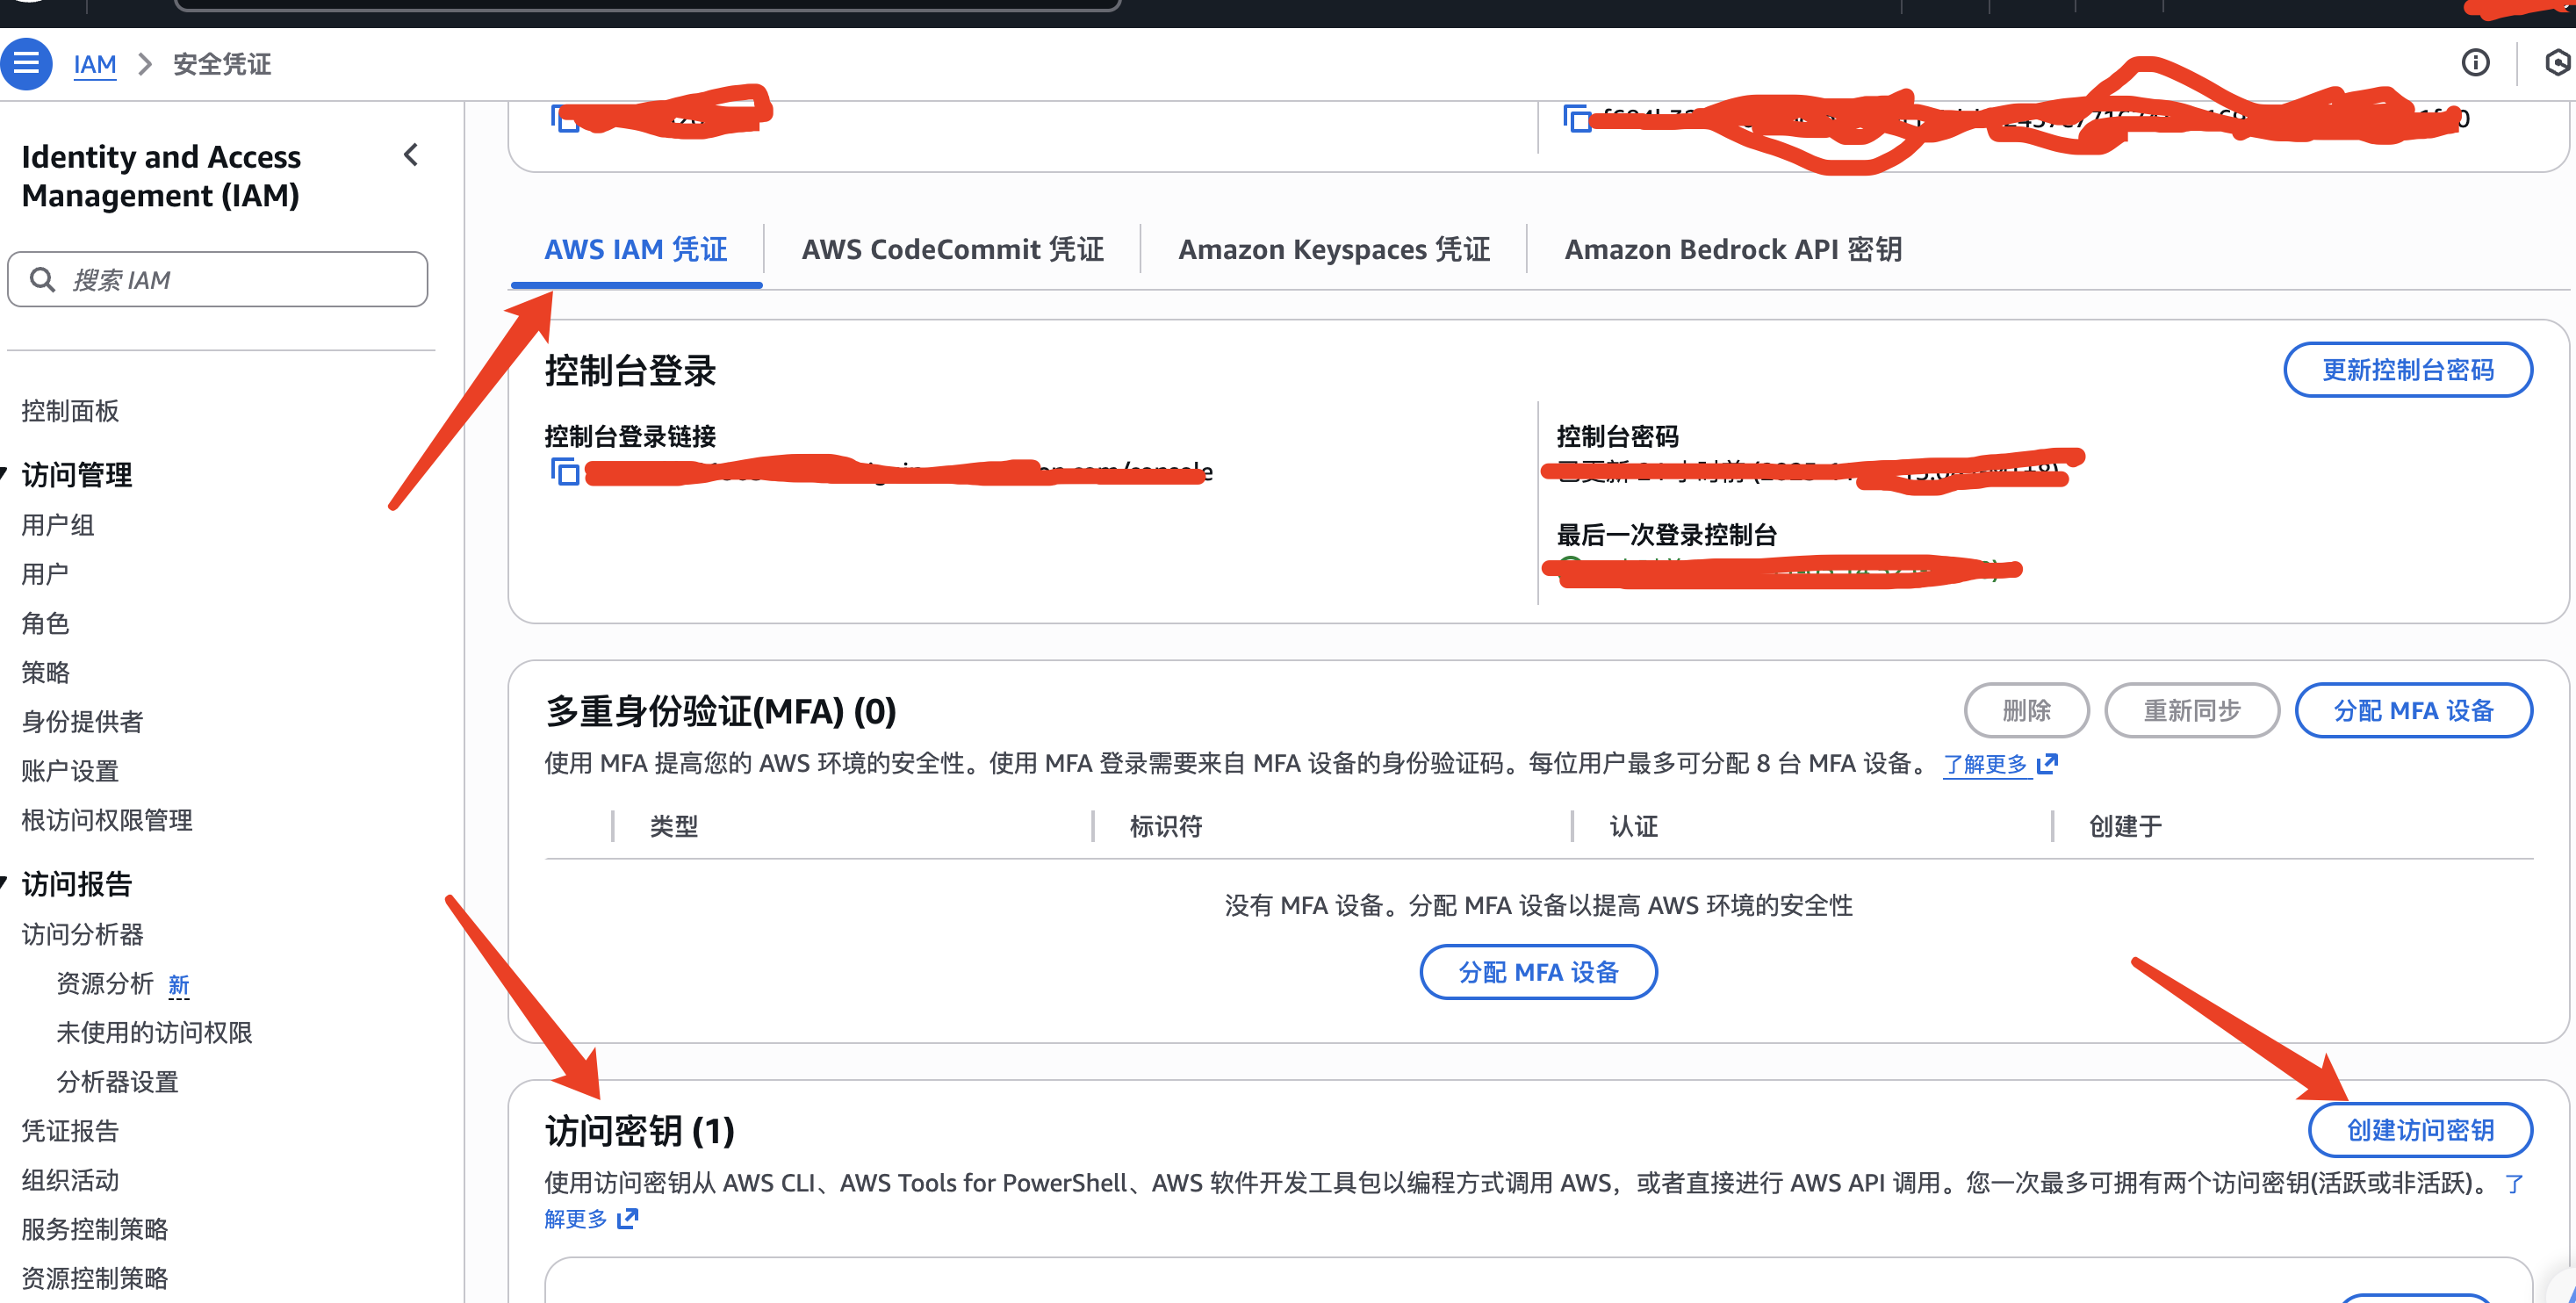
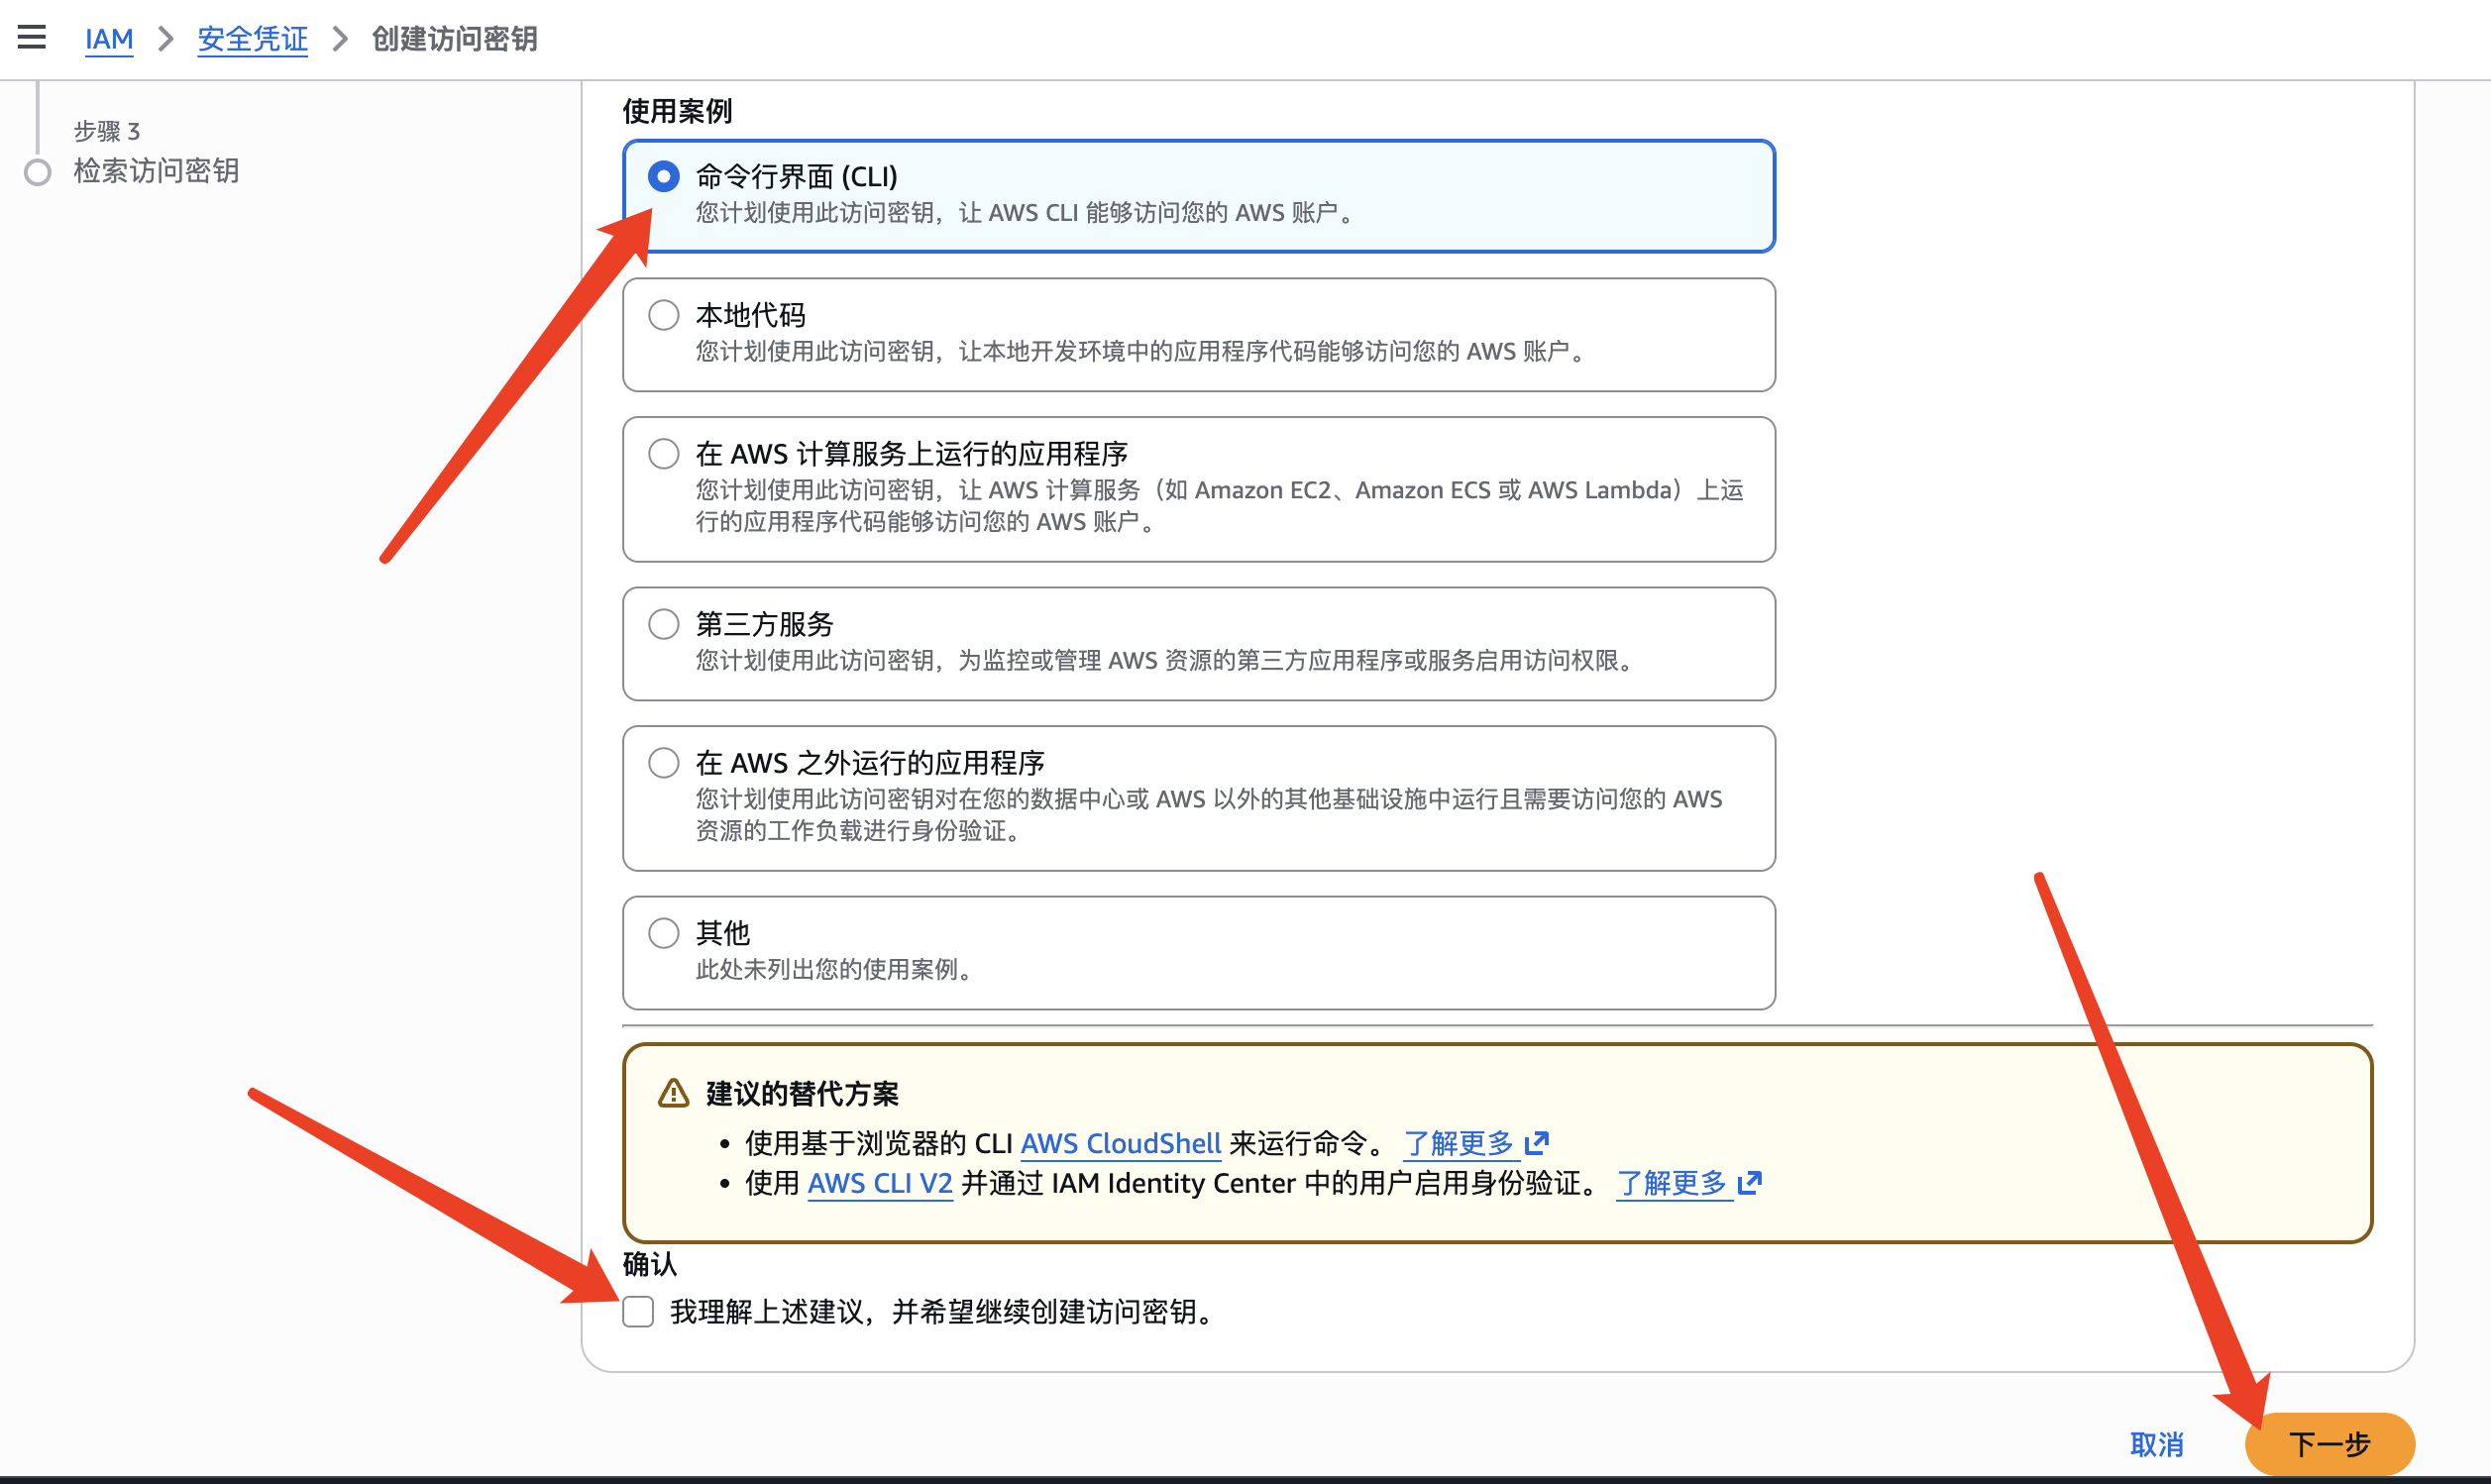
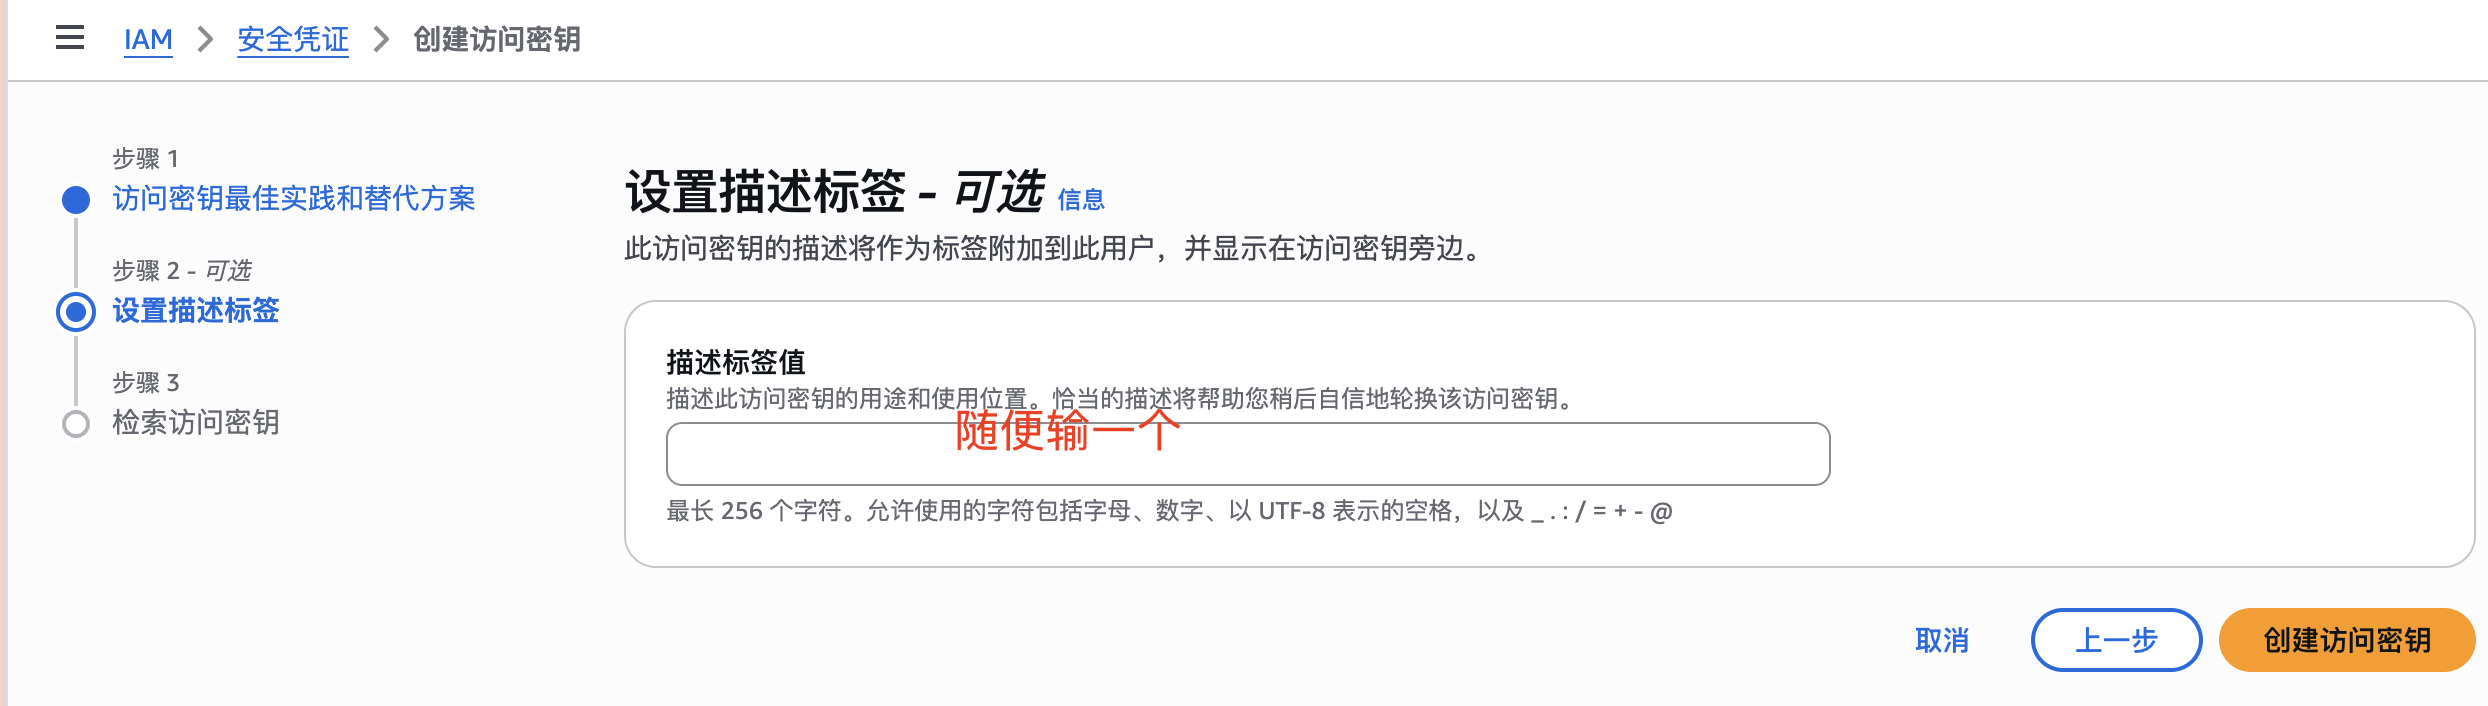
复制下面的access-key和secret-key即可
下面开始java对接:
首先在yml配置文件里面加入S3配置:
aws:s3:region: ap-east-1 (地区,上面有说明的)bucket: eastwwww (这个是我们的桶名称)access-key: 访问密钥里面获取secret-key: 访问密钥里面获取<!-- AWS SDK 核心模块 --> <dependency><groupId>software.amazon.awssdk</groupId><artifactId>s3</artifactId> </dependency><!-- S3 相关模块 --> <dependency><groupId>software.amazon.awssdk</groupId><artifactId>s3control</artifactId> </dependency> <dependency><groupId>software.amazon.awssdk</groupId><artifactId>s3-transfer-manager</artifactId><version>2.20.136</version> </dependency>
package com.ruoyi.common.constant;import lombok.Data;
import org.springframework.boot.context.properties.ConfigurationProperties;
import org.springframework.stereotype.Component;/*** @author hayden*/
@Data
@Component
@ConfigurationProperties(prefix = "aws.s3")
public class S3Properties {private String region;private String bucket;private String accessKey;private String secretKey;
}
package com.ruoyi.common.config;import com.ruoyi.common.constant.S3Properties;
import org.springframework.context.annotation.Bean;
import org.springframework.context.annotation.Configuration;
import software.amazon.awssdk.auth.credentials.AwsBasicCredentials;
import software.amazon.awssdk.auth.credentials.StaticCredentialsProvider;
import software.amazon.awssdk.regions.Region;
import software.amazon.awssdk.services.s3.presigner.S3Presigner;@Configuration
public class S3Config {@Beanpublic S3Presigner s3Presigner(S3Properties props) {return S3Presigner.builder().region(Region.of(props.getRegion())).credentialsProvider(StaticCredentialsProvider.create(AwsBasicCredentials.create(props.getAccessKey(), props.getSecretKey()))).build();}
}
通过流的方式吧文件传到后台服务器,在有服务器上传到S3
package com.ruoyi.web.controller.file;import com.ruoyi.common.constant.S3Properties;
import com.ruoyi.common.core.controller.BaseController;
import com.ruoyi.common.core.domain.AjaxResult;
import org.springframework.stereotype.Controller;
import org.springframework.web.bind.annotation.*;
import org.springframework.web.multipart.MultipartFile;
import software.amazon.awssdk.services.s3.presigner.S3Presigner;
import software.amazon.awssdk.services.s3.presigner.model.PresignedPutObjectRequest;
import software.amazon.awssdk.services.s3.presigner.model.PutObjectPresignRequest;import java.io.OutputStream;
import java.net.HttpURLConnection;
import java.time.Duration;
import java.util.UUID;/*** 图片上传API接口** @author HayDen* @date 2021-03-11*/
@Controller
@RequestMapping("/project/file")
public class FileController {private final S3Presigner presigner;private final S3Properties props;public FileController(S3Presigner presigner, S3Properties props) {this.presigner = presigner;this.props = props;}@PostMapping("/updateAvatar")@ResponseBodypublic AjaxResult updateAvatar(@RequestParam("file") MultipartFile file) {try {// 1. 生成唯一文件名String fileName = UUID.randomUUID() + "_" + file.getOriginalFilename();String objectKey = "moving/" + fileName;//activity/// 2. 生成预签名URL(有效期10分钟)PutObjectPresignRequest presignRequest = PutObjectPresignRequest.builder().signatureDuration(Duration.ofMinutes(10)).putObjectRequest(b -> b.bucket(props.getBucket()).key(objectKey).contentType(file.getContentType()).contentLength(file.getSize())).build();PresignedPutObjectRequest presignedRequest = presigner.presignPutObject(presignRequest);// 3. 使用预签名URL上传文件HttpURLConnection connection = (HttpURLConnection) presignedRequest.url().openConnection();connection.setDoOutput(true);connection.setRequestMethod("PUT");connection.setRequestProperty("Content-Type", file.getContentType());try (OutputStream out = connection.getOutputStream()) {out.write(file.getBytes());}int responseCode = connection.getResponseCode();String responseMessage = connection.getResponseMessage();System.out.println("S3 Response: " + responseCode + " - " + responseMessage);// 4. 返回访问URL(根据您的S3配置选择URL格式)String fileUrl = "https://" + props.getBucket() + ".s3." + props.getRegion() + ".amazonaws.com/" + objectKey;return AjaxResult.success(fileUrl);} catch (Exception e) {return AjaxResult.error("上传失败: " + e.getMessage());}}@PostMapping("/updateAvatarMp4")@ResponseBodypublic AjaxResult updateAvatarMp4(@RequestParam("file") MultipartFile file) {try {// 1. 生成唯一文件名String fileName = UUID.randomUUID() + "_" + file.getOriginalFilename();String objectKey = "webx-mp4/" + fileName;//activity/// 2. 生成预签名URL(有效期10分钟)PutObjectPresignRequest presignRequest = PutObjectPresignRequest.builder().signatureDuration(Duration.ofMinutes(10)).putObjectRequest(b -> b.bucket(props.getBucket()).key(objectKey).contentType(file.getContentType()).contentLength(file.getSize())).build();PresignedPutObjectRequest presignedRequest = presigner.presignPutObject(presignRequest);// 3. 使用预签名URL上传文件HttpURLConnection connection = (HttpURLConnection) presignedRequest.url().openConnection();connection.setDoOutput(true);connection.setRequestMethod("PUT");connection.setRequestProperty("Content-Type", file.getContentType());try (OutputStream out = connection.getOutputStream()) {out.write(file.getBytes());}int responseCode = connection.getResponseCode();String responseMessage = connection.getResponseMessage();System.out.println("S3 Response: " + responseCode + " - " + responseMessage);// 4. 返回访问URL(根据您的S3配置选择URL格式)String fileUrl = "https://" + props.getBucket() + ".s3." + props.getRegion() + ".amazonaws.com/" + objectKey;return AjaxResult.success(fileUrl);} catch (Exception e) {return AjaxResult.error("上传失败: " + e.getMessage());}}}
下面是生成预签名的形式,给前端上传
package com.app.web.api;import com.app.common.annotation.Login;
import com.app.common.common.S3Properties;
import com.app.common.common.UploadResponse;
import com.app.common.enums.BaseResultCodeEnum;
import com.app.common.exception.DcException;
import com.app.common.util.RedisKeyUtil;
import com.app.common.util.RedisUtil;
import com.app.common.util.RequestUtil;
import io.swagger.annotations.Api;
import io.swagger.annotations.ApiOperation;
import lombok.extern.slf4j.Slf4j;
import org.apache.commons.lang3.StringUtils;
import org.springframework.web.bind.annotation.*;
import software.amazon.awssdk.services.s3.model.PutObjectRequest;
import software.amazon.awssdk.services.s3.presigner.S3Presigner;
import software.amazon.awssdk.services.s3.presigner.model.PresignedPutObjectRequest;
import java.net.URL;
import java.time.Duration;
import java.time.LocalDateTime;
import java.time.format.DateTimeFormatter;
import java.util.UUID;@Slf4j
@RestController
@RequestMapping("/api/s3")
@Api(tags = "S3上传中心")
@CrossOrigin(origins = "*")
public class S3Controller {private final S3Presigner presigner;private final S3Properties props;public S3Controller(S3Presigner presigner, S3Properties props) {this.presigner = presigner;this.props = props;}@Login@GetMapping("/upload-url")@ApiOperation("获取上传URL")public UploadResponse getUploadUrl(@RequestParam String contentType, @RequestParam(required = false) Integer type) {String key = "";if (type != null && type == 1) {int memberId = Integer.parseInt(RequestUtil.getCurrentAccount());String updateImageKey = RedisKeyUtil.updateImageNumber(memberId);Integer number = RedisUtil.getNumber(updateImageKey);if (number > 0) {throw new DcException(BaseResultCodeEnum.USER_IMAGE_UPDATE_LIMIT);}if (StringUtils.isBlank(contentType) ||!("image/jpeg".equals(contentType) ||"image/png".equals(contentType) ||"image/gif".equals(contentType))) {throw new DcException(BaseResultCodeEnum.ERROR_PARAMETERS);}key = "moving/userImage/" + LocalDateTime.now().format(DateTimeFormatter.ofPattern("yyyy-MM")) + "/"+ UUID.randomUUID() + "." + this.contentTypeToExtension(contentType);number++;RedisUtil.setEx(updateImageKey, number.toString(), 60 * 60 * 24 * 3);} else {if (StringUtils.isBlank(contentType) ||!("image/jpeg".equals(contentType) ||"image/png".equals(contentType) ||"image/gif".equals(contentType) ||"video/mp4".equals(contentType) ||"video/quicktime".equals(contentType))) {throw new DcException(BaseResultCodeEnum.NO_ACCOUNT_DETECTED);}key = "moving/" + LocalDateTime.now().format(DateTimeFormatter.ofPattern("yyyy-MM")) + "/"+ UUID.randomUUID() + "." + this.contentTypeToExtension(contentType);}PutObjectRequest objectRequest = PutObjectRequest.builder().bucket(props.getBucket()).key(key).contentType(contentType).build();PresignedPutObjectRequest presignedRequest = presigner.presignPutObject(r -> r.putObjectRequest(objectRequest).signatureDuration(Duration.ofMinutes(10)));URL url = presignedRequest.url();UploadResponse response = new UploadResponse();response.setUploadUrl(url.toString());response.setKey(key);response.setFileUrl("https://" + props.getBucket() + ".s3." + props.getRegion() + ".amazonaws.com/" + key);return response;}private String contentTypeToExtension(String contentType) {String suffix;switch (contentType) {case "image/jpeg":suffix = "jpg";break;case "image/png":suffix = "png";break;case "image/gif":suffix = "gif";break;case "video/mp4":suffix = "mp4";break;case "video/quicktime":suffix = "mov";break;case "application/pdf":suffix = "pdf";break;default:suffix = "bin";}return suffix;}}