Elasticsearch 8 安装与配置
1. 背景
因为研发使用新功能,需要把Elasticsearch 7 升级至 Elasticsearh 8。新建8.19.3的ES集群,然后迁移数据。
2. 参考
- 官方文档 8.19
3. 环境
- 网络:千兆网络
- 服务器:80C/256G/2.2T(机械盘)3台
- 系统:Centos 7.9 和 Ubuntu24.04
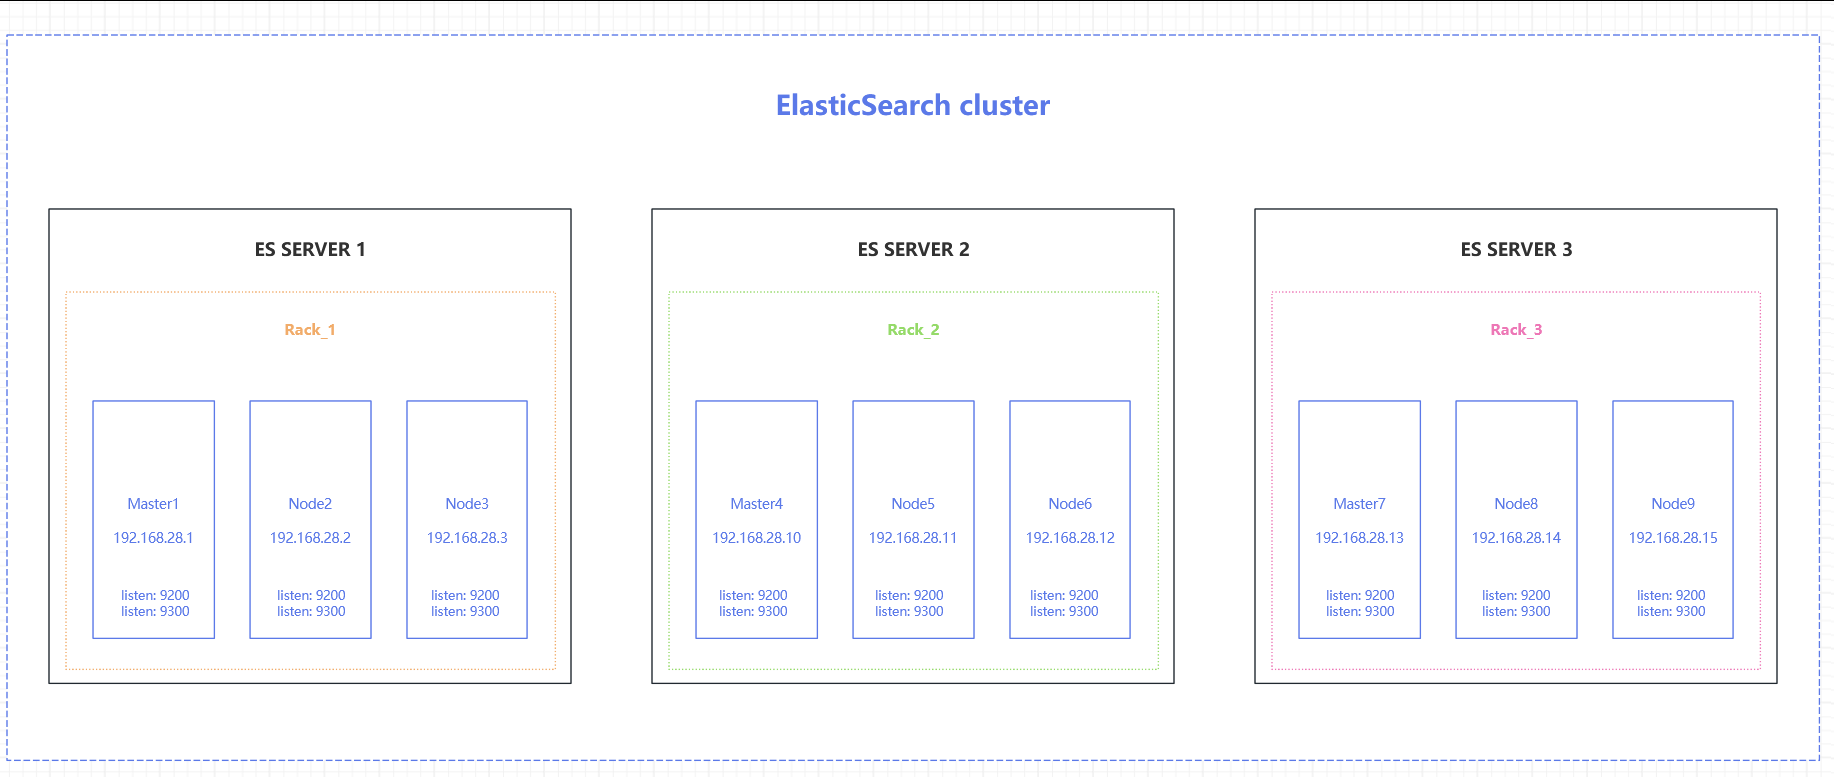
4. 规划
- 服务器每台80核(2颗CPU),256G内存,考虑每个ES节点内存不超过31G的限制,所以每台服务器上部署3个节点,1个Master,2个Data。
- 每台服务器上配置3个IP,每个节点监听1个IP
- 192.168.28.1/2/3
- 192.168.28.10/11/12
- 192.168.28.13/14/15
- 配置内部域名,解析节点IP
* kol-cluster01.es.kx.in 192.168.28.1
* kol-cluster02.es.kx.in 192.168.28.2
* kol-cluster03.es.kx.in 192.168.28.3
* kol-cluster04.es.kx.in 192.168.28.10
* kol-cluster05.es.kx.in 192.168.28.11
* kol-cluster06.es.kx.in 192.168.28.12
* kol-cluster07.es.kx.in 192.168.28.13
* kol-cluster08.es.kx.in 192.168.28.14
* kol-cluster09.es.kx.in 192.168.28.15
5. 准备
5.1 服务器配置多IP
- Centos 7.9
- 复制2个当前的网卡配置
cd /etc/sysconfig/network-scripts/
cp ifcfg-em1 ifcfg-em1:1
cp ifcfg-em1 ifcfg-em1:2
- 编辑新增网卡配置(示例ifcfg-em1:1)
vim ifcfg-em1:1
- 因为是同段网络,所以去除UUID,去除网关配置,修改对应的NAME
TYPE=Ethernet
PROXY_METHOD=none
BROWSER_ONLY=no
BOOTPROTO=none
DEFROUTE=yes
IPV4_FAILURE_FATAL=no
IPV6INIT=yes
IPV6_AUTOCONF=yes
IPV6_DEFROUTE=yes
IPV6_FAILURE_FATAL=no
IPV6_ADDR_GEN_MODE=stable-privacy
NAME=em1:1
DEVICE=em1:1
ONBOOT=yes
IPADDR=192.168.28.2
PREFIX=18
- 重启网络服务
systemctl restart network
- 查看结果(3个IP)
ip a | grep -A3 em1
2: em1: <BROADCAST,MULTICAST,UP,LOWER_UP> mtu 1500 qdisc mq state UP group default qlen 1000link/ether 34:48:ed:f3:9e:b0 brd ff:ff:ff:ff:ff:ffinet 192.168.28.2/18 brd 192.168.63.255 scope global noprefixroute em1valid_lft forever preferred_lft foreverinet 192.168.28.1/18 brd 192.168.63.255 scope global secondary noprefixroute em1:1valid_lft forever preferred_lft foreverinet 192.168.28.3/18 brd 192.168.63.255 scope global secondary noprefixroute em1:2valid_lft forever preferred_lft foreverinet6 fe80::a225:516e:9e8e:3ba7/64 scope link noprefixroute valid_lft forever preferred_lft forever
- Ubuntu 24.04
- 编辑网络配置文件
cd /etc/netplan/
vim 50-cloud-init.yaml
- 增加3个IP
network:version: 2ethernets:eno3np2:addresses:- "192.168.28.10/18"- "192.168.28.11/18"- "192.168.28.12/18"nameservers:addresses:- 172.26.111.1- 172.26.112.2search: []routes:- to: "default"via: "192.168.0.1"
- 网络配置生效
netplan apply
ip a | grep -A3 eno3np2
- 查看结果(3个IP)
4: eno3np2: <BROADCAST,MULTICAST,UP,LOWER_UP> mtu 1500 qdisc mq state UP group default qlen 1000link/ether 5c:e8:83:31:87:e0 brd ff:ff:ff:ff:ff:ffaltname enp26s0f2np2inet 192.168.28.10/18 brd 192.168.63.255 scope global eno3np2valid_lft forever preferred_lft foreverinet 192.168.28.11/18 brd 192.168.63.255 scope global secondary eno3np2valid_lft forever preferred_lft foreverinet 192.168.28.12/18 brd 192.168.63.255 scope global secondary eno3np2valid_lft forever preferred_lft foreverinet6 fe80::5ee8:83ff:fe31:87e0/64 scope link valid_lft forever preferred_lft forever
5.2 创建ES运行账号
useradd -r -s /sbin/nologin es
5.3 配置重要系统设置
官方文档-配置重要系统设置
5.3.1 增大进程打开文件描述符最大值
- 修改单个用户可创建的最大进程数和单个进程能够同时打开的文件描述符(File Descriptor)的最大数量
- 临时修改
# 设置最大进程数
ulimit -u 655350           # 设置软限制
ulimit -Hu 655350          # 设置硬限制# 设置最大打开文件数
ulimit -n 655350           # 设置软限制
ulimit -Hn 655350          # 设置硬限制
- 永久修改
vim /etc/security/limits.conf
# 增加以下内容
* soft nproc 655350    # 所有用户的软限制 - 最大进程数
* hard nproc 655350    # 所有用户的硬限制 - 最大进程数
* soft nofile 655350   # 所有用户的软限制 - 最大打开文件数
* hard nofile 655350   # 所有用户的硬限制 - 最大打开文件数es soft nproc 655350
es hard nproc 655350
# 增加以下内容
es soft nofile 655350
es hard nofile 655350
- Ubuntu系统启用limits.conf配置(使用init.d启动的es服务需要)
vim /etc/pam.d/su
# Sets up user limits according to /etc/security/limits.conf# (Replaces the use of /etc/limits in old login)# 取消以下行的注释session required pam_limits.so
5.3.2 取消进程能够锁定的内存大小的限制
- 临时修改
ulimit -l unlimited
- 永久修改
vim /etc/security/limits.conf
* soft nproc 655350
* hard nproc 655350
* soft nofile 655350
* hard nofile 655350es soft nproc 655350
es hard nproc 655350
es soft nofile 655350
es hard nofile 655350
# 增加以下内容
es soft memlock unlimited
es hard memlock unlimited
5.3.3 关闭Swap分区
- 临时关闭
sudo swapoff -a
- 永久修改
vim /etc/fstab
#
# /etc/fstab
# Created by anaconda on Thu Feb 27 13:35:28 2025
#
# Accessible filesystems, by reference, are maintained under '/dev/disk'
# See man pages fstab(5), findfs(8), mount(8) and/or blkid(8) for more info
#
/dev/mapper/centos-root /                       xfs     defaults        0 0
UUID=769b0597-31be-444b-8047-6ba9550507e9 /boot                   xfs     defaults        0 0
UUID=99C5-E214          /boot/efi               vfat    umask=0077,shortname=winnt 0 0
# 注释掉swap分区
#/dev/mapper/centos-swap swap                    swap    defaults        0 0
5.3.4 启用ES的bootstrap.memory_lock设置
- 可与修改elasticsearch.yml其它配置项时,一同修改
vim elasticsearch.yml
# ----------------------------------- Memory -----------------------------------
#
# Lock the memory on startup:
#
# 启用以下设置
bootstrap.memory_lock: true
#
# Make sure that the heap size is set to about half the memory available
# on the system and that the owner of the process is allowed to use this
# limit.
#
# Elasticsearch performs poorly when the system is swapping the memory.
5.3.5 增大虚拟内存值
- 临时修改
# 官方建议不小于262144
# sysctl -w vm.max_map_count=262144
# 这里一台服务器上运行3个节点,所以设置为786432
sysctl -w vm.max_map_count=786432
- 永久修改
vim /etc/sysctl.conf
# ES 使用参数。表示进程可以拥有的内存映射区域的最大数量。它通常用于限制一个进程可以打开的文件数量。
vm.max_map_count = 786432
# 执行生效参数
sysctl -p
5.3.6 增大最大线程数量
- 临时修改
ulimit -u 655350
- 永久修改
vim /etc/security/limits.conf
# 默认修改值
* soft nproc 655350
* hard nproc 655350
* soft nofile 655350
* hard nofile 655350# 增加以下内容
es soft nproc 655350
es hard nproc 655350# 增加打开文件数
es soft nofile 655350
es hard nofile 655350
# 取消锁定内存的限制
es soft memlock unlimited
es hard memlock unlimited
5.3.7 取消进程最大文件大小限制(默认值就是unlimited)
- 临时修改(可选)
ulimit -f unlimited
- 永久修改(可选)
vim /etc/security/limits.conf
# 默认修改值
* soft nproc 655350
* hard nproc 655350
* soft nofile 655350
* hard nofile 655350# 增加进程最大线程数量
es soft nproc 655350
es hard nproc 655350
# 增加进进程打开文件数
es soft nofile 655350
es hard nofile 655350
# 取消进程锁定内存的限制
es soft memlock unlimited
es hard memlock unlimited# 取消进程最大文件大小限制(可选)
es soft fsize unlimited
es hard fsize unlimited
5.3.8 取消进程最大虚拟内存限制(默认值就是unlimited)
- 临时修改(可选)
ulimit -v unlimited
- 永久修改(可选)
vim /etc/security/limits.conf
# 默认修改值
* soft nproc 655350
* hard nproc 655350
* soft nofile 655350
* hard nofile 655350
* soft as unlimited
* hard as unlimitedroot soft nproc 655350
root hard nproc 655350
root soft nofile 655350
root hard nofile 655350
root soft as unlimited
root hard as unlimited# 增加进程最大线程数量
es soft nproc 655350
es hard nproc 655350
# 增加进进程打开文件数
es soft nofile 655350
es hard nofile 655350
# 取消进程锁定内存的限制
es soft memlock unlimited
es hard memlock unlimited
# 取消进程最大文件大小限制(可选)
es soft fsize unlimited
es hard fsize unlimited
# 取消进程最大虚拟内存限制(可选)
es soft as unlimited
es hard as unlimited
5.3.9 降低重传超时时长
- 通过减少重试次数来降低超时时长
- 临时修改
sysctl -w net.ipv4.tcp_retries2=5
- 永久修改
vim /etc/sysctl.conf
#在丢弃激活(已建立通讯状况)的TCP连接之前﹐需要进行多少次重试。默认15。
net.ipv4.tcp_retries2 = 5
# 使配置生效
sysctl -p
5.3.10 启动检查
- 开发模式与生产模式
- 开发模式,默认模式,只监听localhost 或 127.0.0.1
- 生产模式,监听非环回地址(除localhost 和 127.0.0.1以外的地址)
- 引动检查结果
- 开发模式,检查不通过,记录警告,节点仍能启动
- 生产模式,检查不通过,抛异常,节点无法启动
6. 安装ES
官方文档-安装ES
- 创建下载目录
mkdir -p /public/software
- 官网下载安装包
cd  /public/software
wget https://artifacts.elastic.co/downloads/elasticsearch/elasticsearch-8.19.5-linux-x86_64.tar.gz
wget https://artifacts.elastic.co/downloads/elasticsearch/elasticsearch-8.19.5-linux-x86_64.tar.gz.sha512
shasum -a 512 -c elasticsearch-8.19.5-linux-x86_64.tar.gz.sha512
tar -xzf elasticsearch-8.19.5-linux-x86_64.tar.gz
cd elasticsearch-8.19.5/
- 复制3个节点程序
# 物理机上运行3个节点,1是master,2和3是数据节点
cp -rf  elasticsearch-8.19.5  /public/elasticsearch-8-1
cp -rf  elasticsearch-8.19.5  /public/elasticsearch-8-2
cp -rf  elasticsearch-8.19.5  /public/elasticsearch-8-3
- 创建3个节点的数据目录
mkdir -p /public/es-data-{1..3}
- 修改目录属主(es用户)
chown -R es:es elasticsearch-8-1 elasticsearch-8-2 elasticsearch-8-3 es-data-1 es-data-2 es-data-3
7. 配置ES
7.1 配置文件
- elasticsearch.yml for configuring Elasticsearch
- jvm.options for configuring Elasticsearch JVM settings
- log4j2.properties for configuring Elasticsearch logging
7.2 重要配置项
官方文档-重要配置项
- 编辑 elasticsearch.yml 配置文件
vim config/elasticsearch.yml
7.2.1 集群名称
- 集群名称唯一
cluster.name: kol-cluster
7.2.2 集群区域
- 集群定义标识,然后根据不同标识将不同节点划分到不同的区域中
- 目标是避免同一台服务器上两个节点分别存储主分片和副本分片,防止服务器宕机导致数据丢失
# 集群使用 rack_id 标识来划分区域
cluster.routing.allocation.awareness.attributes: rack_id
# 集群一共划分了3个区域
cluster.routing.allocation.awareness.force.zone.values: rack_1,rack_2,rack_3
节点名称
官方文档-节点
- 9个节点,每个名称唯一,这里使用了内部域名
node.name: kol-cluster05.es.xk.in
7.2.3 节点角色
- 集群有多种角色,详见 官网文档-节点角色
- 候选主节点 (master):有资格被选举为主节点的节点,主节点负责控制集群。
- 数据节点 (数据, data_content, data_hot, data_warm, data_cold, data_frozen):具有多种数据角色之一的节点。数据节点存储数据并执行与数据相关的操作,例如增删改查(CRUD)、搜索和聚合。您可以在集群中使用多种数据角色,以便实现数据分层架构。
- 预处理节点 (ingest):预处理节点能够对文档应用预处理管道,以便在索引之前对文档进行转换和丰富。在数据摄入负载较重的情况下,使用专用的预处理节点,并避免在具有主节点或数据节点角色的节点上包含预处理角色是合理的做法。
- 远程客户端候选节点 (remote_cluster_client):有资格充当远程客户端的节点。
- 机器学习节点 (ml):可以运行机器学习功能的节点。如果您想使用机器学习功能,集群中必须至少有一个机器学习节点。
- 转换节点 (transform):可以执行数据转换的节点。如果您想使用数据转换功能,集群中必须至少有一个转换节点。
- 集群要求至少设置"master"角色与 “data_content 和 data_hot” 角色 或者 "master"角色与 “data” 角色
- 本例中简单设置:master角色, data_content 和 data_hot 角色
# 每台服务器上第1节点设置为master
node.roles: [master]
# 每台服务器上第2和3节点设置为data_content和data_hot
node.roles: [data_content,data_hot]
7.2.4 节点使用处理器数量
- 服务器CPU 80核,本例中master分配8核,剩余两个data节点每个分配32核,为操作系统保留8个(极端情况,保留4个也可以)
# master节点配置
node.processors: 8
# 数据节点配置
node.processors: 32
7.2.5 节点区域标识
- 集群9个节点,划分在3个区域中,每个区域1个Master、2个Data,依靠节点区域标识区分
- 服务器1上3个节点(1个master,2个data)标识是rack_1
- 服务器2上3个节点(1个master,2个data)标识是rack_2
- 服务器3上3个节点(1个master,2个data)标识是rack_3
- 后续增加新节点,可以根据需要添加到对应的rack_x区域
- 定义节点的区域标识,例如:定义当前节点标识是 rack_2
node.attr.rack_id: rack_2
7.2.6 路径设置
- 每台服务器上每个节点对应不同的目录
- 节点1对应/public/es-data-1/data和logs (节点1程序目录/public/elasticsearch-8-1)
- 节点2对应/public/es-data-2/data和logs (节点1程序目录/public/elasticsearch-8-2)
- 节点3对应/public/es-data-3/data和logs (节点1程序目录/public/elasticsearch-8-3)
- 例如:节点2对应/public/es-data-2目录
# Path to directory where to store the data (separate multiple locations by comma)
path.data: /public/es-data-2/data
# Path to log files:
path.logs: /public/es-data-2/logs
7.2.7 内存设置
- 设置true:禁止 Elasticsearch 使用的内存被交换到磁盘上
bootstrap.memory_lock: true
7.2.8 网络设置
- 配置每个节点监听IP
- 9个节点,每个IP唯一,这里也可以使用内部域名
- 节点1:192.168.28.1
- 节点2:192.168.28.2
- 节点3:192.168.28.3
- 节点4:192.168.28.10
- 节点5:192.168.28.11
- 节点6:192.168.28.12
- 节点7:192.168.28.13
- 节点8:192.168.28.14
- 节点9:192.168.28.15
network.host: 192.168.28.11
transport.host: 192.168.28.11
- 节点监听端口
- 设置外部通讯和内部通讯端口
http.port: 9200
transport.port: 9300
- http启用跨域支持
http.cors.enabled
http.cors.allow-origin: "*"
7.2.9 集群发现
- 集群所有节点(9个)的列表
discovery.seed_hosts:- kol-cluster01.es.kx.in:9300- kol-cluster02.es.kx.in:9300- kol-cluster03.es.kx.in:9300- kol-cluster04.es.kx.in:9300- kol-cluster05.es.kx.in:9300- kol-cluster06.es.kx.in:9300- kol-cluster07.es.kx.in:9300- kol-cluster08.es.kx.in:9300- kol-cluster09.es.kx.in:9300
- 集群初始化Master节点列表
- 配置集群所有Master节点列表
- 首次启动需要配置。一旦集群启动成功,务必要注释掉这个配置,防止集群脑裂
#cluster.initial_master_nodes:
#   - kol-cluster01.es.kx.in
#   - kol-cluster04.es.kx.in
#   - kol-cluster07.es.kx.in
7.2.10 断路器
- 启用了painless语法正则支持
- 建议启用专用ingest节点,并配置索引的default_pipeline,以提升集群性能
script.painless.regex.enabled: true
7.2.11 数据迁移
- 增加同步远程ES数据白名单
- 当前集群从远程ES(192.168.8.63:9200)同步迁移数据
reindex.remote.whitelist: "192.168.8.63:9200"
7.2.12 配置变量
- 销毁索引时,需要指定索引名称
action.destructive_requires_name: yes
7.2.13 安全配置
7.2.13.1 禁用安全(不推荐)
官方文档-安全
- 禁用安全
- ES首次启动时设置为false,es会禁用安全配置,这会导致外部组件,例如Kibana等无法连接
- 如需要启用,后续可手动配置(会比较麻烦)官方文档-手动配置安全
# 没有启动安全选项,这会导致外部kibana等应用无法连接
xpack.security.enabled: false
7.2.13.2 启用自动安全(不推荐)
官方文档-自动启用安全
自动启用安全配置也很麻烦。因为自动配置需要符合很多检查条件,其中对配置文件项目有严格限制,对集群配置有限制。如果使用自动配置,需要单master节点,使用命令行启动服务,结果输出到终端,才能自动配置成功,然后再修改当前master节点配置改为集群模式重启,并把其它节点依次启动加入。
- ES首次启动时提供自动配置安全功能,包括:
- 为传输层(transport)和 HTTP 层生成用于 TLS(传输层安全协议)的证书与密钥。
- 将 TLS 配置设置写入 elasticsearch.yml 文件。
- 为 elastic 用户生成一个密码。
- 为 Kibana 生成一个注册令牌(enrollment token)。
之后你可以启动 Kibana 并输入该注册令牌,此令牌的有效期为 30 分钟。该令牌会自动应用 Elasticsearch 集群的安全设置,通过内置的 kibana 服务账户向 Elasticsearch 进行身份验证,并将安全配置写入 kibana.yml 文件。
| 配置阶段 | 具体操作内容 | 涉及关键对象 | 关联文件 / 有效期 |
|---|---|---|---|
| 1. Elasticsearch 自动安全配置 | 1. 生成用于 TLS(传输层安全协议)的证书与密钥 | 传输层(transport)、HTTP 层、TLS 证书 / 密钥 | 无(仅生成证书文件) |
| 2. 写入 TLS 相关的配置参数 | TLS 配置设置 | elasticsearch.yml | |
| 3. 生成初始访问密码 | elastic 用户(内置超级用户) | 无(需手动记录密码) | |
| 4. 生成用于关联 Kibana 的令牌 | Kibana 注册令牌(enrollment token) | 无(令牌有效期 30 分钟) | |
| 2. Kibana 后续配置 | 1. 启动 Kibana 并输入上述注册令牌 | Kibana、Elasticsearch 集群 | 无(需在 30 分钟内完成输入 |
| 2. 自动应用集群安全设置 | Elasticsearch 集群安全配置 | 无(自动同步) | |
| 3. 完成身份验证 | kibana 内置服务账户 | 无(自动执行认证) | |
| 4. 写入 Kibana 安全配置 | Kibana 安全参数 | kibana.yml |
- ES跳过自动配置安全配置的情况:
- 核心跳过场景总览
| 触发场景 | 背后原因 | 操作建议 |
|---|---|---|
| 启动前检查失败 | 节点非首次启动、安全已手动配置、启动流程无配置修改权限 | 1. 检查elasticsearch.yml确认是否已有安全配置 2. 若需重新自动配置,需清理现有安全相关配置后重启 |
| 输出重定向到文件 | 自动配置凭据(如elastic密码)仅能在首次启动终端查看,重定向会导致凭据无法获取 | 1. 首次启动不重定向输出,记录好生成的凭据 2. 后续启动可正常使用输出重定向 |
- 关键检查项说明
- 节点首次启动检查:判断节点是否为全新启动,若已有历史启动记录则跳过自动配置
- 安全配置状态检查:检测elasticsearch.yml中是否存在security相关配置(如xpack.security.enabled),若有则视为已手动配置
- 配置修改权限检查:确认启动进程对elasticsearch.yml文件有写入权限,无权限则无法完成自动配置
备注:自动配置仅在首次启动且满足所有检查条件时触发,若跳过需根据实际场景选择"保留手动配置"或"重置后重新自动配置"。
- 首次启动且满足所有检查条件:
-
环境检查项
- /data目录检查:若Elasticsearch /data目录存在且不为空,表明节点曾启动过,可能已加入集群,跳过自动配置
- 核心文件可读性检查:elasticsearch.yml不存在/不可读,或elasticsearch.keystore不可读,无法判断安全功能状态,跳过自动配置
- 配置目录可写性检查:Elasticsearch配置目录不可写(如设为只读或用户权限不足),无法写入安全配置,跳过自动配置
-
已有设置冲突检查
以下设置与安全自动配置不兼容,若存在任何一项,将跳过自动配置并正常启动节点:- 节点角色设置冲突:node.roles设为无法被选为master或无法存储数据的角色
- 自动配置开关禁用:xpack.security.autoconfiguration.enabled设为false
- 安全功能已配置:xpack.security.enabled已设置具体值
- SSL相关配置存在:elasticsearch.yml或elasticsearch.keystore中设置了xpack.security.transport.ssl.*或xpack.security.http.ssl.*相关参数
- 集群发现配置存在:设置了discovery.type、discovery.seed_hosts或cluster.initial_master_nodes(例外情况:discovery.type设为single-node,或cluster.initial_master_nodes仅包含当前节点名称)
7.2.13.3 手动启用安全(推荐)
官方文档-手动配置
手动启用安全项,需要生成证书(ES提供工具),配置在elasticsearch.yml文件中。启动服务完成配置。以下以CA证书为例
- ES证书工具
官方文档-证书命令行工具
- elasticsearch-certutil帮助
./bin/elasticsearch-certutil --help
warning: ignoring JAVA_HOME=/usr/java; using bundled JDK
Simplifies certificate creation for use with the Elastic StackCommands
--------
csr - generate certificate signing requests
cert - generate X.509 certificates and keys
ca - generate a new local certificate authority  # 生成一个新的本地证书颁发机构
http - generate a new certificate (or certificate request) for the Elasticsearch HTTP interfaceNon-option arguments:
command              Option             Description
------             -----------
-E <KeyValuePair>  Configure a setting
-h, --help         Show help
-s, --silent       Show minimal output
-v, --verbose      Show verbose output
- 创建Certificate Authority(CA)帮助
./bin/elasticsearch-certutil ca --help
warning: ignoring JAVA_HOME=/usr/java; using bundled JDK
generate a new local certificate authorityOption               Description
------               -----------
-E <KeyValuePair>    Configure a setting
--ca-dn              distinguished name to use for the generated ca. defaultsto CN=Elastic Certificate Tool Autogenerated CA
--days <Integer>     number of days that the generated certificates are valid  # 指定证书有效期,默认3年
-h, --help           Show help
--keysize <Integer>  size in bits of RSA keys
--keyusage           comma separated key usages to use for the generated CA. defaults to 'keyCertSign,cRLSign'
--out                path to the output file that should be produced
--pass               password for generated private keys
--pem                output certificates and keys in PEM format instead of   PKCS#12
-s, --silent         Show minimal output
-v, --verbose        Show verbose output
- 手动生成证书
# 进入Elasticsearch安装目录
cd /path/to/your/elasticsearch
# 生成CA证书
./bin/elasticsearch-certutil ca --days 36500
# 根据提示操作,通常可接受默认文件名(elastic-stack-ca.p12)并设置CA密码
# 使用刚生成的CA为集群节点生成证书
./bin/elasticsearch-certutil cert --ca elastic-stack-ca.p12
# 同样,按提示操作,通常会生成一个名为elastic-certificates.p12的文件
- 详细说明生成证书步骤
- 生成有效期100年的CA证书(默认值3年),100年为示例,生产不要这么用
- 使用默认证书输出文件
- 设置证书密码
# 执行命令
./bin/elasticsearch-certutil ca --days 36500
# 显示结果
warning: ignoring JAVA_HOME=/usr/java; using bundled JDK
This tool assists you in the generation of X.509 certificates and certificate
signing requests for use with SSL/TLS in the Elastic stack.The 'ca' mode generates a new 'certificate authority'
This will create a new X.509 certificate and private key that can be used
to sign certificate when running in 'cert' mode.Use the 'ca-dn' option if you wish to configure the 'distinguished name'
of the certificate authorityBy default the 'ca' mode produces a single PKCS#12 output file which holds:* The CA certificate* The CA's private keyIf you elect to generate PEM format certificates (the -pem option), then the output will
be a zip file containing individual files for the CA certificate and private key
# 如果不输入,使用默认输出文件名称elastic-stack-ca.p12
Please enter the desired output file [elastic-stack-ca.p12]:
# 可以设置密码。不输入则密码为空
Enter password for elastic-stack-ca.p12 :
- 生成ES集群使用的证书和私钥
- 生成的文件elastic-stack-ca.p12,既包含私钥和证书,也包含受信任的根证书
# 执行命令
./bin/elasticsearch-certutil cert --ca elastic-stack-ca.p12
# 显示结果
warning: ignoring JAVA_HOME=/usr/java; using bundled JDK
This tool assists you in the generation of X.509 certificates and certificate
signing requests for use with SSL/TLS in the Elastic stack.The 'cert' mode generates X.509 certificate and private keys.* By default, this generates a single certificate and key for useon a single instance.* The '-multiple' option will prompt you to enter details for multipleinstances and will generate a certificate and key for each one* The '-in' option allows for the certificate generation to be automated by describingthe details of each instance in a YAML file* An instance is any piece of the Elastic Stack that requires an SSL certificate.Depending on your configuration, Elasticsearch, Logstash, Kibana, and Beatsmay all require a certificate and private key.* The minimum required value for each instance is a name. This can simply be thehostname, which will be used as the Common Name of the certificate. A fulldistinguished name may also be used.* A filename value may be required for each instance. This is necessary when thename would result in an invalid file or directory name. The name provided hereis used as the directory name (within the zip) and the prefix for the key andcertificate files. The filename is required if you are prompted and the nameis not displayed in the prompt.* IP addresses and DNS names are optional. Multiple values can be specified as acomma separated string. If no IP addresses or DNS names are provided, you maydisable hostname verification in your SSL configuration.* All certificates generated by this tool will be signed by a certificate authority (CA)unless the --self-signed command line option is specified.The tool can automatically generate a new CA for you, or you can provide your own withthe --ca or --ca-cert command line options.By default the 'cert' mode produces a single PKCS#12 output file which holds:* The instance certificate* The private key for the instance certificate* The CA certificateIf you specify any of the following options:* -pem (PEM formatted output)* -multiple (generate multiple certificates)* -in (generate certificates from an input file)
then the output will be be a zip file containing individual certificate/key files# 输入elastic-stack-ca.p12设置的密码
Enter password for CA (elastic-stack-ca.p12) :
# 如果不输入,使用默认输出文件名称elastic-certificates.p12
Please enter the desired output file [elastic-certificates.p12]:
# 设置elastic-certificates.p12的密码
Enter password for elastic-certificates.p12 : Certificates written to /public/elasticsearch-8-2/elastic-certificates.p12This file should be properly secured as it contains the private key for
your instance.
This file is a self contained file and can be copied and used 'as is'
For each Elastic product that you wish to configure, you should copy
this '.p12' file to the relevant configuration directory
and then follow the SSL configuration instructions in the product guide.For client applications, you may only need to copy the CA certificate and
configure the client to trust this certificate.
- 配置elasticsearch.yml 安全项
官方文档-安全配置项
#----------------------------------- Security -----------------------------------
# Disable security features
# 启用安全功能
xpack.security.enabled: true
# 集群节点通讯启用SSL
xpack.security.transport.ssl.enabled: true
# 要求客户端提供安全验证
xpack.security.transport.ssl.client_authentication: required# 节点证书文件(包含节点身份 + CA 信任链)
# 验证方式采用 certificate
xpack.security.transport.ssl.verification_mode: certificate
# 密钥库文件路径,文件包含了当前节点的私钥和证书,用于证明本节点身份
xpack.security.transport.ssl.keystore.path: elastic-certificates.p12
# 密钥库文件的密码。没有密码可以不配置
xpack.security.transport.ssl.keystore.password: "x*000*k"
# 官方建议禁止使用明文密码,推荐使用以下命令将密码添加至证书文件中(这里使用明文是防止忘记了密码,生产环境不要这么用)
#./bin/elasticsearch-keystore add xpack.security.transport.ssl.keystore.secure_password# 信任库文件路径,文件包含了信任的证书,用于验证对方的证书是否可信
xpack.security.transport.ssl.truststore.path: elastic-certificates.p12
# 信任库文件的密码。没有密码可以不配置
xpack.security.transport.ssl.truststore.password: "x*000*k"
# 官方建议禁止使用明文密码,推荐使用以下命令将密码添加至证书文件中(这里使用明文,是防止忘记了密码,生产环境不建议这么用)
#./bin/elasticsearch-keystore add xpack.security.transport.ssl.truststore.secure_password# 关于节点证书更新
# [官方文档-更新节点证书](https://www.elastic.co/guide/en/elasticsearch/reference/8.19/update-node-certs.html)
# 建议替换同名证书文件,ES默认每5秒检测证书变更,更换新证书不会影响已建立的连接(ES不会自动加载elasticsearch.yml配置文件,所以不同名证书文件无效)
# 如果需要重新加载elasticsearch.yml配置文件,请参考滚动重启 [官方文档](https://www.elastic.co/guide/en/elasticsearch/reference/8.19/restart-cluster.html#restart-cluster-rolling)# 启用外部https访问证书
# 可以使用上述生成的同一证书,但调用方(程序或浏览器)需要信任自签名证书
# 配置方式类似 transport 证书
xpack.security.http.ssl.enabled: true
xpack.security.http.ssl.verification_mode: certificate
xpack.security.http.ssl.keystore.path: elastic-certificates.p12
xpack.security.http.ssl.keystore.password: "x*000*k"
xpack.security.http.ssl.truststore.path: elastic-certificates.p12
xpack.security.http.ssl.truststore.password: "x*000*k"# 开启使用token加入集群(新节点或kibana),需要先开启xpack.security.http.ssl.enabled
# 生成token的命令工具[elasticsearch-create-enrollment-token](https://www.elastic.co/docs/reference/elasticsearch/command-line-tools/create-enrollment-token)
# 为增加节点创建token命令, bin/elasticsearch-create-enrollment-token -s node
# 为增加kibana创建token命令, bin/elasticsearch-create-enrollment-token -s kibana --url "https://172.0.0.3:9200"
xpack.security.enrollment.enabled: true
# 增加和移除节点参考 [add-and-remove-elasticsearch-nodes](https://www.elastic.co/docs/deploy-manage/maintenance/add-and-remove-elasticsearch-nodes)
7.2.14 JVM配置
官方文档-JVM配置
- Xms 和 Xmx 设置成一样大,建议设置30G
vim config/jvm.options.d/heap.options
-Xms30g
-Xmx30g
8. 启动ES
8.1 启用进程绑定
将Elasticsearch进程绑定到特定的CPU核心上,有两个目的:
- 减少缓存失效:进程的数据更容易保留在对应CPU核心的缓存中,提高了缓存命中率。
- 减少上下文切换:操作系统不会在所有的CPU核心上调度该进程,避免了在核心间迁移带来的开销。
- 为了简化运维管理,每台第1个节点(master)不绑定CPU核心,节点2绑定CPU节点0,节点3绑定CPU节点1
- 安装numactl
- Centos
yum install -y numactl
- Ubuntu
apt-getinstall -y numactl
- 查看节点
# 执行命令
numactl --hardware
# 输出结果
available: 2 nodes (0-1)   # 两个处理器节点(0-39是物理核,40-79是超线程对应逻辑核)
node 0 cpus: 0 1 2 3 4 5 6 7 8 9 10 11 12 13 14 15 16 17 18 19 40 41 42 43 44 45 46 47 48 49 50 51 52 53 54 55 56 57 58 59
node 0 size: 128268 MB
node 0 free: 125904 MB
node 1 cpus: 20 21 22 23 24 25 26 27 28 29 30 31 32 33 34 35 36 37 38 39 60 61 62 63 64 65 66 67 68 69 70 71 72 73 74 75 76 77 78 79
node 1 size: 129017 MB
node 1 free: 127467 MB
node distances:
node   0   1 0:  10  21 1:  21  10
- 启动命令绑定
- 见下启动脚本
8.2 配置启动脚本
- 以下用节点2举例:
- ES_HOME=“/public/elasticsearch-8-2” ,对应节点2的目录(节点3应为/public/elasticsearch-8-3)
- NUMA_ID=0 , 节点2绑定了CPU节点0(节点3应绑定CPU节点1)
#!/bin/bash# 限制NUMA节点(numactl --hardware),适用每台服务器运行2+个节点,注意分担绑定NUMA节点
ES_HOME="/public/elasticsearch-8-2"
PID_FILE=$ES_HOME/es.pid
NOHUP_FILE=$ES_HOME/es.out
PID=''
# 服务器CPU节点0
NUMA_ID=0cd $ES_HOME# 检查是否存在PID文件(注意,如果使用KILL直接杀死ES,不会删除PID文件,需要手动删除PID文件)
[ -f $PID_FILE ] && PID=$(cat $PID_FILE)
[ -n "$PID" ] && echo -e "$ES_HOME/bin/elasticsearch is running, pid: $PID \n"
# 正常停止ES进程,等待30秒,查看程序是否消失
[ -n "$PID" ] && for i in {1..30}; do sudo kill -0 $PID 2>/dev/null || break; sleep 1; done;
# 如果30秒后ES进程仍然存在,启动-9 强杀
sudo kill -0 $PID 2>/dev/null && sudo kill -9 $PID >/dev/null && echo -e "kill -9 $PID \n"
sudo sleep 5# 清除PID 文件和 nohup文件
cd $ES_HOME && [ -f $PID_FILE ] && rm -rf $PID_FILE
cd $ES_HOME && [ -f $NOHUP_FILE ] && rm -rf $NOHUP_FILE# 启动E节点程序
# sudo -u es 以es用户运行
# bash -c "...":启动新的 bash 子进程来执行引号内的命令
# nohup 忽略挂断信号
# & 后台运行
# disown 从当前 shell 的作业表中移除进程,由 init 进程接管
cd $ES_HOME && sudo -u es bash -c "nohup numactl --cpunodebind=$NUMA_ID --membind=$NUMA_ID $ES_HOME/bin/elasticsearch -d -p $PID_FILE > $NOHUP_FILE & disown"# 输出结果启动结果
[ $? -eq 0 ] && echo "$ES_HOME/bin/elasticsearch start successed" || echo "$ES_HOME/bin/elasticsearch start failed"
- master节点脚本
#!/bin/bash# 不限制NUMA节点,适用每台服务器运行1个节点或不限制NUMA节点
ES_HOME="/public/elasticsearch-8-1"
PID_FILE=$ES_HOME/es.pid
NOHUP_FILE=$ES_HOME/es.out
PID=''cd $ES_HOME[ -f $PID_FILE ] && PID=$(cat $PID_FILE)
[ -n "$PID" ] && echo -e "$ES_HOME/bin/elasticsearch is running, pid: $PID \n"
[ -n "$PID" ] && for i in {1..30}; do sudo kill -0 $PID 2>/dev/null || break; sleep 1; done;
sudo kill -0 $PID 2>/dev/null && sudo kill -9 $PID >/dev/null && echo -e "kill -9 $PID \n"
sudo sleep 5cd $ES_HOME && [ -f $PID_FILE ] && rm -rf $PID_FILE
cd $ES_HOME && [ -f $NOHUP_FILE ] && rm -rf $NOHUP_FILEcd $ES_HOME && sudo -u es bash -c "nohup $ES_HOME/bin/elasticsearch -d -p $PID_FILE > $NOHUP_FILE & disown"[ $? -eq 0 ] && echo "$ES_HOME/bin/elasticsearch start successed" || echo "$ES_HOME/bin/elasticsearch start failed"
9. 设置账号密码
9.1 ES内置用户
官方文档-内置用户
- 内置用户:
-
elastic
一个内置的超级用户。
任何能够以 elastic 用户身份登录的人,都拥有对受限索引(例如 .security)的直接只读访问权限。此用户还具有管理安全性以及创建具有无限权限的角色能力。 -
kibana_system
Kibana 用于连接 Elasticsearch 并与之通信的用户。 -
logstash_system
Logstash 在 Elasticsearch 中存储监控信息时使用的用户。 -
beats_system
Beats 在 Elasticsearch 中存储监控信息时使用的用户。 -
apm_system
APM 服务器在 Elasticsearch 中存储监控信息时使用的用户。 -
remote_monitoring_user
Metricbeat 在收集和存储监控信息到 Elasticsearch 时使用的用户。它拥有 remote_monitoring_agent 和 remote_monitoring_collector 内置角色。
9.2 设置密码
官方文档-设置密码工具
bin/elasticsearch-setup-passwords interactive
9.3 修改密码
官方文档-重置密码工具
# 重置 elastic账号密码,-u 账号名,-i 交互输入密码
elasticsearch-reset-password -u elastic -i
10. 检查ES
10.1 Shell 命令
- 查看进程
root@ubuntu24-192-168-028-010:/public/elasticsearch-8-2# jps -l
2431632 jdk.jcmd/sun.tools.jps.Jps
1974315 org.elasticsearch.server/org.elasticsearch.bootstrap.Elasticsearch
1973993 org.elasticsearch.server/org.elasticsearch.bootstrap.Elasticsearch
1974128 org.elasticsearch.server/org.elasticsearch.bootstrap.Elasticsearch
- 查看端口
root@ubuntu24-192-168-028-010:/public/elasticsearch-8-2# netstat -nltp |grep -E '1974315|1973993|1974128'
tcp6       0      0 192.168.28.12:9300      :::*                    LISTEN      1974315/java
tcp6       0      0 192.168.28.12:9200      :::*                    LISTEN      1974315/java
tcp6       0      0 192.168.28.11:9200      :::*                    LISTEN      1974128/java
tcp6       0      0 192.168.28.11:9300      :::*                    LISTEN      1974128/java
tcp6       0      0 192.168.28.10:9300      :::*                    LISTEN      1973993/java
tcp6       0      0 192.168.28.10:9200      :::*                    LISTEN      1973993/java
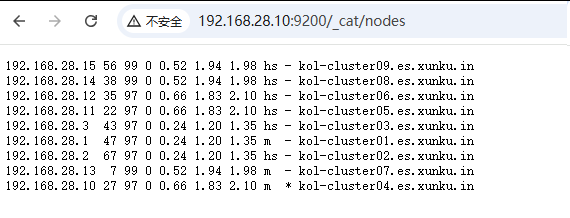
10.2 Http检查节点状态
http://192.168.28.10:9200/_cat/nodes
10.3 Elasticsearch Multi-head工具
- 安装Chrome插件-Multi Elasticsearch Head
直接在Chrome浏览器应用市场搜索安装Multi Elasticsearch Head。安装完之后输入ES集群地址,就可以看到集群概况了

11. 重要操作
ES首次启动成功后,必须注释elasticsearch.yml中的配置项-cluster.initial_master_nodes(防止重启脑裂)
官方文档-cluster.initial_master_nodes
# 一定要注释掉,防止集群脑裂
# cluster.initial_master_nodes