[Linux] 内核链表实现详解
Linux内核链表实现详解
目录
- 1. 概述
- 2. 基本结构
- 3. 实现原理
- 4. 主要操作函数
- 5. 链表遍历
- 6. 应用实例
- 7. 设计思想
- 8. 参考资料
1. 概述
Linux内核链表是内核中最基础也是最重要的数据结构之一,它采用了"侵入式"链表的设计思想,具有高效、灵活、通用的特点。本文档详细介绍Linux内核链表的实现原理、操作函数、应用实例以及设计思想。
2. 基本结构
Linux内核中链表的核心结构定义在include/linux/list.h文件中,其基本结构如下:
struct list_head {struct list_head *next;  // 指向下一个节点的指针struct list_head *prev;  // 指向前一个节点的指针
};
这是一个双向链表节点,只包含两个指针:一个指向下一个节点,一个指向前一个节点。
2.1 链表结构示意图
下图展示了Linux内核链表的基本结构和工作原理:
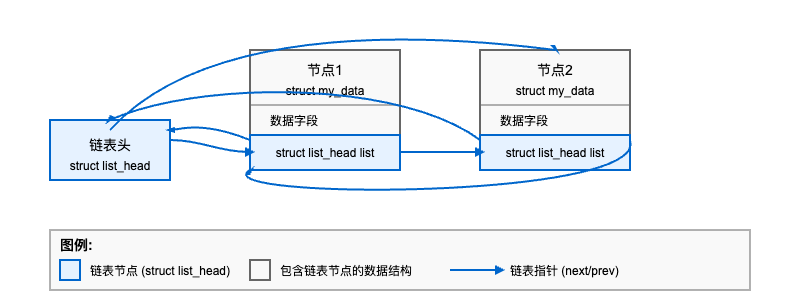
如图所示,Linux内核链表是一个双向循环链表,其中:
- 链表头是一个
struct list_head结构 - 每个节点都包含一个嵌入的
struct list_head成员 - 链表节点通过
next和prev指针相互连接 - 链表头的
next指向第一个节点,prev指向最后一个节点 - 最后一个节点的
next指向链表头,形成一个循环
链表的初始化方式有两种:
- 静态初始化:
#define LIST_HEAD_INIT(name) { &(name), &(name) }
#define LIST_HEAD(name) \struct list_head name = LIST_HEAD_INIT(name)
- 动态初始化:
static inline void INIT_LIST_HEAD(struct list_head *list)
{list->next = list;list->prev = list;
}
初始化时,链表头的next和prev指针都指向自身,表示一个空链表。
3. 实现原理
3.1 侵入式链表设计
Linux内核链表采用了"侵入式"设计。在传统链表中,链表节点通常包含数据或指向数据的指针:
// 传统链表节点
struct traditional_node {void *data;           // 指向数据的指针struct traditional_node *next;struct traditional_node *prev;
};
而在Linux内核的侵入式链表中,链表节点被嵌入到数据结构中:
// 数据结构
struct my_data {int id;char name[16];struct list_head list;  // 嵌入的链表节点// 其他数据...
};
3.2 container_of宏
container_of宏是侵入式链表设计的关键,它允许从链表节点指针获取包含该节点的结构体指针:
/*** container_of - 从成员指针获取包含它的结构体指针* @ptr:        指向成员的指针* @type:       包含该成员的结构体类型* @member:     成员在结构体中的名称** 返回值: 指向包含该成员的结构体的指针*/
#define container_of(ptr, type, member) ({                      \const typeof( ((type *)0)->member ) *__mptr = (ptr);    \(type *)( (char *)__mptr - offsetof(type,member) );})
这个宏的工作原理是:
- 计算成员在结构体中的偏移量(使用
offsetof宏) - 从成员的地址减去这个偏移量,得到结构体的起始地址
- 将结果转换为适当的结构体指针类型
下面是一个图示,展示了container_of宏的工作原理:
内存布局:
+---------------------------+
| struct my_data           |
|                           |
| int id;                   |  <-- 结构体起始地址
| char name[16];            |
|                           |
| struct list_head list;    |  <-- 链表节点地址 (ptr)
|                           |
+---------------------------+offsetof(struct my_data, list) = 链表节点地址 - 结构体起始地址container_of(ptr, struct my_data, list) = 链表节点地址 - offsetof(struct my_data, list)= 结构体起始地址
基于container_of宏,Linux内核定义了list_entry宏,用于从链表节点获取包含它的结构体:
/*** list_entry - 从链表节点获取包含它的结构体* @ptr:    链表节点指针* @type:   包含该节点的结构体类型* @member: 链表节点在结构体中的名称*/
#define list_entry(ptr, type, member) \container_of(ptr, type, member)
4. 主要操作函数
Linux内核链表提供了丰富的操作函数,使得链表操作变得简单高效。下面是这些函数的详细介绍。
4.1 链表操作函数参考表
| 函数名 | 功能描述 | 时间复杂度 | 使用场景 |
|---|---|---|---|
INIT_LIST_HEAD | 初始化链表头或节点 | O(1) | 动态初始化链表 |
list_add | 在指定节点之后添加新节点 | O(1) | 实现栈(后进先出) |
list_add_tail | 在指定节点之前添加新节点 | O(1) | 实现队列(先进先出) |
list_del | 从链表中删除节点 | O(1) | 移除不再需要的节点 |
list_del_init | 删除节点并重新初始化 | O(1) | 移除节点后可能重新使用 |
list_replace | 用新节点替换旧节点 | O(1) | 替换链表中的节点 |
list_move | 将节点移动到另一个链表的头部 | O(1) | 节点在链表间移动 |
list_move_tail | 将节点移动到另一个链表的尾部 | O(1) | 节点在链表间移动 |
list_is_last | 检查节点是否是链表的最后一个节点 | O(1) | 判断节点位置 |
list_empty | 检查链表是否为空 | O(1) | 判断链表状态 |
list_is_singular | 检查链表是否只有一个节点 | O(1) | 判断链表状态 |
list_cut_position | 将链表分割为两个 | O(1) | 链表分割操作 |
list_splice | 将一个链表合并到另一个链表的头部 | O(1) | 合并两个链表 |
list_splice_tail | 将一个链表合并到另一个链表的尾部 | O(1) | 合并两个链表 |
list_splice_init | 合并后重新初始化源链表 | O(1) | 合并后清空源链表 |
list_splice_tail_init | 合并到尾部后重新初始化源链表 | O(1) | 合并后清空源链表 |
4.2 遍历宏参考表
| 宏名 | 功能描述 | 使用场景 |
|---|---|---|
list_for_each | 正向遍历链表节点 | 只需访问链表节点 |
list_for_each_prev | 反向遍历链表节点 | 从尾到头遍历 |
list_for_each_safe | 安全地正向遍历(可删除节点) | 遍历过程中可能删除节点 |
list_for_each_prev_safe | 安全地反向遍历(可删除节点) | 反向遍历过程中可能删除节点 |
list_for_each_entry | 遍历包含链表节点的结构体 | 需要访问结构体数据 |
list_for_each_entry_reverse | 反向遍历包含链表节点的结构体 | 从尾到头访问结构体 |
list_for_each_entry_safe | 安全地遍历结构体(可删除节点) | 遍历过程中可能删除节点 |
list_for_each_entry_safe_reverse | 安全地反向遍历结构体(可删除节点) | 反向遍历过程中可能删除节点 |
list_for_each_entry_continue | 从当前位置继续遍历结构体 | 中断后继续遍历 |
list_for_each_entry_from | 从指定位置开始遍历结构体 | 从特定位置开始遍历 |
4.3 添加节点
4.1.1 list_add - 在指定节点之后添加新节点
static inline void list_add(struct list_head *new, struct list_head *head)
{__list_add(new, head, head->next);
}
4.1.2 list_add_tail - 在指定节点之前添加新节点
static inline void list_add_tail(struct list_head *new, struct list_head *head)
{__list_add(new, head->prev, head);
}
4.2 删除节点
4.2.1 list_del - 从链表中删除节点
static inline void list_del(struct list_head *entry)
{__list_del(entry->prev, entry->next);entry->next = LIST_POISON1;entry->prev = LIST_POISON2;
}
4.2.2 list_del_init - 删除节点并重新初始化
static inline void list_del_init(struct list_head *entry)
{__list_del_entry(entry);INIT_LIST_HEAD(entry);
}
4.3 移动节点
4.3.1 list_move - 将节点从一个链表移动到另一个链表的头部
static inline void list_move(struct list_head *list, struct list_head *head)
{__list_del_entry(list);list_add(list, head);
}
4.3.2 list_move_tail - 将节点从一个链表移动到另一个链表的尾部
static inline void list_move_tail(struct list_head *list, struct list_head *head)
{__list_del_entry(list);list_add_tail(list, head);
}
4.4 链表合并
4.4.1 list_splice - 将一个链表合并到另一个链表的头部
static inline void list_splice(const struct list_head *list, struct list_head *head)
{if (!list_empty(list))__list_splice(list, head, head->next);
}
4.4.2 list_splice_tail - 将一个链表合并到另一个链表的尾部
static inline void list_splice_tail(struct list_head *list, struct list_head *head)
{if (!list_empty(list))__list_splice(list, head->prev, head);
}
4.5 链表状态检查
4.5.1 list_empty - 检查链表是否为空
static inline int list_empty(const struct list_head *head)
{return head->next == head;
}
4.5.2 list_is_singular - 检查链表是否只有一个节点
static inline int list_is_singular(const struct list_head *head)
{return !list_empty(head) && (head->next == head->prev);
}
5. 链表遍历
Linux内核提供了多种遍历链表的宏,使得链表遍历变得简单高效:
5.1 基本遍历
#define list_for_each(pos, head) \for (pos = (head)->next; pos != (head); pos = pos->next)
5.2 安全遍历(防止遍历过程中删除节点)
#define list_for_each_safe(pos, n, head) \for (pos = (head)->next, n = pos->next; pos != (head); \pos = n, n = pos->next)
5.3 遍历包含链表节点的结构体
#define list_for_each_entry(pos, head, member) \for (pos = list_first_entry(head, typeof(*pos), member); \&pos->member != (head); \pos = list_next_entry(pos, member))
5.4 安全地遍历包含链表节点的结构体
#define list_for_each_entry_safe(pos, n, head, member) \for (pos = list_first_entry(head, typeof(*pos), member), \n = list_next_entry(pos, member); \&pos->member != (head); \pos = n, n = list_next_entry(n, member))
6. 应用实例
6.1 进程管理
Linux内核中的进程管理是链表应用的典型例子:
struct task_struct {// ...struct list_head tasks;        // 用于所有进程的链表struct list_head children;     // 用于子进程链表struct list_head sibling;      // 用于兄弟进程链表// ...
};
6.2 内存管理
在伙伴系统(Buddy System)中,每个空闲页块链表都使用list_head:
struct zone {// ...struct free_area free_area[MAX_ORDER];// ...
};struct free_area {struct list_head free_list[MIGRATE_TYPES];unsigned long nr_free;
};
6.3 文件系统
在目录项缓存(dentry cache)中,每个目录项都包含一个链表节点:
struct dentry {// ...struct list_head d_lru;        // 用于LRU链表struct list_head d_child;      // 用于子目录项链表struct list_head d_subdirs;    // 用于子目录链表// ...
};
6.4 完整示例
下面是一个完整的示例,展示如何在内核模块中使用链表:
#include <linux/module.h>
#include <linux/kernel.h>
#include <linux/init.h>
#include <linux/list.h>
#include <linux/slab.h>// 定义数据结构
struct my_device {int id;char name[16];struct list_head list;  // 嵌入的链表节点
};// 定义全局链表头
static LIST_HEAD(device_list);// 初始化函数
static int __init my_init(void)
{int i;struct my_device *dev;printk(KERN_INFO "链表示例模块加载\n");// 创建5个设备并添加到链表for (i = 0; i < 5; i++) {// 分配内存dev = kmalloc(sizeof(struct my_device), GFP_KERNEL);if (!dev) {printk(KERN_ERR "内存分配失败\n");return -ENOMEM;}// 初始化设备dev->id = i;snprintf(dev->name, sizeof(dev->name), "设备%d", i);// 添加到链表list_add_tail(&dev->list, &device_list);printk(KERN_INFO "添加设备: %s (ID: %d)\n", dev->name, dev->id);}// 遍历并打印链表printk(KERN_INFO "链表中的设备:\n");list_for_each_entry(dev, &device_list, list) {printk(KERN_INFO "  %s (ID: %d)\n", dev->name, dev->id);}return 0;
}// 退出函数
static void __exit my_exit(void)
{struct my_device *dev, *tmp;// 安全地遍历并释放链表list_for_each_entry_safe(dev, tmp, &device_list, list) {printk(KERN_INFO "删除设备: %s (ID: %d)\n", dev->name, dev->id);list_del(&dev->list);kfree(dev);}printk(KERN_INFO "链表示例模块卸载\n");
}module_init(my_init);
module_exit(my_exit);MODULE_LICENSE("GPL");
MODULE_AUTHOR("示例作者");
MODULE_DESCRIPTION("Linux内核链表示例模块");
7. 设计思想
7.1 简单而强大的设计哲学
Linux内核链表的设计遵循了"简单而强大"的哲学。它的核心结构非常简单,只有两个指针,但通过巧妙的设计和宏的使用,提供了强大的功能。
7.2 通用性与特殊性的平衡
Linux内核链表设计了一个通用的框架,可以适用于各种场景,同时又提供了针对特定场景的优化(如哈希链表)。
7.3 侵入式设计的思想
侵入式设计是Linux内核链表的核心思想,它将数据结构和链表节点紧密结合,提高了内存和缓存效率。
7.4 宏的巧妙运用
Linux内核链表大量使用宏来简化代码,提高可读性和可维护性。例如,container_of宏和各种遍历宏使得链表操作变得简单直观。
7.5 性能优先的设计
Linux内核链表的设计始终将性能放在首位,例如:
- 所有基本操作都是O(1)复杂度
- 侵入式设计提高了缓存命中率
- 避免了不必要的内存分配和释放
8. 参考资料
- Linux内核源代码:include/linux/list.h
- 《Linux内核设计与实现》,作者:Robert Love
- 《深入理解Linux内核》,作者:Daniel P. Bovet, Marco Cesati