OCR-图片内容识别
一、需求分析
现有需求,一些数据暂时不方便直接读取或通过csv等文件导入数据库。只能以截图-图片/jpg形式发给业务,业务老师想直接上传图片后解析数据存到对应表中。
经查询OCR技术符合,现以Tess4J 演示
1.1 选择Tess4J 的原因
允许 Java 程序直接使用 Tesseract OCR 引擎进行光学字符识别(OCR),并且省去了额外安装 Tesseract 环境的麻烦。使用 Tess4J 时,Tesseract 的核心库已经被封装进了该库中,因此无需单独安装 Tesseract 引擎。
优势:
1.Tess4J 能够在 Windows、Linux 和 macOS 上运行,无需为不同操作系统安装不同版本的 Tesseract。
2.通过简单的 API 调用即可完成 OCR
1.2 使用步骤
老规矩, 1.2.1 加 maven 依赖
<!-- Tesseract-OCR 依赖 --><dependency><groupId>net.sourceforge.tess4j</groupId><artifactId>tess4j</artifactId><version>5.8.0</version></dependency></dependencies>
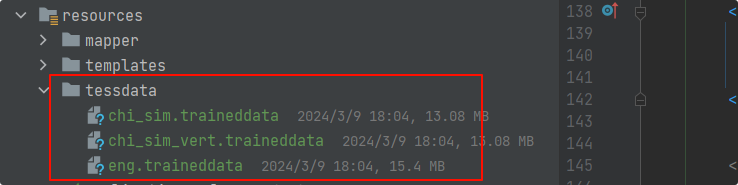
1.2.2 虽然 Tess4J 不需要单独安装 Tesseract 引擎,但你仍然需要下载 Tesseract 语言数据文件(例如,chi_sim.traineddata 用于简体中文),并将其放在指定的路径中。Tesseract 官方 GitHub
下图展示
1.2.3 代码演示
    // 临时文件存储路径(实际项目建议用分布式存储,如 MinIO)private static final String TEMP_DIR = "temp/images";  @ApiOperation("上传图片解析内容")@PostMapping("/upload-ocr")@SneakyThrowspublic String uploadAndOcr(@RequestParam("file") MultipartFile file) {// 1. 保存上传的图片到临时目录File tempDir = new File(TEMP_DIR);if (!tempDir.exists()) tempDir.mkdirs();File tempFile = new File(TEMP_DIR +File.separator+ file.getOriginalFilename());// 2. 强制转为绝对路径文件(关键!避免 Tomcat 重写路径)File absoluteTempFile = tempFile.getAbsoluteFile();file.transferTo(absoluteTempFile);String tempPath = tempFile.getAbsolutePath();String newPath = generateNewFileName(tempPath);ImagePreprocessUtil.preprocessWithImageIO(tempPath,newPath);// 再进行膨胀处理(1次即可,强化 -- 特征)
//        ImagePreprocessUtil.dilateImage(newPath, newPath, 1);service.uploadAndOcr(newPath);// 4. 数据入库(调用 Service 层)
//        service.saveBatch(cleanData);// 5. 删除临时文件(可选)
//        tempFile.delete();return "解析成功!";}/*** 生成新文件名(如 "23.jpg" → "23bak.jpg")* @param originalFileName 原始文件名* @return 新文件名*/public static String generateNewFileName(String originalFileName) {if (originalFileName == null || originalFileName.isEmpty()) {return null;}int dotIndex = originalFileName.lastIndexOf(".");if (dotIndex == -1) {// 无扩展名:"23" → "23bak"return originalFileName + "bak";} else {// 有扩展名:"23.jpg" → "23bak.jpg"String prefix = originalFileName.substring(0, dotIndex);String suffix = originalFileName.substring(dotIndex);return prefix + "bak" + suffix;}}
1.3 处理解析图片
@Override@SneakyThrowspublic String uploadAndOcr(String tempPath) {// 2. 调用 OCR 解析图片文字List<List<String>> tableData = OcrUtils.parseImageTable(tempPath);// 3. 数据清洗过滤(移除“不佳、一般”) 这个针对自身业务的,可不看List<FundRiseVO> cleanData = OcrUtils.filterInvalidData(tableData);System.out.println(cleanData);return null;}
package com.test.dawu.util;import com.test.dawu.vo.FundRiseVO;
import lombok.extern.slf4j.Slf4j;
import net.sourceforge.tess4j.ITesseract;
import net.sourceforge.tess4j.Tesseract;
import net.sourceforge.tess4j.TesseractException;import java.io.File;
import java.util.ArrayList;
import java.util.List;/*** OCR 解析图片*/
@Slf4j
public class OcrUtils {// 初始化 Tesseract(需下载中文训练集 eng.traineddata 和 chi_sim.traineddata,放入 tessdata 目录)private static final ITesseract TESSERACT = new Tesseract();static {// 设置训练集路径(本地 tessdata 目录)TESSERACT.setDatapath("src/main/resources/tessdata");// 设置语言(中文+英文)TESSERACT.setLanguage("chi_sim+eng");// 多次调用 setVariable 设置多个参数(替代批量设置)TESSERACT.setVariable("load_system_dawg", "false"); // 关闭系统字典TESSERACT.setVariable("load_freq_dawg", "false");   // 关闭频率字典// 例如:只识别 数字、字母、中文、--、/ 等(根据你的场景调整)
//        TESSERACT.setVariable("tessedit_char_whitelist", "\u4e00-\u9fa50123456789abcdefghijklmnopqrstuvwxyzABCDEFGHIJKLMNOPQRSTUVWXYZ--/=");TESSERACT.setVariable("preserve_interword_spaces", "1"); // 保留空格// 设置页面分割模式TESSERACT.setPageSegMode(6);}/*** 解析图片中的表格文字,返回二维列表(行→列)*/public static List<List<String>> parseImageTable(String imagePath) throws TesseractException {File imageFile = new File(imagePath);// 1. OCR 识别图片文字(返回按行分割的字符串)String ocrText = TESSERACT.doOCR(imageFile);log.info("直接即系数据为{}",ocrText);String[] lines = ocrText.split("\\n"); // 按换行符分割行List<List<String>> tableData = new ArrayList<>();// 2. 按制表符分割每行数据(假设图片表格用制表符分隔列,可根据实际调整分割符)for (String line : lines) {String[] columns = line.trim().split("\\t+"); // 多个制表符合并为一个List<String> rowData = new ArrayList<>();for (String col : columns) {if (!col.isEmpty()) {rowData.add(col); // 过滤空字符串}}if (!rowData.isEmpty()) {tableData.add(rowData);}}return tableData;}// 无效内容列表(可配置到配置文件中)private static final List<String> INVALID_CONTENTS = List.of("不佳", "一般", "良好", "优秀");/*** 过滤无效数据,将表格转为 FundRiseVO 列表*/public static List<FundRiseVO> filterInvalidData(List<List<String>> tableData) {List<FundRiseVO> cleanData = new ArrayList<>();// 假设表格第 3 行开始是数据行(索引 2,需根据实际 OCR 结果调整)for (int i = 2; i < tableData.size(); i++) {List<String> row = tableData.get(i);if (row.size() < 4) continue; // 过滤列数不足的无效行// 1. 提取原始数据(周期、涨跌幅、同类平均、同类排行)String period = row.get(0); // 近1周、近1月String riseRate = row.get(1); // -0.93%、5.69%String peerAvg = row.get(2); // 2.16%、10.58%String peerRank = row.get(3); // 4175/4394、3079/4249// 2. 检查后续列是否包含无效内容(如“不佳”“一般”),并剔除for (int j = 4; j < row.size(); j++) {String col = row.get(j);if (INVALID_CONTENTS.contains(col)) {// 无效内容已找到,直接跳出(避免影响其他数据)break;}}// 3. 封装为 VO(过滤空值)if (!period.isEmpty() && !riseRate.isEmpty()) {FundRiseVO vo = new FundRiseVO();vo.setPeriod(period);vo.setRiseRate(riseRate);vo.setPeerAvg(peerAvg);vo.setPeerRank(peerRank);cleanData.add(vo);}}return cleanData;}
}
二、工具类
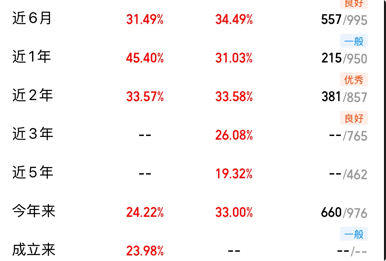
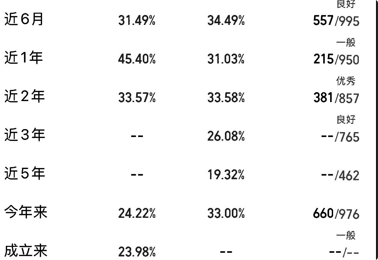
为啥写这个工具类,前面的解析图片后发现以下情况
1. 500/1050 【/1050】这个是灰色的,直接解析发现输出的数据中 只有500。此时需要将图片
package com.swsmu.esp.espbackend.util;import javax.imageio.ImageIO;
import java.awt.*;
import java.awt.image.BufferedImage;
import java.io.File;
import java.io.IOException;/****@author dawu_jinsan*@date 2025/10/27 16:17*@version V1.0* @desc   对图片进行简单预处理**/
public class ImagePreprocessUtil {/*** 简单预处理:灰度化 + 对比度增强(基于亮度调整)*/public static void preprocessWithImageIO(String inputPath, String outputPath) throws IOException {
// 1. 读取图片BufferedImage src = ImageIO.read(new File(inputPath));int width = src.getWidth();int height = src.getHeight();// 2. 转为灰度图(同之前)BufferedImage gray = new BufferedImage(width, height, BufferedImage.TYPE_BYTE_GRAY);Graphics2D g = gray.createGraphics();g.drawImage(src, 0, 0, null);g.dispose();// 3. 增强对比度(核心优化:文字变暗,背景保持白色)BufferedImage enhanced = new BufferedImage(width, height, BufferedImage.TYPE_BYTE_GRAY);for (int y = 0; y < height; y++) {for (int x = 0; x < width; x++) {int grayValue = gray.getRGB(x, y) & 0xFF; // 0-255(0=黑,255=白)// 关键逻辑:// - 背景(接近白色,灰度值高):保持白色(255)// - 文字(浅灰色,灰度值中等):按比例加深(降低灰度值)int threshold = 230; // 背景阈值(高于此值视为背景,保持白色)int enhancedValue;if (grayValue > threshold) {// 背景:强制为白色(255)enhancedValue = 255;} else {// 文字:按比例加深(灰度值越低,文字越黑)// 例如:将 150-230 的浅灰范围映射到 0-150 的深灰范围enhancedValue = (int) (grayValue * (150.0 / threshold));}// 确保值在 0-255 范围内enhancedValue = Math.max(0, Math.min(255, enhancedValue));// 设置像素(灰度图:R=G=B=enhancedValue)enhanced.setRGB(x, y, enhancedValue << 16 | enhancedValue << 8 | enhancedValue);}}
/*        // 3. 二值化处理(替代对比度增强,适合背景干净的图片)BufferedImage enhanced = new BufferedImage(width, height, BufferedImage.TYPE_BYTE_GRAY);int binaryThreshold = 200; // 二值化阈值(高于此值为白,低于为黑)for (int y = 0; y < height; y++) {for (int x = 0; x < width; x++) {int grayValue = gray.getRGB(x, y) & 0xFF;// 非黑即白:文字(<200)→ 黑(0),背景(≥200)→ 白(255)int binaryValue = grayValue < binaryThreshold ? 0 : 255;enhanced.setRGB(x, y, binaryValue << 16 | binaryValue << 8 | binaryValue);}}*/// 4. 保存图片ImageIO.write(enhanced, "jpg", new File(outputPath));}/*** 自适应阈值二值化:兼顾浅灰色文字和特殊符号* @param inputPath 原始图片路径* @param outputPath 处理后图片路径* @param blockSize 局部区域大小(奇数,如 15,越大越平滑)* @param c 阈值偏移量(负数可保留更多浅灰,如 -10)*/public static void adaptiveThreshold(String inputPath, String outputPath, int blockSize, int c) throws IOException {// 1. 读取图片并转为灰度图BufferedImage src = ImageIO.read(new File(inputPath));int width = src.getWidth();int height = src.getHeight();BufferedImage gray = new BufferedImage(width, height, BufferedImage.TYPE_BYTE_GRAY);Graphics2D g = gray.createGraphics();g.drawImage(src, 0, 0, null);g.dispose();// 2. 自适应阈值二值化(核心)BufferedImage binary = new BufferedImage(width, height, BufferedImage.TYPE_BYTE_GRAY);for (int y = 0; y < height; y++) {for (int x = 0; x < width; x++) {// 计算当前像素周围 blockSize×blockSize 区域的平均灰度int sum = 0;int count = 0;int halfBlock = blockSize / 2;// 遍历局部区域(避免越界)for (int dy = -halfBlock; dy <= halfBlock; dy++) {for (int dx = -halfBlock; dx <= halfBlock; dx++) {int nx = x + dx;int ny = y + dy;if (nx >= 0 && nx < width && ny >= 0 && ny < height) {sum += gray.getRGB(nx, ny) & 0xFF;count++;}}}// 局部区域平均灰度作为基准阈值int localThreshold = sum / count + c;// 当前像素灰度值int pixel = gray.getRGB(x, y) & 0xFF;// 二值化:低于局部阈值为黑(文字),高于为白(背景)int binaryPixel = pixel < localThreshold ? 0 : 255;binary.setRGB(x, y, binaryPixel << 16 | binaryPixel << 8 | binaryPixel);}}// 3. 保存处理后的图片ImageIO.write(binary, "jpg", new File(outputPath));}/*** 低阈值二值化:保留浅灰色文字(如/1050),同时尽量减少背景噪声* @param inputPath 原始图片路径* @param outputPath 处理后图片路径* @param threshold 二值化阈值(建议220-230,值越高保留的浅灰色越多)*/public static void lowThresholdBinarization(String inputPath, String outputPath, int threshold) throws IOException {// 1. 读取图片并转为灰度图BufferedImage src = ImageIO.read(new File(inputPath));int width = src.getWidth();int height = src.getHeight();BufferedImage gray = new BufferedImage(width, height, BufferedImage.TYPE_BYTE_GRAY);Graphics2D g = gray.createGraphics();g.drawImage(src, 0, 0, null);g.dispose();// 2. 低阈值二值化(核心:保留浅灰色)BufferedImage binary = new BufferedImage(width, height, BufferedImage.TYPE_BYTE_GRAY);for (int y = 0; y < height; y++) {for (int x = 0; x < width; x++) {int grayValue = gray.getRGB(x, y) & 0xFF; // 0-255(0=黑,255=白)// 阈值判断:低于阈值→文字(黑),高于→背景(白)// 阈值设为220-230,确保浅灰色(如200-220)被保留为文字int binaryValue = grayValue < threshold ? 0 : 255;binary.setRGB(x, y, binaryValue << 16 | binaryValue << 8 | binaryValue);}}// 3. 保存处理后的图片ImageIO.write(binary, "jpg", new File(outputPath));}/*** 膨胀处理:加粗线条(让 -- 的两条横线更清晰,避免粘连或误判)* @param inputPath 二值化后的图片路径(非黑即白,效果更佳)* @param outputPath 处理后图片路径* @param iterations 膨胀次数(1-2次即可,过多会导致线条粘连)*/public static void dilateImage(String inputPath, String outputPath, int iterations) throws IOException {// 1. 读取二值化图片(非黑即白,确保膨胀效果)BufferedImage binary = ImageIO.read(new File(inputPath));int width = binary.getWidth();int height = binary.getHeight();BufferedImage dilated = new BufferedImage(width, height, BufferedImage.TYPE_BYTE_GRAY);// 2. 膨胀逻辑:将黑色像素(文字)的周围像素也设为黑色,加粗线条for (int i = 0; i < iterations; i++) {for (int y = 0; y < height; y++) {for (int x = 0; x < width; x++) {int pixel = binary.getRGB(x, y) & 0xFF;if (pixel == 0) { // 当前像素是黑色(文字)// 将周围 3x3 区域的像素设为黑色(膨胀)for (int dy = -1; dy <= 1; dy++) {for (int dx = -1; dx <= 1; dx++) {int nx = x + dx;int ny = y + dy;if (nx >= 0 && nx < width && ny >= 0 && ny < height) {dilated.setRGB(nx, ny, 0 << 16 | 0 << 8 | 0); // 设为黑色}}}} else {// 背景保持白色dilated.setRGB(x, y, 255 << 16 | 255 << 8 | 255);}}}// 迭代时,将处理后的图片作为下一次的输入binary = dilated;}// 3. 保存膨胀后的图片ImageIO.write(dilated, "jpg", new File(outputPath));}}
2.1 二值化 与 增强对比度 转为灰度图各自作用
-
二值化:
- 作用:将图像转为只有两种颜色(黑白),突出主要信息,简化图像。
- 应用:OCR,边缘检测,图像分割。
-
增强对比度:
- 作用:增强图像中不同亮度区域之间的对比度,使细节更加突出,改善图像的清晰度。
- 应用:OCR,图像优化,细节增强。
-
转为灰度图:
- 作用:去除颜色信息,只保留亮度信息,简化图像,减少复杂度。
- 应用:图像预处理,图像分析,OCR。
2.2 结果
因文中是某个产品的测试原图
1.转为灰度图
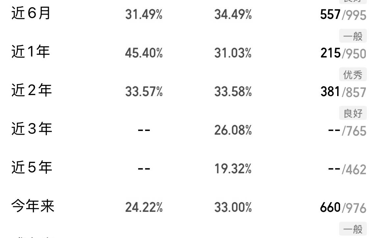
2.直接增强对比度
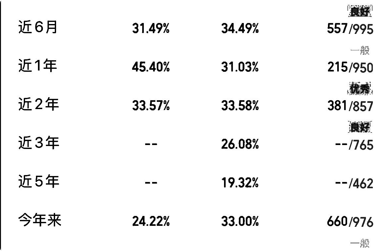
3. 灰度图+增强对比度
4. 二值化处理
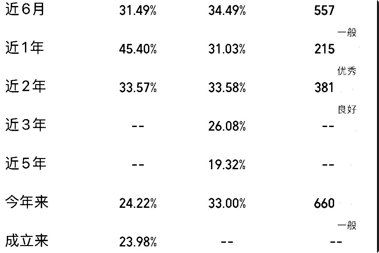
读取还是会有问题,比如--/-- 识别为 -~-/-- 或者 = 或者 ww
解决办法:
// 设置字符白名单,确保识别 "0-9", "-", "." 等 tesseract.setTessVariable("tessedit_char_whitelist", "0123456789-.")
三、spire_ocr_java
原因换种方式 试一试
1.导包 + Maven 在构建过程中查找依赖的仓库来源
如何在 Java 项目中扫描识别图片中的文字
<dependency><groupId>e-iceblue</groupId><artifactId>spire.ocr</artifactId><version>2.1.1</version></dependency><repository><id>com.e-iceblue</id><name>e-iceblue</name><url>https://repo.e-iceblue.cn/repository/maven-public/</url></repository>
2.代码
代码中dependencis 文件地址 【我是直接解压放到E盘测试,看你自己放置位置】也可以在1中点击进入官方下载
https://www.e-iceblue.com/downloads/plugins/java/ocr/windows/dependencies.zip
@ApiOperation("上传图片解析内容")@PostMapping("/upload-ocr/spire")@SneakyThrowspublic String uploadAndOcr2(@RequestParam("file") MultipartFile file) {// 1. 保存上传的图片到临时目录File tempDir = new File(TEMP_DIR);if (!tempDir.exists()) tempDir.mkdirs();File tempFile = new File(TEMP_DIR + File.separator + file.getOriginalFilename());// 2. 强制转为绝对路径文件(关键!避免 Tomcat 重写路径)File absoluteTempFile = tempFile.getAbsoluteFile();file.transferTo(absoluteTempFile);// 2. 关键:旋转 180° 矫正上下颠倒String rotatedImagePath = TEMP_DIR + File.separator + "rotated_" + file.getOriginalFilename();rotate180(absoluteTempFile.getAbsolutePath(), rotatedImagePath);// 指定依赖文件的路径String dependencies = "E:\\dependencies";// 指定输出文件的路径String outputFile = TEMP_DIR+"/test_out.txt";// 创建一个 OcrScanner 对象OcrScanner scanner = new OcrScanner();// 设置 OcrScanner 对象的依赖文件路径scanner.setDependencies(dependencies);// 使用 OcrScanner 对象扫描指定的图像文件scanner.scan(rotatedImagePath);// 获取 IOCRText 对象(而非直接字符串)IOCRText ocrText = scanner.getText();System.out.println(ocrText);// 从 IOCRText 中提取完整文本(包含换行等格式)String text = ocrText.toString();// 创建一个输出文件对象File output = new File(outputFile);// 如果输出文件已经存在,则删除它if (output.exists()) {output.delete();}// 创建一个 BufferedWriter 对象用于向输出文件写入内容BufferedWriter writer = new BufferedWriter(new FileWriter(outputFile));// 将扫描的文本内容写入输出文件中writer.write(text);// 关闭 BufferedWriter 对象以释放资源writer.close();return "解析成功";}/*** 将图片旋转 180°(矫正上下颠倒)* @param inputPath 原始图片路径* @param outputPath 旋转后图片路径*/public static void rotate180(String inputPath, String outputPath) throws IOException {// 读取原始图片BufferedImage src = ImageIO.read(new File(inputPath));int width = src.getWidth();int height = src.getHeight();// 创建旋转后的图片缓冲区BufferedImage rotated = new BufferedImage(width, height, src.getType());Graphics2D g = rotated.createGraphics();// 旋转 180°:先平移到中心,旋转,再平移回来g.translate(width / 2, height / 2);g.rotate(Math.PI); // 旋转 180°(π 弧度)g.translate(-width / 2, -height / 2);// 绘制旋转后的图片g.drawImage(src, 0, 0, null);g.dispose();// 保存旋转后的图片ImageIO.write(rotated, "jpg", new File(outputPath));}
3.测试结果
我测试出来结果是倒着来的 ,【一般是从上到下,从左到右 的正常顺序】。
实际结果是 从下到上,从左到右。搜索得知
文字倒序的常见原因
- 图片被旋转:若图片因拍摄或处理失误被旋转了 180°(上下颠倒),OCR 会按 “倒着的文字” 顺序识别,导致结果倒序。
- 图片镜像翻转:图片左右翻转(如镜像效果),文字会从右到左排列,OCR 识别结果也会随之反转。
- 特殊排版:极少数情况下,图片文字本身是倒序排版(如设计需求),OCR 会忠实按排版顺序识别。
四、百度云中 通用文字识别
具体过程简单如下操作即可
大概参考https://blog.csdn.net/qq_37493556/article/details/109299207
因时间变动,会变得不同,最好根据下述官方来操作。上述可作为java代码参考
百度智能云-文字识别公有云API在线调试教程
五、参考文档
https://blog.csdn.net/running17/article/details/127240736