ksycopg2实战:Python连接KingbaseES数据库的完整指南
摘要:本文详细介绍了KingbaseES数据库的Python专用驱动ksycopg2的使用方法。内容涵盖驱动安装、连接配置、CRUD操作等基础功能,以及事务管理、连接池等高级特性。ksycopg2作为遵循Python DBAPI 2.0规范的线程安全适配器,针对KingbaseES进行了深度优化,支持数据类型映射、批量操作等特性。文章提供了完整的业务表创建示例和员工管理系统实战案例,包含环境配置、性能优化建议和常见问题解决方案,帮助开发者快速掌握该驱动的使用技巧。通过详细的代码示例,展示了如何高效安全地操作KingbaseES数据库。
一、安装ksycopg2:KingbaseES的Python
ksycopg2是专为KingbaseES数据库设计的Python适配器,完全遵循Python DB API 2.0规范,具有线程安全的特性。它不仅提供了高效的数据操作能力,还支持KingbaseES特有的功能特性。
与通用的PostgreSQL驱动psycopg2相比,ksycopg2针对KingbaseES进行了深度优化,特别是在数据类型映射、事务处理和高级功能支持方面表现更加出色。
KingbaseES提供了专门的Python驱动包ksycopg2,它是基于Python DB API 2.0规范实现的线程安全数据库适配器!
1.1 科普ksycopg2知识
ksycopg2是Python编程语言的KingbaseES数据库适配器。它的主要特点是Python DB API 2.0 规范的完整实现和线程安全。
ksycopg2 主要在C程序中作为libkci包装器实现,因此既高效又安全。它拥有客户端和服务端游标,支持异步通信和通知、复制。
ksycopg2驱动需要和python大版本一致,如python3.8的ksycopg2驱动支持python3.8.x的任意小版本。
更多科普请查看金仓官方手册:如何通过 Python 驱动 Ksycopg2 连接和使用 Kingbase 数据库

1.2 官方下载ksycopg2驱动
1、首先需要下载并安装与你的Python版本和系统架构匹配的ksycopg2驱动。驱动可以从KingbaseES官方网站(KES-电科金仓官网)获取,如下图所示:
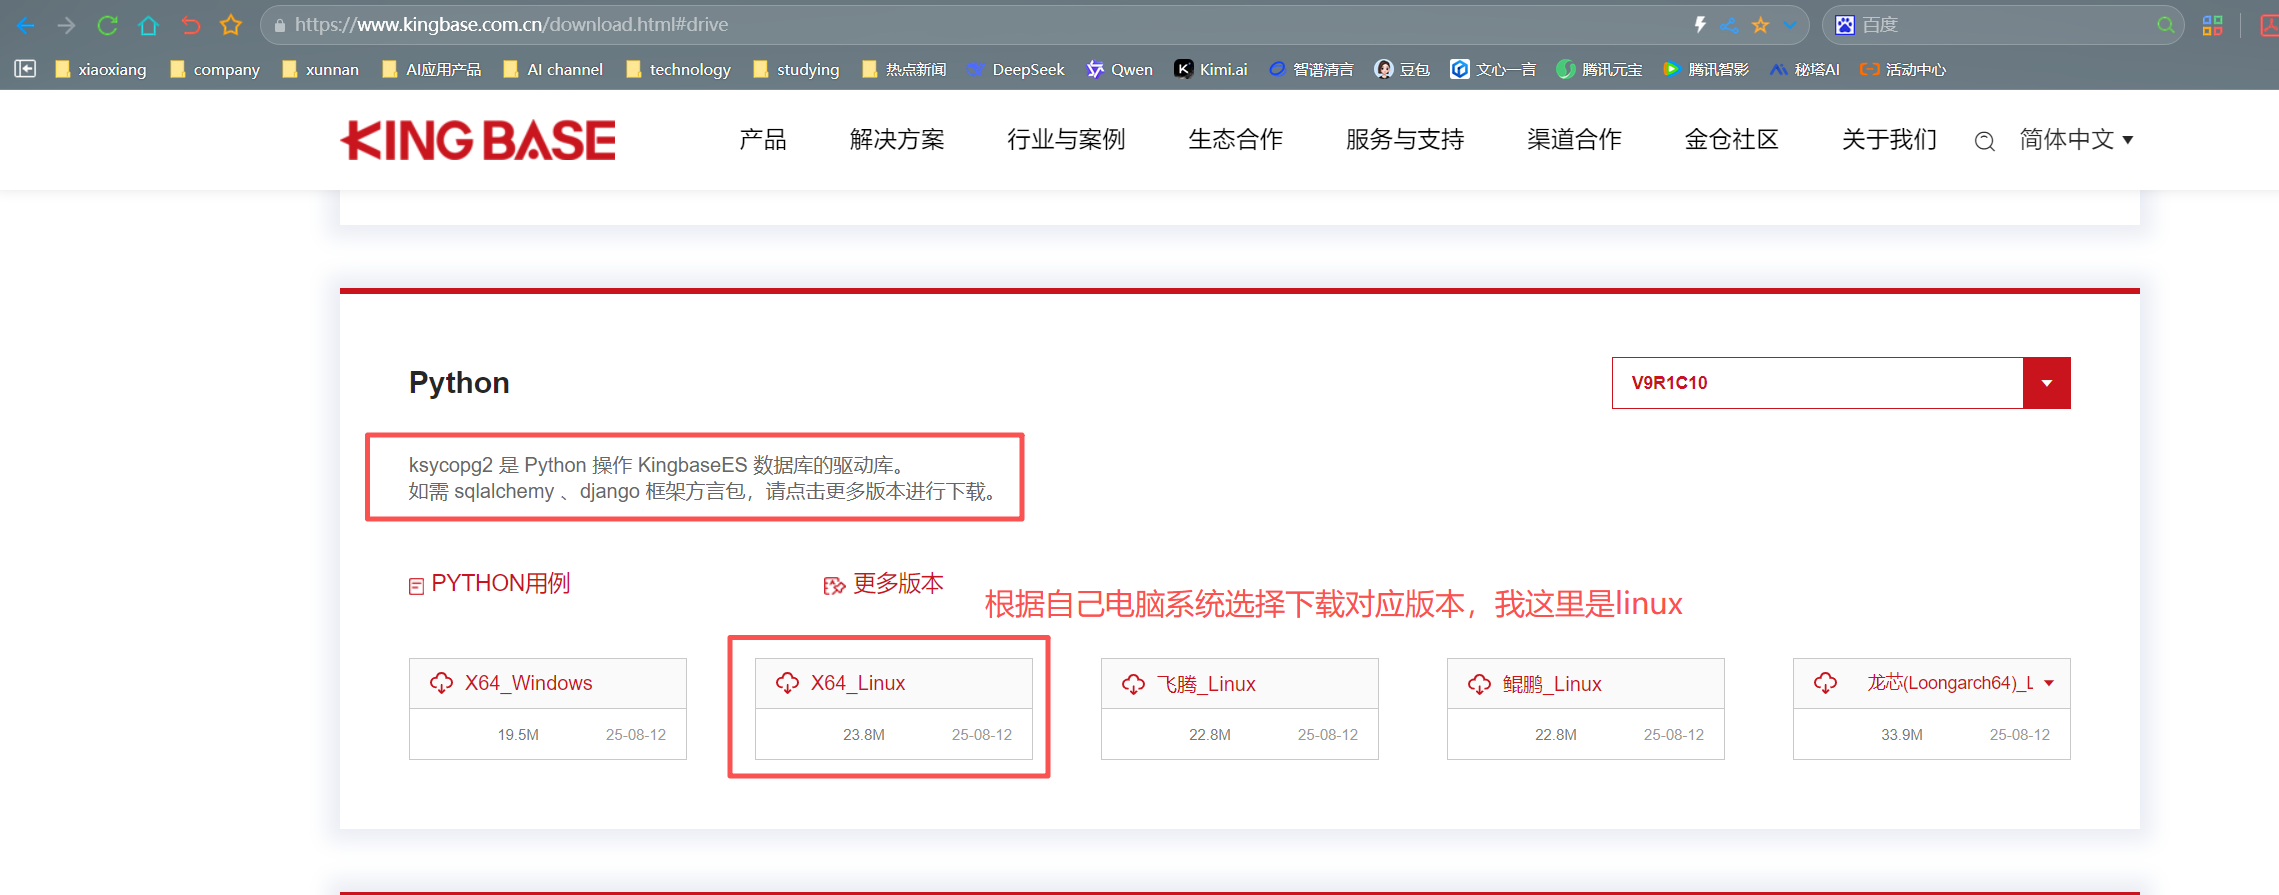
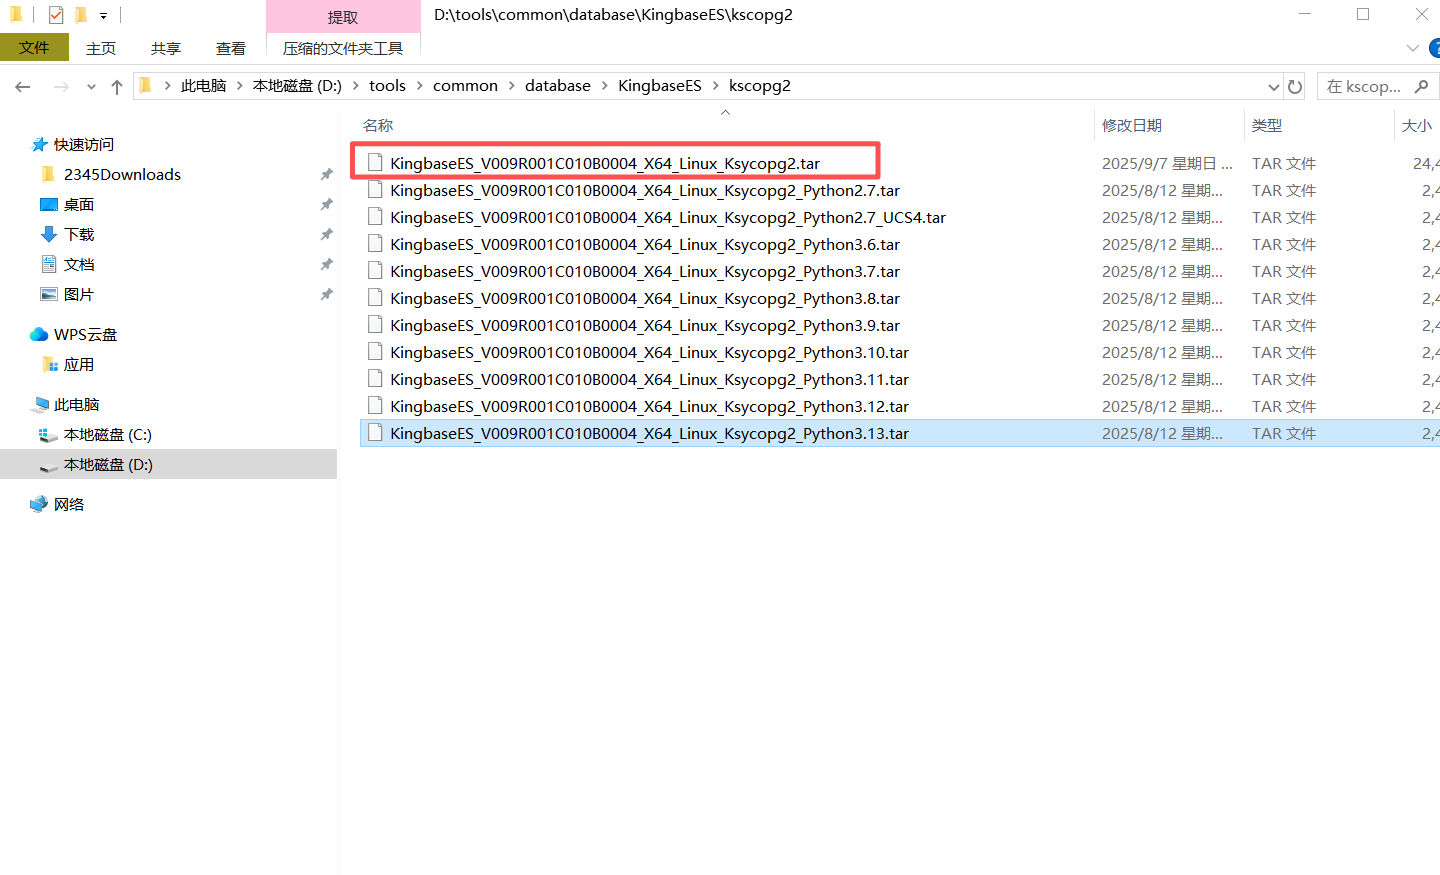
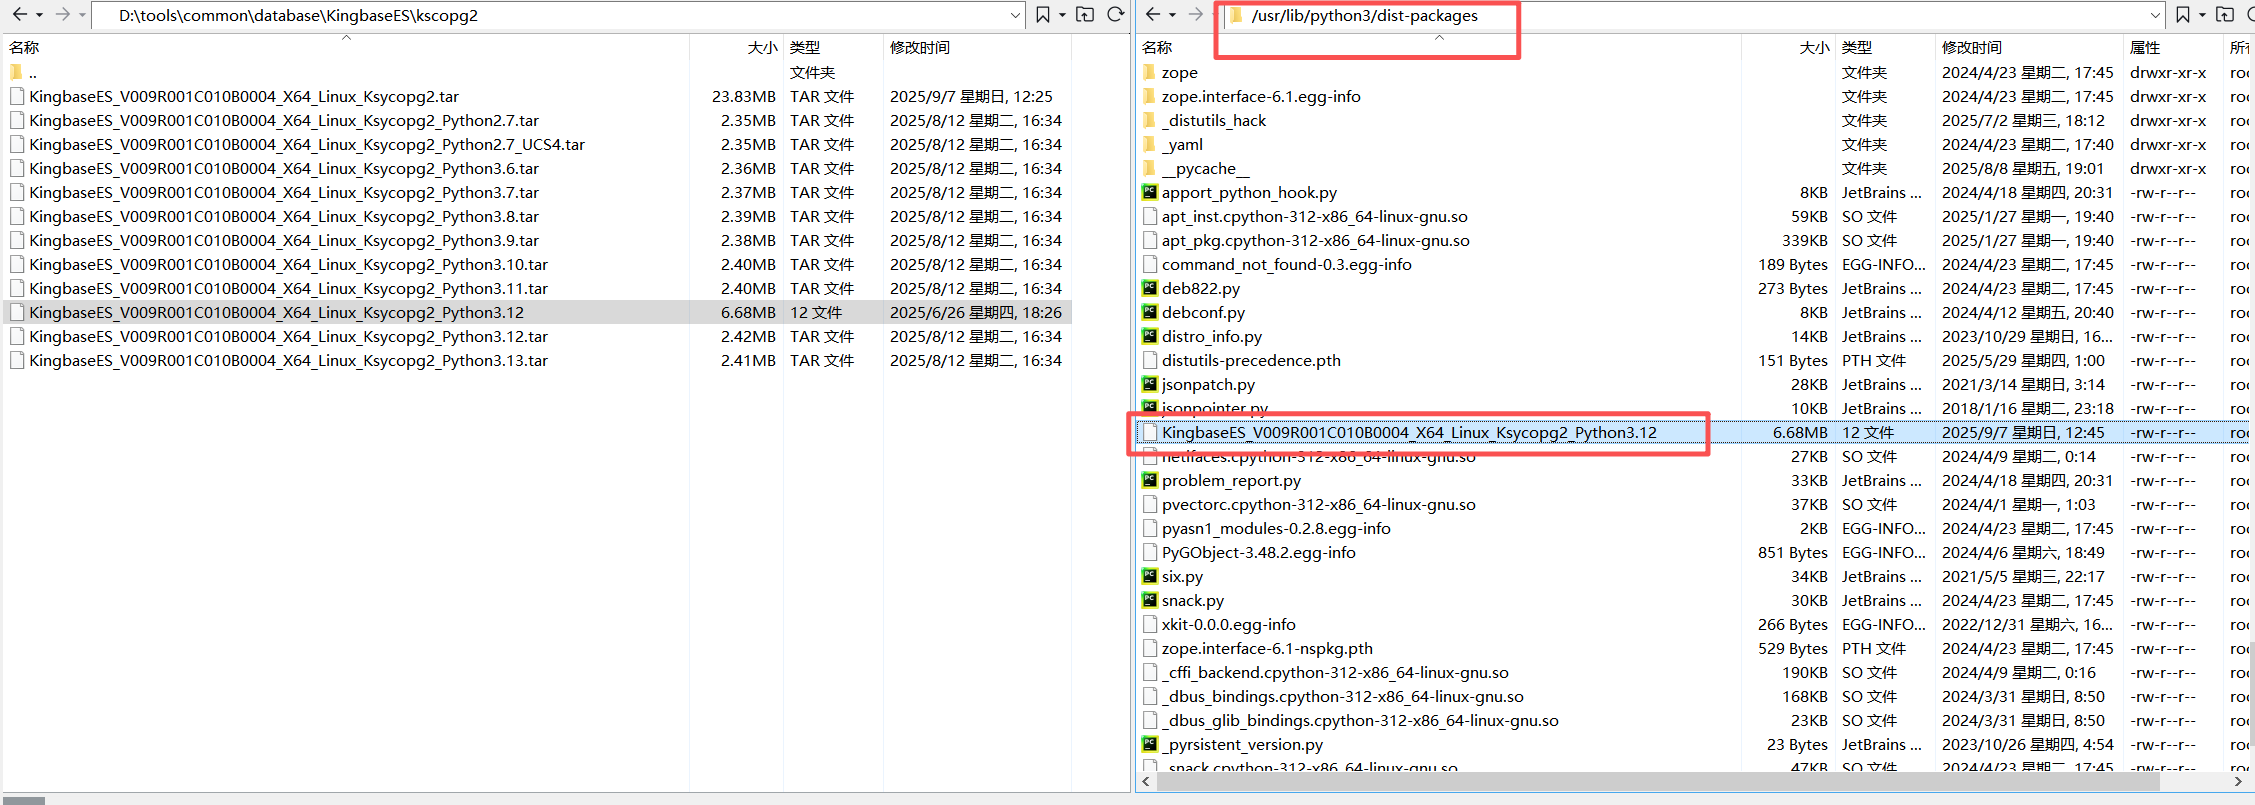
2、这里兄弟盟根据自己电脑系统,选择对应的版本,我这里是linux,下载下来如下图所示:KingbaseES_V009R001C010B0004_X64_Linux_Ksycopg2.tar 解压后可以看到有python2.7、python3.6、python3.7、python3.8、python3.9、python3.10、python3.11、python3.12,准备得真是周到,照顾各位大佬电脑上不同python版本,这一点为国产金仓数据库点赞👍👍👍
1.3 安装ksycopg2驱动
1、上面下载后解压并将ksycopg2文件夹放置在Python的模块搜索路径中,如果不清楚自己Python的模块在哪里,可以写个简单python代码查看:
import sys
print(sys.path)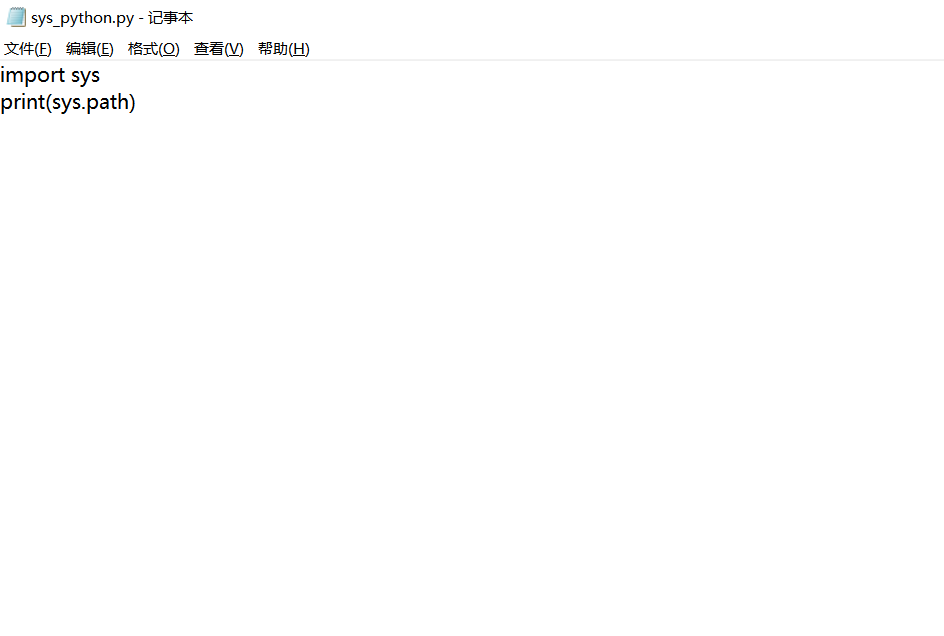
2、运行后如下所示,可以查看Python的模块位置:/usr/lib/python3/dist-packages
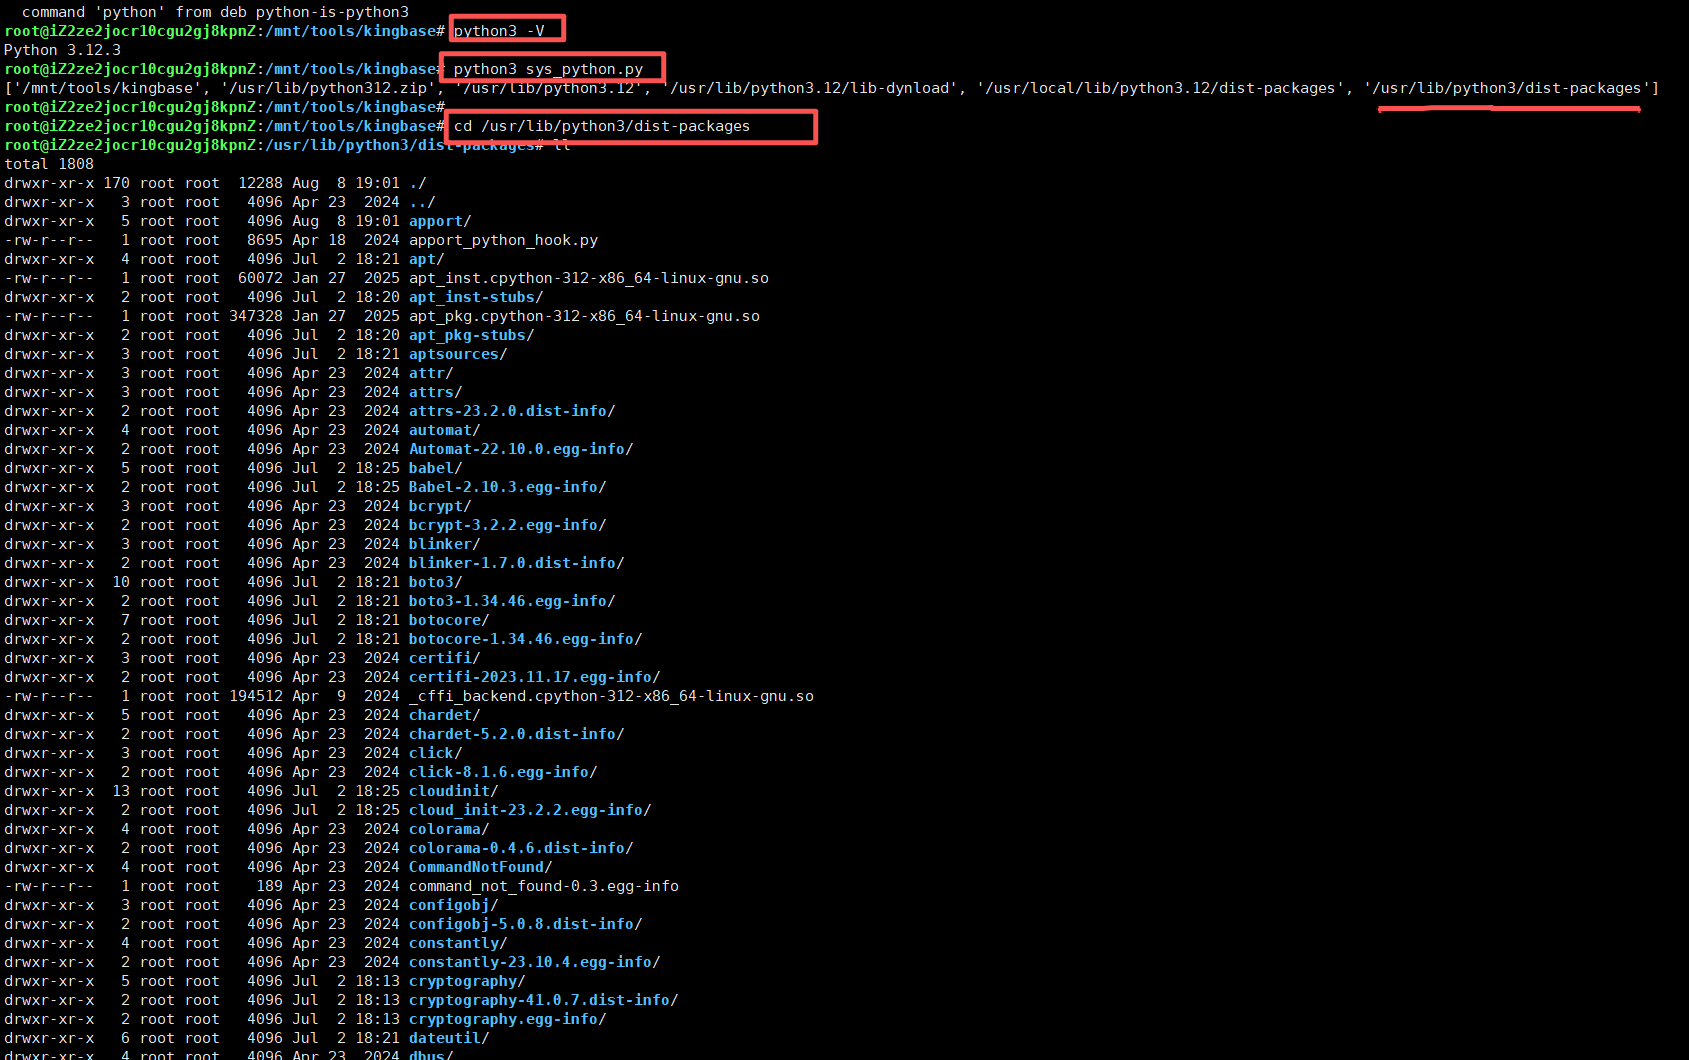
3、开始上传到:/usr/lib/python3/dist-packages
4、此外,还需要将KingbaseES的libkci库文件路径添加到LD_LIBRARY_PATH环境变量中:
export LD_LIBRARY_PATH=/kingbase/data/KESRealPro/V009R002C012/Server/lib:$LD_LIBRARY_PATH如果不清楚自己KingbaseES的libkci库文件路在哪里,可以用这个命令查看:
ps -ef | grep kingbase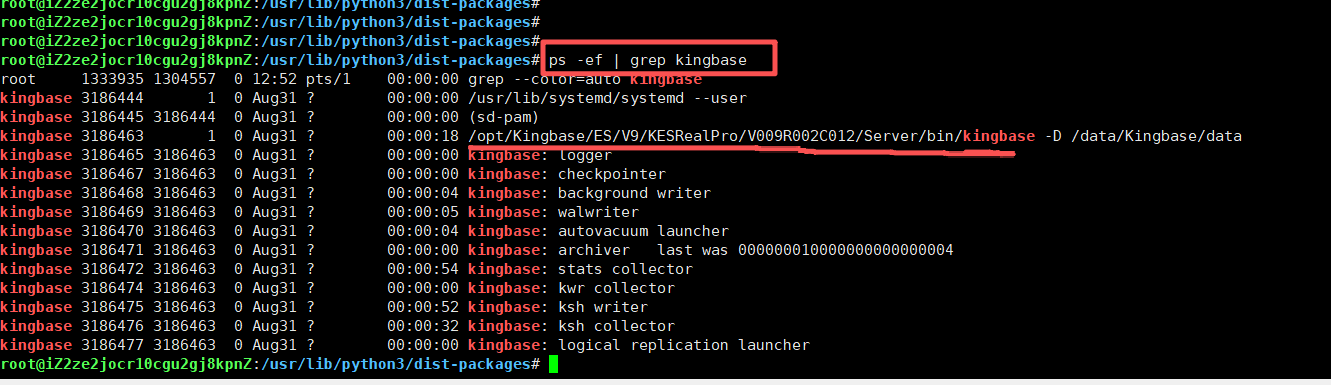
5、验证安装ksycoph2驱动
import ksycopg2
print("ksycopg2驱动安装成功")
1.4. 连接KingbaseES数据库
使用ksycopg2连接KingbaseES数据库需要提供数据库名称、用户名、密码、主机地址和端口号等信息。
import ksycopg2def create_connection():try:conn = ksycopg2.connect(database="TEST",user="SYSTEM",password="qwe123!@#",host="127.0.0.1",port="54321")print("数据库连接成功")return connexcept Exception as e:print(f"连接数据库失败: {e}")return None# 建立数据库连接
connection = create_connection()
创建一个connect_database.py把上面代码复制进去,然后执行
python connect_database.py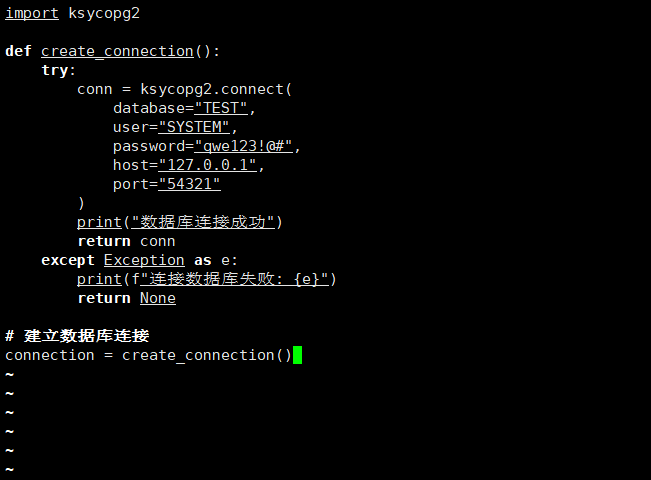
1.5. 创建数据表
在执行增删改查操作前,需要先创建一张测试表,有表才好对后面的案例进行操作。
def create_table(conn):try:cursor = conn.cursor()create_table_sql = """CREATE TABLE IF NOT EXISTS user_info (id INTEGER PRIMARY KEY,username VARCHAR(50) NOT NULL,age INTEGER,created_time TIMESTAMP DEFAULT CURRENT_TIMESTAMP)"""cursor.execute(create_table_sql)conn.commit()cursor.close()print("表创建成功")except Exception as e:print(f"创建表失败: {e}")conn.rollback()# 创建表
if connection:create_table(connection)
同理,在ubuntu服务器上新建一个create_table.py文件,把上面代码丢进去执行:
python create_table.py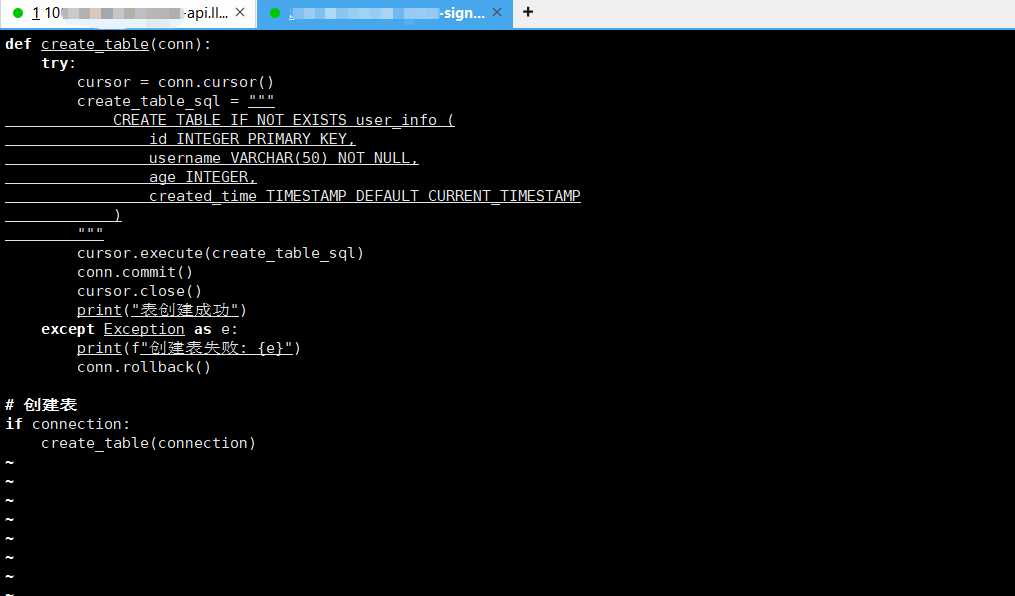
二、ksycopg2建立数据库连接

1. 验证安装
# 验证ksycopg2安装
try:import ksycopg2print(f"ksycopg2版本: {ksycopg2.__version__}")print(f"libpq版本: {ksycopg2.__libpq_version__}")print("✅ ksycopg2驱动安装成功!")
except ImportError as e:print(f"❌ 导入ksycopg2失败: {e}")
2. 连接数据库经典案例
# -*- coding: utf-8 -*-
import ksycopg2
import datetimedatabase = "test"
user = "username"
password = "123456"
host = "127.0.0.1"
port = "54321"failed = 0def check(name, val):if val is None:global failedfailed += 1else:if isinstance(val, ksycopg2.extensions.connection):print("close connection")val.close()print("test", name, "success !", "\n")def testConn():try:conn = ksycopg2.connect("dbname={} user={} password={} host={} port={}".format(database, user, password, host, port))# conn.set_session(autocommit=True)except Exception as e:print(e)return Noneelse:return conndef testConn2():try:conn = ksycopg2.connect(database=database, user=user, password=password, host=host, port=port)cur = conn.cursor()cur.execute("select version()")rows = cur.fetchall()print("database version:", rows[0])cur.close()except Exception as e:print(e)return Noneelse:return conndef testExecute():conn = testConn()if conn is not None:cur = conn.cursor()cur.execute('drop table if exists test_ksy')cur.execute('create table test_ksy(id integer, name TEXT)')cur.execute("insert into test_ksy values(%s, %s)", (1, "John"))cur.execute("insert into test_ksy values(%s, %s)", (2, '中文测试文字'))cur.execute("insert into test_ksy values(%s, %s)", (3, '!@#¥%……'))cur.close()conn.commit()conn.close()return 0else:return Nonedef testSelect():conn = testConn()if conn is not None:cur = conn.cursor()cur.execute("select * from test_ksy")rows = cur.fetchall()for c in cur.description:print(c.name, "\t", end="")print()for row in rows:for cell in row:print(cell, " ", end="")print()cur.close()conn.commit()conn.close()return 0else:return Nonedef testLob():conn = testConn()if conn is not None:cur = conn.cursor()cur.execute('drop table if exists test_lob')cur.execute('create table test_lob(id integer, b BLOB, c CLOB, ba bytea)')ba = bytearray("中文测试字符bytearray", "UTF8")b = bytes('中文测试字符bytes' * 2, "UTF8")u = u'中文字unicode' * 3s = '中文str' * 4cur.execute("insert into test_lob values(%s, %s, %s, %s)", (1, ba, ba, ba))cur.execute("insert into test_lob values(%s, %s, %s, %s)", (2, b, b, b))cur.execute("insert into test_lob values(%s, %s, %s, %s)", (3, u, u, u))cur.execute("insert into test_lob values(%s, %s, %s, %s)", (4, s, s, s))cur.execute("select * from test_lob")rows = cur.fetchall()for row in rows:for cell in row:if isinstance(cell, memoryview):print(type(cell), cell[:].tobytes().decode('UTF8'), " ", end="")else:print(type(cell), cell, " ", end="")print()cur.close()conn.commit()conn.close()return 0else:return Nonedef testOID():conn = testConn()if conn is not None:cur = conn.cursor()cur.execute('drop table if exists test_oid')cur.execute('create table test_oid(id integer, o OID)')lo1 = conn.lobject()lo1.write("raw data")cur.execute("insert into test_oid values(%s, %s)", (1, lo1.oid))lo2 = conn.lobject()lo2.write(b'binary data')cur.execute("insert into test_oid values(%s, %s)", (3, lo2.oid))lo3 = conn.lobject()lo3.write('中文数据 data')cur.execute("insert into test_oid values(%s, %s)", (3, lo3.oid))lo1.close()lo2.close()lo3.close()cur.execute("select o from test_oid")rows = cur.fetchall()for c in cur.description:print(c.name, "\t", end="")print()for row in rows:for cell in row:lo_out = conn.lobject(cell)r = lo_out.read()lo_out.close()print("oid:", cell, ":", r, " ", end="")print()cur.close()conn.commit()conn.close()return 0else:return Nonedef testNewType():conn = testConn()if conn is not None:cur = conn.cursor()cur.execute('drop table if exists test_newtype')cur.execute('create table test_newtype(num INTEGER, bcb bpcharbyte(30), vcb varcharbyte(30), date date, blob BLOB, nclob NCLOB)')cur.execute("insert into test_newtype values(%s, %s, %s, %s, %s, %s)",(100, 'bpcharbyte_30', 'varcharbyte_30', '2000-12-01 15:30:12', 'blob', 'nclob'))cur.execute("insert into test_newtype values(%s, %s, %s, %s, %s, %s)",(200, u'中文测试数据', u'中文测试数据', datetime.datetime.today(), u'电科金仓数据库', u'电科金仓'))cur.execute("select * from test_newtype")rows = cur.fetchall()for row in rows:for cell in row:print(type(cell), cell, " ", end="")print()cur.close()conn.commit()conn.close()return 0else:return Noneif __name__ == "__main__":print("libpq version:", ksycopg2.__libpq_version__)print("ksycopg2 version:", ksycopg2.__version__)check("testConn", testConn())check("testConn2", testConn2())check("testExecute", testExecute())check("testSelect", testSelect())check("testLob", testLob())check("testOID", testOID())check("testNewType", testNewType())print("failed case:", failed)
三、基础数据库操作实战

1. 数据库连接管理
创建可重用的连接工具类:
import ksycopg2
from ksycopg2 import OperationalErrorclass KingbaseESManager:def __init__(self, dbname="TEST", user="SYSTEM", password="your_password", host="127.0.0.1", port="54321"):self.db_params = {"database": dbname,"user": user,"password": password,"host": host,"port": port,"charset": "utf8"  # 防止中文乱码}self.conn = Nonedef connect(self):"""建立数据库连接"""try:self.conn = ksycopg2.connect(**self.db_params)print("✅ 数据库连接成功")return Trueexcept OperationalError as e:print(f"❌ 连接失败: {e}")return Falsedef disconnect(self):"""关闭数据库连接"""if self.conn:self.conn.close()print("✅ 数据库连接已关闭")def test_connection(self):"""测试连接并获取数据库版本"""try:cursor = self.conn.cursor()cursor.execute("SELECT substr(version(), 1, 50) as db_version")result = cursor.fetchone()print(f"📊 数据库版本: {result[0]}")cursor.close()return Trueexcept Exception as e:print(f"❌ 连接测试失败: {e}")return False# 使用示例
if __name__ == "__main__":db_mgr = KingbaseESManager(dbname="TEST", user="SYSTEM", password="your_password",  # 替换为实际密码host="localhost", port="54321")if db_mgr.connect():db_mgr.test_connection()db_mgr.disconnect()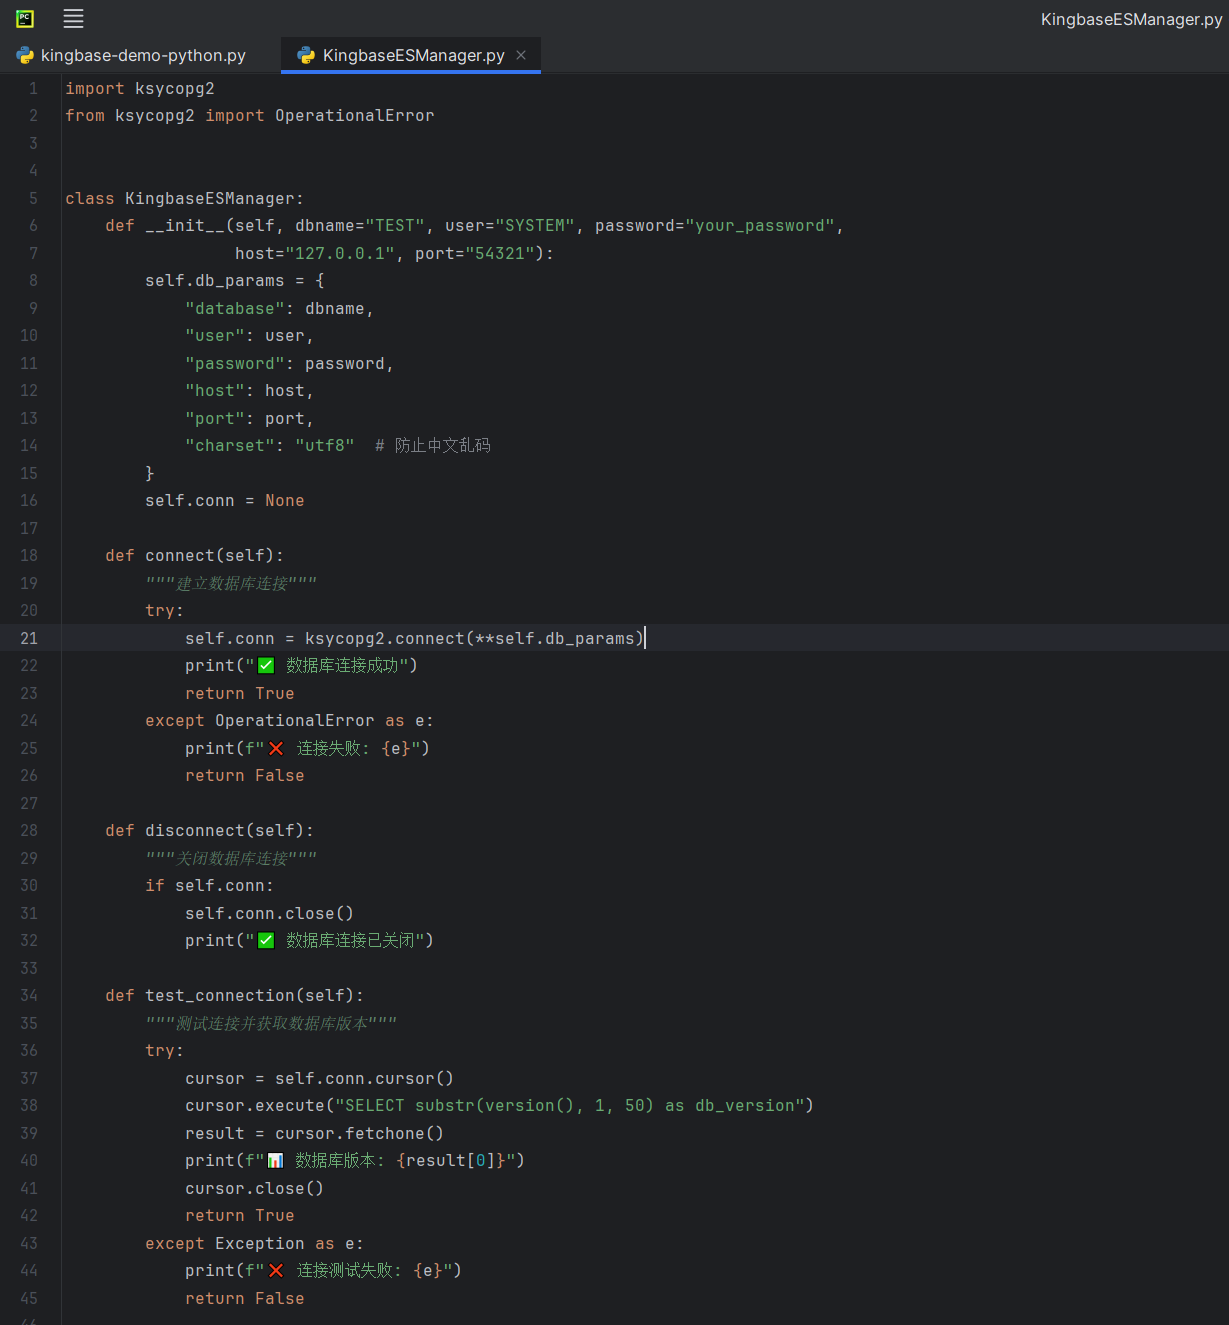
2. 数据表创建与管理
创建完整的业务数据表:
def create_business_tables(conn):"""创建业务相关的数据表包含员工表、部门表、工资记录表"""cursor = conn.cursor()# 创建部门表department_table_sql = """CREATE TABLE IF NOT EXISTS departments (dept_id SERIAL PRIMARY KEY,dept_name VARCHAR(100) NOT NULL UNIQUE,manager VARCHAR(50),create_time TIMESTAMP DEFAULT CURRENT_TIMESTAMP,update_time TIMESTAMP DEFAULT CURRENT_TIMESTAMP)"""# 创建员工表employee_table_sql = """CREATE TABLE IF NOT EXISTS employees (emp_id SERIAL PRIMARY KEY,emp_code VARCHAR(20) UNIQUE NOT NULL,name VARCHAR(50) NOT NULL,gender CHAR(1) CHECK (gender IN ('M', 'F')),age INT CHECK (age >= 18 AND age <= 65),position VARCHAR(50),salary DECIMAL(10,2),dept_id INT,hire_date DATE,active BOOLEAN DEFAULT TRUE,created_time TIMESTAMP DEFAULT CURRENT_TIMESTAMP,CONSTRAINT fk_dept FOREIGN KEY(dept_id) REFERENCES departments(dept_id))"""# 创建工资记录表salary_history_sql = """CREATE TABLE IF NOT EXISTS salary_history (record_id SERIAL PRIMARY KEY,emp_id INT NOT NULL,salary_month VARCHAR(7) NOT NULL,  -- 格式: YYYY-MMbase_salary DECIMAL(10,2),bonus DECIMAL(10,2) DEFAULT 0,deduction DECIMAL(10,2) DEFAULT 0,total_salary DECIMAL(10,2) GENERATED ALWAYS AS (base_salary + bonus - deduction) STORED,pay_date DATE,remark TEXT,created_time TIMESTAMP DEFAULT CURRENT_TIMESTAMP,CONSTRAINT fk_emp FOREIGN KEY(emp_id) REFERENCES employees(emp_id),CONSTRAINT unique_emp_month UNIQUE(emp_id, salary_month))"""try:# 执行建表语句cursor.execute(department_table_sql)cursor.execute(employee_table_sql)cursor.execute(salary_history_sql)conn.commit()print("✅ 业务数据表创建成功!")# 验证表结构cursor.execute("""SELECT table_name, column_name, data_type FROM information_schema.columns WHERE table_schema = 'public' AND table_name IN ('departments', 'employees', 'salary_history')ORDER BY table_name, ordinal_position""")tables = cursor.fetchall()print("\n📋 创建的表结构概览:")current_table = ""for table, column, dtype in tables:if table != current_table:print(f"\n{table}:")current_table = tableprint(f"  - {column} ({dtype})")except Exception as e:conn.rollback()print(f"❌ 创建表失败: {e}")finally:cursor.close()# 执行建表
db_mgr = KingbaseESManager()
if db_mgr.connect():create_business_tables(db_mgr.conn)db_mgr.disconnect()
3. 数据操作完整示例
完整的CRUD操作封装:
class BusinessDataManager:def __init__(self, db_manager):self.db = db_managerdef insert_department(self, dept_name, manager=None):"""插入部门数据"""sql = "INSERT INTO departments (dept_name, manager) VALUES (%s, %s) RETURNING dept_id"try:cursor = self.db.conn.cursor()cursor.execute(sql, (dept_name, manager))dept_id = cursor.fetchone()[0]self.db.conn.commit()print(f"✅ 部门 '{dept_name}' 创建成功,ID: {dept_id}")return dept_idexcept Exception as e:self.db.conn.rollback()print(f"❌ 插入部门失败: {e}")return Nonedef batch_insert_employees(self, employees_data):"""批量插入员工数据"""sql = """INSERT INTO employees (emp_code, name, gender, age, position, salary, dept_id, hire_date) VALUES (%s, %s, %s, %s, %s, %s, %s, %s)"""try:cursor = self.db.conn.cursor()cursor.executemany(sql, employees_data)self.db.conn.commit()print(f"✅ 批量插入员工成功,影响行数: {cursor.rowcount}")except Exception as e:self.db.conn.rollback()print(f"❌ 批量插入员工失败: {e}")def query_employees_by_department(self, dept_name=None):"""根据部门查询员工信息"""if dept_name:sql = """SELECT e.emp_id, e.emp_code, e.name, e.position, e.salary, d.dept_nameFROM employees eLEFT JOIN departments d ON e.dept_id = d.dept_idWHERE d.dept_name = %s AND e.active = TRUEORDER BY e.salary DESC"""params = (dept_name,)else:sql = """SELECT e.emp_id, e.emp_code, e.name, e.position, e.salary, d.dept_nameFROM employees eLEFT JOIN departments d ON e.dept_id = d.dept_idWHERE e.active = TRUEORDER BY d.dept_name, e.salary DESC"""params = Nonecursor = self.db.conn.cursor()cursor.execute(sql, params)results = cursor.fetchall()print(f"\n👥 员工查询结果 ({len(results)} 条记录):")for emp in results:print(f" 编号: {emp[1]}, 姓名: {emp[2]}, 职位: {emp[3]}, 薪资: {emp[4]:.2f}, 部门: {emp[5]}")cursor.close()return resultsdef update_employee_salary(self, emp_code, new_salary):"""更新员工薪资"""update_sql = "UPDATE employees SET salary = %s WHERE emp_code = %s"history_sql = """INSERT INTO salary_history (emp_id, salary_month, base_salary, bonus, pay_date)SELECT emp_id, TO_CHAR(CURRENT_DATE, 'YYYY-MM'), %s, 0, CURRENT_DATEFROM employees WHERE emp_code = %s"""try:cursor = self.db.conn.cursor()# 更新员工薪资cursor.execute(update_sql, (new_salary, emp_code))if cursor.rowcount == 0:print("❌ 未找到对应员工")return False# 插入薪资历史记录cursor.execute(history_sql, (new_salary, emp_code))self.db.conn.commit()print(f"✅ 员工 {emp_code} 薪资更新成功")return Trueexcept Exception as e:self.db.conn.rollback()print(f"❌ 更新薪资失败: {e}")return False# 完整的使用示例
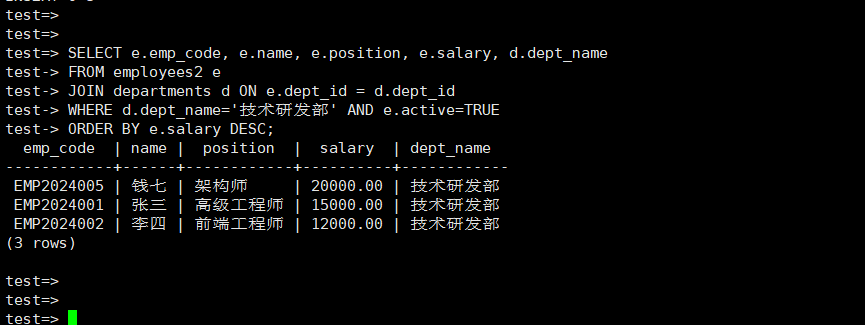
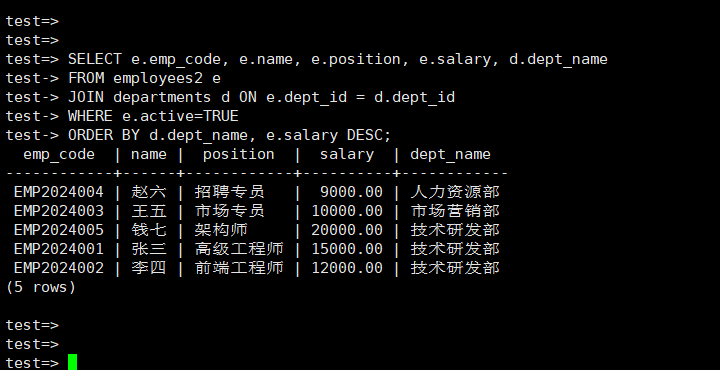
def comprehensive_demo():"""综合演示示例"""db_mgr = KingbaseESManager()if not db_mgr.connect():returnmanager = BusinessDataManager(db_mgr)# 1. 插入部门数据dept1 = manager.insert_department("技术研发部", "张经理")dept2 = manager.insert_department("市场营销部", "李经理")dept3 = manager.insert_department("人力资源部", "王经理")# 2. 批量插入员工数据employees = [("EMP2024001", "张三", "M", 28, "高级工程师", 15000.00, dept1, "2024-01-15"),("EMP2024002", "李四", "F", 25, "前端工程师", 12000.00, dept1, "2024-02-20"),("EMP2024003", "王五", "M", 30, "市场专员", 10000.00, dept2, "2024-01-10"),("EMP2024004", "赵六", "F", 26, "招聘专员", 9000.00, dept3, "2024-03-01"),("EMP2024005", "钱七", "M", 32, "架构师", 20000.00, dept1, "2024-02-15"),]manager.batch_insert_employees(employees)# 3. 查询员工信息print("\n" + "="*50)print("技术研发部员工列表:")manager.query_employees_by_department("技术研发部")print("\n所有部门员工列表:")manager.query_employees_by_department()# 4. 更新薪资print("\n" + "="*50)manager.update_employee_salary("EMP2024001", 18000.00)# 5. 验证更新结果print("\n更新后的技术研发部员工列表:")manager.query_employees_by_department("技术研发部")db_mgr.disconnect()if __name__ == "__main__":comprehensive_demo()以上操作,后台查看数据库部分如下图所示:
技术研发部员工列表:
查询全公司列表:
四、高级特性与实战技巧
1. 连接池管理
使用连接池提升性能:
from ksycopg2 import poolclass ConnectionPoolManager:def __init__(self, minconn=1, maxconn=10, **db_params):self.db_params = db_paramstry:self.connection_pool = pool.SimpleConnectionPool(minconn, maxconn, **db_params)print("✅ 数据库连接池创建成功")except Exception as e:print(f"❌ 连接池创建失败: {e}")self.connection_pool = Nonedef get_connection(self):"""从连接池获取连接"""if self.connection_pool:return self.connection_pool.getconn()return Nonedef return_connection(self, conn):"""将连接返回连接池"""if self.connection_pool and conn:self.connection_pool.putconn(conn)def close_all_connections(self):"""关闭所有连接"""if self.connection_pool:self.connection_pool.closeall()print("✅ 所有连接已关闭")# 使用连接池的示例
def connection_pool_demo():db_params = {"database": "TEST","user": "SYSTEM", "password": "your_password","host": "localhost","port": "54321"}pool_mgr = ConnectionPoolManager(**db_params)# 从连接池获取连接执行操作conn = pool_mgr.get_connection()if conn:try:cursor = conn.cursor()cursor.execute("SELECT COUNT(*) FROM employees")count = cursor.fetchone()[0]print(f"当前员工总数: {count}")cursor.close()finally:pool_mgr.return_connection(conn)pool_mgr.close_all_connections()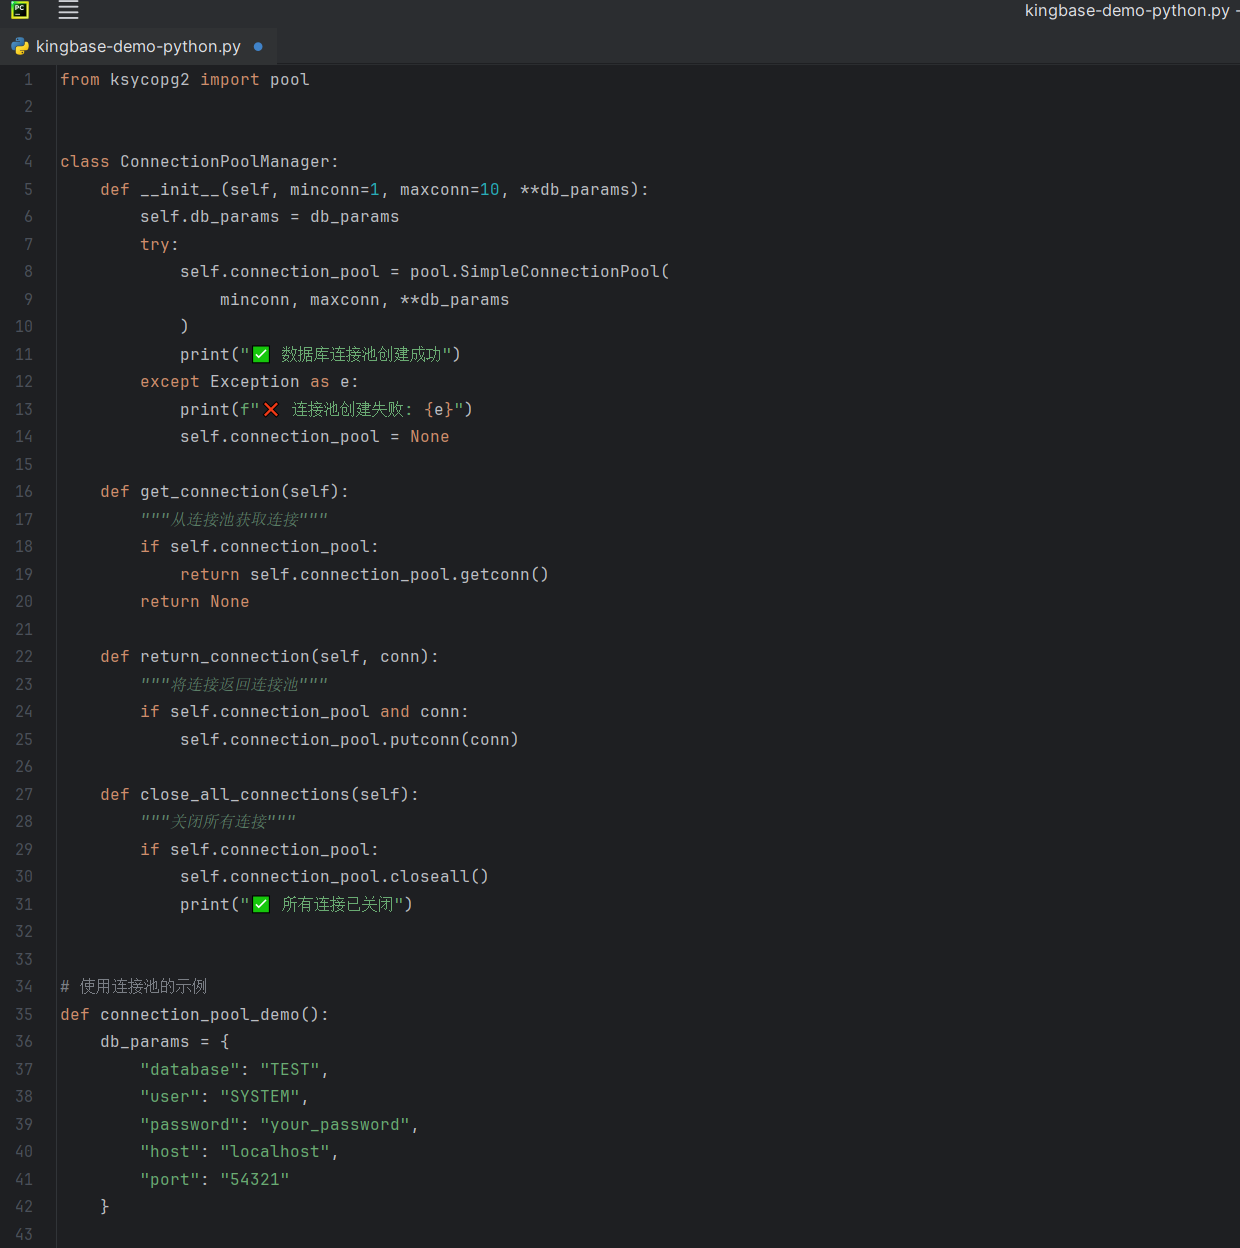
2. 事务处理与错误处理
完整的事务管理示例:
def transfer_salary_with_transaction(db_mgr, from_emp, to_emp, amount):"""薪资转账事务示例演示完整的事务回滚机制"""conn = db_mgr.conncursor = conn.cursor()try:# 开始事务conn.autocommit = False# 检查转出账户余额cursor.execute("SELECT salary FROM employees WHERE emp_code = %s", (from_emp,))from_balance = cursor.fetchone()if not from_balance:raise Exception(f"员工 {from_emp} 不存在")if from_balance[0] < amount:raise Exception(f"员工 {from_emp} 余额不足")# 执行转账操作cursor.execute("UPDATE employees SET salary = salary - %s WHERE emp_code = %s", (amount, from_emp))cursor.execute("UPDATE employees SET salary = salary + %s WHERE emp_code = %s", (amount, to_emp))# 记录交易日志cursor.execute("""INSERT INTO salary_history (emp_id, salary_month, base_salary, bonus, remark)SELECT emp_id, TO_CHAR(CURRENT_DATE, 'YYYY-MM'), -%s, 0, '转账给员工%s'FROM employees WHERE emp_code = %s""", (amount, to_emp, from_emp))cursor.execute("""INSERT INTO salary_history (emp_id, salary_month, base_salary, bonus, remark)SELECT emp_id, TO_CHAR(CURRENT_DATE, 'YYYY-MM'), %s, 0, '收到员工%s转账'FROM employees WHERE emp_code = %s""", (amount, from_emp, to_emp))# 提交事务conn.commit()print(f"✅ 转账成功: 从 {from_emp} 向 {to_emp} 转账 {amount} 元")return Trueexcept Exception as e:# 回滚事务conn.rollback()print(f"❌ 转账失败,已回滚: {e}")return Falsefinally:cursor.close()conn.autocommit = True五、实战建议与最佳实践

1. 性能优化技巧
-
使用参数化查询:防止SQL注入,提高查询效率
-
合理使用连接池:避免频繁创建关闭连接的开销
-
批量操作:使用
executemany()进行批量插入更新
2. 错误处理策略
def robust_query(db_mgr, sql, params=None):"""健壮的查询函数"""max_retries = 3for attempt in range(max_retries):try:cursor = db_mgr.conn.cursor()cursor.execute(sql, params)results = cursor.fetchall()cursor.close()return resultsexcept OperationalError as e:if attempt == max_retries - 1:raise eprint(f"数据库操作失败,重试 {attempt + 1}/{max_retries}")db_mgr.connect() # 重新连接六、常见问题
-
驱动包 SSL 库与系统环境的 SSL 库冲突
原因:系统环境的依赖库版本过高,或应用程序运行时错误加载了系统环境的SSL库。
解决:通过
ldd _ksycopg 开头的驱动, 查看当前环境下的依赖关系,确保运行应用程序时加载驱动包提供的 SSL 库,若仍然有 SSL 相关报错,则确定是驱动包提供的 SSL 库无法在当前环境下使用,此时请联系技服获取 Ksycopg2静态依赖 SSL 库的驱动包来解决 SSL 依赖冲突问题。 -
Ksycopg2 加载失败,报错 No module named 'ksycopg2._ksycopg'
原因:使用与当前环境架构不符或 Python 版本不一致的驱动包,也有可能是驱动包安装路径不对,Python 无法识别。
解决:先确保使用对应架构及对应 Python 版本的驱动包,若确认驱动包无误,则可能是 Python 未成功识别到对应 Ksycopg2 模块,可通过在 Python 强制设置模块搜索路径解决:
>>> import sys
>>> sys.path.insert(0, "Ksycopg2 驱动包的父目录")
七、总结

ksycopg2作为KingbaseES的专用Python驱动,提供了完整、高效、安全的数据库操作解决方案。通过本文的实战示例,您可以快速掌握:
-
环境配置:正确安装和配置ksycopg2驱动
-
基础操作:连接管理、CRUD操作、事务处理
-
高级特性:连接池、批量操作、错误处理
-
最佳实践:性能优化和安全建议
建议您在实际环境中运行这些代码示例,根据具体业务需求进行调整和优化。KingbaseES的官方文档提供了更详细的功能说明和API参考,是深入学习的重要资源。

关于本文,博主还写了相关文章,欢迎关注《电科金仓》分类:
第一章:基础与入门
1、【金仓数据库征文】政府项目数据库迁移:从MySQL 5.7到KingbaseES的蜕变之路
2、【金仓数据库征文】学校AI数字人:从Sql Server到KingbaseES的数据库转型之路
3、电科金仓2025发布会,国产数据库的AI融合进化与智领未来
4、国产数据库逆袭:老邓的“六大不敢替”被金仓逐一破解
5、《一行代码不改动!用KES V9 2025完成SQL Server → 金仓“平替”迁移并启用向量检索》
6、《赤兔引擎×的卢智能体:电科金仓如何用“三骏架构”重塑AI原生数据库一体机》
7、探秘KingbaseES在线体验平台:技术盛宴还是虚有其表?
8、破除“分布式”迷思:回归数据库选型的本质
9、KDMS V4 一键搞定国产化迁移:零代码、零事故、零熬夜——金仓社区发布史上最省心数据库迁移评估神器
10、KingbaseES V009版本发布:国产数据库的新飞跃
11、从LIS到全院云:浙江省人民医院用KingbaseES打造国内首个多院区异构多活信创样板
第二章:能力与提升
1、零改造迁移实录:2000+存储过程从SQL Server滑入KingbaseES V9R4C12的72小时
2、国产数据库迁移神器,KDMSV4震撼上线
3、在Ubuntu服务器上安装KingbaseES V009R002C012(Orable兼容版)数据库过程详细记录
4、金仓数据库迁移评估系统(KDMS)V4 正式上线:国产化替代的技术底气
5、Ubuntu系统下Python连接国产KingbaseES数据库实现增删改查
6、KingbaseES V009版本发布,新特性代码案例
7、Java连接电科金仓数据库(KingbaseES)实战指南
8、使用 Docker 快速部署 KingbaseES 国产数据库:亲测全过程分享
9、【金仓数据库产品体验官】Oracle兼容性深度体验:从SQL到PL/SQL,金仓KingbaseES如何无缝平替Oracle?
10、KingbaseES在Alibaba Cloud Linux 3 的深度体验,从部署到性能实战
第三章:实践与突破
1、国产之光金仓数据库,真能平替MongoDB?实测来了!
2、【金仓数据库产品体验官】实战测评:电科金仓数据库接口兼容性深度体验
3、KingbaseES与MongoDB全面对比:一篇从理论到实战的国产化迁移指南
4、从SQL Server到KingbaseES:一步到位的跨平台迁移与性能优化指南
5、ksycopg2实战:Python连接KingbaseES数据库的完整指南
后期作品正在准备中,敬请关注......