RHCA - DO374 | Day02:管理内容集和执行环境
一、重用Ansible内容集
1. 关于Ansible内容集
内容集合指的是Ansible内容的一种分发格式。一个内容集合提供了一组相互关联的模块、角色和插件,用户可以将集合下载到Ansible控制节点,然后在剧本中使用集合。
例如:
-
redhat.insights,此集合整合了一组模块和角色,用来向Red Hat insights注册系统。
-
cisco.ios,此集合整合了用来管理Cisco IOS网络设备的模块和插件,由思科公司维护。
-
community.crypto,此集合提供了用来创建SSL/TLS证书的模块。
集合的引入,将Ansible核心代码的更新与模块/插件的更新分开了,从而服务商和开发人员可以按照自己的节奏,独立于Ansible版本来维护和分发他们的集合。用户也可以开发自己的集合,为团队提供自定义角色和模块。根据应用需要,可以只安装所需的内容,而不是安装所有支持的模块;可以选用Red Hat支持的集合版本,或者选用社区提供的集合版本。
Ansible开发团队从 Ansible Base 2.10 和 Ansible core 2.11 中的核心Ansible代码中,分解出大多数模块,并将它们放在集合中。红帽AAP 2.2提供了基于继承此功能的 Ansible Core 2.13 的自动化执行环境。
在命名空间中组织Ansible内容集合
为了更方便按名称来指定集合及其内容,集合名称被组织到名称空间中。服务商、合作伙伴、开发人员和内容创建者可以使用名称空间为其集合分配唯一的名称,而不会与其他开发人员发生冲突。
命名空间是集合名称的第一部分。
-
Ansible社区维护的所有集合都在community这个命名空间中,名称例如community.crypto、community.postgresql和community.rabitmq。
-
Red Hat维护和支持的集合可能使用redhat命名空间,名称例如redhat.rhv、redhat.satellite和redhat.insights。
命名空间的名称仅限于ASCII小写字母、数字和下划线,长度必须至少为两个字符,并且不能以下划线开头。
2. 使用Ansible内容集
Red Hat提供的自动化执行环境已经包括一些集合。我们可以在本地系统上安装额外的集合,也可以创建包含这些集合的自定义自动化执行环境。
1)访问Ansible内容集合的文档
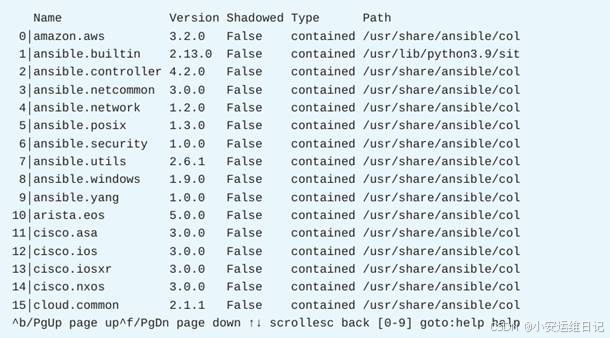
使用 ansible-navigator collections 命令可以列出自动化执行环境中可用的集合。以下输出显示了ee-supported-rhel8 自动化执行环境中可用的集合(如图-1所示):

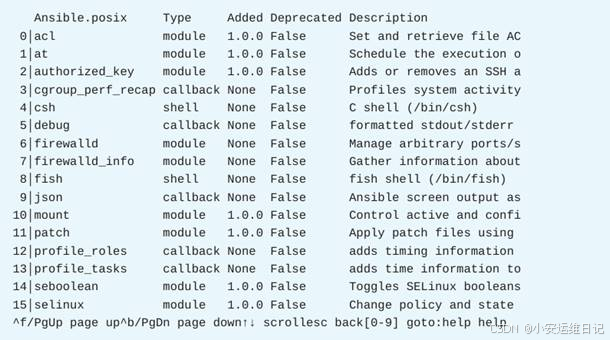
要列出某个集合中包含哪些模块和插件,请输入关联的集合编号(当集合编号大于9时,需在编号前加上冒号),例如 :21 代表第21行,然后按Enter键。以下输出显示了 redhat.insights 集合中可用的模块(如图-2所示)。

输入模块编号可以访问这个模块的文档。使用 ansible-navigator collections 命令时,默认情况下以YAML格式呈现文档;如果使用 ansible-navigator doc 命令的 --mode stdout(或-m stdout)选项,则以纯文本形式呈现文档。例如,以下命令显示insights_register模块的文档:
[user@host ~]$ ansible-navigator doc redhat.insights.insights_register --mode stdout
> REDHAT.INSIGHTS.INSIGHTS_REGISTER (/usr/share/ansible/collections/ansible_>This module will check the current registration status,
unregister if needed, and then register the insights client (and update the display_name if needed).. ..
OPTIONS (= is mandatory):display_name
This option is here to enable registering with a display_name outside of using a configuration file. Some may be used to doing it this way so I Neft this in as an optional parameter. [Default: (null)]
type: str
2)在剧本中使用Ansible内容集
若要使用集合中的模块或角色,可以通过这个集合的FQCN(完全限定的集合名称)来进行引用。例如,使用redhat.insights.insights_register 引用 insights_register模块。
下面这个剧本中的play包含一个调用 insights_register 模块的任务:
---
- name: Register new systems hosts: db.example.comtasks:- name: Ensure the new system is registered with Red Hat Insightsredhat.insights.insights_register:     # 使用完整模块名称state: presentforce_reregister: true
下面这个剧本中的play调用了 redhat.satellite 集合中的角色:
---
- name: Add the test organizations to Red Hat Satellitehosts: localhosttasks:- name: Ensure the organizations existansible.builtin.include_role:name: redhat.satellite.organizations   # 使用完整角色名称vars:satellite_server_url: https://sat.example.comsatellite_username: adminsatellite_password: Sup3r53cr3tsatellite_organizations:- name: test1label: tst1state: presentdescription: Test organization 1- name: test2label: tst2state: presentdescription: Test organization 2
下面这个剧本中的play使用 kubernetes.core 集合中的k8s查询插件:
---
- name: Fetch the namespaces from Kuberneteshosts: localhosttasks:- name: Retrieve the namespaces as a listansible.builtin.set_fact:ns: "{{ lookup('kubernetes.core.k8s', kind='Namespace') }}"     # 使用完整插件名称
3)查找Ansible内容集合
旧有的剧本可能会使用到一些模块,而这些模块在新的Ansible中已经转移到集合中,如果你打算升级这些剧本,就需要确定这些模块现在在哪个集合中可用。
以下文件提供了从ansible 2.9中的模块名称到新的FQCN的映射:
https://github.com/ansible/ansible/blob/devel/lib/ansible/config/ansible_builtin_runtime.yml
例如,acl模块现在是ansible.posix集合的一部分,可以用ansible.posix.acl这个FQCN来调用(如图-3所示)。
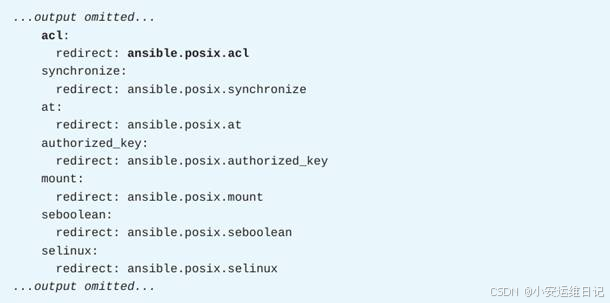
很多Ansible内容集合都使用这种将短名称转换为FQCN的重定向机制,因此为Ansible 2.9(Red Hat Ansible Automation Platform 1.2)编写的剧本在升级时也比较容易。
对于不使用Ansible内容集合的剧本,可以采用ee-29-rhel8自动化执行环境来管理剧本升级。这个自动化执行环境提供了不需要集合的Ansible 2.9环境。
4)使用内置的Ansible内容集合
新的Ansible自带一个名为 ansible.builtin 的特殊集合,这个集合包括一组通用模块,比如copy、template、file、yum、command和service。
可以在剧本中直接使用这些模块的简短名称,例如用file来引用 ansible.buildin.file 模块。这样的话,很多现有的Ansible剧本几乎不用怎么修改就可以正常工作(当然,如果用到ansible.buildin集合中不包括的模块,还需要安装相应的额外的集合)。不过,红帽建议改用FQCl表示方法,以避免与可能使用相同模块名称的集合发生冲突。
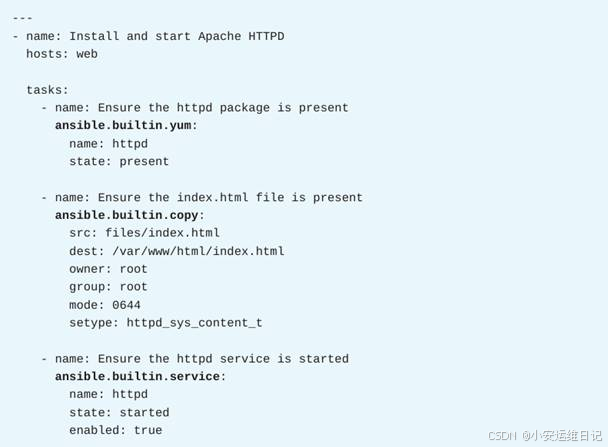
下面这个剧本就使用了FQCl表示法来调用yum、copy和service模块(如图-4所示)。
3. 课堂练习:重用Ansible内容集
开始练习(部署环境):
以用户student登入workstation虚拟机,使用lab命令来构建案例环境。
[student@workstation ~]$ lab start manage-reusing步骤说明:
方式1:直接指定内容集合的FQCN名称调用
1)进入/home/student/manage-reusing/目录,尝试用ansible-playbook命令运行basic-web.yml剧本
切换到/home/student/manage-reusing/目录,列出目录内容:
[student@workstation ~]$ cd ~/manage-reusing/ ; ls
ansible.cfg basic-web.yml inventory
使用ansible-playbook命令来运行basic-web.yml剧本,会报错:
[student@workstation manage-reusing]$ ansible-playbook basic-web.yml
ERROR! couldn't resoNve module/action 'firewalld'. This often indicates a misspelling, missing collection, or incorrect module path.
...output omitted...
尝试在ansible-core软件包安装的模块中查找firewalld模块,会发现没有结果:
[student@workstation manage-reusing]$ ansible-doc -l | grep firewalld红帽AAP2提供的 ansible-playbook 命令基于Ansible Core 2.13软件包,这个软件包只包括ansible.buildin 集合,你的控制节点也没有安装其他的内容集合(firewalld模块被移到了一个单独的集合中),所以前面的两个子步骤会失败。
2)使用带有默认 ee-supported-rhel8 执行环境的 ansible-navigator 导航器来识别提供 firewalld模块的Ansible内容集合
使用podman命令登录到位于hub.lab.example.com的私有自动化中心,用户名student、密码redhat123。此步骤模拟客户登录到registry.redhat.io,并假定已经将自动化执行环境下载到本地。
[student@workstation manage-reusing]$ podman login hub.lab.example.com
Username: student
Password: redhat123
login Succeeded!
列出 ee-supported-rhel8 自动化执行环境中可用的模块文档(注意末行的冒号,表示内容还有更多):
[student@workstation manage-reusing]$ ansible-navigator doc -l --eei ee-supported-rhel8 --pp missing -m stdout
add_host  Add a host (and alternatively a group) to the ...
amazon.aws.aws_az_info  Gather information about availability zones in ...
amazon.aws.aws_caller_info  Get information about the user and account ...
amazon.aws.aws_s3 manage objects in S3
amazon.aws.cloudformation   Create or delete an AWS CloudFormation stack
...output omitted...
输入 /firewalld 来查找firewalld模块的文档,在ansible.posix集合中提供了firewalld模块:
add_host   Add a host (and alternatively a group) to the ...
amazon.aws.aws_az_info   Gather information about availability zones in ...
amazon.aws.aws_caller_info  Get information about the user and account ...
amazon.aws.aws_s3 manage objects in S3
amazon.aws.cloudformation Create or delete an AWS CloudFormation stack
...output omitted...
firewalld模块的FQCN名称为 ansible.posix.firewalld:
/firewalld
ansible.posix.firewalld  Manage arbitrary ports/services with firewalld
ansible.posix.firewalld_info    Gather information about firewalld
...output omitted...
按 q键 退出ansible-navigator命令。
3)将basic-web.yml剧本拷贝为新的basic-web-fqcn.yml文件,修改这个新文件中的模块设置(使用FQCN名称)
复制basic-web.yml剧本为basic-web-fqcn.yml:
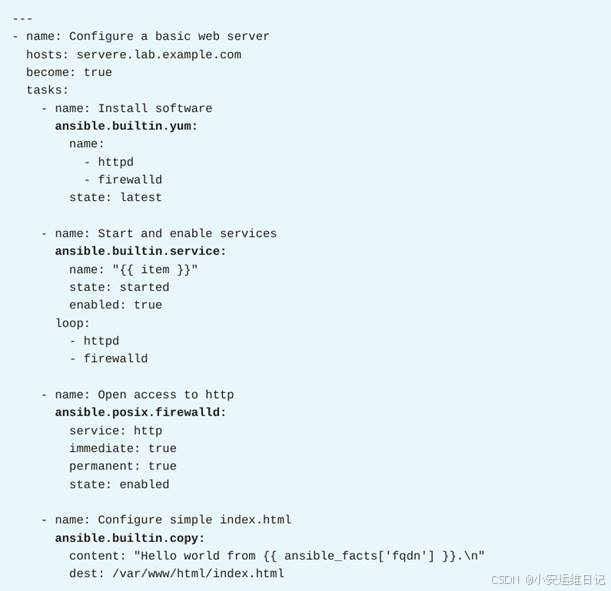
[student@workstation manage-reusing]$ cp basic-web.yml basic-web-fqcn.yml修改新的basic-web-fqcn.yml 剧本文件的内容,采用FQCN调用模块。ansible.posix集合不止提供了firewalld模块,也提供了其他的一些模块(如图-5所示):
4)使用ee-supported-rhel8环境来验证,确认basic-web-fqcn.yml剧本成功运行
运行新剧本basic-web-fqcn.yml:
[student@workstation manage-reusing]$ ansible-navigator run basic-web-fqcn.yml --eei ee-supported-rhel8 --pp missing在Progress列出现Successful后,按ESC键退出ansible-navigator命令。
使用curl命令查看servere.lab.example.com站点的网页内容:
[student@workstation manage-reusing]$ curl servere.lab.example.com
Hello world from servere.lab.example.com.
方式2:使用collections关键字调用
5)将basic-web.yml剧本拷贝为新的basic-web-keyword.yml文件,修改新文件来引入指定的集合
拷贝出新剧本:
[student@workstation manage-reusing]$ cp basic-web.yml basic-web-keyword.yml在新剧本中使用collections关键字调用 ansible.builtin 和 ansible.posix 集合:
将play配置为在主机serverf.lab.example.com 上运行(而不是servere.lab.example.com)
---
- name: Configure a basic web serverhosts: serverf.lab.example.com    # 修改成serverfbecome: truecollections:    # 提前加载集合- ansible.builtin- ansible.posixtasks:...output omitted...
6)使用ee-supported-rhel8环境来验证,确认basic-web-keyword.yml剧本成功运行
运行basic-web-keyword.yml剧本:
[student@workstation manage-reusing]$ ansible-navigator run basic-web-keyword.yml --eei ee-supported-rhel8 --pp missing在Progress列出现Successful后,按ESC键退出ansible-navigator命令。
使用curl命令查看servere.lab.example.com站点的网页内容:
[student@workstation manage-reusing]$ curl serverf.lab.example.com
Hello world from serverf.lab.example.com.
结束练习(清理环境):
在workstation虚拟机上,切换到student用户主目录,使用lab命令来清理案例环境,确保先前练习的资源不会影响后续的练习。
[student@workstation ~]$ lab finish manage-reusing二、 查找及安装Ansible内容集
1. 内容集的来源
主要有两个来源可提供Ansible内容集合:Automation Hub,由Red Hat官方支持;以及由开源社区提供的Ansible Galaxy。
-
Automation Hub:自动化中心负责托管 Red Hat认证 的Ansible内容集合,需要有效的红帽AAP订阅 才能访问。这些内容由Red Hat及其合作伙伴为客户提供官方支持,Red Hat审查、维护、更新并完全支持这些系列。例如redhat.rhv、redhat.satellite、redhat.insights和cisco.ios系列可在此平台上获得。
网站地址:https://console.redhat.com/ansible/automation-hub/
-
Ansible Galaxy:这是一个公共网站,托管由各种Ansible开发人员和用户提交的未受官方支持的内容集合。例如community.crypto、community.postgresql和community.rabbitmq集合都可以从该平台获得。
网站地址:https://galaxy.ansible.com/
除了这两个平台之外,企业也可以部署一个私有的自动化中心来存储自定义的内容集合,或者向自己的团队提供一个精心策划的集合列表,也可以直接从它们的Git存储库中检索集合。
1)从Automation Hub查找集合
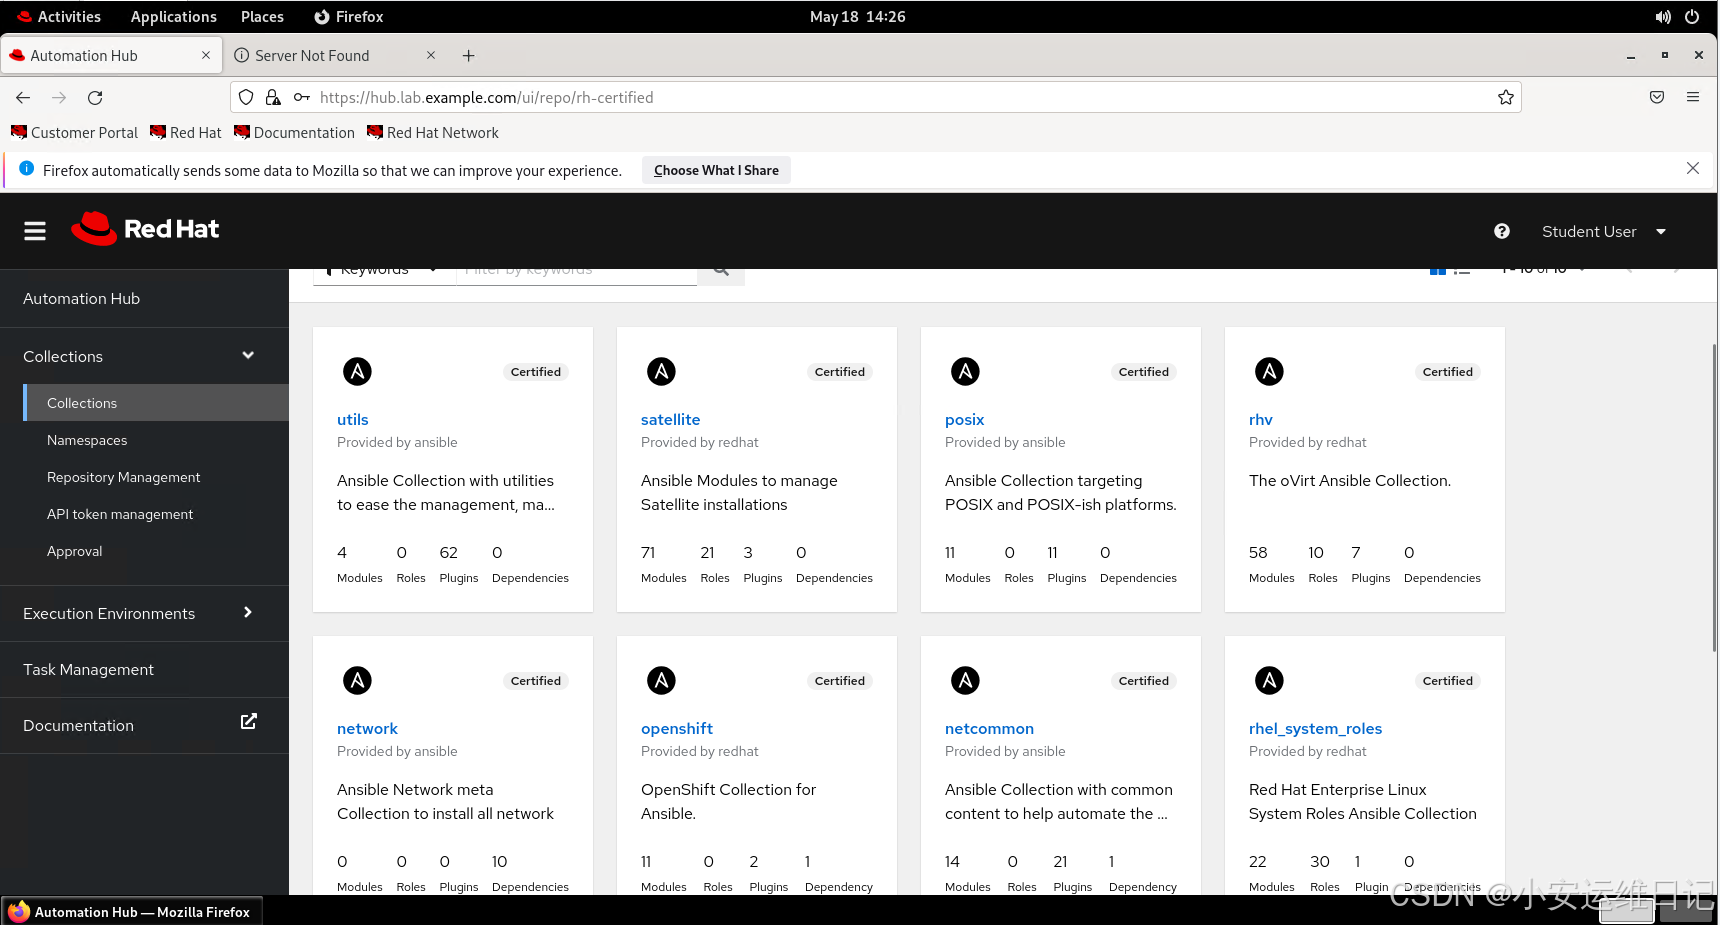
访问网站:https://console.redhat.com/ansible/automation-hub/,
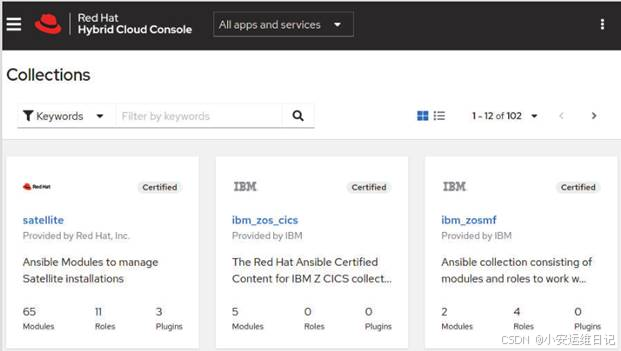
通过 Automation Hub > Collections 可以列出集合(如图-6所示),通过“Search”区域可以按关键字查询需要的集合。还可以通过 Automation Hub > Partners 来浏览合作伙伴的集合。
2. 安装内容集
剧本中会用到一些内容集合,但是在你使用的自动化执行环境中可能并没有包含,这时就要想办法让这些内容集合可用。
一种办法是:使用ansible-navigator命令之前,在剧本所在的目录下安装要用到的内容集合。通常情况下,会在剧本目录下创建 collections 子目录,用来存放新安装的内容集合。
1)从命令行安装内容集合
可以使用ansible-galaxy命令来下载内容集合,这些集合可以来自多种途径,包括Ansible Galaxy。
① 使用 ansible-galaxy 命令将 community.crypto 内容集合安装到本地系统:
[user@host ~]$ ansible-galaxy collection install community.crypto默认情况下,ansible-galaxy命令会试图从Ansible Galaxy下载内容集合,也可以配置ansible-galaxy从Automation Hub或者私有的自动化中心来下载集合。
② 使用ansible-galaxy命令也能够从本地或远程的.tar文件或Git仓库来安装内容集合:
[user@host ~]$ ansible-galaxy collection install /tmp/community-dns-1.2.0.tar.gz[user@host ~]$ ansible-galaxy collection install http://www.example.com/redhat-insights-1.0.5.tar.gz[user@host ~]$ ansible-galaxy collection install git@github.com:ansible-collections/community.mysql.gitAnsible运行剧本时,会在与剧本文件平级的 collections/ 子目录下查找集合。如果找不到,则根据配置文件 ansible.cfg 中 collections_path 语句指向的路径来查找集合。这个语句定义了Ansible在系统上查找已安装集合的路径的列表(冒号分隔)。
ansible-galaxy命令默认将集合安装在collections_path语句指向的第一个目录中。collections_path的默认值是 ~/.ansible/collections:/usr/share/ansible/collections。因此,ansible-galaxy命令默认情况下会在 ~/.ansible/collections 目录中安装集合。
如果想要把集合安装到其他目录中,请使用 --collections-path(或-p)选项:
[user@host ~]$ ansible-galaxy collection install community.postgresql \
-p ~/myproject/collections/
2)通过 requirements.yml 文件来安装内容集合
collections/requirements.yml 文件定义了在Ansible项目中运行剧本所需要的集合列表,就好像通过 roles/requirements.yml 文件来列出需要安装的角色一样。Automation Controller控制器会检测这个requirements.yml文件,并在运行剧本之前自动安装其指定的集合。
以下 collections/requirements.ym 文件列出了几个要安装的集合,分别来自不同的途径:
---
collections:- name: community.crypto- name: ansible.posix version: 1.2.0- name: /tmp/community-dns-1.2.0.tar.gz- name: http://www.example.com/redhat-insights-1.0.5.tar.gz- name: git@github.com:ansible-collections/community.mysql.git
使用ansible-galaxy命令时,可以结合 --requirements-file(或-r)选项来指定用某个requirements.yml 文件来安装内容集合:
[user@host ~]$ ansible-galaxy collection install -r requirements.yml3)列出已经安装的内容集合
使用 ansible-navigator collections 命令启动一个交互式的文本用户界面(TUI),这个界面列出了当前自动化执行环境中安装的集合(如图-7所示)。
如果输入某个特定集合的行号,ansible-navigator将在TUI中显示有关该集合内容的详细信息。
例如,在图-7所示的界面中,输入5 可以看到ansible.posix集合的信息(如图-8所示):
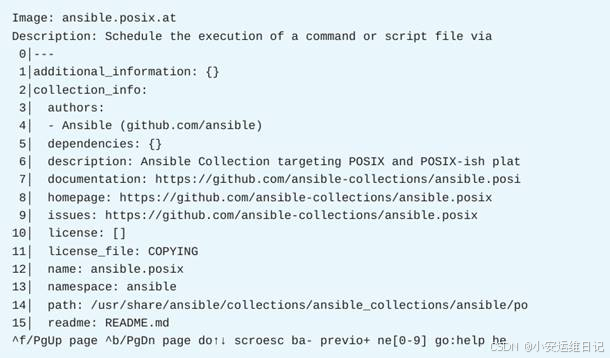
在上述界面中再 输入1 可以查看ansible.posix.at模块的文档及使用帮助(如图-9所示):
还可以使用 ansible-galaxy collections list 命令,来列出当前 collections_paths 语句指定的目录下可用的集合(不包括可能已安装到其他目录下的集合):
[user@host ~]$ ansible-galaxy collection list# /home/user/.ansible/collections/ansible_collectionsCollection Version----------------------------ansible.posix 1.3.0community.crypto 1.9.5community.dns 1.2.0community.mysql 2.1.0redhat.insights 1.0.7# /usr/share/ansible/collections/ansible_collectionsCollection Version---------------------------redhat.rhel_system_roles 1.0.1注意:ansible.builtin 集合不会被列出,这个是始终可用的内置集合。
3. 配置集合来源
默认情况下,ansible-galaxy命令从 Ansible Galaxy(位于https://galaxy.ansible.com/)下载内容集。 可以通过修改 ansible.cfg 文件来设置其他的内容集合来源。
1)安装来自Automation Hub的内容集合
要让ansible-galaxy命令也使用来自Automation Hub的内容集合, 可以在ansible.cfg文件中添加如下配置:
...output omitted...[galaxy]server_list = automation_hub, galaxy[galaxy_server.automation_hub]url=https://console.redhat.com/api/automation-hub/auth_url=https://sso.redhat.com/auth/realms/redhat-external/protocol/openid-connect/tokentoken=eyJh...Jf0o[galaxy_server.galaxy]url=https://galaxy.ansible.com/其中,server_list语句,按顺序列出ansible-galaxy命令必须使用的所有存储库。对于server_list行定义的每个名称,后续需要设置 [galaxy_server.name] 区段来提供连接参数。
因为Automation Hub可能无法提供需要的所有内容集合,因此建议将Ansible Galaxy添加到最后一个位置作为后备。
-
url语句,指定分发平台的访问地址
-
auth_url语句,指定用来验证用户身份的网址
-
token语句,指定与您的帐户关联的身份验证令牌。需要访问自动化中心
要获得前面的URL网址并生成令牌,请登录到自动化中心的网站,然后导航到Automation Hub > Connect to Hub(如图-10所示)。

除了使用token令牌,也可以使用username和password参数来提供用户名和密码。
...output omitted...[galaxy_server.automation_hub]url=https://console.redhat.com/api/automation-hub/username=operator1password=Sup3r53cR3t...output omitted...如果不希望在 ansible.cfg 配置中暴露你的凭据(这可能对访问版本控制系统带来风险), 那么可以删除ansible.cfg配置文件中的凭据设置,改成通过环境变量来实现认证。
ANSIBLE_GALAXY_SERVER_SERVERID_KEY=value
其中,
-
SERVERID:大写的服务器标识符,是在server_list中使用的名称,也位于[galaxy_server.serverid] 部分的名称中。
-
KEY:大写的密钥名称,比如用TOKEN作为令牌密钥,以下示例将通过环境变量来提供令牌密钥。
[user@host ~]$ cat ansible.cfg...output omitted...[galaxy_server.automation_hub]url=https://console.redhat.com/api/automation-hub/auth_url=https://sso.redhat.com/auth/realms/redhat-external/protocol/openid-connect/token [user@host ~]$ export \ANSIBLE_GALAXY_SERVER_AUTOMATION_HUB_TOKEN='eyJh...Jf0o'[user@host ~]$ ansible-galaxy collection install redhat.insights2)安装来自私有自动化中心的内容集合
配置从私有的自动化中心下载内容集,与配置从官方的自动化中心下载内容集是类似的。下面这个例子中的配置,用来让ansible-galaxy使用位于hub.example.com的私有自动化中心
...output omitted...[galaxy]server_list = my_hub, automation_hub, galaxy[galaxy_server.my_hub]url=https://hub.example.com/api/galaxy/content/rh-certified/token=e8e4...b0c2[galaxy_server.automation_hub]url=https://console.redhat.com/api/automation-hub/auth_url=https://sso.redhat.com/auth/realms/redhat-external/protocol/openid- connect/token[galaxy_server.galaxy]url=https://galaxy.ansible.com/请注意,使用私有的自动化中心不需要auth_url语句,可以通过私有自动化中心的Web界面来获取需要的网址并生成令牌。
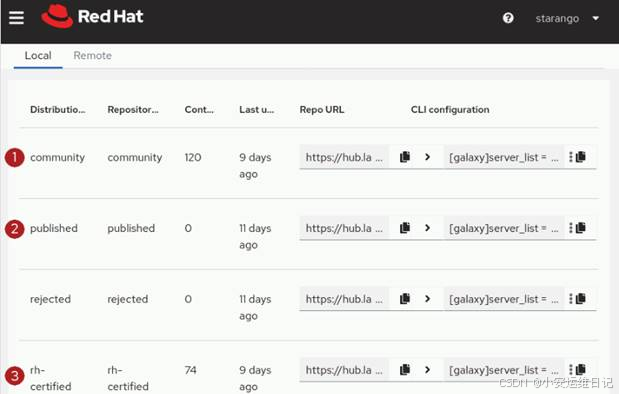
在网页中导航到 Collections > Repository Management,可以查找URL。私有的自动化中心可以托管你从Automation Hub、Ansible Galaxy同步的集合,或者你为团队创建的集合。选择与要安装的集合类型相对应的URL网址(如图-11所示)。
其中,
-
community,表示社区存储库,使用的是你从Ansible Galaxy同步的内容集合。
-
Published,表示已发布的存储库,使用你已安装并批准的自定义的内容集合。
-
rh-certified,表示红帽认证的存储库,使用从红帽Authmation Hub同步的内容集合。
要生成令牌,请单击“Repo Management”页面上的“Get token”,或导航到Collections > API token management 单击 Load token。
安装和部署私有的自动化中心不在本课程讨论。
4. 课堂练习:查找及安装Ansible内容集
开始练习(部署环境):
以用户student登入workstation虚拟机,使用lab命令来构建案例环境。
[student@workstation ~]$ lab start manage-finding步骤说明:
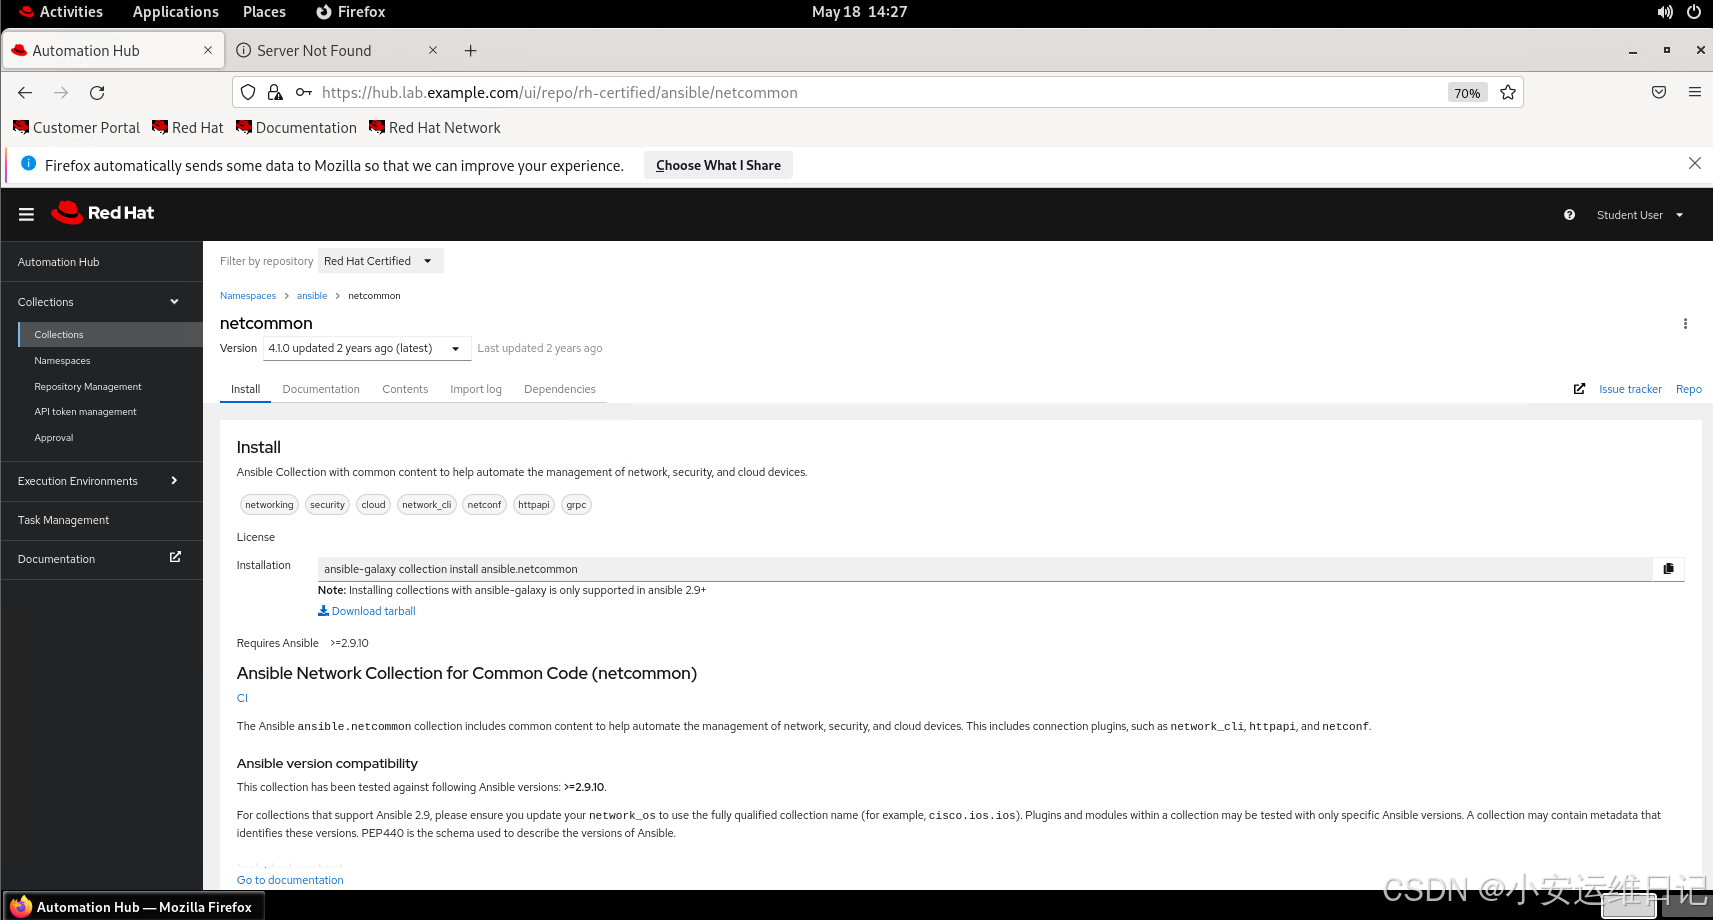
1)浏览私有自动化中心提供的Ansible内容集合。访问其中一个由Red Hat提供并支持的ansible.netcommon内容集合,查看详细信息
-
a) 从浏览器访问 https://hub.lab.example.com,用户名student、密码redhat123。
-
b) 导航到 Collections > Collections 来浏览内容集合。由于ansible.netcommon集合是经过红帽认证的,所以请通过 Filter by repository 菜单选择 Red Hat Certification。
-
c) 在Search字段中输入netcommon来搜索集合,搜索完成后,单击netcommon图标。
-
d) 可以看到,网页中显示了ansible-galaxy collection install ansible.netcommon命令,你可以使用这个命令来安装此集合,单击Documentation选项卡可以访问此集合中可用的模块和插件的列表。
2)在主机workstation上,配置位于/home/student/manage-finding/目录的Ansible项目,以使ansible-galaxy命令从私有自动化中心获取内容集,启用 rh-certified 和 community 这两个仓库
-
a) 进入/home/student/manage-finding/目录:
[student@workstation ~]$ cd ~/manage-finding/注意:ansible-galaxy命令应在这个目录下运行,以确保使用正确的ansible.cfg配置。
-
b) 在私有自动化中心的网页界面,导航到Collections > Repository Management,这个页面提供了配置ansible.cfg文件所需要的参数。点击 rh-certified 行CLI configuration下的 Copy to clipboard 图标将其复制,不要关闭浏览器窗口。
-
c) 修改 ansible.cfg 文件,将刚复制的内容添加到文件中,就像这样:
[student@workstation manage-finding]$ vim ansible.cfg
[defaults]
inventory = ./inventory[galaxy]
server_list = rh-certified_repo[galaxy_server.rh-certified_repo]
url=https://hub.lab.example.com/api/galaxy/content/rh-certified/
token=<put your token here>-
d) 返回私有自动化中心的Repo Management页面,点击 community 行CLI configuration下的Copy to clipboard图标将其复制,不要关闭浏览器窗口。
-
e) 修改ansible.cfg文件,将刚复制的内容添加到文件中,就像这样:
[defaults]
inventory = ./inventory[galaxy]
server_list = rh-certified_repo
[galaxy_server.rh-certified_repo]
url=https://hub.lab.example.com/api/galaxy/content/rh-certified/
token=<put your token here>[galaxy]
server_list = community_repo
[galaxy_server.community_repo]
url=https://hub.lab.example.com/api/galaxy/content/community/
token=<put your token here>-
f) 返回私有自动化中心的网站页面,导航到 Collections > API token management,点击Load token,复制API token令牌字串。
-
g) 将复制的令牌字串粘贴到ansible..cfg文件中的 token= 后边,保存更改。比如像这样:
[defaults]
inventory = ./inventory[galaxy]
server_list = rh-certified_repo,community_repo[galaxy_server.rh-certified_repo]
url=https://hub.lab.example.com/api/galaxy/content/rh-certified/
token=e277c2b0cbc6dd785896f0a05a3e9584c5537f72[galaxy_server.community_repo]
url=https://hub.lab.example.com/api/galaxy/content/community/
token=e277c2b0cbc6dd785896f0a05a3e9584c5537f72
3)在项目目录下创建collections子目录,并将ansible.netcommon集合安装到此目录
-
a) 创建collections子目录:
[student@workstation manage-finding]$ mkdir collections-
b) 使用ansible-galaxy命令安装ansible.netcommon集合到collections目录下:
[student@workstation manage-finding]$ ansible-galaxy collection install ansible.netcommon -p collections/
Starting galaxy collection install process
[WARNING]: The specified collections path '/home/student/manage-finding/
collections' is not part of the configured Ansible
.. ..
Downloading https://hub.lab.example.com/api/galaxy/v3/plugin/ansible/content/rh-certified/collections/artifacts/ansible-utils-2.8.0.tar.gz to /home/student/.ansible/tmp/ansible-local-29962sr162r7w/tmprxsyau18/ansible-utils-2.8.0-hn1_8a18
ansible.netcommon:4.1.0 was installed successfully
Installing 'ansible.utils:2.8.0' to '/home/student/manage-finding/collections/ansible_collections/ansible/utils'
ansible.utils:2.8.0 was installed successfully
注意:上述操作可能会遇到2个WARNING警告消息,可以直接忽略。其中第1个警告将会在下一步配置collections_paths语句后解决,第2个警告 是因为Ansible Galaxy服务器提供了用来校验下载内容的GnuPG数字签名(但是你的客户端并未验证这个签名)。
前面的输出结果表明ansible-galaxy命令从 https://hub.lab.example.com 私有自动化中心下载集合,ansible.utils集合是作为ansible.netcommon集合的依赖项而自动安装的。
-
c) 修改ansible.cfg文件明确定义在项目的collections子目录中查找集合,否则使用ansible-galaxy collection list 查看已安装的集合,提示为默认路径 /usr/share/ansible/collections/ansible_collections。修改后的文件开头现在包含以下内容:
[student@workstation manage-finding]$ vim ansible.cfg
[defaults]
inventory = ./inventory
collections_paths = ./collections:/usr/share/ansible/collections...output omitted...-
d) 在/home/student/manage-finding目录下,使用ansible-galaxy命令列出由语句collections_paths指定的目录下已安装的集合:
[student@workstation manage-finding]$ ansible-galaxy collection list
# /home/student/manage-finding/collections/ansible_collections      # 指定路径
Collection        Version
----------------- -------
ansible.netcommon 4.1.0
ansible.utils     2.8.0# /usr/share/ansible/collections/ansible_collections       # 默认路径
Collection               Version
------------------------ -------
redhat.rhel_system_roles 1.16.2
4)安装2.1.0版本的redhat.rhv内容集合
确保你是在项目目录/home/student/manage-finding下执行的ansible-galaxy命令,因为配置文件ansible.cfg中设置了从./collections目录找集合,所以不用再添加-p选项:
[student@workstation manage-finding]$ ansible-galaxy collection install redhat.rhv:2.1.0
...output omitted...Installing 'redhat.rhv:2.1.0' to '/home/student/manage-finding/collections/ ansible_collections/redhat/rhv'
redhat.rhv:2.1.0 was installed successfully[student@workstation manage-finding]$ ansible-galaxy collection list# /usr/share/ansible/collections/ansible_collections
Collection               Version
------------------------ -------
redhat.rhel_system_roles 1.16.2# /home/student/manage-finding/collections/ansible_collections      # 指定路径
Collection        Version
----------------- -------
ansible.netcommon 4.1.0
ansible.utils     2.8.0
redhat.rhv        2.1.0
5)安装requirements文件指定的内容集合,包括现有的ansible.netcommon集合和 redhat.rhv集合,再添加community.crypto和ansible.controller这两个新集合
在collections目录下新建 requirements.yml 文件,添加以下内容:
[student@workstation manage-finding]$ vi collections/requirements.yml
---
collections:- name: ansible.netcommon- name: redhat.rhvversion: 2.1.0- name: community.cryptoversion: 2.7.0- name: ansible.controllerversion: 4.2.1
保存更改并退出编辑器。在目录 /home/student/manage-finding 下使用ansible-galaxy命令安装集合,注意使用-r选项来指定requirements文件。执行命令后发现ansible.netcommon、redhat.rhv、ansible.utils这三个集合会被跳过,因为这三个集合已经安装过了:
[student@workstation manage-finding]$ ansible-galaxy collection install -r collections/requirements.yml在目录/home/student/manage-finding下,验证已安装的集合列表:
[student@workstation manage-finding]$ ansible-galaxy collection list# /usr/share/ansible/collections/ansible_collections
Collection               Version
------------------------ -------
redhat.rhel_system_roles 1.16.2# /home/student/manage-finding/collections/ansible_collections      # 指定路径
Collection         Version
------------------ -------
ansible.controller 4.2.1
ansible.netcommon  4.1.0
ansible.utils      2.8.0
community.crypto   2.7.0
redhat.rhv         2.1.0
结束练习(清理环境):
在workstation虚拟机上,切换到student用户主目录,使用lab命令来清理案例环境,确保先前练习的资源不会影响后续的练习。
[student@workstation ~]$ lab finish manage-finding三、 选用自动化执行环境
1. 关于自动化执行环境
自动化执行环境,即automation execution environment,简写为EE,指的是一类容器镜像,其中包括Ansible内容集合、它们的软件依赖项,以及可以运行你的剧本的最小Ansible引擎。
通过使用自动化执行环境,可以很方便地在一个系统上开发剧本,并在另一个系统中运行这些剧本。从而大大简化了开发过程,有助于确保可预测、可重复的结果。
自动化执行环境是运行Ansible剧本的地方。通常使用诸如ansible-navigator之类的工具来运行剧本,但剧本是在容器内运行,而不是直接在当前的系统上运行。
自动化执行环境由以下组件组成:
-
Ansible Core(或Ansible)
-
Ansible Core之外的其他Ansible内容集合
-
Python和Ansible Core的任何其他依赖项以及包含的集合
-
用来运行剧本的Ansible Runner
自动化执行环境的镜像文件由构建器ansible-builder生成,可以推送到任何容器仓库。
2. 选择一个支持的自动化执行环境
红帽AAP 2.2提供了3个预置的自动化执行环境(如表所示)
| 短名称 | 容器的镜像 | 描述 |
| Minimal | ee-minimal-rhel8 | 基于Ansible Core 2.13的最小执行环境 |
| Supported | ee-supported-rhel8 | 基于Ansible Core 2.13,且包含了红帽认证的内容结合以及相关软件依赖的执行环境 |
| Compatibility | ee-29-rhel8 | 基于 Ansible 2.9 的兼容执行环境 |
-
Minimal环境仅包括ansible.buildin的内容集合,通常将其作为构建自定义自动化执行环境的起点。
-
Supported环境包括红帽支持的一些其他的内容集合。默认情况下,自动化导航器和自动化控制器使用此环境,建议为你的新剧本使用这个执行环境。
-
Compatibility环境基于Ansible 2.9,它是在将模块从核心Ansible包分离到集合之前发布的。如果想运行之前的旧剧本时,可以使用这个兼容的执行环境。
红帽公司通过位于registry.redhat.io的仓库提供这3个执行环境:
-
registry.redhat.io/ansible-automation-platform-22/e-minimal-rhel8:latest
-
registry.redhat.io/ansible-automation-platform-22/e-supported-rhel8:latest
-
registry.redhat.io/ansible-automation-platform-22/ee-29-rhel8:latest
可以访问https://catalog.redhat.com/software/containers/search?q=ansible-automation-platform-22 来查看仓库目录。每一个容器镜像可以设置多个标记/标签,在本课程的练习环境中,上面这三个容器镜像都可以从私有自动化中心 hub.lab.example.com 下载标签为latest的版本。
3. 检查自动化执行环境
使用 ansible-navigator images 命令,可以列出及检查系统中可用的自动化执行环境。
[user@host ~]$ ansible-navigator images
Image                Tag    Execution environment Created       Size
0|ee-29-rhel8         latest True                 4 months ago   815 MB
1|ee-minimal-rhel8    latest True                 4 months ago   265 MB
2|ee-supported-rhel8  latest True                 4 months ago   1.05 GB^f/PgUp page up ^b/PgDn page down T† scroll esc back [0-9] goto :help help
你可以在导航器界面输入想要检查的自动化执行环境的编号。例如,按2 来检查ee-supported-rhel8环境的详情。
Image: ee-supported-rhel8:latest    Description
0|Image information      Information collected from image inspectio
1|General information   OS and python version information
2|Ansible version and collections  Information about ansible and ansible coll
3|Python packages                            Information about python and python packag
4|Operating system packages Information about operating system package
5|Everything                                           All image information^f/PgUp page up ^b/PgDn page down T† scroll esc back [0-9] goto :help help
可以进一步选择编号来查看指定执行环境某个特定方面的更多详情。在前面的示例中,如果按2或输入 :2 ,则会获得这个执行环境中可用集合的列表。
4. ansible-navigator导航器使用自动化执行环境
ansible-navigator run命令会在自动化执行环境中来运行剧本,默认选用supported环境,你也可以通过--execution-environment-image(或者--eei)选项 来选用其他环境。下面这个例子展示了如何使用campatibility兼容环境来运行剧本。
[user@host ~]$ ansible-navigator run oldplaybook.yml --eei \
registry.redhat.io/ansible-automation-platform-22/ee-29-rhel8:latest
如果已经下载了容器镜像到本地,那么可以使用这个镜像的短名称,,比如 --eei ee-29-rhel8:latest 。
如果还没有下载到本地,那么ansible-navigator会尝试从容器仓库中提取它。必要的话,应先使用 podman login命令来确保已经通过了容器仓库的身份验证。
上面这个示例中,可以提前运行 podman login registry.redhat.io 命令,来登录到容器仓库。
使用 --pull-policy(或--pp)选项可以控制ansible-navigator如何提取容器映像,对应的参数有多个(如表所示)
| 参数 | 描述 |
| always | 总是提取这个镜像 |
| missing | 如果本地缺失,那么就提取镜像到本地 |
| never | 不提取镜像到本地 |
| tag | 如果镜像的标签是latest,或者此镜像在本地缺失,就提取镜像到本地 |
除了使用--eei选项,你还可以创建一个 ansible-navigator.yml 配置文件来指定默认要使用的自动化执行环境。后续章节会讲解这个配置文件的详细配置。
5. 课堂练习:选用自动化执行环境
开始练习(部署环境):
以用户student登入workstation虚拟机,使用lab命令来构建案例环境。
[student@workstation ~]$ lab start manage-selecting步骤说明:
1)确认用来运行预置剧本需要哪些Ansible内容集合
进入/home/student/manage-selecting/目录,检查acl_info.yml剧本:
[student@workstation ~]$ cd ~/manage-selecting
[student@workstation manage-selecting]$ cat acl_info.yml
---
- name: Retrieving ACls using the ansible.posix collectionhosts: web_serversgather_facts: falsetasks:- name: Obtain the ACls for /webserver_data directoryansible.posix.acl:path: /webserver_data/register: acl_info- name: Print the ACls obtained for /webserver_data directoryansible.builtin.debug:var: acl_info['acl']
确认 acl_info.yml 剧本使用的模块:ansible.builtin.acl、ansible.builtin.debug。其中的ansible.posix.acl模块是ansible.posix集合的一部分,这个集合还没有安装;另一个模块ansible.builtin.debug是ansible.builtin集合的一部分,这个集合已经内置在ansible-core软件包中了。
2)找到提供了ansible.posix内容集合的自动化执行环境
使用podman login命令登录到位于hub.lab.example.com的私有自动化中心,这个自动化中心提供了红帽AAP2平台提供的三个自动化执行环境。
[student@workstation manage-selecting]$ podman login hub.lab.example.com
Username: student
Password: redhat123
login Succeeded!
使用ansible-navigator images命令分析 minimal迷你版镜像:
[student@workstation manage-selecting]$ ansible-navigator images --eei hub.lab.example.com/ee-minimal-rhel8等待几秒钟后,导航器就会显示ee-minimal-rhel8自动化环境的信息:
  Image                                                           Tag                     Execution environment                                                     Created                                  Size
0│ee-minimal-rhel8                                                latest                  True                                                                      2 years ago                              294 MB
1│ee-supported-rhel8                                              latest                  True                                                                      2 years ago                              1.68 GB
按0 来检查自动化执行环境,接下来再 按2 来选择 Ansible version and collections:
  Image: ee-minimal-rhel8:latest (primary)                                                                Description
0│Image information                                                                                       Information collected from image inspection
1│General information                                                                                     OS and python version information
2│Ansible version and collections                                                                         Information about ansible and ansible collections
3│Python packages                                                                                         Information about python and python packages
4│Operating system packages                                                                               Information about operating system packages
5│Everything                                                                                              All image information
结果表明minimal执行环境中不包含任何额外的Ansible内容集合:
Image: ee-minimal-rhel8:latest (primary) (Information about ansible and ansible collections)
0│---
1│ansible:
2│  collections:
3│    details: {}
4│    errors:
5│    - |-
6│      ERROR! - None of the provided paths were usable. Please specify a valid path with --collections-path
7│  version:
8│    details: ansible [core 2.13.4]
ee-minimal-rhel8 执行环境不足以支持上述剧本的运行,输入 :q 并按Enter键退出ansible-navigator命令。
使用ansible-navigator命令提取 supported镜像:
[student@workstation manage-selecting]$ ansible-navigator images --eei hub.lab.example.com/ee-supported-rhel8导航器中显示了2个自动化执行环境,按1 键来分析supported镜像,接下来再输入2入口选项Ansible version and collections的编号:
  Image                                                           Tag                     Execution environment                                                     Created                                  Size
0│ee-minimal-rhel8                                                latest                  True                                                                      2 years ago                              294 MB
1│ee-supported-rhel8                                              latest                  True                                                                      2 years ago                              1.68 GB
Image: ee-supported-rhel8:latest (primary) Description
0│Image information Information collected from image inspection
1│General information OS and python version information
2│Ansible version and collections Information about ansible and ansible collections
3│Python packages Information about python and python packages
4│Operating system packages Information about operating system packages
5│Everything All image information结果表明supported执行环境包含了ansible.posix内容集合:
Image: ee-supported-rhel8:latest (primary) (Information about ansible and ansible collections)0│---1│ansible:2│  collections:3│    details:4│      amazon.aws: 3.2.05│      ansible.controller: 4.2.16│      ansible.netcommon: 3.1.17│      ansible.network: 1.2.08│      ansible.posix: 1.3.09│      ansible.security: 1.0.0
10│      ansible.utils: 2.6.1
11│      ansible.windows: 1.9.0
12│      ansible.yang: 1.0.0
13│      arista.eos: 5.0.0
14│      cisco.asa: 3.0.0
15│      cisco.ios: 3.0.0
16│      cisco.iosxr: 3.0.0
17│      cisco.nxos: 3.0.0
18│      cloud.common: 2.1.1
19│      frr.frr: 2.0.0
20│      ibm.qradar: 2.0.0
21│      junipernetworks.junos: 3.0.0
22│      kubernetes.core: 2.2.3
23│      openvswitch.openvswitch: 2.1.0
24│      redhat.insights: 1.0.7
25│      redhat.openshift: 2.1.0
26│      redhat.rhv: 1.6.5
27│      redhat.satellite: 3.3.0
28│      servicenow.itsm: 1.3.3
29│      splunk.es: 2.0.0
30│      trendmicro.deepsec: 2.0.0
31│      vmware.vmware_rest: 2.1.5
32│      vyos.vyos: 3.0.0
33│  version:
34│    details: ansible [core 2.13.4]
输入 :q 并按Enter键退出ansible-navigator命令。ee-supported-rhel8执行环境包含了剧本需要的ansible.posix集合,可以使用这个环境来运行剧本。
3)使用导航器运行acl_info.yml剧本
由于minimal环境不包含ansible.posix集合,所以不能满足acl_info.yml的需要,当使用ansible-navigator命令在minimal环境中来运行acl_info.yml剧本时,剧本会无法解析到 ansible.posix.acl集合,从而导致失败:
[student@workstation manage-selecting]$ ansible-navigator run acl_info.yml -m stdout --eei ee-minimal-rhel8 --pp missingERROR! couldn't resolve module/action 'ansible.posix.acl'. This often indicates a misspelling, missing collection, or incorrect module path.
The error appears to be in '/home/student/manage-selecting/acl_info.yml': line 7, column 7, but may
be elsewhere in the file depending on the exact syntax problem.
The offending line appears to be:
tasks:
- name: Obtain the ACLs for /webserver_data directory
^ here
Please review the log for errors.
使用ansible-navigator命令在supported环境中来运行acl_info.yml剧本,才会成功。
[student@workstation manage-selecting]$ ansible-navigator run acl_info.yml -m stdout --eei ee-supported-rhel8 --pp missing
PLAY [Retrieving ACLs using the ansible.posix collection] **********************
TASK [Obtain the ACLs for /webserver_data directory] ***************************
ok: [serverb.lab.example.com]
ok: [serverc.lab.example.com]
TASK [Print the ACLs obtained for /webserver_data directory] *******************
ok: [serverb.lab.example.com] => {
"acl_info['acl']": [
"user::rwx",
"group::r-x",
"other::r-x",
"default:user::rwx",
"default:group::r-x",
"default:mask::rwx",
"default:other::r-x"
]
}
ok: [serverc.lab.example.com] => {
"acl_info['acl']": [
"user::rwx",
"group::r-x",
"other::r-x",
"default:user::rwx",
"default:group::r-x",
"default:mask::rwx",
"default:other::r-x"
]
}
PLAY RECAP *********************************************************************
serverb.lab.example.com    : ok=2    changed=0    unreachable=0    failed=0    skipped=0    rescued=0    ignored=0
serverc.lab.example.com    : ok=2    changed=0    unreachable=0    failed=0    skipped=0    rescued=0    ignored=0
结束练习(清理环境):
在workstation虚拟机上,切换到student用户主目录,使用lab命令来清理案例环境,确保先前练习的资源不会影响后续的练习。
[student@workstation ~]$ lab finish manage-selecting四、 综合实验:管理内容集和执行环境
开始实验(部署环境):
以用户student登入workstation虚拟机,使用lab命令来构建案例环境。
[student@workstation ~]$ lab start manage-review解决方案:
1. 进入/home/student/manage-review/目录检查cockpit.yml剧本,记录此剧本用到了哪些内容集合
1)进入/home/student/manage-review/目录
[student@workstation ~]$ cd ~/manage-review/2)检查cockpit.yml剧本(注意ansible.posix.firewalld模块需要用到ansible.posix模块)
[student@workstation manage-review]$ cat cockpit.yml
---
- name: Deploy cockpithosts: servera.lab.example.combecome: truetasks:- name: Ensure cockpit is installedansible.builtin.yum:name: cockpitstate: present- name: Ensure the cockpit service is started and enabledansible.builtin.systemd:name: cockpitstate: startedenabled: true- name: Ensure Cockpit network traffic is allowedansible.posix.firewalld:service: cockpitpermanent: truestate: enabledimmediate: true
2. 使用ansible-navigator命令检查当前系统中可用的内容集合镜像,确定要运行cockpit.yml剧本应该选用哪一个镜像
1)列出可用的自动化环境镜像
[student@workstation manage-review]$ ansible-navigator imagesImage                Tag    Execution environment    Created Size
0|ee-minimal-rhel8    latest True   3 months ago      294 MB
1|ee-supported-rhel8  latest True   3 months ago      1.68 GB
按1 来选择ee-supported-rhel8镜像。
2)从TUI界面可以看到ee-supported-rhel8镜像的信息
Image: ee-supported-rhel8:latest Description0|Image information Information collected from image inspection1|General information OS and python version information2|Ansible version and collections Information about ansible and ansible ...3|Python packages Information about python and python packages4|Operating system packages Information about operating system packages 5|Everything All image information按2 来查看ee-supported-rhel8镜像中提供了哪些可用的集合。
3)注意ee-supported-rhel8镜像提供了运行cockpit.yml剧本所需要的ansible.posix集合
Image: ee-supported-rhel8:latest (Information about ansible and ansible collections)0│---1│ansible:2│  collections:3│    details:4│      amazon.aws: 3.2.05│      ansible.controller: 4.2.16│      ansible.netcommon: 3.1.17│      ansible.network: 1.2.08│      ansible.posix: 1.3.09│      ansible.security: 1.0.0
10│      ansible.utils: 2.6.1
11│      ansible.windows: 1.9.0
12│      ansible.yang: 1.0.0
13│      arista.eos: 5.0.0
14│      cisco.asa: 3.0.0
15│      cisco.ios: 3.0.0
16│      cisco.iosxr: 3.0.0
17│      cisco.nxos: 3.0.0
18│      cloud.common: 2.1.1
19│      frr.frr: 2.0.0
20│      ibm.qradar: 2.0.0
21│      junipernetworks.junos: 3.0.0
22│      kubernetes.core: 2.2.3
23│      openvswitch.openvswitch: 2.1.0
24│      redhat.insights: 1.0.7
25│      redhat.openshift: 2.1.0
26│      redhat.rhv: 1.6.5
27│      redhat.satellite: 3.3.0
28│      servicenow.itsm: 1.3.3
29│      splunk.es: 2.0.0
30│      trendmicro.deepsec: 2.0.0
31│      vmware.vmware_rest: 2.1.5
32│      vyos.vyos: 3.0.0
33│  version:
34│    details: ansible [core 2.13.4]
输入 :q 并按Enter键退出ansible-navigator命令。
3. 使用ansible-navigator命令来运行cockpit.yml剧本,注意选用正确的自动化执行环境镜像
使用ansible-navigator命令在ee-supported-rhel8镜像中运行cockpit.yml剧本。
[student@workstation manage-review]$ ansible-navigator run cockpit.yml --eei ee-supported-rhel8等剧本运行完毕以后,按Esc 键退出ansible-navigator命令。
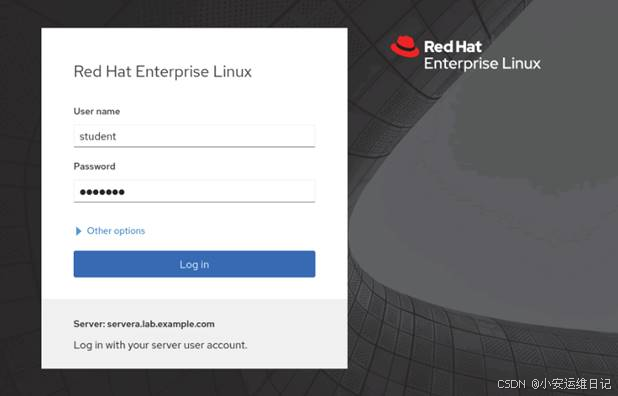
4. 登录网站 https://servera.lab.example.com:9090,确认剧本已正确配置Web控制台
接受不安全的证书,登录用户名student、密码student
1)在workstation主机上从浏览器访问 https://servera.lab.example.com:9090 (如图-12所示)
2)用户名student,密码student。若登录成功,说明剧本已配置好web控制台(如图-13所示)

5. 检查create_samples_db.yml剧本,记录此剧本要用到哪些集合,在私有自动化中心找到这些集合
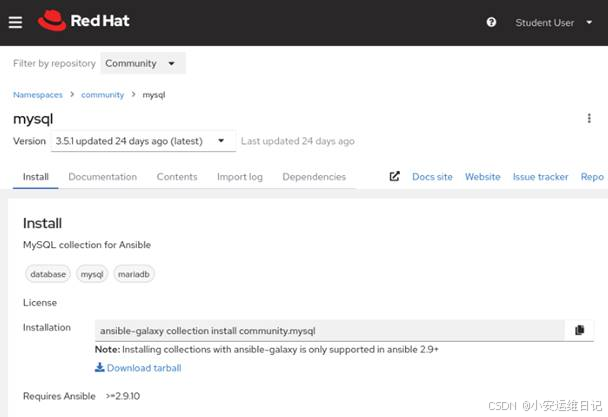
1)检查create_samples_db.yml剧本,注意此剧本要求 community.mysql 集合。
[student@workstation manage-review]$ cat create_samples_db.yml
---
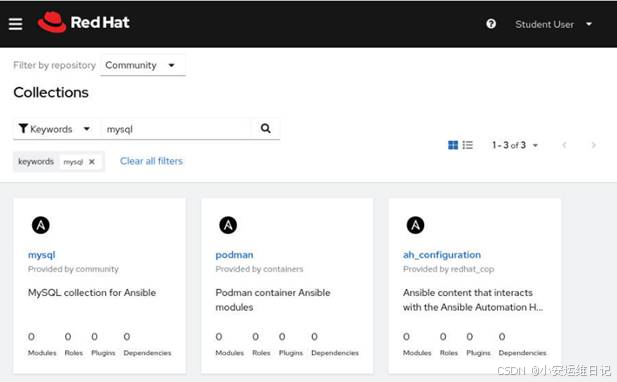
- name: Create samples databasehosts: serverb.lab.example.combecome: truetasks:- name: Ensure MariaDB is installedansible.builtin.yum:name:- mariadb- mariadb-serverstate: present- name: Ensure the mariadb service is started and enabledansible.builtin.systemd:name: mariadbstate: startedenabled: true- name: Ensure the samples database existscommunity.mysql.mysql_db:name: samplesstate: present2)从浏览器访问https://hub.lab.example.com,
用户名student、密码redhat123
导航到 Collections > Collections,在 Filter by repository处选择 Community,然后搜索 mysql(如图-14所示)。
3)点击页面上的mysql内容集,来获取ansible-galaxy安装命令
6. 调整/home/student/manage-review/ansible.cfg配置文件,以便ansible-galaxy命令从私有的自动化中心安装集合
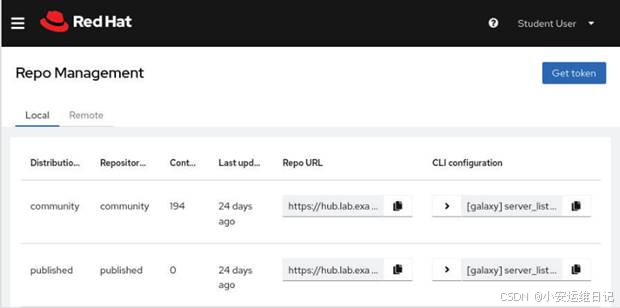
1)在私有自动化中心的页面导航到 Collections > Repository Management,从community仓库使用CLI configuration区域提供的配置来构建/home/student/manage-review/ansible.cfg文件,如图-16所示。
2)在配置文件 /home/student/manage-review/ansible.cfg 中添加仓库设置
[defaults]
inventory = ./inventory
remote_user = devops[galaxy]
server_list = community_repo[galaxy_server.community_repo]
url=https://hub.lab.example.com/api/galaxy/content/community/
token=<put your token here>
3)导航到Collections > API token management,点击Load token,再点击Copy to clipboard图标,如图-17所示

4)修改/home/student/manage-review/ansible.cfg文件,将复制的令牌字串粘贴到token=位置
注意:实际生成的令牌字串可能会与这里不一样。
[student@workstation manage-review]$ vim ansible.cfg
[defaults]
inventory = ./inventory
remote_user = devops
collections_paths = ./collections:/usr/share/ansible/collections/ansible_collections[galaxy]
server_list = community_repo[galaxy_server.community_repo]
url=https://hub.lab.example.com/api/galaxy/content/community/
token=865d4517fe18135059d5c093321aac0959041720
7. 创建/home/student/manage-review/collections/目录,将剧本create_samples_db.yml要求的集合安装到此目录下
1)创建/home/student/manage-review/collections/目录
[student@workstation manage-review]$ mkdir collections2)将community.mysql内容集安装到/home/student/manage- review/collections/目录
[student@workstation manage-review]$ ansible-galaxy collection install community.mysql -p collections/
[student@workstation manage-review]$ ansible-galaxy collection list
# /usr/share/ansible/collections/ansible_collections      # 指定路径
Collection               Version
------------------------ -------
redhat.rhel_system_roles 1.16.2# /home/student/manage-review/collections/ansible_collections
Collection      Version
--------------- -------
community.mysql 3.5.1
8. 使用ansible-navigator命令来运行create_samples_db.yml剧本
使用ansible-navigator run命令来运行剧本:
[student@workstation manage-review]$ ansible-navigator run create_samples_db.yml等剧本运行完毕以后,按Esc键退出ansible-navigator命令。
9. 确认剧本中已正确配置了MariaDB数据库连接,你可以通过运行sudo mysql -e "SHOW DATABASES"命令来确认此剧本是否成功创建了样例数据库。用户student的密码也是student
1)以用户student连接serverb主机
[student@workstation manage-review]$ ssh serverb2)确认samples数据库已经存在
[student@serverb ~]$ sudo mysql -e "SHOW DATABASES"[sudo] password for student: student+-----------------------------+
| Database                    |
+-----------------------------+
| information_schema          |
| mysql                       |
| performance_schema          |
| samples                     |
+-----------------------------+
3)退出serverb主机
[student@serverb ~]$ logout结束实验(清理环境):
在workstation虚拟机上,切换到student用户主目录,使用lab命令来清理案例环境,确保先前练习的资源不会影响后续的练习。
[student@workstation ~]$ lab finish manage-review思维导图:
小结:
本篇为 【RHCA认证 - DO374 | Day02:管理内容集和执行环境】的学习笔记,希望这篇笔记可以让您初步了解如何重用Ansible内容集、如何查找及安装Ansible内容集、 选用自动化执行环境、以及综合实验:管理内容集和执行环境等,不妨跟着我的笔记步伐亲自实践一下吧!
Tip:毕竟两个人的智慧大于一个人的智慧,如果你不理解本章节的内容或需要相关环境、视频,可评论666并私信小安,请放下你的羞涩,花点时间直到你真正的理解。