AutoGen框架入门:5个核心概念搭建智能体协作系统
AutoGen 是微软研究院开源的多智能体 AI 系统框架。这个框架的设计思路很简单——让多个 AI 智能体(加上人类参与)在对话中完成复杂任务的协作和推理。
你甚至可以把它理解成一个团队聊天室,智能体们在里面讨论、争论、协作,最终得出解决方案。
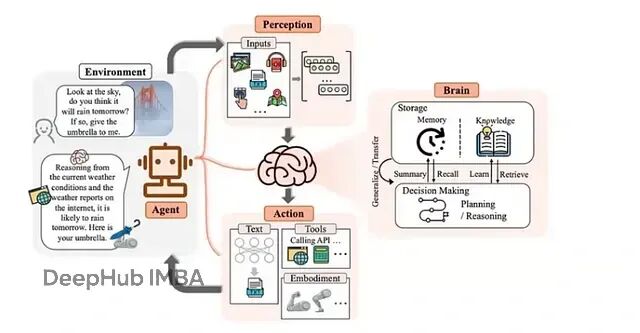
AutoGen 通过创建多个专门化智能体,为每个智能体设定自己的角色、目标,来达到上面说的聊天能力,并且还能通过配置工具来获得代码执行能力。智能体之间通过消息机制通信,互相配合完成任务。
AutoGen 为什么值得关注
AutoGen 真正好玩的地方在于它实现了 AI 之间的协作。智能体可以相互辩论、推理、纠错、共同创造,整个过程不需要人工逐步编写脚本,设置可以不需要人工的参与。
相比于CrewAI,AutoGen 则把重点放在讨论、推理和演化上,而CrewAI 更关注执行层面。
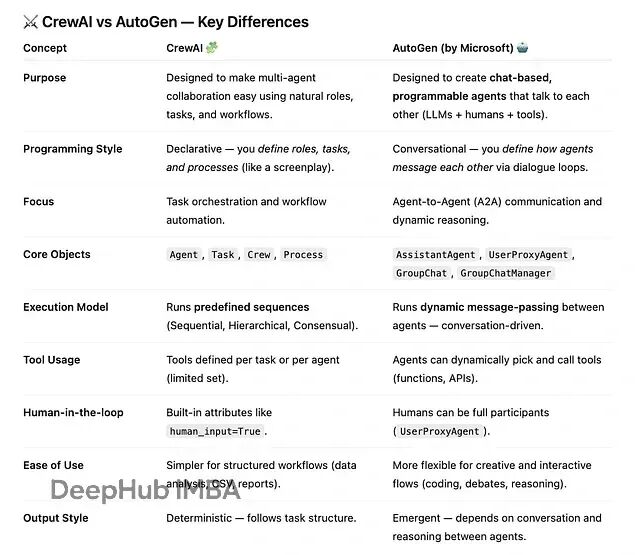
你可以理解为CrewAI更像是我们现在用的工作助手,而AutoGen 更像是圆桌会议。
AutoGen 框架处理了很多底层问题,这样我们可以只专著于如何编排角色和任务。
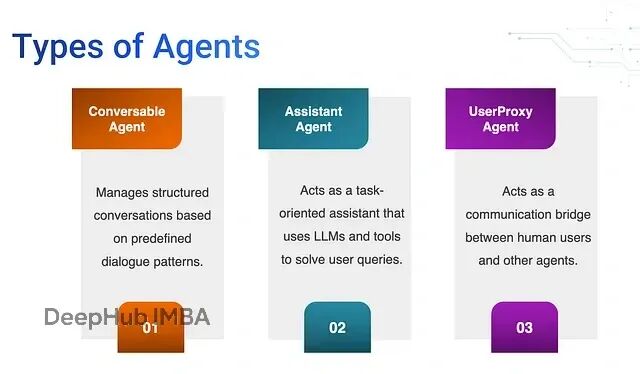
AutoGen 定义了三类核心智能体:
- Conversable Agent:负责管理结构化对话和预定义的交互模式
- Assistant Agent:执行具体任务,调用工具或 LLM
- UserProxy Agent:充当人机接口层,转发消息和响应
简单的群聊演示
 from autogen import ConversableAgent, AssistantAgent, UserProxyAgent, GroupChat, GroupChatManager# Define AssistantAgent (AI assistant)
assistant = AssistantAgent(name="AssistantAgent",system_message="You are a helpful AI assistant. Suggest Python code when relevant.",human_input_mode="NEVER"  # No human input required, runs automatically
)# Define UserProxyAgent (represents human)
user_proxy = UserProxyAgent(name="UserProxyAgent",human_input_mode="ALWAYS"  # Requires human input
)# Define group chat
chat = GroupChat(agents=[assistant, user_proxy],messages=[]
)# Manage group chat with GroupChatManager
manager = GroupChatManager(groupchat=chat,llm_config={"model": "gpt-5-mini"}
)#  Start the chat
user_proxy.initiate_chat(manager,message="Write a short Python function to calculate factorial.")
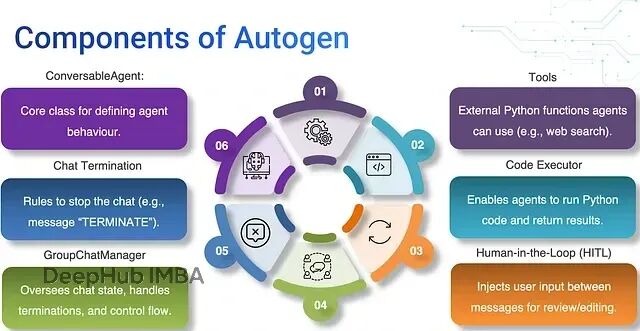
AutoGen 核心概念详解
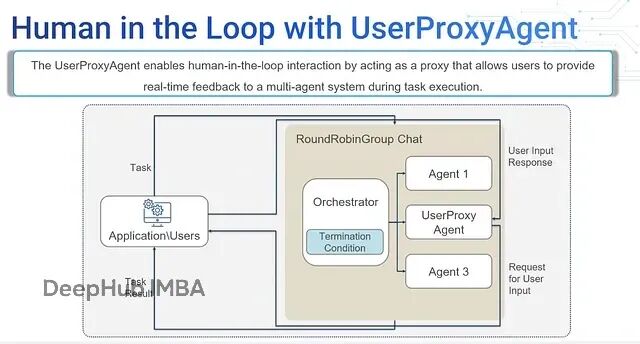
1、Human-in-the-Loop(人工参与)
这个功能让人类可以在智能体执行过程中进行干预。
 # Human-in-the-Loop example
from autogen import AssistantAgent, UserProxyAgent# Step 1: Create assistant agent
assistant = AssistantAgent(name="code_writer",system_message="You are a helpful coding assistant."
)# Step 2: Create user proxy with human-in-the-loop enabled
user = UserProxyAgent(name="human_user",human_input_mode="ALWAYS"  # 👈 Enable human confirmation
)# Step 3: Start conversation
user.initiate_chat(assistant,message="Write a Python function to calculate factorial.")
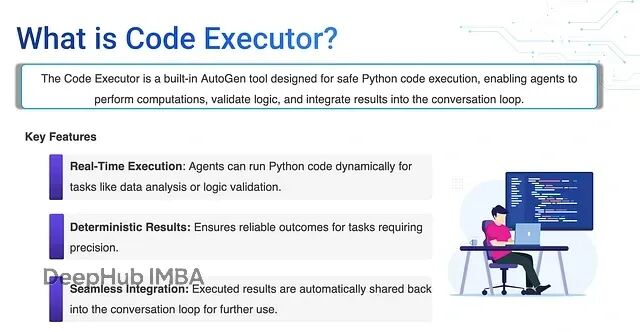
2、Code Executor 的工作机制
Code Executor 负责安全执行智能体生成的代码。
 # Behind the scenes
# AssistantAgent generates code:
sum([x for x in range(1, 21) if x % 2 == 0])# PythonCodeExecutor automatically:
# - Executes safely in sandbox
# - Captures output
# - Returns result to agent# UserProxyAgent displays result:
✅ Result: 110# Optional: Add human approval
user = UserProxyAgent(name="human_user",code_execution_config={"executor": executor},human_input_mode="ALWAYS")
3、工具集成方式
工具通过初始化时的
tools
参数传入智能体。
 from autogen import AssistantAgent, UserProxyAgent, Tool# Define tool function
def multiply_numbers(a: int, b: int) -> int:"""Returns the product of two numbers."""return a * b# Wrap as Tool object
multiply_tool = Tool(func=multiply_numbers,name="multiply_tool",description="Multiplies two numbers and returns the product."
)# Create agent and integrate tool
assistant = AssistantAgent(name="math_agent",system_message="You are a math assistant. Use multiply_tool when needed.",tools=[multiply_tool]
)user = UserProxyAgent(name="human_user")user.initiate_chat(assistant,message="Can you multiply 8 and 7?")
4、多智能体协作模式
AutoGen 对话系统的核心特征是支持多智能体协作对话模式。
 # Example: Multi-agent conversational pattern
from autogen import AssistantAgent, ReviewerAgent, UserProxyAgent, PythonCodeExecutorexecutor = PythonCodeExecutor()# Coder agent
coder = AssistantAgent(name="coder_agent",system_message="You are a code-writing assistant."
)# Reviewer agent
reviewer = ReviewerAgent(name="reviewer_agent",system_message="You are a code reviewer. Check logic and security."
)# User proxy
user = UserProxyAgent(name="human_user",human_input_mode="TERMINATE",code_execution_config={"executor": executor}
)def run_multi_agent_workflow(prompt: str):coder_response = coder.chat_with(user, message=prompt)print("Coder ->", coder_response["content"])reviewer_response = reviewer.review(code={"code": coder_response["content"]})print("Reviewer ->", reviewer_response["content"])if "SUGGEST_CHANGES" in reviewer_response["content"]:revision = coder.chat_with(reviewer, message=reviewer_response["content"])final_code = revision["content"]else:final_code = coder_response["content"]print("Waiting for human approval...")if not user.get_human_approval(final_code):print("Human rejected execution.")returnexec_result = executor.execute(final_code)print("Execution result ->", exec_result["output"])if __name__ == "__main__":run_multi_agent_workflow("Write a Python function prime_factors(n).")
这个例子展示了多智能体协作的几个关键点:Coder、Reviewer、User 各司其职完成协作,然后通过Reviewer 把关代码的安全性和质量,HITL 模式给人类最终审批权,最后可以通过Code Executor 在沙箱环境安全执行代码
5、会话终止机制
会话会在满足终止条件时结束,这样一个整个的”会议“就结束了
 from autogen import AssistantAgent, UserProxyAgentdef is_termination_msg(message):"""Returns True when message contains TERMINATE keyword."""return "TERMINATE" in message["content"].upper()assistant = AssistantAgent(name="helper_agent",system_message="Stop when receiving 'TERMINATE'."
)user = UserProxyAgent(name="human_user",is_termination_msg=is_termination_msg
)user.initiate_chat(assistant, message="Hello, explain recursion in simple terms.")assistant.send({"role": "user", "content": "Thanks, that's clear. TERMINATE"})
总结
AutoGen 提供了构建复杂 AI 协作系统的完整支持,覆盖了角色结构、通信机制、人工参与、工具集成、代码执行和多智能体协作设计等各个方面。框架把底层复杂度封装得很好,开发者可以专注在业务逻辑和智能体设计上。
https://avoid.overfit.cn/post/a50b2cf5363046739250c9c284421d2f
作者:Sonika