【Linux】fork函数详解

目录
1. 概述
2. 查询当前进程ID
3. fork函数的运用
4. 延伸--验证存储空间
5. vfork函数
6. 使用fork复制文件描述符
1. 概述
fork创建一个新的进程,原进程称为父进程,新的进程称为子进程。fork创建进程后,函数在子进程返回0值,在父进程中返回子进程的PID。两个进程都有自己的数据段、BSS段、栈、堆等资源,父进程间不共享这些存储空间,而代码段为父进程和子进程共享。父进程和子进程各自从fork函数后开始执行代码,在创建子进程后,子进程复制了父进程打开的文件描述符,但是不复制文件锁。子进程未处理的闹钟定时被清除,子进程不继承父进程的未决信号集。
函数表头文件:
#include<unistd.h>函数原型:
/* Clone the calling process, creating an exact copy.Return -1 for errors, 0 to the new process,and the process ID of the new process to the old process.  */
extern __pid_t fork (void) __THROWNL;
返回值,如果失败,则返回-1,如果成功,则返回进程PID。
查看进程ID的函数:
pid_t getpid(void);
pid_t getppid(void);
2. 查询当前进程ID
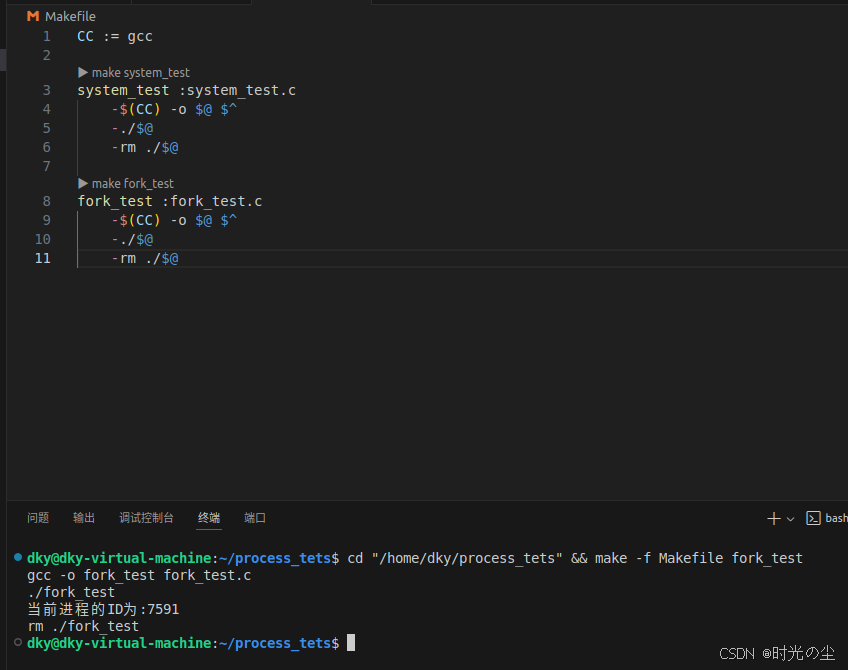
我们开始编写一个代码看看,首先创建一个fork_test.c文件用来存放我们后续工程,我们先来查看一下当前进程:
#include<stdio.h>
#include<stdlib.h>
#include<unistd.h>int main(int argc, char const *argv[])
{printf("当前进程的ID为:%d\n",getpid());return 0;
}
编写一个Makefile文件:
fork_test :fork_test.c-$(CC) -o $@ $^-./$@-rm ./$@可以看到此时的进程ID:
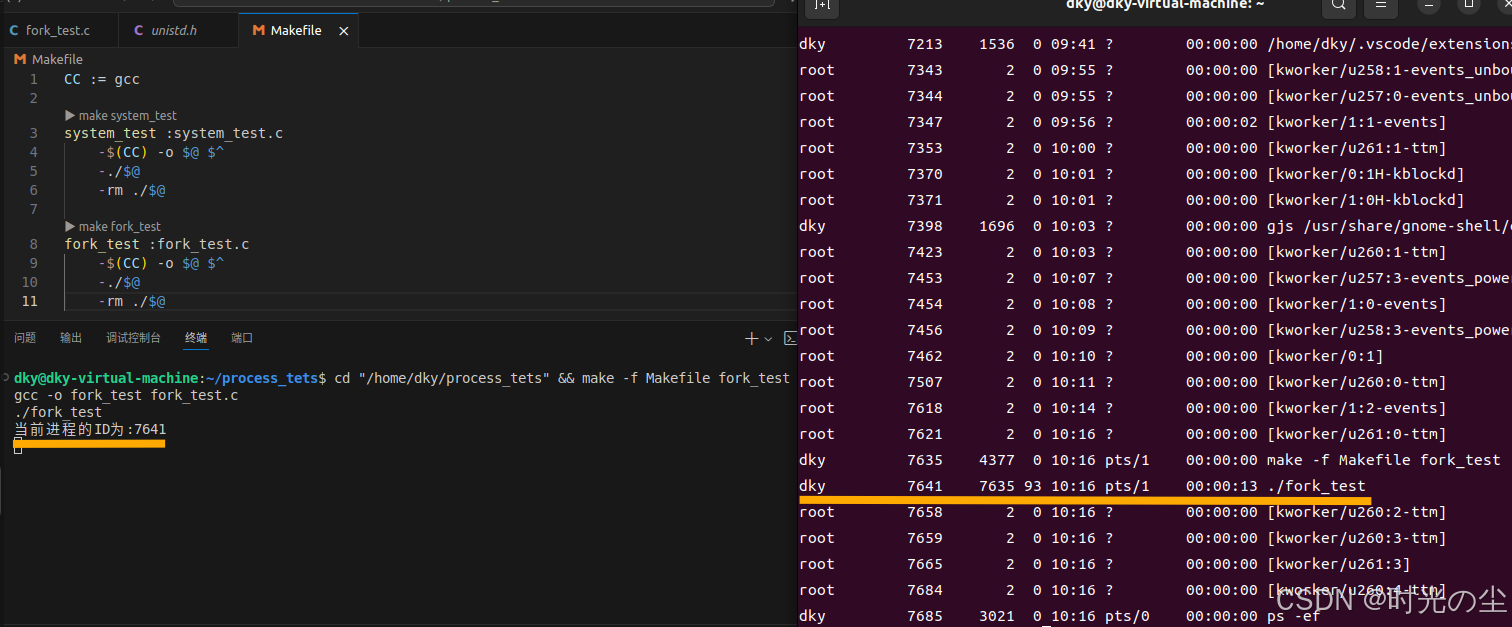
我们如果想要通过终端命令查看当前进程,则需要再主函数添加一个 while() 循环,不要让进程结束过快,否则看不见:
#include<stdio.h>
#include<stdlib.h>
#include<unistd.h>int main(int argc, char const *argv[])
{printf("当前进程的ID为:%d\n",getpid());while(1){}return 0;
}
3. fork函数的运用
我们上面知道,fork创建一个新的进程,原进程称为父进程,新的进程称为子进程。fork创建进程后,函数在子进程返回0值,在父进程中返回子进程的PID:
#include<stdio.h> // 标准输入输出
#include<stdlib.h> // 标准库函数
#include<unistd.h> // Unix 标准函数(包含 fork(), getpid(), getppid())
#include <sys/types.h> // 系统类型定义(包含 pid_t)int main(int argc, char const *argv[])
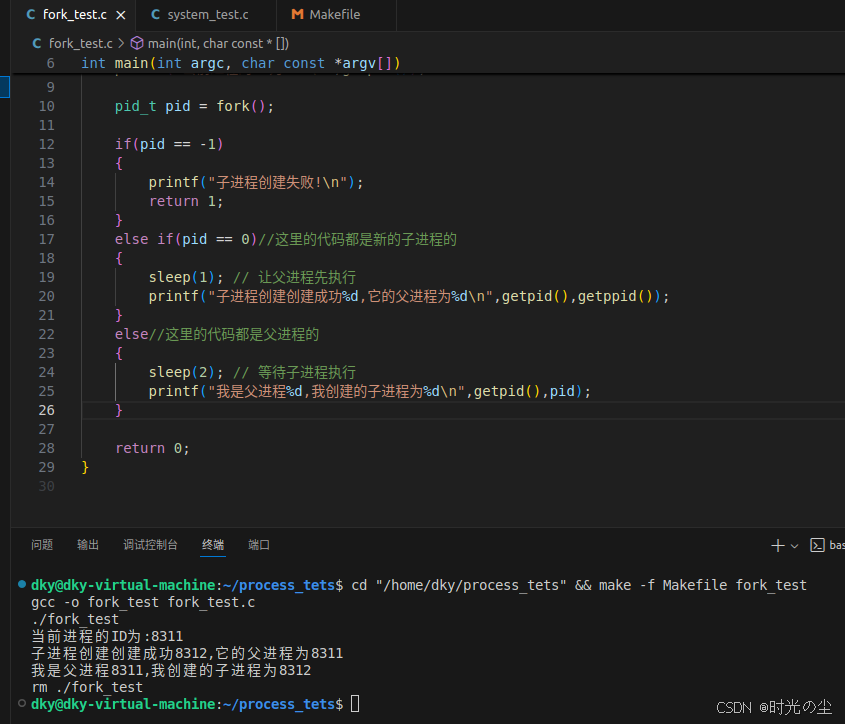
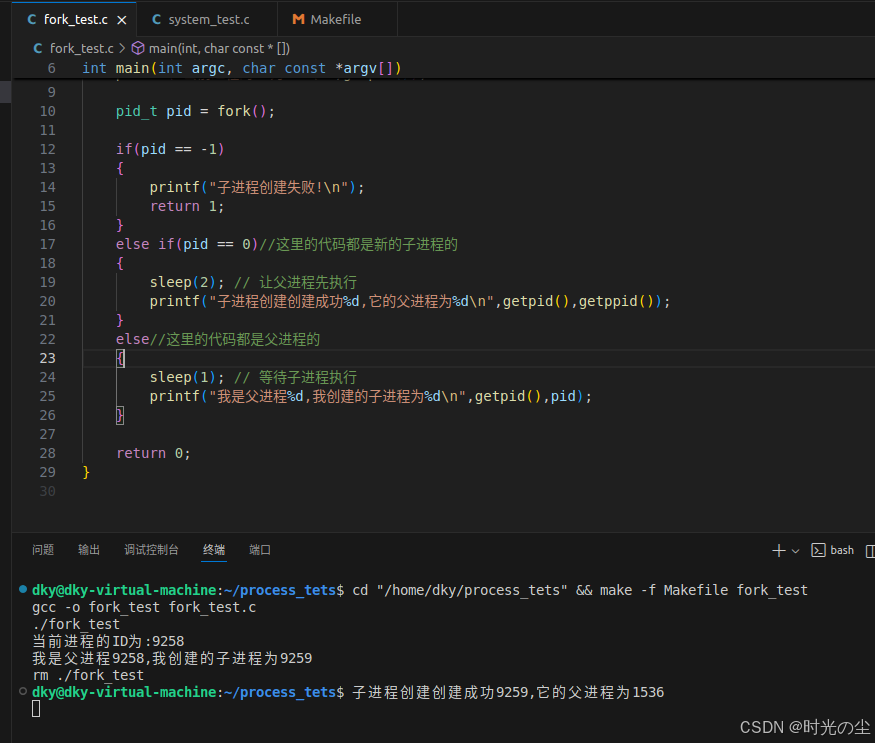
{printf("当前进程的ID为:%d\n",getpid());pid_t pid = fork();if(pid == -1){printf("子进程创建失败!\n");return 1;}else if(pid == 0)//这里的代码都是新的子进程的{sleep(1); // 让父进程先执行printf("子进程创建创建成功%d,它的父进程为%d\n",getpid(),getppid());}else//这里的代码都是父进程的{sleep(2); // 等待子进程执行printf("我是父进程%d,我创建的子进程为%d\n",getpid(),pid);}return 0;
}
这里需要注意,代码中需要加入sleep进行一个延时,如上述,子进程在休眠1秒期间,父进程有足够时间执行并退出,子进程醒来时父进程还在,所以能正确显示父进程ID。
如果不加延时,或者父进程比子进程执行过快,就会出现,父进程执行太快,在子进程输出之前就退出了,子进程变成了"孤儿进程",被 init/systemd 进程收养:
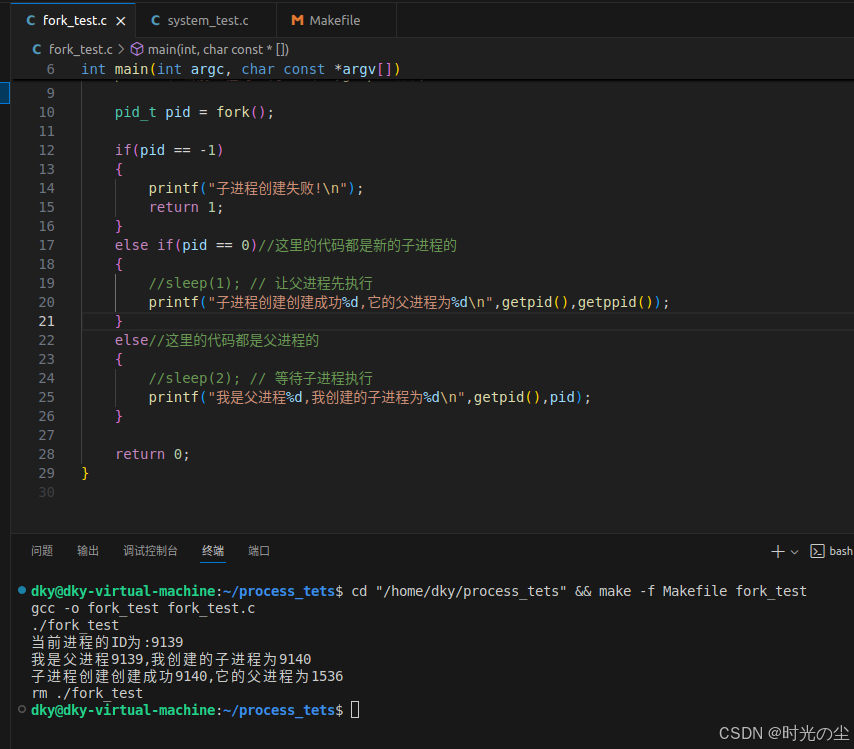
我们也可以通过更改延时看一下:
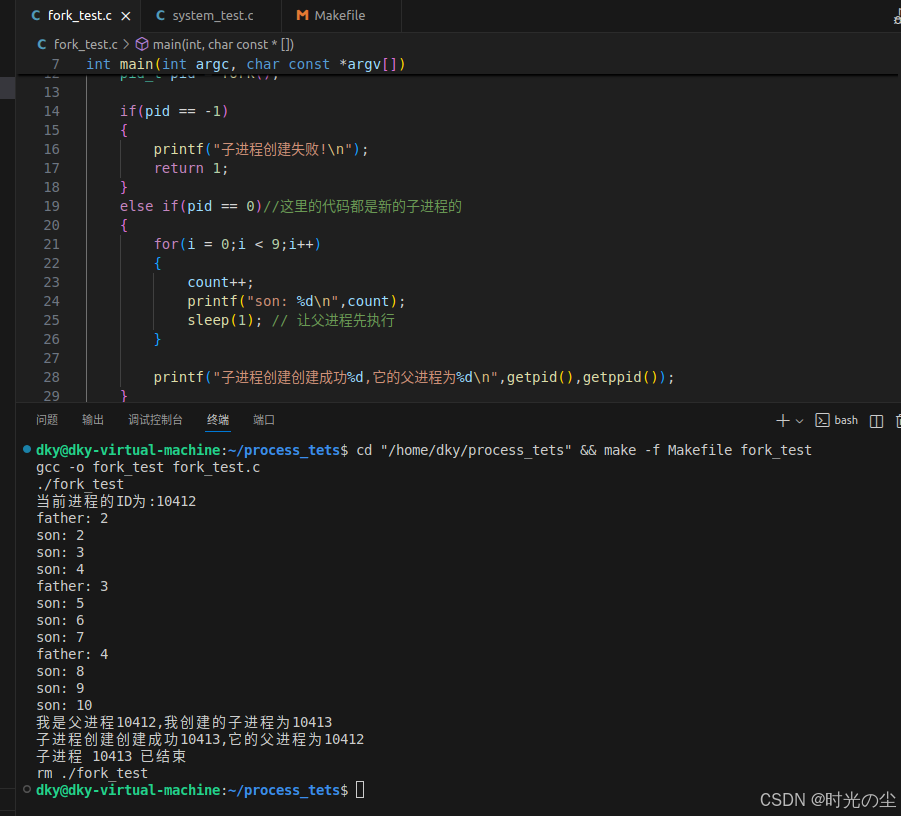
我们可以创建一个for循环用来打印数据,去观察父进程和子进程的并发执行:
#include<stdio.h>    // 标准输入输出
#include<stdlib.h>   // 标准库函数
#include<unistd.h>   // Unix 标准函数(包含 fork(), getpid(), getppid())
#include <sys/types.h> // 系统类型定义(包含 pid_t)int main(int argc, char const *argv[])
{printf("当前进程的ID为:%d\n",getpid());pid_t pid = fork();if(pid == -1){printf("子进程创建失败!\n");return 1;}else if(pid == 0)//这里的代码都是新的子进程的{int i,a=5;for(i = 0;i < 5;i++){printf("son: %d\n",i);sleep(1); // 让父进程先执行           }printf("子进程创建创建成功%d,它的父进程为%d\n",getpid(),getppid());}else//这里的代码都是父进程的{int i,a=10;for(i = 5;i<a;i++){printf("father: %d\n",i);sleep(2); // 等待子进程执行}printf("我是父进程%d,我创建的子进程为%d\n",getpid(),pid);}return 0;
}
运行结果:
我们可以将上述结果拆分如下分析:
时间(秒)  父进程(PID:9542)       子进程(PID:9543)
--------------------------------------------------
t=0       father: 5             son: 0
t=1       (休眠中)               son: 1
t=2       father: 6             son: 2
t=3       (休眠中)               son: 3
t=4       father: 7             son: 4
t=5       (休眠中)               子进程创建成功...
t=6       father: 8             (子进程结束)
t=7       (休眠中)
t=8       father: 9
t=9       我是父进程...
更加正确的做法应当调用waitpid函数进行等待子进程的结束,而不是一味的通过时间进行判断,如:
#include<stdio.h> // 标准输入输出
#include<stdlib.h> // 标准库函数
#include<unistd.h> // Unix 标准函数(包含 fork(), getpid(), getppid())
#include <sys/types.h> // 系统类型定义(包含 pid_t)
#include <sys/wait.h> // 添加 waitpid 所需的头文件int main(int argc, char const *argv[])
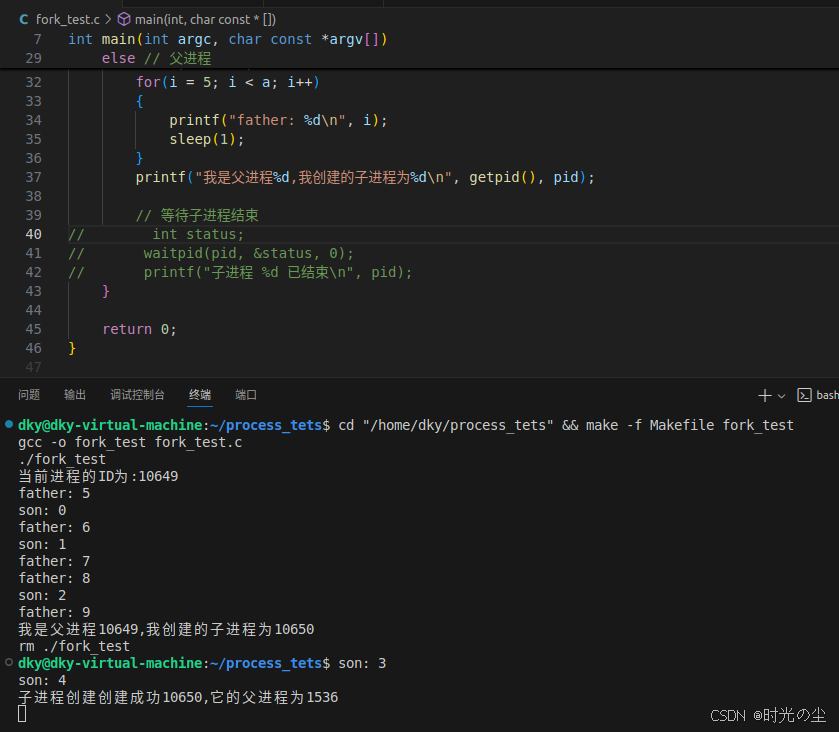
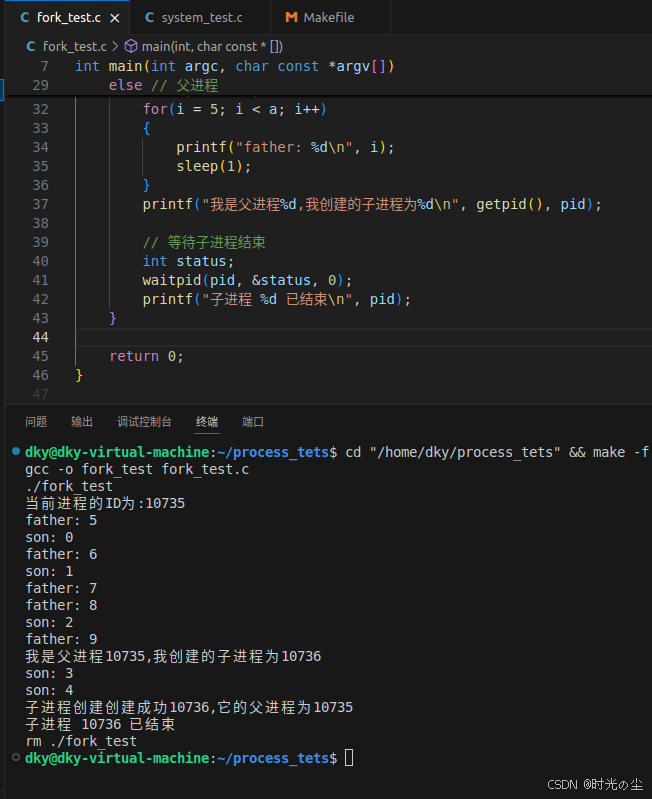
{printf("当前进程的ID为:%d\n",getpid());pid_t pid = fork();if(pid == -1){printf("子进程创建失败!\n");return 1;}else if(pid == 0)//这里的代码都是新的子进程的{int i,a=5;for(i = 0;i < 5;i++){printf("son: %d\n",i);sleep(1); // 让父进程先执行 }printf("子进程创建创建成功%d,它的父进程为%d\n",getpid(),getppid());}else // 父进程{int i, a = 10;for(i = 5; i < a; i++){printf("father: %d\n", i);sleep(2);}printf("我是父进程%d,我创建的子进程为%d\n", getpid(), pid);// 等待子进程结束int status;waitpid(pid, &status, 0);printf("子进程 %d 已结束\n", pid);}return 0;
}
这样做的好处就是可以防止孤儿进程的产生,假如我们将子进程的时间延长,父进程的时间缩短,如果不通过waitpid等待子进程结束,那么自己成就会变成孤儿进程:
而如果我们加上,父进程需要等待子进程结束而结束:
4. 延伸--验证存储空间
对于waitpid函数文章后续会详细解释,这里只是为了了解fork的调用,我们上面通过打印 i 和 a 大致可以看出进程间是并发执行的,我们下面再来看一下另一个点,两个进程都有自己的数据段、BSS段、栈、堆等资源,父进程间不共享这些存储空间,而代码段为父进程和子进程共享,这一点我们要怎么理解呢?我们在对上面的代码进行一个简单的修改,声明一个全局变量 count,为了方便观察现象,将父进程的延时在延长一点,通过for循环在父子进程中各自累加看看会是什么结果:
#include<stdio.h>    // 标准输入输出
#include<stdlib.h>   // 标准库函数
#include<unistd.h>   // Unix 标准函数(包含 fork(), getpid(), getppid())
#include <sys/types.h> // 系统类型定义(包含 pid_t)
#include <sys/wait.h>  // 添加 waitpid 所需的头文件int main(int argc, char const *argv[])
{printf("当前进程的ID为:%d\n",getpid());int i,count = 1;pid_t pid = fork();if(pid == -1){printf("子进程创建失败!\n");return 1;}else if(pid == 0)//这里的代码都是新的子进程的{for(i = 0;i < 9;i++){count++;printf("son: %d\n",count);sleep(1); // 让父进程先执行           }printf("子进程创建创建成功%d,它的父进程为%d\n",getpid(),getppid());}else // 父进程{for(i = 0; i < 3; i++){count++;printf("father: %d\n", count);sleep(3);}printf("我是父进程%d,我创建的子进程为%d\n", getpid(), pid);// 等待子进程结束int status;waitpid(pid, &status, 0);printf("子进程 %d 已结束\n", pid);}return 0;
}
可以看出,当 fork() 创建子进程后,此时父子进程各有独立的 count 变量副本,初始值都是 1,父进程和子进程各自累计自己的count的值,没有共享存储空间:
5. vfork函数
vfork相较于fork的主要区别是fork要复制父进程的数据段;而vfork则不需要完全复制父进程的数据段,子进程与父进程共享数据段。
fork不对父进程的执行次序进行限制,但是vfork需要子进程先运行、父进程挂起。
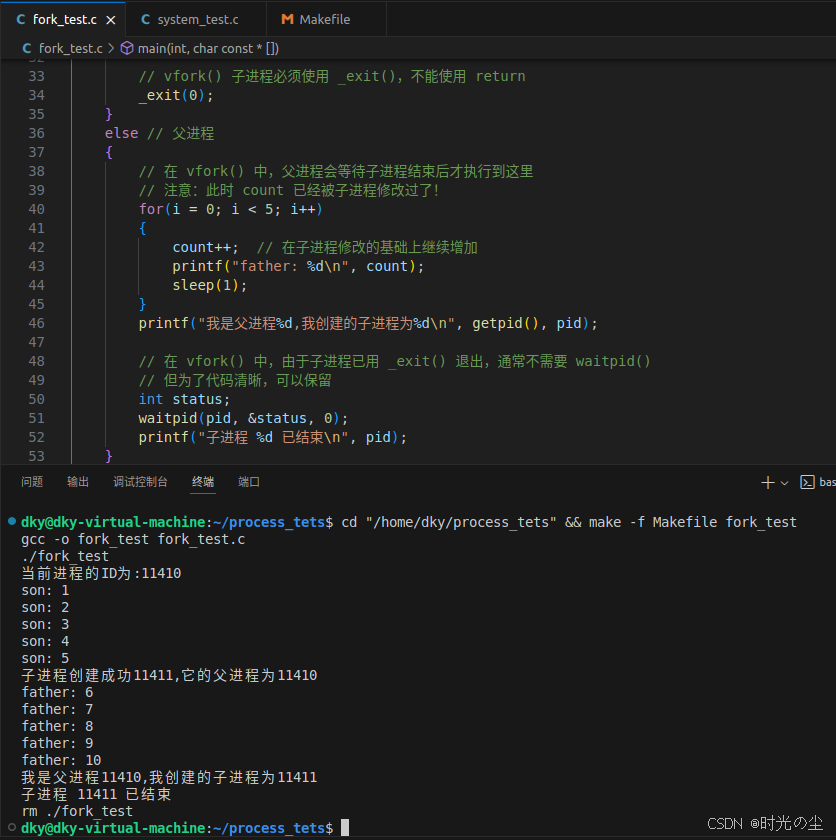
我们对上面代码更改一下,将fork改为vfork:
#include<stdio.h>    // 标准输入输出
#include<stdlib.h>   // 标准库函数
#include<unistd.h>   // Unix 标准函数
#include<sys/types.h> // 系统类型定义
#include<sys/wait.h>  // waitpid 头文件int main(int argc, char const *argv[])
{printf("当前进程的ID为:%d\n",getpid());int i, count = 0;// 使用 vfork() 替代 fork()pid_t pid = vfork();if(pid == -1){printf("子进程创建失败!\n");return 1;}else if(pid == 0) // 子进程{// 警告:vfork() 子进程与父进程共享内存空间!// 修改 count 会影响父进程的 count 值for(i = 0; i < 5; i++){count++;  // 这会修改父进程的 count 变量!printf("son: %d\n", count);sleep(1);           }printf("子进程创建成功%d,它的父进程为%d\n", getpid(), getppid());// vfork() 子进程必须使用 _exit(),不能使用 return_exit(0);}else // 父进程{// 在 vfork() 中,父进程会等待子进程结束后才执行到这里// 注意:此时 count 已经被子进程修改过了!for(i = 0; i < 5; i++){count++;  // 在子进程修改的基础上继续增加printf("father: %d\n", count);sleep(1);}printf("我是父进程%d,我创建的子进程为%d\n", getpid(), pid);// 在 vfork() 中,由于子进程已用 _exit() 退出,通常不需要 waitpid()// 但为了代码清晰,可以保留int status;waitpid(pid, &status, 0);printf("子进程 %d 已结束\n", pid);}return 0;
}
此时运行发现子进程先进行累加,然后父进程才进行运行,并且父子进程的数据是共享的:
| 特性 | fork() | vfork() |
|---|---|---|
| 内存复制 | 写时复制(Copy-on-Write) | 不复制,共享父进程内存空间 |
| 执行顺序 | 父子进程并发执行 | 子进程先执行,父进程阻塞等待 |
| 性能 | 相对较慢(需要设置页表) | 很快(几乎不消耗资源) |
| 安全性 | 安全,进程隔离 | 危险,可能破坏父进程状态 |
| 使用场景 | 通用进程创建 | 后接 exec() 族函数 |
| 现代系统 | 推荐使用 | 已过时,不推荐使用 |
6. 使用fork复制文件描述符
我们重新创建一个.c文件,先将我们需要使用的头文件全部引入,然后调用open函数创建一个.txt文件,open返回的文件描述符为 fd:
#include<stdio.h>     // 标准输入输出
#include<stdlib.h>    // 标准库函数
#include<unistd.h>    // Unix 标准函数(包含 fork(), getpid(), getppid())
#include<sys/types.h> // 系统类型定义(包含 pid_t)
#include<fcntl.h>     // 文件控制选项
#include <sys/stat.h> // 文件状态信息int main(int argc, char const *argv[])
{int fd = open("io.txt",O_CREAT | O_WRONLY | O_APPEND ,0644);if(fd == -1){printf("打开文件失败\n");perror("open");exit(EXIT_FAILURE);}return 0;
}
对于open函数的调用,不熟悉可以了解:
【Linux应用开发·入门指南】详解文件IO以及文件描述符的使用-CSDN博客
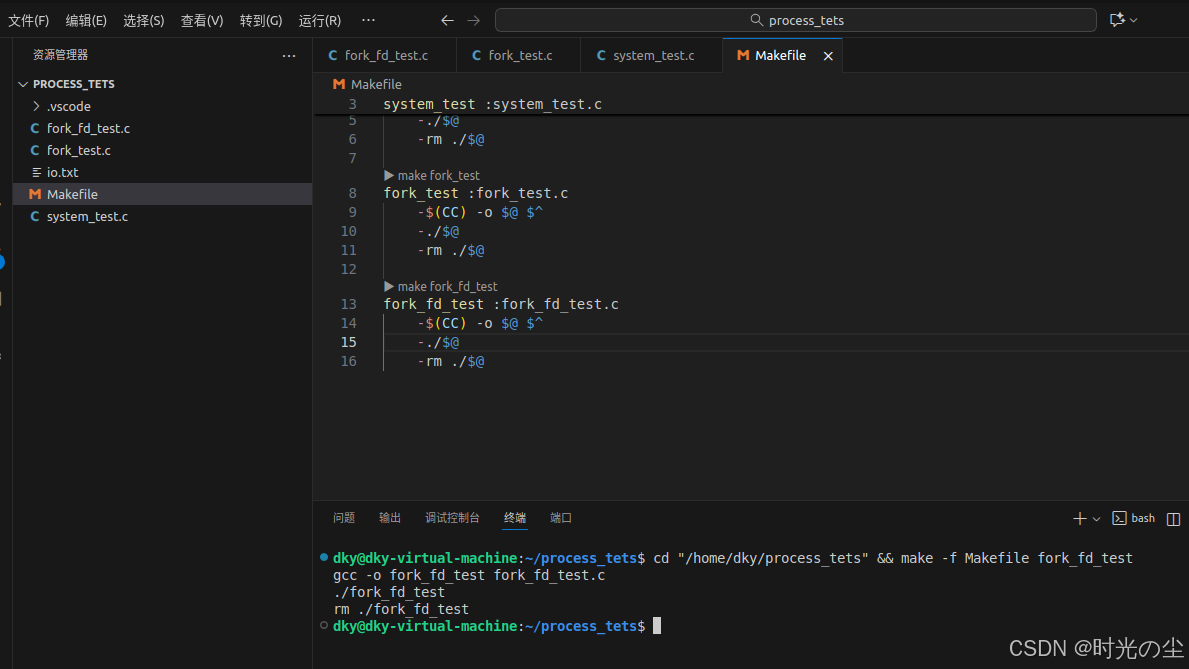
然后在Makefile中编写代码:
fork_fd_test :fork_fd_test.c-$(CC) -o $@ $^-./$@-rm ./$@运行后发现创建一个 io.txt 文件:
调用fork函数创建子进程:
pid_t pid = fork();if(pid == -1){printf("子进程创建失败!\n");perror("fork");exit(EXIT_FAILURE);}else if(pid == 0){printf("子进程开始写入数据······\n");/*子进程需要写入的数据*/}else{printf("父进程开始写入数据······\n"); /*父进程需要写入的数据*/}我们可以通过strcpy函数进行数据复制,我们可以将想要写入的数据写入到缓冲区去,然后通过writer进行写入到io.txt文件当中:
#include<stdio.h>     // 标准输入输出
#include<stdlib.h>    // 标准库函数
#include<unistd.h>    // Unix 标准函数
#include<sys/types.h> // 系统类型定义
#include<fcntl.h>     // 文件控制选项
#include <sys/stat.h> // 文件状态信息
#include <string.h>   // 字符串操作
#include <sys/wait.h> // 进程等待int main(int argc, char const *argv[])
{int fd = open("io.txt", O_CREAT | O_WRONLY | O_APPEND, 0644);if(fd == -1){printf("打开文件失败\n");perror("open");exit(EXIT_FAILURE);}char buffer[1024];pid_t pid = fork();if(pid == -1){printf("子进程创建失败!\n");perror("fork");close(fd);exit(EXIT_FAILURE);}else if(pid == 0){// 子进程printf("子进程开始写入数据······\n");strcpy(buffer, "这是子进程写入的数据!\n");ssize_t bytes_write = write(fd, buffer, strlen(buffer));if (bytes_write == -1){perror("子进程write失败");} else {printf("子进程写入数据成功,写入 %zd 字节\n", bytes_write);}close(fd);printf("子进程写入完毕,并释放文件描述符\n");exit(EXIT_SUCCESS);  // 子进程明确退出}else{// 父进程printf("父进程开始写入数据······\n");       strcpy(buffer, "这是父进程写入的数据!\n");     ssize_t bytes_write = write(fd, buffer, strlen(buffer));if (bytes_write == -1){perror("父进程write失败");} else {printf("父进程写入数据成功,写入 %zd 字节\n", bytes_write);}// 等待子进程结束int status;waitpid(pid, &status, 0);printf("子进程已结束,状态: %d\n", status);close(fd);printf("父进程写入完毕,并释放文件描述符\n");}return 0;
}
我们运行看一下:
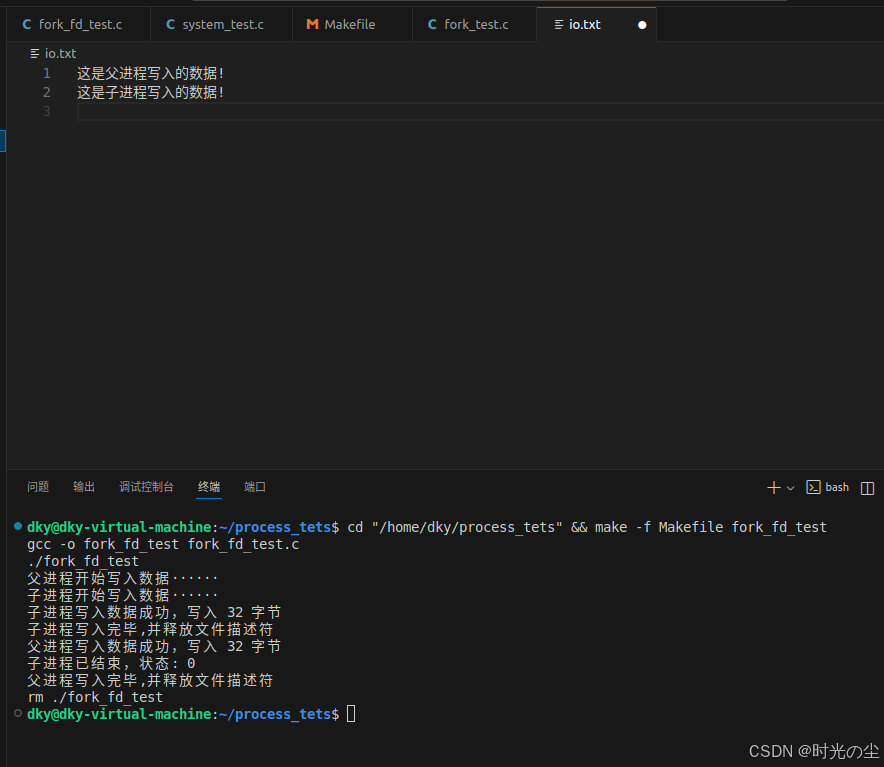
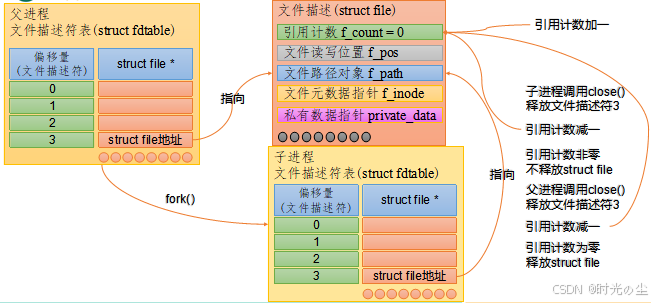
根据上述结果我们可以看出,子进程复制了父进程的文件描述符fd,二者指向的应是同一个底层文件描述(struct file结构体)。我们思考一个问题,子进程通过close()释放文件描述符之后,父进程对于相同的文件描述符执行write()操作仍然成功了。这是为什么?
struct file结构体中有一个属性为引用计数,记录的是与当前struct file绑定的文件描述符数量。close()系统调用的作用是将当前进程中的文件描述符和对应的struct file结构体解绑,使得引用计数减一。如果close()执行之后,引用计数变为0,则会释放struct file相关的所有资源。
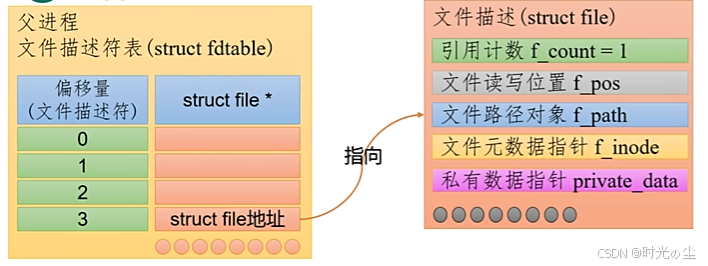
我们通过图示来解释一下,最开始的时候,父进程open创建一个文件,其地址指向如下,此时引用计数为1:
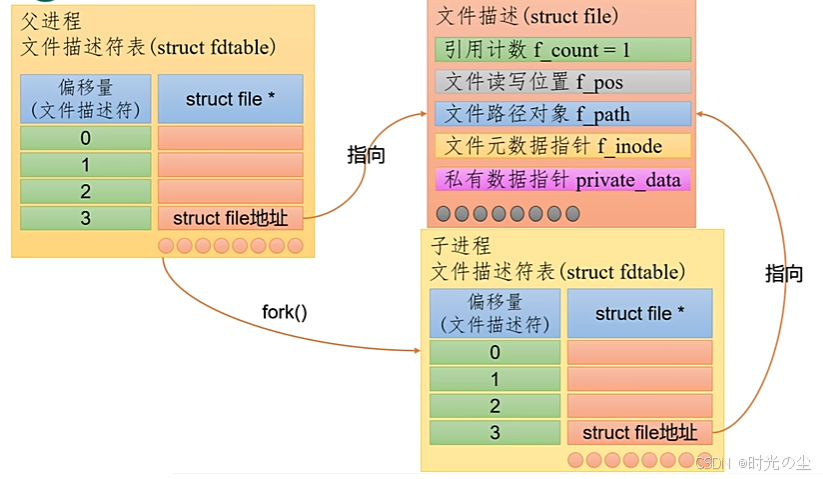
当我们使用fork后会创建一个子进程,其地址也是执行图示:
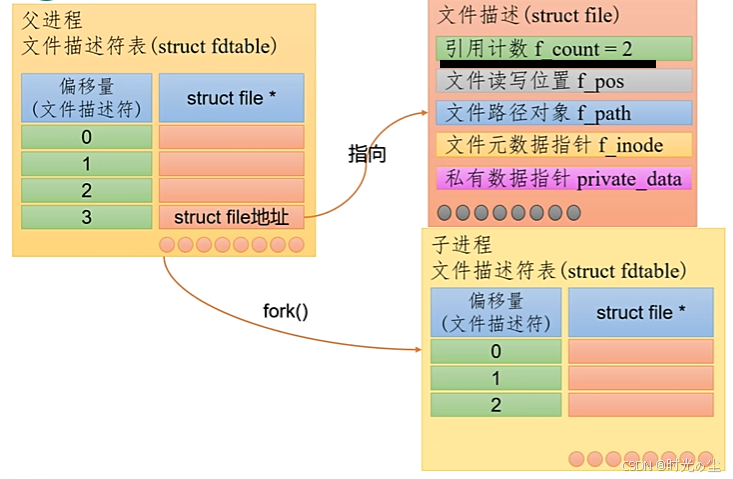
此时的文件描述,引用计数就会变为2:
因此虽然我们子进程调用close使引用计数减1,并不会马上关闭文件,灯父进程也调用close后才会正式清零关闭:

嵌入式Linux_时光の尘的博客-CSDN博客
