ES 别名:核心用法与避坑
概念
ES 别名(Alias)是指向一个或多个物理索引的逻辑引用,类似电脑里的 “快捷方式”。应用程序通过别名与索引交互,无需知晓背后真实的索引名称。
https://www.elastic.co/guide/cn/elasticsearch/guide/current/index-aliases.html
应用程序通过别名与索引交互,无需感知背后真实的索引名称,从而实现灵活的索引管理。本身不存储数据,仅作为索引的映射层。
# 创建索引 my_index_v1
PUT /my_index_v1# 创建指向单个索引的别名
PUT /my_index_v1/_alias/my_search_alias# 原子化操作:同时移除旧索引并添加新索引到别名
POST /_aliases
{"actions": [{ "remove": { "index": "my_index_v1", "alias": "my_search_alias" }},{ "add": { "index": "my_index_v2", "alias": "my_search_alias" }}]
}# 查看别名指向哪一个索引
GET /*/_alias/my_search_alias# 查看哪些别名指向这个索引
GET /my_index_v1/_alias/*
在早期或者简单的用法中,开发者会直接操作索引名。但随着系统复杂性和数据量的增长,这种“硬编码”的方式暴露了许多问题。
核心演变思路:引入一个抽象层(别名)来解耦应用程序和物理数据结构。
- 传统阶段(直接操作索引):应用代码
->索引名(如user_watch_history_202405) - 现代阶段(通过别名操作):应用代码
->别名(如user_watch_history_current)->索引名(如user_watch_history_202405)
这个抽象的“别名层”带来了运维上的巨大灵活性。
核心特性:
- 可关联单个 / 多个索引;
- 支持添加过滤条件(仅关联符合条件的文档);
- 切换关联索引时操作原子性(无中间状态)。
版本演进
Elasticsearch 0.90 是首个支持别名的版本
最初用于:
- 为索引提供更简洁的逻辑名称。
- 支持多索引查询(如 GET /alias_name/_search)。
- 隔离应用层与物理索引名称,简化索引切换。
POST /_aliases
{"actions": [{ "add": { "index": "original_index", "alias": "my-alias" } ]
}
只提供了基础功能:仅支持别名与单个索引的静态关联,解决 “索引名硬编码” 问题
Elasticsearch 1.4(2015 年 4 月)
支持别名过滤器(Alias Filter):允许为别名添加查询条件,实现 动态查询隔离。
示例:
POST /_aliases{"actions": [{ "add": { "index": "original_index", "alias": "my-alias", "filter": { "term": { "tenant": "abc" } } } ]}
Elasticsearch 6.4(2018 年 8 月)
引入 is_write_index 参数:别名可同时指向多个索引,但仅一个索引用于写入。
示例:
POST /_aliases{"actions": [{ "add": { "index": "log-2024-01", "alias": "logs" } },{ "add": { "index": "log-2024-07", "alias": "logs", "is_write_index": true } ]}
Elasticsearch 7.x 及更高版本
与 Index Lifecycle Management(ILM)深度集成:
别名常用于指向当前活跃的索引(如 logs-write),而历史数据通过 logs-read 别名聚合。
支持别名的 API 增强:
如 GET /_alias 查询所有别名。
GET /my-alias/_metadata 查看别名元数据。
别名功能的版本演进总结

核心价值与最佳实践
核心价值在于解耦索引与业务逻辑、提升运维灵活性,避免因索引结构变化(如拆分、迁移、更新)导致业务代码频繁修改。
平滑索引切换
场景说明
假设我们最初的用户观看记录索引user_watch_v1只有user_id、video_id和watch_time字段,现在需要新增duration(观看时长)和complete_rate(完成率)字段。
传统做法
- 停服止损:停止应用对
user_watch_v1的写入操作 - 建新索引:创建新索引user_watch_v2,包含新字段
PUT /user_watch_v2
{"mappings": {"properties": {"user_id": {"type": "keyword"},"video_id": {"type": "keyword"},"watch_time": {"type": "date"},"duration": {"type": "integer"},"complete_rate": {"type": "float"}}}
}
- 迁移数据:将user_watch_v1的数据迁移到user_watch_v2
POST /_reindex
{"source": {"index": "user_watch_v1"},"dest": {"index": "user_watch_v2"}
}
上面没有指定,默认是全量覆盖(同 ID 以源为准)
- 改码部署:开发修改所有应用代码(从user_watch_v1改为user_watch_v2),测试后重新部署;
- 恢复服务:重启应用,恢复写入。
问题:
- 整个过程需要停机,用户无法记录观看行为
- 代码修改和部署存在风险
- 如果新索引有问题,回滚过程同样繁琐
别名做法
应用程序始终使用user_watch别名进行操作
- 初始时创建别名user_watch指向user_watch_v1
POST /_aliases
{"actions": [{"add": {"index": "user_watch_v1", "alias": "user_watch"}}]
}
- 建新索引 + 迁数据:同传统做法的步骤 2-3(无需停服,新数据仍写入user_watch别名);创建新索引
user_watch_v2,包含新字段
PUT /user_watch_v2
{"mappings": {"properties": {"user_id": {"type": "keyword"},"video_id": {"type": "keyword"},"watch_time": {"type": "date"},"duration": {"type": "integer"},"complete_rate": {"type": "float"}}}
}
迁移数据
POST /_reindex
{"source": {"index": "user_watch_v1"},"dest": {"index": "user_watch_v2"}
}
- 原子切换:毫秒级切换别名指向,无停机
POST /_aliases
{"actions": [{"remove": {"index": "user_watch_v1", "alias": "user_watch"}},{"add": {"index": "user_watch_v2", "alias": "user_watch"}}]
}
优势:
- 全程无需停机,用户体验不受影响
- 应用代码无需修改
- 如遇问题,只需再次切换别名即可快速回滚
- 切换操作是原子性的,不会出现中间状态
按时间分片管理
场景说明
如果用户观看记录增长迅速,我们按月份创建索引(如user_watch_202405、user_watch_202406),需要查询 “本月观看记录” 和 “近 3 个月观看记录”。
传统做法
- 查询本月记录时,应用代码需动态生成当月索引名
// Java代码示例
SimpleDateFormat sdf = new SimpleDateFormat("yyyyMM");
String currentMonthIndex = "user_watch_" + sdf.format(new Date());
// 使用currentMonthIndex进行查询
- 查询近 3 个月记录时,需生成 3 个索引名并拼接
List<String> indices = new ArrayList<>();
Calendar cal = Calendar.getInstance();
for (int i = 0; i < 3; i++) {String indexName = "user_watch_" + sdf.format(cal.getTime());indices.add(indexName);cal.add(Calendar.MONTH, -1);
}
// 使用indices列表进行多索引查询
问题:
- 代码复杂,需要处理日期计算
- 索引命名规则变更时,所有相关代码都需修改
- 多索引查询逻辑繁琐,易出错
别名做法
- 创建月度别名,每月自动更新
// 每月执行一次,将user_watch_current指向当月索引
POST /_aliases
{"actions": [{"remove": {"index": "*", "alias": "user_watch_current"}},{"add": {"index": "user_watch_202406", "alias": "user_watch_current"}}]
}
- 创建季度别名,每月更新
// 每月执行一次,确保包含最近3个月
POST /_aliases
{"actions": [{"remove": {"index": "user_watch_202403", "alias": "user_watch_last_3months"}},{"add": {"index": "user_watch_202406", "alias": "user_watch_last_3months"}}]
}
实际使用肯定不建议手动去维护,易遗忘,可以搞定时任务,每月 1 日凌晨 2 点自动执行脚本(确保月初完成更新)
- 应用查询时直接使用别名
// 查询本月记录
GET /user_watch_current/_search// 查询近3个月记录
GET /user_watch_last_3months/_search
优势:
- 应用代码简洁,无需处理复杂的日期和索引名生成逻辑
- 索引命名规则变更时,只需修改别名关联,无需修改应用代码
- 新增时间维度查询(如近半年)只需新增相应别名
数据分组与过滤
场景说明
需要分别查询 “付费用户观看记录” 和 “免费用户观看记录”,user_type字段标识用户类型。
传统做法
每次查询都需要包含用户类型过滤条件:
// 查询付费用户观看记录
GET /user_watch/_search
{"query": {"bool": {"must": [{"match": {"video_id": "v12345"}}],"filter": [{"term": {"user_type": "paid"}}]}}
}// 查询免费用户观看记录
GET /user_watch/_search
{"query": {"bool": {"must": [{"match": {"video_id": "v12345"}}],"filter": [{"term": {"user_type": "free"}}]}}
}
问题:
- 过滤条件在代码中重复出现,维护成本高
- 若用户类型判断逻辑变化(如新增 “trial” 试用用户),所有相关查询都需修改
- 容易遗漏过滤条件,导致查询结果不准确
别名做法
- 创建带过滤条件的别名
POST /_aliases
{"actions": [{"add": {"index": "user_watch","alias": "paid_user_watch","filter": {"term": {"user_type": "paid"}}}},{"add": {"index": "user_watch","alias": "free_user_watch","filter": {"term": {"user_type": "free"}}}}]
}
- 查询时直接使用别名,无需重复写过滤条件
// 查询付费用户观看记录
GET /paid_user_watch/_search
{"query": {"match": {"video_id": "v12345"}}
}// 查询免费用户观看记录
GET /free_user_watch/_search
{"query": {"match": {"video_id": "v12345"}}
}
优势:
- 过滤条件集中管理,修改一次即可影响所有相关查询
- 查询语句更简洁,降低出错概率
- 业务逻辑(如什么是付费用户)与查询代码解耦
权限控制(运营 / 开发隔离)
背景:运营需读写所有观看记录,开发仅能读测试环境记录(env:test),避免误操作生产数据。
传统做法(无别名)
直接给角色分配真实索引权限:
- 给 “运营角色” 分配user_watch_prod的读写权限;
- 给 “开发角色” 分配user_watch_test的只读权限。
痛点:真实索引名暴露(开发可能尝试访问生产索引);索引按时间滚动时(如user_watch_prod_202409),每月需手动更新权限,易遗漏。
别名做法
1、创建环境别名:
POST /_aliases
{"actions": [{"add": {"index": "user_watch_prod_202409", "alias": "watch_prod"}},{"add": {"index": "user_watch_test_202409", "alias": "watch_test"}}]
}
2、绑定权限到别名:
- 运营角色:watch_prod读写权限;
- 开发角色:watch_test只读权限。
优势:隐藏真实索引名,安全性更高;索引滚动时仅更新别名关联,权限配置不变。
总结
| 维度 | 传统做法 | 别名做法 | 别名核心价值 |
|---|---|---|---|
| 业务连续性 | 索引升级 / 迁移需停机 | 原子切换,零停机 | 保障服务可用性 |
| 代码耦合度 | 应用与真实索引名强耦合 | 应用仅依赖别名,索引变化无感知 | 降低代码维护成本 |
| 逻辑管理 | 过滤 / 时间范围需硬编码 | 别名内置规则,集中维护 | 提升逻辑一致性 |
| 安全性 | 真实索引名暴露,权限维护繁琐 | 别名隔离,权限配置稳定 | 增强数据安全与运维效率 |
常见反模式与陷阱
致命反模式:向多索引别名写入
错误代码:
IndexRequest request = new IndexRequest("my_search_alias"); // 该别名指向多个索引
request.id("1");
request.source("field", "value");
client.index(request, RequestOptions.DEFAULT); // 这将抛出异常!
后果: ElasticsearchException: 由于别名 [my_search_alias] 指向多个索引,写入请求被拒绝,ES 无法确定应将文档索引到哪个具体索引。
根因: 违背了“写入别名必须且只能指向一个索引”的原则。
性能陷阱:别名指向过多索引
问题: 一个别名 logs_all 指向了 10,000 个日志索引。执行一个简单的 match_all 查询时,协调节点需要向 10,000 个分片(可能分布在多个节点上)发送请求并聚合结果,开销巨大。
解决方案: 使用 ILM 策略(Index Lifecycle Management)自动滚动索引并基于时间、空间等条件管理别名,避免别名无限制地指向过多索引。
管理混乱:无规范的别名使用
问题: 团队随意创建别名,如 alias1, test_alias, temp_search,缺乏明确的命名规范和用途文档,最终无人敢删,成为技术债。
解决方案: 建立团队规范,例如:
{{index_pattern}}_write: 写入别名{{index_pattern}}_read: 读取别名{{index_pattern}}_{{filter_criteria}}: 带过滤的查询别名
高级模式:与 ILM 集成
Elasticsearch 的 ILM 功能极大地简化了基于别名的索引生命周期管理。
典型 ILM 策略示例(定义在索引模板中):
{"index_patterns": ["logs-*"],"template": {"settings": {"number_of_shards": 1,"number_of_replicas": 1,"index.lifecycle.name": "my_logs_policy", // 关联ILM策略"index.lifecycle.rollover_alias": "logs_write" // 关键:指定写入别名},"aliases": {"logs_search": {} // 自动加入搜索别名}}
}
流程:
- 初始创建索引
logs-001并设置is_write_index: true给别名logs_write。 - ILM 根据策略(如大小超 50GB 或时间超 30 天)自动执行 Rollover。
- Rollover 动作会:
- 创建新索引
logs-002。 - 自动将别名
logs_write的指向切换到logs-002,并将其设置为新的写入索引。 - 将旧索引
logs-001移至下一个生命周期阶段(如 Warm、Cold、Delete)。
- 创建新索引
项目简单实战
简单代码使用
在完成多端观看记录打通,数据就存到了ES,具体构建了如下索引
@Data
@Document(indexName = EsIndex.USER_WATCH_HISTORY_INDEX,shards = 3,replicas = 1,refreshInterval = "1s")
public class UserWatchHistoryIndex implements EsIndex{@Field(type = FieldType.Keyword)private Long userId;@Field(type = FieldType.Long)private Long tpId;@Field(type = FieldType.Long)private Long campPeriodId;@Field(type = FieldType.Long)private Long zbId;@Field(type = FieldType.Text)private String tpUrl;/*** 终端,:0未知 1微信h5 2PC 3小程序 4手机端 5其他 6APP*/@Field(type = FieldType.Integer)private Integer terminal = 0;@Field(type = FieldType.Date,format = DateFormat.custom,pattern = "yyyy-MM-dd HH:mm:ss")@JsonFormat(timezone = "GMT+8", pattern = "yyyy-MM-dd HH:mm:ss")@DateTimeFormat(pattern = "yyyy-MM-dd HH:mm:ss")private Date createTime;@Field(type = FieldType.Date,format = DateFormat.custom,pattern = "yyyy-MM-dd HH:mm:ss")@JsonFormat(timezone = "GMT+8", pattern = "yyyy-MM-dd HH:mm:ss")@DateTimeFormat(pattern = "yyyy-MM-dd HH:mm:ss")private Date updateTime;@Field(type = FieldType.Boolean)private Boolean deleted = false;@Overridepublic String getMainId() {Long userId = Optional.ofNullable(this.getUserId()).orElse(0L);Long zbId = Optional.ofNullable(this.getZbId()).orElse(0L);Long tpId = Optional.ofNullable(this.getTpId()).orElse(0L);return String.format("%d_%d_%d", userId, zbId, tpId);}}
然后我们按照首次观看时间,将索引按半年分一次,“user_watch_history_年月”,例如:user_watch_history_202506、user_watch_history_202512,并通过相同的别名(Alias)“user_watch_history” 统一管理,这样有啥好处呢,我们来分析下:
有了别名,我们的写法如下:
SearchSourceBuilder searchSourceBuilder = new SearchSourceBuilder();
BoolQueryBuilder boolQueryBuilder = new BoolQueryBuilder();
boolQueryBuilder.filter(QueryBuilders.termQuery("userId", userId));
boolQueryBuilder.filter(QueryBuilders.termQuery("deleted", false));
searchSourceBuilder.sort("updateTime", SortOrder.DESC);
long form = (dto.getPage() - 1) * dto.getSize();
searchSourceBuilder.from((int) form);
searchSourceBuilder.size(dto.getSize().intValue());
searchSourceBuilder.query(boolQueryBuilder);
SearchRequest request = new SearchRequest(new String[]{"user_watch_history"}, searchSourceBuilder);
client.search(request, RequestOptions.DEFAULT);
像我们之前,如果没有使用别名,查询这里可能就是下面这种写法,需要带上*去搜索,也同样可以满足
SearchRequest request = new SearchRequest(new String[]{"user_watch_history_*"}, searchSourceBuilder);
但是,如果要根据主键(_id)查,还是需要指定具体的索引名称
在删除文档时无法直接使用指向多个索引的别名。这是 Elasticsearch 的一项安全限制,防止误操作导致大规模数据丢失。
所以,当课程下架或删除时,我们无法利用别名删除,但可以写成indexName*,但不建议
UpdateByQueryRequest updateByQuery = new UpdateByQueryRequest("user_watch_history_*");
//设置分片并行
updateByQuery.setSlices(2);
//设置版本冲突时继续执行
updateByQuery.setConflicts("proceed");
//设置更新完成后刷新索引 ps很重要如果不加可能数据不会实时刷新
updateByQuery.setRefresh(true);
BoolQueryBuilder boolQueryBuilder = QueryBuilders.boolQuery().filter(QueryBuilders.termsQuery("tpId", tpIdList));
updateByQuery.setQuery(boolQueryBuilder);
//设置要修改的内容可以多个值多个用;隔开
updateByQuery.setScript(new Script(String.format("ctx._source['deleted']=%s", state)));
client.updateByQuery(updateByQuery, RequestOptions.DEFAULT);
如果要进行修改,就没办法了,最好还是先查出具体索引,使用具体索引名称进行修改
UserWatchHistoryIndex userWatchHistoryIndex = BeanUtil.toBean(recordBean, UserWatchHistoryIndex.class);
String indexName = EsIndex.USER_WATCH_HISTORY_INDEX;
String mainId = userWatchHistoryIndex.getMainId();
SearchRequest searchRequest = new SearchRequest(indexName + "_*");
SearchSourceBuilder searchSourceBuilder = new SearchSourceBuilder();
searchSourceBuilder.query(QueryBuilders.termQuery("_id", mainId));
searchRequest.source(searchSourceBuilder);
SearchResponse searchResponse = restHighLevelClientWatch.search(searchRequest, RequestOptions.DEFAULT);UserWatchHistoryIndex existingData = null;
SearchHit[] hits = searchResponse.getHits().getHits();
if (hits.length > 0) {SearchHit hit = hits[0];existingData = JsonUtil.fromJson(hit.getSourceAsString(), UserWatchHistoryIndex.class);
}
BulkRequest bulkRequest = new BulkRequest();
Date date = new Date();
if (existingData == null) {userWatchHistoryIndex.setCreateTime(date);userWatchHistoryIndex.setUpdateTime(date);indexName = elasticSearchDataService.getRealIndexName(EsIndex.USER_WATCH_HISTORY_INDEX, date);IndexRequest indexRequest = new IndexRequest(indexName).id(mainId).opType("create").source(JsonUtil.toJson(userWatchHistoryIndex), XContentType.JSON);bulkRequest.add(indexRequest);
} else {existingData.setTpUrl(recordBean.getTpUrl());if (recordBean.getCampPeriodId() != null) {existingData.setCampPeriodId(recordBean.getCampPeriodId());}existingData.setUpdateTime(date);indexName = elasticSearchDataService.getRealIndexName(EsIndex.USER_WATCH_HISTORY_INDEX, existingData.getCreateTime());UpdateRequest updateRequest = new UpdateRequest(indexName, mainId).doc(JsonUtil.toJson(existingData), XContentType.JSON).detectNoop(true);bulkRequest.add(updateRequest);
}BulkResponse bulkResponse = restHighLevelClientWatch.bulk(bulkRequest, RequestOptions.DEFAULT);
对别名进行操作
上面我们是1个别名对多个索引,无法直接对别名进行修改,不然会出现下面这种错误
Elasticsearch exception [type=illegal_argument_exception, reason=no write index is defined for alias [user_watch_history]. The write index may be explicitly disabled using is_write_index=false or the alias points to multiple indices without one being designated as a write index]
具体解决方案1:指定具体写到那个索引
{
“actions”: [
{
“add”: {
“index”: “user_watch_history_2512”,
“alias”: “user_watch_history”,
“is_write_index”: true
}
}
]
}
满足了写别名,但可能出现一些数据是要写到user_watch_history_2506,可能无法满足
具体解决方案2:双层别名
ES里面是不支持嵌套别名,但我们可以使用双层别名。
步骤 1:创建 “内层年份别名”(一对一,用于单年份索引升级)
为每个实际索引创建别名,就可以直接对别名进行增删查改,用于后续结构升级时平滑切换
POST /_aliases
{"actions": [{"add": {"index": "user_watch_history_202512_v1", "alias": "user_watch_history_202512_alias"}}]
}POST /_aliases
{"actions": [{"add": {"index": "user_watch_history_202606_v1", "alias": "user_watch_history_202606_alias"}}]
}
步骤 2:创建 “外层总别名”(一对多,直接关联所有实际索引)
外层总别名直接关联所有实际索引(而非内层别名),用于跨年份查询:
POST /_aliases
{"actions": [{"add": {"index": "user_watch_history_202512_v1", "alias": "user_watch_history"}},{"add": {"index": "user_watch_history_202606_v1", "alias": "user_watch_history"}}]
}
步骤 3:当某年份索引需要升级时(如 202512年从 v1→v2)
- 创建新索引
user_watch_history_202512_v2(含新字段); - 迁移数据后,切换 “内层年份别名” 指向 v2:
POST /_aliases
{"actions": [{"remove": {"index": "user_watch_history_202512_v1", "alias": "user_watch_history_202512_alias"}},{"add": {"index": "user_watch_history_202512_v2", "alias": "user_watch_history_202512_alias"}}]
}
- 同步更新 “外层总别名”,移除旧索引 v1,添加新索引 v2:
POST /_aliases
{"actions": [{"remove": {"index": "user_watch_history_202512_v1", "alias": "user_watch_history"}},{"add": {"index": "user_watch_history_202512_v2", "alias": "user_watch_history"}}]
}
对于别名没有正常利用起来,索引修改类型,应该如何操作
数据量少
// 创建新索引
PUT /user_watch_history_temp
{"mappings": {"properties": {"campPeriodId": {"type": "long"},"createTime": {"type": "date","format": "yyyy-MM-dd HH:mm:ss"},"deleted": {"type": "boolean"},"mainId": {"type": "text","fields": {"keyword": {"type": "keyword","ignore_above": 256}}},"terminal": {"type": "integer"},"tpId": {"type": "long"},"tpUrl": {"type": "text"},"updateTime": {"type": "date","format": "yyyy-MM-dd HH:mm:ss"},"userId": {"type": "keyword"},"zbId": {"type": "long"}}},"settings": {"index": {"refresh_interval": "1s","number_of_shards": "3","number_of_replicas": "1","store": {"type": "fs"}}}
}// 迁移数据
POST /_reindex
{"source": {"index": "user_watch_history_2512"},"dest": {"index": "user_watch_history_temp"}
}// 删除原索引(释放名称占用)
DELETE /user_watch_history_2512// 重建原名称索引(含正确映射)
PUT /user_watch_history_2512
{"mappings": {"properties": {"campPeriodId": {"type": "long"},"createTime": {"type": "date","format": "yyyy-MM-dd HH:mm:ss"},"deleted": {"type": "boolean"},"mainId": {"type": "text","fields": {"keyword": {"type": "keyword","ignore_above": 256}}},"terminal": {"type": "integer"},"tpId": {"type": "long"},"tpUrl": {"type": "text"},"updateTime": {"type": "date","format": "yyyy-MM-dd HH:mm:ss"},"userId": {"type": "keyword"},"zbId": {"type": "long"}}},"settings": {"index": {"refresh_interval": "1s","number_of_shards": "3","number_of_replicas": "1","store": {"type": "fs"}}}
}// 将临时索引数据迁移到重建的原索引
POST /_reindex
{"source": {"index": "user_watch_history_temp"},"dest": {"index": "user_watch_history_2512"}
}// 恢复别名关联
POST /_aliases
{"actions": [{"add": {"index": "user_watch_history_2512","alias": "user_watch_history"}}]
}// 删除临时索引(清理资源)
DELETE /user_watch_history_temp
数据量大
步骤 1:创建新索引(定义正确的字段类型)
PUT /user_watch_history_2512_v2
{"mappings": {"properties": {"campPeriodId": { "type": "long" },"createTime": { "type": "date", "format": "yyyy-MM-dd HH:mm:ss" },"deleted": { "type": "boolean" },"mainId": { "type": "text", "fields": { "keyword": { "type": "keyword", "ignore_above": 256 } } },"terminal": { "type": "integer" },"tpId": { "type": "long" },"tpUrl": { "type": "text" },"updateTime": {  // 目标类型:date"type": "date","format": "yyyy-MM-dd HH:mm:ss"  // 与原keyword存储的格式一致},"userId": { "type": "keyword" },"zbId": { "type": "long" }}},"settings": {"index": {"refresh_interval": "1s","number_of_shards": "3","number_of_replicas": "1"}}
}
步骤 2:迁移历史数据(处理keyword转date)
使用_reindex将旧索引数据迁移到新索引,ES 会自动尝试将updateTime的keyword字符串解析为date类型(需确保原字符串格式与format一致)
POST /_reindex
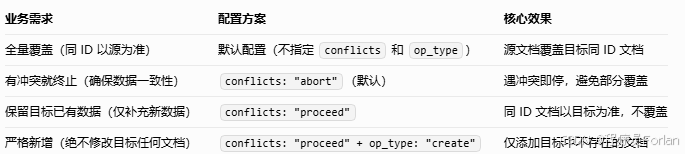
{"conflicts": "proceed","source": {"index": "user_watch_history_2512"},"dest": {"index": "user_watch_history_2512_v2"}
}
关键处理:
- 若原updateTime的keyword值格式不规范(如2023/12/01),会导致迁移失败,需用脚本强制转换:
POST /_reindex
{"conflicts": "proceed","source": { "index": "user_watch_history_2512" },"dest": { "index": "user_watch_history_2512_v2" },"script": {  // 将"/"格式转换为"-""source": """if (ctx._source.updateTime != null) {ctx._source.updateTime = ctx._source.updateTime.replace('/', '-');}""","lang": "painless"}
}
- 迁移后通过_count确认数据量:
GET /user_watch_history_2512/_count  // 旧索引总数
GET /user_watch_history_2512_v2/_count  // 新索引总数(应相等或略少,少的是解析失败的文档)
步骤 3:同步增量数据(避免迁移期间数据丢失)
迁移过程中,旧索引可能仍有新数据写入(如用户操作产生的updateTime更新),需同步到新索引:
- 方案 1:短时间停写(适合低峰期)
- 暂停应用对旧索引的写入(如关闭相关功能);
- 执行一次_reindex增量同步(只迁移新增数据):
POST /_reindex
{"source": {"index": "user_watch_history_2512","query": {  // 只迁移迁移开始后新增的文档"range": {"updateTime": { "gt": "迁移开始时间" }}}},"dest": { "index": "user_watch_history_2512_v2" }
}
3. 确认增量数据同步完成后,恢复写入。
- 方案 2:双写(无感知但需改代码)
- 修改应用代码,同时向旧索引和新索引写入数据;
- 迁移完成后,停止向旧索引写入,仅保留新索引写入。
步骤 4:验证新索引可用性
- 检查updateTime字段类型是否生效:
GET /user_watch_history_2512_v2/_mapping // 确认updateTime为date类型
- 测试时间范围查询(验证date类型功能):
GET /user_watch_history_2512_v2/_search
{"query": {"range": {"updateTime": { "gte": "2025-12-01 00:00:00", "lte": "2025-12-31 23:59:59" }}}
}
- 对比新旧索引的查询结果,确保数据一致。
步骤 5:切换应用到新索引
- 修改应用中所有操作索引的代码,从
user_watch_history_2512改为user_watch_history_2512_v2; - 部署后观察新索引的读写是否正常(如监控
_cluster/allocation和应用日志)。
步骤 6:清理旧索引(可选)
确认新索引稳定运行后,删除旧索引释放资源:
DELETE /user_watch_history_2512