一文掌握 CodeX CLI 安装以及使用!
🍉 CSDN 叶庭云:https://yetingyun.blog.csdn.net/
文章目录
- 一、CodeX CLI 是什么?
- 二、安装 CodeX CLI 的具体步骤与命令
- 三、CodeX 的基本使用
- 四、CodeX 做一道 LeetCode 困难算法题
- 五、CodeX 实现 Python + PyTorch 版稀疏自编码器完整代码
一、CodeX CLI 是什么?
在电脑的终端窗口里让 OpenAI CodeX 和你一起写代码,开启愉快的 Vibe Coding 之旅!
-
终端:通常是一个可以输入命令、看文字输出的黑色窗口,比如 CMD、Anaconda Prompt。
-
结对:两个人一起写代码,在此情景下,一个是你,另一个则是今天的主角 —— CodeX。
-
CodeX:一个会帮你写代码的智能助手,给出代码建议或者直接补全。
CodeX CLI 是一个可在本地终端运行的编码智能体,能够在本机指定目录中读取、修改并执行代码。CodeX CLI 为开源项目,使用 Rust 开发,侧重性能与效率。该项目托管于 GitHub(https://github.com/openai/codex),并在持续迭代中不断完善。
安装前须知:CodeX CLI 官方支持 Linux 与 macOS ;Windows 的支持仍处于试验阶段,建议通过 WSL(Windows Subsystem for Linux)运行以获得更好兼容性。
二、安装 CodeX CLI 的具体步骤与命令
注意:可以使用常用包管理器(例如 npm、Homebrew 等)安装 CodeX CLI。不同操作系统的安装命令各有差异,但安装流程的核心思路相同。
以基于 Debian 的 Linux 发行版(例如 Ubuntu)为例,建议首先检查系统信息,包括文件系统类型、发行版本与 Linux 内核版本。随后对系统软件执行全面升级,并检查 apt、apt-get 与 dpkg 的版本信息,以确保与所需工具链的兼容性。
# 查看文件系统信息
df -hT
# 查看 Ubuntu 发行版本
cat /etc/os-release
# 查看 Linux 内核信息
uname -a# 前一条执行系统软件的全面升级,后三条分别查询 apt、apt-get 和 dpkg 的版本信息
sudo apt full-upgrade
apt --version
apt-get --version
dpkg --version
在系统中添加 NodeSource 源并安装 Node.js 22 及其 npm,然后验证安装版本。
curl -fsSL https://deb.nodesource.com/setup_22.x | sudo bash -
sudo apt-get install -y nodejs
node --version
npm --version
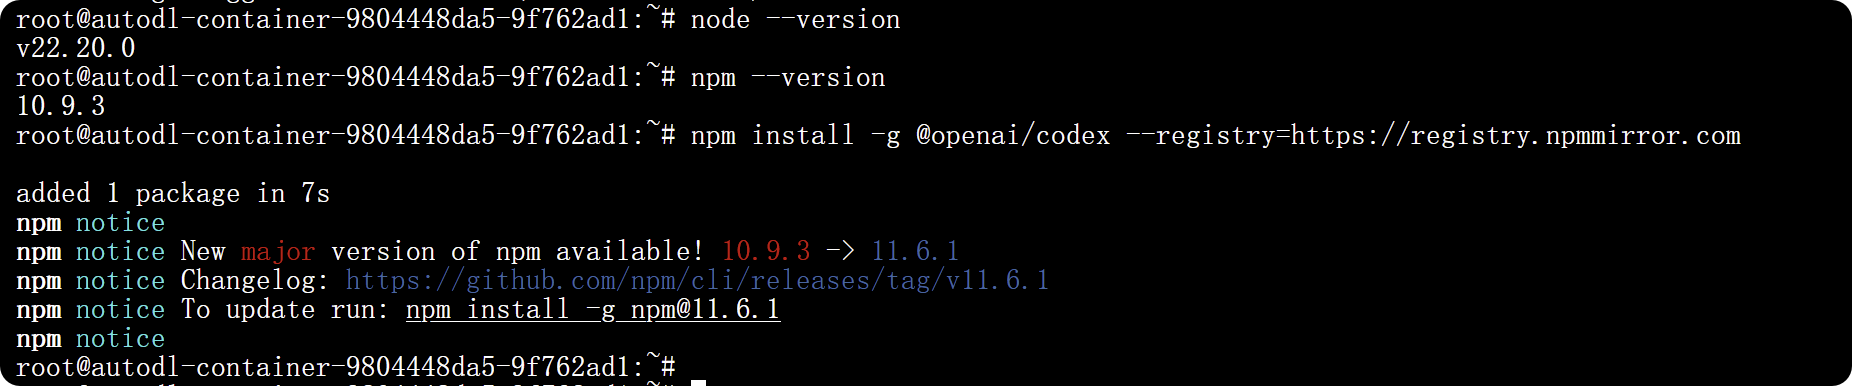
通过镜像源全局安装 OpenAI CodeX CLI 与指定版本的 npm,检查依赖信息及验证 CodeX CLI 版本。
npm install -g @openai/codex --registry=https://registry.npmmirror.com
npm install -g npm@11.6.1 --registry=https://registry.npmmirror.com
npm fund
codex --version
# codex-cli 0.42.0
# codex-cli 0.46.0
在当前目录下创建一个名为 .codex 的隐藏目录。-p 选项的作用是:如果目录已存在则不报错,如果上层目录不存在则一并创建。列出 ~/.codex/ 目录下的文件和目录,并显示详细信息(权限、属主、大小、修改时间等)。目的:确认该目录存在并查看其内容。
-
[ -f ~/.codex/config.toml ]:检测 ~/.codex/config.toml 文件是否存在且为普通文件。
-
||:逻辑或运算符,表示如果前面的条件为假(即文件不存在),则执行后面的命令。
-
cat > ~/.codex/config.toml <<‘EOF’:将接下来的多行文本写入 ~/.codex/config.toml 文件,直到遇到 EOF 为止。
-
目的:仅在配置文件不存在时才生成一个新的 config.toml。
下面整段命令的作用是:在用户主目录下创建一个 ~/.codex/config.toml 配置文件(若不存在),并写入一份用于连接 bltcy 提供的 GPT-5-Codex 模型 API 的配置,其中包括模型名称、推理强度、认证方式以及 API 接口信息。
mkdir -p ~/.codex
ls -l ~/.codex/依次输入以下内容:
[ -f ~/.codex/config.toml ] || cat > ~/.codex/config.toml <<'EOF'model = "gpt-5-codex"
model_provider = "bltcy"
model_reasoning_effort = "high"
preferred_auth_method = "apikey"[model_providers.bltcy]
name = "bltcy"
base_url = "https://api.openai.com/v1"
env_key = "OPENAI_API_KEY"
wire_api = "responses"EOF
下面整段命令的作用是在用户目录下创建一个 ~/.codex/auth.json 配置文件(若不存在),并填入 OPENAI_API_KEY 对应的值。需要创建这个文件的原因:不能将 API KEY 作为字符串直接传递给 env_key,env_key 实际必须指向环境变量。
依次输入以下内容:
cat > ~/.codex/auth.json <<'EOF'{
"OPENAI_API_KEY": "sk-xxxbabyxxxxxxxxxxxxxxxxxxxxxxxxxxxxxxxxxxxxxxxxxxx"
}EOF
安装完成后,在终端中输入 codex 即可成功启动 CodeX CLI!
codex

首次运行 CodeX 命令行界面(Command-Line Interface,CLI)时,系统可能会提示进行身份验证。因此,建议先登录 ChatGPT 账户,以确保在 Plus、Pro、Team、Edu 或 Enterprise 等订阅计划下享有相应的访问权限与功能。有关各订阅计划包含的功能和具体定价,请参阅定价页面。本文实际演示通过 API KEY 调用 CodeX;该方式需要额外的配置步骤,但无需进行身份验证。
备注:使用 codex resume 打开会话选择器,可以查看历史对话记录。cd /root/.codex/sessions/2025/09/27 这个目录,用 ls 命令查看对话文件(JSON 格式)。
在后续使用过程中,若需升级 CodeX,请参照官方文档或安装说明中提供的如下升级命令进行操作:
npm install -g @openai/codex@latest --registry=https://registry.npmmirror.com
三、CodeX 的基本使用
最后,我们在终端中运行以下命令之一即可测试 CodeX CLI 配置是否成功:
codex "Initial prompt"
codex exec "Initial prompt"
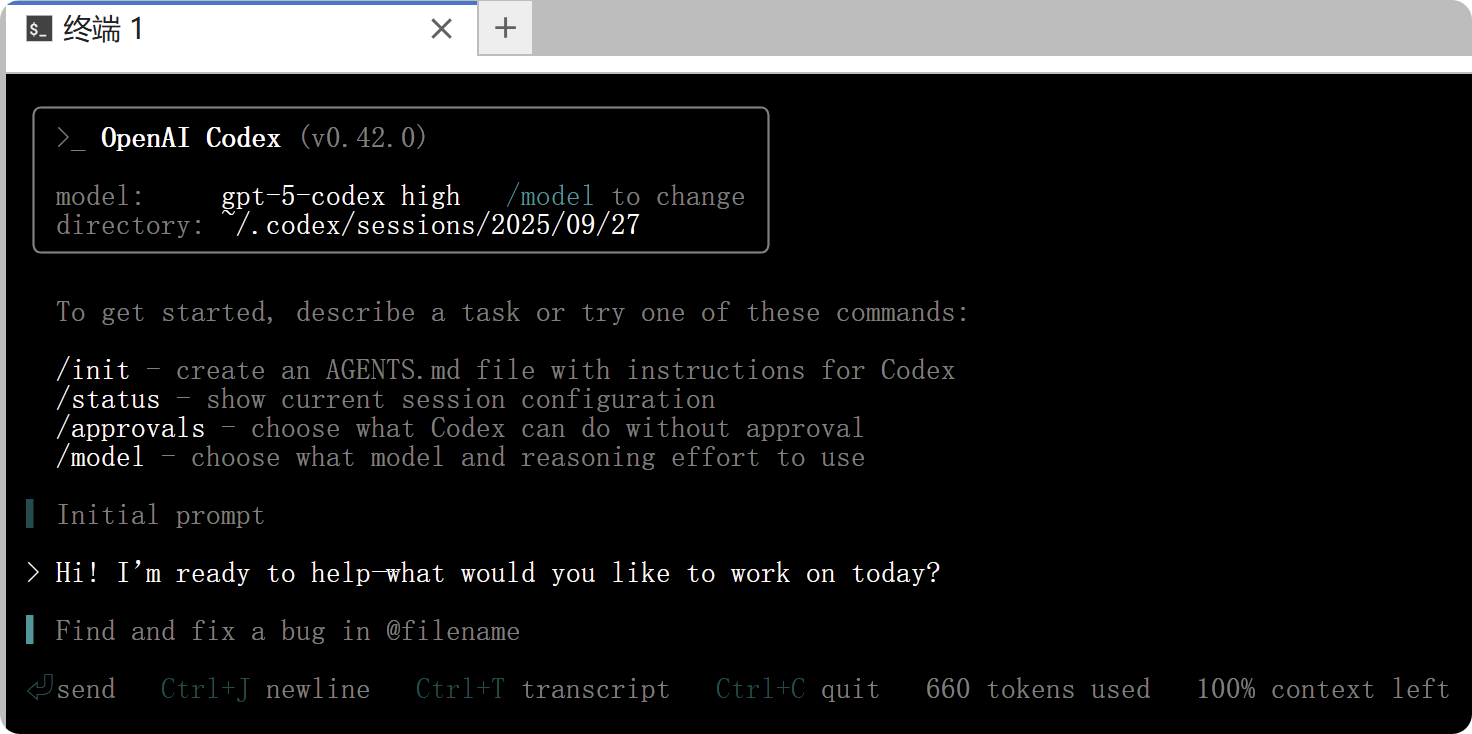
如上图所示,CodeX 正在命令行的交互式终端界面中运行。你可以通过 CodeX 完成多种操作:它能够读取代码库、修改代码并执行命令。使用提示词引导 CodeX 十分简单,并且它还支持图像输入。你只需输入一条简要的说明(称为提示),即可直接运行 CodeX。
codex "Explain this code repository (https://github.com/PriorLabs/TabPFN) clearly."
在实践中,可按两次 Esc 或 Ctrl + T 打开 transcript 窗口,非常适合调试和理解 AI 的思考过程;再按 q 即可返回主界面。
模型与编码智能体:
-
官方建议将 CodeX 与 GPT-5-Codex 结合使用。后者是专为编码智能体优化的高性能编码模型。默认情况下,CodeX 运行的是 GPT-5,但您也可以通过
/model命令切换至 GPT-5-Codex。 -
默认推理级别为 中级(medium)。在处理复杂任务时,您可以使用同样的
/model命令将其升级为 高级(high)。 -
您也可以使用基于 API KEY 的身份验证,并通过 --model 标志启动 CodeX,以调用 gpt-5-codex 或旧版本模型:codex --model gpt-5-codex
-
有关不同模型和推理级别的更多信息,请参阅 OpenAI 的模型页面。
OpenAI 为 CodeX 在本地计算机上的运行设计了一个默认模式:auto。在该模式下,CodeX 可以自动读取文件、执行编辑操作,并运行工作目录中的命令。然而,当 CodeX 尝试在工作目录之外执行任务或访问网络时,仍需获得您的批准。如果您仅希望进行对话,或在深入使用前进行规划,可以通过 /approvals 命令切换至只读模式。若您需要 CodeX 具备网络访问权限,以便在无需额外批准的情况下读取文件、编辑代码和运行命令,则可以启用完全访问模式。请谨慎使用此模式,以确保安全。
图片输入:建议传入图片的文件路径(还可把图片粘贴到编辑器里),将其附加到您的提示中。
codex -i screenshot.png "Explain this error."
codex --image img1.png,img2.jpg "Summarize these diagrams."
codex 作为脚本指令,使用 exec 命令非交互式运行 codex:
codex exec "Write a quicksort algorithm using the Python programming language that is the most accurate, efficient, and concise. The specific requirement is to first clearly explain the specific algorithm ideas, then analyze the time and space complexity, and finally write complete Python code." --skip-git-repo-check
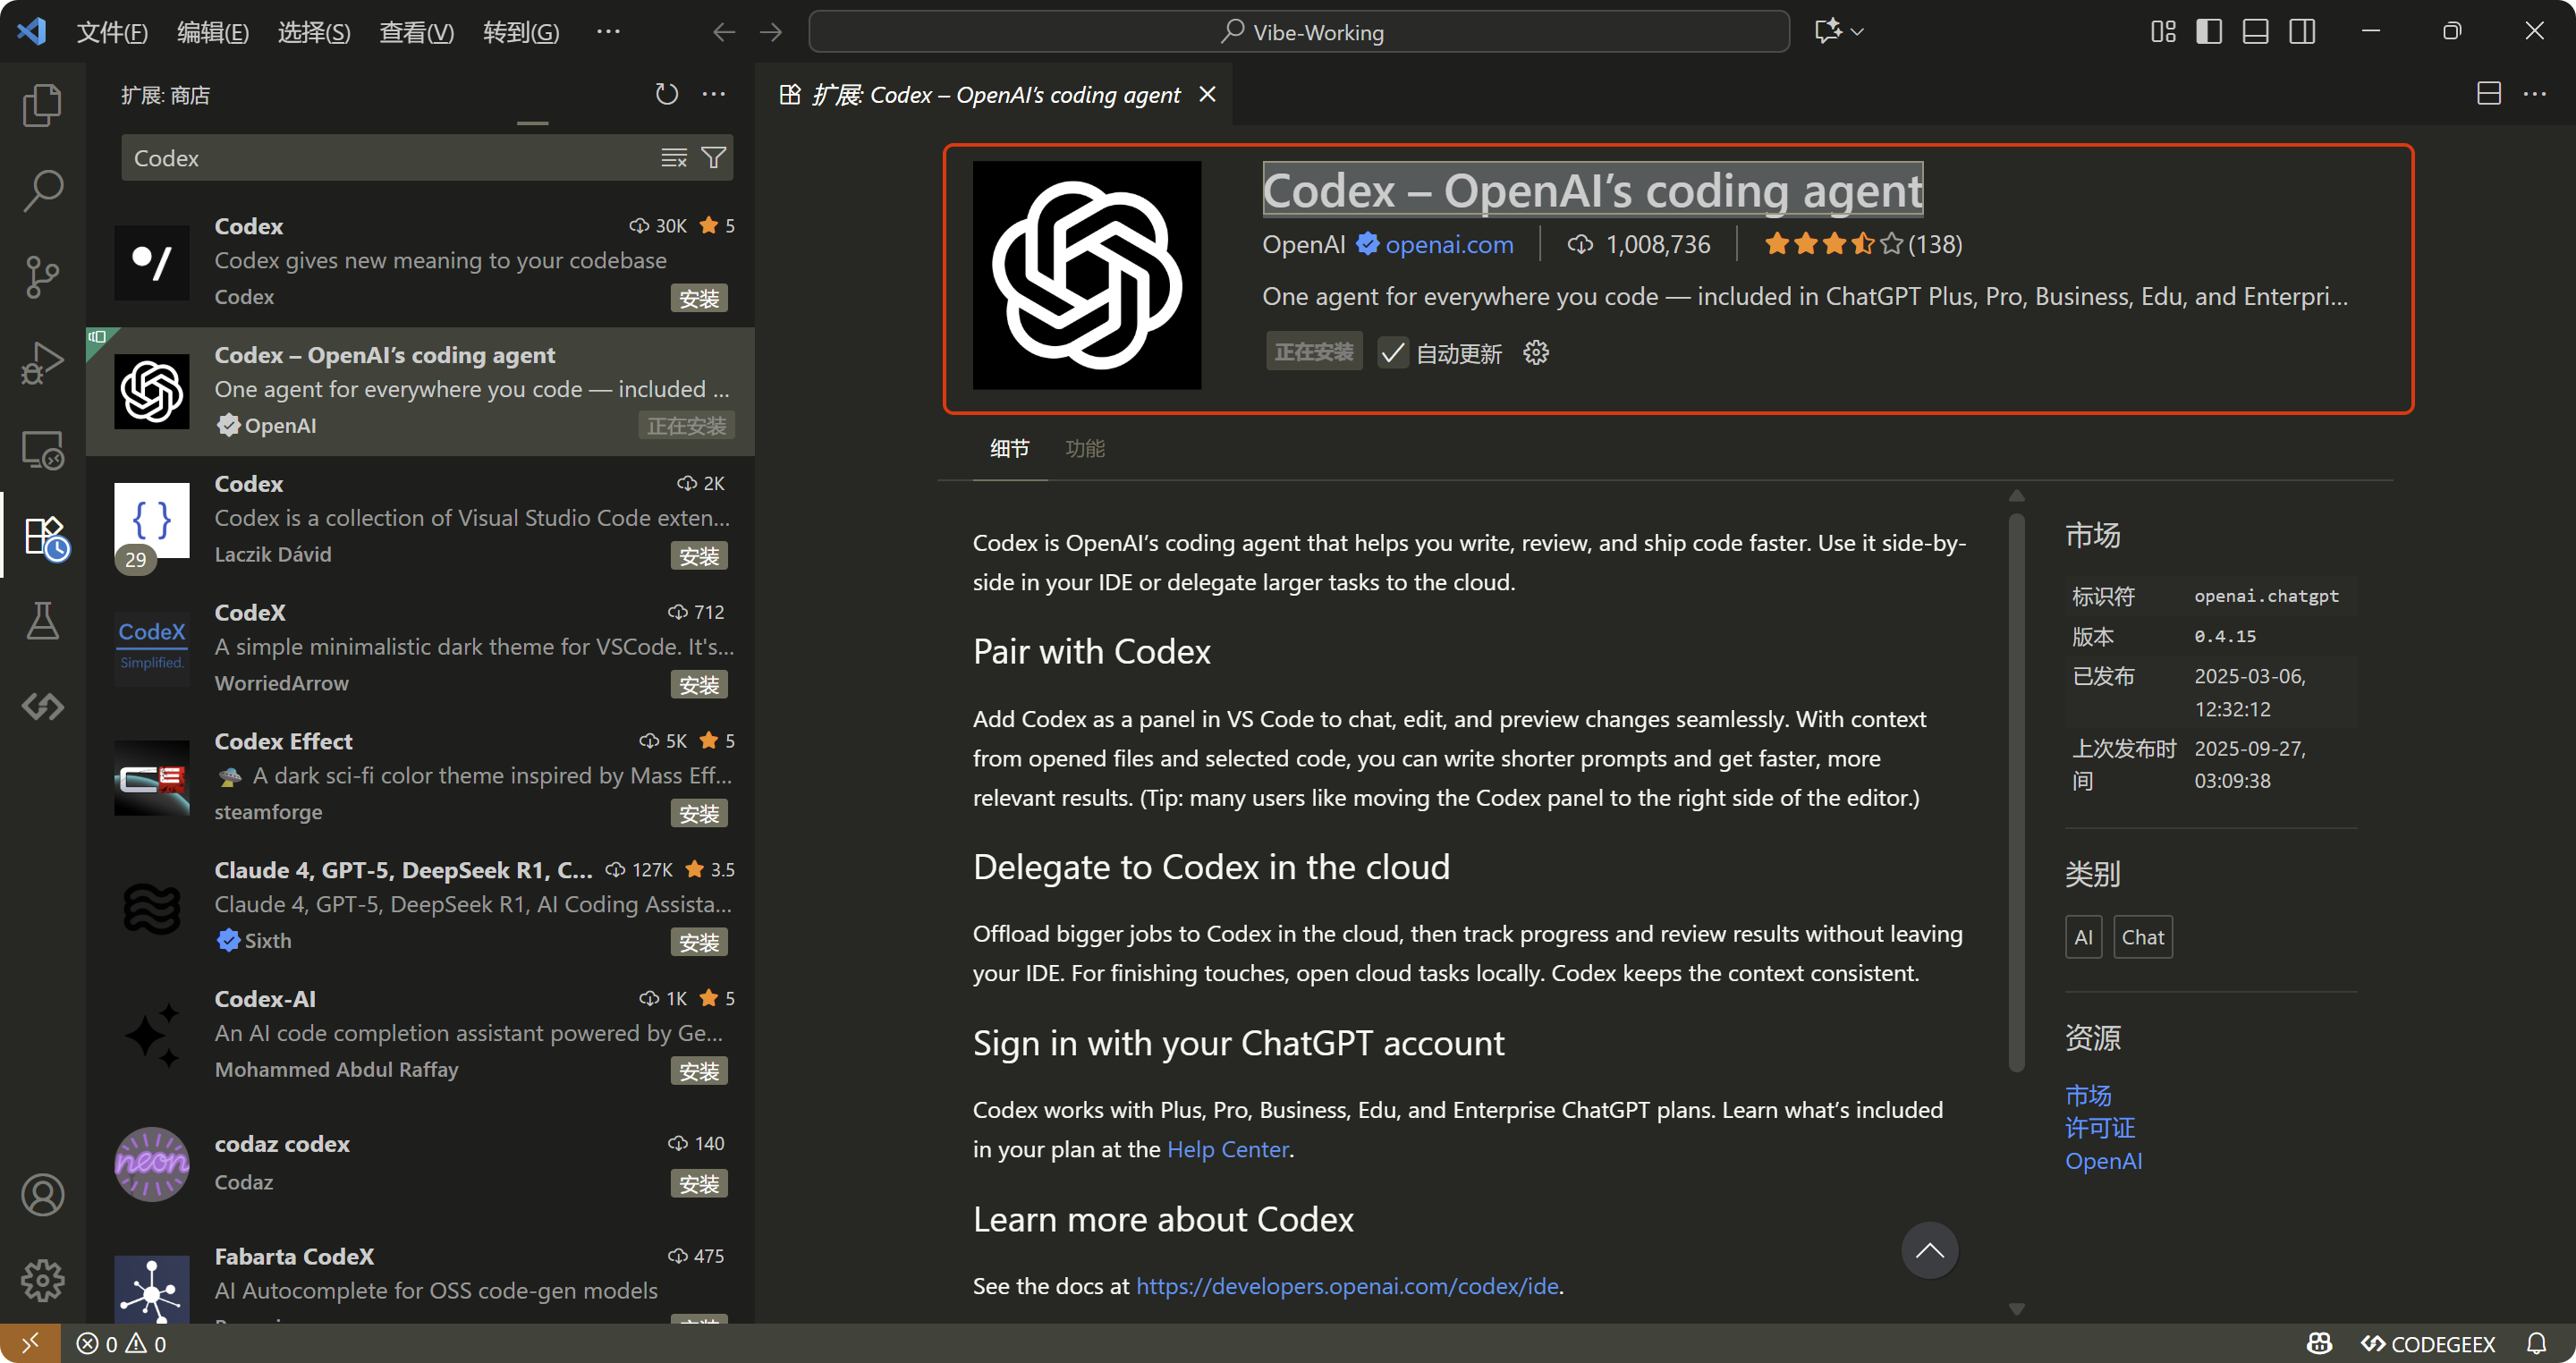
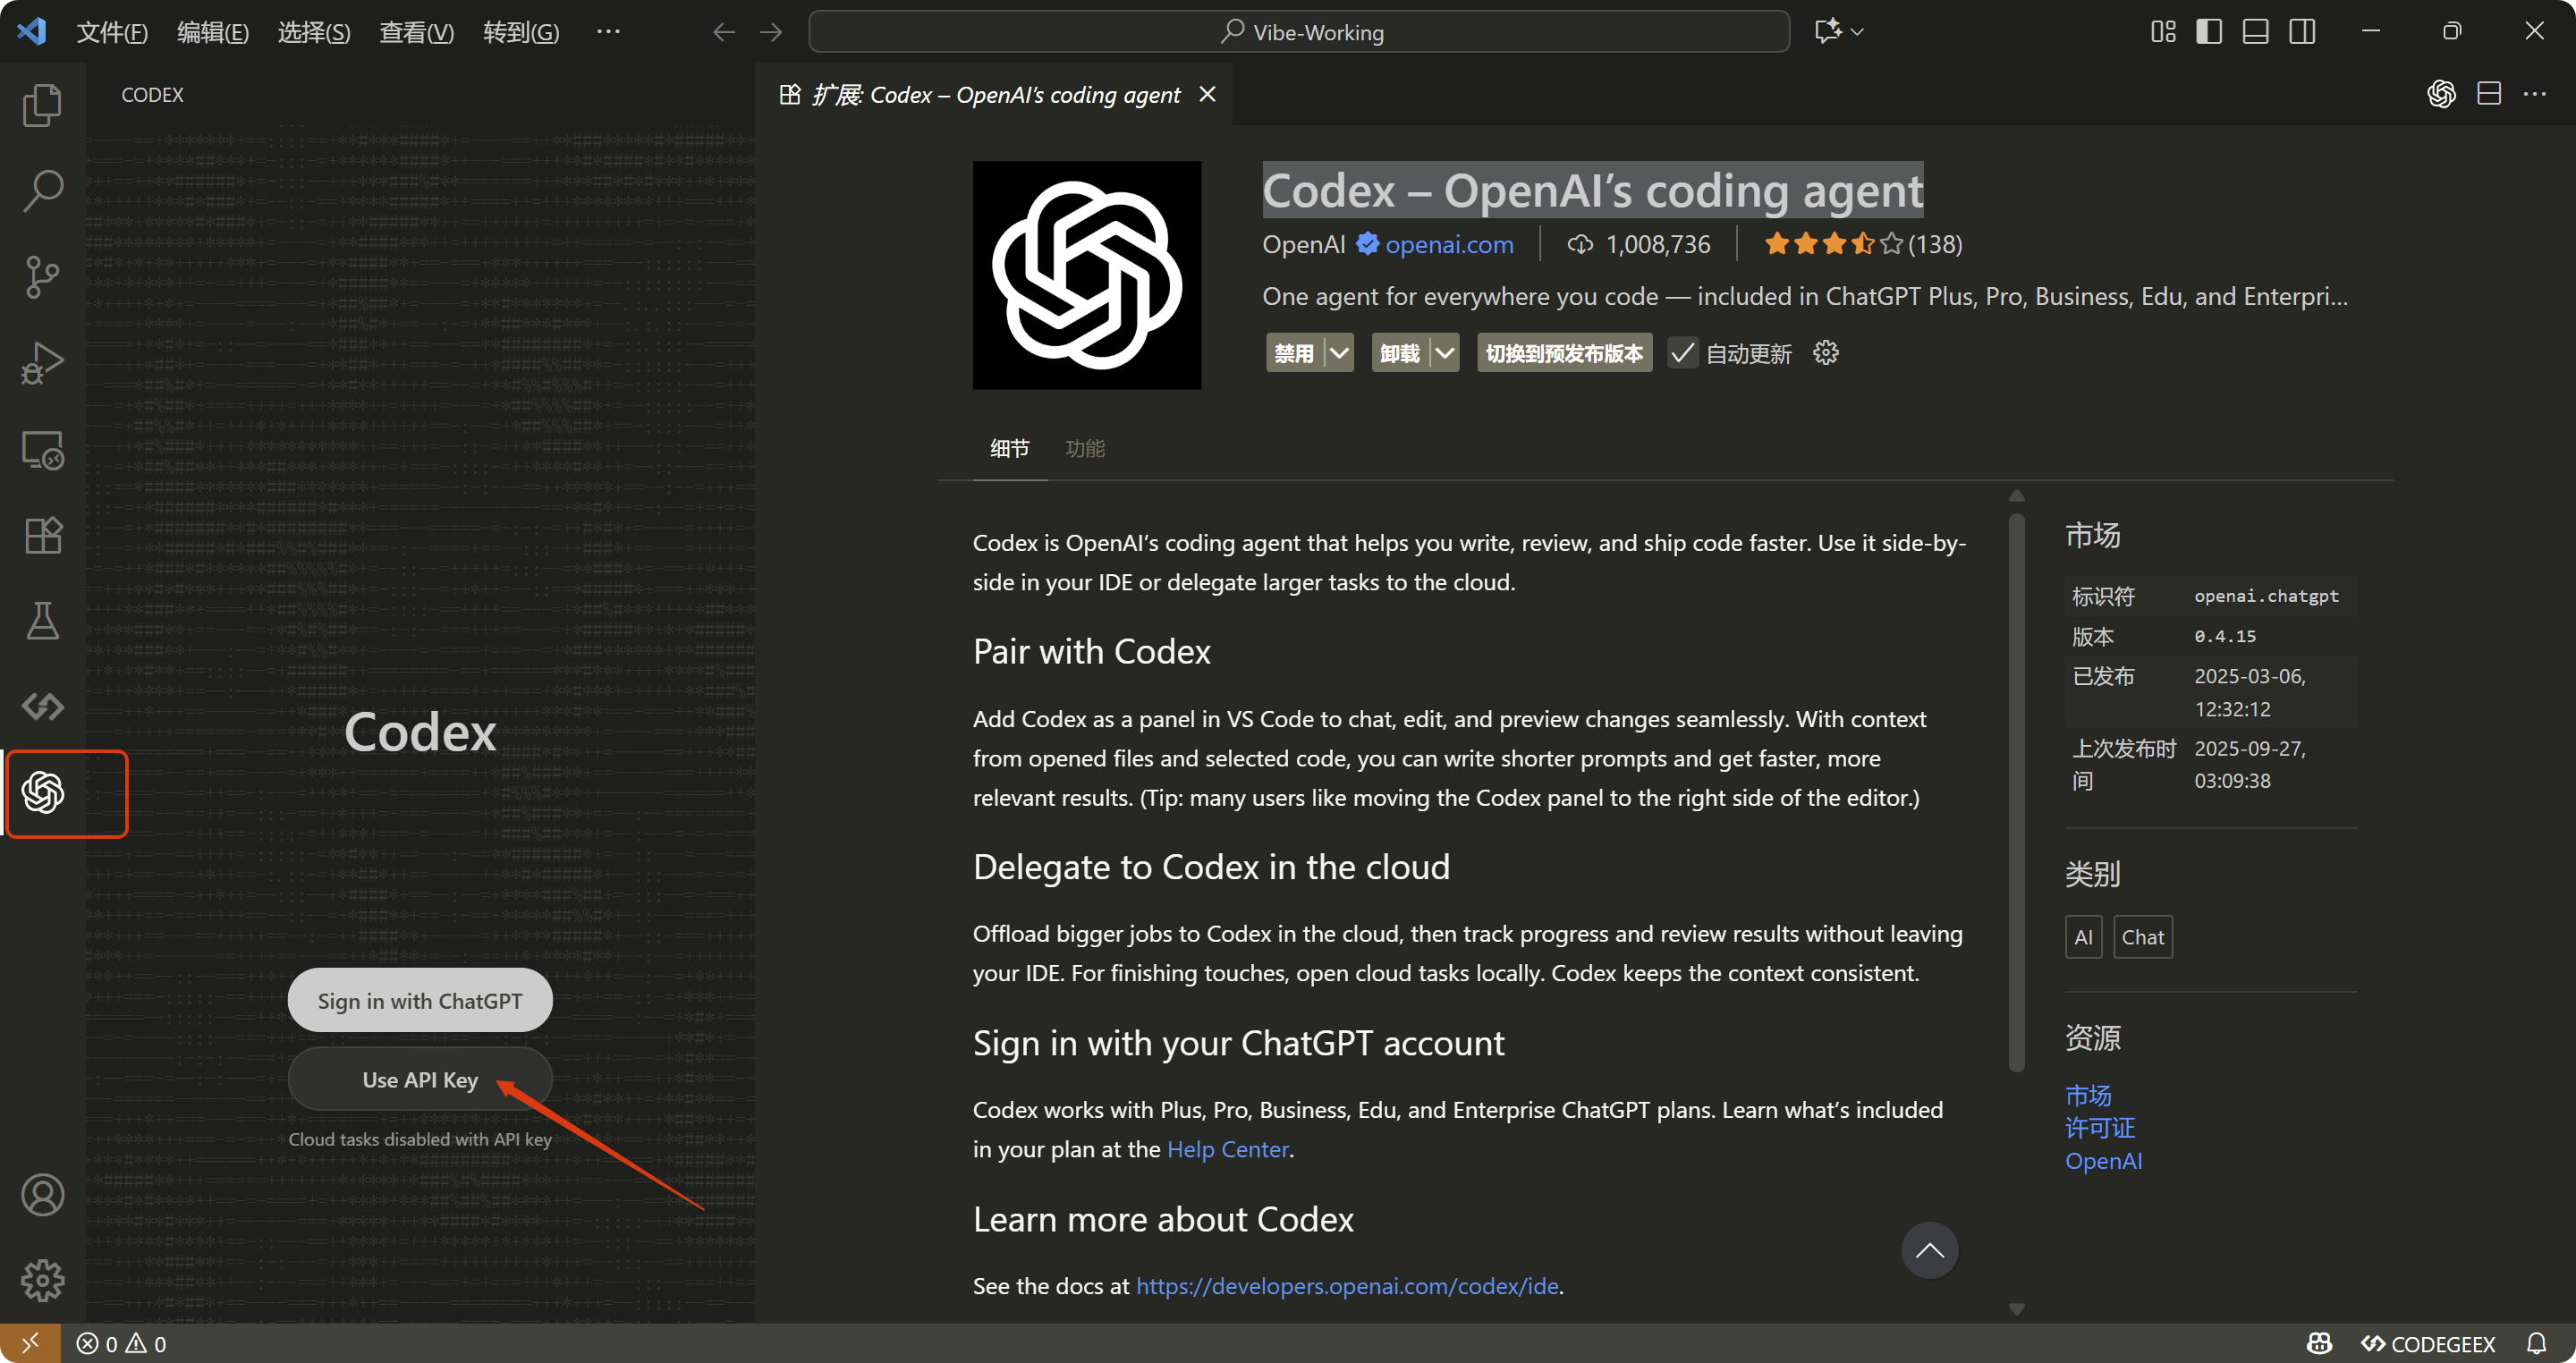
此外,不一定非要用 CodeX CLI,还可以直接使用 VSCode 扩展商店中的 Codex – OpenAI’s Coding Agent 插件。
参阅官方文档:
-
Codex IDE Extension:https://developers.openai.com/codex/ide
-
CodeX settings - config 说明:https://github.com/openai/codex/blob/main/docs/config.md
最后,其他高级配置、MCPs 等更详细的文档,请直接查看 README 和开源软件仓库(https://github.com/openai/codex)中的链接。
四、CodeX 做一道 LeetCode 困难算法题
输入 Prompt 如下所示:
你就是真正的 ACM/ICPC 国际大学生程序设计竞赛总决赛冠军。你非常精通 Python 编程语言,并且精通数据结构与算法、计算机底层原理。你的职责是成功解决各种具体的算法题目。
客户指定的具体算法题目如下:
中位数是有序整数列表中的中间值(奇数情况)。如果列表的大小是偶数,中位数是两个中间值的平均值。
- 例如 arr = [2, 3, 4] 的中位数是 3。
- 例如 arr = [2, 3] 的中位数是 (2 + 3) / 2 = 2.5。实现 MedianFinder 类:
- MedianFinder() 初始化 MedianFinder 对象。
- void addNum(int num) 将数据流中的整数 num 添加到数据结构中。
- double findMedian() 返回到目前为止所有元素的中位数。与实际答案相差 10^(-5) 以内的答案将被接受。示例 1:
输入
["MedianFinder", "addNum", "addNum", "findMedian", "addNum", "findMedian"]
[[], [1], [2], [], [3], []]
输出
[null, null, null, 1.5, null, 2.0]解释
MedianFinder medianFinder = new MedianFinder();
medianFinder.addNum(1);    // arr = [1]
medianFinder.addNum(2);    // arr = [1, 2]
medianFinder.findMedian(); // 返回 1.5 ((1 + 2) / 2)
medianFinder.addNum(3);    // arr[1, 2, 3]
medianFinder.findMedian(); // return 2.0提示:
(-10)^5 <= num <= 10^5
在调用 findMedian 之前,数据结构中至少有一个元素
最多 5 * 10^4 次调用 addNum 和 findMedian
对这道算法题进行深入而透彻的解析,让初学者也能理解。深入思考最优算法及代码的设计思路和步骤,旨在最小化算法的时间复杂度与空间复杂度。准确分析前一步所设计的最优算法的时间复杂度与空间复杂度,确保实现的算法是最准确且最优的。在运用 Python 编程语言来实现最优算法时,整体代码必须尽可能简洁,代码行数必须尽可能少,确保代码中包含输入和输出的测试用例,以便于验证算法能否充分通过算法题。务必遵守题目所规定的输出格式,同时保证代码完整、直接运行即可通过所有测试用例,并辅以详尽的注释说明,以便客户更好地理解和调试。
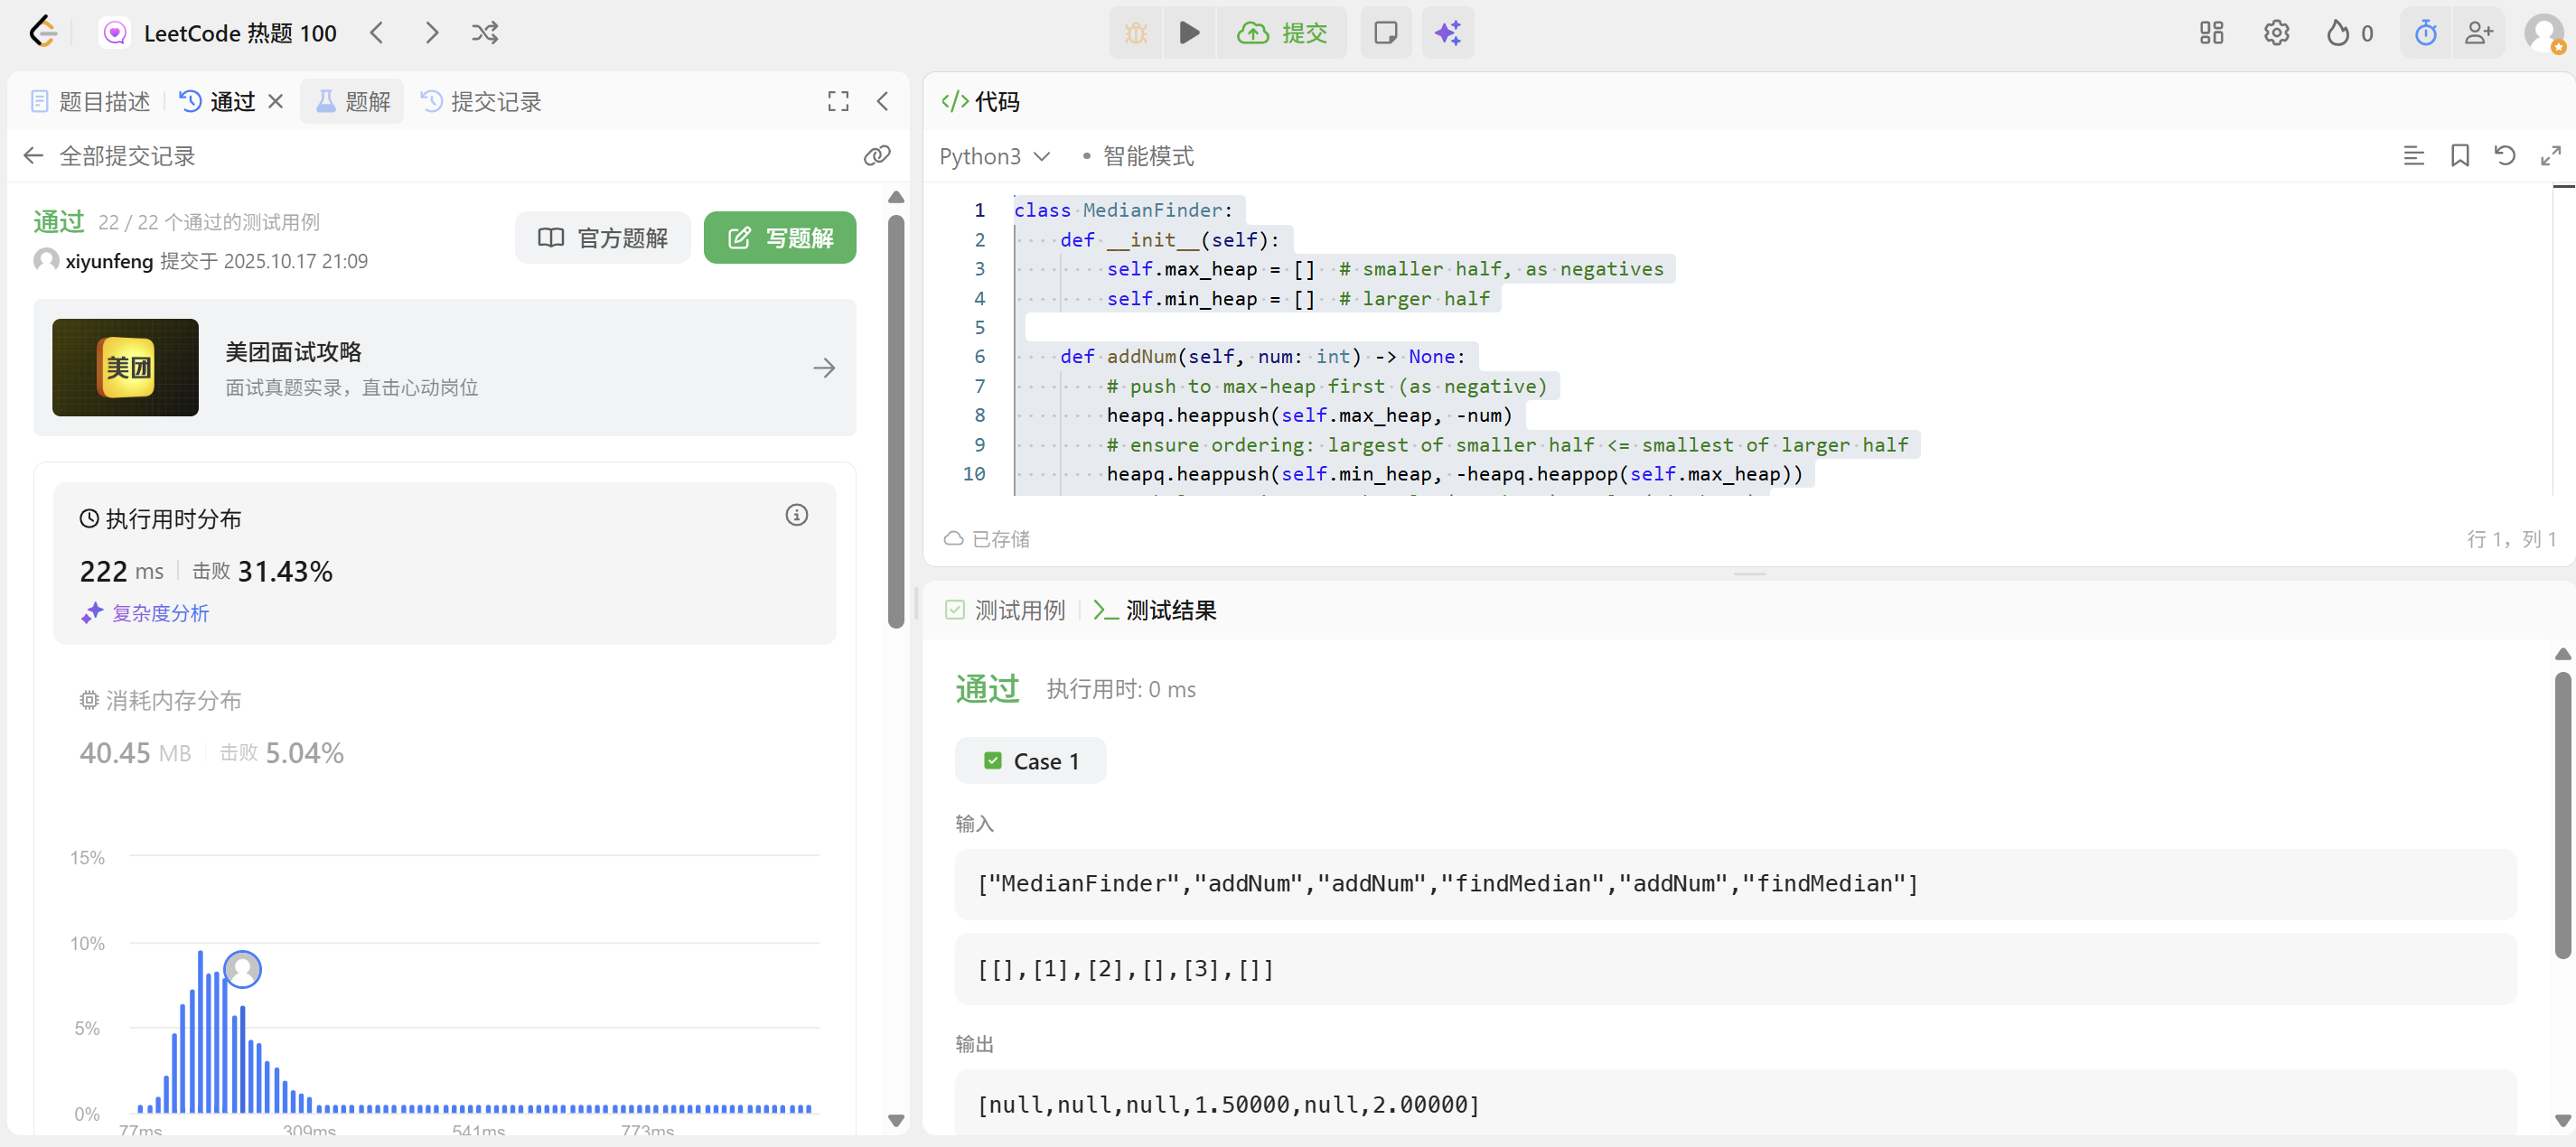
生成的 Python 代码如下所示:
class MedianFinder:def __init__(self):self.max_heap = [] # smaller half, as negativesself.min_heap = [] # larger halfdef addNum(self, num: int) -> None:# push to max-heap first (as negative)heapq.heappush(self.max_heap, -num)# ensure ordering: largest of smaller half <= smallest of larger halfheapq.heappush(self.min_heap, -heapq.heappop(self.max_heap))# rebalance sizes so that len(max_heap) >= len(min_heap)if len(self.min_heap) > len(self.max_heap):heapq.heappush(self.max_heap, -heapq.heappop(self.min_heap))def findMedian(self) -> float:if len(self.max_heap) > len(self.min_heap):return float(-self.max_heap[0])return (-self.max_heap[0] + self.min_heap[0]) / 2.0
运行结果如下所示:

五、CodeX 实现 Python + PyTorch 版稀疏自编码器完整代码
输入 Prompt 如下所示:
在深度学习领域,稀疏自编码器是一种强大的模型,它能够对数据进行有效的特征提取和降维。本任务要求你使用 Python 编程语言结合 PyTorch 深度学习框架,完整且准确地实现一个稀疏自编码器。具体而言,你需要处理具有 n 个样本、每个样本有 d 个特征的结构化数据。在实现过程中,要包含以下关键步骤:
- 数据预处理:对输入的结构化数据进行必要的预处理操作,确保数据符合模型的输入要求。
- 损失函数和优化器定义:选择合适的损失函数和优化器,用于衡量模型的性能并更新模型参数。
- 模型训练:使用预处理后的数据对稀疏自编码器进行训练,在训练过程中记录损失函数值的变化情况,并将这些值打印输出。
- 损失函数值变化曲线绘制:使用 matplotlib 库绘制损失函数值随训练轮数变化的曲线,以便直观地观察模型的训练过程。
- 模型评估:在模型训练完成后,将模型设置为评估模式(model.eval()),并进行测试,确保模型能够根据低维表征正常解码生成数据。
你提供的代码必须完整且准确,同时要带有详细的注释,以便他人能够理解代码的每一个步骤。此外,还需要提供测试用例,用于验证代码的正确性。
变量说明:
- n:表示数据集中样本的数量。
- d:表示每个样本的特征数量。
生成的 Python 代码如下所示:
"""
Comprehensive implementation of a sparse autoencoder using PyTorch.The script provides:1. Data preprocessing to normalize structured data.2. Definition of a deep sparse autoencoder with Kullback-Leibler sparsity penalty.3. Training loop that reports loss values and tracks their history.4. Visualization of loss trajectories via matplotlib.5. Evaluation routine that verifies the model can reconstruct data from latent codes.Running the module directly will launch an end-to-end example on synthetic data.
"""from __future__ import annotationsimport os
from dataclasses import dataclass
from typing import List, Sequence, Tupleimport matplotlib
import numpy as np
import torch
from matplotlib import pyplot as plt
from torch import Tensor, nn
from torch.utils.data import DataLoader, TensorDataset# Use a non-interactive backend so plotting works in headless environments.
matplotlib.use("Agg")@dataclass
class TrainingConfig:"""Container for the main training hyperparameters."""input_dim: intencoder_dims: Sequence[int] = (128, 64, 32)latent_dim: int = 16batch_size: int = 32learning_rate: float = 1e-3epochs: int = 100sparsity_target: float = 0.05sparsity_weight: float = 1e-3weight_decay: float = 1e-5device: torch.device = torch.device("cpu")def preprocess_data(raw_data: np.ndarray, device: torch.device) -> Tensor:"""Normalize structured data so each feature has zero mean and unit variance.Args:raw_data: NumPy array shaped (n_samples, n_features).device: Target PyTorch device for downstream computation.Returns:Normalized tensor on the requested device."""if raw_data.ndim != 2:raise ValueError("Input data must be a 2D array [n_samples, n_features].")# Center data to zero mean across the dataset.mean = raw_data.mean(axis=0, keepdims=True)centered = raw_data - mean# Scale by standard deviation with numerical stability guard.std = raw_data.std(axis=0, keepdims=True)std[std == 0] = 1.0scaled = centered / std# Convert to PyTorch tensor for model consumption.tensor = torch.from_numpy(scaled.astype(np.float32)).to(device)return tensorclass SparseAutoencoder(nn.Module):"""Deep fully connected sparse autoencoder with progressive dimensionality changes.The sparsity penalty is applied to the latent activations, so the encode methodexposes the latent representation explicitly."""def __init__(self, input_dim: int, encoder_dims: Sequence[int], latent_dim: int) -> None:super().__init__()hidden_layers = list(encoder_dims)if len(hidden_layers) < 3:raise ValueError("encoder_dims must contain at least three intermediate layer sizes.")# Build encoder with progressively shrinking dimensions.encoder_modules: List[nn.Module] = []prev_dim = input_dimfor hidden_dim in hidden_layers:encoder_modules.append(nn.Linear(prev_dim, hidden_dim))encoder_modules.append(nn.ReLU())prev_dim = hidden_dim# Latent layer uses sigmoid so activations stay in (0, 1) for KL sparsity.encoder_modules.append(nn.Linear(prev_dim, latent_dim))encoder_modules.append(nn.Sigmoid())self.encoder = nn.Sequential(*encoder_modules)# Build decoder mirroring the encoder with expanding dimensions.decoder_modules: List[nn.Module] = []prev_dim = latent_dimfor hidden_dim in reversed(hidden_layers):decoder_modules.append(nn.Linear(prev_dim, hidden_dim))decoder_modules.append(nn.ReLU())prev_dim = hidden_dimdecoder_modules.append(nn.Linear(prev_dim, input_dim))self.decoder = nn.Sequential(*decoder_modules)def encode(self, x: Tensor) -> Tensor:"""Encode inputs into the sparse latent representation."""return self.encoder(x)def decode(self, latent: Tensor) -> Tensor:"""Project latent codes back to the input feature space."""return self.decoder(latent)def forward(self, x: Tensor) -> Tuple[Tensor, Tensor]:"""Run the autoencoder end-to-end.Returns:reconstruction: Output of the decoder.hidden: Hidden activations required for sparsity penalty."""hidden = self.encode(x)reconstruction = self.decode(hidden)return reconstruction, hiddendef kl_divergence(rho: float, rho_hat: Tensor) -> Tensor:"""Compute element-wise KL divergence between desired sparsity and observed activations.Args:rho: Target sparsity level (typically small, e.g., 0.05).rho_hat: Tensor with mean activation per hidden unit.Returns:Scalar tensor representing the KL divergence penalty."""rho_tensor = torch.full_like(rho_hat, fill_value=rho)rho_hat = torch.clamp(rho_hat, 1e-7, 1 - 1e-7)term1 = rho_tensor * torch.log(rho_tensor / rho_hat)term2 = (1 - rho_tensor) * torch.log((1 - rho_tensor) / (1 - rho_hat))return torch.sum(term1 + term2)def build_dataloader(tensor_data: Tensor, batch_size: int, shuffle: bool = True
) -> DataLoader:"""Wrap tensor data into a DataLoader for efficient batching.Args:tensor_data: Preprocessed input data.batch_size: Mini-batch size for training iterations.shuffle: Whether to randomize batch ordering."""dataset = TensorDataset(tensor_data)return DataLoader(dataset, batch_size=batch_size, shuffle=shuffle)def train_sparse_autoencoder(model: SparseAutoencoder,dataloader: DataLoader,config: TrainingConfig,
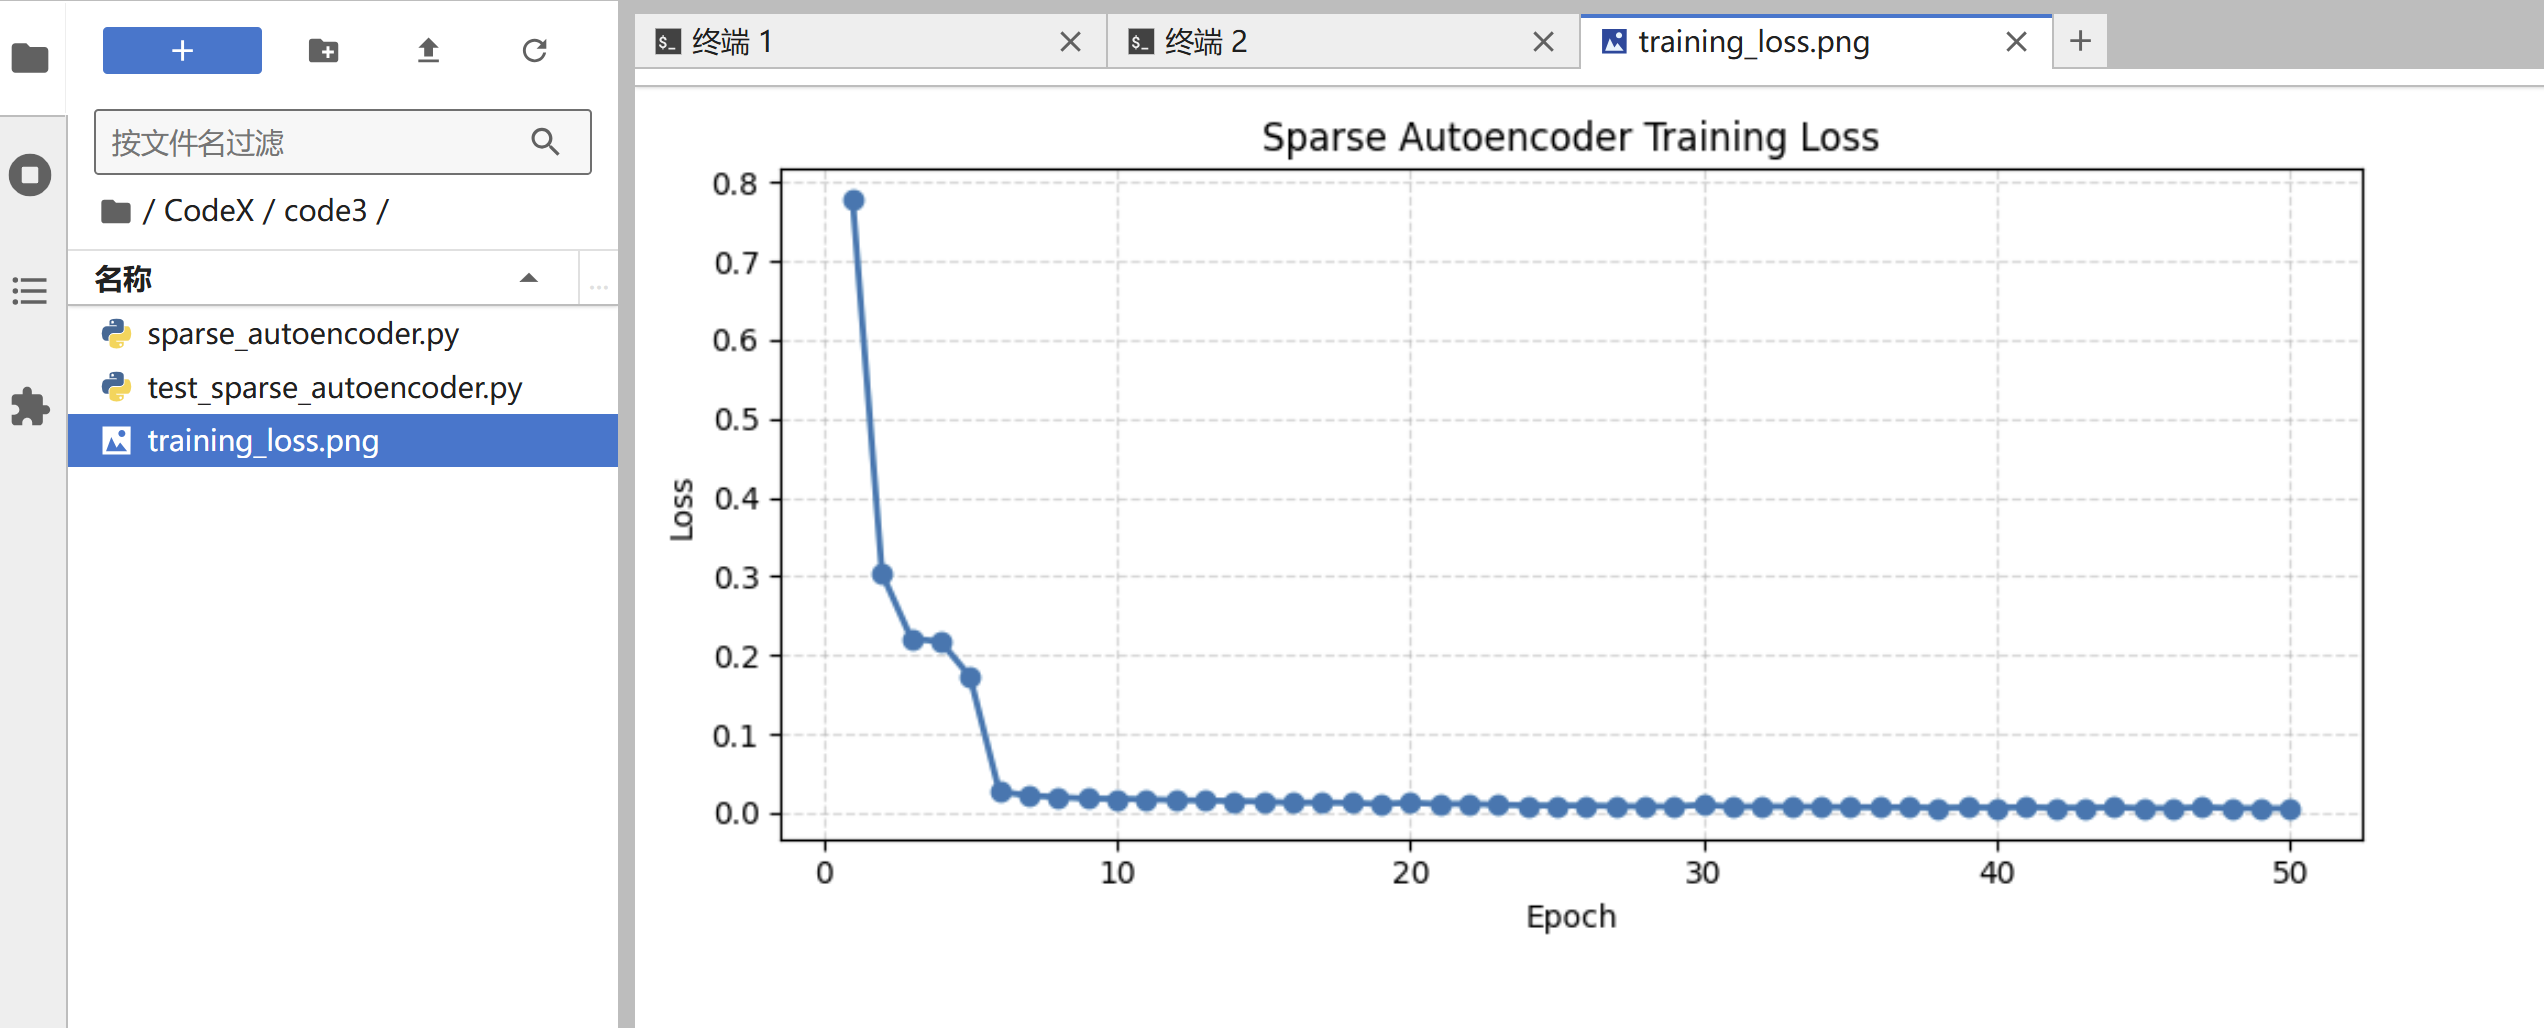
) -> List[float]:"""Train the sparse autoencoder and report the loss for each epoch.Args:model: Autoencoder to optimize.dataloader: Preprocessed data loader.config: Training hyperparameters.Returns:loss_history: A list storing the loss value after each epoch."""model.to(config.device)criterion = nn.MSELoss()optimizer = torch.optim.Adam(model.parameters(),lr=config.learning_rate,weight_decay=config.weight_decay,)loss_history: List[float] = []for epoch in range(1, config.epochs + 1):model.train()running_loss = 0.0batch_count = 0for (batch,) in dataloader:optimizer.zero_grad()reconstruction, hidden = model(batch)reconstruction_loss = criterion(reconstruction, batch)# Average hidden activation over the batch for sparsity calculation.rho_hat = hidden.mean(dim=0)sparsity_penalty = kl_divergence(config.sparsity_target, rho_hat)loss = reconstruction_loss + config.sparsity_weight * sparsity_penaltyloss.backward()optimizer.step()running_loss += loss.item()batch_count += 1epoch_loss = running_loss / max(batch_count, 1)loss_history.append(epoch_loss)print(f"Epoch {epoch:03d}/{config.epochs} - Loss: {epoch_loss:.6f}")return loss_historydef plot_losses(loss_history: Sequence[float], output_path: str) -> None:"""Plot the training loss trajectory and save it to disk.Args:loss_history: Sequence containing per-epoch loss values.output_path: File path where the plot will be saved."""if len(loss_history) == 0:raise ValueError("loss_history is empty; nothing to plot.")plt.figure(figsize=(8, 4))plt.plot(range(1, len(loss_history) + 1), loss_history, marker="o", linewidth=2)plt.title("Sparse Autoencoder Training Loss")plt.xlabel("Epoch")plt.ylabel("Loss")plt.grid(True, linestyle="--", alpha=0.5)plt.tight_layout()plt.savefig(output_path)plt.close()@torch.no_grad()
def evaluate_model(model: SparseAutoencoder, data_loader: DataLoader, device: torch.device
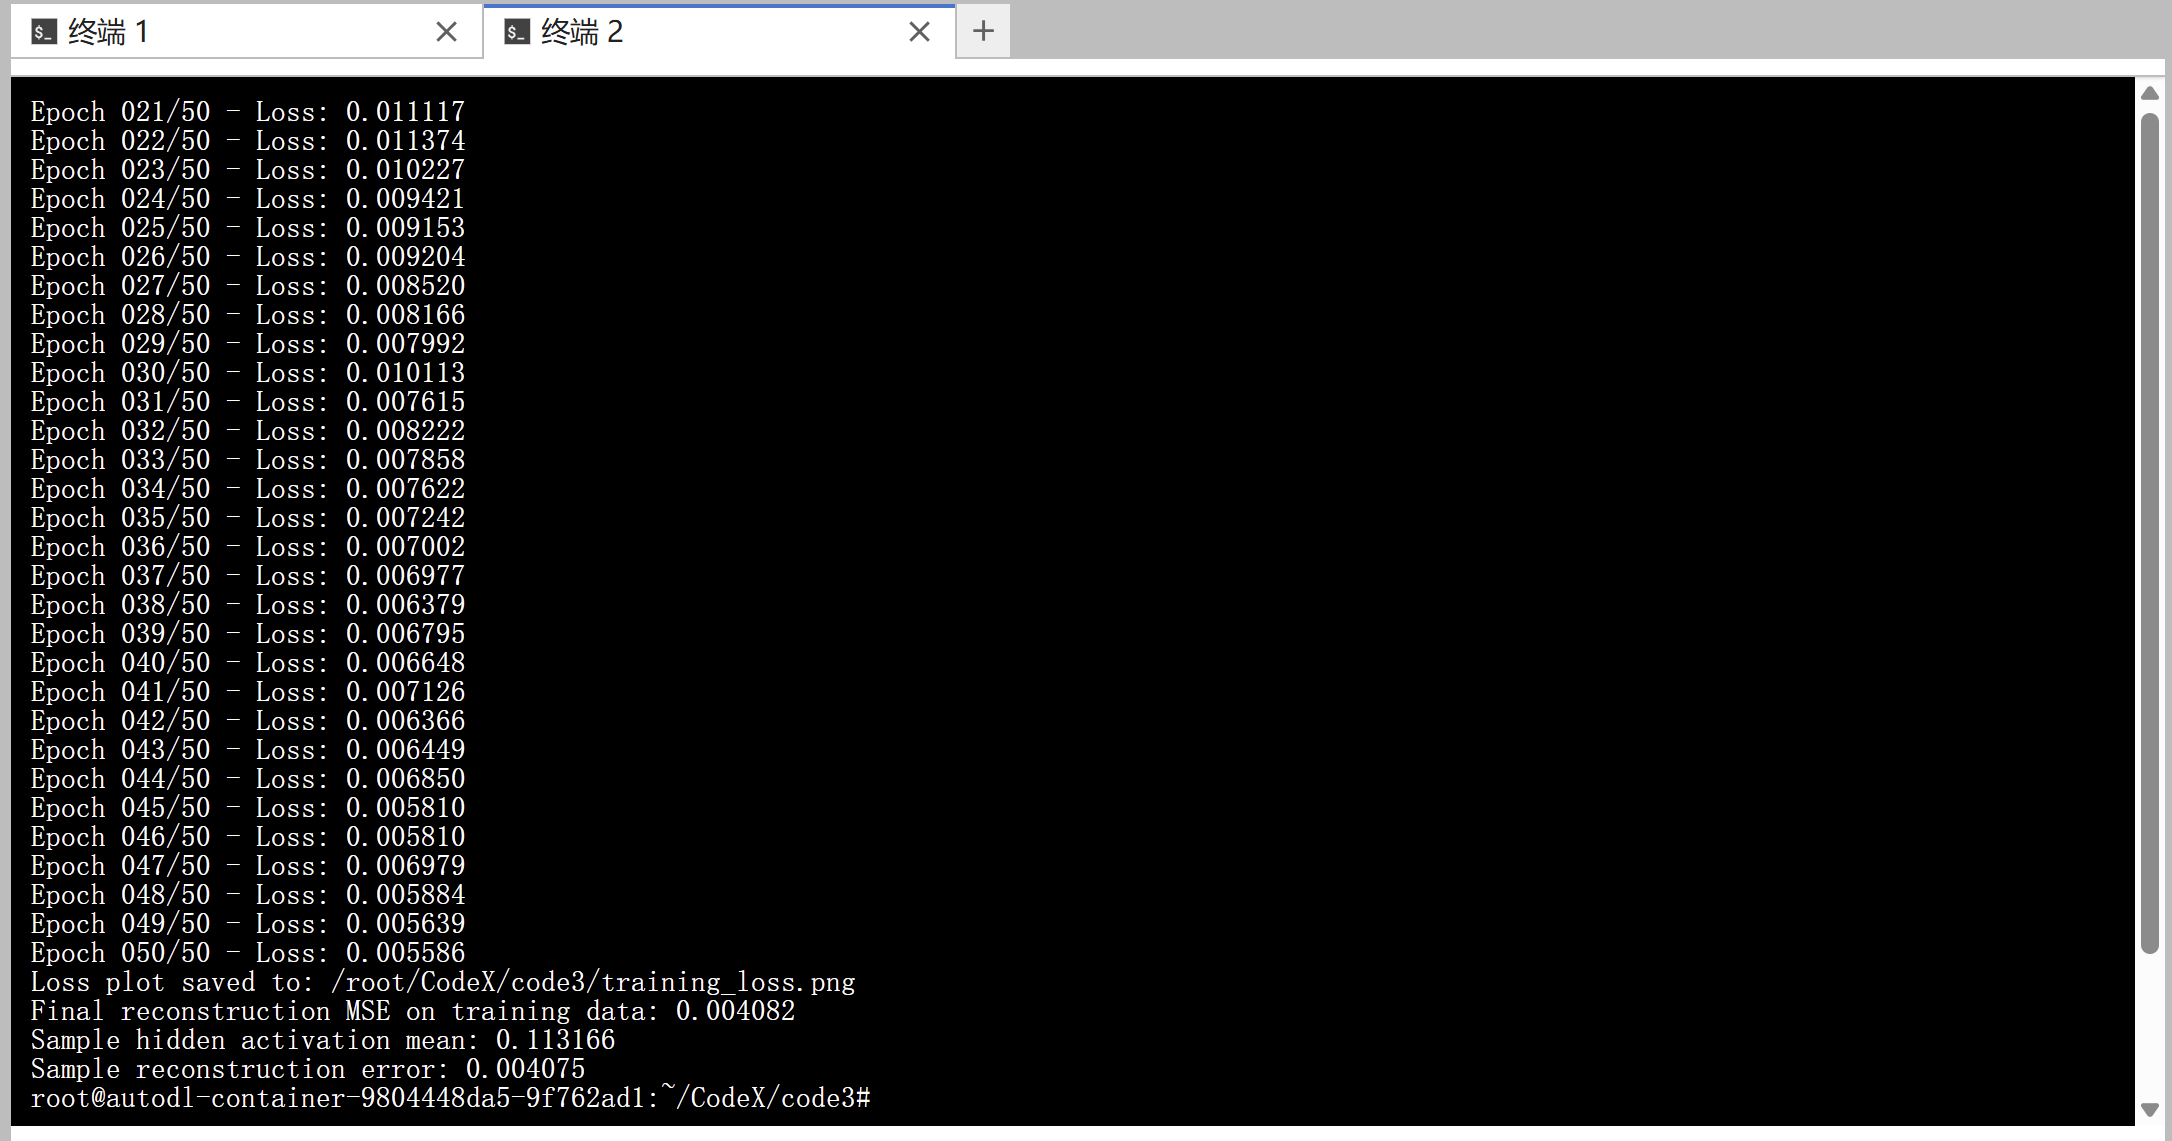
) -> float:"""Evaluate reconstruction error on the provided dataset.Args:model: Trained autoencoder.data_loader: DataLoader used for evaluation.device: Device on which evaluation will be performed.Returns:Mean squared reconstruction error across the dataset."""model.eval()criterion = nn.MSELoss(reduction="sum")total_loss = 0.0total_elements = 0for (batch,) in data_loader:batch = batch.to(device)reconstruction, _ = model(batch)loss = criterion(reconstruction, batch)total_loss += loss.item()total_elements += batch.numel()mean_loss = total_loss / max(total_elements, 1)return mean_lossdef run_demo_example() -> None:"""Execute a full training/evaluation pipeline on synthetic structured data.The synthetic dataset simulates a simple scenario where the autoencoder attempts toreconstruct inputs with hidden sparse representations."""torch.manual_seed(42)np.random.seed(42)n_samples, n_features = 5000, 1024# Generate synthetic data with underlying low-rank structure plus noise.latent_factors = np.random.randn(n_samples, 5)projection_matrix = np.random.randn(5, n_features)noise = 0.05 * np.random.randn(n_samples, n_features)raw_data = latent_factors @ projection_matrix + noisedevice = torch.device("cuda" if torch.cuda.is_available() else "cpu")processed_tensor = preprocess_data(raw_data, device)config = TrainingConfig(input_dim=n_features,encoder_dims=(128, 64, 32),latent_dim=16,batch_size=32,learning_rate=1e-3,epochs=50,sparsity_target=0.05,sparsity_weight=3e-3,weight_decay=1e-5,device=device,)dataloader = build_dataloader(processed_tensor, config.batch_size, shuffle=True)model = SparseAutoencoder(config.input_dim, config.encoder_dims, config.latent_dim)print("Starting sparse autoencoder training...")loss_history = train_sparse_autoencoder(model, dataloader, config)plot_path = os.path.join(os.getcwd(), "training_loss.png")plot_losses(loss_history, plot_path)print(f"Loss plot saved to: {plot_path}")eval_loader = build_dataloader(processed_tensor, batch_size=config.batch_size, shuffle=False)final_loss = evaluate_model(model, eval_loader, device=config.device)print(f"Final reconstruction MSE on training data: {final_loss:.6f}")# Demonstrate encode/decode round-trip on a single sample.sample = processed_tensor[0].unsqueeze(0)reconstruction, hidden = model(sample)print(f"Sample hidden activation mean: {hidden.mean().item():.6f}")print(f"Sample reconstruction error: {nn.functional.mse_loss(reconstruction, sample).item():.6f}")if __name__ == "__main__":run_demo_example()
运行结果如下所示:

📚️ 参考资料链接整理如下:
-
OpenAI 官方文档 CodeX CLI - Pair with CodeX In Your Terminal
-
再见 Claude Code!玩转 CodeX CLI 的 16 个实用小技巧,效率拉满!!
-
如何安装和使用 CodeX CLI:OpenAI 对标 Claude Code 的 AI 编码工具
-
Codex CLI 配置 Azure OpenAI GPT-5-codex 指南
-
国内无限制在 CodeX CLI 中使用 GPT-5 High 模型完整指南