Mac安装使用Gradle
本文用于本人技术学习和备忘。水平有限,如有错漏欢迎指正!
原创不易,如有转载请标注出处:https://blog.csdn.net/luyou0401/article/details/153281348
Mac安装使用Gradle
- 前言
- Gradle安装教程
- 安装前准备:检查 Java 环境
- 下载Gradle 发行版
- 安装Gradle
- 配置系统环境
- 验证安装
- 配置存储目录
- 配置国内镜像源
- 使用示例
- Gradle命令使用
- IntelliJ IDEA设置
- 单模块项目
- 多模块项目
- Springboot项目
- Spring源码
前言
我使用Gradle的契机是为了学习和使用Spring6.0的源码,Spring Framework 5.1.x(2018年后),全面转向Gradle,并逐步移除Maven构建支持。
项目构建工具的选择因人而异,Maven和Gradle的优劣比较我就不做了。从技术栈角度上建议,我推荐全都掌握;从使用角度分析,具体项目具体分析,因地制宜!
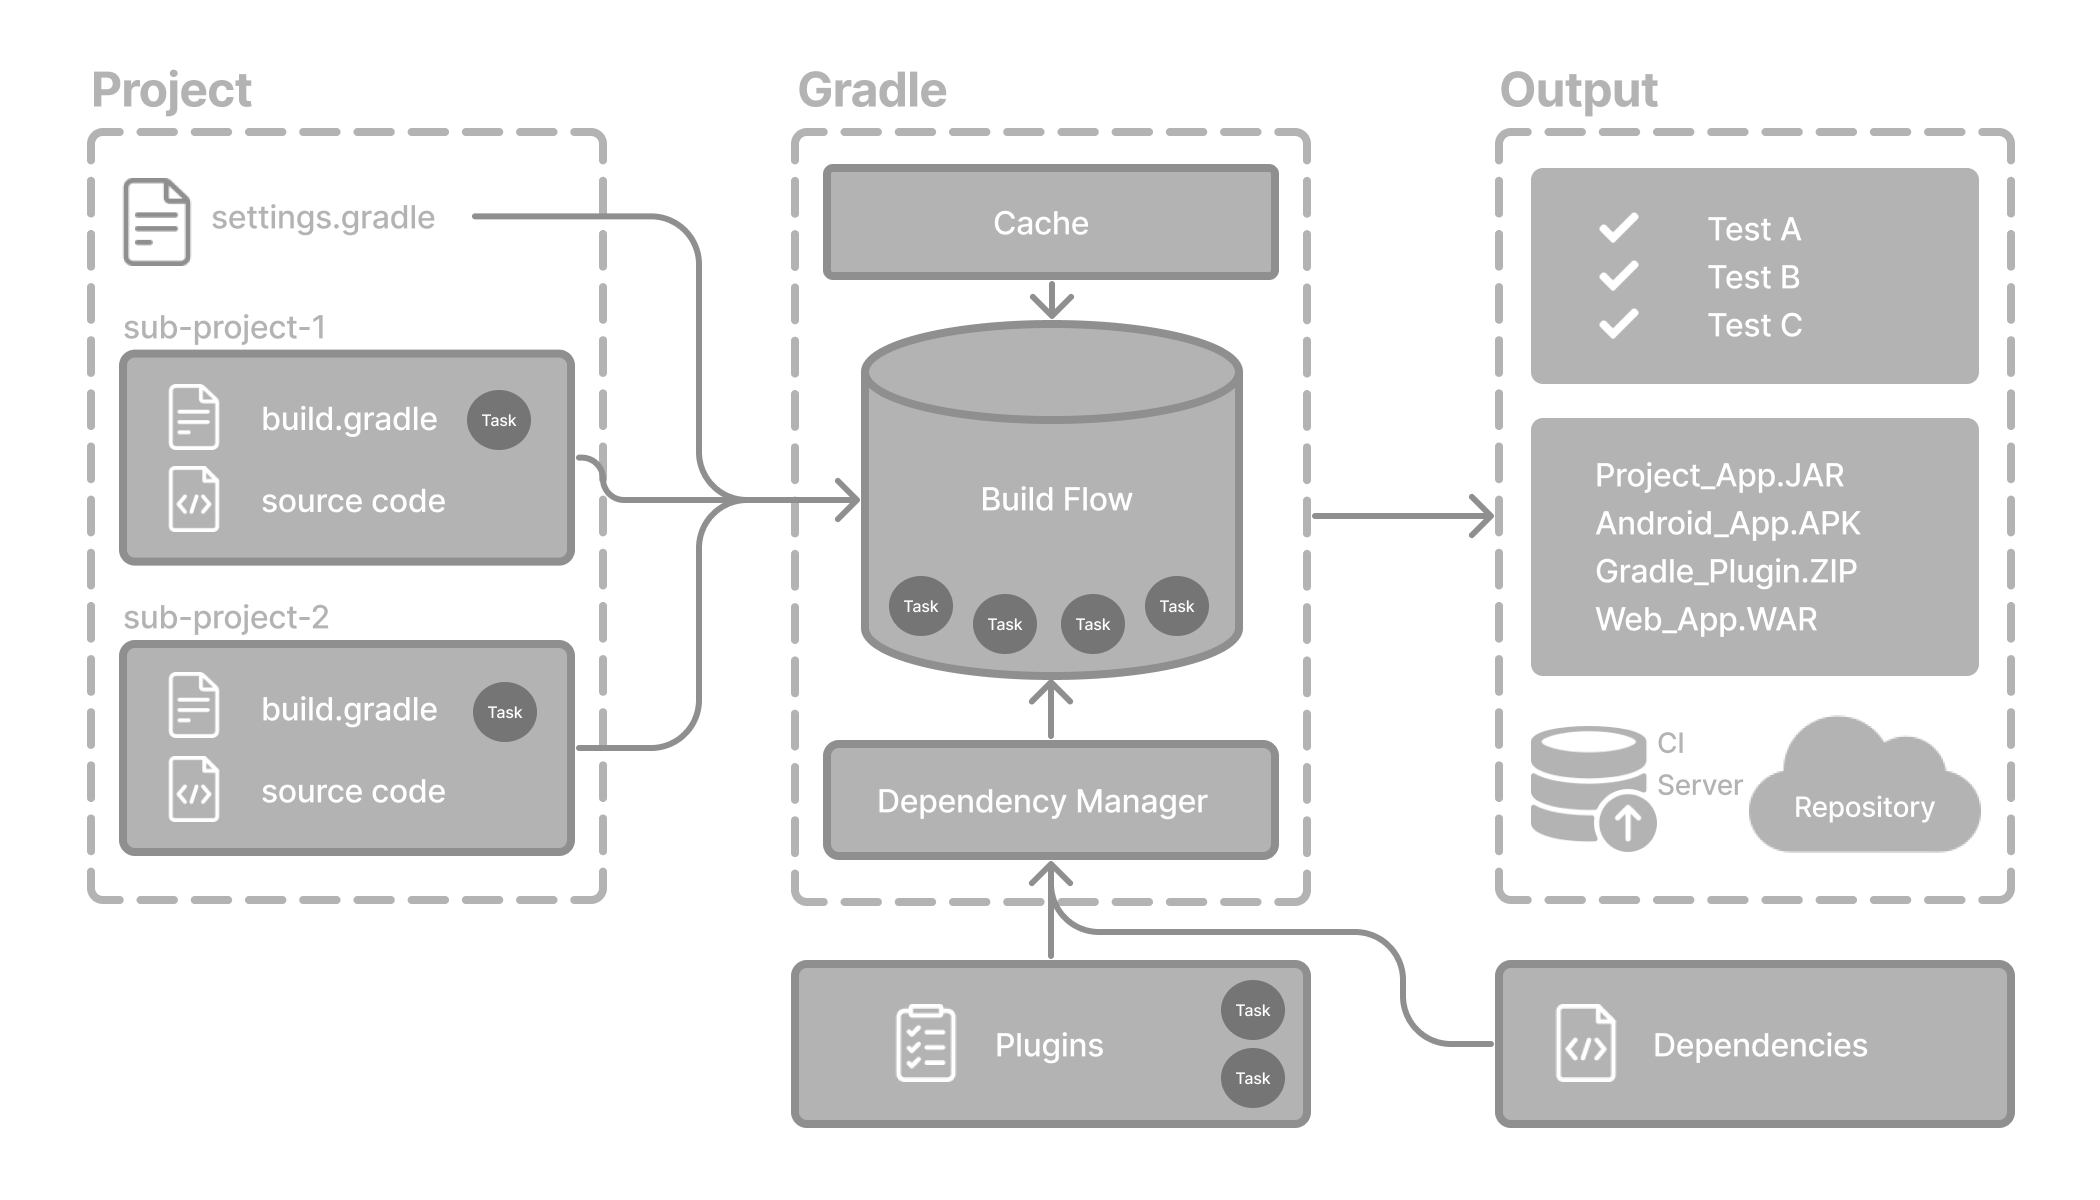
在 macOS 上配置 Gradle 并在 IntelliJ IDEA 中使用并不复杂。下面我将梳理从安装、环境配置到 IntelliJ IDEA集成的完整步骤,同时提供一些使用示例。
本文中使用的环境涉及:
JDK 17.0.15Gradle 8.14.3IntelliJ IDEA 2025.2.3 (Ultimate Edition)
特别推荐:
B站宝藏博主:青空の霞光的Gradle教程。满满干货,比看官网文档更易学高效!!!2个小时让你掌握Gradle的常见用法。
相关文档:https://www.itbaima.cn/zh-CN/document/3at7ybv04dmjc0wp (绝对实用)
Gradle安装教程
官网下载地址:Gradle官网
Gradle 8.14.3用户手册:用户手册
安装前准备:检查 Java 环境
Gradle 在 Java 虚拟机 (JVM) 上运行,通常由 JDK 或 JRE 提供。执行 Gradle 需要 JVM 版本 8 到 24 之间。在开始之前,请确保你的 Mac 上已经安装了合适版本的 JDK。
JDK版本兼容性说明请查阅:兼容性说明
下载Gradle 发行版
建议下载 bin 文件;它是一个较小的文件,可以快速下载(并且最新文档可以在线获取)。
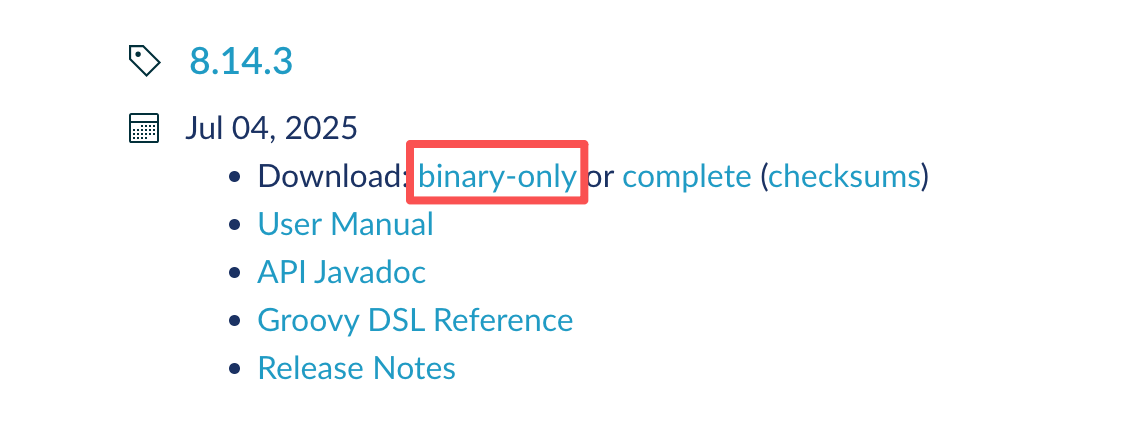
下载之后的文件,如下:

安装Gradle
终端进入到Gradle下载文件所在目录,执行以下命令:
# 如果命令执行报:Permission denied,在命令前加sudo使用管理员权限运行。
❯ mkdir /usr/local/gradle
❯ unzip gradle-8.14.3-bin.zip -d /usr/local/gradle
❯ ls /usr/local/gradle/gradle-8.14.3
LICENSE	NOTICE	README	bin	init.d	lib
配置系统环境
添加环境变量GRADLE_HOME并将其指向解压后的发行版。在.bash_profile中编辑以添加GRADLE_HOME变量:
export GRADLE_HOME=/usr/local/gradle/gradle-8.14.3
export PATH=$GRADLE_HOME/bin:$PATH
验证安装
命令行执行gradle -v以运行 gradle 并显示版本:
@MacBook-Pro-yaco ~ % gradle -vWelcome to Gradle 8.14.3!Here are the highlights of this release:- Java 24 support- GraalVM Native Image toolchain selection- Enhancements to test reporting- Build Authoring improvementsFor more details see https://docs.gradle.org/8.14.3/release-notes.html------------------------------------------------------------
Gradle 8.14.3
------------------------------------------------------------Build time:    2025-07-04 13:15:44 UTC
Revision:      e5ee1df3d88b8ca3a8074787a94f373e3090e1dbKotlin:        2.0.21
Groovy:        3.0.24
Ant:           Apache Ant(TM) version 1.10.15 compiled on August 25 2024
Launcher JVM:  17.0.15 (Oracle Corporation 17.0.15+9-LTS-241)
Daemon JVM:    /Library/Java/JavaVirtualMachines/jdk-17.0.15.jdk/Contents/Home (no JDK specified, using current Java home)
OS:            Mac OS X 12.7.6 x86_64
配置存储目录
Gradle User Home目录用于存储Gradle的全局配置属性、初始化脚本、缓存的文件(如依赖项)以及日志文件等。指定一个自定义位置有助于统一管理和备份。
指定Gradle用户主目录(Gradle User Home),在.bash_profile中编辑以添加GRADLE_USER_HOME变量:
export GRADLE_HOME=/usr/local/gradle/gradle-8.14.3
export GRADLE_USER_HOME=/Users/XXXX/opt/gradle/repository # 自定义目录
export PATH=$GRADLE_USER_HOME:$GRADLE_HOME/bin:$PATH
配置国内镜像源
为了加快依赖下载速度,配置国内镜像源是非常有效的方法。推荐全局配置,这是最便捷的方法,一次配置对所有项目生效。
- 自定义
Gradle User Home目录的位置。如果未特殊指定,默认是用户主目录下的.gradle文件夹(例如,在Windows上通常是C:\Users\用户名.gradle,在Linux和Mac上通常是~/.gradle)。 - 在该目录下,创建或修改
init.gradle文件。 - 将以下脚本内容写入init.gradle文件中,它可以自动将构建过程中的仓库请求重定向到国内镜像站:
allprojects {repositories {def ALIYUN_REPOSITORY_URL = 'https://maven.aliyun.com/repository/public'def ALIYUN_JCENTER_URL = 'https://maven.aliyun.com/repository/jcenter'def ALIYUN_GOOGLE_URL = 'https://maven.aliyun.com/repository/google'def ALIYUN_GRADLE_PLUGIN_URL = 'https://maven.aliyun.com/repository/gradle-plugin'all { ArtifactRepository repo ->if (repo instanceof MavenArtifactRepository) {def url = repo.url.toString()if (url.startsWith('https://repo1.maven.org/maven2/')) {project.logger.lifecycle "Repository ${repo.url} replaced by ${ALIYUN_REPOSITORY_URL}."remove repo}if (url.startsWith('https://jcenter.bintray.com/')) {project.logger.lifecycle "Repository ${repo.url} replaced by ${ALIYUN_JCENTER_URL}."remove repo}if (url.startsWith('https://dl.google.com/dl/android/maven2/')) {project.logger.lifecycle "Repository ${repo.url} replaced by ${ALIYUN_GOOGLE_URL}."remove repo}if (url.startsWith('https://plugins.gradle.org/m2/')) {project.logger.lifecycle "Repository ${repo.url} replaced by ${ALIYUN_GRADLE_PLUGIN_URL}."remove repo}}}maven { url ALIYUN_REPOSITORY_URL }maven { url ALIYUN_JCENTER_URL }maven { url ALIYUN_GOOGLE_URL }maven { url ALIYUN_GRADLE_PLUGIN_URL }}
}
请注意:JCenter仓库已停止服务,但部分旧项目可能仍会引用,上述脚本包含了对其的替换,新项目可酌情处理。
使用示例
Gradle命令使用
安装完成Gradle之后,我们就可以开始正式进行学习了,首先我们还是来尝试创建一个Gradle项目。
- 创建项目文件夹
选择目录,创建项目根目录文件夹。
mkdir gradle-demo
进入项目根目录,执行:
@MacBook-Pro-yaco gradle % cd gradle-demo
@MacBook-Pro-yaco gradle-demo % gradle initWelcome to Gradle 8.14.3!Here are the highlights of this release:- Java 24 support- GraalVM Native Image toolchain selection- Enhancements to test reporting- Build Authoring improvementsFor more details see https://docs.gradle.org/8.14.3/release-notes.htmlStarting a Gradle Daemon (subsequent builds will be faster)Select type of build to generate:1: Application2: Library3: Gradle plugin4: Basic (build structure only)
Enter selection (default: Application) [1..4] 1Select implementation language:1: Java2: Kotlin3: Groovy4: Scala5: C++6: Swift
Enter selection (default: Java) [1..6] 1Enter target Java version (min: 7, default: 21): 17Project name (default: gradle-demo): Select application structure:1: Single application project2: Application and library project
Enter selection (default: Single application project) [1..2] 1Select build script DSL:1: Kotlin2: Groovy
Enter selection (default: Kotlin) [1..2] 1Select test framework:1: JUnit 42: TestNG3: Spock4: JUnit Jupiter
Enter selection (default: JUnit Jupiter) [1..4] Generate build using new APIs and behavior (some features may change in the next minor release)? (default: no) [yes, no]   > Task :init
Learn more about Gradle by exploring our Samples at https://docs.gradle.org/8.14.3/samples/sample_building_java_applications.html[Incubating] Problems report is available at: file:///Users/luyou/opt/gradle/gradle-demo/build/reports/problems/problems-report.htmlDeprecated Gradle features were used in this build, making it incompatible with Gradle 9.0.You can use '--warning-mode all' to show the individual deprecation warnings and determine if they come from your own scripts or plugins.For more on this, please refer to https://docs.gradle.org/8.14.3/userguide/command_line_interface.html#sec:command_line_warnings in the Gradle documentation.BUILD SUCCESSFUL in 3m 15s
1 actionable task: 1 executed
查看创建成功的项目文件夹:
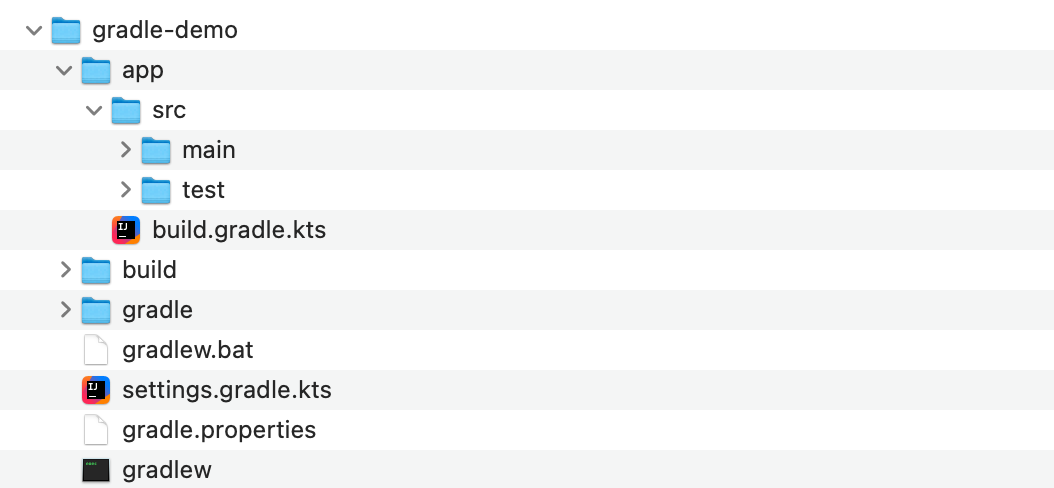
项目文件介绍:
.gradle:Gradle自动生成的项目缓存目录。app:存放整个项目的源代码、测试等,这里面就是我们写代码的地方了。build.gradle.kts:项目的gradle构建脚本。src:存放源代码和测试代码。main:编写所有项目核心代码。test:编写项目测试代码。
gradle:包含JAR文件和Gradle Wrapper的配置。gradlew:适用于macOS和Linux的使用Gradle Wrapper执行构建的脚本(这里的版本就是GradleWrapper指定的版本)gradlew.bat:适用于Windows的使用Gradle Wrapper执行构建的脚本。settings.gradle.kts:定义子项目列表的项目配置文件,也是最关键的设置文件。
运行测试:
@MacBook-Pro-yaco gradle-demo % ./gradlew task
Calculating task graph as no cached configuration is available for tasks: task> Task :tasks------------------------------------------------------------
Tasks runnable from root project 'gradle-demo'
------------------------------------------------------------Application tasks
-----------------
run - Runs this project as a JVM applicationBuild tasks
-----------
assemble - Assembles the outputs of this project.
build - Assembles and tests this project.
buildDependents - Assembles and tests this project and all projects that depend on it.
buildNeeded - Assembles and tests this project and all projects it depends on.
classes - Assembles main classes.
clean - Deletes the build directory.
jar - Assembles a jar archive containing the classes of the 'main' feature.
testClasses - Assembles test classes.Build Setup tasks
-----------------
init - Initializes a new Gradle build.
updateDaemonJvm - Generates or updates the Gradle Daemon JVM criteria.
wrapper - Generates Gradle wrapper files.Distribution tasks
------------------
assembleDist - Assembles the main distributions
distTar - Bundles the project as a distribution.
distZip - Bundles the project as a distribution.
installDist - Installs the project as a distribution as-is.Documentation tasks
-------------------
javadoc - Generates Javadoc API documentation for the 'main' feature.Help tasks
----------
artifactTransforms - Displays the Artifact Transforms that can be executed in root project 'gradle-demo'.
buildEnvironment - Displays all buildscript dependencies declared in root project 'gradle-demo'.
dependencies - Displays all dependencies declared in root project 'gradle-demo'.
dependencyInsight - Displays the insight into a specific dependency in root project 'gradle-demo'.
help - Displays a help message.
javaToolchains - Displays the detected java toolchains.
kotlinDslAccessorsReport - Prints the Kotlin code for accessing the currently available project extensions and conventions.
outgoingVariants - Displays the outgoing variants of root project 'gradle-demo'.
projects - Displays the sub-projects of root project 'gradle-demo'.
properties - Displays the properties of root project 'gradle-demo'.
resolvableConfigurations - Displays the configurations that can be resolved in root project 'gradle-demo'.
tasks - Displays the tasks runnable from root project 'gradle-demo' (some of the displayed tasks may belong to subprojects).Verification tasks
------------------
check - Runs all checks.
test - Runs the test suite.To see all tasks and more detail, run gradlew tasks --allTo see more detail about a task, run gradlew help --task <task>[Incubating] Problems report is available at: file:///Users/luyou/opt/gradle/gradle-demo/build/reports/problems/problems-report.htmlDeprecated Gradle features were used in this build, making it incompatible with Gradle 9.0.You can use '--warning-mode all' to show the individual deprecation warnings and determine if they come from your own scripts or plugins.For more on this, please refer to https://docs.gradle.org/8.14.3/userguide/command_line_interface.html#sec:command_line_warnings in the Gradle documentation.BUILD SUCCESSFUL in 42s
1 actionable task: 1 executed
Configuration cache entry stored.
## 运行项目
@MacBook-Pro-yaco gradle-demo % ./gradlew run
Calculating task graph as no cached configuration is available for tasks: run> Task :app:run
Hello World![Incubating] Problems report is available at: file:///Users/luyou/opt/gradle/gradle-demo/build/reports/problems/problems-report.htmlDeprecated Gradle features were used in this build, making it incompatible with Gradle 9.0.You can use '--warning-mode all' to show the individual deprecation warnings and determine if they come from your own scripts or plugins.For more on this, please refer to https://docs.gradle.org/8.14.3/userguide/command_line_interface.html#sec:command_line_warnings in the Gradle documentation.BUILD SUCCESSFUL in 20s
2 actionable tasks: 2 executed
Configuration cache entry stored.
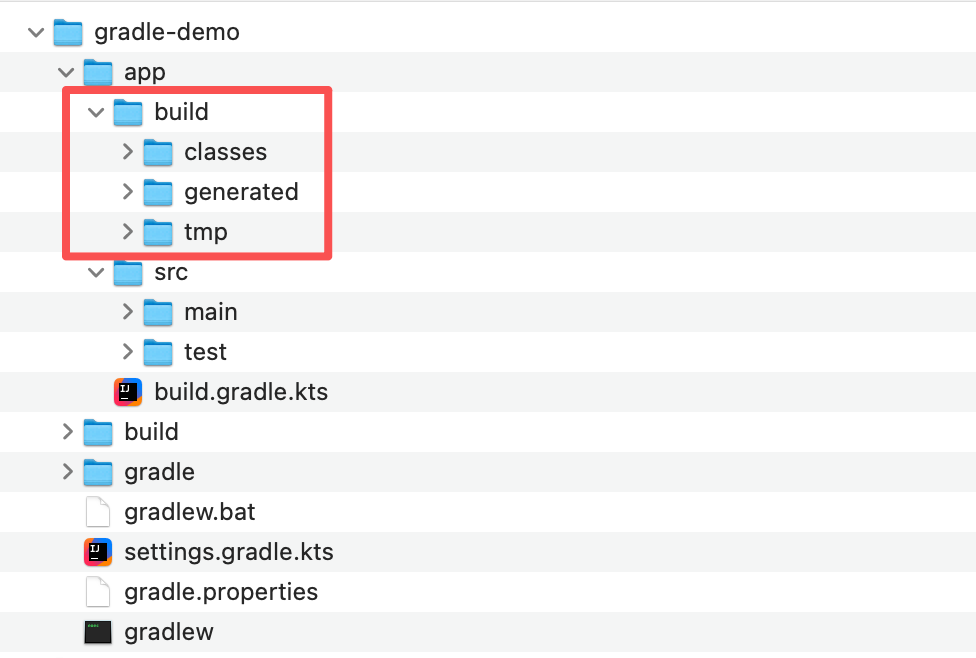
此时在app目录下会生成一个新的build目录,此目录中存放的就是编译之后的相关文件。
IntelliJ IDEA设置
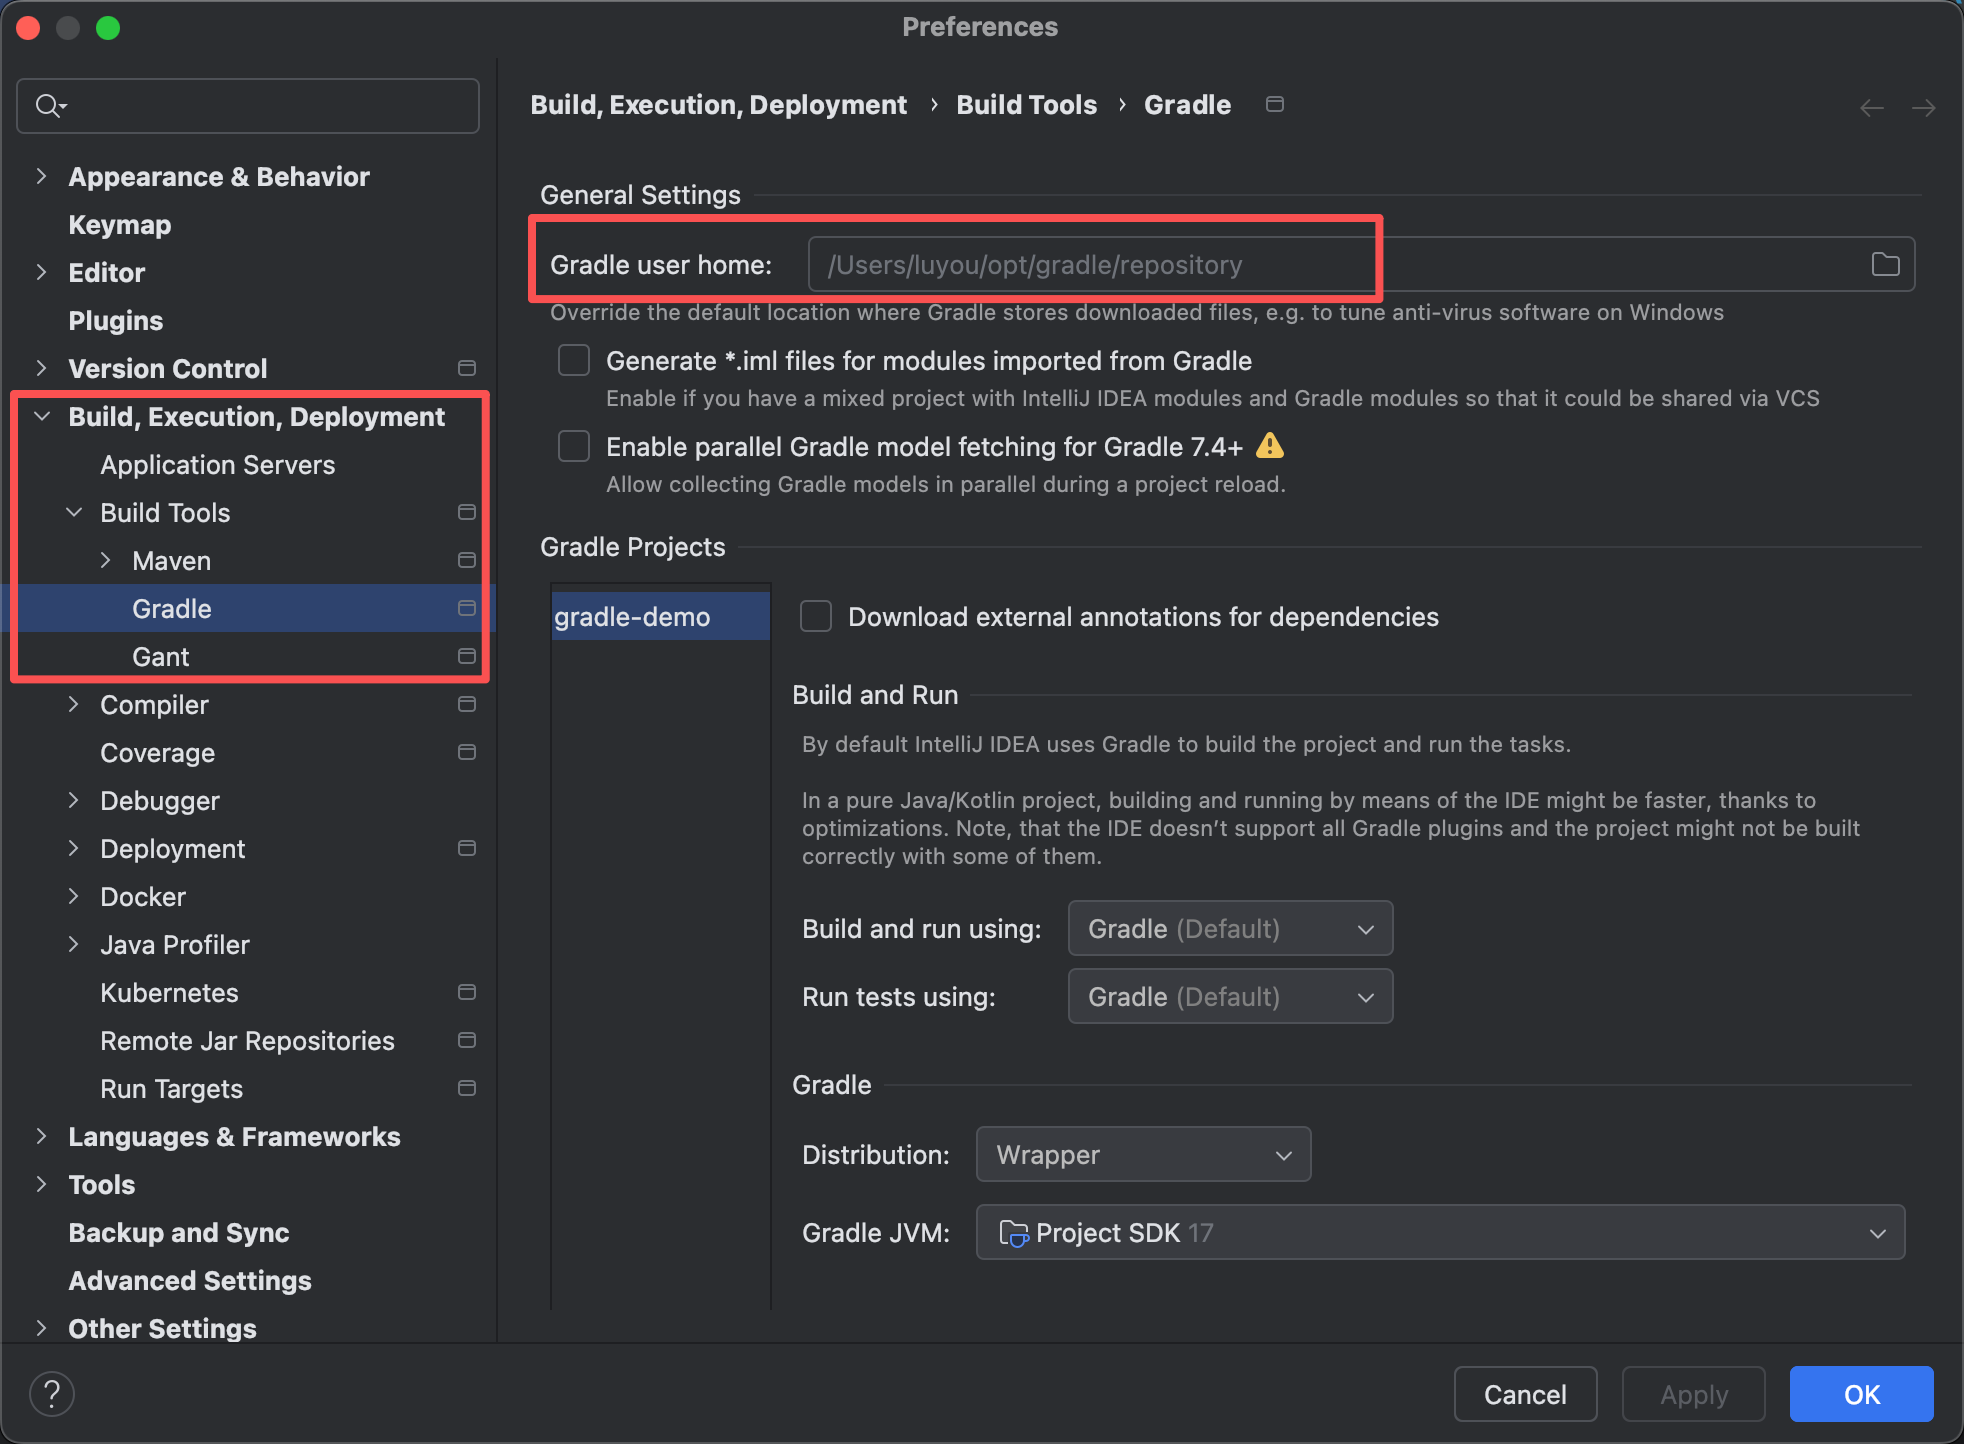
- 进入
IntelliJ IDEA>Preferences(macOS)。
导航到 Build, Execution, Deployment > Build Tools > Gradle。
在"Gradle user home"字段中,输入您希望用作Gradle用户主目录的自定义路径。
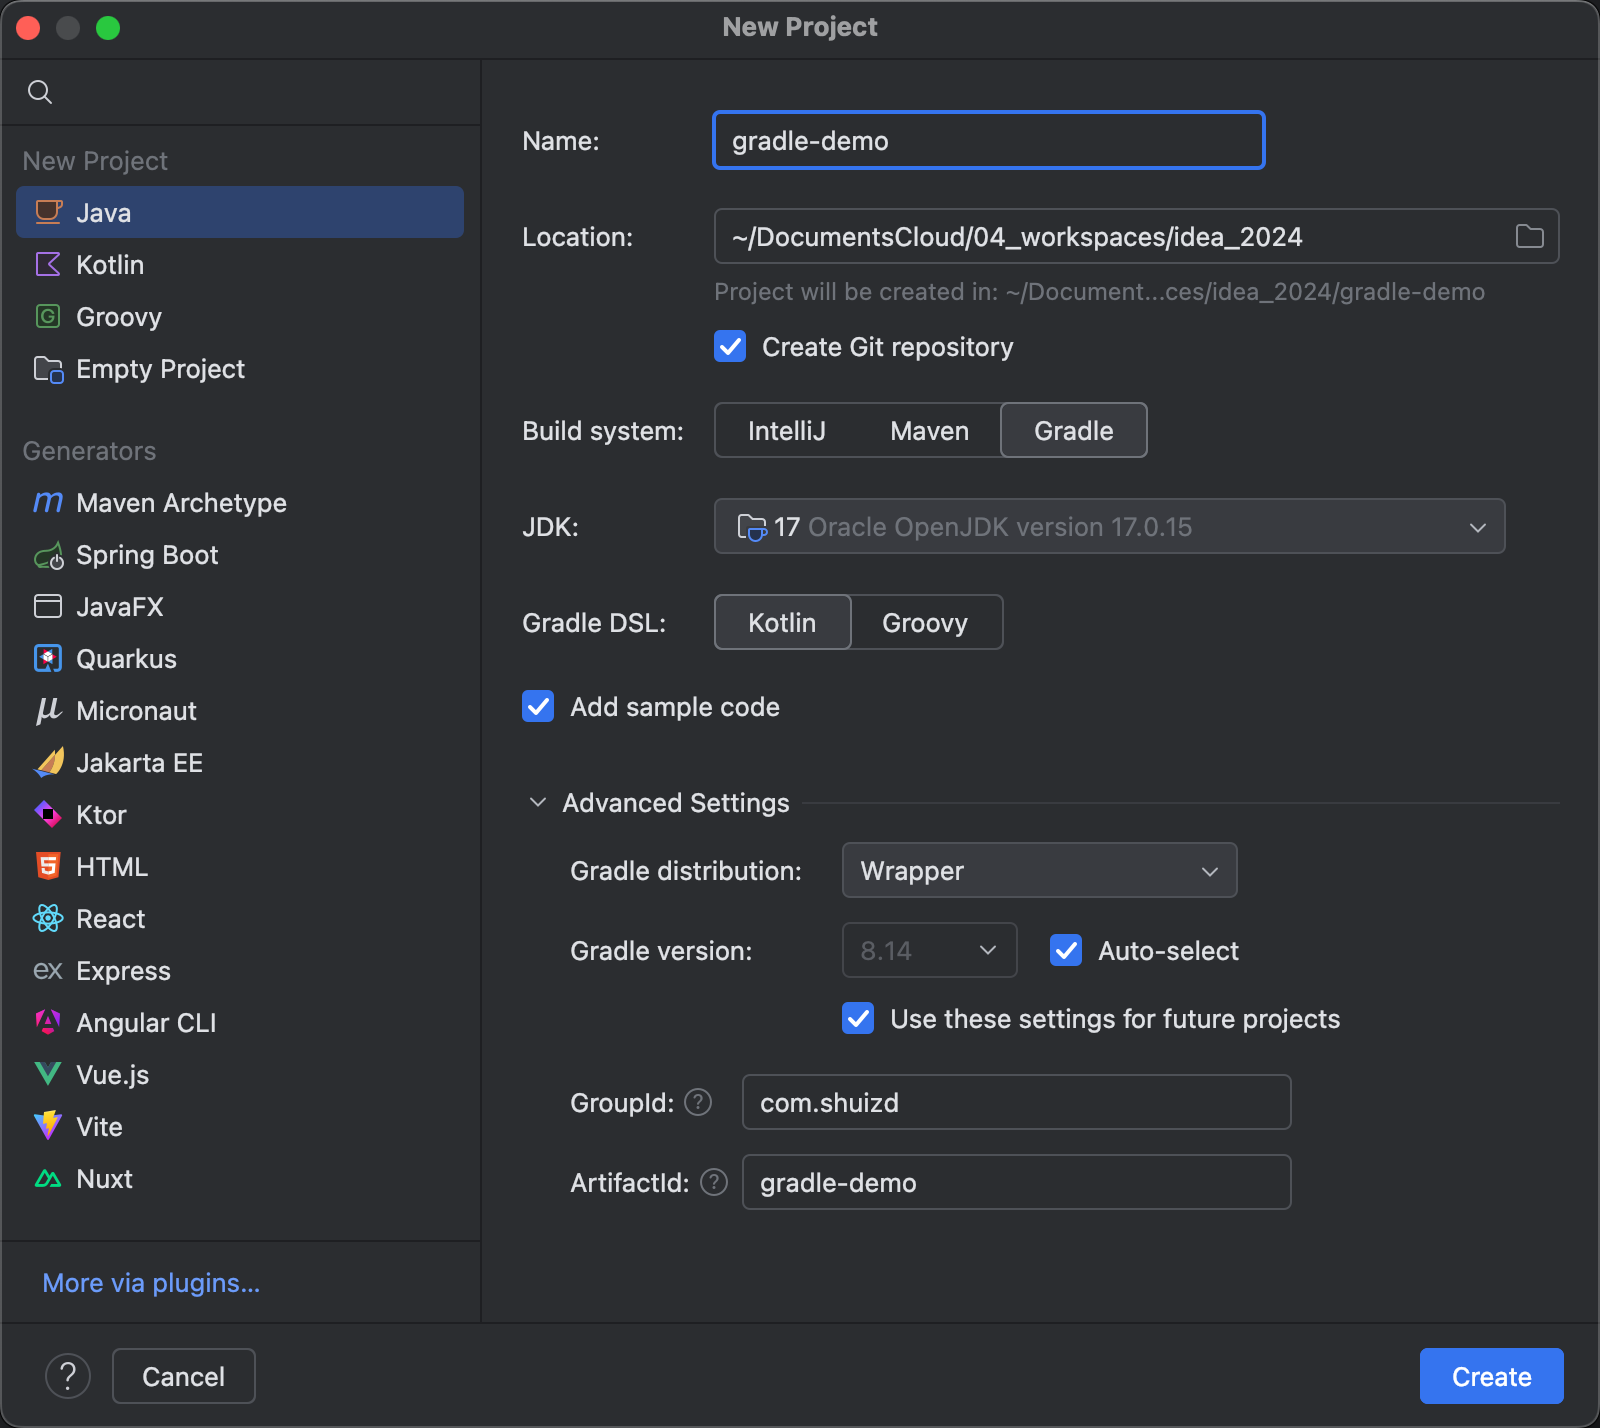
单模块项目
下面介绍使用IDEA创建单模块项目。
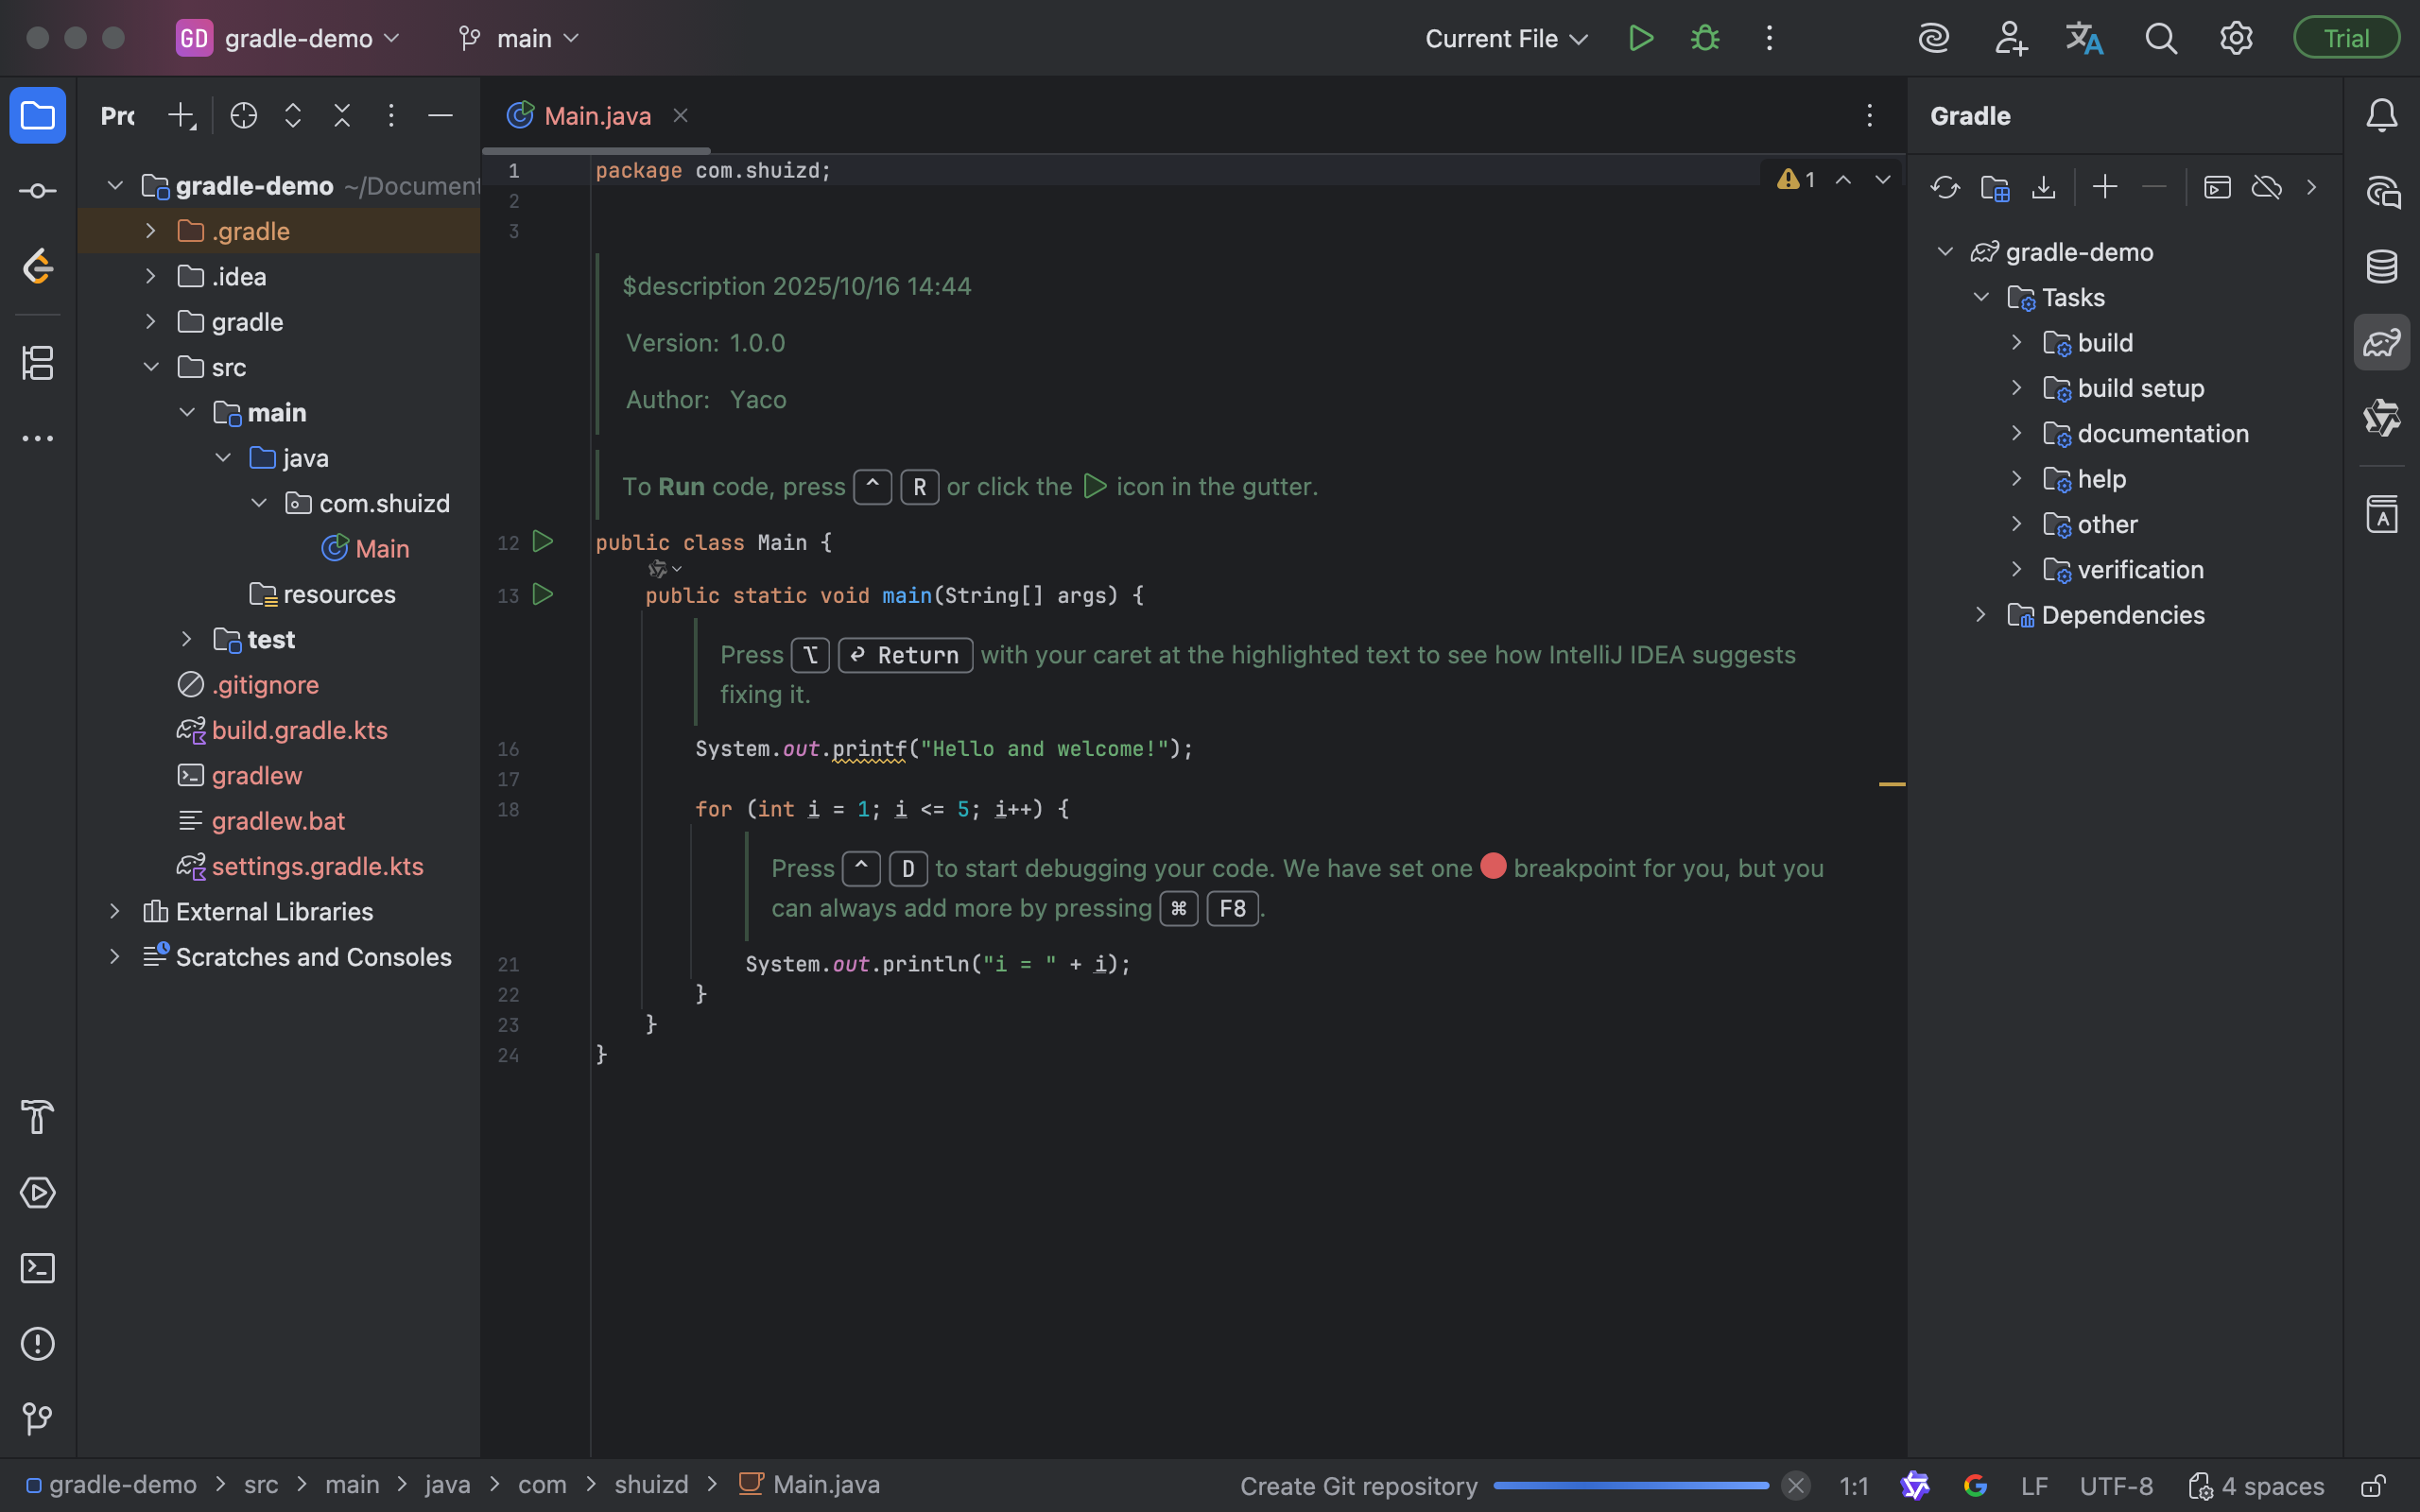
创建后的文件,源码文件和使用Gradle命令稍有区别。如图:
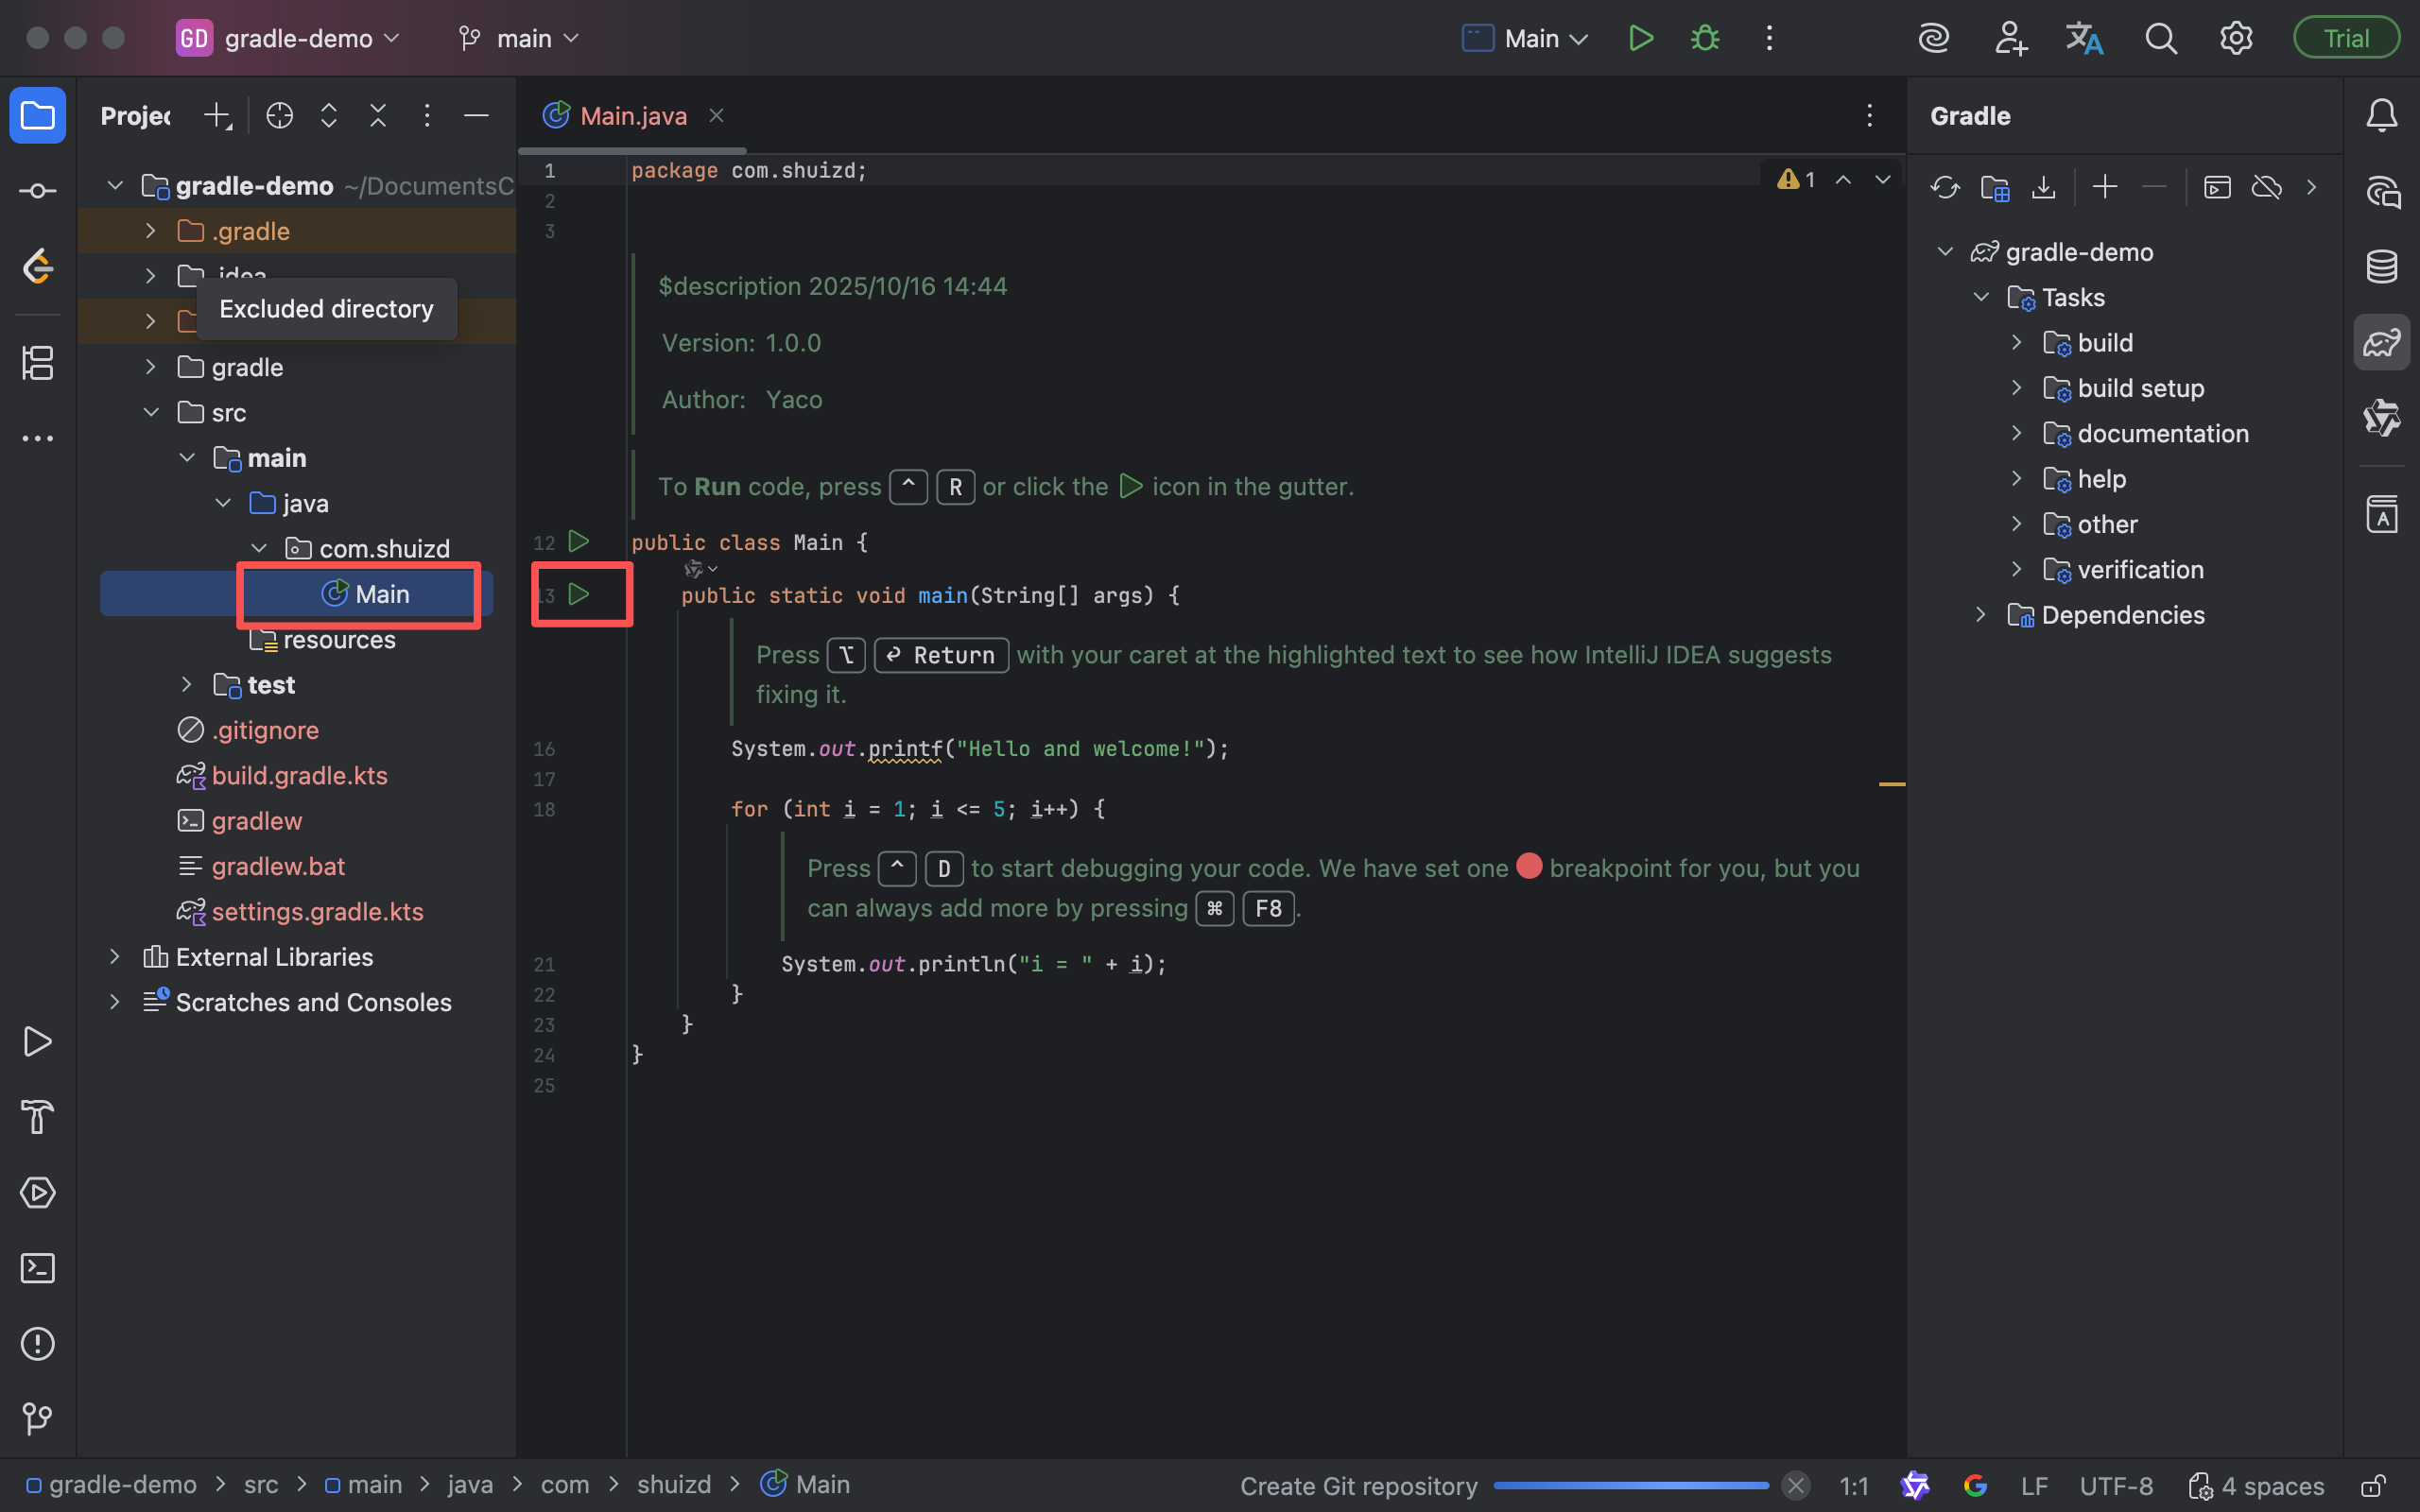
执行Main.main();如图:
结果:
14:50:58: Executing ':com.shuizd.Main.main()'…> Task :compileJava
> Task :processResources NO-SOURCE
> Task :classes> Task :com.shuizd.Main.main()
Hello and welcome!i = 1
i = 2
i = 3
i = 4
i = 5BUILD SUCCESSFUL in 6s
2 actionable tasks: 2 executed
14:51:05: Execution finished ':com.shuizd.Main.main()'.
多模块项目
要创建一个多模块项目gradle-multi-module,先使用IDEA创建一个简单的Gradle项目。删除不需要的内容,比如:src目录、build.gradle.kts文件等。
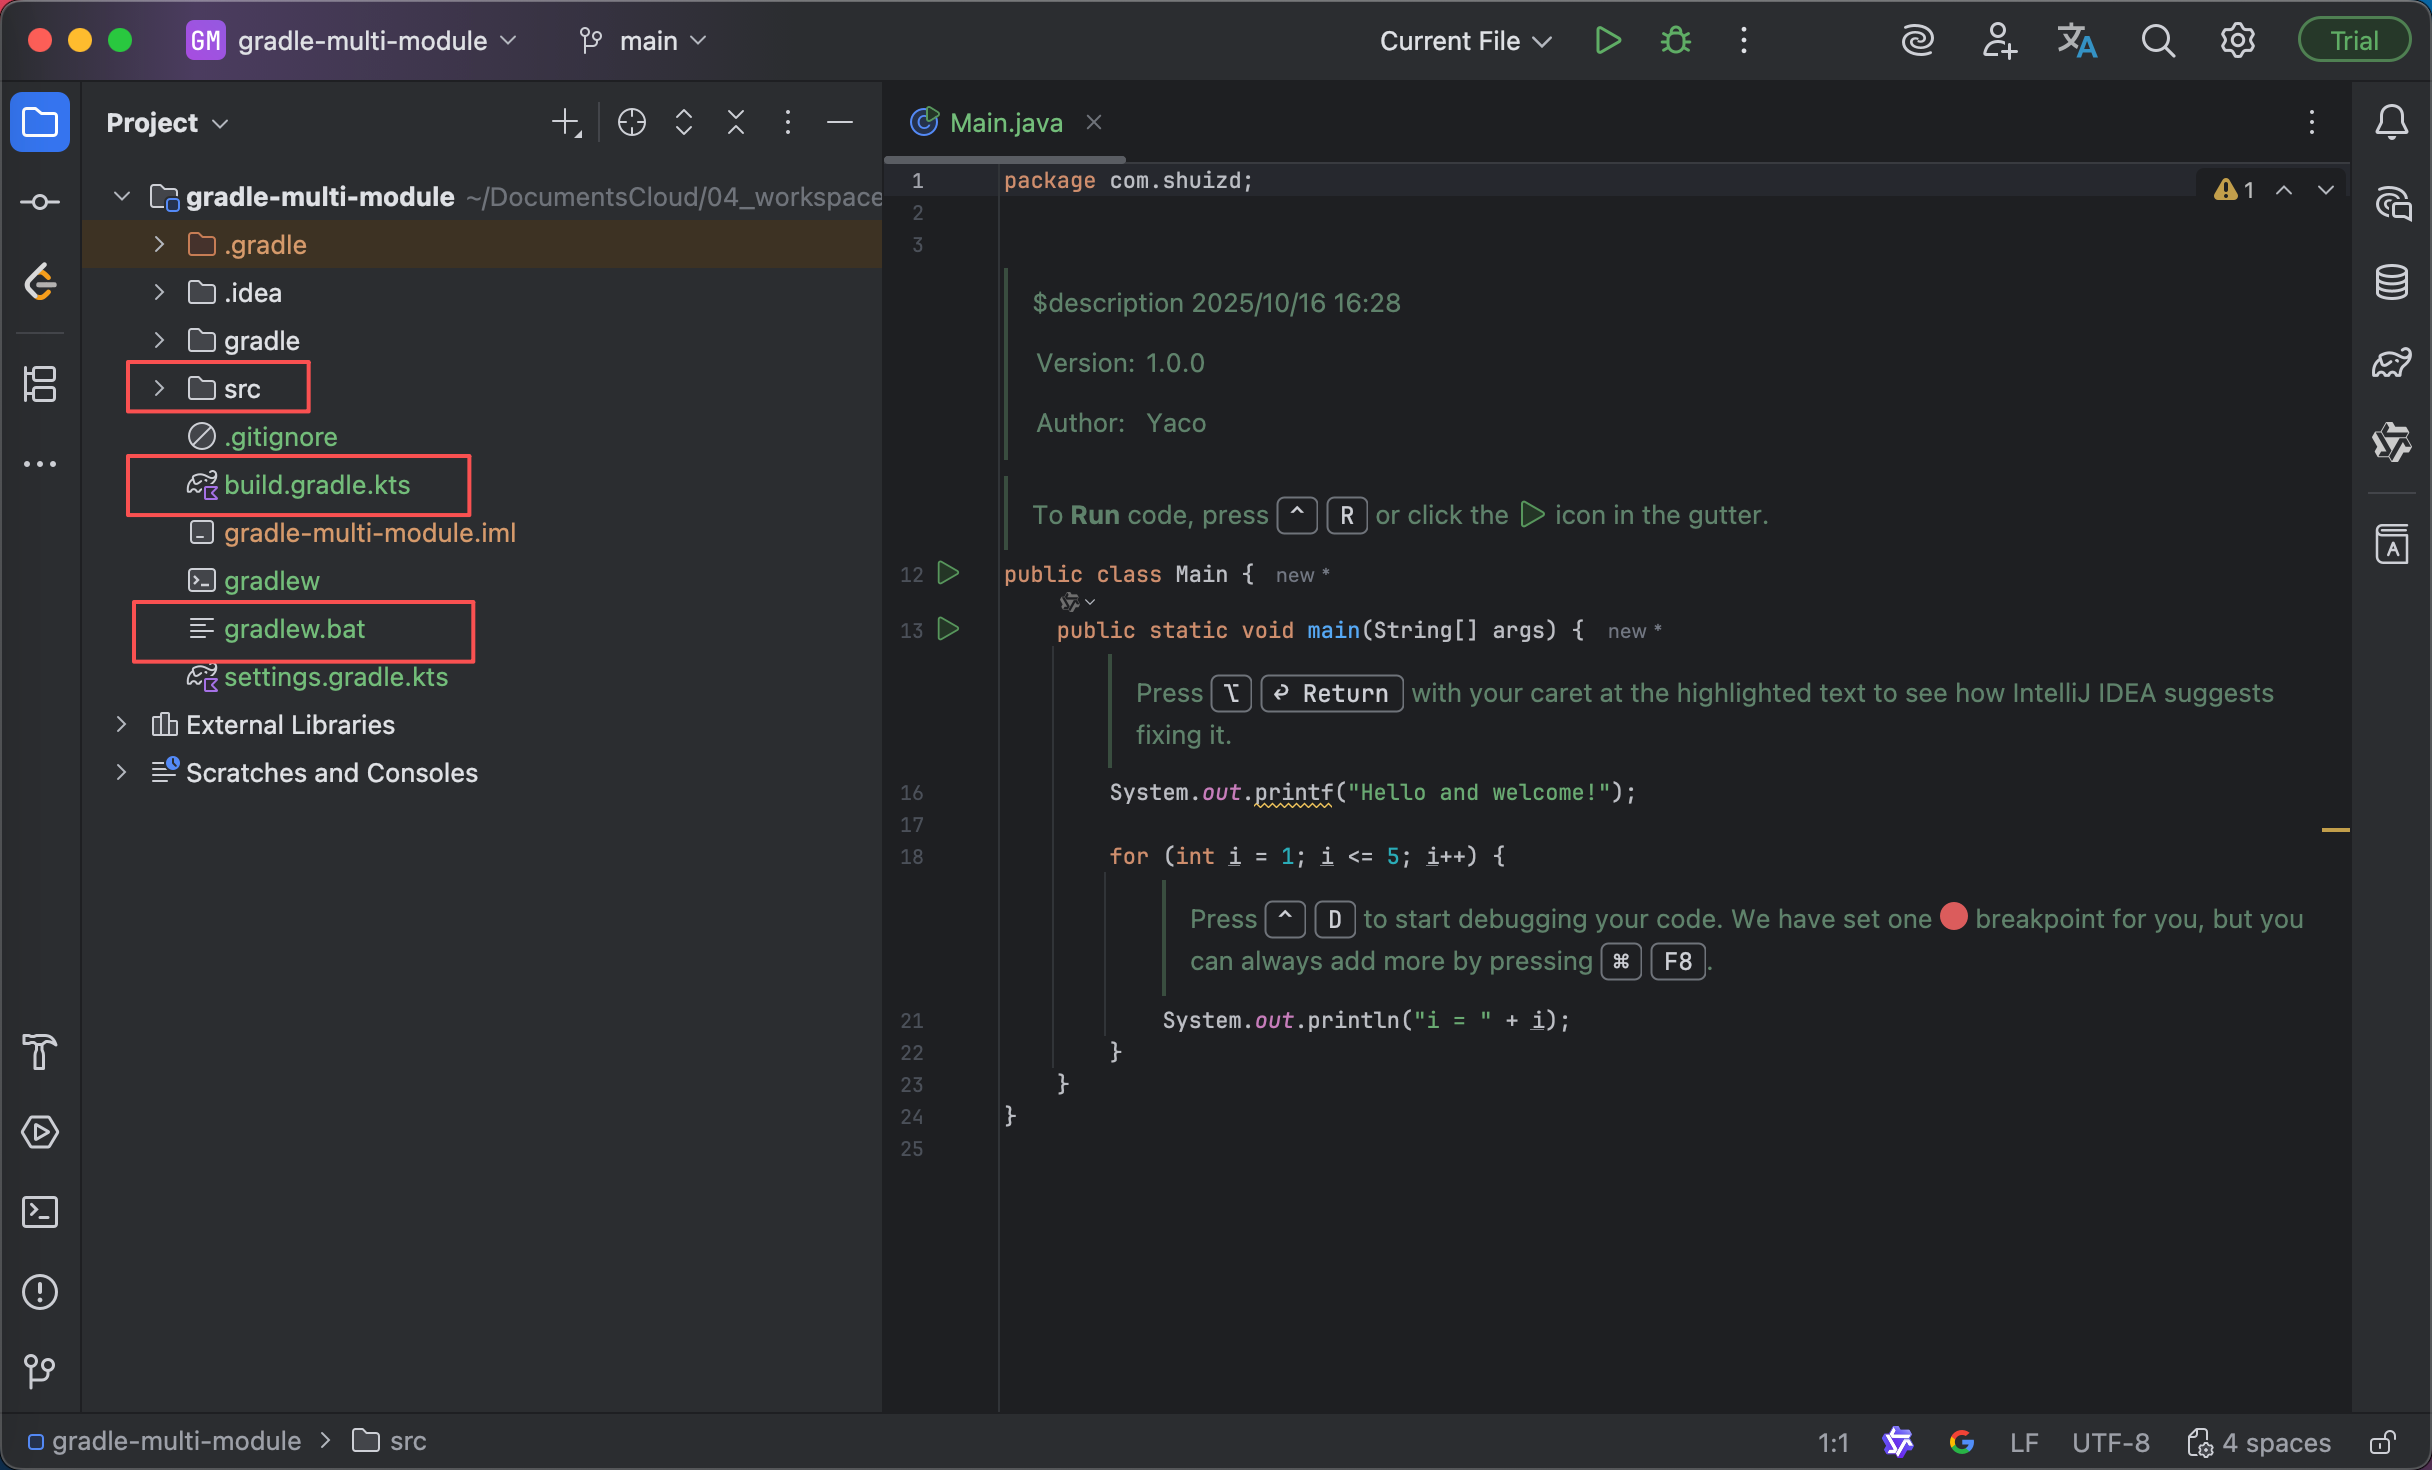
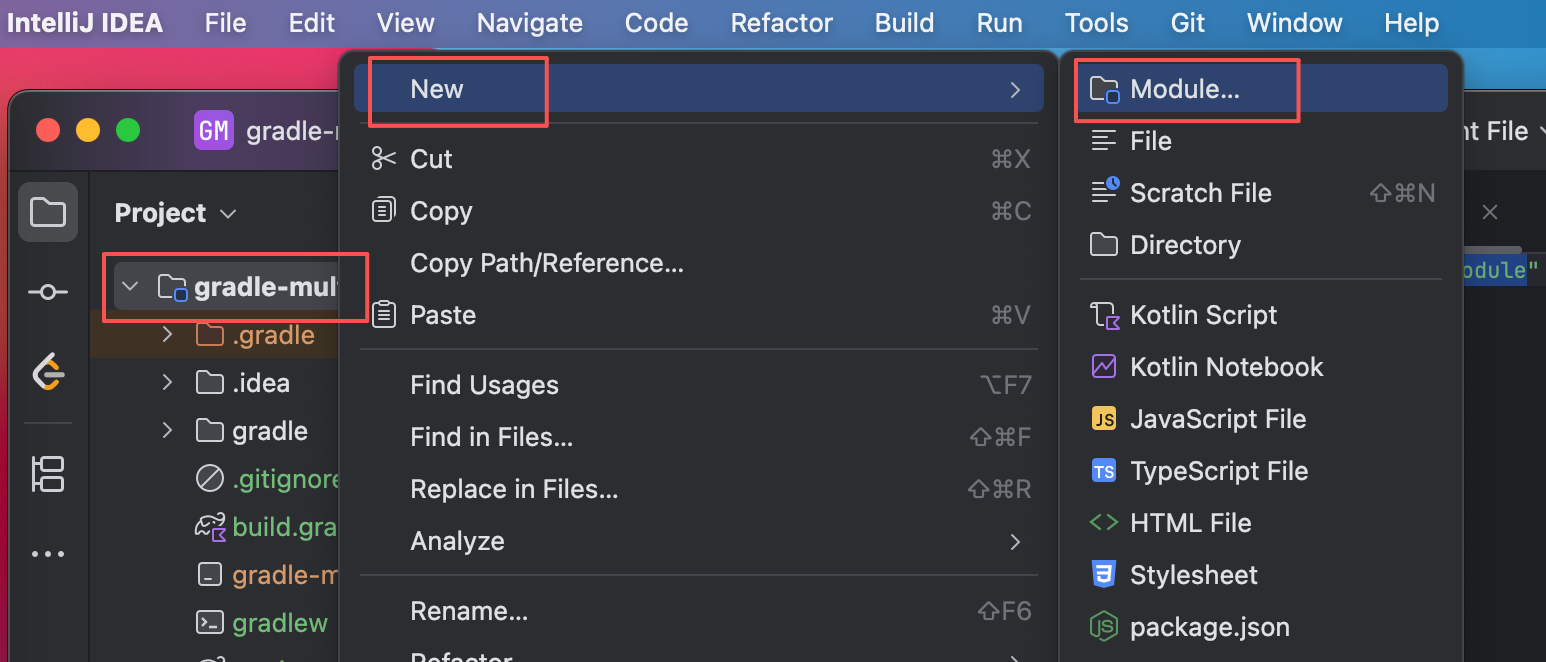
右键gradle-multi-module,创建一个子项目。
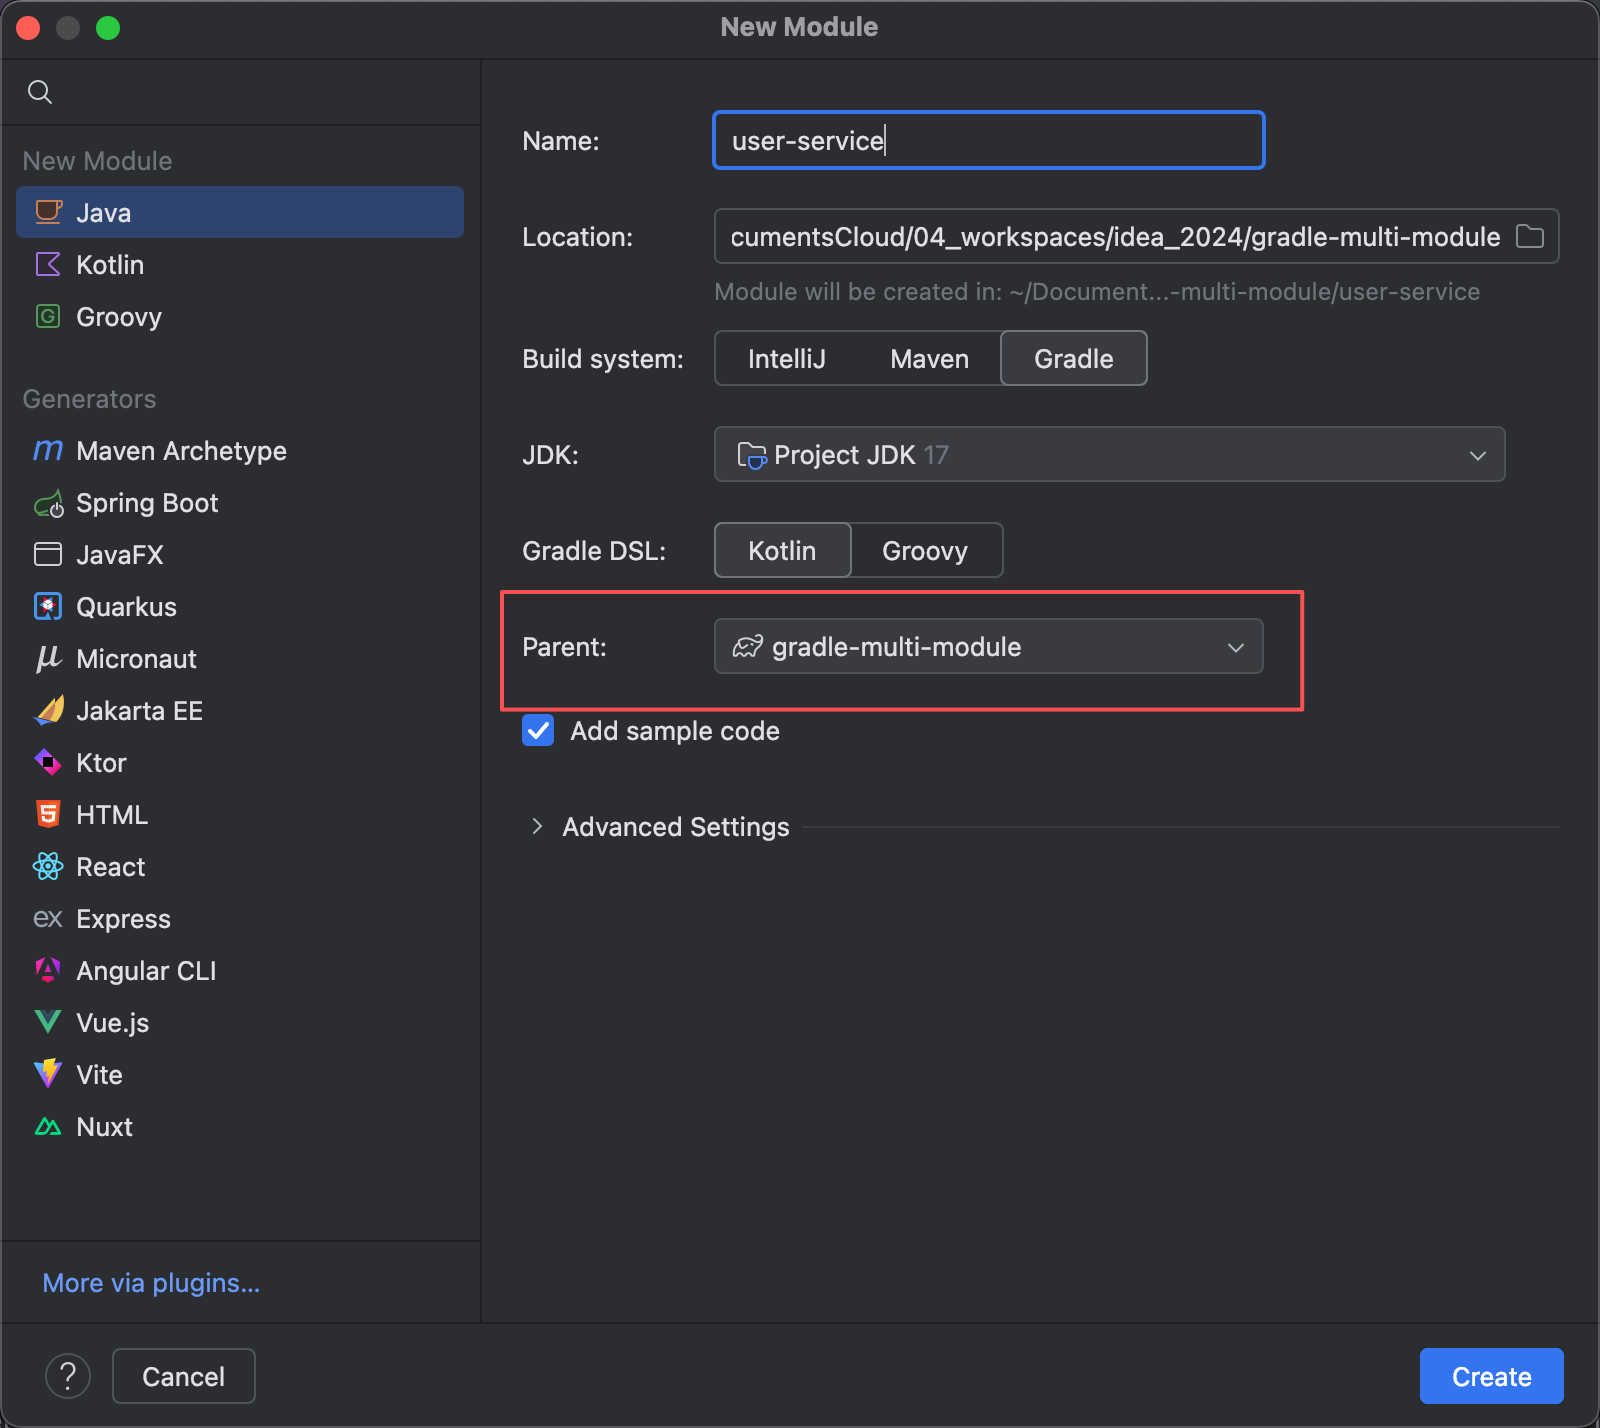
此时默认选择gradle-multi-module为我们的父项目。
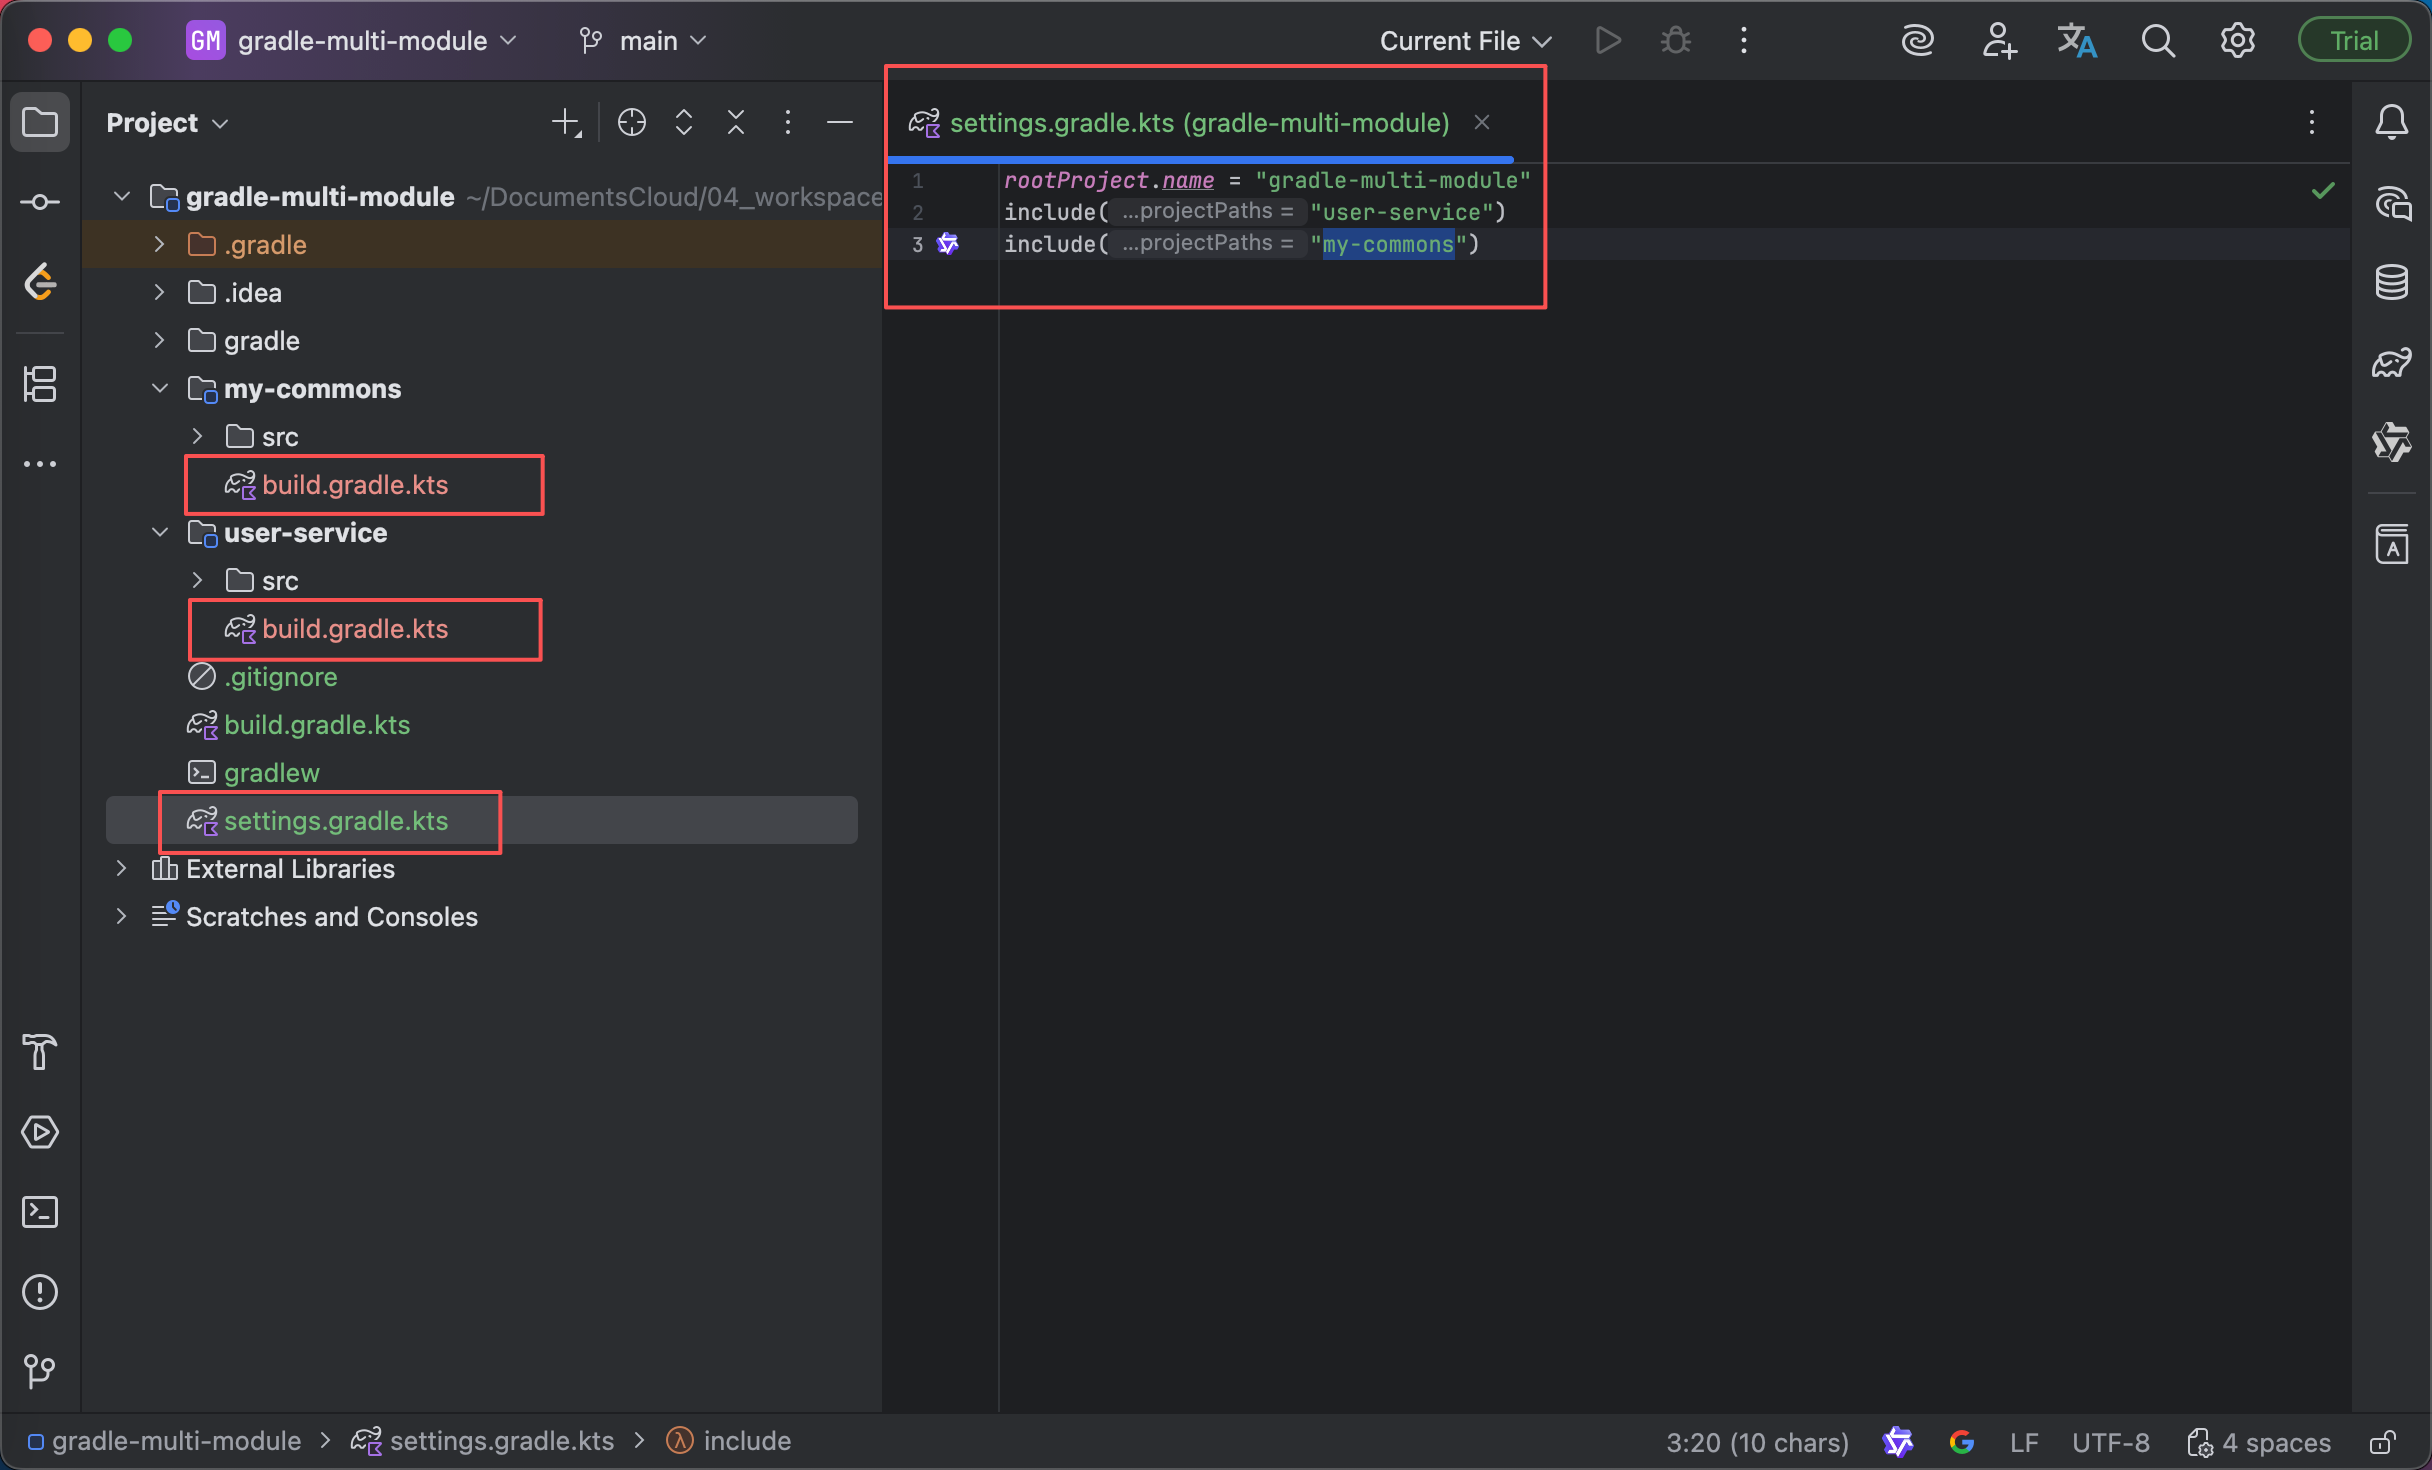
创建完成后打开父项目的settings.gradle.kts文件,IDEA已经自动为我们添加了模块引入:
rootProject.name = "gradle-multi-module"
include("user-service")
再创建一个子项目my-commons:
配置项目之间的依赖,我们只需在子项目中的build.gradle.kts 中进行配置:
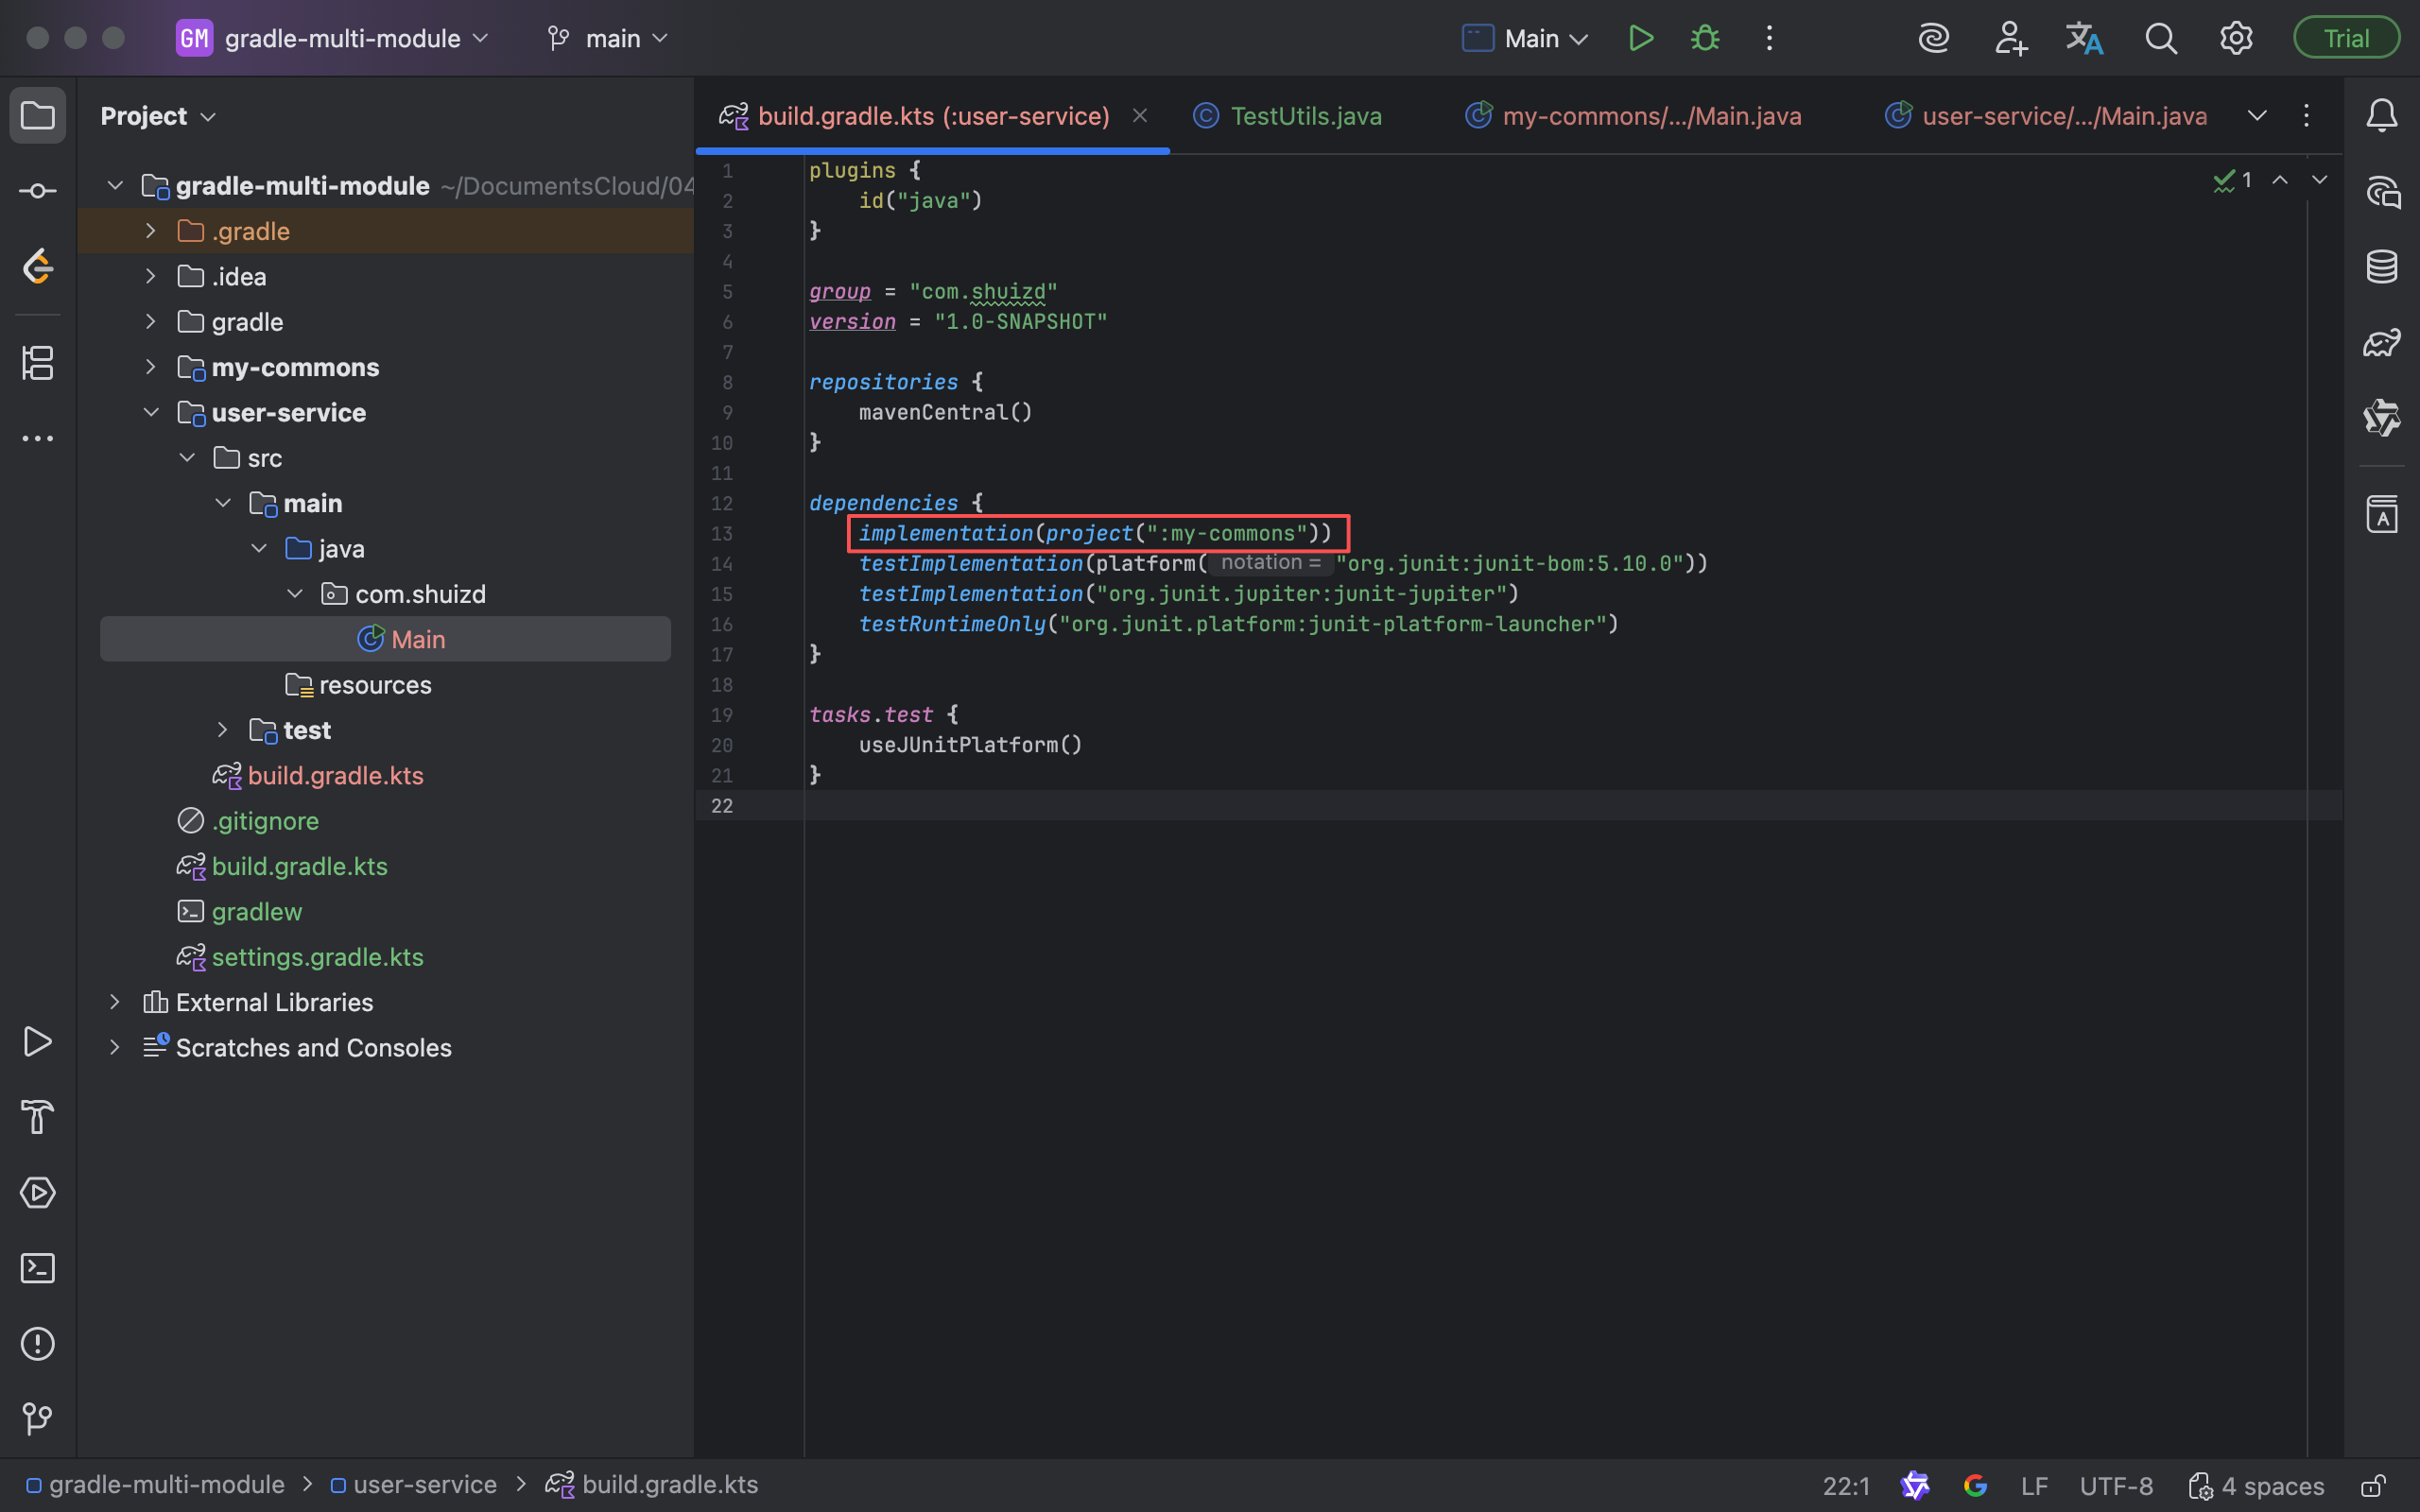
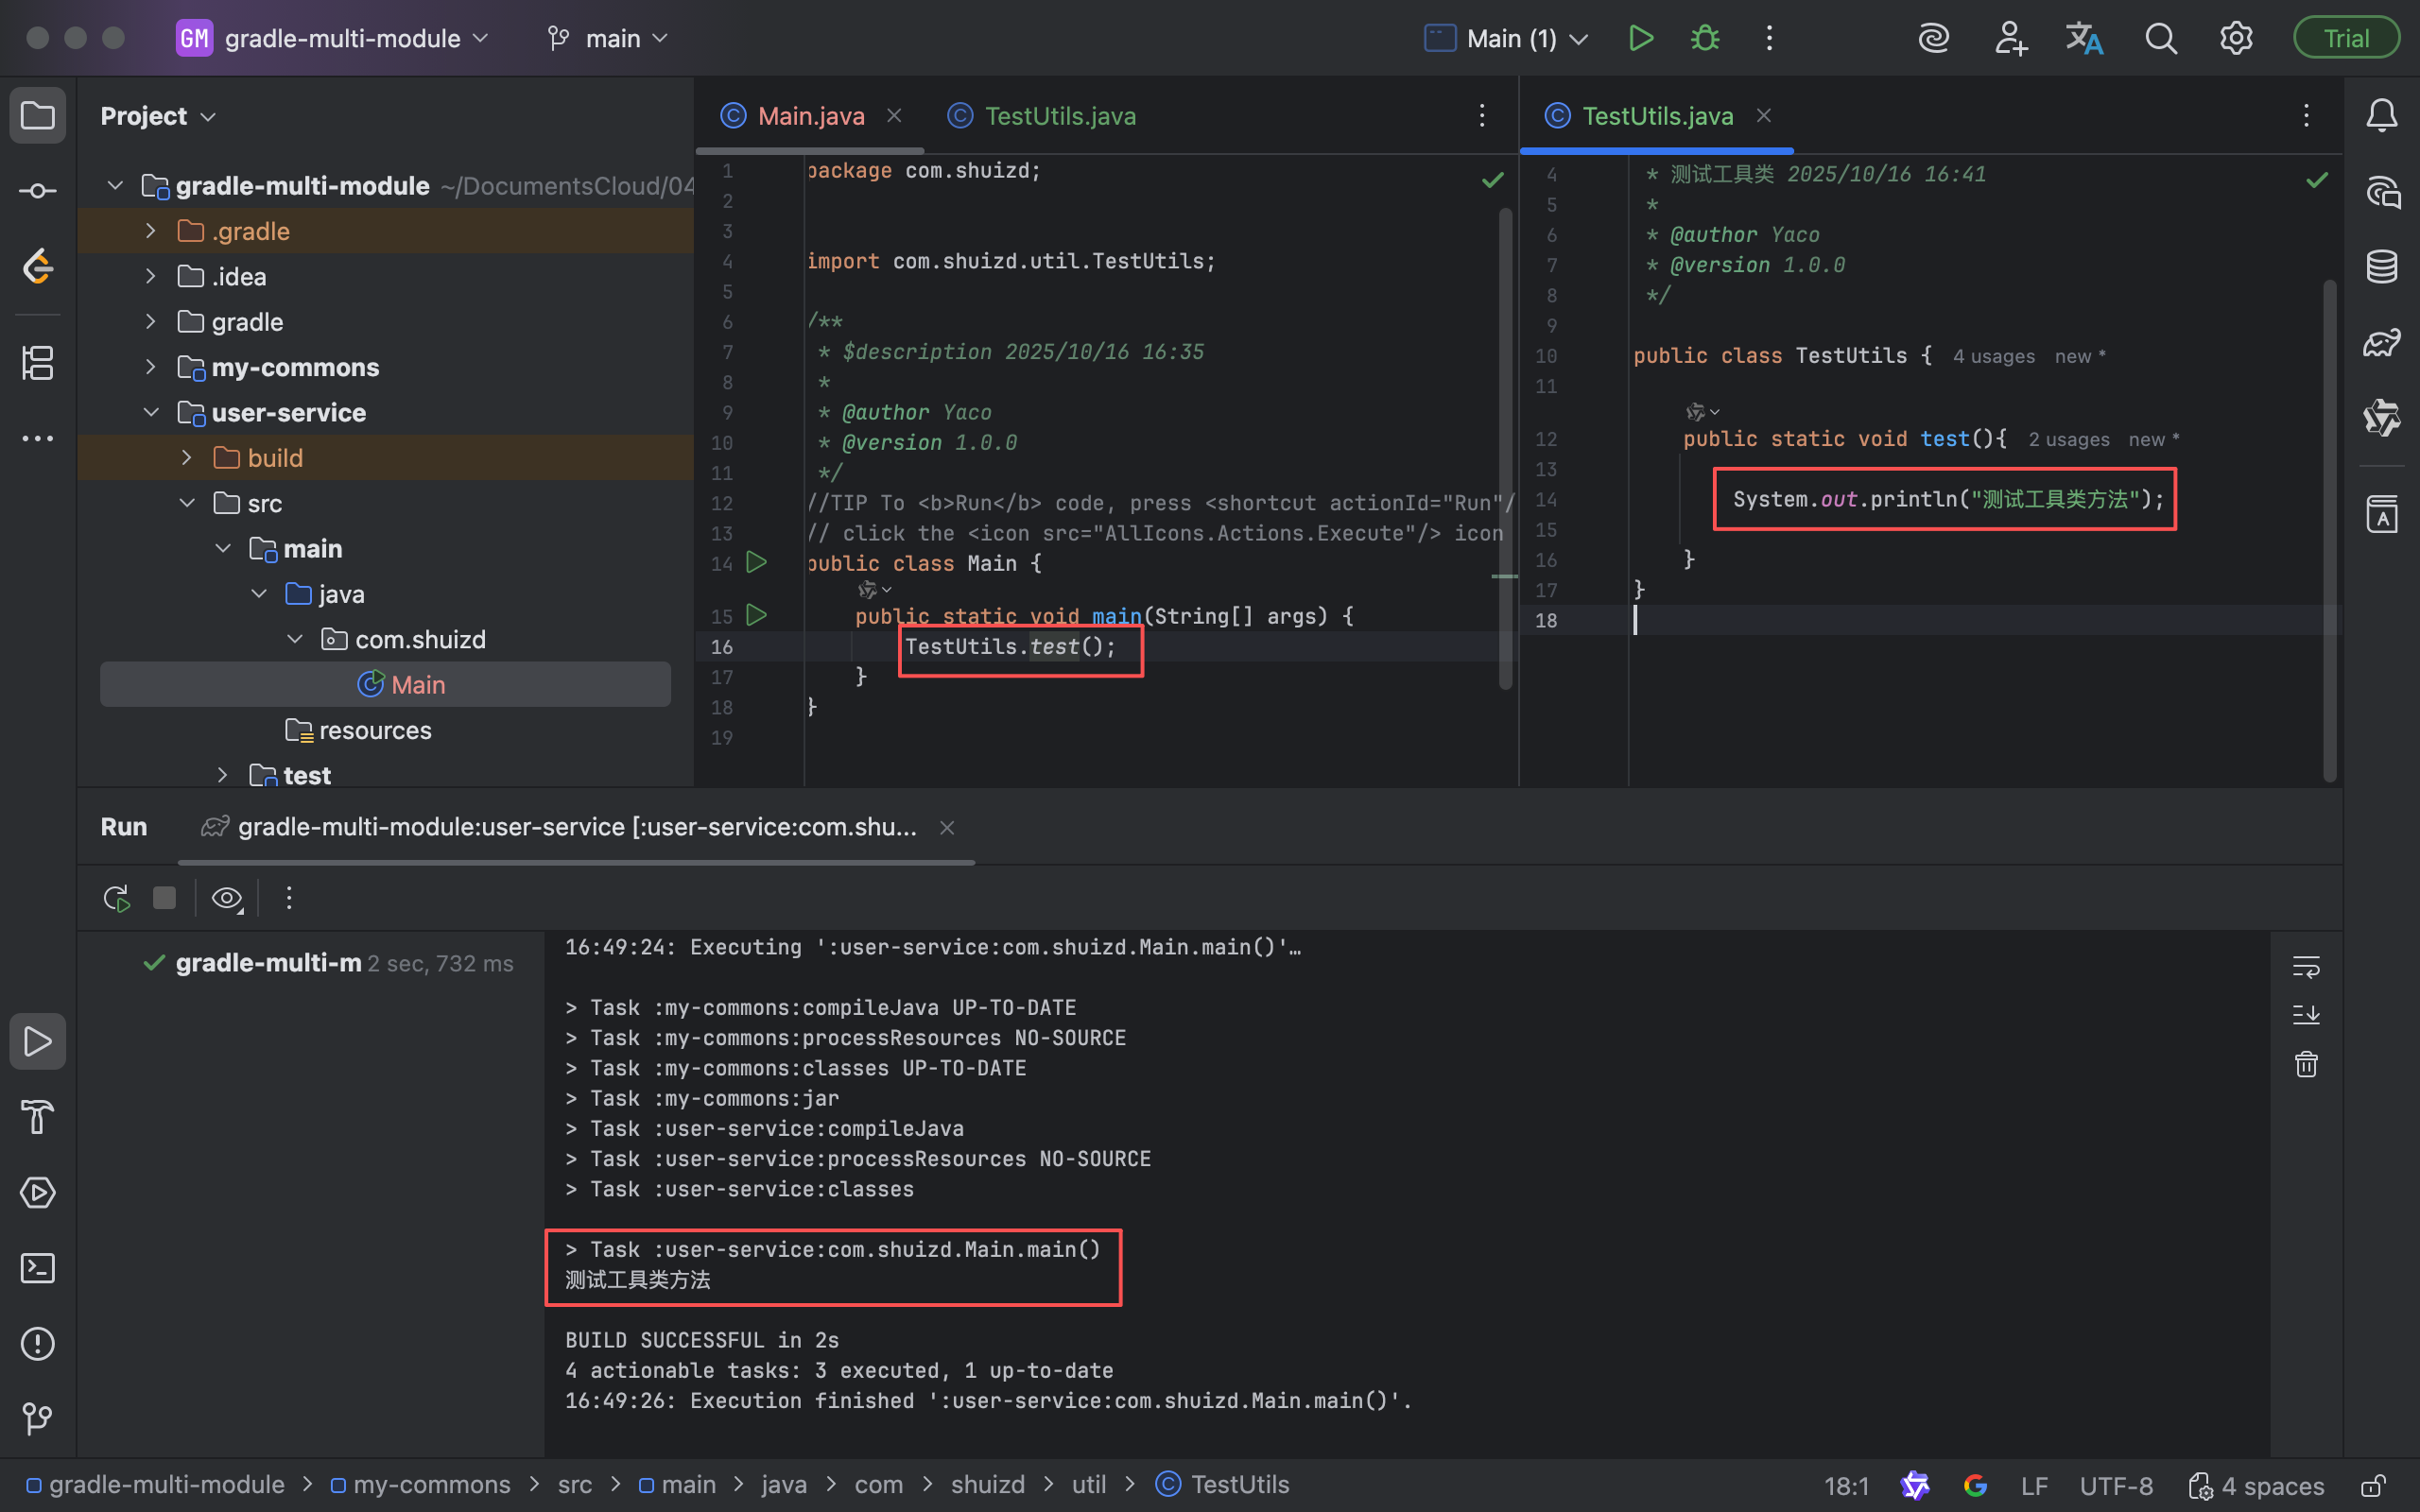
在user-service项目中添加测试代码,调用my-commons中的方法。
依赖传递性:
假设有服务A、B、C,A依赖B,B依赖C。
- 在Maven中,A可以直接使用C,依赖具有传递性。
- 在Gradle中:
- 使用
implementation(project(":my-commons"))导入方式不具备传递性,A无法使用C;- 使用
java-library插件api(project(":my-commons"))导入方式具备传递性,A可以使用C;
Springboot项目
通过IDEA创建springboot项目,非常便捷。
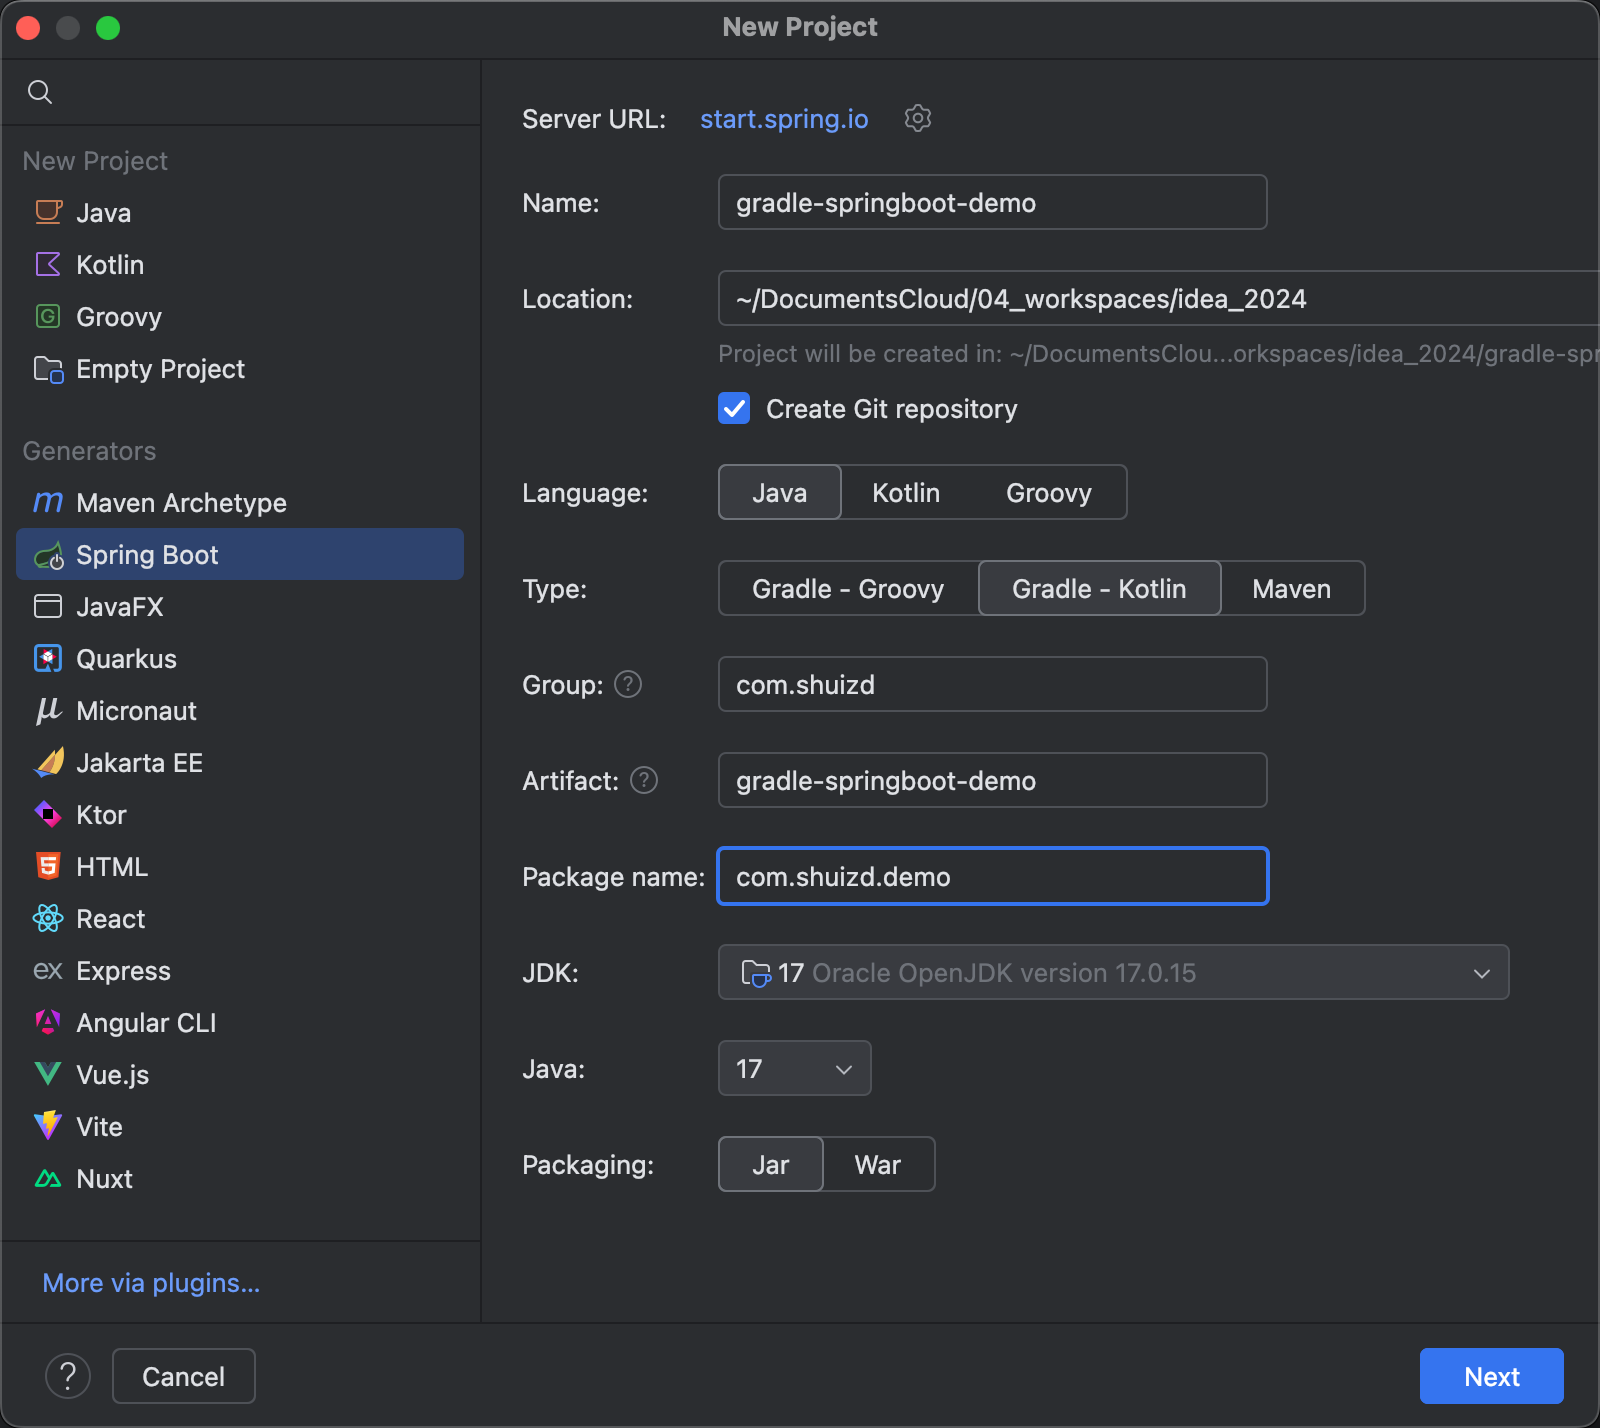
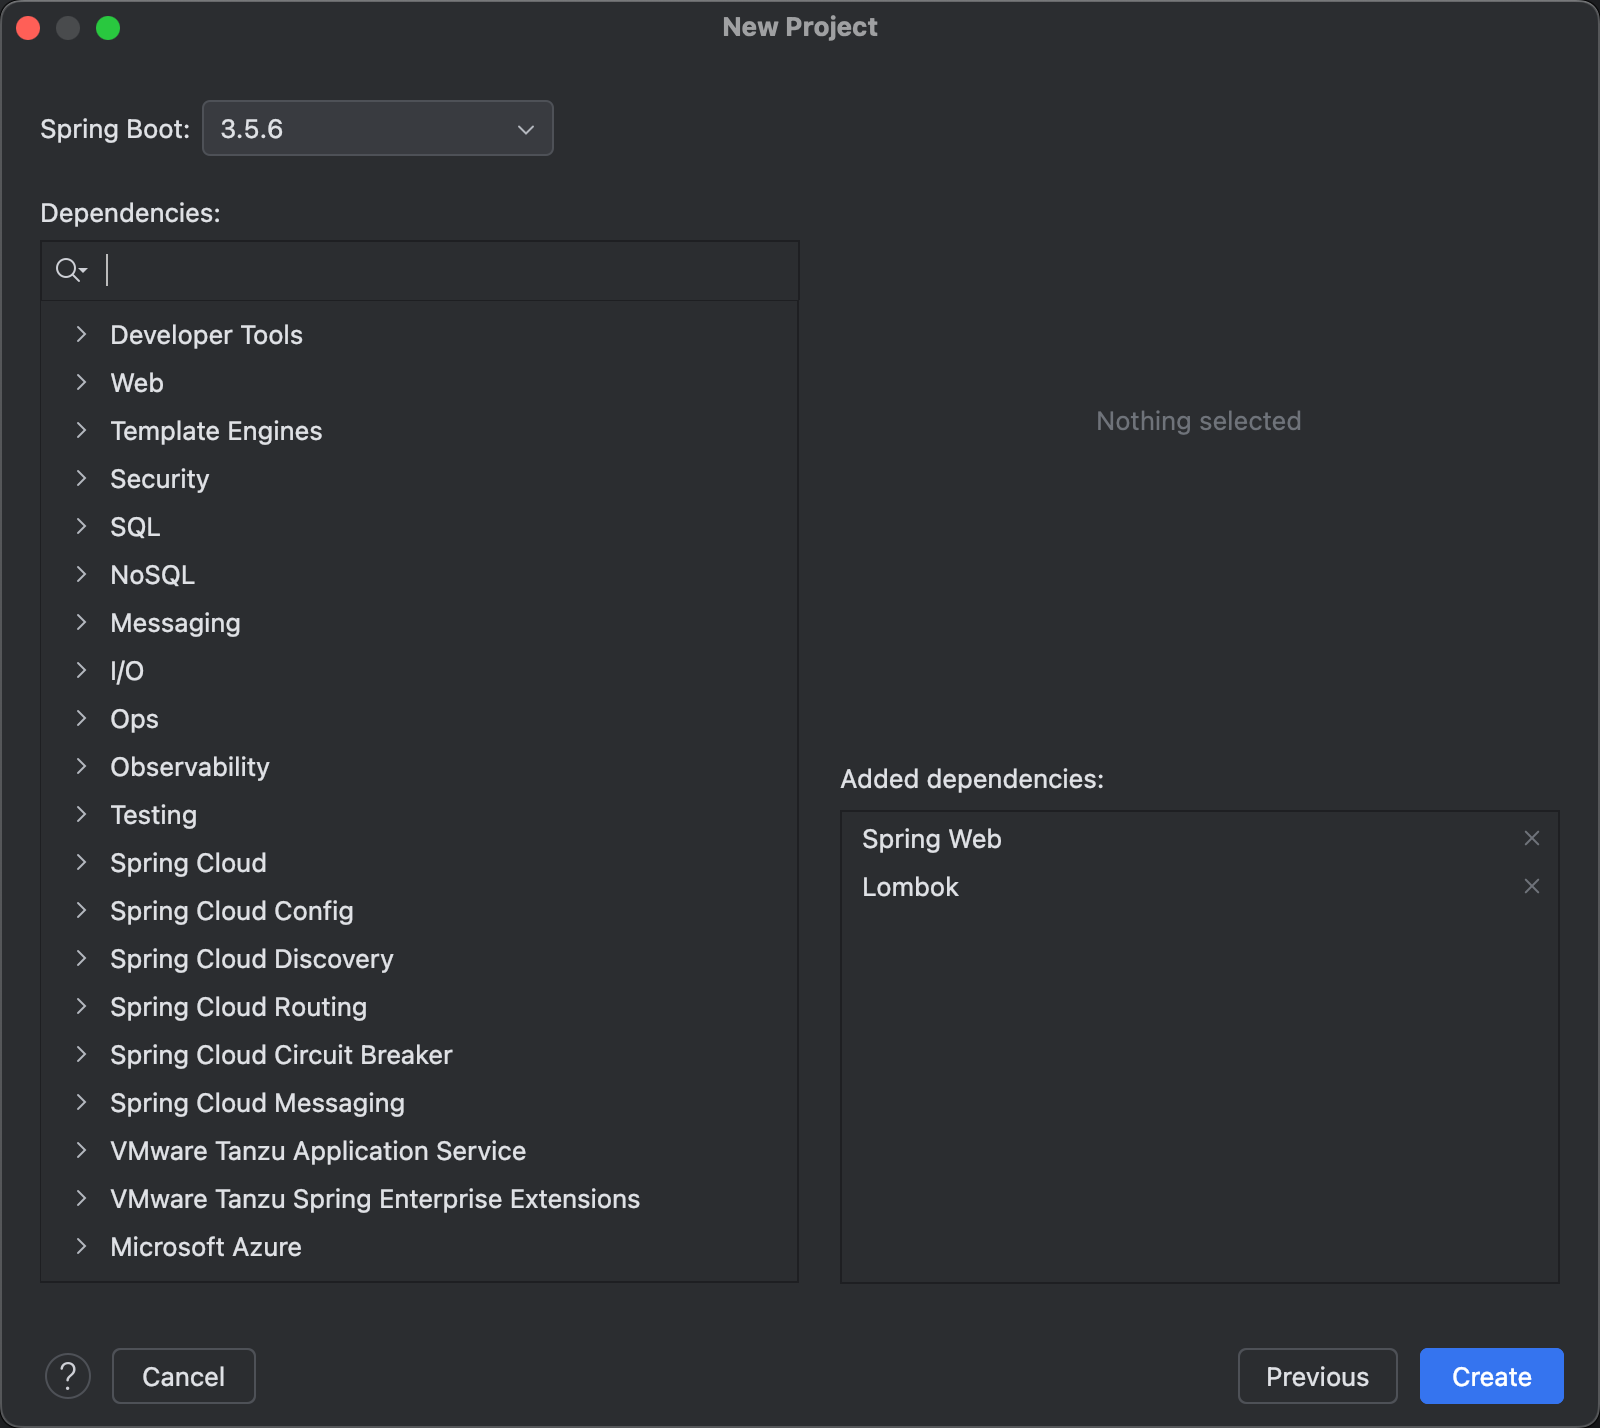
选择版本和依赖
创建后的项目如下:
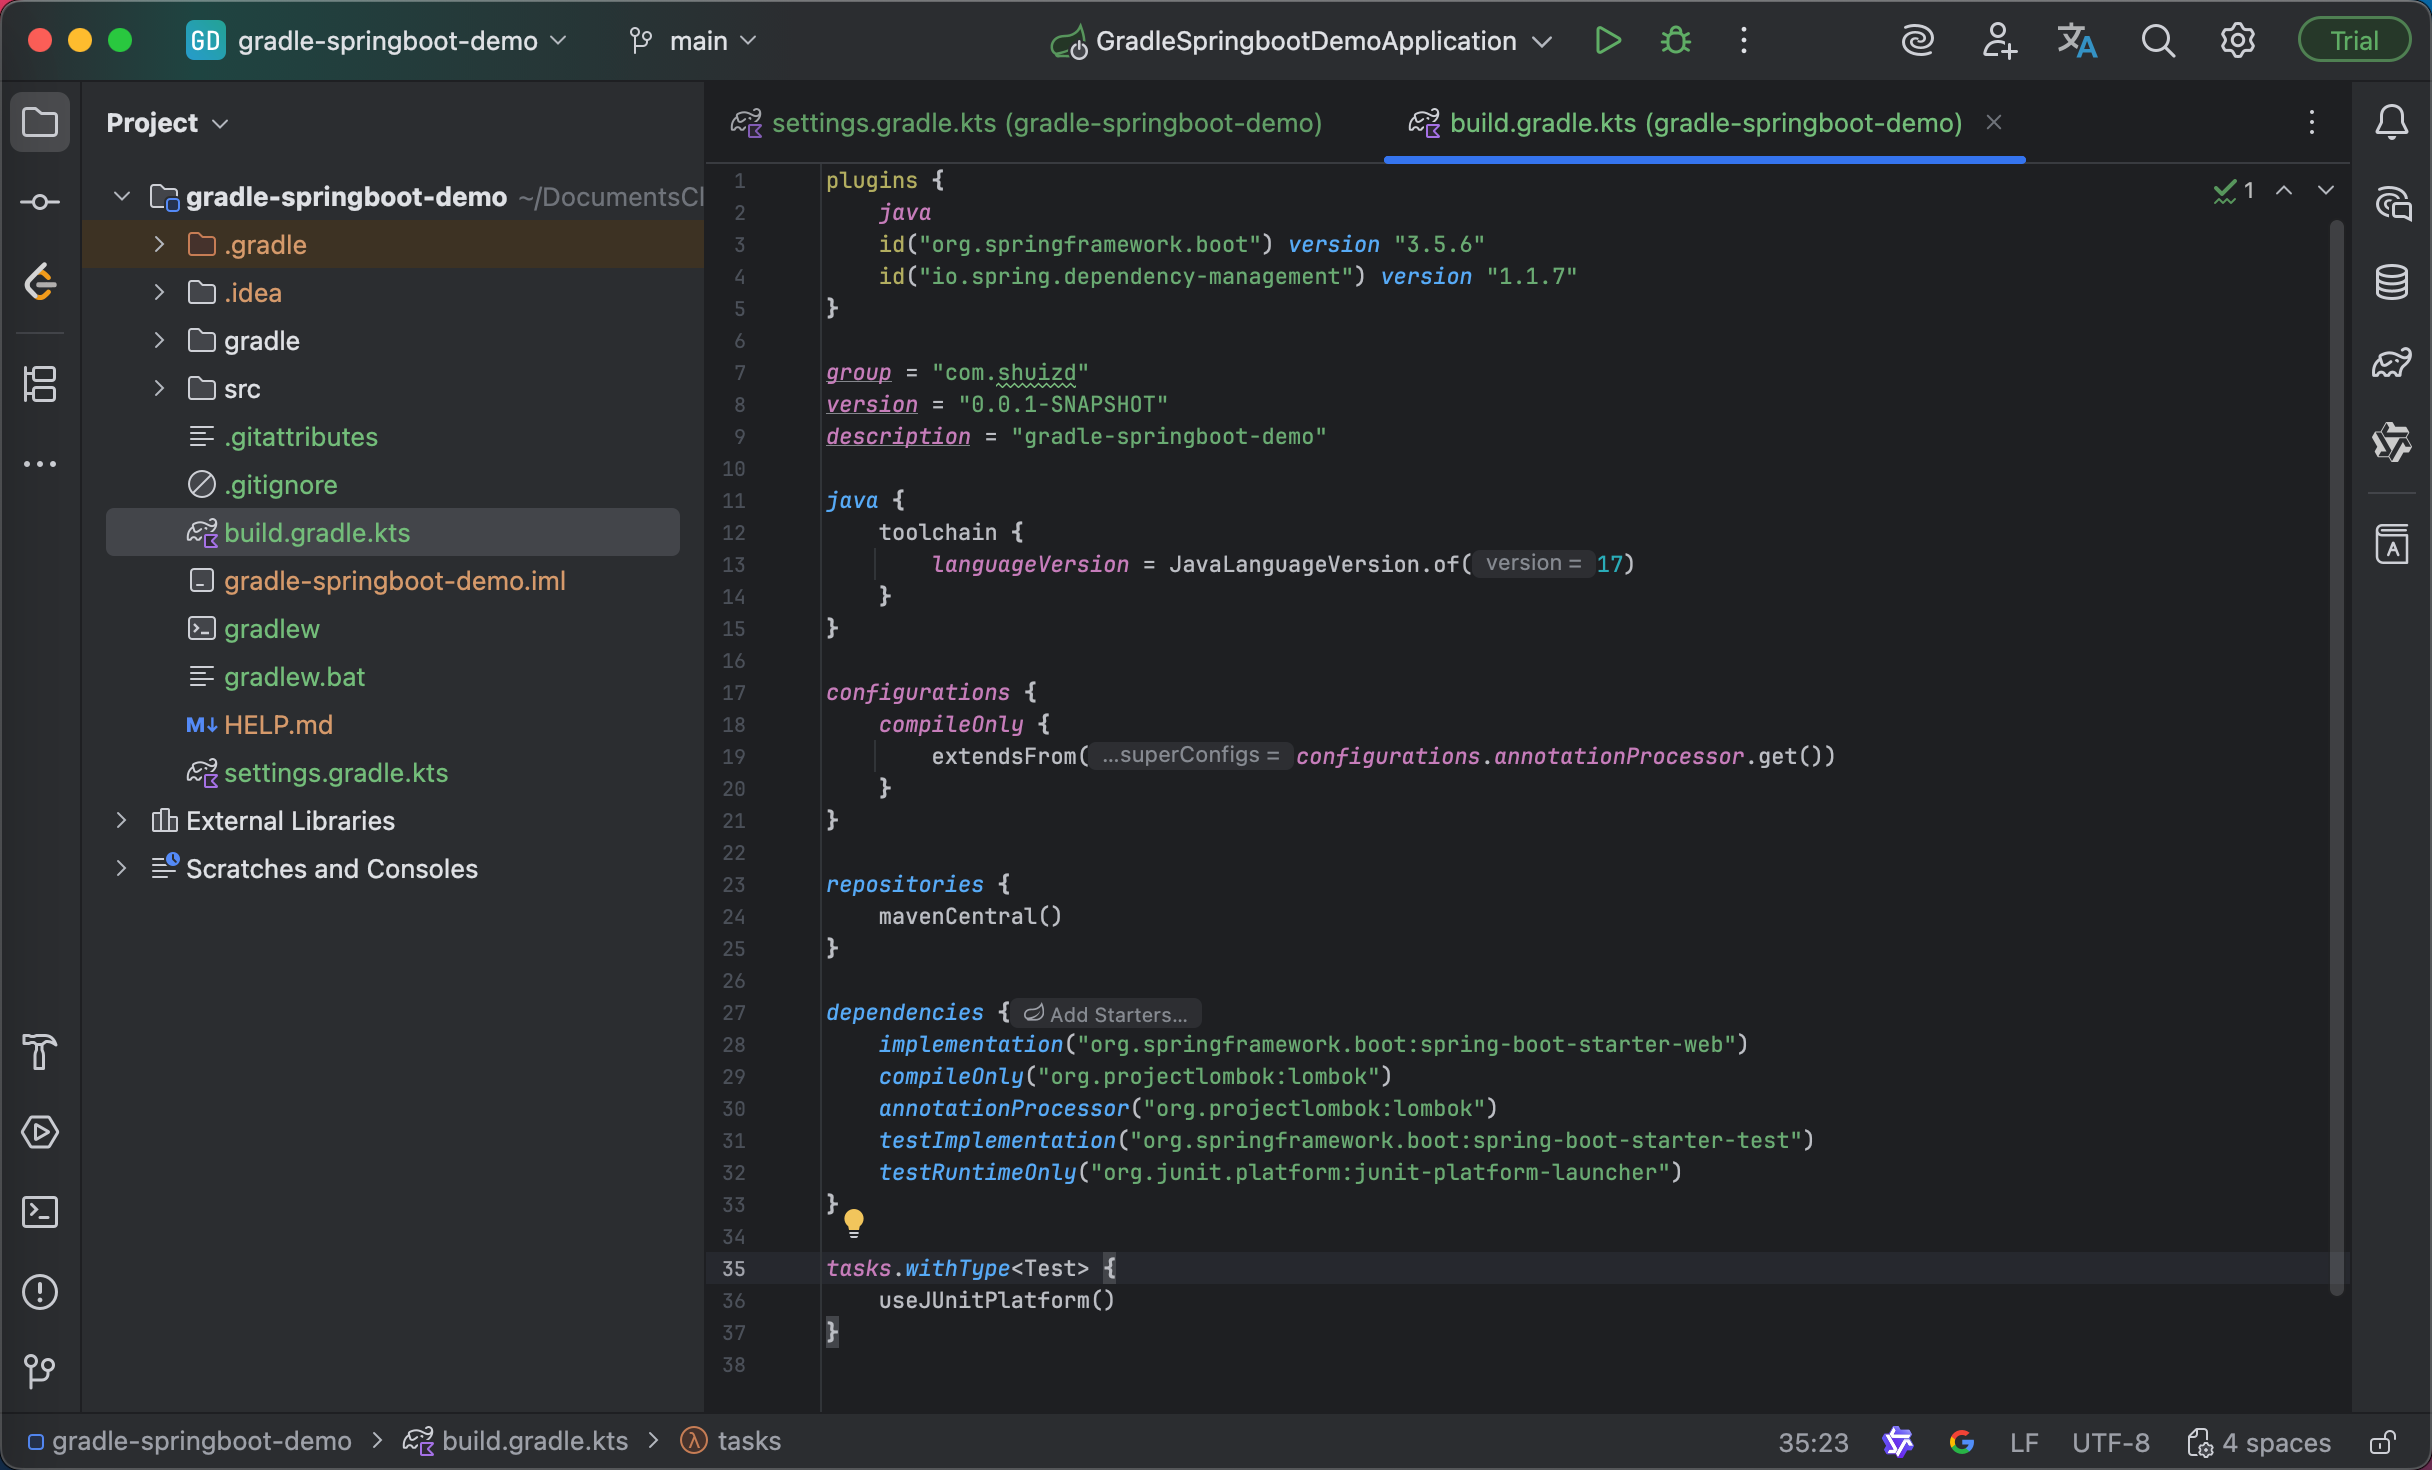
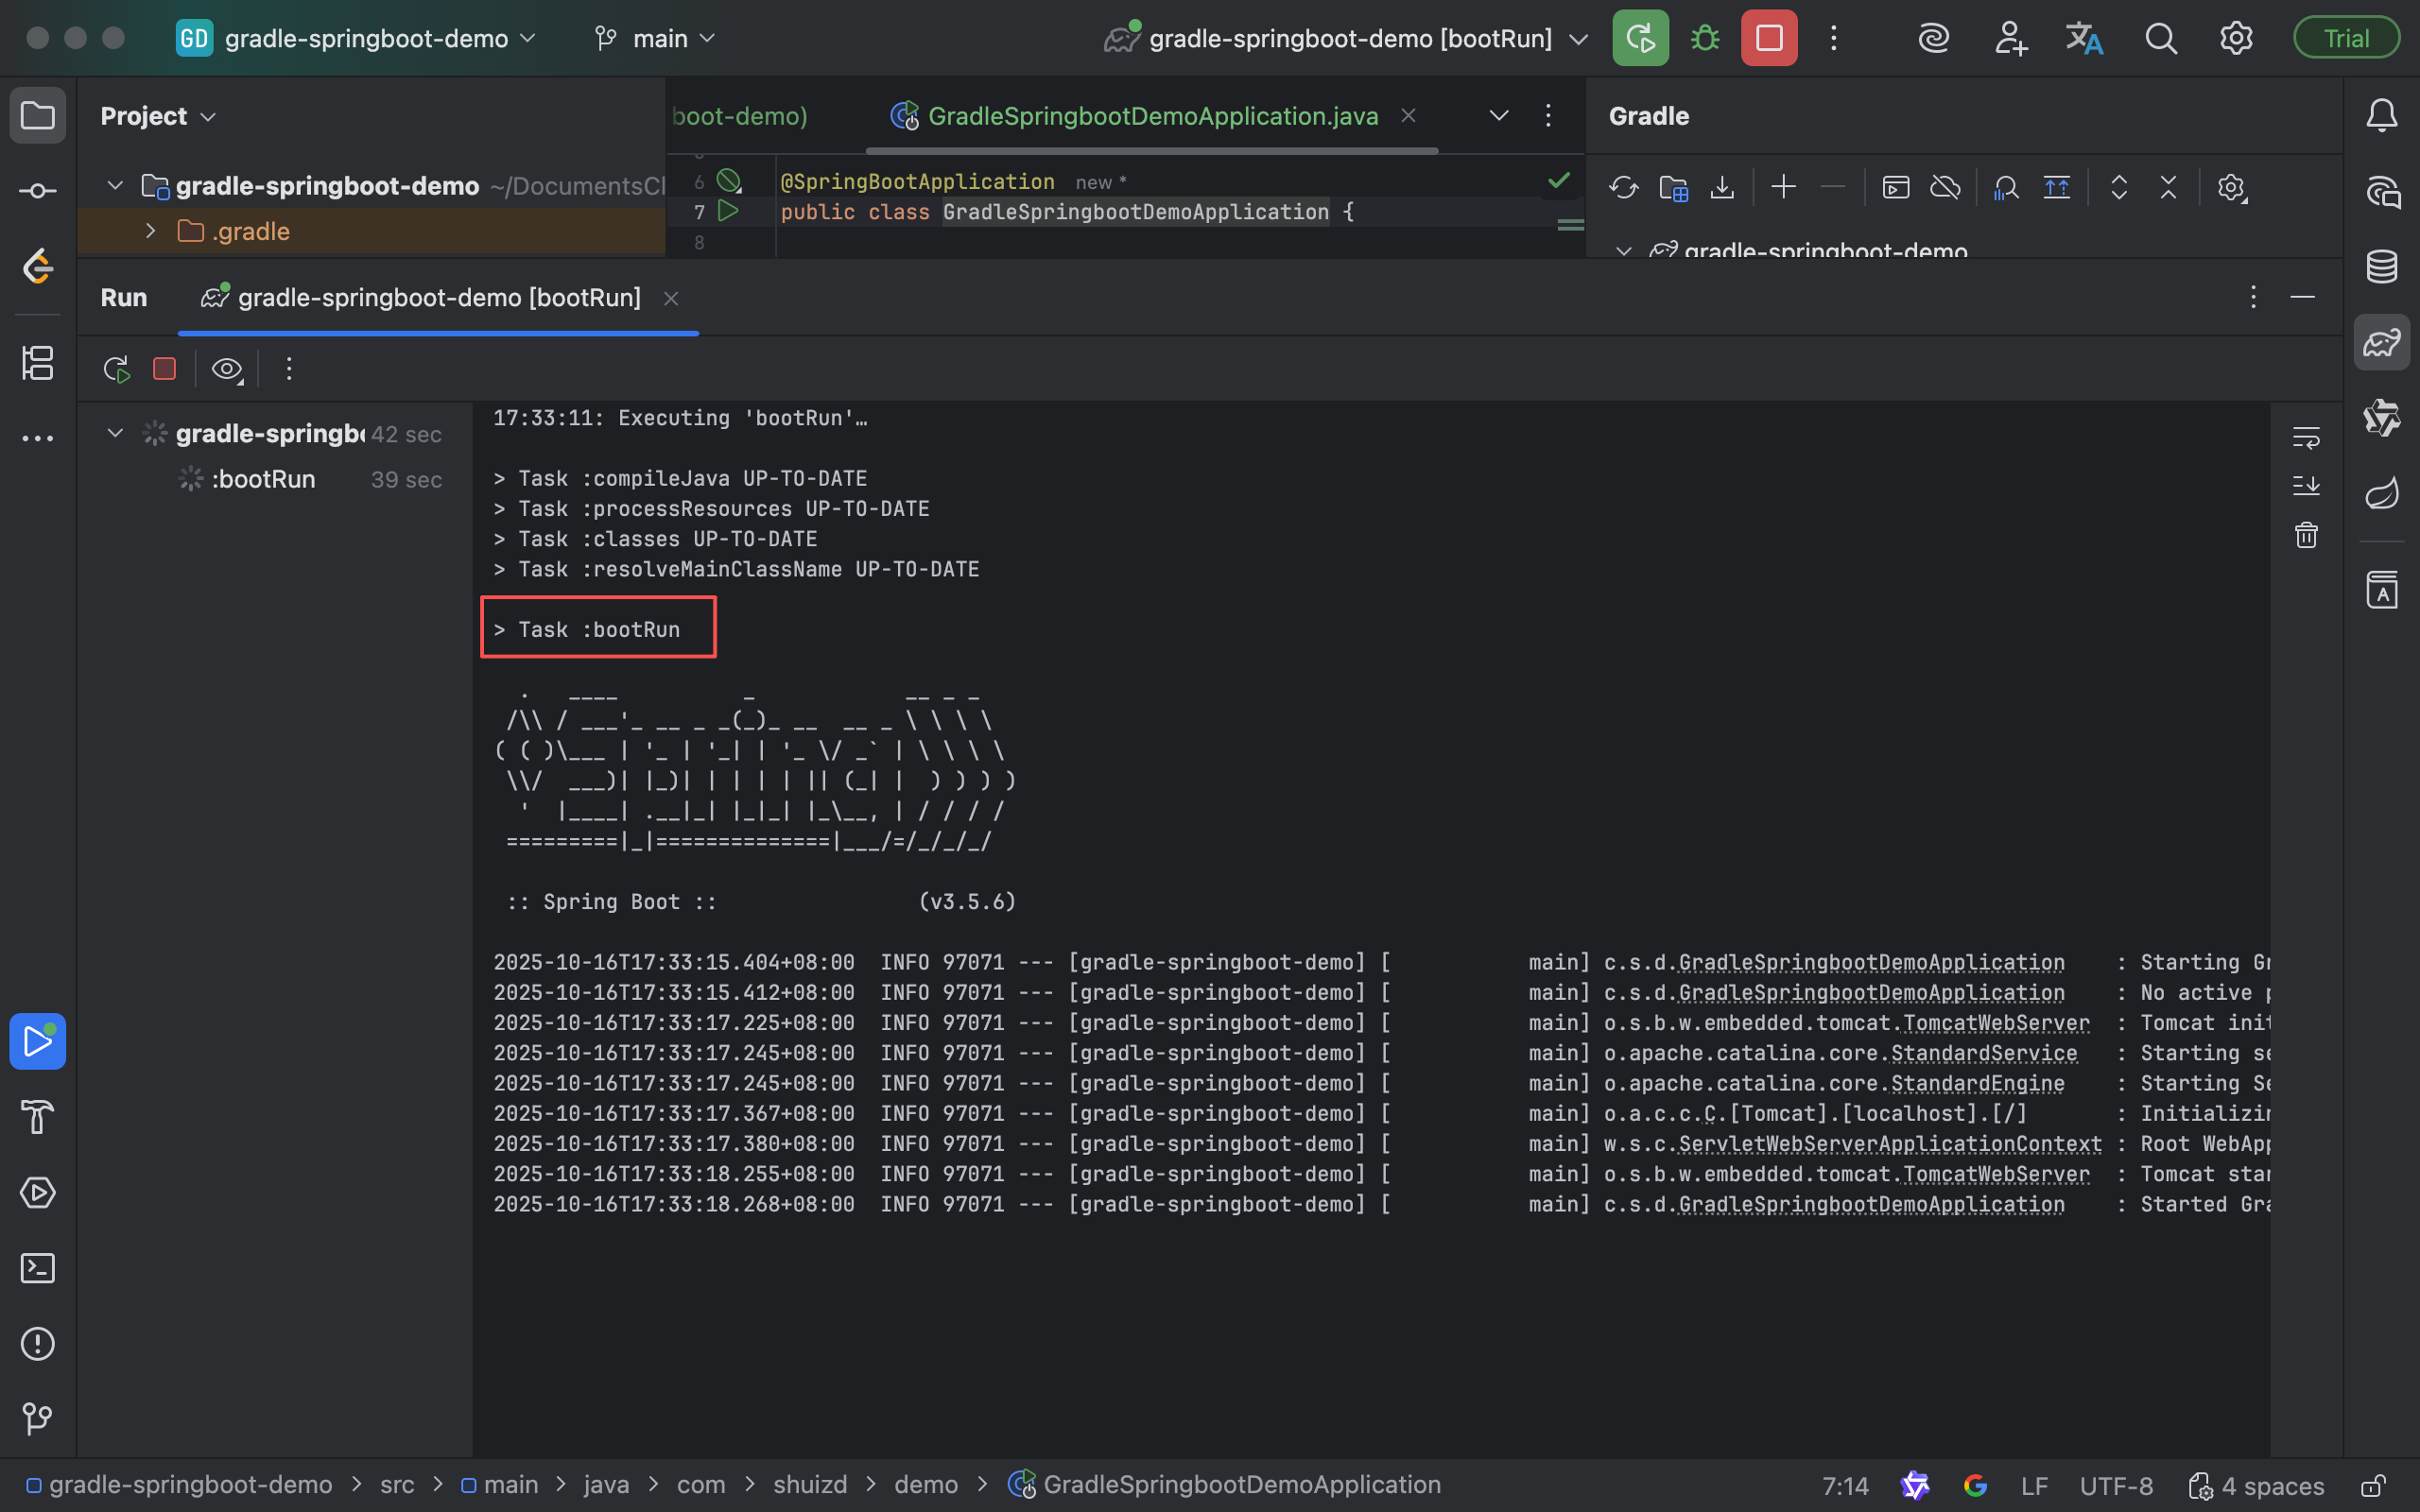
点击右边栏Gradle命令运行项目:
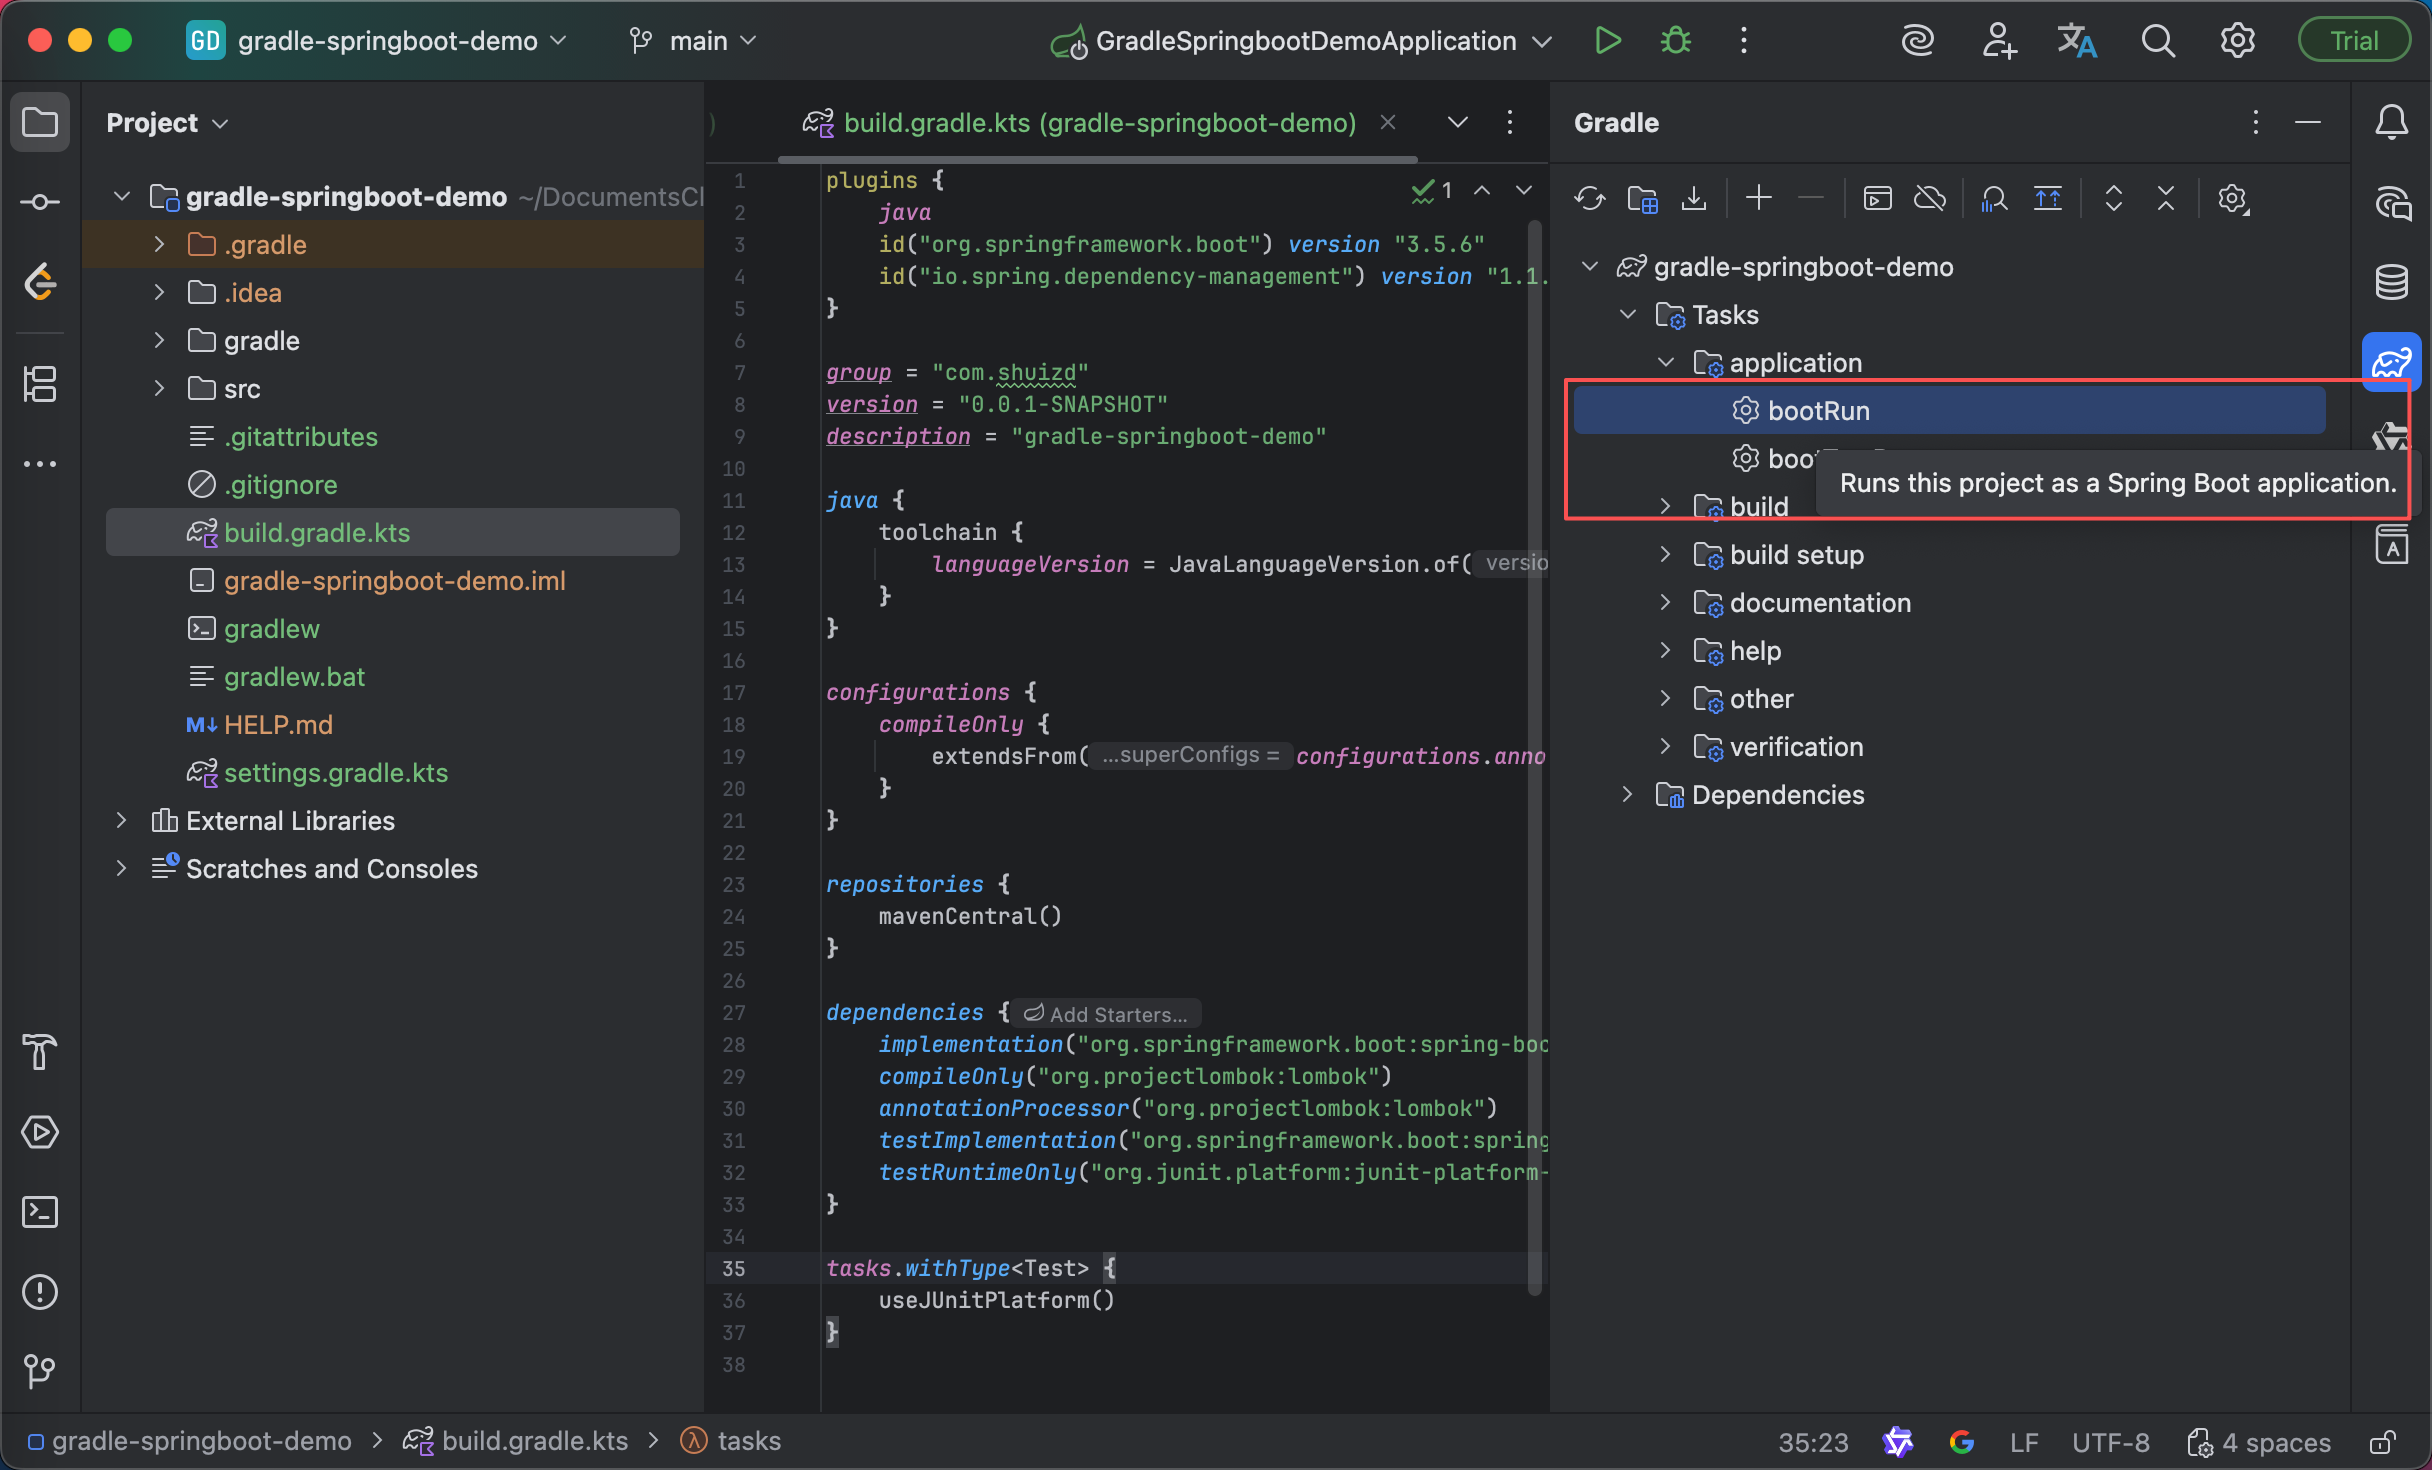
运行情况:
Spring源码
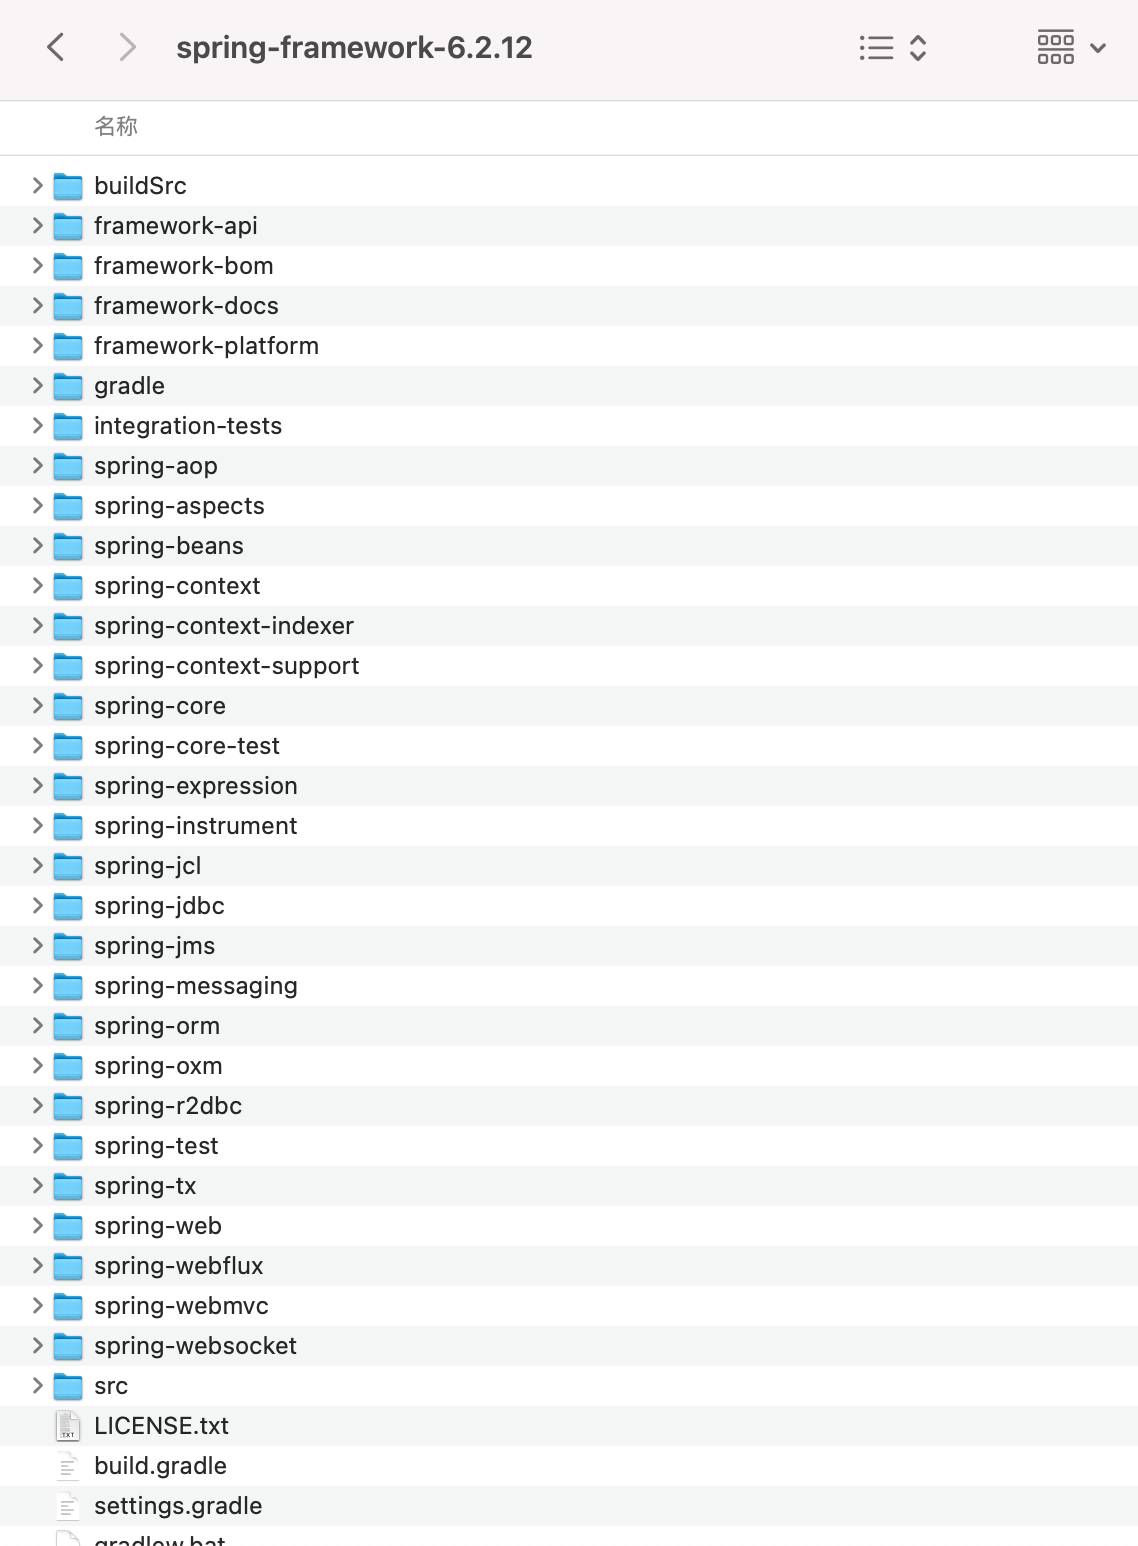
这个小节介绍,演示使用Gradle构建Spring 6.2.12源码。
Spring框架文档:https://docs.spring.io/spring-framework/reference/index.html
Spring Framework GitHub:https://github.com/spring-projects/spring-framework
文章中使用的版本:https://github.com/spring-projects/spring-framework/releases/tag/v6.2.12
由于大部分同学访问Github有困难,我将使用源码包的形式演示。相关源码资源已上传、关联本文章,博客标题下方可下载。
解压源码包:
在IDEA中导入:
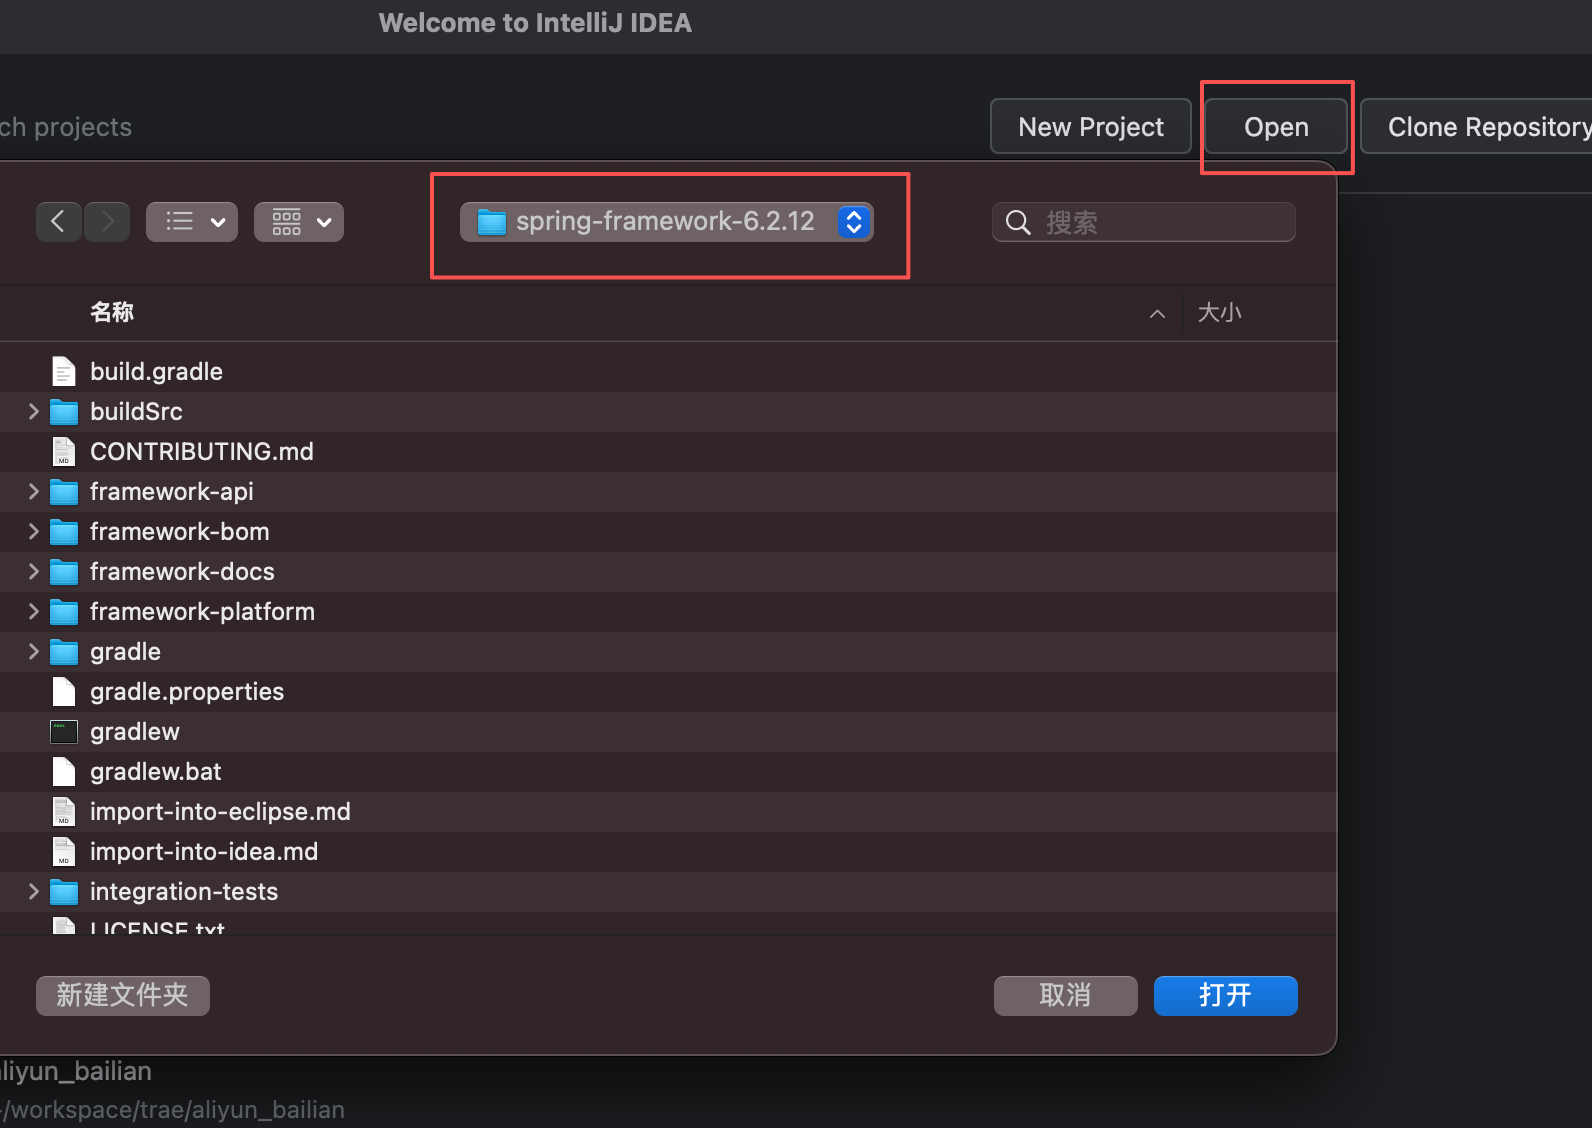
待填坑
本文用于本人技术学习和备忘。水平有限,如有错漏欢迎指正!
原创不易,如有转载请标注出处:https://blog.csdn.net/luyou0401/article/details/153281348