vue3+ts+uniapp微信小程序xr-frame实现AR追踪器(ARTracker)
xr-frame是一套小程序官方提供的XR/3D应用解决方案,基于混合方案实现,性能逼近原生、效果好、易用、强扩展、渐进式、遵循小程序开发标准,官方文档:https://developers.weixin.qq.com/miniprogram/dev/component/xr-frame/overview/#%E6%A6%82%E8%BF%B0
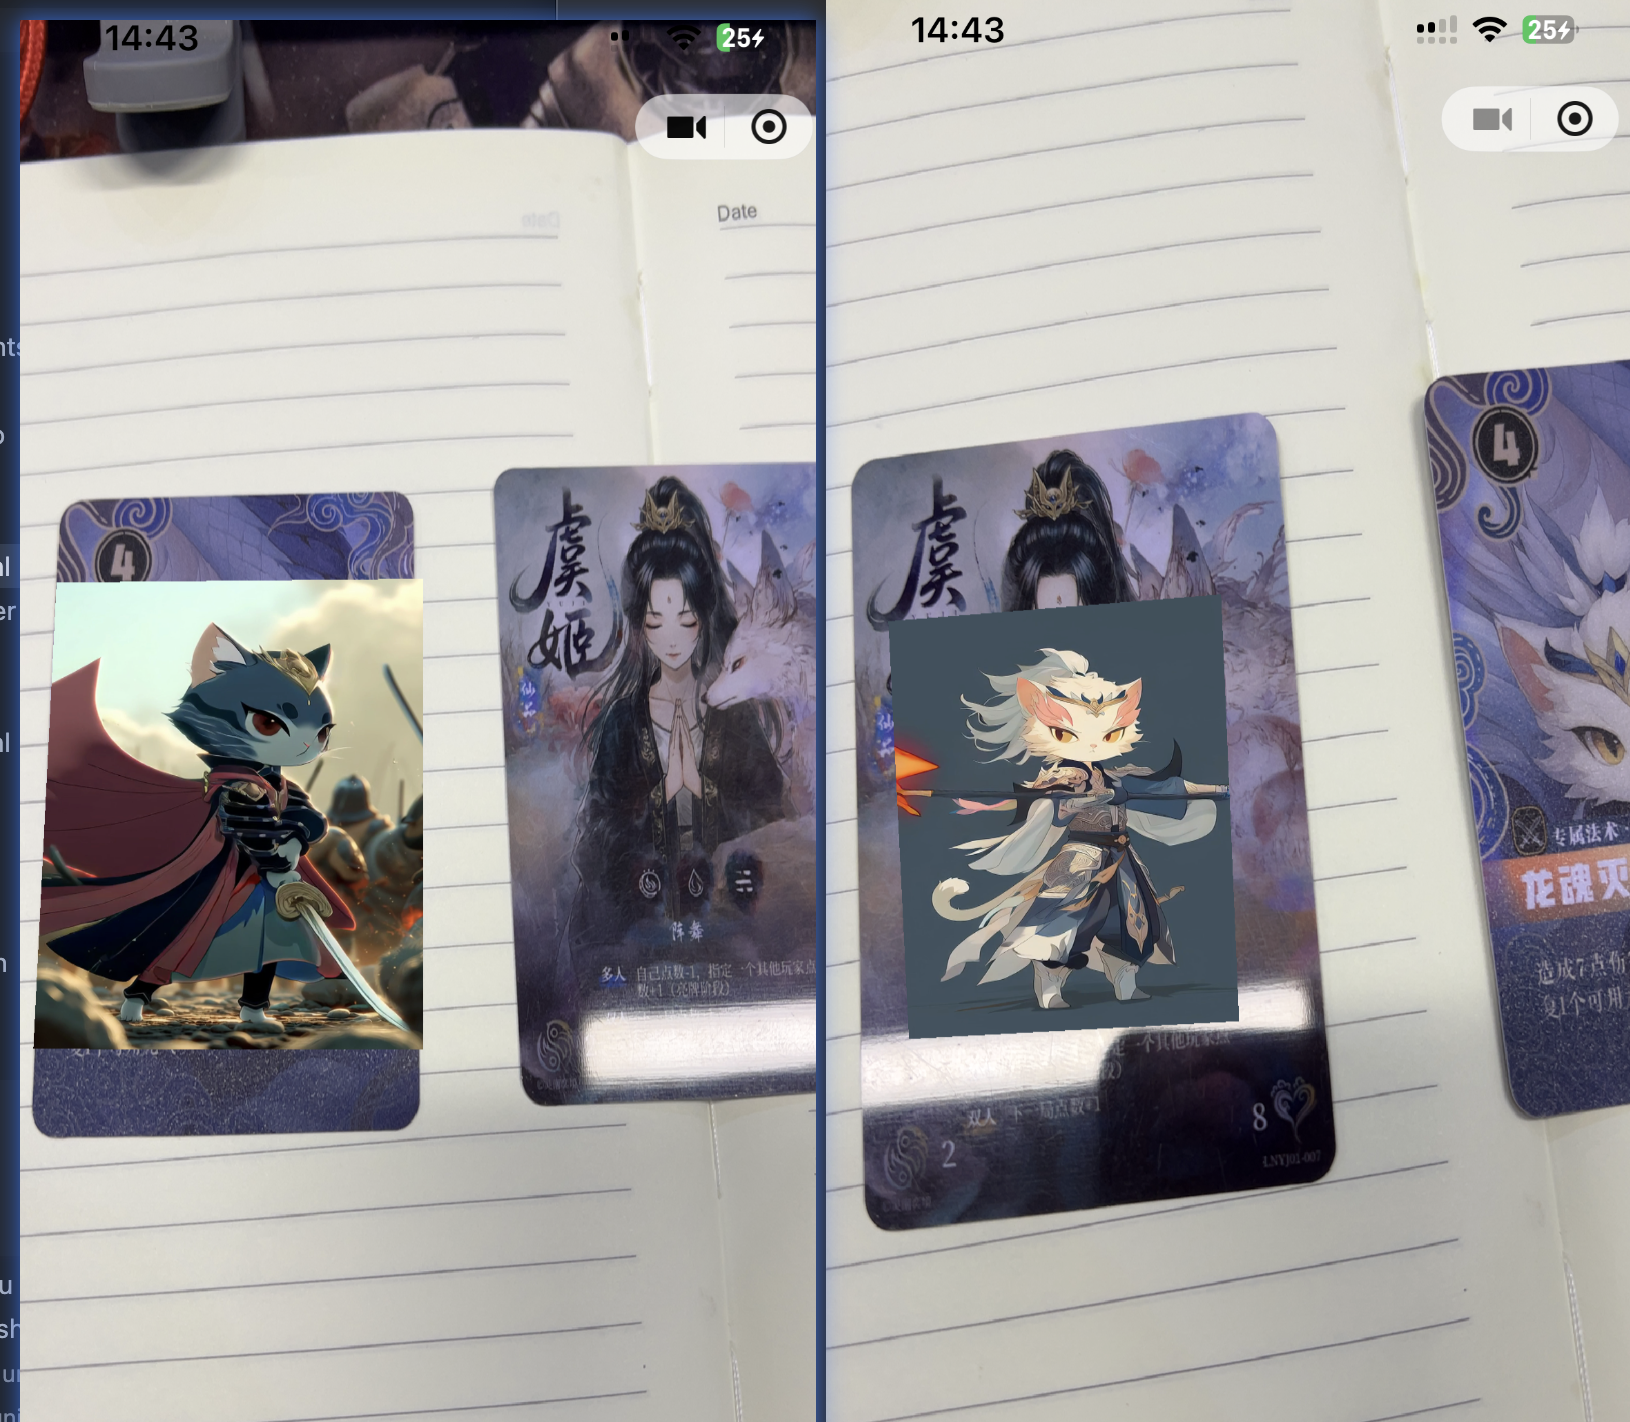
这次我们产品有一个需求,要根据不同的卡片内容,展示对应的视频,并在画面中展示出来,这就用到了小程序的AR追踪器技术。非常非常不巧的是,我们的小程序用的框架是uniapp,而且还是vue3写的,所以你懂的,新技术就是不太会适配,好在查遍整个互联网,还是被我找到了解决办法,使用vue3+uniapp的时候很多人都会遇到各种奇奇怪怪的问题,我也是,这里就记录一下踩坑经历。演示项目已开源,开源地址:https://github.com/Sjj1024/uniapp-vue3
创建xr微信模块
在项目根目录wxcomponents中创建xr-2d-video组件,并创建小程序的文件:
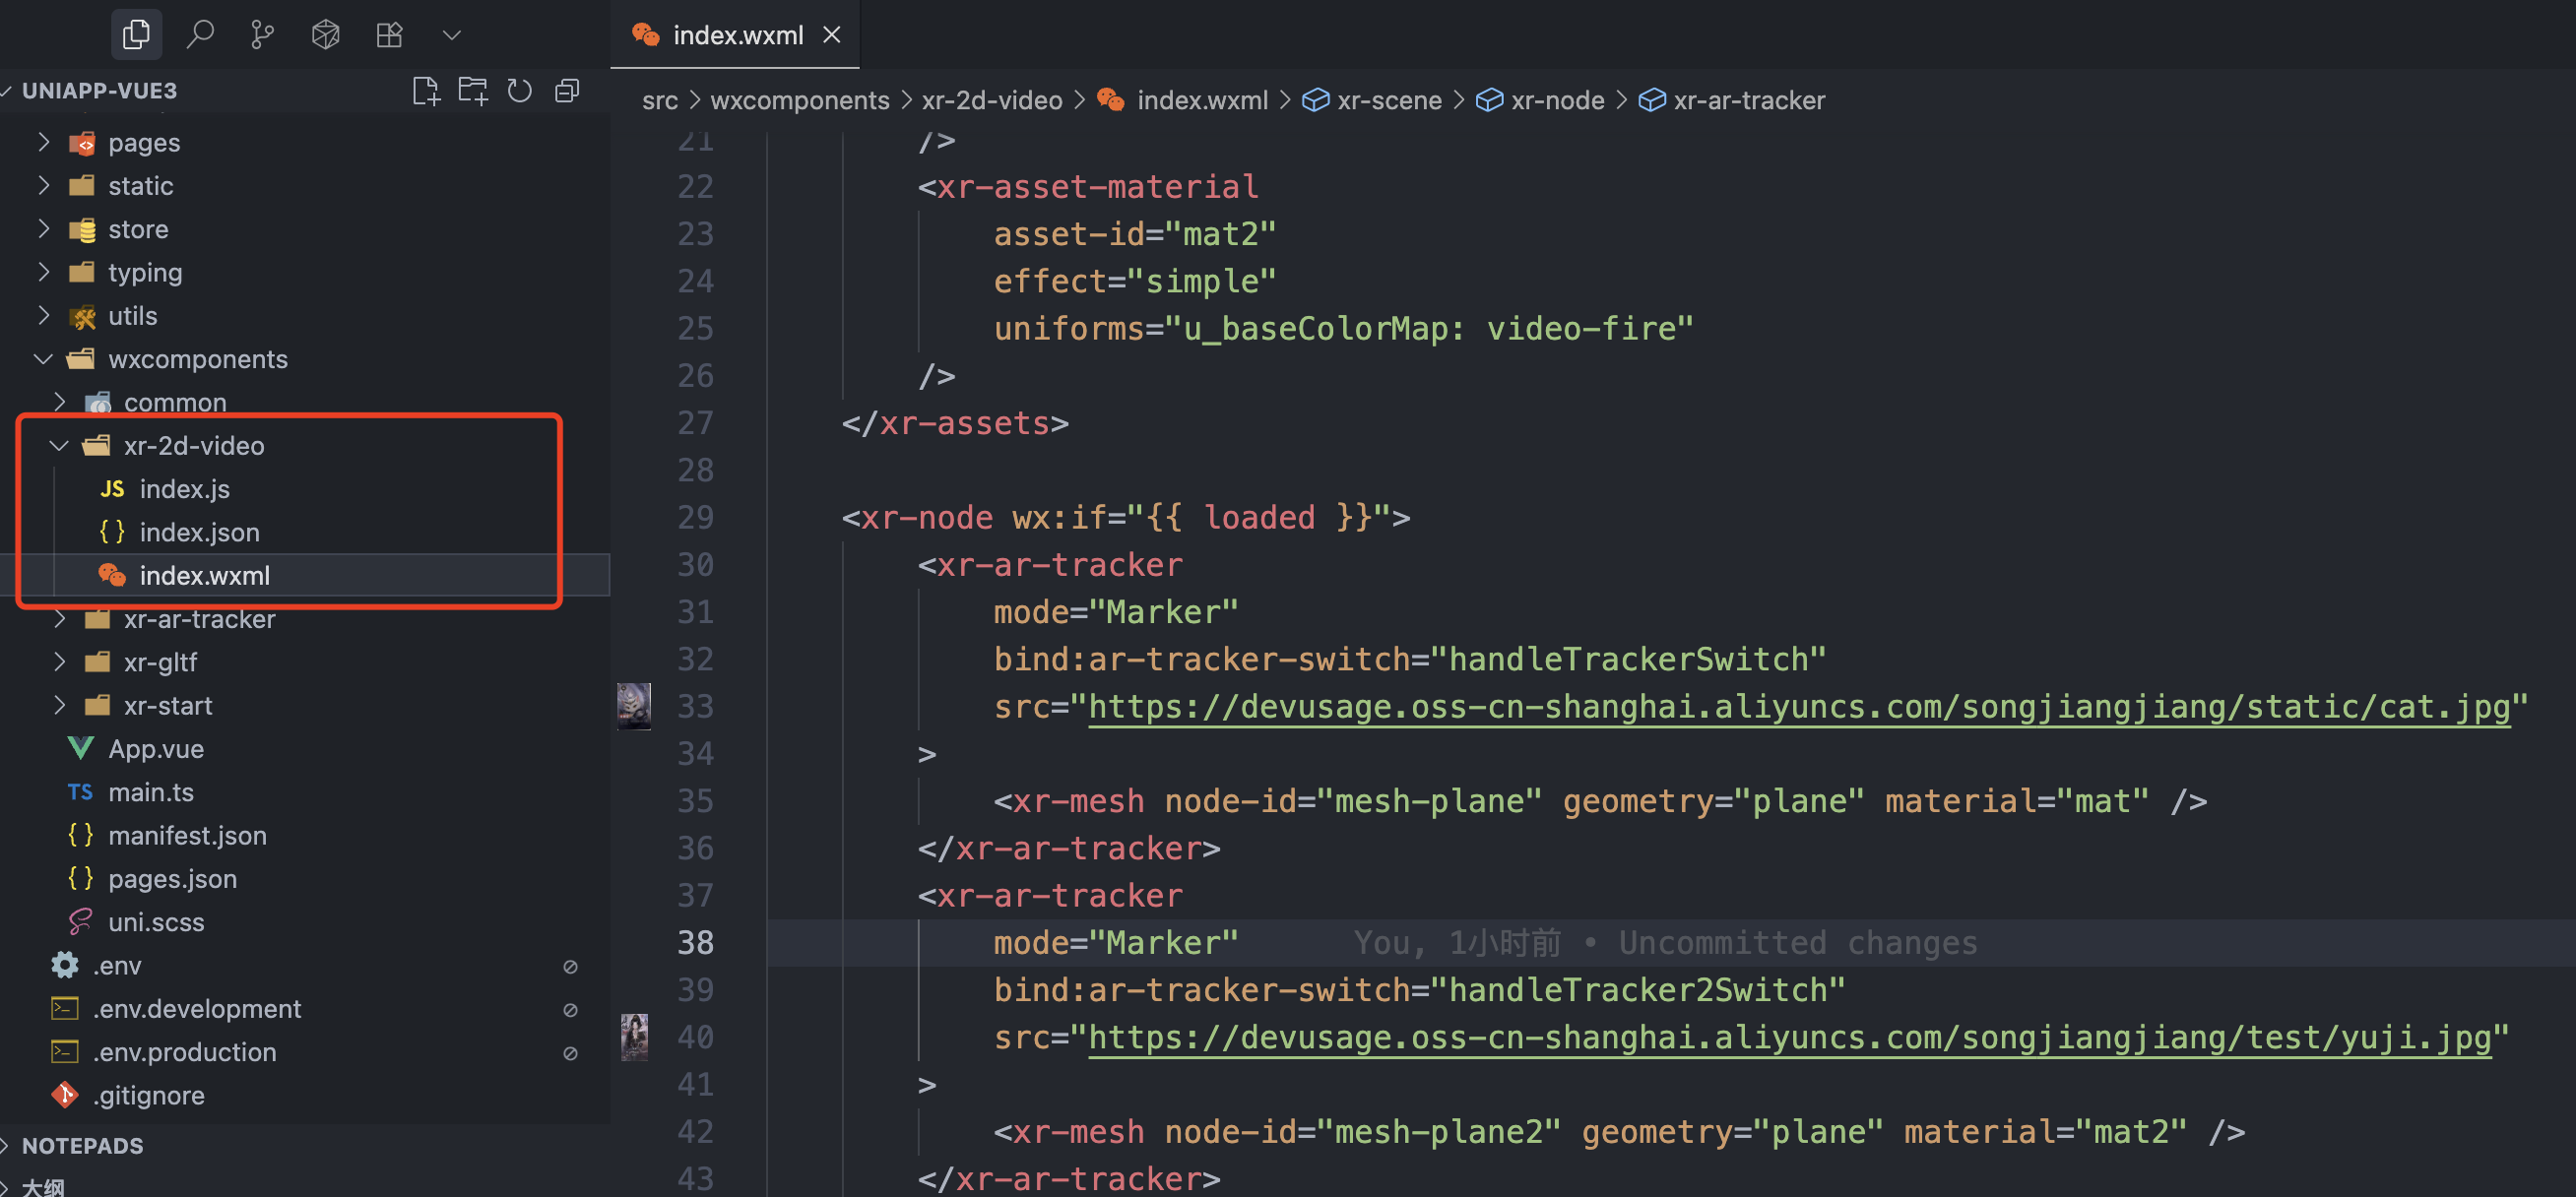
文件包含:index.js + index.json + index.wxml三个
index.js内容如下:
Component({behaviors: [require('../common/share-behavior').default],properties: {markerImg: {type: String,},},data: {loaded: false,arReady: false,},lifetimes: {async attached() {console.log('data', this.data)},},methods: {handleReady({ detail }) {const xrScene = (this.scene = detail.value)console.log('xr-scene', xrScene)},handleAssetsProgress: function ({ detail }) {console.log('assets progress', detail.value)},handleAssetsLoaded: function ({ detail }) {this.setData({ loaded: true })},handleTrackerSwitch: function (event) {console.log('handleTrackerSwitch', event)const detail = event.detailconst active = detail.valueconst video = this.scene.assets.getAsset('video-texture', 'hikari')active ? video.play() : video.stop()},handleTracker2Switch: function (event) {console.log('handleTracker2Switch', event)const detail = event.detailconst active = detail.valueconst video = this.scene.assets.getAsset('video-texture', 'fire')active ? video.play() : video.stop()},handleARReady: function ({ detail }) {console.log('arReady')this.setData({arReady: true,})},handleLog: function ({ detail }) {console.log('log', detail.value)},},
})
index.json:
{"component": true,"usingComponents": {},"renderer": "xr-frame"
}
index.wxml:
<xr-scene ar-system="modes:Marker" bind:ready="handleReady"><xr-assets bind:loaded="handleAssetsLoaded"><!-- 第一个视频 --><xr-asset-loadtype="video-texture"asset-id="hikari"options="loop:true"src="https://devusage.oss-cn-shanghai.aliyuncs.com/songjiangjiang/test/jian.mp4"/><xr-asset-materialasset-id="mat"effect="simple"uniforms="u_baseColorMap: video-hikari"/><!-- 第二个视频 --><xr-asset-loadtype="video-texture"asset-id="fire"options="loop:true"src="https://devusage.oss-cn-shanghai.aliyuncs.com/songjiangjiang/test/fire.mp4"/><xr-asset-materialasset-id="mat2"effect="simple"uniforms="u_baseColorMap: video-fire"/></xr-assets><xr-node wx:if="{{ loaded }}"><xr-ar-trackermode="Marker"bind:ar-tracker-switch="handleTrackerSwitch"src="https://devusage.oss-cn-shanghai.aliyuncs.com/songjiangjiang/static/cat.jpg"><xr-mesh node-id="mesh-plane" geometry="plane" material="mat" /></xr-ar-tracker><xr-ar-trackermode="Marker"bind:ar-tracker-switch="handleTracker2Switch"src="https://devusage.oss-cn-shanghai.aliyuncs.com/songjiangjiang/test/yuji.jpg"><xr-mesh node-id="mesh-plane2" geometry="plane" material="mat2" /></xr-ar-tracker></xr-node><xr-camera clear-color="0.4 0.8 0.6 1" background="ar" is-ar-camera />
</xr-scene>
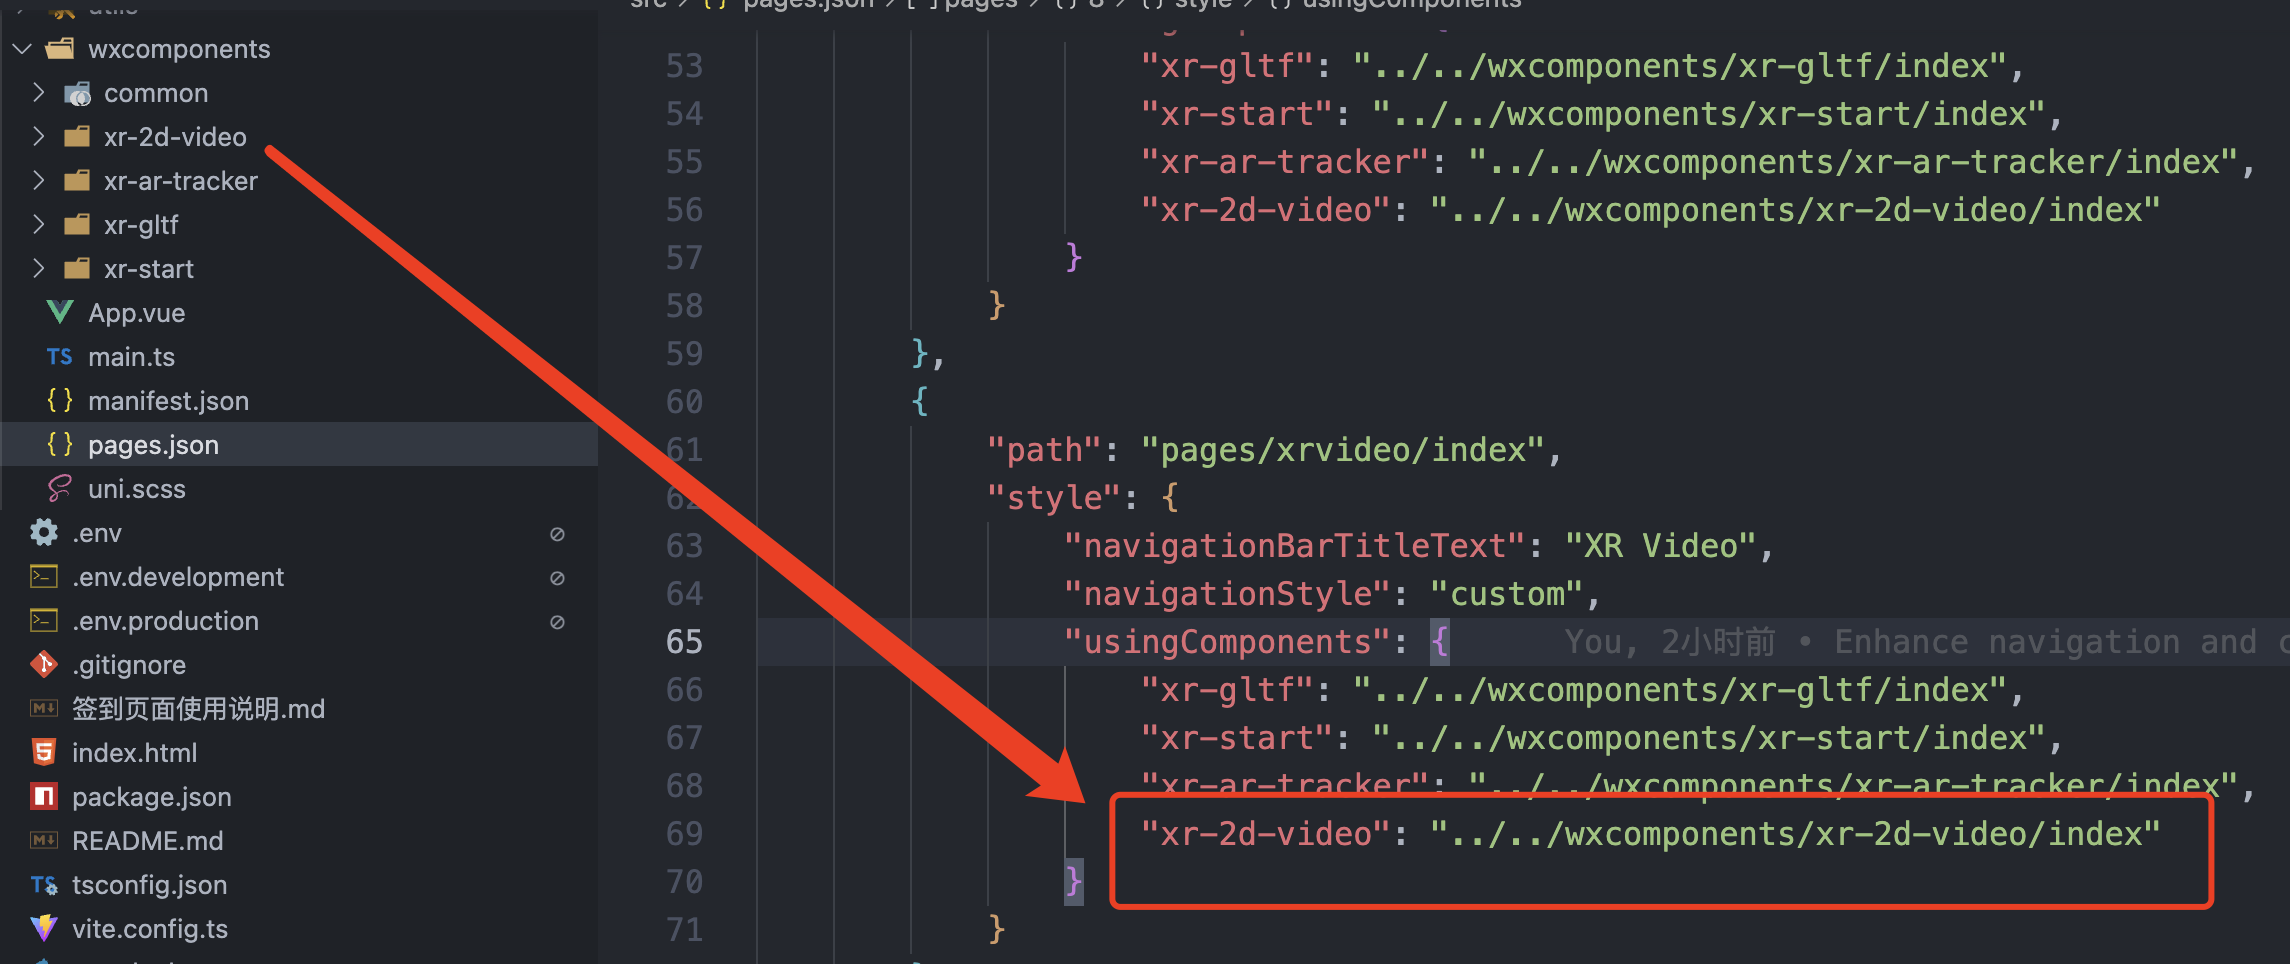
在pages.json中添加这个组件:
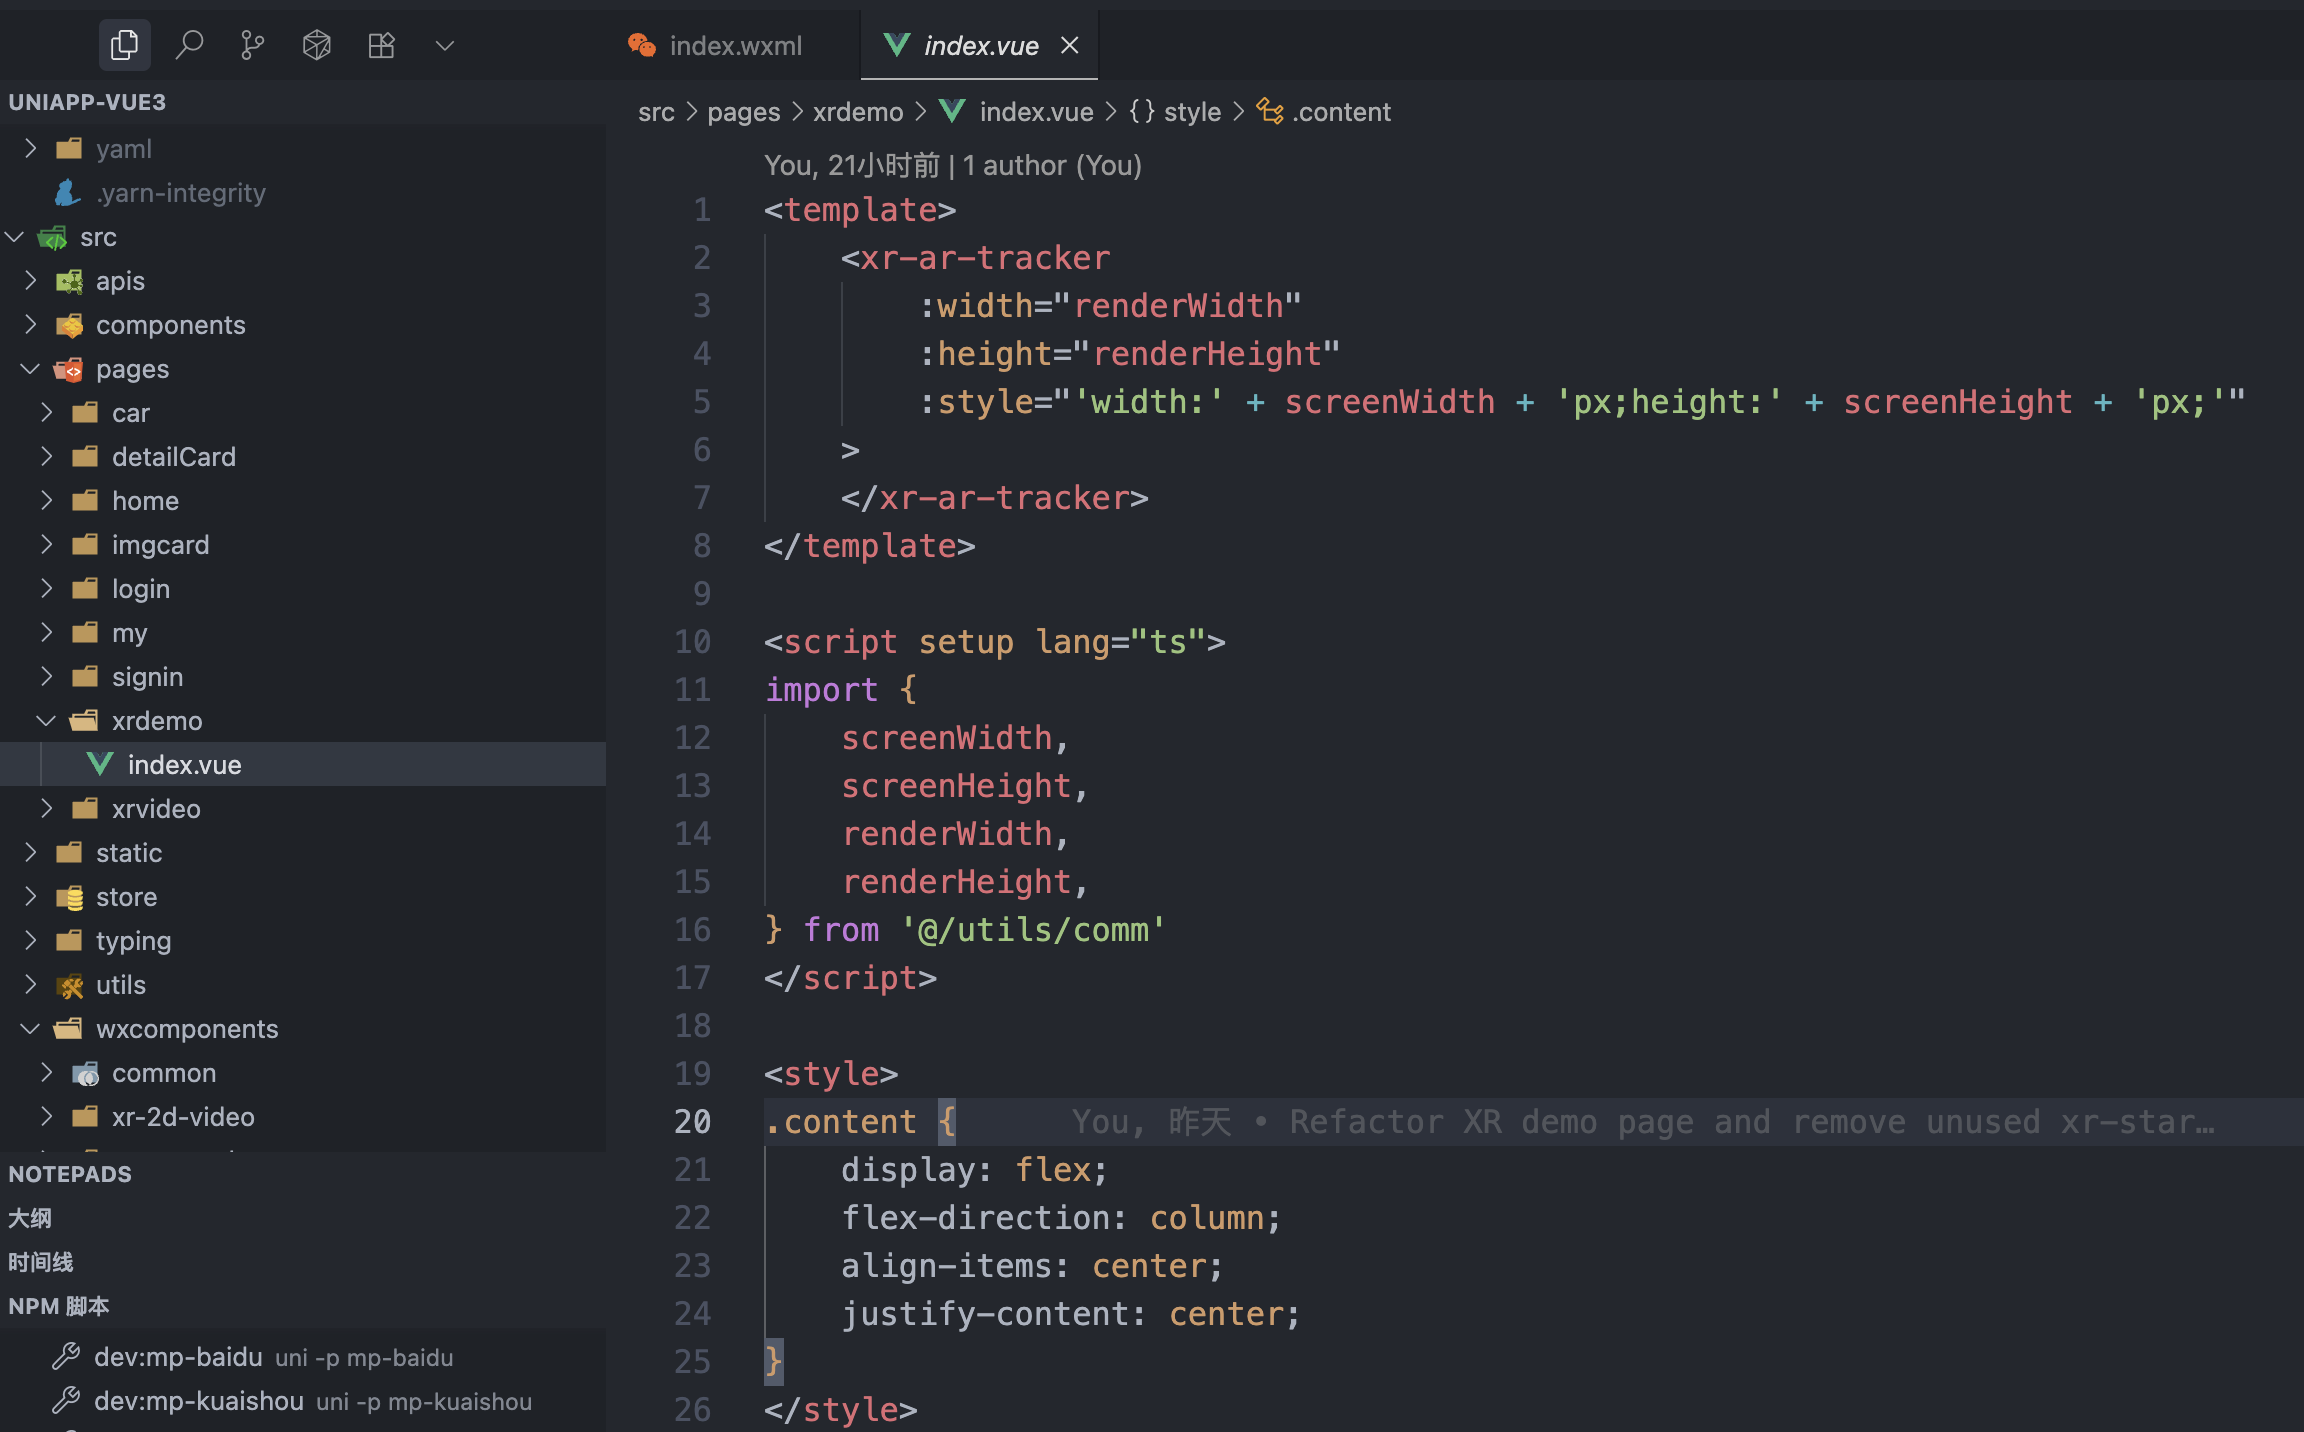
Vue3中引入并使用
在vue3页面中创建并引入这个组件,注意要先获取到 screenWidth, screenHeight, renderWidth, renderHeight 这四个变量,分别是屏幕的宽高和渲染的宽高。通过uni.uni.getSystemInfo可以获取到设备的信息。
获取设备信息的代码:
// 获取顶部状态栏高度uni.getSystemInfo({success: (result: any) => {// 获取手机系统的状态栏高度(不同手机的状态栏高度不同) ( 不要使用uni-app官方文档的var(--status-bar-height) 官方这个是固定的20px 不对的 )console.log('当前手机设备信息', result)let statusBarHeight = result.statusBarHeight + 'px'// 获取右侧胶囊的信息 单位pxconst menuButtonInfo = uni.getMenuButtonBoundingClientRect()console.log('胶囊信息', menuButtonInfo)//bottom: 胶囊底部距离屏幕顶部的距离//height: 胶囊高度//left: 胶囊左侧距离屏幕左侧的距离//right: 胶囊右侧距离屏幕左侧的距离//top: 胶囊顶部距离屏幕顶部的距离//width: 胶囊宽度// console.log(menuButtonInfo.width, menuButtonInfo.height, menuButtonInfo.top)// console.log('计算胶囊右侧距离屏幕右边距离', result.screenWidth - menuButtonInfo.right)let menuWidth = menuButtonInfo.width + 'px'let menuHeight = menuButtonInfo.height + 'px'let menuBorderRadius = menuButtonInfo.height / 2 + 'px'let menuRight = result.screenWidth - menuButtonInfo.right + 'px'let menuTop = menuButtonInfo.top + 'px'let contentTop = result.statusBarHeight + 44 + 'px'let menuLeft = menuButtonInfo.left + 'px'let menuInfo = {statusBarHeight: statusBarHeight, //状态栏高度----用来给自定义导航条页面的顶部导航条设计padding-top使用:目的留出系统的状态栏区域menuWidth: menuWidth, //右侧的胶囊宽度--用来给自定义导航条页面的左侧胶囊设置使用menuHeight: menuHeight, //右侧的胶囊高度--用来给自定义导航条页面的左侧胶囊设置使用menuBorderRadius: menuBorderRadius, //一半的圆角--用来给自定义导航条页面的左侧胶囊设置使用menuRight: menuRight, //右侧的胶囊距离右侧屏幕距离--用来给自定义导航条页面的左侧胶囊设置使用menuTop: menuTop, //右侧的胶囊顶部距离屏幕顶部的距离--用来给自定义导航条页面的左侧胶囊设置使用contentTop: contentTop,screenHeight: result.screenHeight,screenWidth: result.screenWidth,devicePixelRatio: result.devicePixelRatio,windowWidth: result.windowWidth, // 屏幕宽高,绘制海报时候使用windowHeight: result.windowHeight,menuLeft: menuLeft,}uni.setStorageSync('menuInfo', menuInfo)},fail: (error) => {console.log(error)},})还有最重要的,就是修改 node_modules/@dcloudio/uni-mp-weixin/dist/uni.compiler.js 这个文件中的一个变量:customElements,在里面添加上 xr-2d-video:

运行后,使用手机测试即可看到效果: