android13 wifi热点setting学习笔记
主要参考文章链接android 13 热点启动流程
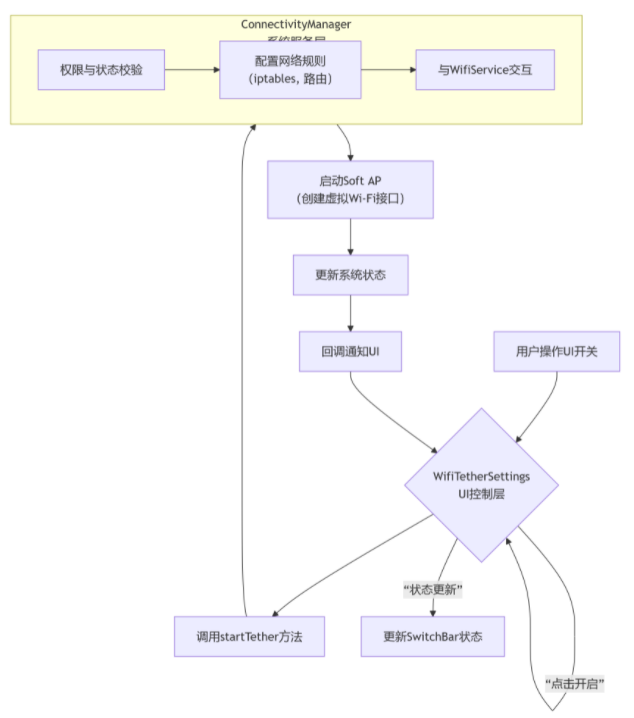
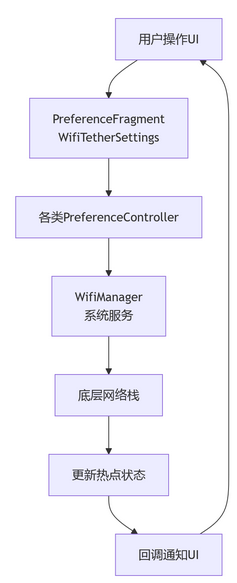
在 Android 系统中,Wi-Fi 热点的设置(Setting)涉及系统框架、应用层交互及底层驱动等多个层面,其核心功能是让设备作为接入点(AP)供其他设备连接。整个热点功能可以清晰地分为三个层次,其协作关系如下图所示:
1. 按钮初始化
相关代码位置packages/apps/Settings/src/com/android/settings/wifi/tether/WifiTetherSettings.java
界面创建阶段:onActivityCreated方法
在 Activity 创建完成后,设置主开关(Master Switch)。
@Override
public void onActivityCreated(Bundle savedInstanceState) {super.onActivityCreated(savedInstanceState);if (mUnavailable) return; // 检查硬件是否支持热点功能final SettingsActivity activity = (SettingsActivity) getActivity();final SettingsMainSwitchBar switchBar = activity.getSwitchBar();switchBar.setTitle(getContext().getString(R.string.use_wifi_hotspot_main_switch_title));mSwitchBarController = new WifiTetherSwitchBarController(activity, switchBar);getSettingsLifecycle().addObserver(mSwitchBarController); // 生命周期绑定switchBar.show(); // 显示主开关
}
主开关的特殊性:
-
它是全局开关,控制热点的整体启用/禁用。
-
通过
Lifecycle观察者模式管理,确保在界面销毁时正确释放资源。
数据回调接口:动态获取配置
代码中的回调接口是连接主开关和具体配置项的桥梁。
mSwitchBarController.setGetWifiInfoCallback(new WifiTetherSwitchBarController.Callback() {@Overridepublic String getSsid() {return mSSIDPreferenceController.getSSID(); // 从SSID控制器获取最新名称}@Overridepublic String getPassword() {return mPasswordPreferenceController.getPasswordValidated(-1); // 获取验证后的密码}
});
回调
-
解耦设计:主开关控制器不需要知道 SSID 和密码的具体实现细节。
-
动态获取:确保每次开启热点时都使用最新的配置值。
数据验证:密码控制器会先验证密码复杂度,再返回有效值。
可以看到按钮的控制类在 WifiTetherSwitchBarController 里面。
2. 按钮的控制类
相关代码位置:packages/apps/Settings/src/com/android/settings/wifi/tether/WifiTetherSwitchBarController.java
相关的代码:
2.1 界面生命周期控制 (onStart和 onStop)
相关代码位于控制器( WifiTetherSwitchBarController)中,负责在界面可见时注册监听,在界面不可见时注销监听,这是标准的 Android 生命周期管理实践。
2.1.1 onStart()方法:界面可见时的准备工作
@Override
public void onStart() {// 1. 监听数据节省模式状态mDataSaverBackend.addListener(this);// 2. 为主开关添加状态变化监听器(重点修改)mSwitchBar.addOnSwitchChangeListener(this); //add by llet task ID1150272 for wifi hotspotmSwitchBar.addOnSwitchChangeListener(this);// 3. 注册广播接收器,监听系统Wi-Fi热点状态变化mContext.registerReceiver(mReceiver, WIFI_intent_FILTER, Context.RECEIVER_EXPORTED_UNAUDITED);// 4. 初始化界面状态:获取当前热点状态并更新UIhandleWifiApStateChanged(mWifiManager.getWifiApState());
}
核心作用:确保界面显示时,能实时响应系统和用户的操作变化。
-
监听数据节省模式:如果用户开启了数据节省模式,可能需要禁用热点功能。
-
监听开关变化:当用户点击主开关时,执行开启或关闭热点的逻辑。
-
监听系统状态:当热点被其他方式(如快捷设置、ADB命令)开启或关闭时,及时更新开关状态。
2.1.2 onStop()方法:界面不可见时的清理工作
@Override
public void onStop() {// 1. 移除数据节省模式的监听mDataSaverBackend.remListener(this);// 2. 移除开关的监听器(防止内存泄漏)mSwitchBar.removeOnSwitchChangeListener(this);// 3. 注销广播接收器mContext.unregisterReceiver(mReceiver);
}
核心作用:防止资源浪费和内存泄漏。当设置界面不可见时,不再需要接收系统事件。
2.2 热点功能的业务执行 (startTether和 stopTether)
这段代码是真正执行热点开启和关闭命令的地方,是连接UI和系统服务(ConnectivityManager)的桥梁。
2.2.1 isWifiApActivated()- 状态检查器
private boolean isWifiApActivated() {final int wifiApState = mWifiManager.getWifiApState();// 判断状态是否为“正在开启”或“已开启”return (wifiApState == WIFI_AP_STATE_ENABLED || wifiApState == WIFI_AP_STATE_ENABLING);
}
作用:获取热点的真实状态,用于防止重复操作。
2.2.2 startTether()- 启动热点
void startTether() {if (isWifiApActivated()) return; // 已开启则直接返回,防止重复调用mSwitchBar.setEnabled(false); // 立即禁用开关,提供视觉反馈,防止用户重复点击mConnectivityManager.startTethering(TETHERING_WIFI, true, mOnStartTetheringCallback, new Handler(Looper.getMainLooper()));
}
mConnectivityManager.startTethering参数解析:
-
TETHERING_WIFI:指定共享类型为 Wi-Fi 热点。 -
true:在需要时显示运营商验证界面。 -
mOnStartTetheringCallback:回调接口,用于接收启动成功或失败的结果。
new Handler(Looper.getMainLooper()):指定回调在主线程执行,以便安全更新UI。
2.2.3 stopTether()- 停止热点
void stopTether() {if (!isWifiApActivated()) return; // 已关闭则直接返回mSwitchBar.setEnabled(false); // 禁用开关mConnectivityManager.stopTethering(TETHERING_WIFI); // 调用系统服务停止热点
}
2.2.4 错误异步回调函数
Android Wi-Fi 热点功能中处理启动失败情况的错误回调函数,专门用于处理 Wi-Fi 热点启动失败的场景。它是确保热点功能稳定性和用户体验的关键部分。
final ConnectivityManager.OnStartTetheringCallback mOnStartTetheringCallback =new ConnectivityManager.OnStartTetheringCallback() {@Overridepublic void onTetheringFailed() {super.onTetheringFailed(); // 1. 首先调用父类方法Log.e(TAG, "Failed to start Wi-Fi Tethering."); // 2. 记录错误日志handleWifiApStateChanged(mWifiManager.getWifiApState()); // 3. 更新UI状态}};
2.2.5 两段代码的协同工作流程
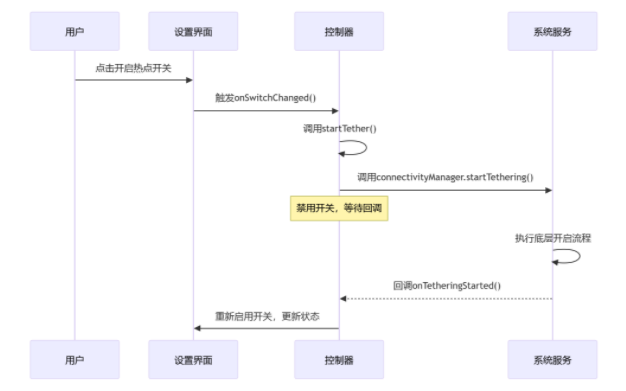
-
用户打开设置界面:触发控制器的
onStart()方法,开始监听各种状态。 -
用户点击开关:开关的监听器(在
onStart()中注册)被触发,调用startTether()或stopTether()方法。 -
执行系统调用:
startTether()方法通过ConnectivityManager向系统服务发出指令。 -
处理异步结果:系统服务在后台完成操作后,通过
mOnStartTetheringCallback回调通知控制器,控制器再更新UI(如重新启用开关)。 -
用户离开界面:触发
onStop()方法,清理所有监听器。
2.2.6 处理主开关状态变化的核心业务逻辑 - onSwitchChanged
onSwitchChanged是一个事件监听器。当用户在设置界面中点击 Wi-Fi 热点的总开关时,系统就会调用这个方法。它的主要职责是:根据开关的新状态 (isChecked) 和设备的复杂状态(网络、SIM卡等),执行正确的后续流程。

//modify for Wi-Fi hotspot requirement by lit task 10153072 start
@Override
public void onSwitchChanged(Switch switchView, boolean isChecked) {// 检查开关是否可用,如果禁用则直接返回if (!switchView.isEnabled()) return;if (isChecked) {// 用户尝试开启热点if (!mWifiManager.isWifiApEnabled()) {// 热点当前未启用,执行开启前的条件检查if (!HotspotCheckProvision.isHotspotEntitlementProject()) {// 不需要运营商验证,直接开启热点startTether();return;}// 需要运营商验证,检查各种前提条件if (HotspotCheckProvision.isNoInsertSimCard()) {// 情况1: 未插入SIM卡CreateDialog createDialog = new CreateDialog(mContext, null, null);createDialog.createDialog(false, createDialog.Type.NO_SIM_NETWORK);mSwitchBar.setChecked(false); // 重置开关状态} else if (HotspotCheckProvision.isSuccess(mContext)) {// 情况2: SIM卡存在且套餐支持if (isRoaming(mConnectivityManager)) {showRoamingDialog(); // 漫游状态提示} else if (shouldWarn()) {showWarningMsg(); // 其他警告信息} else {startTether(); // 所有条件满足,开启热点}} else {// 情况3: 需要运营商套餐验证hotspotCheckProvision = new HotspotCheckProvision(mContext, checkRunnable);hotspotCheckProvision.checkMobileHotspotFeature();}}} else if (mWifiManager.isWifiApEnabled()) {// 用户尝试关闭已开启的热点stopTether();}
}
总结
这个控制类为按钮设置的点击事件,点击事件里面就开始了开启wifi热点的流程 startTether()
startTether() 执行了 mConnectivityManager.startTethering()然后就进入到了 ConnectivityManager 类里面。
3. ConnectivityManager类
代码位置:packages/modules/Connectivity/framework/src/android/net/wifi/ConnectivityManager.java
public void startTethering(int type, boolean showProvisioningUi,final OnStartTetheringCallback callback, Handler handler) {Objects.requireNonNull(callback, "OnStartTetheringCallback cannot be null.");//线程调度final Executor executor = new Executor() {@Overridepublic void execute(Runnable command) {if (handler == null) {comman// 如果未提供Handler,则在当前线程同步执行d.run();} else {handler.post(command); // 如果提供了Handler,则投递到指定线程执行}}};//回调包装final StartTetheringCallback tetheringCallback = new StartTetheringCallback() {@Overridepublic void onTetheringStarted() {callback.onTetheringStarted(); // 将新回调的成功事件转发给旧回调}@Overridepublic void onTetheringFailed(final int error) {callback.onTetheringFailed(); // 将新回调的失败事件转发给旧回调(注意:这里丢弃了error细节)}};final TetheringRequest request = new TetheringRequest.Builder(type).setShouldShowEntitlementUi(showProvisioningUi).build();getTetheringManager().startTethering(request, executor, tetheringCallback);}
-
@SystemApi:表明这是一个系统级 API,只有系统应用(如 Settings)或具有系统签名的应用才能调用。普通第三方应用无法使用。 -
@Deprecated:明确的标记,表示这个方法已经过时,谷歌不推荐继续使用。开发者应该转向使用新的、更优的替代方法。 -
@RequiresPermission:声明调用此方法需要TETHER_PRIVILEGED权限,这是一个只有系统应用才能持有的高级权限,确保了网络共享功能的安全性。
参数说明:
-
int type:共享类型,如TETHERING_WIFI、TETHERING_USB。 -
boolean showProvisioningUi:是否显示运营商配置界面(用于检查用户套餐是否支持热点)。 -
OnStartTetheringCallback callback:回调接口,用于接收操作结果(成功或失败)。
Handler handler:指定回调方法在哪个线程执行。
getTetheringManager().startTethering() 指向了TetheringManager中
4.TetheringManager类
代码位置:packages/modules/Connectivity/Tethering/common/TetheringLib/src/android/net/TetheringManager.java
Android 系统中 TetheringManager.startTethering方法的实现是一个完整的、基于异步 Binder IPC 通信的系统服务调用流程。
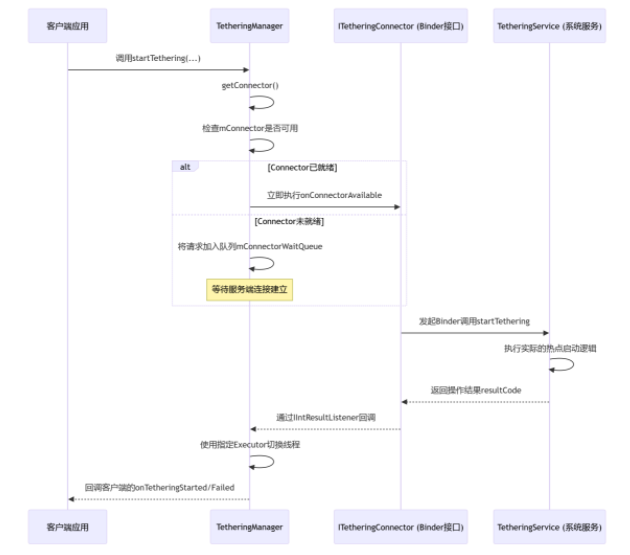
public void startTethering(@NonNull final TetheringRequest request,@NonNull final Executor executor, @NonNull final StartTetheringCallback callback) {final String callerPkg = mContext.getOpPackageName();Log.i(TAG, "startTethering caller:" + callerPkg);final IIntResultListener listener = new IIntResultListener.Stub() {@Overridepublic void onResult(final int resultCode) {executor.execute(() -> {if (resultCode == TETHER_ERROR_NO_ERROR) {callback.onTetheringStarted();} else {callback.onTetheringFailed(resultCode);}});}};getConnector(c -> c.startTethering(request.getParcel(), callerPkg,getAttributionTag(), listener));}private void getConnector(ConnectorConsumer consumer) {final ITetheringConnector connector;synchronized (mConnectorWaitQueue) {connector = mConnector;if (connector == null) {mConnectorWaitQueue.add(consumer);return;}}try {consumer.onConnectorAvailable(connector);} catch (RemoteException e) {throw new IllegalStateException(e);}}private interface ConnectorConsumer {void onConnectorAvailable(ITetheringConnector connector) throws RemoteException;}
ConnectorConsumer 本质是一个 “服务就绪回调” 的抽象,它将 “获取 ITetheringConnector” 和 “使用 ITetheringConnector 执行操作” 这两个步骤解耦,优雅地处理了跨进程服务连接的异步性,保证了在服务就绪后能可靠执行后续的网络共享(如热点开启)操作。
consumer.onConnectorAvailable(connector)就相当于调用了connector.startTethering()
ITetheringConnector connector 是一个aidl 接口,跨进程进去到了
packages/modules/Connectivity/Tethering/src/com/android/networkstack/tethering/TetheringService.java
5. TetheringService类
Android 网络共享框架中,Binder 服务端接口的具体实现。它位于系统服务进程(如 TetheringService)中,是客户端调用(如 TetheringManager)的最终处理端。
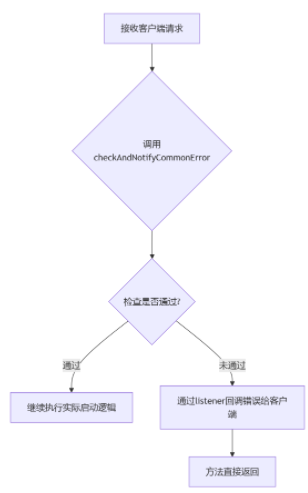
这段代码是 ITetheringConnector.Stub的一个方法实现,它作为Binder IPC 的服务端,负责接收来自客户端的“启动网络共享”请求,并进行权限校验和请求转发。
@Overridepublic void startTethering(TetheringRequestParcel request, String callerPkg,String callingAttributionTag, IIntResultListener listener) {if (checkAndNotifyCommonError(callerPkg,callingAttributionTag,request.exemptFromEntitlementCheck /* onlyAllowPrivileged */,listener)) {return;}mTethering.startTethering(request, listener);}
Override:表明这是对接口中定义方法的具体实现。
参数分析:
-
TetheringRequestParcel request:客户端序列化后的请求参数(如共享类型、配置等)。 -
String callerPkg:调用方的包名,用于权限和身份验证。 -
String callingAttributionTag:调用方的归属标签(用于权限跟踪)。 -
IIntResultListener listener:回调接口,用于将操作结果异步返回给客户端。
这段代码是系统服务中一个典型的 Binder 接口实现,它体现了 Android 框架的安全设计原则:
-
安全性:所有客户端请求都必须通过严格的前置检查。
-
异步通信:通过
IIntResultListener异步返回结果,不阻塞客户端。
模块化:清晰的层次分离,权限检查、路由转发、业务实现各司其职。

mTethering.startTethering(request, listener);的调用,又进入到Tethering类中
6. Tethering类
代码位置:packages/modules/Connectivity/Tethering/src/com/android/networkstack/tethering/Tethering.java
/*** 启动网络共享(热点)的核心方法* @param request 网络共享请求参数(包含类型、配置等)* @param listener 异步结果回调监听器*/
void startTethering(final TetheringRequestParcel request, final IIntResultListener listener) {// 通过Handler切换到后台线程执行,避免阻塞Binder调用线程mHandler.post(() -> {// 获取当前同类型共享的未完成请求final TetheringRequestParcel unfinishedRequest = mActiveTetheringRequests.get(request.tetheringType);// 如果存在未完成的且配置不同的请求,先停止它if (unfinishedRequest != null && !TetheringUtils.isTetheringRequestEquals(unfinishedRequest, request)) {enableTetheringInternal(request.tetheringType, false /* disabled */, null);mEntitlementMgr.stopProvisioningIfNeeded(request.tetheringType);}// 记录新的活动请求mActiveTetheringRequests.put(request.tetheringType, request);// 根据是否需要运营商验证执行不同流程if (request.exemptFromEntitlementCheck) {// 免验证场景:直接设置豁免的下游类型mEntitlementMgr.setExemptedDownstreamType(request.tetheringType);} else {// 需要验证:启动运营商授权流程mEntitlementMgr.startProvisioningIfNeeded(request.tetheringType, request.showProvisioningUi);}// 执行实际的启用操作enableTetheringInternal(request.tetheringType, true /* enabled */, listener);});
}/*** 停止网络共享的核心方法* @param type 共享类型(如Wi-Fi热点、USB共享等)*/
void stopTethering(int type) {// 同样在后台线程执行停止操作mHandler.post(() -> {stopTetheringInternal(type);});
}
该代码在Android 网络共享框架中,处理 startTethering和 stopTethering请求的核心业务逻辑。这段代码位于系统服务进程内,是真正执行热点开启和关闭命令的地方。
核心参数
TetheringRequestParcel request:序列化的请求对象,包含:
-
tetheringType:共享类型(Wi-Fi/USB/蓝牙) -
exemptFromEntitlementCheck:是否免运营商验证 -
showProvisioningUi:是否显示验证界面
-
IIntResultListener listener:异步回调接口,用于返回操作结果
重要成员变量
-
mHandler:确保线程安全的Handler -
mActiveTetheringRequests:活动请求映射表,用于冲突检测 -
mEntitlementMgr:运营商授权管理器
关键方法调用
-
enableTetheringInternal():实际启用/禁用共享功能 -
stopTetheringInternal():内部停止共享的实现
TetheringUtils.isTetheringRequestEquals():比较请求配置是否相同
enableTetheringInternal():实际启用/禁用共享功能
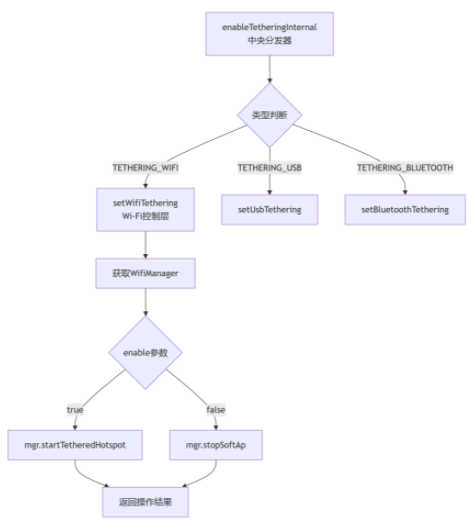
开启wifi热点执行 result = setWifiTethering(enable);
private void enableTetheringInternal(int type, boolean enable,final IIntResultListener listener) {int result = TETHER_ERROR_NO_ERROR;switch (type) {case TETHERING_WIFI:result = setWifiTethering(enable);break;case TETHERING_USB:result = setUsbTethering(enable);break;case TETHERING_BLUETOOTH:setBluetoothTethering(enable, listener);break;case TETHERING_NCM:result = setNcmTethering(enable);break;case TETHERING_ETHERNET:result = setEthernetTethering(enable);break;default:Log.w(TAG, "Invalid tether type.");result = TETHER_ERROR_UNKNOWN_TYPE;}// The result of Bluetooth tethering will be sent by #setBluetoothTethering.if (type != TETHERING_BLUETOOTH) {sendTetherResult(listener, result, type);}}private int setWifiTethering(final boolean enable) {final long ident = Binder.clearCallingIdentity();try {final WifiManager mgr = getWifiManager();if (mgr == null) {mLog.e("setWifiTethering: failed to get WifiManager!");return TETHER_ERROR_SERVICE_UNAVAIL;}if ((enable && mgr.startTetheredHotspot(null /* use existing softap config */))|| (!enable && mgr.stopSoftAp())) {mWifiTetherRequested = enable;return TETHER_ERROR_NO_ERROR;}} finally {Binder.restoreCallingIdentity(ident);}return TETHER_ERROR_INTERNAL_ERROR;}
核心代码:
if ((enable && mgr.startTetheredHotspot(null)) || (!enable && mgr.stopSoftAp())) {mWifiTetherRequested = enable;  // 更新内部状态return TETHER_ERROR_NO_ERROR;   // 操作成功
}
startTetheredHotspot(null):启用热点,null参数表示使用现有配置。-
stopSoftAp():停止软接入点(Soft AP)
startTetheredHotspot里面传了一个空的参数,这个参数是有意义的,代表在开启热点时,会根据配置文件的内容决定开启热点的参数。这个配置文件在手机的data/misc/apexdata/com.android.wifi/下。里面有两个配置文件,一个是wifi的,一个是热点的。
WifiConfigStore.xml WifiConfigStoreSoftAp.xml
执行这个方法后又进入到了WifiManager类。
7. WifiManager 类
代码位置:packages/modules/Wifi/framework/java/android/net/wifi/WifiManager.java
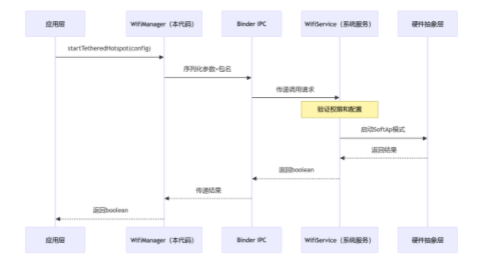
下述代码是 Android 框架中 WifiManager.startTetheredHotspot方法的客户端实现。这是一个典型的Binder IPC 客户端代理模式的实现,负责将应用层的调用转发给系统服务。
public boolean startTetheredHotspot(@Nullable SoftApConfiguration softApConfig) {try {return mService.startTetheredHotspot(softApConfig, mContext.getOpPackageName());} catch (RemoteException e) {throw e.rethrowFromSystemServer();}}
这段代码是 客户端存根(Client Stub),它作为应用程序与系统服务 WifiService之间的桥梁。它的主要职责是:接收应用层的热点启动请求,将其序列化并通过 Binder IPC 传递给系统服务进程执行。
-
返回值:
boolean,表示启动请求是否成功发送(注意:不代表热点已成功启动)。 -
参数:
@Nullable SoftApConfiguration softApConfig -
SoftApConfiguration:包含热点配置(SSID、密码、频段等)的对象。
@Nullable:表示该参数可以为 null。如果为 null,系统将使用上次的配置或默认配置
核心 IPC 调用
return mService.startTetheredHotspot(softApConfig, mContext.getOpPackageName());
这是整个方法的核心所在:
-
mService:这是一个 Binder 代理对象(通常为IWifiManager类型),它指向运行在system_server进程中的真正的WifiService。
跨进程调用:当调用 mService.startTetheredHotspot()时,实际上发生了:
-
参数被序列化(Parcelable)
-
通过 Binder 驱动将请求发送到系统服务进程
-
系统服务执行实际的热点启动逻辑
-
将布尔结果返回给客户端
mContext.getOpPackageName():这是关键的安全措施。它获取调用方的包名,并传递给系统服务。系统服务会用这个包名来:
-
权限验证:检查该应用是否有
TETHER_PRIVILEGED等权限 -
资源记账:跟踪是哪个应用发起的请求
-
归属统计:用于应用行为分析和系统统计
异常处理
} catch (RemoteException e) {throw e.rethrowFromSystemServer();
}
这是 Binder IPC 的标准错误处理模式:
RemoteException:在以下情况发生时抛出:
-
系统服务进程崩溃或重启
-
Binder 缓冲区已满
-
权限验证失败
rethrowFromSystemServer():将原始的 Binder 异常重新包装为 RuntimeException,这样调用方就不需要显式捕获受检异常,简化了客户端代码
该代码在完整架构中的位置:
mService.startTetheredHotspot()又是一个aidl 接口。进入到了
packages/modules/Wifi/service/java/com/android/server/wifi/WifiServiceImpl.java 里面
8. WifiServiceImpl类
代码位置packages/modules/Wifi/service/java/com/android/server/wifi/WifiServiceImpl.java
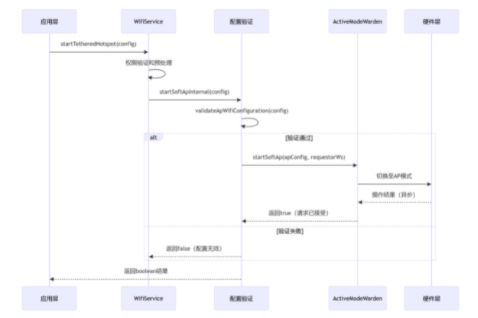
这是 Wi-Fi 热点启动流程的核心安全控制点和业务逻辑入口。这段代码运行在 system_server系统服务进程中,是热点启动请求的最终处理者。它负责执行严格的权限验证、用户限制检查,并协调多个内部组件来安全地启动热点。
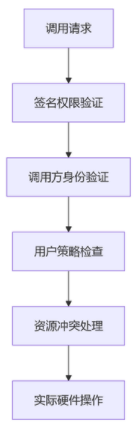
public boolean startTetheredHotspot(@Nullable SoftApConfiguration softApConfig,@NonNull String packageName) {// NETWORK_STACK is a signature only permission.enforceNetworkStackPermission();int callingUid = Binder.getCallingUid();mWifiPermissionsUtil.checkPackage(callingUid, packageName);// If user restriction is set, cannot start softapif (mWifiTetheringDisallowed) {mLog.err("startTetheredHotspot with user restriction: not permitted").flush();return false;}mLog.info("startTetheredHotspot uid=%").c(callingUid).flush();// TODO: b/233363886, handle timeout in general way.if (!checkSetEnablingIfAllowed()) {return false;}WorkSource requestorWs = new WorkSource(callingUid, packageName);if (!mWifiThreadRunner.call(() -> mActiveModeWarden.canRequestMoreSoftApManagers(requestorWs), false)) {// Take down LOHS if it is up.mLohsSoftApTracker.stopAll();}if (!startSoftApInternal(new SoftApModeConfiguration(WifiManager.IFACE_IP_MODE_TETHERED, softApConfig,mTetheredSoftApTracker.getSoftApCapability()), requestorWs)) {mTetheredSoftApTracker.setFailedWhileEnabling();return false;}mLastCallerInfoManager.put(WifiManager.API_TETHERED_HOTSPOT, Process.myTid(),callingUid, Binder.getCallingPid(), packageName, true);return true;}
执行了 startSoftApInternal()
private boolean startSoftApInternal(SoftApModeConfiguration apConfig, WorkSource requestorWs) {int uid = Binder.getCallingUid();boolean privileged = isSettingsOrSuw(Binder.getCallingPid(), uid);mLog.trace("startSoftApInternal uid=% mode=%").c(uid).c(apConfig.getTargetMode()).flush();// null wifiConfig is a meaningful input for CMD_SET_AP; it means to use the persistent// AP config.SoftApConfiguration softApConfig = apConfig.getSoftApConfiguration();if (softApConfig != null&& (!WifiApConfigStore.validateApWifiConfiguration(softApConfig, privileged, mContext))) {Log.e(TAG, "Invalid SoftApConfiguration");return false;}mActiveModeWarden.startSoftAp(apConfig, requestorWs);return true;}
这个方法是将经过所有安全验证的请求最终下发到硬件驱动层的关键环节。
核心功能概括
startSoftApInternal方法是一个配置验证和任务分发器,它负责:
-
验证热点配置的合法性
-
将合法的配置请求转发给硬件控制层
-
返回操作是否被成功接受
之后执行mActiveModeWarden.startSoftAp(apConfig, requestorWs);进入packages/modules/Wifi/service/java/com/android/server/wifi/ActiveModeWarden.java
public void startSoftAp(SoftApModeConfiguration softApConfig, WorkSource requestorWs) {stopStaIfRequired(softApConfig, requestorWs);mWifiController.sendMessage(WifiController.CMD_SET_AP, 1, 0,Pair.create(softApConfig, requestorWs));}
这里执行了mWifiController.sendMessage(WifiController.CMD_SET_AP, 1, 0, Pair.create(softApConfig, requestorWs));发送了一条消息进入到了ActiveModeWarden 的 内部类 EnabledState 里面
case CMD_SET_AP:// note: CMD_SET_AP is handled/dropped in ECM mode - will not start hereif (msg.arg1 == 1) {Pair<SoftApModeConfiguration, WorkSource> softApConfigAndWs =(Pair) msg.obj;startSoftApModeManager(softApConfigAndWs.first, softApConfigAndWs.second);} else {stopSoftApModeManagers(msg.arg2);}break;
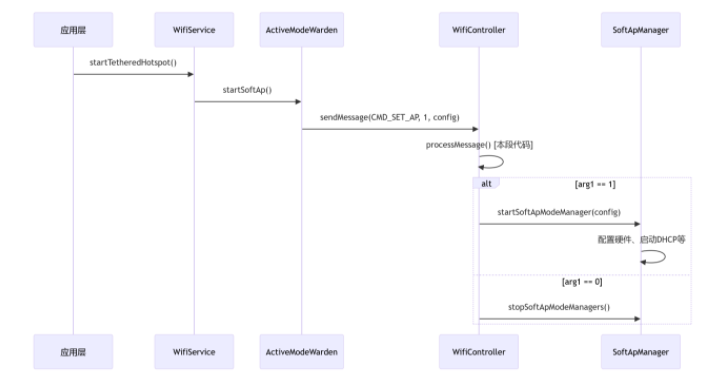
这里又执行了startSoftApModeManager(softApConfigAndWs.first, softApConfigAndWs.second();
private void startSoftApModeManager(@NonNull SoftApModeConfiguration softApConfig, @NonNull WorkSource requestorWs) {Log.d(TAG, "Starting SoftApModeManager config = " + softApConfig.getSoftApConfiguration());Preconditions.checkState(softApConfig.getTargetMode() == IFACE_IP_MODE_LOCAL_ONLY|| softApConfig.getTargetMode() == IFACE_IP_MODE_TETHERED);WifiServiceImpl.SoftApCallbackInternal callback =softApConfig.getTargetMode() == IFACE_IP_MODE_LOCAL_ONLY? mLohsCallback : mSoftApCallback;SoftApManager manager = mWifiInjector.makeSoftApManager(new SoftApListener(), callback, softApConfig, requestorWs,getRoleForSoftApIpMode(softApConfig.getTargetMode()), mVerboseLoggingEnabled);mSoftApManagers.add(manager);}
这里的callback 传入的 mLohsCallback 。
后面又执行了mWifiInjector.makeSoftApManager()方法。进入到WifiInjector类
9. WifiInjector类
代码位置:packages/modules/Wifi/service/java/com/android/server/wifi/WifiInjector.java
public SoftApManager makeSoftApManager(@NonNull ActiveModeManager.Listener<SoftApManager> listener,@NonNull WifiServiceImpl.SoftApCallbackInternal callback,@NonNull SoftApModeConfiguration config,@NonNull WorkSource requestorWs,@NonNull ActiveModeManager.SoftApRole role,boolean verboseLoggingEnabled) {return new SoftApManager(mContext, mWifiHandlerThread.getLooper(),mFrameworkFacade, mWifiNative, mCoexManager, makeBatteryManager(),mCountryCode.getCountryCode(), listener, callback, mWifiApConfigStore,config, mWifiMetrics, mSarManager, mWifiDiagnostics,new SoftApNotifier(mContext, mFrameworkFacade, mWifiNotificationManager),mCmiMonitor, mActiveModeWarden, mClock.getElapsedSinceBootMillis(),requestorWs, role, verboseLoggingEnabled);}
这里直接new了一个SoftApManger。进入到了构造方法里面。
// null is a valid input and means we use the user-configured tethering settings.if (mCurrentSoftApConfiguration == null) {mCurrentSoftApConfiguration = mWifiApConfigStore.getApConfiguration();// may still be null if we fail to load the default config}mStateMachine = new SoftApStateMachine(looper); // 在这里真正的创建了热点的状态机mStateMachine.sendMessage(SoftApStateMachine.CMD_START, requestorWs);
由于之前的config 一直是空的,所以 mWifiApConfigStore.getApConfiguration() 这里面就从配置文件里,获取了热点的配置信息。
最后send一个message。由 SoftApManager 的内部类 IdleState processMessage() 捕获处理.
int result = startSoftAp();
private int startSoftAp() {if (SdkLevel.isAtLeastS()) {Log.d(getTag(), "startSoftAp: channels " + mCurrentSoftApConfiguration.getChannels()+ " iface " + mApInterfaceName + " country " + mCountryCode);} else {Log.d(getTag(), "startSoftAp: band " + mCurrentSoftApConfiguration.getBand());}int result = setMacAddress();if (result != SUCCESS) {return result;}result = setCountryCode();if (result != SUCCESS) {return result;}// Make a copy of configuration for updating AP band and channel.SoftApConfiguration.Builder localConfigBuilder =new SoftApConfiguration.Builder(mCurrentSoftApConfiguration);result = ApConfigUtil.updateApChannelConfig(mWifiNative, mCoexManager, mContext.getResources(), mCountryCode,localConfigBuilder, mCurrentSoftApConfiguration, mCurrentSoftApCapability);if (result != SUCCESS) {Log.e(getTag(), "Failed to update AP band and channel");return result;}if (mCurrentSoftApConfiguration.isHiddenSsid()) {Log.d(getTag(), "SoftAP is a hidden network");}if (!ApConfigUtil.checkSupportAllConfiguration(mCurrentSoftApConfiguration, mCurrentSoftApCapability)) {Log.d(getTag(), "Unsupported Configuration detect! config = "+ mCurrentSoftApConfiguration);return ERROR_UNSUPPORTED_CONFIGURATION;}if (!mWifiNative.startSoftAp(mApInterfaceName,localConfigBuilder.build(),mOriginalModeConfiguration.getTargetMode() == WifiManager.IFACE_IP_MODE_TETHERED,mSoftApHalCallback)) {Log.e(getTag(), "Soft AP start failed");return ERROR_GENERIC;}mWifiDiagnostics.startLogging(mApInterfaceName);mStartTimestamp = FORMATTER.format(new Date(System.currentTimeMillis()));Log.d(getTag(), "Soft AP is started ");return SUCCESS;}
主要是调用mWifiNative.startSoftAp()方法
public boolean startSoftAp(@NonNull String ifaceName, SoftApConfiguration config, boolean isMetered,SoftApHalCallback callback) {if (mHostapdHal.isApInfoCallbackSupported()) {if (!mHostapdHal.registerApCallback(ifaceName, callback)) {Log.e(TAG, "Failed to register ap hal event callback");return false;}} else {SoftApHalCallbackFromWificond softApHalCallbackFromWificond =new SoftApHalCallbackFromWificond(ifaceName, callback);if (!mWifiCondManager.registerApCallback(ifaceName,Runnable::run, softApHalCallbackFromWificond)) {Log.e(TAG, "Failed to register ap hal event callback from wificond");return false;}}if (!addAccessPoint(ifaceName, config, isMetered, callback)) {Log.e(TAG, "Failed to add acccess point");mWifiMetrics.incrementNumSetupSoftApInterfaceFailureDueToHostapd();return false;}return true;}
后面会进入到
packages\modules\Wifi\service\java\com\android\server\wifi\HostapdHal.java
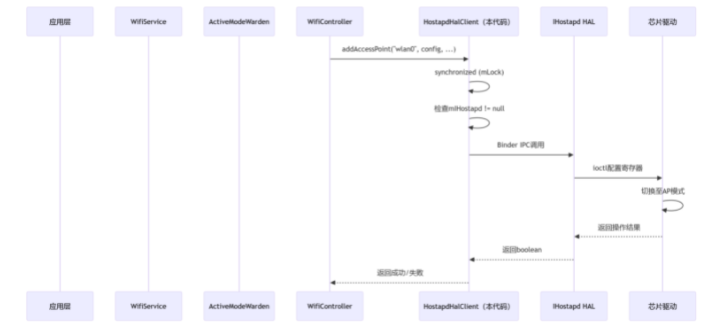
10. HostapdHal类
该代码为Android Wi-Fi 热点架构中最底层的硬件抽象层(HAL)接口调用。这是整个热点启动流程的最终执行点,直接与 Wi-Fi 芯片驱动进行交互。
/*** Add and start a new access point.** @param ifaceName Name of the interface.* @param config Configuration to use for the AP.* @param isMetered Indicates the network is metered or not.* @param onFailureListener A runnable to be triggered on failure.* @return true on success, false otherwise.*/
public boolean addAccessPoint(@NonNull String ifaceName, @NonNull SoftApConfiguration config,boolean isMetered, @NonNull Runnable onFailureListener) {synchronized (mLock) {String methodStr = "addAccessPoint";if (mIHostapd == null) {return handleNullHostapd(methodStr);}return mIHostapd.addAccessPoint(ifaceName, config, isMetered, onFailureListener);}
}
-
线程安全: 使用
synchronized (mLock)确保多线程环境下的安全访问 -
空值检查: 验证
mIHostapdHAL 服务对象是否可用 -
错误处理: 通过
handleNullHostapd()处理服务不可用的情况 -
底层调用: 最终调用
mIHostapd.addAccessPoint()执行实际的硬件操作
在完整架构中的位置
11.完整工作流程

详细流程解析
第一阶段:用户交互与权限校验 (App → Framework)
用户点击开关
-
界面层:
Settings应用中的WifiTetherSettings界面响应用户点击。 -
代码入口:
onSwitchChanged()方法被触发,isChecked为true。
发起系统调用
- 调用链:
Settings应用通过ConnectivityManager.startTethering(TETHERING_WIFI, ...)发起系统调用。 - 权限检查: 系统验证调用者是否具有
TETHER_PRIVILEGED等高阶权限。
第二阶段:策略检查与路由 (TetheringService)
策略引擎处理
- 入口:
TetheringService.enableTetheringInternal(TETHERING_WIFI, true, callback)。
关键检查:
-
SIM 卡与套餐: 通过
EntitlementManager检查用户移动套餐是否支持热点功能。 -
漫游状态: 若设备处于漫游状态,可能弹出提示框警告用户。
-
双频支持: 检查并配置 2.4GHz/5GHz/6GHz 等多频段支持。
第三阶段:Wi-Fi 服务处理 (WifiService)
配置验证
-
入口:
WifiService.startSoftApInternal(softApConfig, requestorWs)。 -
验证内容: 验证 SSID、密码长度、加密方式等
SoftApConfiguration的合法性。
资源仲裁与模式切换
- 决策者:
ActiveModeWarden.startSoftAp(apConfig, requestorWs)。 - 关键决策: 调用
stopStaIfRequired()判断是否需要先断开当前的 Wi-Fi 连接(STA 模式),因为大部分硬件不支持 STA 和 AP 模式并发。
第四阶段:状态机与硬件抽象层 (WifiController → HAL)
状态机处理
-
核心:
WifiController状态机接收CMD_SET_AP消息。 -
路由: 根据
msg.arg1 == 1判断是启动命令,路由到startSoftApModeManager。
驱动层调用
- 最终执行:
HostapdHalClient.addAccessPoint(ifaceName, config, isMetered, listener)。 - 硬件操作: 通过 Binder IPC 调用
IHostapdHAL 服务,最终将配置下发给 Linux 内核的hostapd进程和 Wi-Fi 驱动。
第五阶段:网络服务启动 (内核空间)
软接入点启动
-
内核操作: Wi-Fi 驱动将芯片切换到 AP(接入点)模式。
-
接口启动: 启动虚拟接口(如
wlan0或ap0)并分配 IP 地址(通常是192.168.43.1)。
服务进程启动
- DHCP 服务: 启动
dnsmasq或hostapd内嵌的 DHCP 服务器,为连接的客户端分配 IP。 - NAT 设置: 配置
iptables规则,实现蜂窝数据到 Wi-Fi 热点的网络地址转换(NAT)。
第六阶段:结果回调与状态同步
异步结果通知
-
成功路径: 通过
IIntResultListener.onResult(TETHER_ERROR_NO_ERROR)逐层回调到 UI。 -
失败处理: 通过
onTetheringFailed(errorCode)返回具体错误码(如无 SIM 卡、无数据连接等)。 -
UI 更新:
Settings应用收到回调后,更新开关状态并显示给用户。
Android 13 热点新特性
在此流程中,Android 13 引入了以下关键特性:
-
默认 WPA3 加密: 新热点默认使用更安全的 WPA3-SAE 加密(如果硬件支持)。
-
智能频段选择: 自动根据环境拥堵情况选择 2.4GHz、5GHz 或 6GHz 频段。
-
增强的权限模型: 使用
NEARBY_WIFI_DEVICES权限替代粗略位置权限。 -
自动关闭超时: 可配置无设备连接时自动关闭热点以节省电量。
总结
Android 13 的热点启动流程是一个复杂的系统工程,涉及:
-
6+ 个系统进程间的 Binder IPC 通信
-
3 层以上的权限与策略校验
-
硬件抽象层(HAL)到 Linux 内核的深度交互
这种分层架构和异步通信模型确保了功能的安全性、稳定性和可扩展性,是 Android 系统设计精髓的集中体现。整个流程在用户无感知的情况下,通常在 2-5 秒内 完成,提供了流畅的用户体验。