JavaWeb后端实战(IOC+DI)
文章目录
- 一、开发规范
- 1.1 前后端混合开发
- 1.2 前后端分离开发
- 1.3 Restful
- 二、环境准备
- 2.1 Apifox
- 2.2 创建工程
- 三、查询部门
- 3.1 基本实现
- 3.2 统一响应结果
- 3.3 前后端联调
- 四、分层解耦
- 4.1 三层架构
- 4.1.1 三层架构
- 4.1.2 面向接口编程
- 4.2 分层解耦
- 4.2.1 问题分析
- 4.2.2 什么是耦合
- 4.2.3 解耦思路
- 4.3 IOC & DI入门
- 4.3.1 步骤
- 4.4 IOC详解
- 4.4.1 Bean的声明
- 4.4.2 组件扫描
- 4.5 DI详解
一、开发规范
1.1 前后端混合开发
特点:沟通成本高、分工不明确、不便管理、难以维护
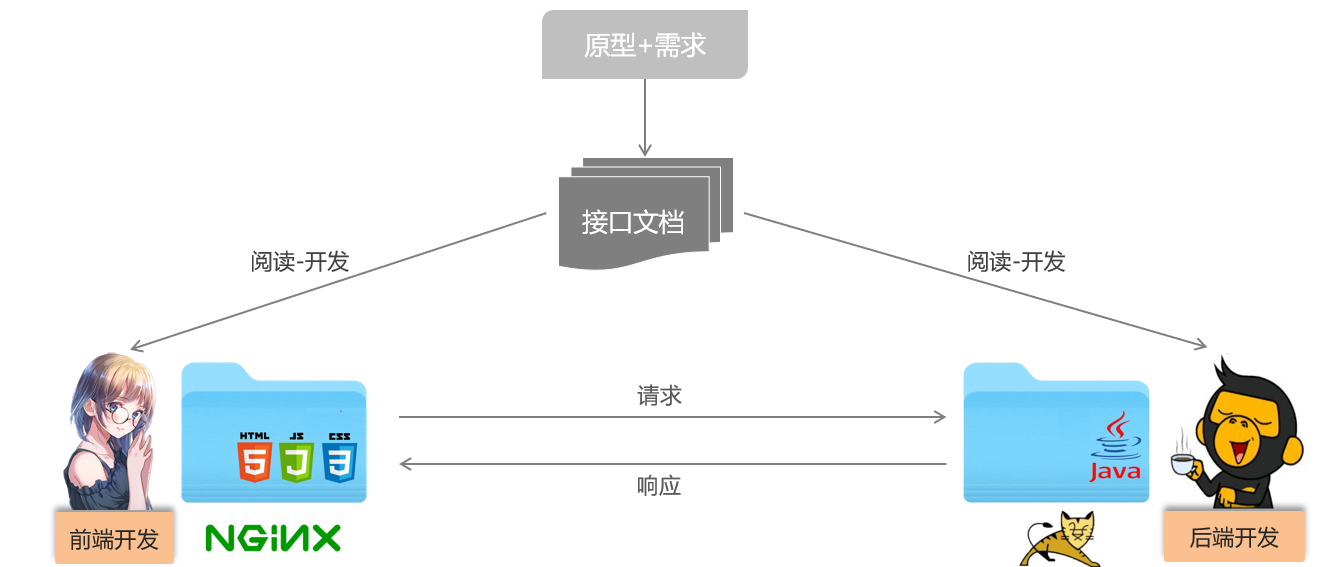
1.2 前后端分离开发
特点:当前最为主流的开发模式

1.3 Restful
REST(REpresentational State Transfer),表述性状态转换,他是一种软件架构风格
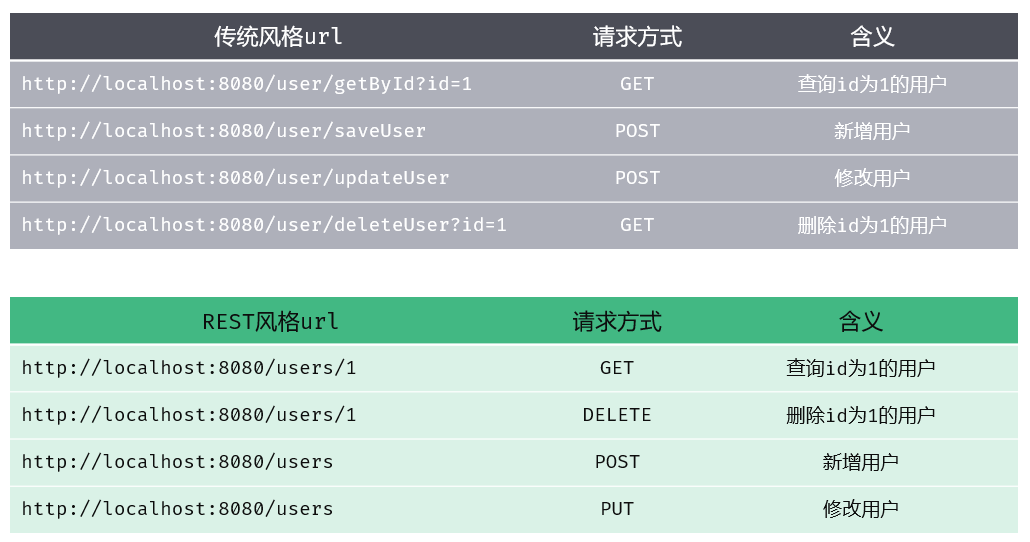
REST风格特点:
URL定义资源
HTTP动词描述操作
REST风格中的四种请求方式及对应的操作
GET:查询
POST:新增
PUT:修改
DELETE:删除
注意:
①REST是风格,是约定方式,约定不是规定,可以打破
②描述功能模块通常使用复数形式(加s),表示此类资源,而非单个资源,如:users、books……
二、环境准备
2.1 Apifox
介绍:Apifox是一款集成了api文档、api调试、Mock、Api测试的一体化协作平台
作用:接口文档管理、接口请求测试、Mock服务
2.2 创建工程
①创建SpringBoot工程,并引入web开发起步依赖、lombok。(额外引入commons-io工具包)
②准备基础包结构
注意:
commons-io——IO操作工具包
三、查询部门
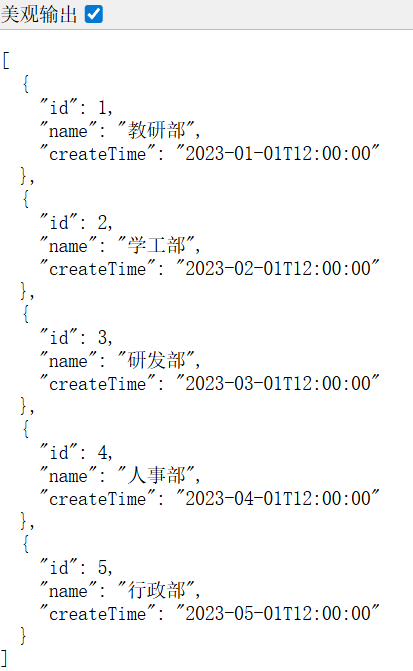
3.1 基本实现
1,教研部,2023-01-01 12:00:00
2,学工部,2023-02-01 12:00:00
3,研发部,2023-03-01 12:00:00
4,人事部,2023-04-01 12:00:00
5,行政部,2023-05-01 12:00:00
开发步骤:
①定义一个实体类Dept.java
@Data
@NoArgsConstructor
@AllArgsConstructor
public class Dept {private Integer id;private String name;private LocalDateTime createTime;
//    private LocalDateTime updateTime;
}
②定义一个请求处理类DeptContorller.java,目前没有涉及到数据库,使用Dept.txt来存储数据,先读取该文件,然后解析文本中的数据,并将其封装成集合然后将数据返回
/*** @author Tender* @date 2025/10/8 19:10*/package com.chenxd.controller;import com.chenxd.entity.Dept;
import org.apache.commons.io.IOUtils;
import org.springframework.web.bind.annotation.RequestMapping;
import org.springframework.web.bind.annotation.RestController;import java.io.InputStream;
import java.time.LocalDateTime;
import java.time.format.DateTimeFormatter;
import java.util.List;@RestController
public class DeptController {@RequestMapping("/depts")public List<Dept> getAll() {// 获取数据// getClass():获取当前对象的运行时类// getClassLoader():获取加载当前类的类加载器// getResourAsStream():通过类加载器查找指定资源,并返回一个 InputStream 流InputStream input = this.getClass().getClassLoader().getResourceAsStream("dept.txt");List<String> strings = IOUtils.readLines(input, "UTF-8");//2.解析文本中的数据,并将其封装成集合List<Dept>List<Dept> depts = strings.stream().map((str) -> {String[] parts = str.split(",");Integer id = Integer.valueOf(parts[0]);String name = parts[1];LocalDateTime updateTime = LocalDateTime.parse(parts[2], DateTimeFormatter.ofPattern("yyyy-MM-dd HH:mm:ss"));return new Dept(id, name, updateTime);}).toList();return depts;}
}
③测试,在浏览器输入http://localhost:8080/depts
注解:@Controller——标识类为 MVC 控制器,处理 HTTP 请求
注解:@ResponseBody——方法注解、类注解;作用与Controller方法上/类上;作用:将方法返回值直接响应,如果返回值类型是实体对象/集合,将会转为JSON格式响应
注解:@RestController——组合@Controller和@ResponseBody,返回数据直接作为响应体
提示:
前后端分离的项目中,一般直接在请求处理类上加@RestController注解,就无需在方法上加@RestController注解了。
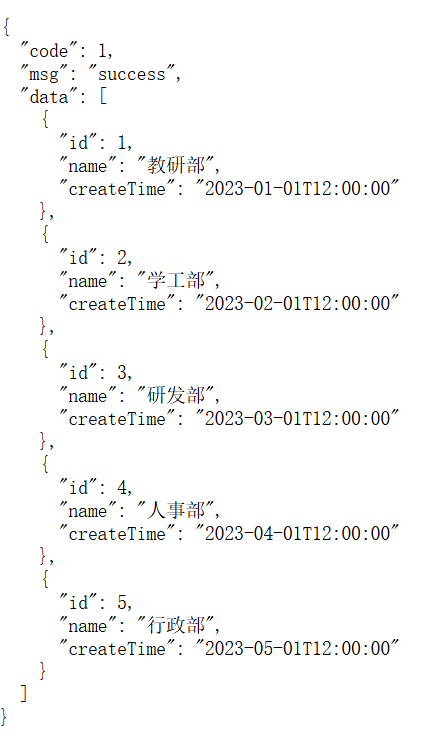
3.2 统一响应结果
无论执行的是增删改查什么样的业务操作,都返回一个统一的响应结果
为什么要统一响应结果:
所有的Controller的方法的返回值是各式各样的,什么样的都有,响应的结果,也是各式各样。 如果做一个大型项目,要实现的需求、功能非常多,如果按照这种方案来,最终就会造成项目不便管理、难以维护。
实现步骤:
①引入统一响应结果Result
package com.chenxd.entity;import lombok.Data;/*** 后端统一返回结果*/
@Data
public class Result {private Integer code; //编码:1成功,0为失败private String msg; //错误信息private Object data; //数据public static Result success() {Result result = new Result();result.code = 1;result.msg = "success";return result;}public static Result success(Object object) {Result result = new Result();result.data = object;result.code = 1;result.msg = "success";return result;}public static Result error(String msg) {Result result = new Result();result.msg = msg;result.code = 0;return result;}}
②改造DeptController中的方法返回值
/*** @author Tender* @date 2025/10/8 19:10*/package com.chenxd.controller;import com.chenxd.entity.Dept;
import com.chenxd.entity.Result;
import org.apache.commons.io.IOUtils;
import org.springframework.web.bind.annotation.RequestMapping;
import org.springframework.web.bind.annotation.RestController;import java.io.InputStream;
import java.time.LocalDateTime;
import java.time.format.DateTimeFormatter;
import java.util.List;@RestController
public class DeptController {@RequestMapping("/depts")public Result getAll() {// 获取数据// getClass():获取当前对象的运行时类// getClassLoader():获取加载当前类的类加载器// getResourAsStream():通过类加载器查找指定资源,并返回一个 InputStream 流InputStream input = this.getClass().getClassLoader().getResourceAsStream("dept.txt");List<String> strings = IOUtils.readLines(input, "UTF-8");//2.解析文本中的数据,并将其封装成集合List<Dept>List<Dept> depts = strings.stream().map((str) -> {String[] parts = str.split(",");Integer id = Integer.valueOf(parts[0]);String name = parts[1];LocalDateTime updateTime = LocalDateTime.parse(parts[2], DateTimeFormatter.ofPattern("yyyy-MM-dd HH:mm:ss"));return new Dept(id, name, updateTime);}).toList();return Result.success(depts);}
}
3.3 前后端联调
问:前端工程请求服务的地址是如何访问到后端的tomcat服务器的?
答:是通过前端服务Nginx中提供的反向代理功能实现的。
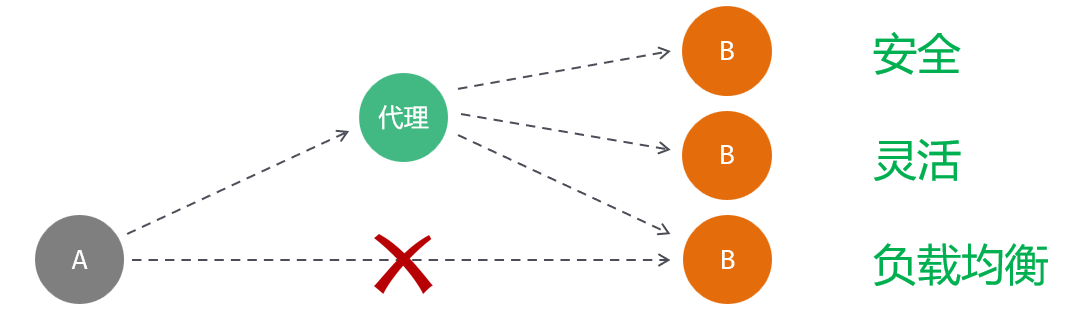
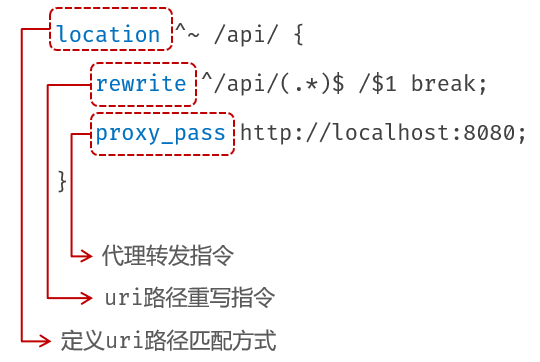
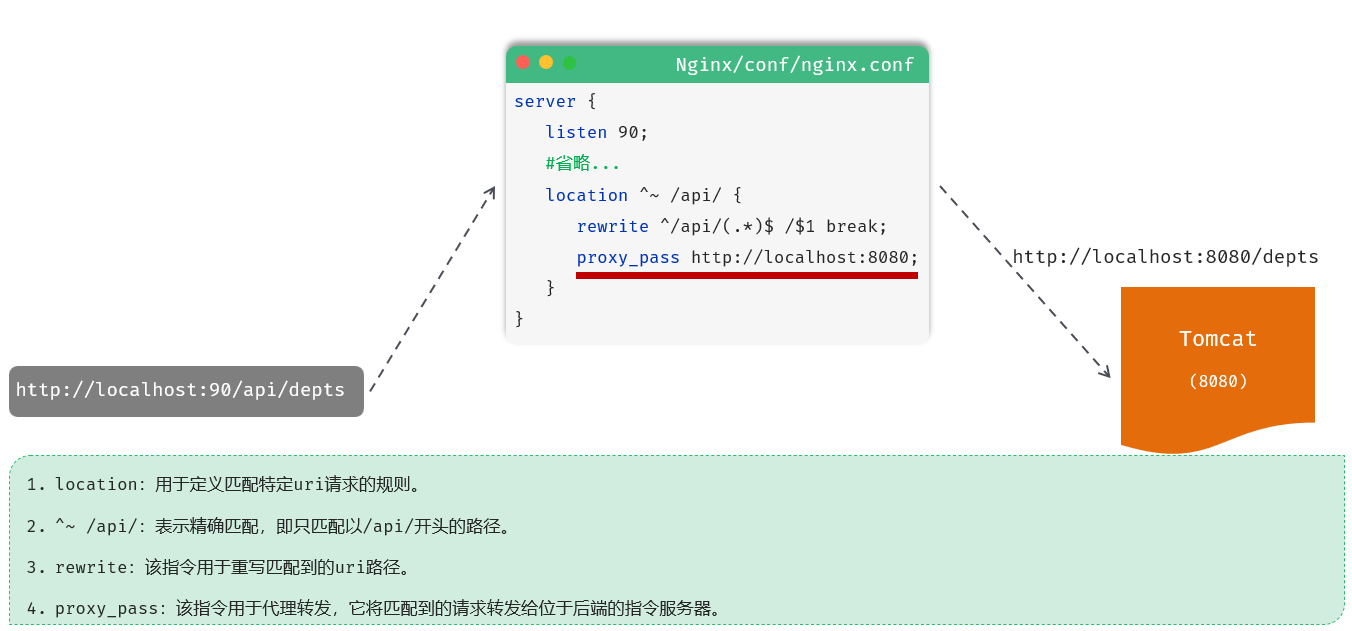
Nginx反向代理的配置
四、分层解耦
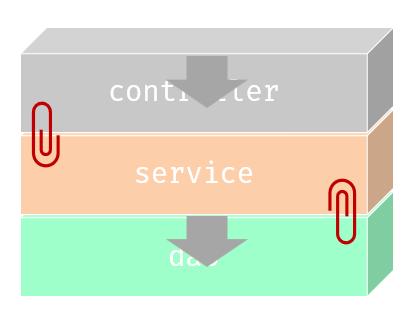
4.1 三层架构
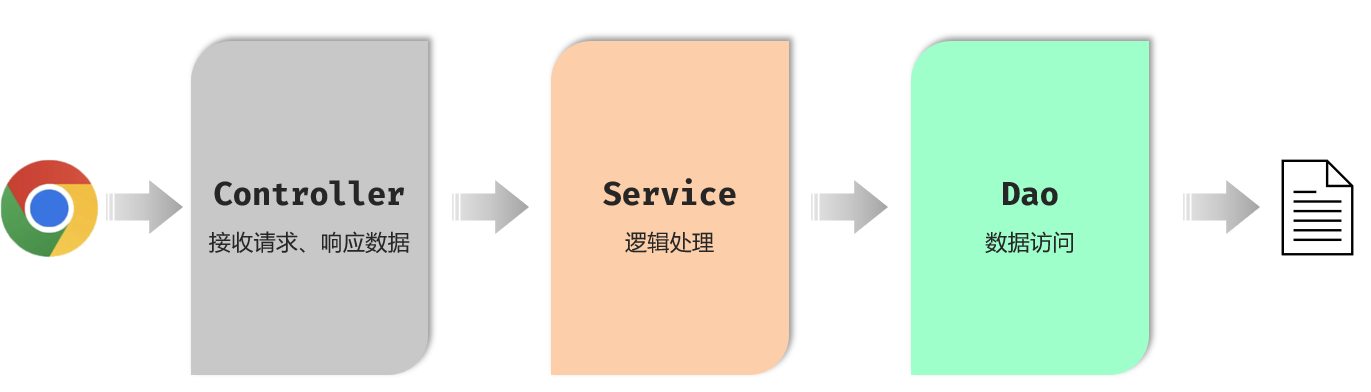
4.1.1 三层架构
①controller:控制层,接收前端发送的请求,对请求进行处理,并响应数据
②service:业务逻辑层,处理具体的业务逻辑
③dao:数访问层(Data Access Object)(持久层),负责数据访问操作,包括数据的增、删、改、查。
代码修改:
@RestController
public class DeptController {DeptService deptService = new DeptService();@RequestMapping("/depts")public Result getAll() {// 获取数据// getClass():获取当前对象的运行时类// getClassLoader():获取加载当前类的类加载器// getResourAsStream():通过类加载器查找指定资源,并返回一个 InputStream 流
//        InputStream input = this.getClass().getClassLoader().getResourceAsStream("dept.txt");
//        List<String> strings = IOUtils.readLines(input, "UTF-8");//2.解析文本中的数据,并将其封装成集合List<Dept>
//        List<Dept> depts = strings.stream().map((str) -> {
//            String[] parts = str.split(",");
//            Integer id = Integer.valueOf(parts[0]);
//            String name = parts[1];
//            LocalDateTime updateTime = LocalDateTime.parse(parts[2], DateTimeFormatter.ofPattern("yyyy-MM-dd HH:mm:ss"));
//            return new Dept(id, name, updateTime);
//        }).toList();List<Dept> depts = deptService.getAll();return Result.success(depts);}
}
/*** @author Tender* @date 2025/10/9 12:22*/package com.chenxd.service;import com.chenxd.Mapper.DeptMapper;
import com.chenxd.entity.Dept;import java.time.LocalDateTime;
import java.time.format.DateTimeFormatter;
import java.util.List;public class DeptService {DeptMapper deptMapper = new DeptMapper();public List<Dept> getAll(){List<String> all = deptMapper.getAll();List<Dept> depts = all.stream().map((str) -> {String[] parts = str.split(",");Integer id = Integer.valueOf(parts[0]);String name = parts[1];LocalDateTime updateTime = LocalDateTime.parse(parts[2], DateTimeFormatter.ofPattern("yyyy-MM-dd HH:mm:ss"));return new Dept(id, name, updateTime);}).toList();return depts;}}/*** @author Tender* @date 2025/10/9 12:22*/package com.chenxd.Mapper;import org.apache.commons.io.IOUtils;import java.io.InputStream;
import java.util.List;public class DeptMapper {public List<String> getAll(){InputStream input = this.getClass().getClassLoader().getResourceAsStream("dept.txt");List<String> strings = IOUtils.readLines(input, "UTF-8");return strings;}}优点:
①复用性强
②方便维护
③遵循单一职责原则
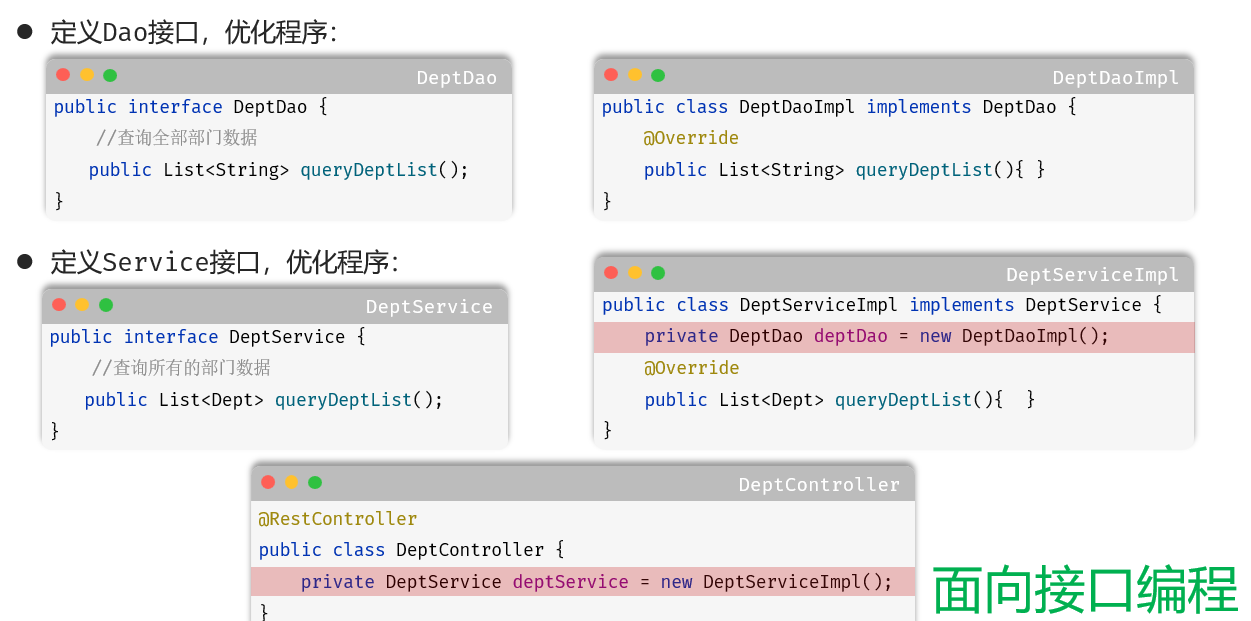
4.1.2 面向接口编程
优点:
增强程序扩展性
4.2 分层解耦
4.2.1 问题分析
由于我们现在在程序中需要什么对象,直接new一个对象new DeptServiceImpl(),如果说我么们需要更换实现类,比如由于业务的变更,那么还需要new另一个业务的实现类,这种就称之为层与层之间耦合了。
4.2.2 什么是耦合
耦合:衡量软件中各个层/模块之间的依赖、关联程度。
内聚:软件中各个功能模块内部的功能联系
软件设计原则:高内聚低耦合
4.2.3 解耦思路
①提供一个容器,容器中存储一些对象
②Controller程序从容器中获取对象
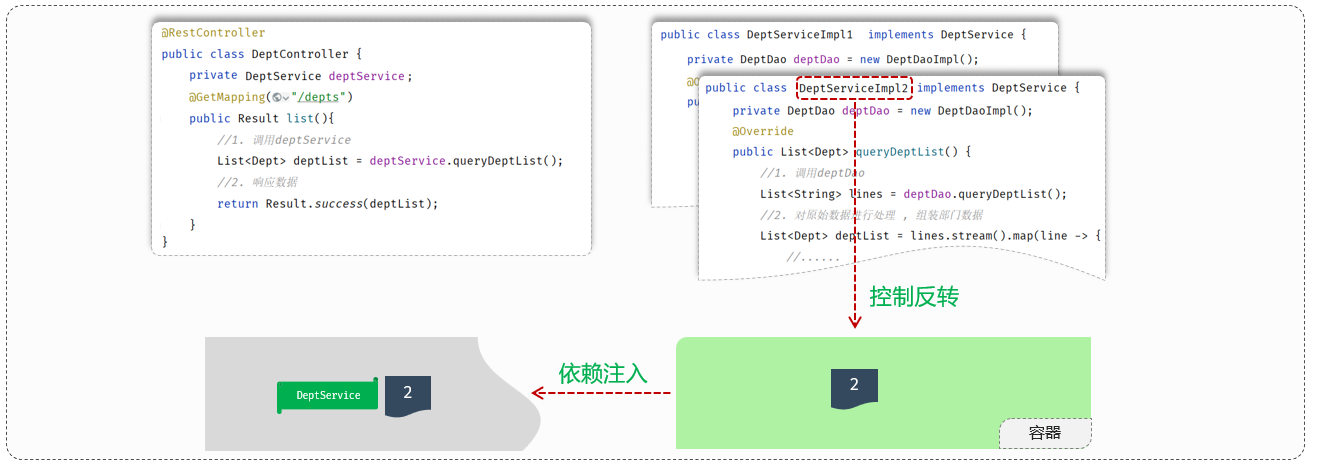
控制反转:Inversion Of Control ,简称IOC 。对象的创建控制权由程序自身转移到外部(容器),这种思想称为控制反转。
依赖注入:Dependency Injection,简称DI。容器为应用程序提供运行时,所依赖的资源,称之为依赖注入。
Bean对象: IOC容器中创建、管理的对象称之为Bean
4.3 IOC & DI入门
4.3.1 步骤
①将Service及Dao层的实现类,交给IOC容器管理,在实现类上加@Component注解
注解:@component——代表把当前类产生的对象交给IOC容器管理
@Component
public class DeptServiceImpl implements DeptService {DeptMapper deptMapper = new DeptMapper();@Overridepublic List<Dept> getAll(){List<String> all = deptMapper.getAll();List<Dept> depts = all.stream().map((str) -> {String[] parts = str.split(",");Integer id = Integer.valueOf(parts[0]);String name = parts[1];LocalDateTime updateTime = LocalDateTime.parse(parts[2], DateTimeFormatter.ofPattern("yyyy-MM-dd HH:mm:ss"));return new Dept(id, name, updateTime);}).toList();return depts;}}
②为Controller及Service注入运行时所依赖的对象,通过@Autowired注解
注解:@Autowired——为应用程序提供运行时所依赖的对象
@RestController
public class DeptController {@Autowiredprivate DeptService deptService;@RequestMapping("/depts")public Result getAll() {List<Dept> depts = deptService.getAll();return Result.success(depts);}
}
问:为什么 Controller 层用的是接口变量,而不是实现类变量?
①当在Service实现类上标注@Service时,Spring会把这个类实例化,并放入容器中
②容器中Bean的默认类型时它实现的接口类型
③所以在Controller中些private DeptService deptService时,Spring会找到容器中实现了DeptService接口的Bean,并注入进去
4.4 IOC详解
4.4.1 Bean的声明
前面我们提到的IOC控制反转,就是像对象的控制权交给Spring的IOC容器,由IOC容器创建及管理对象,IOC容器创建的对象称之为Bean对象。
要把某个对象交给IOC容器管理,需要在对应的类上加上如下注解之一:
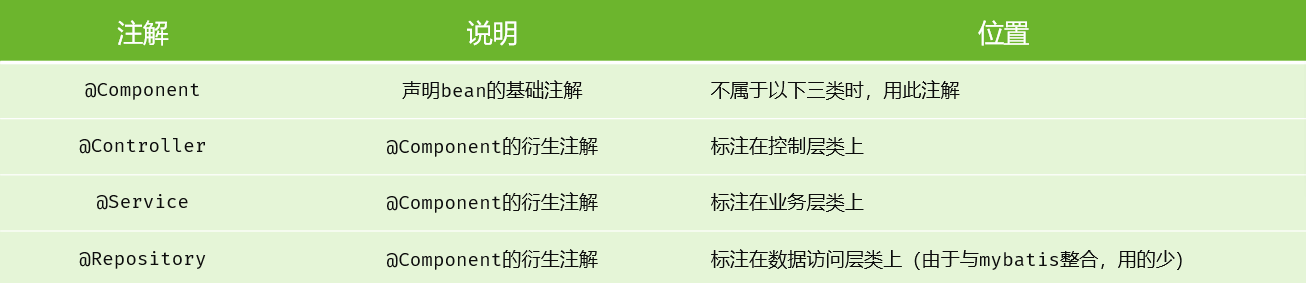
注意1:
声明bean的时候,可以直接通过注解的value属性指定bean的名字,如果没有指定,默认为类名首字母小写
注意2:
使用以上四个注解都可以声明bean,但是在springboot集成web开发中,声明控制器bean只能用@Controller
4.4.2 组件扫描
①前面声明的bean的四大注解,要想生效,还需要被组件扫描注解@ComponentScan扫描
②该注解虽然没有显示配置,但是实际上已经包含在了启动类声明注解@SpringBootApplication中,默认扫描的范围是启动类所在包及其子包
4.5 DI详解
@Autowired注解默认是按照类型进行,如果存在多个相同类型的bean,将会报如下错误

①方案一:使用@Primary注解
注解:@primary——存在多个相同类型的Bean注入时,加上@Primary注解,来确定默认的实现。
@Primary
@Service
public class DeptServiceImpl implements DeptService {
}
②方案二:使用@Qualifier注解
注解:@Qualifier——指定当前要注入的bean对象。在@Qualifier的value属性中,指定注入的bean名称,@qualifier注解不能单独使用
@RestController
public class DeptController {@Qualifier("deptServiceImpl")@Autowiredprivate DeptService deptService;
③方案三:使用@Resource注解
注解:@Resource——是按照bean的名称进行注入,通过name属性指定要注入的bean名称
@RestController
public class DeptController {@Resource(name = "deptServiceImpl")private DeptService deptService;
问:@Resource与@Autowired的区别?
①@Autowired是Spring框架提供的注解,而@Resource是JavaEE规范提供的
②@Autowired默认是按照类型注入,而@Resource默认是按照名称注入
问:依赖注入的注解有哪些?
@Autowired:默认按照类型自动装配
如果是同类型的bean存在多个:Ⅰ@Primary; Ⅱ@Autowired + @Qualifier; ⅢResource