若依前后端分离版学习笔记(十九)——导入,导出实现流程及图片,文件组件
一、导入实现流程
这里参考官方文档
1.1 前端部分
前端使用的是vue3的代码
1、添加导入前端代码
在src/views/system/user/index.vue中新增代码
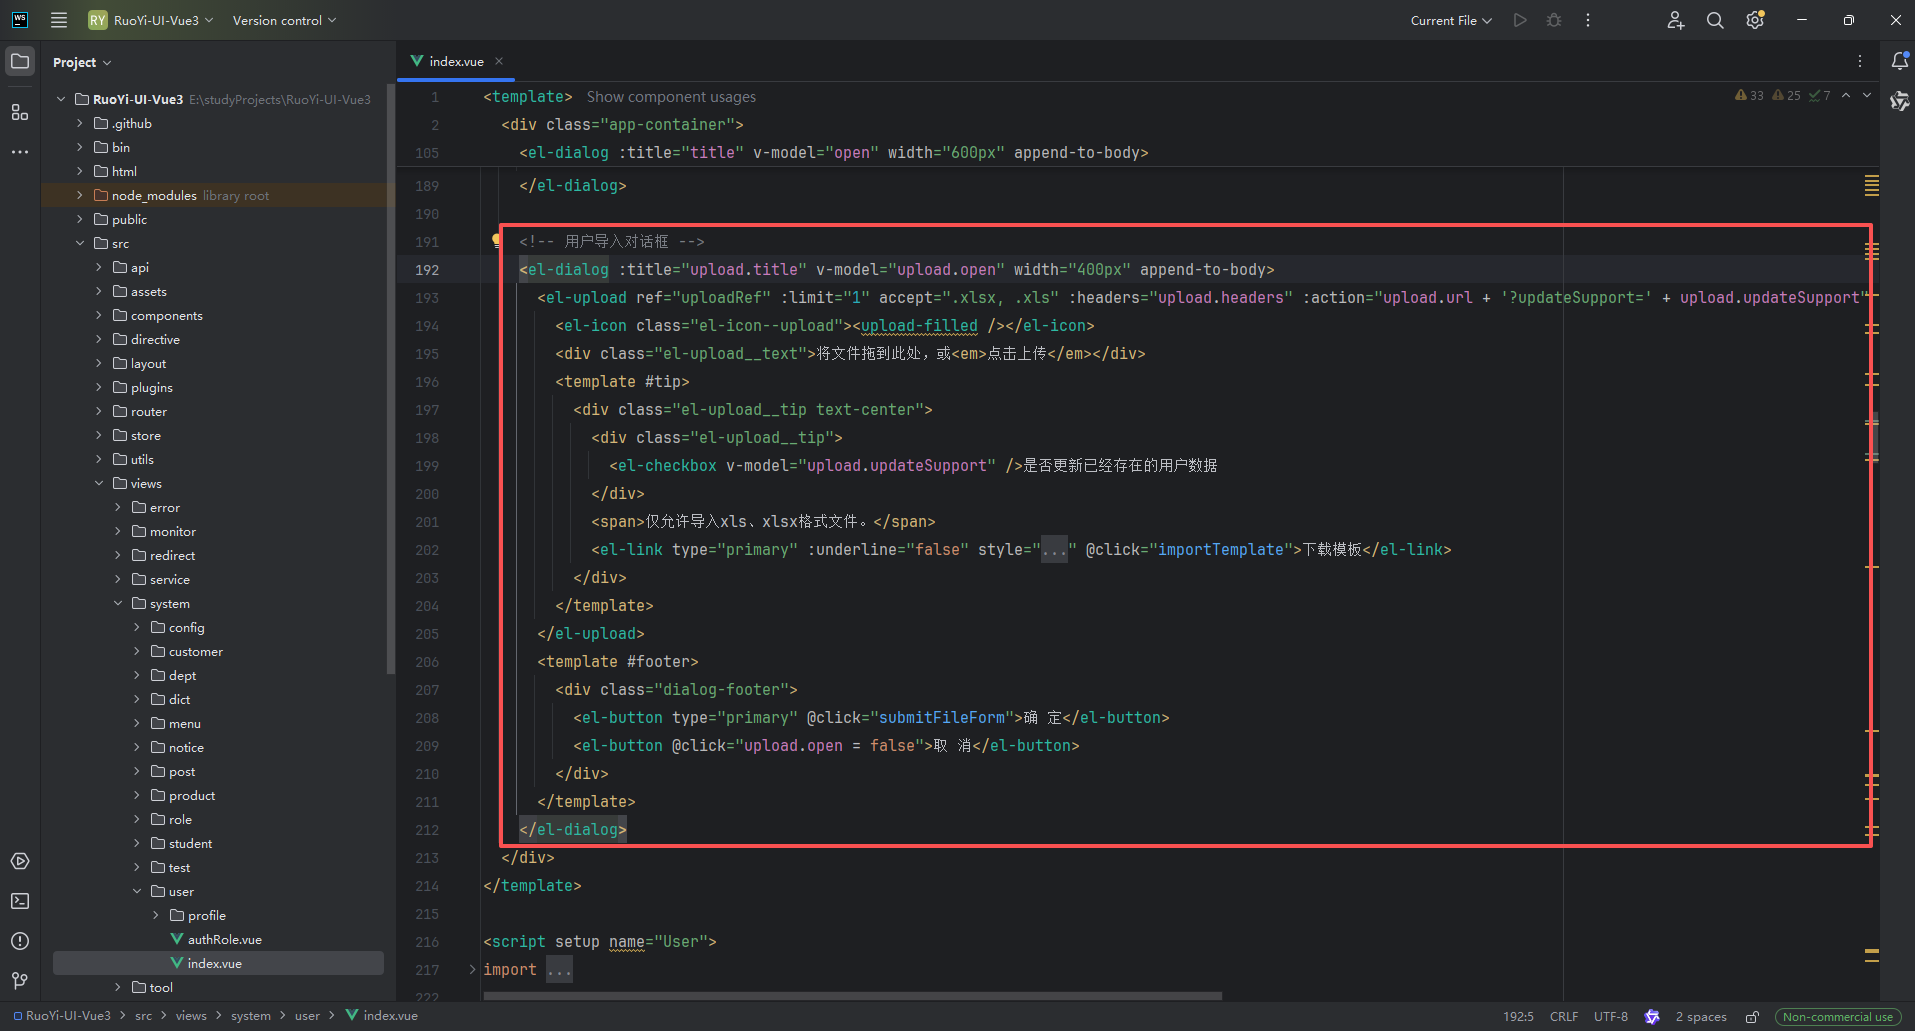
<!-- 用户导入对话框 -->
<el-dialog :title="upload.title" v-model="upload.open" width="400px" append-to-body><el-upload ref="uploadRef" :limit="1" accept=".xlsx, .xls" :headers="upload.headers" :action="upload.url + '?updateSupport=' + upload.updateSupport" :disabled="upload.isUploading" :on-progress="handleFileUploadProgress" :on-success="handleFileSuccess" :auto-upload="false" drag><el-icon class="el-icon--upload"><upload-filled /></el-icon><div class="el-upload__text">将文件拖到此处,或<em>点击上传</em></div><template #tip><div class="el-upload__tip text-center"><div class="el-upload__tip"><el-checkbox v-model="upload.updateSupport" />是否更新已经存在的用户数据</div><span>仅允许导入xls、xlsx格式文件。</span><el-link type="primary" :underline="false" style="font-size: 12px; vertical-align: baseline" @click="importTemplate">下载模板</el-link></div></template></el-upload><template #footer><div class="dialog-footer"><el-button type="primary" @click="submitFileForm">确 定</el-button><el-button @click="upload.open = false">取 消</el-button></div></template>
</el-dialog>
2、添加导入按钮事件
在src/views/system/user/index.vue中新增代码
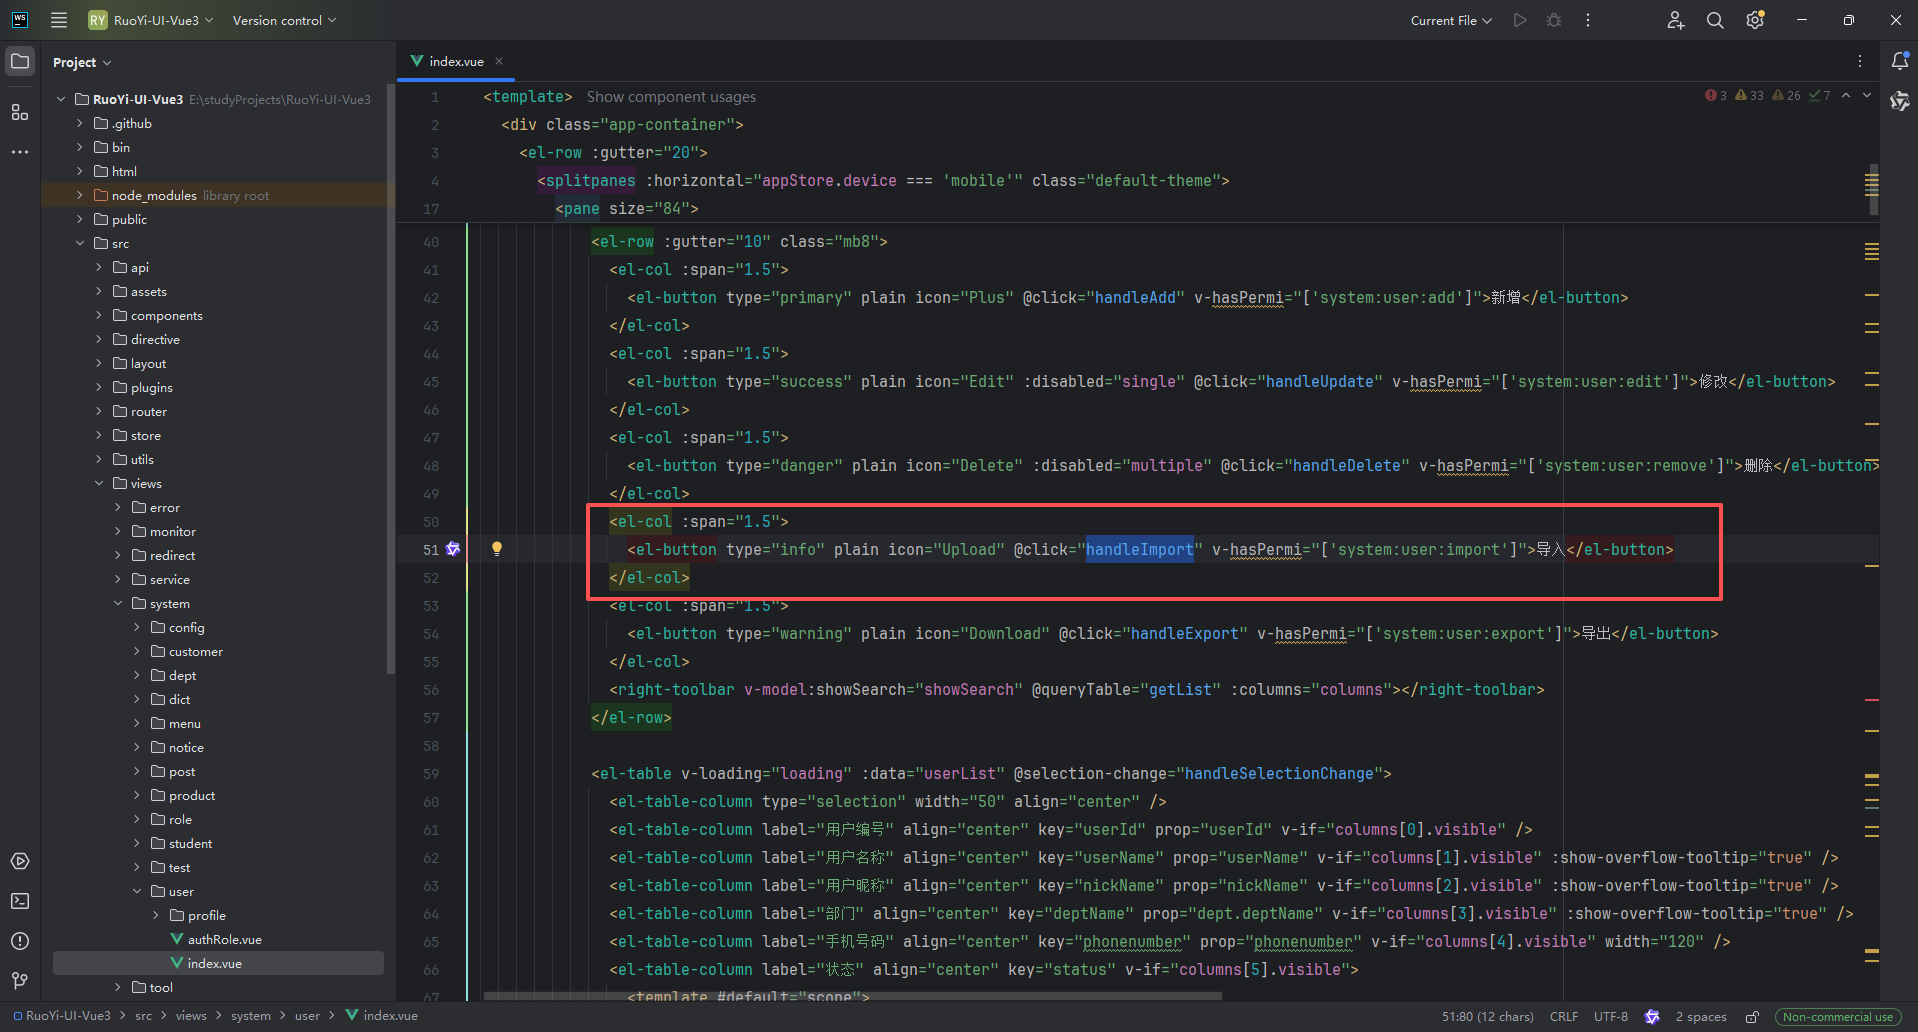
<el-col :span="1.5"><el-button type="info" plain icon="Upload" @click="handleImport" v-hasPermi="['system:user:import']">导入</el-button>
</el-col>
3、前端调用方法
import { getToken } from "@/utils/auth"/*** 用户导入参数 */
const upload = reactive({// 是否显示弹出层(用户导入)open: false,// 弹出层标题(用户导入)title: "",// 是否禁用上传isUploading: false,// 是否更新已经存在的用户数据updateSupport: 0,// 设置上传的请求头部headers: { Authorization: "Bearer " + getToken() },// 上传的地址url: import.meta.env.VITE_APP_BASE_API + "/system/user/importData"
})/** 导入按钮操作 */
function handleImport() {upload.title = "用户导入"upload.open = true
}
/** 下载模板操作 */
function importTemplate() {proxy.download("system/user/importTemplate", {}, `user_template_${new Date().getTime()}.xlsx`)
}
/**文件上传中处理 */
const handleFileUploadProgress = (event, file, fileList) => {upload.isUploading = true
}
/** 文件上传成功处理 */
const handleFileSuccess = (response, file, fileList) => {upload.open = falseupload.isUploading = falseproxy.$refs["uploadRef"].handleRemove(file)proxy.$alert("<div style='overflow: auto;overflow-x: hidden;max-height: 70vh;padding: 10px 20px 0;'>" + response.msg + "</div>", "导入结果", { dangerouslyUseHTMLString: true })getList()
}
/** 提交上传文件 */
function submitFileForm() {proxy.$refs["uploadRef"].submit()
}
1.2 后端部分
1、在实体变量上添加@Excel注解,默认为导出导入,也可以单独设置仅导入 Type.IMPORT
@Excel(name = "用户序号")
private Long id;@Excel(name = "部门编号", type = Type.IMPORT)
private Long deptId;@Excel(name = "用户名称")
private String userName;/** 导出部门多个对象 */
@Excels({@Excel(name = "部门名称", targetAttr = "deptName", type = Type.EXPORT),@Excel(name = "部门负责人", targetAttr = "leader", type = Type.EXPORT)
})
private SysDept dept;/** 导出部门单个对象 */
@Excel(name = "部门名称", targetAttr = "deptName", type = Type.EXPORT)
private SysDept dept;
2、上传接口地址为:/system/user/importData,由此查看后端代码实现
在src/main/java/com/ruoyi/web/controller/system/SysUserController.java中
@Log(title = "用户管理", businessType = BusinessType.IMPORT)
@PreAuthorize("@ss.hasPermi('system:user:import')")
@PostMapping("/importData")
// updateSupport属性为是否存在则覆盖
public AjaxResult importData(MultipartFile file, boolean updateSupport) throws Exception
{ExcelUtil<SysUser> util = new ExcelUtil<SysUser>(SysUser.class);// 从excel中获取数据List<SysUser> userList = util.importExcel(file.getInputStream());// 获取用户名String operName = getUsername();// 上传数据并获得结果String message = userService.importUser(userList, updateSupport, operName);return success(message);
}
3、ExcelUtil导出Excel方法,将 Excel 文件中的数据导入并转换为 Java 对象列表
/*** 对excel表单指定表格索引名转换成list* * @param sheetName 表格索引名(要读取的 Excel 工作表名称)* @param titleNum 标题占用行数* @param is 输入流* @return 转换后集合*/
public List<T> importExcel(String sheetName, InputStream is, int titleNum) throws Exception
{// 初始化this.type = Type.IMPORT;this.wb = WorkbookFactory.create(is);List<T> list = new ArrayList<T>();// 如果指定sheet名,则取指定sheet中的内容 否则默认指向第1个sheetSheet sheet = StringUtils.isNotEmpty(sheetName) ? wb.getSheet(sheetName) : wb.getSheetAt(0);if (sheet == null){throw new IOException("文件sheet不存在");}// 根据Excel文件格式(.xls 或 .xlsx)调用相应图片获取方法boolean isXSSFWorkbook = !(wb instanceof HSSFWorkbook);Map<String, List<PictureData>> pictures = null;if (isXSSFWorkbook){pictures = getSheetPictures07((XSSFSheet) sheet, (XSSFWorkbook) wb);}else{pictures = getSheetPictures03((HSSFSheet) sheet, (HSSFWorkbook) wb);}// 获取最后一个非空行的行下标,比如总行数为n,则返回的为n-1int rows = sheet.getLastRowNum();if (rows > 0){// 定义一个map用于存放excel列的序号和field.Map<String, Integer> cellMap = new HashMap<String, Integer>();// 获取表头Row heard = sheet.getRow(titleNum);// 遍历标题行,建立列名于列索引的映射关系,用于后续将Excel列数据映射到Java对象属性for (int i = 0; i < heard.getPhysicalNumberOfCells(); i++){Cell cell = heard.getCell(i);if (StringUtils.isNotNull(cell)){String value = this.getCellValue(heard, i).toString();cellMap.put(value, i);}else{cellMap.put(null, i);}}// 有数据时才处理 得到类中带 @Excel 注解的字段List<Object[]> fields = this.getFields();Map<Integer, Object[]> fieldsMap = new HashMap<Integer, Object[]>();for (Object[] objects : fields){Excel attr = (Excel) objects[1];Integer column = cellMap.get(attr.name());if (column != null){fieldsMap.put(column, objects);}}// 数据行处理for (int i = titleNum + 1; i <= rows; i++){// 从第2行开始取数据,默认第一行是表头.Row row = sheet.getRow(i);// 判断当前行是否是空行if (isRowEmpty(row)){continue;}T entity = null;for (Map.Entry<Integer, Object[]> entry : fieldsMap.entrySet()){Object val = this.getCellValue(row, entry.getKey());// 如果不存在实例则新建.entity = (entity == null ? clazz.newInstance() : entity);// 从map中得到对应列的field.Field field = (Field) entry.getValue()[0];Excel attr = (Excel) entry.getValue()[1];// 取得类型,并根据对象类型设置值.Class<?> fieldType = field.getType();if (String.class == fieldType){String s = Convert.toStr(val);if (s.matches("^\\d+\\.0$")){val = StringUtils.substringBefore(s, ".0");}else{String dateFormat = field.getAnnotation(Excel.class).dateFormat();if (StringUtils.isNotEmpty(dateFormat)){val = parseDateToStr(dateFormat, val);}else{val = Convert.toStr(val);}}}else if ((Integer.TYPE == fieldType || Integer.class == fieldType) && StringUtils.isNumeric(Convert.toStr(val))){val = Convert.toInt(val);}else if ((Long.TYPE == fieldType || Long.class == fieldType) && StringUtils.isNumeric(Convert.toStr(val))){val = Convert.toLong(val);}else if (Double.TYPE == fieldType || Double.class == fieldType){val = Convert.toDouble(val);}else if (Float.TYPE == fieldType || Float.class == fieldType){val = Convert.toFloat(val);}else if (BigDecimal.class == fieldType){val = Convert.toBigDecimal(val);}else if (Date.class == fieldType){if (val instanceof String){val = DateUtils.parseDate(val);}else if (val instanceof Double){val = DateUtil.getJavaDate((Double) val);}}else if (Boolean.TYPE == fieldType || Boolean.class == fieldType){val = Convert.toBool(val, false);}if (StringUtils.isNotNull(fieldType)){String propertyName = field.getName();if (StringUtils.isNotEmpty(attr.targetAttr())){propertyName = field.getName() + "." + attr.targetAttr();}if (StringUtils.isNotEmpty(attr.readConverterExp())){val = reverseByExp(Convert.toStr(val), attr.readConverterExp(), attr.separator());}else if (StringUtils.isNotEmpty(attr.dictType())){if (!sysDictMap.containsKey(attr.dictType() + val)){String dictValue = reverseDictByExp(Convert.toStr(val), attr.dictType(), attr.separator());sysDictMap.put(attr.dictType() + val, dictValue);}val = sysDictMap.get(attr.dictType() + val);}else if (!attr.handler().equals(ExcelHandlerAdapter.class)){val = dataFormatHandlerAdapter(val, attr, null);}else if (ColumnType.IMAGE == attr.cellType() && StringUtils.isNotEmpty(pictures)){StringBuilder propertyString = new StringBuilder();List<PictureData> images = pictures.get(row.getRowNum() + "_" + entry.getKey());for (PictureData picture : images){byte[] data = picture.getData();String fileName = FileUtils.writeImportBytes(data);propertyString.append(fileName).append(SEPARATOR);}val = StringUtils.stripEnd(propertyString.toString(), SEPARATOR);}// 对象属性设置ReflectUtils.invokeSetter(entity, propertyName, val);}}list.add(entity);}}return list;
}
二、导出实现流程
2.1 前端部分
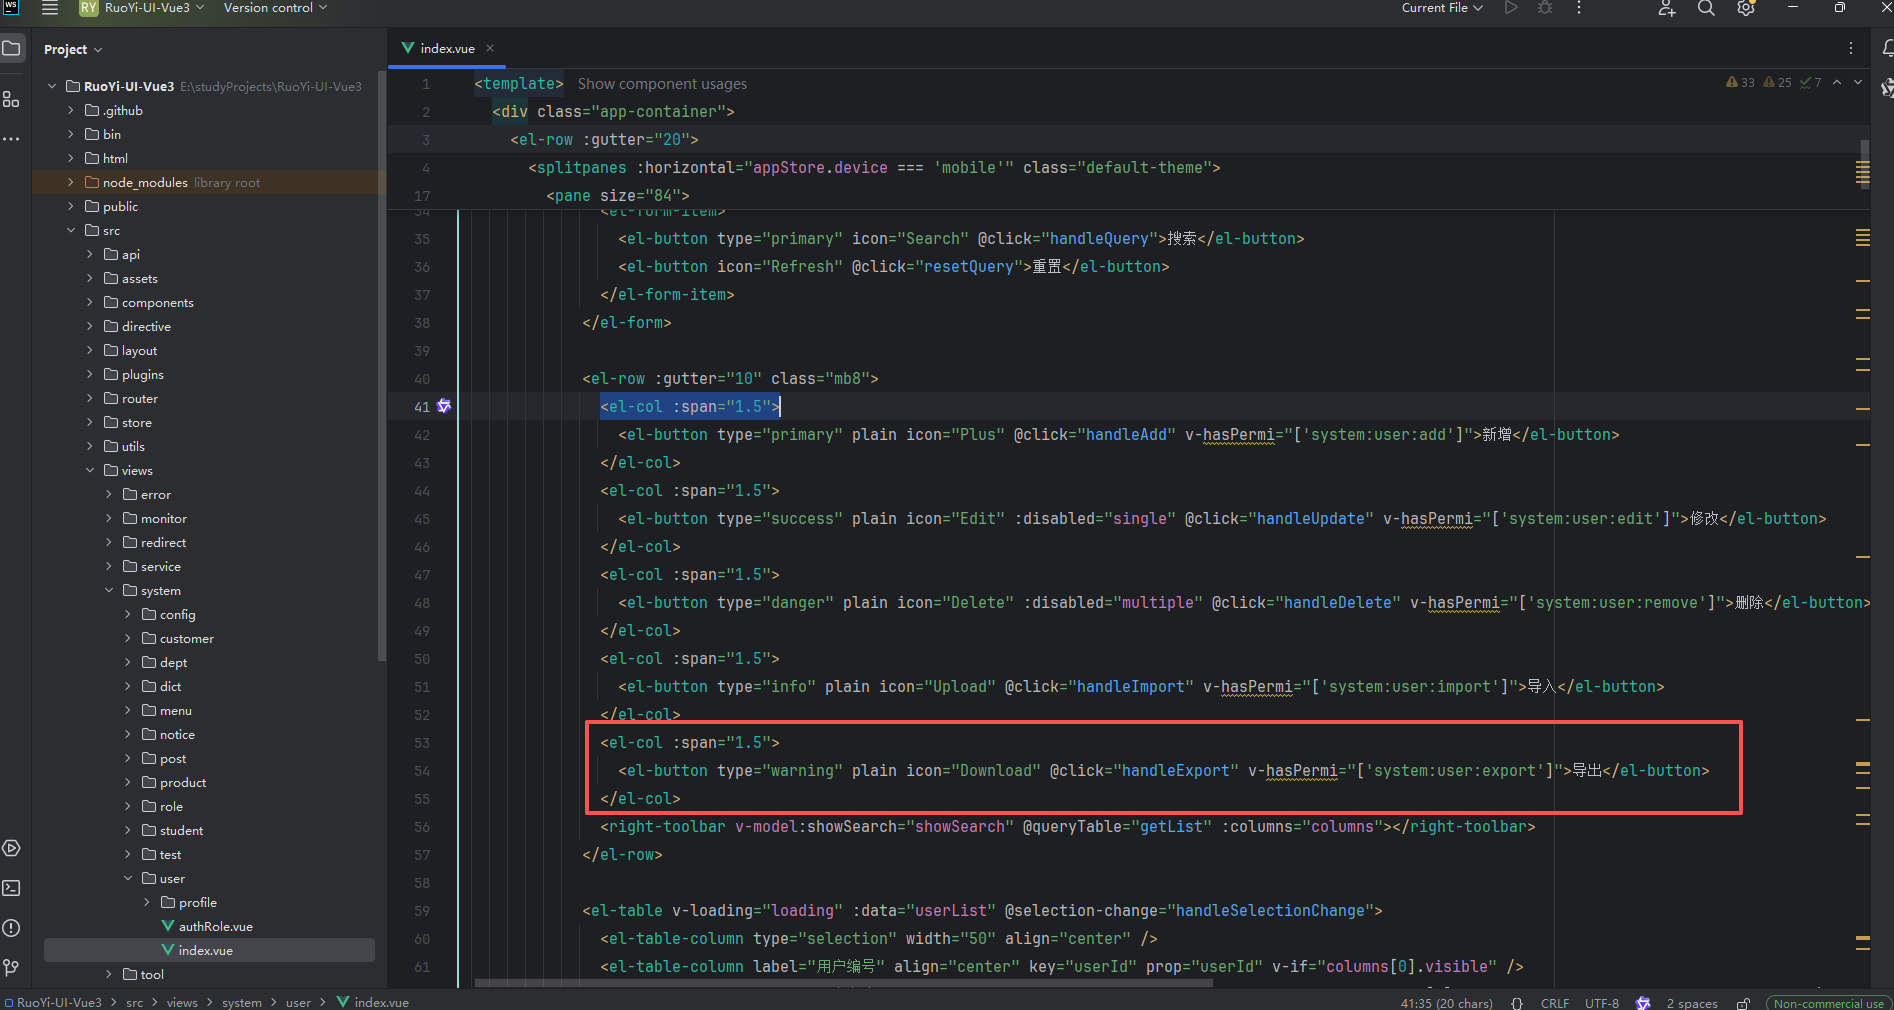
1、添加导出按钮事件
<el-col :span="1.5"><el-button type="warning" plain icon="Download" @click="handleExport" v-hasPermi="['system:user:export']">导出</el-button>
</el-col>
2、前端调用方法
// 查询参数
queryParams: {pageNum: 1,pageSize: 10,userName: undefined,phonenumber: undefined,status: undefined,deptId: undefined
}/** 导出按钮操作 */
function handleExport() {proxy.download("system/user/export", {...queryParams.value,},`user_${new Date().getTime()}.xlsx`)
}
2.2 后端部分
1、实体变量添加@Excel注解
@Excel(name = "用户序号", prompt = "用户编号")
private Long userId;@Excel(name = "用户名称")
private String userName;@Excel(name = "用户性别", readConverterExp = "0=男,1=女,2=未知")
private String sex;@Excel(name = "用户头像", cellType = ColumnType.IMAGE)
private String avatar;@Excel(name = "帐号状态", dictType = "sys_normal_disable")
private String status;@Excel(name = "最后登陆时间", width = 30, dateFormat = "yyyy-MM-dd HH:mm:ss")
private Date loginDate;
2、导出接口地址system/user/export,由此查看后端代码实现,
在src/main/java/com/ruoyi/web/controller/system/SysUserController.java中
@Log(title = "用户管理", businessType = BusinessType.EXPORT)
@PreAuthorize("@ss.hasPermi('system:user:export')")
@PostMapping("/export")
public void export(HttpServletResponse response, SysUser user)
{// 查询用户数据List<SysUser> list = userService.selectUserList(user);ExcelUtil<SysUser> util = new ExcelUtil<SysUser>(SysUser.class);// 将查询数据写入Excel中并返回util.exportExcel(response, list, "用户数据");
}
3、ExcelUtil数据写入Sheet方法,负责创建 Excel 工作表并将数据写入其中,包括处理多个工作表、创建表头和填充数据等操作
/*** 创建写入数据到Sheet*/
public void writeSheet()
{// 取出一共有多少个sheet.int sheetNo = Math.max(1, (int) Math.ceil(list.size() * 1.0 / sheetSize));// 遍历处理每个sheetfor (int index = 0; index < sheetNo; index++){createSheet(sheetNo, index);// 创建表头行Row row = sheet.createRow(rownum);int column = 0;// 写入各个字段的列头名称for (Object[] os : fields){Field field = (Field) os[0];Excel excel = (Excel) os[1];// 对于集合类型字段(子列表),遍历其子字段并为每个子字段创建表头单元格if (Collection.class.isAssignableFrom(field.getType())){for (Field subField : subFields){Excel subExcel = subField.getAnnotation(Excel.class);// 创建并设置表头单元格的样式和内容this.createHeadCell(subExcel, row, column++);}}else{// 普通字段,直接创建表头单元格this.createHeadCell(excel, row, column++);}}// 根据导出类型,处理数据if (Type.EXPORT.equals(type)){fillExcelData(index, row);addStatisticsRow();}}
}
三、图片组件
3.1 图片上传组件
图片上传组件位于src/components/ImageUpload/index.vue,基于Element Plus的el-upload组件实现
核心功能:
- 文件校验:在 handleBeforeUpload 方法中进行文件格式、大小和文件名检查
- 上传处理:通过 handleUploadSuccess 处理上传成功回调
- 拖拽排序:使用 SortableJS 实现图片拖拽排序功能
- 数据绑定:通过 v-model 实现双向数据绑定
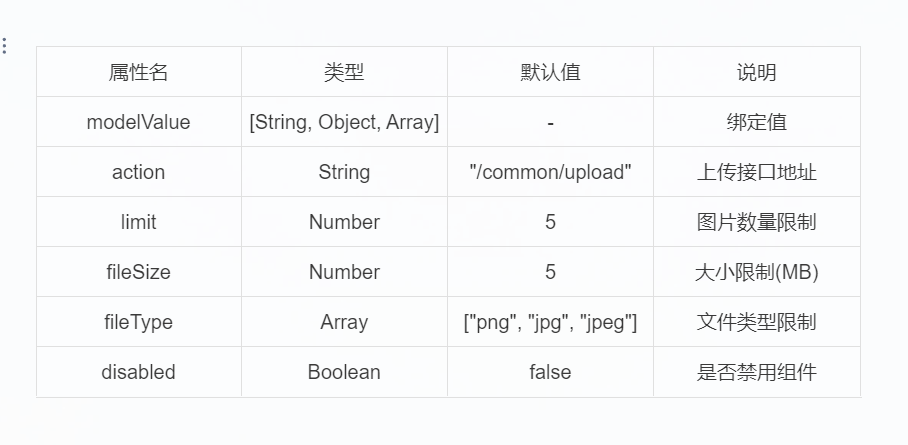
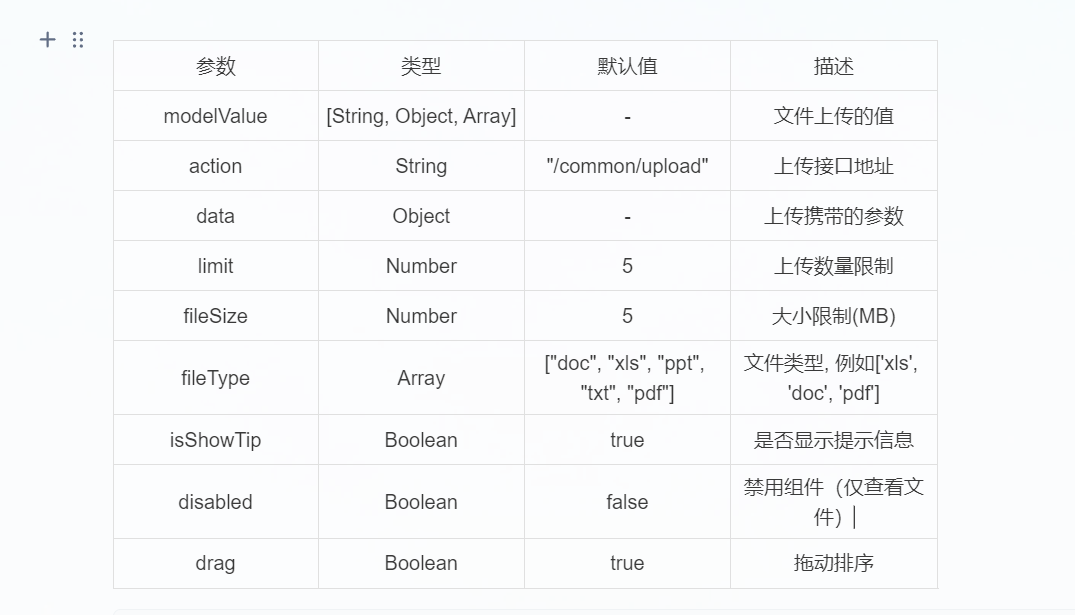
组件Props
<template><div class="component-upload-image"><el-uploadmultiple:disabled="disabled":action="uploadImgUrl"list-type="picture-card":on-success="handleUploadSuccess":before-upload="handleBeforeUpload":data="data":limit="limit":on-error="handleUploadError":on-exceed="handleExceed"ref="imageUpload":before-remove="handleDelete":show-file-list="true":headers="headers":file-list="fileList":on-preview="handlePictureCardPreview":class="{ hide: fileList.length >= limit }"><el-icon class="avatar-uploader-icon"><plus /></el-icon></el-upload><!-- 上传提示 --><div class="el-upload__tip" v-if="showTip && !disabled">请上传<template v-if="fileSize">大小不超过 <b style="color: #f56c6c">{{ fileSize }}MB</b></template><template v-if="fileType">格式为 <b style="color: #f56c6c">{{ fileType.join("/") }}</b></template>的文件</div><el-dialogv-model="dialogVisible"title="预览"width="800px"append-to-body><img:src="dialogImageUrl"style="display: block; max-width: 100%; margin: 0 auto"/></el-dialog></div>
</template><script setup>
import { getToken } from "@/utils/auth"
import { isExternal } from "@/utils/validate"
import Sortable from 'sortablejs'const props = defineProps({modelValue: [String, Object, Array],// 上传接口地址action: {type: String,default: "/common/upload"},// 上传携带的参数data: {type: Object},// 图片数量限制limit: {type: Number,default: 5},// 大小限制(MB)fileSize: {type: Number,default: 5},// 文件类型, 例如['png', 'jpg', 'jpeg']fileType: {type: Array,default: () => ["png", "jpg", "jpeg"]},// 是否显示提示isShowTip: {type: Boolean,default: true},// 禁用组件(仅查看图片)disabled: {type: Boolean,default: false},// 拖动排序drag: {type: Boolean,default: true}
})const { proxy } = getCurrentInstance()
const emit = defineEmits()
const number = ref(0)
const uploadList = ref([])
const dialogImageUrl = ref("")
const dialogVisible = ref(false)
const baseUrl = import.meta.env.VITE_APP_BASE_API
const uploadImgUrl = ref(import.meta.env.VITE_APP_BASE_API + props.action) // 上传的图片服务器地址
const headers = ref({ Authorization: "Bearer " + getToken() })
const fileList = ref([])
const showTip = computed(() => props.isShowTip && (props.fileType || props.fileSize)
)watch(() => props.modelValue, val => {if (val) {// 首先将值转为数组const list = Array.isArray(val) ? val : props.modelValue.split(",")// 然后将数组转为对象数组fileList.value = list.map(item => {if (typeof item === "string") {if (item.indexOf(baseUrl) === -1 && !isExternal(item)) {item = { name: baseUrl + item, url: baseUrl + item }} else {item = { name: item, url: item }}}return item})} else {fileList.value = []return []}
},{ deep: true, immediate: true })// 上传前loading加载
function handleBeforeUpload(file) {let isImg = falseif (props.fileType.length) {let fileExtension = ""if (file.name.lastIndexOf(".") > -1) {fileExtension = file.name.slice(file.name.lastIndexOf(".") + 1)}isImg = props.fileType.some(type => {if (file.type.indexOf(type) > -1) return trueif (fileExtension && fileExtension.indexOf(type) > -1) return truereturn false})} else {isImg = file.type.indexOf("image") > -1}if (!isImg) {proxy.$modal.msgError(`文件格式不正确,请上传${props.fileType.join("/")}图片格式文件!`)return false}if (file.name.includes(',')) {proxy.$modal.msgError('文件名不正确,不能包含英文逗号!')return false}if (props.fileSize) {const isLt = file.size / 1024 / 1024 < props.fileSizeif (!isLt) {proxy.$modal.msgError(`上传头像图片大小不能超过 ${props.fileSize} MB!`)return false}}proxy.$modal.loading("正在上传图片,请稍候...")number.value++
}// 文件个数超出
function handleExceed() {proxy.$modal.msgError(`上传文件数量不能超过 ${props.limit} 个!`)
}// 上传成功回调
function handleUploadSuccess(res, file) {if (res.code === 200) {uploadList.value.push({ name: res.fileName, url: res.fileName })uploadedSuccessfully()} else {number.value--proxy.$modal.closeLoading()proxy.$modal.msgError(res.msg)proxy.$refs.imageUpload.handleRemove(file)uploadedSuccessfully()}
}// 删除图片
function handleDelete(file) {const findex = fileList.value.map(f => f.name).indexOf(file.name)if (findex > -1 && uploadList.value.length === number.value) {fileList.value.splice(findex, 1)emit("update:modelValue", listToString(fileList.value))return false}
}// 上传结束处理
function uploadedSuccessfully() {if (number.value > 0 && uploadList.value.length === number.value) {fileList.value = fileList.value.filter(f => f.url !== undefined).concat(uploadList.value)uploadList.value = []number.value = 0emit("update:modelValue", listToString(fileList.value))proxy.$modal.closeLoading()}
}// 上传失败
function handleUploadError() {proxy.$modal.msgError("上传图片失败")proxy.$modal.closeLoading()
}// 预览
function handlePictureCardPreview(file) {dialogImageUrl.value = file.urldialogVisible.value = true
}// 对象转成指定字符串分隔
function listToString(list, separator) {let strs = ""separator = separator || ","for (let i in list) {if (undefined !== list[i].url && list[i].url.indexOf("blob:") !== 0) {strs += list[i].url.replace(baseUrl, "") + separator}}return strs != "" ? strs.substr(0, strs.length - 1) : ""
}// 初始化拖拽排序
onMounted(() => {if (props.drag && !props.disabled) {nextTick(() => {const element = proxy.$refs.imageUpload?.$el?.querySelector('.el-upload-list')Sortable.create(element, {onEnd: (evt) => {const movedItem = fileList.value.splice(evt.oldIndex, 1)[0]fileList.value.splice(evt.newIndex, 0, movedItem)emit('update:modelValue', listToString(fileList.value))}})})}
})
</script><style scoped lang="scss">
// .el-upload--picture-card 控制加号部分
:deep(.hide .el-upload--picture-card) {display: none;
}:deep(.el-upload.el-upload--picture-card.is-disabled) {display: none !important;
}
</style>
全局注册使用
组件在src/main.js中全局注册
import ImageUpload from "@/components/ImageUpload"
app.component('ImageUpload', ImageUpload)
基本使用方式
<template><image-upload v-model="imageList":limit="3":fileSize="2":fileType="['png', 'jpg']"/>
</template><script setup>import { ref } from 'vue'const imageList = ref([])
</script>
3.2 图片预览组件
图片预览组件位于 src/components/ImagePreview/index.vue,基于 Element Plus 的 el-image 组件实现
核心功能
- 图片路径处理:通过 realSrc 计算属性处理单张图片路径,自动添加基础 API 路径前缀
- 多图预览列表:通过 realSrcList 计算属性处理多张图片路径,支持预览功能
- 尺寸处理:通过 realWidth 和 realHeight 计算属性处理尺寸单位
- 预览功能:使用 Element Plus 的 preview-src-list 属性实现点击预览功能
组件Props
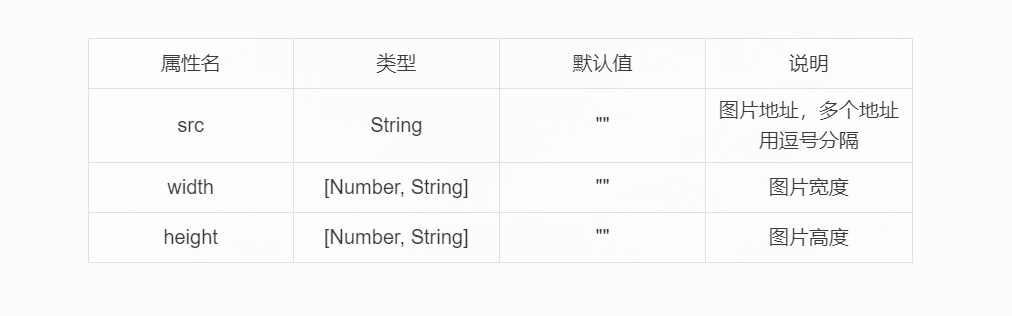
<template><el-image:src="`${realSrc}`"fit="cover":style="`width:${realWidth};height:${realHeight};`":preview-src-list="realSrcList"preview-teleported><template #error><div class="image-slot"><el-icon><picture-filled /></el-icon></div></template></el-image>
</template><script setup>
import { isExternal } from "@/utils/validate"const props = defineProps({src: {type: String,default: ""},width: {type: [Number, String],default: ""},height: {type: [Number, String],default: ""}
})const realSrc = computed(() => {if (!props.src) {return}let real_src = props.src.split(",")[0]if (isExternal(real_src)) {return real_src}return import.meta.env.VITE_APP_BASE_API + real_src
})const realSrcList = computed(() => {if (!props.src) {return}let real_src_list = props.src.split(",")let srcList = []real_src_list.forEach(item => {if (isExternal(item)) {return srcList.push(item)}return srcList.push(import.meta.env.VITE_APP_BASE_API + item)})return srcList
})const realWidth = computed(() =>typeof props.width == "string" ? props.width : `${props.width}px`
)const realHeight = computed(() =>typeof props.height == "string" ? props.height : `${props.height}px`
)
</script><style lang="scss" scoped>
.el-image {border-radius: 5px;background-color: #ebeef5;box-shadow: 0 0 5px 1px #ccc;:deep(.el-image__inner) {transition: all 0.3s;cursor: pointer;&:hover {transform: scale(1.2);}}:deep(.image-slot) {display: flex;justify-content: center;align-items: center;width: 100%;height: 100%;color: #909399;font-size: 30px;}
}
</style>
全局注册
组件已在src/main.js中全局注册
import ImagePreview from "@/components/ImagePreview"
app.component('ImagePreview', ImagePreview)
基本使用方式
<template><!-- 单张图片预览 --><image-preview :src="imageUrl"width="200"height="200"/><!-- 多张图片预览 --><image-preview :src="imageList"width="150"height="150"/>
</template><script setup>import { ref } from 'vue'const imageUrl = ref('/profile/avatar.jpg')
const imageList = ref('/profile/avatar1.jpg,/profile/avatar2.jpg,/profile/avatar3.jpg')
</script>
响应尺寸使用
<template><!-- 使用字符串指定单位 --><image-preview :src="imageUrl"width="100%"height="200px"/><!-- 使用数字指定像素 --><image-preview :src="imageUrl":width="200":height="200"/>
</template><script setup>import { ref } from 'vue'const imageUrl = ref('/profile/avatar.jpg')
</script>
四、文件组件
文件上传组件位于src/components/FileUpload/index.vue,基于 Element Plus 的 el-upload 组件实现,主要用于普通文件上传
核心功能
- 文件上传功能:基于 Element Plus 的 el-upload 组件实现
- 格式限制:支持限制上传文件类型,默认支持文档格式(doc, docx, xls, xlsx, ppt, pptx, txt, pdf)
- 大小限制:默认限制文件大小为 5MB
- 数量限制:默认最多上传 5 个文件
- 拖拽排序:使用 SortableJS 实现文件列表的拖拽排序
- 文件列表展示:以列表形式展示已上传文件,支持文件名显示和删除操作
组件Props
<template><div class="upload-file"><el-uploadmultiple:action="uploadFileUrl":before-upload="handleBeforeUpload":file-list="fileList":data="data":limit="limit":on-error="handleUploadError":on-exceed="handleExceed":on-success="handleUploadSuccess":show-file-list="false":headers="headers"class="upload-file-uploader"ref="fileUpload"v-if="!disabled"><!-- 上传按钮 --><el-button type="primary">选取文件</el-button></el-upload><!-- 上传提示 --><div class="el-upload__tip" v-if="showTip && !disabled">请上传<template v-if="fileSize"> 大小不超过 <b style="color: #f56c6c">{{ fileSize }}MB</b> </template><template v-if="fileType"> 格式为 <b style="color: #f56c6c">{{ fileType.join("/") }}</b> </template>的文件</div><!-- 文件列表 --><transition-group ref="uploadFileList" class="upload-file-list el-upload-list el-upload-list--text" name="el-fade-in-linear" tag="ul"><li :key="file.uid" class="el-upload-list__item ele-upload-list__item-content" v-for="(file, index) in fileList"><el-link :href="`${baseUrl}${file.url}`" :underline="false" target="_blank"><span class="el-icon-document"> {{ getFileName(file.name) }} </span></el-link><div class="ele-upload-list__item-content-action"><el-link :underline="false" @click="handleDelete(index)" type="danger" v-if="!disabled"> 删除</el-link></div></li></transition-group></div>
</template><script setup>
import { getToken } from "@/utils/auth"
import Sortable from 'sortablejs'const props = defineProps({modelValue: [String, Object, Array],// 上传接口地址action: {type: String,default: "/common/upload"},// 上传携带的参数data: {type: Object},// 数量限制limit: {type: Number,default: 5},// 大小限制(MB)fileSize: {type: Number,default: 5},// 文件类型, 例如['png', 'jpg', 'jpeg']fileType: {type: Array,default: () => ["doc", "docx", "xls", "xlsx", "ppt", "pptx", "txt", "pdf"]},// 是否显示提示isShowTip: {type: Boolean,default: true},// 禁用组件(仅查看文件)disabled: {type: Boolean,default: false},// 拖动排序drag: {type: Boolean,default: true}
})const { proxy } = getCurrentInstance()
const emit = defineEmits()
const number = ref(0)
const uploadList = ref([])
const baseUrl = import.meta.env.VITE_APP_BASE_API
const uploadFileUrl = ref(import.meta.env.VITE_APP_BASE_API + props.action) // 上传文件服务器地址
const headers = ref({ Authorization: "Bearer " + getToken() })
const fileList = ref([])
const showTip = computed(() => props.isShowTip && (props.fileType || props.fileSize)
)watch(() => props.modelValue, val => {if (val) {let temp = 1// 首先将值转为数组const list = Array.isArray(val) ? val : props.modelValue.split(',')// 然后将数组转为对象数组fileList.value = list.map(item => {if (typeof item === "string") {item = { name: item, url: item }}item.uid = item.uid || new Date().getTime() + temp++return item})} else {fileList.value = []return []}
},{ deep: true, immediate: true })// 上传前校检格式和大小
function handleBeforeUpload(file) {// 校检文件类型if (props.fileType.length) {const fileName = file.name.split('.')const fileExt = fileName[fileName.length - 1]const isTypeOk = props.fileType.indexOf(fileExt) >= 0if (!isTypeOk) {proxy.$modal.msgError(`文件格式不正确,请上传${props.fileType.join("/")}格式文件!`)return false}}// 校检文件名是否包含特殊字符if (file.name.includes(',')) {proxy.$modal.msgError('文件名不正确,不能包含英文逗号!')return false}// 校检文件大小if (props.fileSize) {const isLt = file.size / 1024 / 1024 < props.fileSizeif (!isLt) {proxy.$modal.msgError(`上传文件大小不能超过 ${props.fileSize} MB!`)return false}}proxy.$modal.loading("正在上传文件,请稍候...")number.value++return true
}// 文件个数超出
function handleExceed() {proxy.$modal.msgError(`上传文件数量不能超过 ${props.limit} 个!`)
}// 上传失败
function handleUploadError(err) {proxy.$modal.msgError("上传文件失败")proxy.$modal.closeLoading()
}// 上传成功回调
function handleUploadSuccess(res, file) {if (res.code === 200) {uploadList.value.push({ name: res.fileName, url: res.fileName })uploadedSuccessfully()} else {number.value--proxy.$modal.closeLoading()proxy.$modal.msgError(res.msg)proxy.$refs.fileUpload.handleRemove(file)uploadedSuccessfully()}
}// 删除文件
function handleDelete(index) {fileList.value.splice(index, 1)emit("update:modelValue", listToString(fileList.value))
}// 上传结束处理
function uploadedSuccessfully() {if (number.value > 0 && uploadList.value.length === number.value) {fileList.value = fileList.value.filter(f => f.url !== undefined).concat(uploadList.value)uploadList.value = []number.value = 0emit("update:modelValue", listToString(fileList.value))proxy.$modal.closeLoading()}
}// 获取文件名称
function getFileName(name) {// 如果是url那么取最后的名字 如果不是直接返回if (name.lastIndexOf("/") > -1) {return name.slice(name.lastIndexOf("/") + 1)} else {return name}
}// 对象转成指定字符串分隔
function listToString(list, separator) {let strs = ""separator = separator || ","for (let i in list) {if (list[i].url) {strs += list[i].url + separator}}return strs != '' ? strs.substr(0, strs.length - 1) : ''
}// 初始化拖拽排序
onMounted(() => {if (props.drag && !props.disabled) {nextTick(() => {const element = proxy.$refs.uploadFileList?.$el || proxy.$refs.uploadFileListSortable.create(element, {ghostClass: 'file-upload-darg',onEnd: (evt) => {const movedItem = fileList.value.splice(evt.oldIndex, 1)[0]fileList.value.splice(evt.newIndex, 0, movedItem)emit('update:modelValue', listToString(fileList.value))}})})}
})
</script>
<style scoped lang="scss">
.file-upload-darg {opacity: 0.5;background: #c8ebfb;
}
.upload-file-uploader {margin-bottom: 5px;
}
.upload-file-list .el-upload-list__item {border: 1px solid #e4e7ed;line-height: 2;margin-bottom: 10px;position: relative;transition: none !important;
}
.upload-file-list .ele-upload-list__item-content {display: flex;justify-content: space-between;align-items: center;color: inherit;
}
.ele-upload-list__item-content-action .el-link {margin-right: 10px;
}
</style>
全局注册
组件已在src/main.js中全局注册
import FileUpload from "@/components/FileUpload"
app.component('FileUpload', FileUpload)
基本使用方式
<template><file-upload v-model="fileList":limit="3":fileSize="10":fileType="['doc', 'docx', 'pdf']"/>
</template><script setup>import { ref } from 'vue'const fileList = ref([])
</script>
FileUpload 组件与 ImageUpload 的主要区别:
- 用途:ImageUpload 专门用于图片上传,FileUpload 用于普通文件上传
- 显示方式:ImageUpload 使用图片墙展示,FileUpload 使用列表展示
- 预览功能:ImageUpload 支持图片预览,FileUpload 仅显示文件名
- 默认格式:ImageUpload 默认支持图片格式,FileUpload 默认支持文档格式