QQ音乐项目的GUI自动化测试
目录
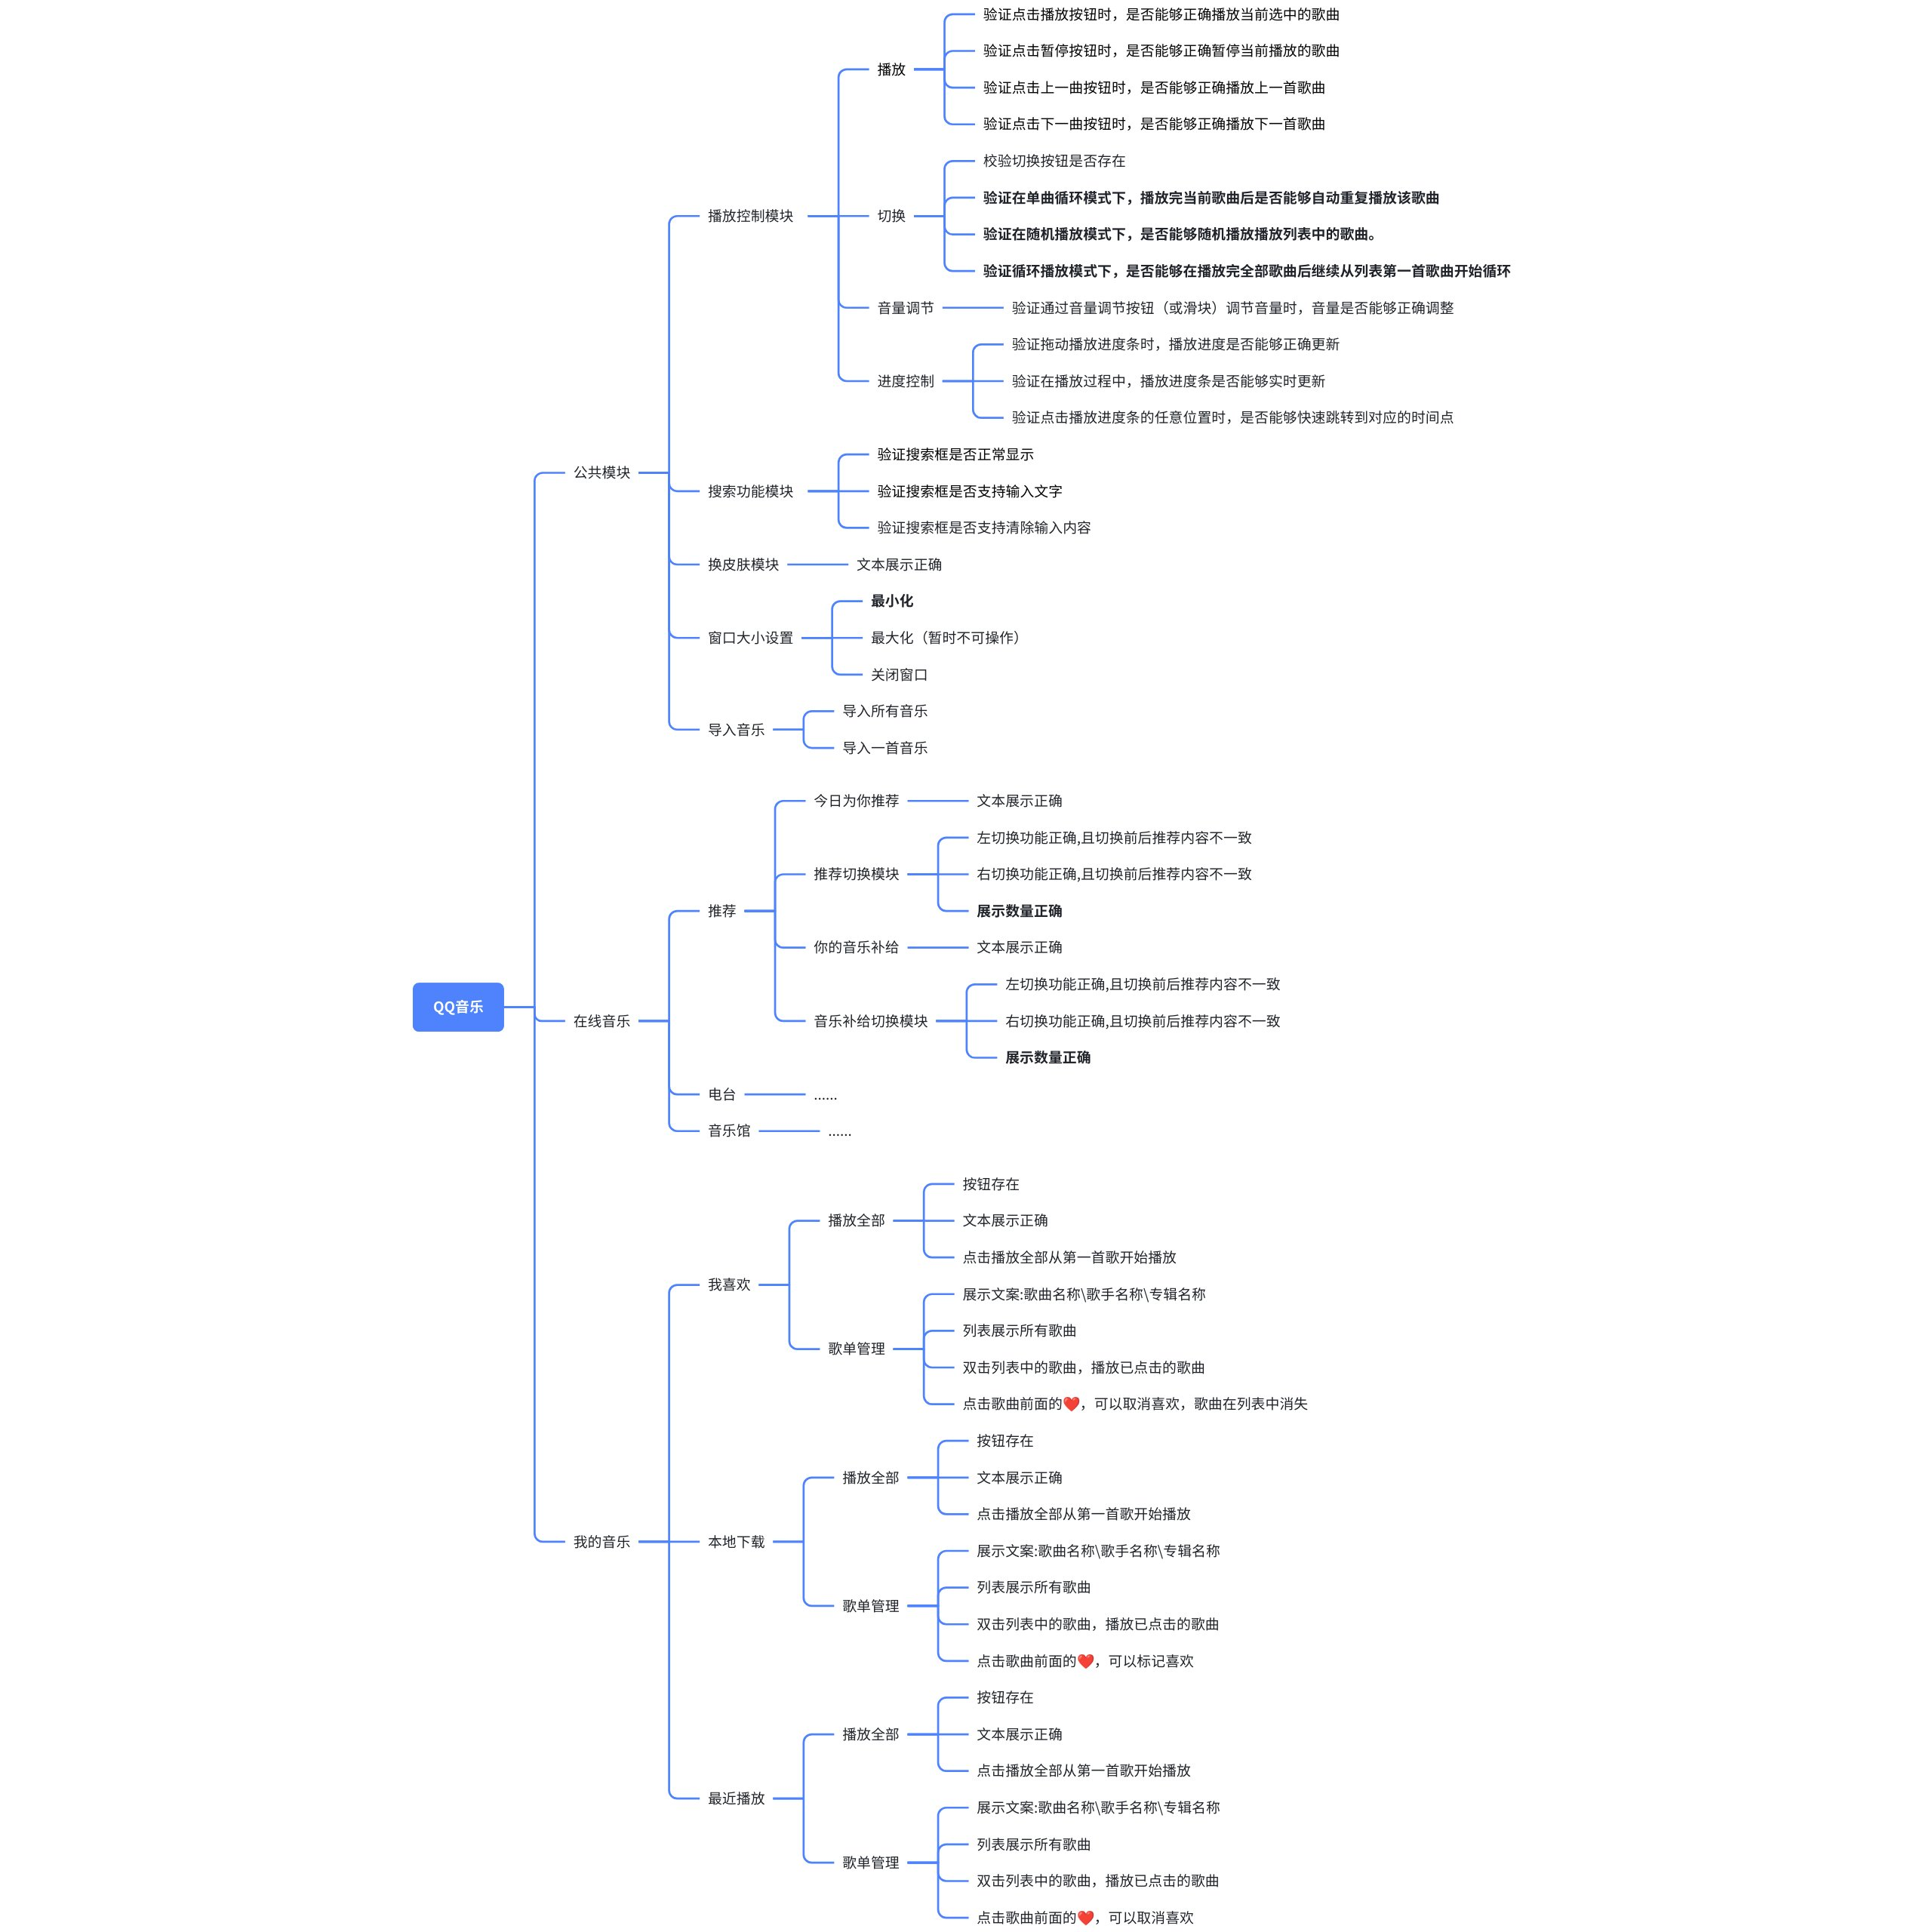
⼀、需求分析与目标制定
⼆、测试用例设计
三、设计自动化测试项目的架构
四、编写代码
4.1. 封装工具类/方法
4.2. 封装各个接口
五、执行测试用例
六、生成测试报告并分析结果
⼀、需求分析与目标制定
-
确定测试目标模块:例如⾳乐播放控制(播放/暂停/切歌)、搜索功能(⽂字输⼊、智能推荐)、 歌单管理(创建/删除/排序)、⽤户交互(评论/分享)等核⼼功能
-
目标制定:对QQ⾳乐实现回归测试,验证核心功能稳定性、界面交互响应等
⼆、测试用例设计
在GUI(图形用户界⾯)自动化测试中,⽤例设计是确保测试全⾯性和有效性的重要环节。从名称上就 可以明显看出,GUI测试的核⼼离不开对⽤⼾界⾯的验证。用户界面作为用户与软件交互的直接窗口, 其设计的合理性、易⽤性和美观性直接影响用户体验。因此,GUI自动化测试的用例设计必须紧密围绕界面和功能展开。
首先,界面测试是GUI自动化测试的基础部分。界⾯测试主要关注界⾯的布局、元素的显示、交互设计 以及整体的用户体验。测试⼈员需要检查界面元素是否按照设计规范正确显示,例如按钮的⼤小、颜色、位置是否符合预期,⽂本是否清晰易读,图标是否正确显示等。此外,还需要验证界面的交互逻 辑,例如用户点击按钮后是否有正确的反馈,输⼊框是否能够正确接收输⼊,下拉菜单是否能够正常 展开等。通过这些测试,可以确保用户界面的友好性和⼀致性。
其次,功能测试是GUI自动化测试的另⼀个重要⽅面。界面不仅仅是⼀个展⽰的平台,它还承载着各种 功能的实现。因此,测试⼈员需要对界面上展示的功能进⾏全面的功能测试。例如,如果界面上有⼀ 个登录功能,测试⼈员需要设计⽤例来验证用户输⼊正确的用户名和密码后是否能够成功登录,输⼊错误的用户名或密码时是否能够给出正确的提⽰,以及在不同⽹络环境下登录功能是否稳定等。对于复杂的业务功能,如数据查询、报表⽣成、⽂件上传下载等,也需要设计详细的测试⽤例来验证其功能的正确性和稳定性。
在用例设计过程中,测试⼈员需要综合考虑界⾯和功能的交互关系。⽤例设计需要从用户的⻆度出 发,模拟真实用户的操作流程,确保界⾯和功能的协同⼯作。
由于QQ⾳乐只有前端,没有后端,⽤例的设计也⽐较简单。后续遇到复杂项⽬,在⽤例设计时尽可能 详细
三、设计自动化测试项目的架构
-
语言选择:python
-
技术栈:pytest框架、requests模块、PyYAML模块、jsonschema模块、allure-pytest模块、logging模块
-
集成开发环境:pycharm
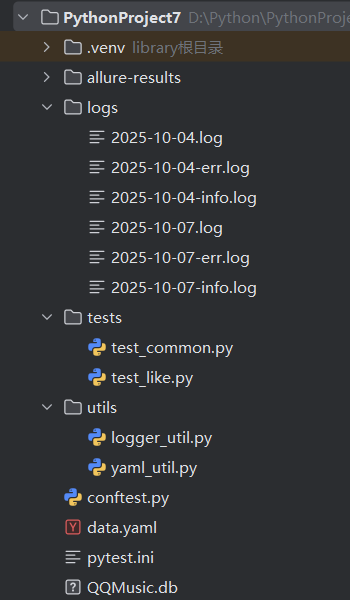
1. alure_results:存放测试结果的文件夹
2. tests:
test_common.py:公共模块测试
test_like.py:我的音乐——本地下载测试
3. utils:
logger_util.py:存放日志通用函数的文件
yaml_util.py:存放向yaml文件中写出函数
4. data.yaml:存放控件的auto_id和control_type
5. pytest.ini:配置文件
6. conftest.py:打开和关闭软件
四、编写代码
4.1. 封装工具类/方法
conftest.py:打开和关闭软件
import pytest
import pywinauto
from pywinauto import Application
from utils.logger_util import Loggerclass QQmusicApp:def __init__(self):# 加r可以避免转义字符self.app_path=r"C:\Users\86136\Desktop\测试课件2024-C++\qqmusic\QQMusic.exe"# 保存app对象self.app=None# 保存窗口对象self.win=None# 获取日志对象self.logger=Logger.GetLog()# 开始def Start(self):# 打开QQMusic.exeself.app=Application(backend="uia").start(self.app_path)# 连接QQMusic# self.app=Application(backend="uia").connect(process=32232 )self.win = self.app.window(title="QQMusic")self.win.wait("exists")if self.app and self.win:self.logger.info("应⽤程序启动成功")else:self.logger.error("应⽤程序启动失败")# 关闭def Close(self):# 如果不为空,则关闭if self.win:self.win.close()# 该函数在在整这生命周期中,只会执行一次
@pytest.fixture(scope="session")
def QQmusic_App():# 构建对象QQmusic=QQmusicApp()# 启动QQ音乐QQmusic.Start()# 返回QQ音乐对象yield QQmusic# 关闭QQ音乐QQmusic.Close()
logger_util.py:存放日志通用函数的文件
import logging
import os.path
import time# info过滤器
class infoFilter(logging.Filter):  # 继承def filter(self, record):return record.levelno == logging.INFO# errFilter过滤器
class errFilter(logging.Filter):def filter(self, record):return record.levelno == logging.ERRORclass Logger:# self: 实例方法调用,在调用函数时,必须先创建对象,然后通过对象调用函数# cls: 类方法调用,在调用函数时,可以直接通过“类名,函数”的方式调用@classmethoddef GetLog(cls):# 创建日志对象cls.logger=logging.getLogger(__name__)# 设置默认等级cls.logger.setLevel(logging.DEBUG)# 创建存放日志文件的文件夹,如果文件夹不存在,则创建LOG_PATH="./logs/"if not os.path.exists(LOG_PATH):os.mkdir(LOG_PATH)# 获取当前时间now=time.strftime("%Y-%m-%d")# 存放所有日志的文件名log_name=LOG_PATH+now+".log"# 存放info等级的日志名info_log_name=LOG_PATH+now+"-info.log"# 存放err等级的日志名err_log_name =LOG_PATH+now+"-err.log"# 创建文件处理器all_handler=logging.FileHandler(filename=log_name,encoding="utf-8")info_handler=logging.FileHandler(filename=info_log_name,encoding="utf-8")err_handler=logging.FileHandler(filename=err_log_name,encoding="utf-8")# 创建日志格式器对象formatter=logging.Formatter("%(asctime)s %(levelname)s [%(name)s] [%(filename)s (%(funcName)s:%(lineno)d)] - %(message)s")# 为每一个文件处理器添加一个日志格式器all_handler.setFormatter(formatter)info_handler.setFormatter(formatter)err_handler.setFormatter(formatter)# 添加过滤器info_handler.addFilter(infoFilter())  # 只有等级等于过滤器等级的日志才会放入该文件中err_handler.addFilter(errFilter())# 将文件处理器添加到日志对象中cls.logger.addHandler(all_handler)cls.logger.addHandler(info_handler)cls.logger.addHandler(err_handler)return cls.logger
yaml_util.py:存放向yaml文件中写出函数
import yaml
import  os# 从data.yaml中读数据
def read_yaml(key):with open(os.getcwd()+"/data.yaml",mode="r",encoding="utf-8") as f:data=yaml.safe_load(f)return data[key]
pytest.ini:配置文件
[pytest]
addopts=-vs -p no:faulthandler --alluredir allure-results
python_files=test_*.py
python_classes=Test*
testpaths=./tests
data.yaml:存放控件的auto_id和control_type
# 测试搜索框
search:# :后面记得加一个空格auto_id: "QQMusic.background.head.headRight.searchBox.lineEdit"control_type: "Edit"
# 换皮肤模块
skin:auto_id: "QQMusic.background.head.headRight.settingBox.skin"control_type: "Button"
# 窗口最小化
minimize:auto_id: "QQMusic.background.head.headRight.settingBox.min"control_type: "Button"
# 导入所有音乐
导入音乐:auto_id: "QQMusic.background.body.bodyRight.controlBox.play2.addLocal"control_type: "Button"
# 本地下载
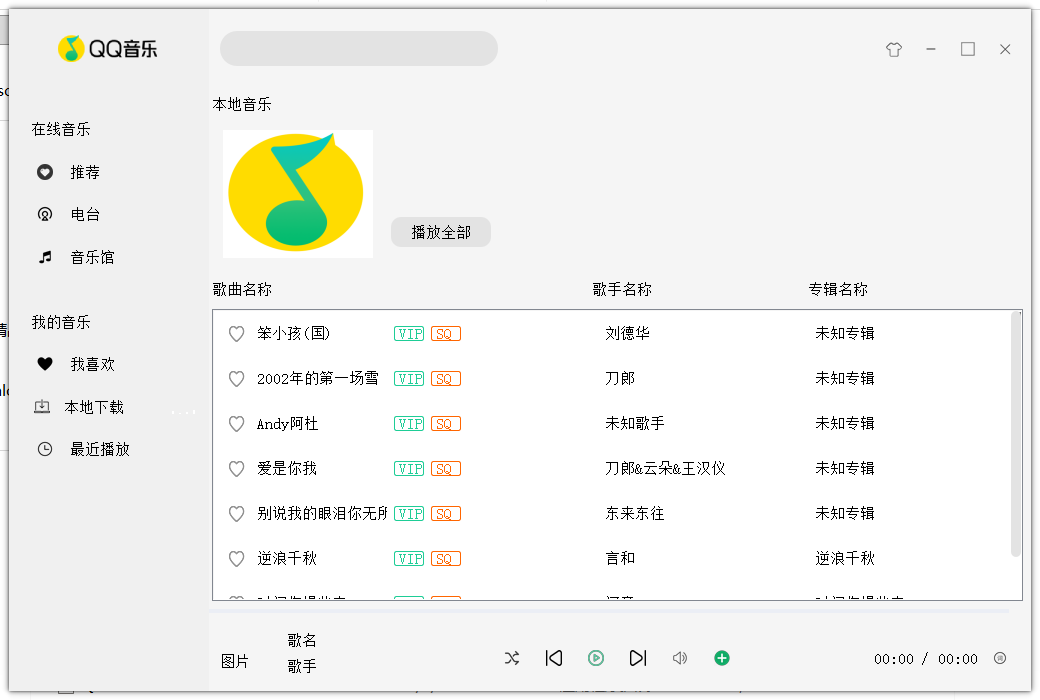
本地下载:auto_id: "QQMusic.background.body.bodyLeft.leftBox.myMusic.local"control_type: "Group"
播放全部:auto_id: "QQMusic.background.body.bodyRight.stackedWidget.localPage.musicPlayBox.playAll.playAllBtn"control_type: "Button"
下一首:auto_id: "QQMusic.background.body.bodyRight.controlBox.play2.playDown"control_type: "Button"
上一首:auto_id: "QQMusic.background.body.bodyRight.controlBox.play2.playUp"control_type: "Button"
暂停:auto_id: "QQMusic.background.body.bodyRight.controlBox.play2.play"control_type: "Button"
歌曲名字:auto_id: "QQMusic.background.body.bodyRight.controlBox.play1.musicName"control_type: "Text"
切换:auto_id: "QQMusic.background.body.bodyRight.controlBox.play2.playMode"control_type: "Button"
播放总进度条:auto_id: "QQMusic.background.body.bodyRight.progressBar.inLine"control_type: "Custom"
当前播放进度:auto_id: "QQMusic.background.body.bodyRight.progressBar.outLine"control_type: "Custom"
本地音乐:auto_id: "QQMusic.background.body.bodyRight.stackedWidget.localPage.PageTittle"control_type: "Text"
歌曲名称:auto_id: "QQMusic.background.body.bodyRight.stackedWidget.localPage.listLabelBox.musicNameLabel"control_type: "Text"
歌手名称:auto_id: "QQMusic.background.body.bodyRight.stackedWidget.localPage.listLabelBox.musicSingerLabel"control_type: "Text"
专辑名称:auto_id: "QQMusic.background.body.bodyRight.stackedWidget.localPage.listLabelBox.musicAlbumLabel"control_type: "Text"
歌曲列表:auto_id: "QQMusic.background.body.bodyRight.stackedWidget.localPage.pageMusicList"control_type: "List"
4.2. 封装各个接口
test_common.py:公共模块测试
import math
import timeimport pytest
from pywinauto import mousefrom utils.logger_util import Logger
from utils.yaml_util import read_yaml@pytest.mark.order(1)
class Test_common:# 获取日志对象logger=Logger.GetLog()# 测试搜索框def test_search(self,QQmusic_App):# 定位YAML中元素的位置edit_ele=read_yaml("search")# 定位搜索框的位置edit=QQmusic_App.win.child_window(auto_id=edit_ele["auto_id"],control_type=edit_ele["control_type"])# 点击一下edit.click_input()# 输入内容edit.type_keys("邓紫棋")#全选并且删除edit.type_keys("^a{BACKSPACE}")# 换皮肤模块def test_skin(self,QQmusic_App):# 定位YAML中元素的位置skin_ele = read_yaml("skin")# 定位换皮肤按钮的位置skin=QQmusic_App.win.child_window(auto_id=skin_ele["auto_id"],control_type=skin_ele["control_type"])# 点击按钮,唤起弹窗skin.click_input()# 验证弹窗是否出现warning=QQmusic_App.win.child_window(title="温馨提示",control_type="Window")warning.wait("visible")# 获取文本text=warning.child_window(control_type="Text").window_text()# 验证文本是否正确assert text=="换肤功能小哥哥正在紧急支持中..."#关闭温馨提示窗口warning.close()# 验证是否关闭warning.wait_not("visible")# 窗口最小化def test_window_min(self, QQmusic_App):# 定位YAML中元素的位置minimize_ele = read_yaml("minimize")# 定位最小化按钮的位置minimize = QQmusic_App.win.child_window(auto_id=minimize_ele["auto_id"], control_type=minimize_ele["control_type"])# 点击按钮,窗口最小化minimize.click_input()# 检查是否最小化assert QQmusic_App.win.is_minimized()# 将窗口还原QQmusic_App.win.restore()# 导入所有音乐def test_into(self,QQmusic_App):# 定位YAML中元素的位置into_ele = read_yaml("导入音乐")# 定位导入按钮的位置minimize = QQmusic_App.win.child_window(auto_id=into_ele["auto_id"], control_type=into_ele["control_type"])# 点击导入按钮,跳出添加窗口minimize.click_input()# 定位添加下载本地音乐窗口download=QQmusic_App.win.child_window(title="添加本地下载音乐",control_type="Window")download.wait("visible")# 定位存放音乐列表的区域list=download.child_window(title="项目视图",control_type="List")# 将输入栏的焦点,转移到项目视图中list.set_focus()# 全选音乐,并且确认list.type_keys("^a{ENTER}")# 查看是否退出该添加下载本地音乐窗口download.wait_not("visible")# 播放音乐(验证随机播放)def test_play_random(self,QQmusic_App):# 定位YAML中元素的位置download_ele = read_yaml("本地下载")# 定位本地下载的位置download = QQmusic_App.win.child_window(auto_id=download_ele["auto_id"],control_type=download_ele["control_type"])# 点击本地下载download.click_input()# 定位并且点击播放全部play_all_ele = read_yaml("播放全部")play_all = QQmusic_App.win.child_window(auto_id=play_all_ele["auto_id"],control_type=play_all_ele["control_type"])# 循环三次,如果三次都失败,则证明随机播放失败for i in range(1,4):# 点击全部播放play_all.click_input()# 点击下一首next_ele = read_yaml("下一首")next = QQmusic_App.win.child_window(auto_id=next_ele["auto_id"], control_type=next_ele["control_type"])next.click_input()time.sleep(2)# 歌曲名字name_ele = read_yaml("歌曲名字")name = QQmusic_App.win.child_window(auto_id=name_ele["auto_id"], control_type=name_ele["control_type"])name_str = name.window_text()if name_str!="时间你慢些走":self.logger.info(f"第{i}次,播放正确")returnelse:self.logger.error(f"第{i}次,播放错误")self.logger.error("随机播放错误")return# 单曲循环def test_single(self,QQmusic_App):# 定位YAML中元素的位置download_ele = read_yaml("本地下载")# 定位本地下载的位置download = QQmusic_App.win.child_window(auto_id=download_ele["auto_id"],control_type=download_ele["control_type"])# 点击本地下载download.click_input()# 定位并且点击播放全部play_all_ele = read_yaml("播放全部")play_all = QQmusic_App.win.child_window(auto_id=play_all_ele["auto_id"],control_type=play_all_ele["control_type"])# 将随机播放,切换到单曲循环switch_ele=read_yaml("切换")switch = QQmusic_App.win.child_window(auto_id=switch_ele["auto_id"],control_type=switch_ele["control_type"])play_all.click_input()# 验证三次播放单曲循环for i in range(1,4):# 点击播放全部play_all.click_input()# 定位播放总进度条progress_ele = read_yaml("播放总进度条")progress = QQmusic_App.win.child_window(auto_id=switch_ele["auto_id"], control_type=switch_ele["control_type"])# 获取进度条大尺寸rec = progress.rectangle()x = rec.right - 3y = math.floor((rec.top + rec.bottom)/2)# 鼠标点击该进度条大尾部mouse.click(coords=(x,y))# 等待切换下一首time.sleep(2)# 歌曲名字name_ele = read_yaml("歌曲名字")name = QQmusic_App.win.child_window(auto_id=name_ele["auto_id"], control_type=name_ele["control_type"])name_str = name.window_text()if name_str=="2002年的第一场雪":self.logger.info(f"第{i}次单曲循环正确")returnelse:self.logger.error(f"第{i}次单曲循环错误")# 单曲循环失败self.logger.error("单曲循环失败")return# 播放音乐(顺序播放)(验证暂停,下一首,上一首是否正确)def test_play(self,QQmusic_App):# 定位YAML中元素的位置download_ele = read_yaml("本地下载")# 定位本地下载的位置download = QQmusic_App.win.child_window(auto_id=download_ele["auto_id"], control_type=download_ele["control_type"])# 点击本地下载download.click_input()# 将单曲播放,切换到顺序switch_ele = read_yaml("切换")switch = QQmusic_App.win.child_window(auto_id=switch_ele["auto_id"], control_type=switch_ele["control_type"])switch.click_input()# 定位并且点击播放全部play_all_ele=read_yaml("播放全部")play_all = QQmusic_App.win.child_window(auto_id=play_all_ele["auto_id"],control_type=play_all_ele["control_type"])play_all.click_input()# 点击暂停stop_ele=read_yaml("暂停")stop=QQmusic_App.win.child_window(auto_id=stop_ele["auto_id"],control_type=stop_ele["control_type"])stop.click_input()time.sleep(2)# 点击开始stop.click_input()# 点击下一首next_ele=read_yaml("下一首")next=QQmusic_App.win.child_window(auto_id=next_ele["auto_id"],control_type=next_ele["control_type"])next.click_input()time.sleep(2)# 歌曲名字name_ele=read_yaml("歌曲名字")name=QQmusic_App.win.child_window(auto_id=name_ele["auto_id"],control_type=name_ele["control_type"])name_str=name.window_text()#判断下一首是否正确assert name_str=="Andy阿杜"# 点击上一首last_ele = read_yaml("上一首")last = QQmusic_App.win.child_window(auto_id=last_ele["auto_id"], control_type=last_ele["control_type"])last.click_input()time.sleep(2)# 歌曲名字name_ele_a = read_yaml("歌曲名字")name_a = QQmusic_App.win.child_window(auto_id=name_ele["auto_id"], control_type=name_ele["control_type"])name_str_a = name_a.window_text()# 判断上一首是否正确assert name_str_a=="2002年的第一场雪"# 播放音乐(验证顺序播放)def test_play_order(self,QQmusic_App):# 定位YAML中元素的位置download_ele = read_yaml("本地下载")# 定位本地下载的位置download = QQmusic_App.win.child_window(auto_id=download_ele["auto_id"],control_type=download_ele["control_type"])# 点击本地下载download.click_input()# 定位并且点击播放全部play_all_ele = read_yaml("播放全部")play_all = QQmusic_App.win.child_window(auto_id=play_all_ele["auto_id"],control_type=play_all_ele["control_type"])play_all.click_input()# 点击上一首last_ele = read_yaml("上一首")last = QQmusic_App.win.child_window(auto_id=last_ele["auto_id"], control_type=last_ele["control_type"])last.click_input()time.sleep(2)# 歌曲名字name_ele = read_yaml("歌曲名字")name = QQmusic_App.win.child_window(auto_id=name_ele["auto_id"], control_type=name_ele["control_type"])name_str = name.window_text()# 判断点击上一首后,是否会跳到最后一首assert name_str=="时间你慢些走"
test_like.py:我的音乐——本地下载测试
import math
import timeimport pytest
from pywinauto import mousefrom utils.logger_util import Logger
from utils.yaml_util import read_yaml# 本地下载模块
@pytest.mark.order(2)
class Test_local:# 获取日志对象logger=Logger.GetLog()# 测试本地下载模块——⽂本#  “播放全部,本地⾳乐、歌曲名称、歌⼿名称、专辑名称”def test_local_text(self,QQmusic_App):# 定位YAML中元素的位置download_ele = read_yaml("本地下载")# 定位本地下载的位置download = QQmusic_App.win.child_window(auto_id=download_ele["auto_id"],control_type=download_ele["control_type"])# 点击本地下载download.click_input()# 定位播放全部,判断该文本是否正确play_all_ele = read_yaml("播放全部")play_all = QQmusic_App.win.child_window(auto_id=play_all_ele["auto_id"],control_type=play_all_ele["control_type"])play_text = play_all.window_text()# 判断播放全部该文本是否正确assert  play_text == "播放全部"self.logger.info("播放全部验证成功")# 定位本地音乐文本local_music_ele = read_yaml("本地音乐")local_music= QQmusic_App.win.child_window(auto_id=local_music_ele["auto_id"],control_type=local_music_ele["control_type"])local_music_text = local_music.window_text()# 判断本地音乐文本是否正确assert local_music_text == "本地音乐"self.logger.info("本地音乐验证成功")# 定位歌曲名称文本music_name_ele = read_yaml("歌曲名称")music_name = QQmusic_App.win.child_window(auto_id=music_name_ele["auto_id"],control_type=music_name_ele["control_type"])music_name_text = music_name.window_text()# 判断歌曲名称文本是否正确assert music_name_text == "歌曲名称"self.logger.info("歌曲名称验证成功")# 定位歌手名称文本singer_name_ele = read_yaml("歌手名称")singer_name = QQmusic_App.win.child_window(auto_id=singer_name_ele["auto_id"],control_type=singer_name_ele["control_type"])singer_name_text = singer_name.window_text()# 判断本地音乐文本是否正确assert singer_name_text == "歌手名称"self.logger.info("歌手名称验证成功")# 定位专辑名称文本album_name_ele = read_yaml("专辑名称")album_name = QQmusic_App.win.child_window(auto_id=album_name_ele["auto_id"],control_type=album_name_ele["control_type"])album_name_text = album_name.window_text()# 判断本地音乐文本是否正确assert album_name_text == "专辑名称"self.logger.info("专辑名称验证成功")# 测试本地下载模块——播放全部功能def test_local_playall(self,QQmusic_App):# 定位YAML中元素的位置download_ele = read_yaml("本地下载")# 定位本地aa下载的位置download = QQmusic_App.win.child_window(auto_id=download_ele["auto_id"],control_type=download_ele["control_type"])# 点击本地下载download.click_input()# 定位并且点击播放全部play_all_ele = read_yaml("播放全部")play_all = QQmusic_App.win.child_window(auto_id=play_all_ele["auto_id"],control_type=play_all_ele["control_type"])play_all.click_input()# 获取播放前进度process_line_ele = read_yaml("当前播放进度")process_line_before =QQmusic_App.win.child_window(auto_id=process_line_ele["auto_id"],control_type=process_line_ele["control_type"])process_line_len_before = process_line_before.rectangle().right# 等待两秒time.sleep(2)# 获取播放后进度process_line_after =QQmusic_App.win.child_window(auto_id=process_line_ele["auto_id"],control_type=process_line_ele["control_type"])process_line_len_after = process_line_after.rectangle().right# 测试前后两个进度是否存在差别assert process_line_len_before != process_line_len_after# 测试本地下载模块——选择歌曲并双击播放def test_local_doubleclick(self,QQmusic_App):music_list_ele = read_yaml("歌曲列表")music_list =QQmusic_App.win.child_window(auto_id=music_list_ele["auto_id"],control_type=music_list_ele["control_type"])# 将歌曲列表还原到最上⽅——————公共模块测试循环播放找最后⼀⾸歌曲将列表拉到了最下⾯# 获取列表中心坐标point = music_list.rectangle().mid_point()# 滚动列表mouse.scroll(coords=(point.x, point.y), wheel_dist=500)# 获取歌曲列表中歌曲数量if music_list.item_count() <= 0:assert 0, "歌曲列表为空"# 选择⼀⾸歌曲并双击播放point = music_list.get_item(row=0).rectangle().mid_point()mouse.double_click(coords=(point.x, point.y))# 获取播放前进度process_line_ele = read_yaml("当前播放进度")process_line_before =QQmusic_App.win.child_window(auto_id=process_line_ele["auto_id"],control_type=process_line_ele["control_type"])process_line_len_before = process_line_before.rectangle().right# 等待两秒time.sleep(2)# 获取播放后进度process_line_after =QQmusic_App.win.child_window(auto_id=process_line_ele["auto_id"],control_type=process_line_ele["control_type"])process_line_len_after = process_line_after.rectangle().right# 测试前后两个进度是否存在差别assert process_line_len_before != process_line_len_after# 将歌曲标记喜欢——为了后⾯我喜欢模块的测试提供数据def test_mark_like(self,QQmusic_App):# 获取歌曲列表中歌曲数量music_list_ele = read_yaml("歌曲列表")music_list =QQmusic_App.win.child_window(auto_id=music_list_ele["auto_id"],control_type=music_list_ele["control_type"])list_size = music_list.item_count()# 对每⼀⾸歌曲标记喜欢for i in range(0, list_size):if i != 0 and i % 6 == 0:# 6及以后的歌曲在标记喜欢之前需要先向下滑动,使其显⽰出来point = music_list.rectangle().mid_point()mouse.scroll(coords=(point.x, point.y), wheel_dist=-500)rec = music_list.get_item(row=i).rectangle()# 获取爱⼼的中间位置(x,y)y = math.floor((rec.top + rec.bottom) / 2)x = rec.left + 22mouse.click(coords=(x, y))
五、执行测试用例
六、生成测试报告并分析结果
在终端执行:
allure serve .\allure-results\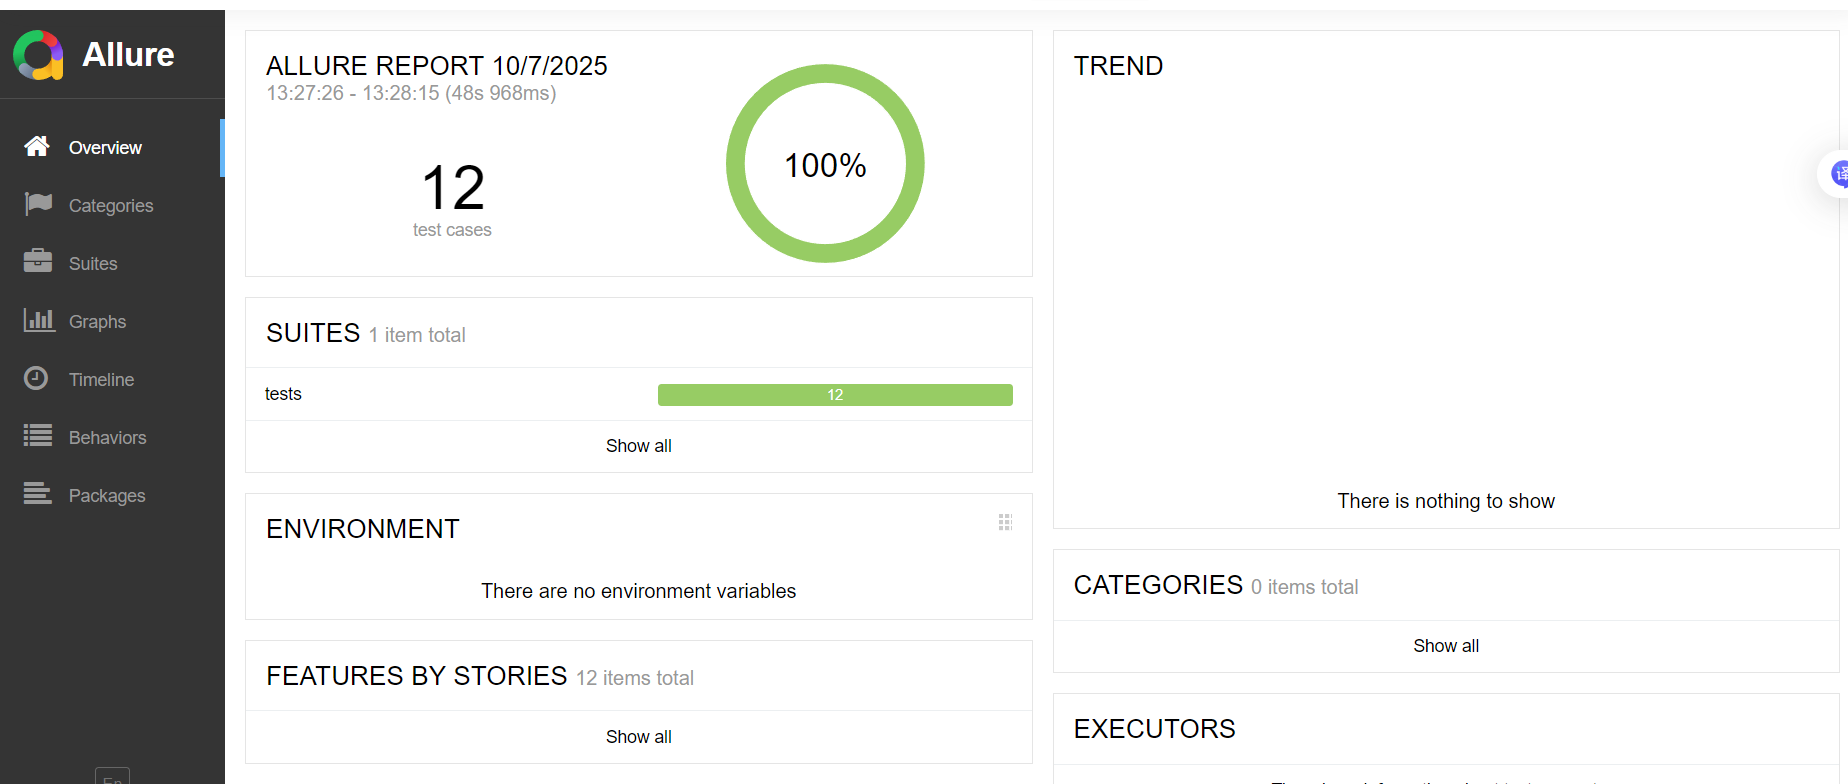
测试时间:
测试执行时间从13:27:26持续到13:28:15,总共耗时48秒968毫秒。测试时间与测试用例数量成正比。用例数量越多,测试时间越长。通过优化测试脚本、并行执行和分布式测试环境,可以显著缩短测试时间。(比如多线程)
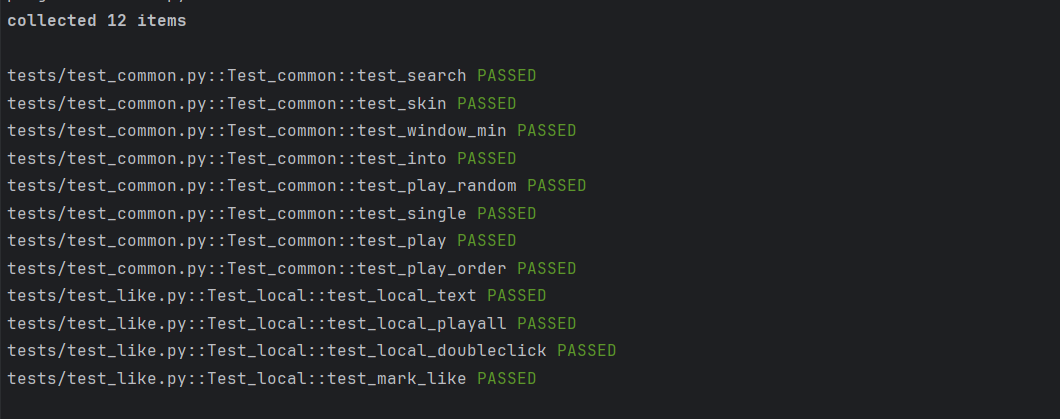
测试用例总数:
共有12个测试用例,高测试用例总数通常表示测试覆盖范围广,能够更全面地验证接口功能;低测试用例总数可能意味着测试覆盖不全面,存在遗漏的风险。
通过率:
饼图显示了测试的通过率为100%,这意味着所有12个测试用例都成功执行,没有失败的测试用例。通过率是衡量接口质量和测试效果的关键指标。在测试环境中,通过率应达到95%以上