Linux学习笔记--IIC子系统
一、一些概念
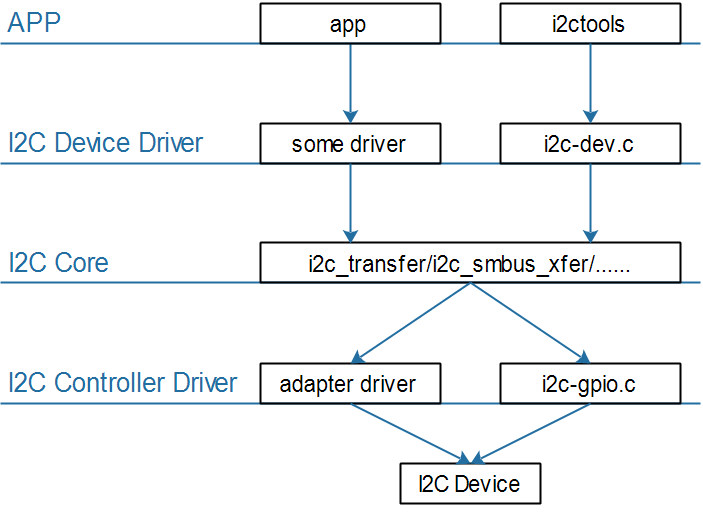
APP:只需要调用设备驱动程序提供的接口
IIC设备驱动:知道设备地址、数据格式
IIC控制器驱动:根据IIC协议发出各种信号,IIC设备地址、IIC存储地址、数据
对于Linux来说APP可以通过两类驱动程序访问设备:
1、I2C设备自己的驱动程序
2、内核自带的i2c-dev.c驱动程序,它是i2c控制器驱动程序暴露给用户空间的驱动程序(i2c-dev.c)
对于I2C Device Driver
1、I2C设备自己的驱动程序
2、内核自带的i2c-dev.c驱动程序,它是i2c控制器驱动程序暴露给用户空间的驱动程序(i2c-dev.c)
I2C Controller Driver
1、芯片I2C控制器的驱动程序(称为adapter)
2、使用GPIO模拟的I2C控制器驱动程序(i2c-gpio.c)
二、一些结构体和函数
1、struct i2c_adapter
在Linux中:
怎么表示I2C Controller
一个芯片里可能有多个I2C Controller,比如第0个、第1个、……
对于使用者,只要确定是第几个I2C Controller即可
使用i2c_adapter表示一个I2C BUS,或称为I2C Controller
里面有2个重要的成员:
nr:第几个I2C BUS(I2C Controller)
i2c_algorithm,里面有该I2C BUS的传输函数,用来收发I2C数据
i2c_adapter
/** i2c_adapter is the structure used to identify a physical i2c bus along* with the access algorithms necessary to access it.*/
struct i2c_adapter {struct module *owner;unsigned int class;		  /* classes to allow probing for */const struct i2c_algorithm *algo; /* the algorithm to access the bus */void *algo_data;/* data fields that are valid for all devices	*/const struct i2c_lock_operations *lock_ops;struct rt_mutex bus_lock;struct rt_mutex mux_lock;int timeout;			/* in jiffies */int retries;struct device dev;		/* the adapter device */int nr;char name[48];struct completion dev_released;struct mutex userspace_clients_lock;struct list_head userspace_clients;struct i2c_bus_recovery_info *bus_recovery_info;const struct i2c_adapter_quirks *quirks;
};
2、struct i2c_algorithm
struct i2c_algorithm {/* If an adapter algorithm can't do I2C-level access, set master_xferto NULL. If an adapter algorithm can do SMBus access, setsmbus_xfer. If set to NULL, the SMBus protocol is simulatedusing common I2C messages *//* master_xfer should return the number of messages successfullyprocessed, or a negative value on error */int (*master_xfer)(struct i2c_adapter *adap, struct i2c_msg *msgs,int num);int (*smbus_xfer) (struct i2c_adapter *adap, u16 addr,unsigned short flags, char read_write,u8 command, int size, union i2c_smbus_data *data);/* To determine what the adapter supports */u32 (*functionality) (struct i2c_adapter *);#if IS_ENABLED(CONFIG_I2C_SLAVE)int (*reg_slave)(struct i2c_client *client);int (*unreg_slave)(struct i2c_client *client);
#endif
};
3、struct i2c_client
怎么表示I2C Device
一个I2C Device,有设备地址
它连接在哪个I2C Controller上,即对应的i2c_adapter是什么
使用i2c_client来表示一个I2C Device
struct i2c_client {unsigned short flags;		/* div., see below		*/unsigned short addr;		/* chip address - NOTE: 7bit	*//* addresses are stored in the	*//* _LOWER_ 7 bits		*/char name[I2C_NAME_SIZE];struct i2c_adapter *adapter;	/* the adapter we sit on	*/struct device dev;		/* the device structure		*/int irq;			/* irq issued by device		*/struct list_head detected;
#if IS_ENABLED(CONFIG_I2C_SLAVE)i2c_slave_cb_t slave_cb;	/* callback for slave mode	*/
#endif
};
4、struct i2c_msg
怎么表示要传输的数据
在上面的i2c_algorithm结构体中可以看到要传输的数据被称为:i2c_msg
i2c_msg
struct i2c_msg {__u16 addr;	/* slave address			*/__u16 flags;
#define I2C_M_RD		0x0001	/* read data, from slave to master *//* I2C_M_RD is guaranteed to be 0x0001! */
#define I2C_M_TEN		0x0010	/* this is a ten bit chip address */
#define I2C_M_RECV_LEN		0x0400	/* length will be first received byte */
#define I2C_M_NO_RD_ACK		0x0800	/* if I2C_FUNC_PROTOCOL_MANGLING */
#define I2C_M_IGNORE_NAK	0x1000	/* if I2C_FUNC_PROTOCOL_MANGLING */
#define I2C_M_REV_DIR_ADDR	0x2000	/* if I2C_FUNC_PROTOCOL_MANGLING */
#define I2C_M_NOSTART		0x4000	/* if I2C_FUNC_NOSTART */
#define I2C_M_STOP		0x8000	/* if I2C_FUNC_PROTOCOL_MANGLING */__u16 len;		/* msg length				*/__u8 *buf;		/* pointer to msg data			*/
};
i2c_msg中的flags用来表示传输方向:bit 0等于I2C_M_RD表示读,bit 0等于0表示写
一个i2c_msg要么是读,要么是写
举例:设备地址为0x50的EEPROM,要读取它里面存储地址为0x10的一个字节,应该构造几个i2c_msg?
要构造2个i2c_msg
第一个i2c_msg表示写操作,把要访问的存储地址0x10发给设备
第二个i2c_msg表示读操作
5、i2c_transfer()函数
i2c_transfer() 是Linux I2C子系统中的核心枢纽函数,它负责:
承上:接收来自设备驱动(如AT24C02驱动)的传输请求
启下:通过I2C控制器驱动在物理线上产生标准的I2C波形
int i2c_transfer(struct i2c_adapter *adap, struct i2c_msg *msgs, int num);参数解析:
参数解析:
struct i2c_adapter *adapI2C控制器适配器,代表具体的I2C硬件控制器包含硬件操作函数指针(算法)struct i2c_msg *msgsI2C消息数组,描述要传输的数据每个消息代表一个独立的I2C起停序列int num消息数组中消息的数量
函数内部执行流程
1. 参数验证与准备
int i2c_transfer(struct i2c_adapter *adap, struct i2c_msg *msgs, int num)
{// 检查适配器和消息有效性if (adap->algo->master_xfer) {// 硬件特定的传输函数ret = adap->algo->master_xfer(adap, msgs, num);}return ret;
}
2. 硬件控制器执行传输(以模拟GPIO为例)
// 这是I2C控制器的具体实现
static int i2c_gpio_master_xfer(struct i2c_adapter *adap, struct i2c_msg *msgs, int num)
{// 遍历所有消息for (int i = 0; i < num; i++) {struct i2c_msg *msg = &msgs[i];// 生成START信号i2c_start(adap);// 发送设备地址 + R/W位u8 addr_byte = (msg->addr << 1) | (msg->flags & I2C_M_RD ? 1 : 0);if (!i2c_send_byte(adap, addr_byte)) {// 无ACK,传输失败i2c_stop(adap);return -EIO;}// 数据传输if (msg->flags & I2C_M_RD) {// 读操作for (int j = 0; j < msg->len; j++) {msg->buf[j] = i2c_recv_byte(adap);// 发送ACK(非最后一个字节)或NACK(最后一个字节)i2c_send_ack(adap, (j == msg->len - 1) ? 1 : 0);}} else {// 写操作for (int j = 0; j < msg->len; j++) {if (!i2c_send_byte(adap, msg->buf[j])) {i2c_stop(adap);return -EIO;}}}// 生成STOP信号if (msg->flags & I2C_M_STOP) {i2c_stop(adap);}}return num;
}
三、I2C-Tools
APP通过I2C Controller与I2C Device传输数据。 所以使用I2C-Tools时也需要指定:
哪个I2C控制器(或称为I2C BUS、I2C Adapter)
哪个I2C设备(设备地址)
数据:读还是写、数据本身
i2cdetect:I2C检测
// 列出当前的I2C Adapter(或称为I2C Bus、I2C Controller)
i2cdetect -l// 打印某个I2C Adapter的Functionalities, I2CBUS为0、1、2等整数
i2cdetect -F I2CBUS// 看看有哪些I2C设备, I2CBUS为0、1、2等整数
i2cdetect -y -a I2CBUS// 效果如下
# i2cdetect -l
i2c-1   i2c             STM32F7 I2C(0x40013000)                 I2C adapter
i2c-2   i2c             STM32F7 I2C(0x5c002000)                 I2C adapter
i2c-0   i2c             STM32F7 I2C(0x40012000)                 I2C adapter# i2cdetect -F 0
Functionalities implemented by /dev/i2c-0:
I2C                              yes
SMBus Quick Command              yes
SMBus Send Byte                  yes
SMBus Receive Byte               yes
SMBus Write Byte                 yes
SMBus Read Byte                  yes
SMBus Write Word                 yes
SMBus Read Word                  yes
SMBus Process Call               yes
SMBus Block Write                yes
SMBus Block Read                 yes
SMBus Block Process Call         yes
SMBus PEC                        yes
I2C Block Write                  yes
I2C Block Read                   yes// --表示没有该地址对应的设备, UU表示有该设备并且它已经有驱动程序,
// 数值表示有该设备但是没有对应的设备驱动
# i2cdetect -y -a 0  0  1  2  3  4  5  6  7  8  9  a  b  c  d  e  f
00: 00 -- -- -- -- -- -- -- -- -- -- -- -- -- -- --
10: -- -- -- -- -- -- -- -- -- -- UU -- -- -- 1e --
20: -- -- UU -- -- -- -- -- -- -- -- -- -- -- -- --
30: -- -- -- -- -- -- -- -- -- -- -- -- -- -- -- --
40: -- -- -- -- -- -- -- -- -- -- -- -- -- -- -- --
50: -- -- -- -- -- -- -- -- -- -- -- -- -- -- -- --
60: -- -- -- -- -- -- -- -- -- -- -- -- -- -- -- --
70: -- -- -- -- -- -- -- -- -- -- -- -- -- -- -- --
i2cget:I2C读
# i2cget
Usage: i2cget [-f] [-y] [-a] I2CBUS CHIP-ADDRESS [DATA-ADDRESS [MODE]]I2CBUS is an integer or an I2C bus nameADDRESS is an integer (0x03 - 0x77, or 0x00 - 0x7f if -a is given)MODE is one of:b (read byte data, default)w (read word data)c (write byte/read byte)Append p for SMBus PEC// 写一个字节: I2CBUS为0、1、2等整数, 表示I2C Bus; CHIP-ADDRESS表示设备地址//           DATA-ADDRESS就是要写的数据i2cset -f -y I2CBUS CHIP-ADDRESS DATA-ADDRESS// 给address写1个字节(address, value)://           I2CBUS为0、1、2等整数, 表示I2C Bus; CHIP-ADDRESS表示设备地址//           DATA-ADDRESS: 8位芯片寄存器地址; //           VALUE: 8位数值//           MODE: 可以省略,也可以写为bi2cset -f -y I2CBUS CHIP-ADDRESS DATA-ADDRESS VALUE [b]// 给address写2个字节(address, value)://           I2CBUS为0、1、2等整数, 表示I2C Bus; CHIP-ADDRESS表示设备地址//           DATA-ADDRESS: 8位芯片寄存器地址; //           VALUE: 16位数值//           MODE: wi2cset -f -y I2CBUS CHIP-ADDRESS DATA-ADDRESS VALUE w// SMBus Block Write:给address写N个字节的数据//   发送的数据有:address, N, value1, value2, ..., valueN//   跟`I2C Block Write`相比, 需要发送长度N//           I2CBUS为0、1、2等整数, 表示I2C Bus; CHIP-ADDRESS表示设备地址//           DATA-ADDRESS: 8位芯片寄存器地址; //           VALUE1~N: N个8位数值//           MODE: si2cset -f -y I2CBUS CHIP-ADDRESS DATA-ADDRESS VALUE1 ... VALUEN s// I2C Block Write:给address写N个字节的数据//   发送的数据有:address, value1, value2, ..., valueN//   跟`SMBus Block Write`相比, 不需要发送长度N//           I2CBUS为0、1、2等整数, 表示I2C Bus; CHIP-ADDRESS表示设备地址//           DATA-ADDRESS: 8位芯片寄存器地址; //           VALUE1~N: N个8位数值//           MODE: ii2cset -f -y I2CBUS CHIP-ADDRESS DATA-ADDRESS VALUE1 ... VALUEN i
i2ctransfer:I2C传输(不是基于SMBus)
# i2ctransfer
Usage: i2ctransfer [-f] [-y] [-v] [-V] [-a] I2CBUS DESC [DATA] [DESC [DATA]]...I2CBUS is an integer or an I2C bus nameDESC describes the transfer in the form: {r|w}LENGTH[@address]1) read/write-flag 2) LENGTH (range 0-65535) 3) I2C address (use last one if omitted)DATA are LENGTH bytes for a write message. They can be shortened by a suffix:= (keep value constant until LENGTH)+ (increase value by 1 until LENGTH)- (decrease value by 1 until LENGTH)p (use pseudo random generator until LENGTH with value as seed)Example (bus 0, read 8 byte at offset 0x64 from EEPROM at 0x50):# i2ctransfer 0 w1@0x50 0x64 r8
Example (same EEPROM, at offset 0x42 write 0xff 0xfe ... 0xf0):# i2ctransfer 0 w17@0x50 0x42 0xff-// Example (bus 0, read 8 byte at offset 0x64 from EEPROM at 0x50):
# i2ctransfer -f -y 0 w1@0x50 0x64 r8// Example (bus 0, write 3 byte at offset 0x64 from EEPROM at 0x50):
# i2ctransfer -f -y 0 w9@0x50 0x64 val1 val2 val3// Example
// first: (bus 0, write 3 byte at offset 0x64 from EEPROM at 0x50)
// and then: (bus 0, read 3 byte at offset 0x64 from EEPROM at 0x50)
# i2ctransfer -f -y 0 w9@0x50 0x64 val1 val2 val3 r3@0x50
# i2ctransfer -f -y 0 w9@0x50 0x64 val1 val2 val3 r3 //如果设备地址不变,后面的设备地址可省略
访问I2C设备
1、指定I2C控制器
i2c-dev.c提供为每个I2C控制器(I2C Bus、I2C Adapter)都生成一个设备节点:/dev/i2c-0、/dev/i2c-1等
open某个/dev/i2c-X节点,就是去访问该I2C控制器下的设备
2、指定I2C设备
通过ioctl指定I2C设备的地址
ioctl(file, I2C_SLAVE, address)
如果该设备已经有了对应的设备驱动程序,则返回失败
ioctl(file, I2C_SLAVE_FORCE, address)
如果该设备已经有了对应的设备驱动程序
但是还是想通过i2c-dev驱动来访问它
则使用这个ioctl来指定I2C设备地址
3、传输数据
- 一般的I2C方式:ioctl(file, I2C_RDWR, &rdwr)(i2ctransfer.c )
- SMBus方式:ioctl(file, I2C_SMBUS, &args)(i2cget.c、i2cset.c )
使用I2C-Tools源码
#include <i2c/smbus.h>      // SMBus协议支持
#include "i2cbusses.h"      // I2C总线工具函数
I2C设备初始化
// 打开I2C设备
file = open_i2c_dev(argv[1][0]-'0', filename, sizeof(filename), 0);
if (file < 0)
{printf("can't open %s\n", filename);return -1;
}// 设置从设备地址(AT24C02的地址是0x50)
if (set_slave_addr(file, dev_addr, 1))
{printf("can't set_slave_addr\n");return -1;
}关键点:
argv[1][0]-'0':将字符数字转换为整数(如'1'→1)dev_addr = 0x50:AT24C02的固定I2C地址第三个参数
1表示强制设置从设备地址
写入操作实现
if (argv[2][0] == 'w')
{str = argv[3];  // 要写入的字符串// 设置延时20ms(AT24C02写入需要时间)req.tv_sec  = 0;req.tv_nsec = 20000000; /* 20ms */// 逐个字符写入while (*str){// 使用SMBus协议写入单字节数据ret = i2c_smbus_write_byte_data(file, mem_addr, *str);if (ret){printf("i2c_smbus_write_byte_data err\n");return -1;}// 等待写入完成(重要!)nanosleep(&req, NULL);mem_addr++;  // 地址递增str++;       // 指向下一个字符}// 写入字符串结束符ret = i2c_smbus_write_byte_data(file, mem_addr, 0);if (ret){printf("i2c_smbus_write_byte_data err\n");return -1;}
}
读取操作实现
else
{// 读取整个块数据ret = i2c_smbus_read_i2c_block_data(file, mem_addr, sizeof(buf), buf);if (ret < 0){printf("i2c_smbus_read_i2c_block_data err\n");return -1;}buf[31] = '\0';  // 确保字符串终止printf("get data: %s\n", buf);
}
关键函数说明
i2c_smbus_write_byte_data(int file, __u8 command, __u8 value)
功能:向指定寄存器地址写入一个字节
参数:
file:I2C设备文件描述符command:设备内部地址(mem_addr)value:要写入的数据(*str)
i2c_smbus_read_i2c_block_data(int file, __u8 command, __u8 length, __u8 *values)
功能:从指定地址开始读取多个字节
参数:
file:I2C设备文件描述符command:起始地址(mem_addr)length:要读取的字节数values:存储读取数据的缓冲区
四、通用i2c-dev
Linux驱动程序: drivers/i2c/i2c-dev.c
核心:
static const struct file_operations i2cdev_fops = {.owner		= THIS_MODULE,.llseek		= no_llseek,.read		= i2cdev_read,.write		= i2cdev_write,.unlocked_ioctl	= i2cdev_ioctl,.compat_ioctl	= compat_i2cdev_ioctl,.open		= i2cdev_open,.release	= i2cdev_release,
};
五、I2C系统驱动程序模型
I2C Core就是I2C核心层,它的作用:
提供统一的访问函数,比如i2c_transfer、i2c_smbus_xfer等
实现
I2C总线-设备-驱动模型,管理:I2C设备(i2c_client)、I2C设备驱动(i2c_driver)、I2C控制器(i2c_adapter)
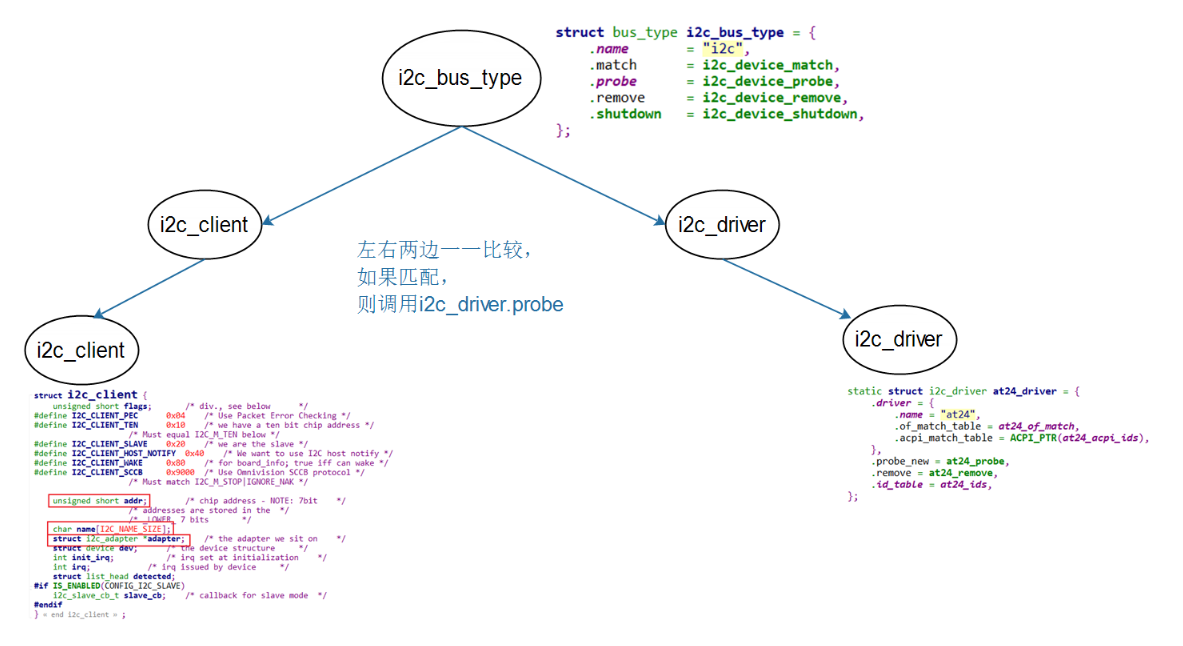
i2c_driver表明能支持哪些设备:
使用of_match_table来判断
设备树中,某个I2C控制器节点下可以创建I2C设备的节点
如果I2C设备节点的compatible属性跟of_match_table的某项兼容,则匹配成功
i2c_client.name跟某个of_match_table[i].compatible值相同,则匹配成功
使用id_table来判断
i2c_client.name跟某个id_table[i].name值相同,则匹配成功
i2c_driver跟i2c_client匹配成功后,就调用i2c_driver.probe函数。
创建i2c_client
1、通过I2C bus number来创建
int i2c_register_board_info(int busnum, struct i2c_board_info const *info, unsigned len);通过设备树来创建
i2c1: i2c@400a0000 {/* ... master properties skipped ... */clock-frequency = <100000>;flash@50 {compatible = "atmel,24c256";reg = <0x50>;};pca9532: gpio@60 {compatible = "nxp,pca9532";gpio-controller;#gpio-cells = <2>;reg = <0x60>;};};还可以使用下面两个函数来创建i2c_client:
i2c_new_device
static struct i2c_board_info sfe4001_hwmon_info = {I2C_BOARD_INFO("max6647", 0x4e),};int sfe4001_init(struct efx_nic *efx){(...)efx->board_info.hwmon_client =i2c_new_device(&efx->i2c_adap, &sfe4001_hwmon_info);(...)}i2c_new_probed_device
static const unsigned short normal_i2c[] = { 0x2c, 0x2d, I2C_CLIENT_END };static int usb_hcd_nxp_probe(struct platform_device *pdev){(...)struct i2c_adapter *i2c_adap;struct i2c_board_info i2c_info;(...)i2c_adap = i2c_get_adapter(2);memset(&i2c_info, 0, sizeof(struct i2c_board_info));strscpy(i2c_info.type, "isp1301_nxp", sizeof(i2c_info.type));isp1301_i2c_client = i2c_new_probed_device(i2c_adap, &i2c_info,normal_i2c, NULL);i2c_put_adapter(i2c_adap);(...)}i2c_new_device:会创建i2c_client,即使该设备并不存在
i2c_new_probed_device:
它成功的话,会创建i2c_client,并且表示这个设备肯定存在
I2C设备的地址可能发生变化,比如AT24C02的引脚A2A1A0电平不一样时,设备地址就不一样
可以罗列出可能的地址
i2c_new_probed_device使用这些地址判断设备是否存在
通过用户空间(user-space)生成 调试时、或者不方便通过代码明确地生成i2c_client时,可以通过用户空间来生成。
// 创建一个i2c_client, .name = "eeprom", .addr=0x50, .adapter是i2c-3# echo eeprom 0x50 > /sys/bus/i2c/devices/i2c-3/new_device// 删除一个i2c_client# echo 0x50 > /sys/bus/i2c/devices/i2c-3/delete_device六、设备驱动i2c_driver
设备树匹配表
static const struct of_device_id of_match_ids_example[] = {{ .compatible = "com_name,chip_name", .data = NULL },{ /* END OF LIST */ },
};作用:通过设备树的compatible属性匹配设备
"com_name,chip_name":对应设备树中的compatible = "com_name,chip_name".data:可传递驱动私有数据
I2C设备ID表
作用:非设备树方式匹配设备
"chip_name":设备名称,用于模块参数或旧式匹配
驱动核心函数
static int i2c_driver_example_probe(struct i2c_client *client)
调用时机:当内核发现匹配的设备时自动调用
参数:i2c_client结构体,包含设备信息(地址、适配器等)
作用:初始化设备,分配资源,注册设备操作
I2C驱动结构体
static struct i2c_driver i2c_example_driver = {.driver = {.name = "example",                    // 驱动名称.of_match_table = of_match_ids_example, // 设备树匹配表},.probe_new = i2c_driver_example_probe,    // 探测函数.remove = i2c_driver_example_remove,      // 移除函数  .id_table = example_ids,                  // 设备ID表
};
驱动加载和匹配流程
1. 模块加载
insmod example_driver.ko调用
i2c_driver_example_init()注册驱动到I2C子系统
2. 设备匹配
设备树方式:
&i2c1 {example_device: example@50 {compatible = "com_name,chip_name";reg = <0x50>;};
};传统方式:
echo chip_name 0x50 > /sys/bus/i2c/devices/i2c-1/new_device当匹配成功时:
内核创建
i2c_client结构体调用
i2c_driver_example_probe()驱动完成设备初始化