PDF中表格的处理 (OCR)
文章目录
- 一、对于表格,可以借助 Python 的pdfplumber库
- 二、对于图片,可以借助PyMuPDF库提取图片并保存
- 三、OCR 接口 处理 图片中的表格
- 3.1 OCR 识别表格的核心原理
- 3.2 主流的 OCR 接口
- 3.3 代码案例
- 3.3.1 腾讯云 OCR(云服务,上手快)
- 3.3.2 PaddleOCR(开源本地,免费无联网)
- 四、优化点
- 4.1 图片预处理
- 4.2 选择合适的接口
- 4.3 ‘可编辑’ PDF 和 ‘扫描版’ PDF
一、对于表格,可以借助 Python 的pdfplumber库
● 找到对应页,创建 page 对象,然后调用 extract_table 方法,就可变读到这个表格转变成 tabel 对象
● 最后 tabel 对象的数据转换成 Dataframe 对象
● 将 df 对象 to_excel 转换成 excel 文件
import pdfplumber
import pandas as pdwith pdfplumber.open("file.pdf") as pdf:page = pdf.pages[0]  # 选择第一页table = page.extract_table()  # 提取表格数据
df = pd.DataFrame(table[1:], columns=table[0])  # 转换为DataFrame
df.to_excel("table_data.xlsx", index=False)  # 保存为Excel
二、对于图片,可以借助PyMuPDF库提取图片并保存
import fitzpdf = fitz.open("file.pdf")
for page_num in range(len(pdf)):page = pdf[page_num]img_list = page.get_images(full=True)for img_idx, img in enumerate(img_list):xref = img[0]base_image = pdf.extract_image(xref)image_bytes = base_image["image"]with open(f"page_{page_num}_img_{img_idx}.png", "wb") as f:f.write(image_bytes)
三、OCR 接口 处理 图片中的表格
OCR (Optical Character Recognition,光学字符识别)接口是处理扫描版 PDF(图片格式 PDF)或图片中表格的核心工具。
这类图片中的表格无法通过常规 PDF 解析工具(如上述说到的 pdfplumber)直接提取结构,需要先通过 OCR 将图像中的文字和表格结构转换为可编辑的文本/数据格式。
3.1 OCR 识别表格的核心原理
扫描版 PDF/图片中的表格无“行列结构信息”,OCR 接口通过两步(1,2)实现识别:
- 表格结构分析:先识别图像中的“表格边框、单元格分割线”,确定表格的行数、列数、单元格位置。
- 文本内容提取:对每个单元格内的图像文字进行 OCR 识别,将像素文字转化为可复制的文本。
- 结构化输出:将“单元格位置”与“识别文本”对应,生成 excel、csv、json 等结构化格式,便于后续继续分析。
总结:通过表格的骨架找到表格位置和基本信息(行、列数等),再通过 OCR 识别图像中表格里面的文字,最后存储文本。
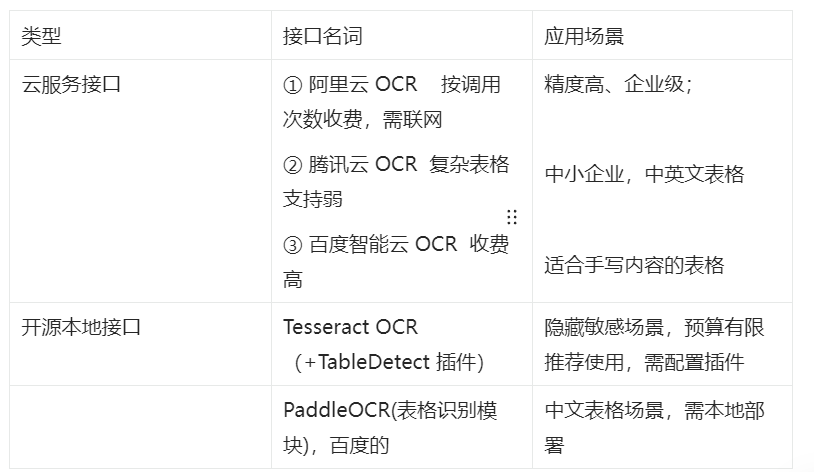
3.2 主流的 OCR 接口
目前主流的 OCR 接口分为两种,一种是无需本地部署适合快速开发的“云服务接口”,一种是需要本地部署适合隐私敏感场景的“开源本地接口”。
3.3 代码案例
3.3.1 腾讯云 OCR(云服务,上手快)
腾讯云 OCR 提供免费额度(新用户 1 万次/月),支持直接上传图片/PDF,输出 Excel 格式表格数据,步骤如下:
-
准备工作:注册腾讯云(https://cloud.tencent.com/)账号,在“控制台-访问管理”中创建 secretID 和 SecretKey
-
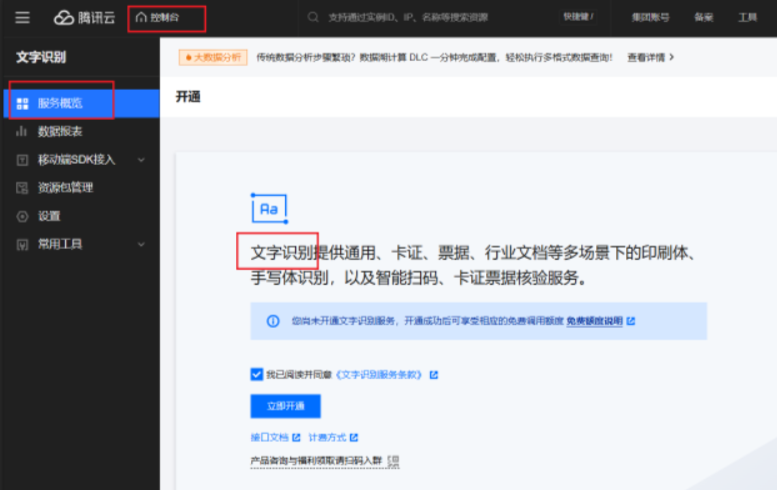
开通文字识别服务
-
安装腾讯云 SDK:pip install tencentcloud-sdk-python
-
API 文档:https://cloud.tencent.com/document/api/866/34936#6.-.E9.94.99.E8.AF.AF.E7.A0.81
from tencentcloud.common import credential
from tencentcloud.common.profile.client_profile import ClientProfile
from tencentcloud.common.profile.http_profile import HttpProfile
from tencentcloud.ocr.v20181119 import ocr_client, modelsdef tencent_ocr_table(image_path, secret_id, secret_key):# 1. 配置API凭证和客户端cred = credential.Credential(secret_id, secret_key)httpProfile = HttpProfile()httpProfile.endpoint = "ocr.tencentcloudapi.com"  # OCR接口域名clientProfile = ClientProfile()clientProfile.httpProfile = httpProfileclient = ocr_client.OcrClient(cred, "ap-beijing", clientProfile)  # 地域选就近的(如ap-shanghai)# 2. 读取图片文件(转为base64格式,腾讯云要求)import base64with open(image_path, "rb") as f:image_base64 = base64.b64encode(f.read()).decode("utf-8")# 3. 构造请求参数(指定表格识别)req = models.TableOCRRequest()req.ImageBase64 = image_base64  # 若传PDF,用req.PdfFileBase64;支持单页PDF#req.OutputFormat = "xlsx"  # 输出格式:Excel/CSV/JSON (废弃了这个参数)# 4. 调用接口并获取结果resp = client.TableOCR(req)result = resp.to_json_string()print("识别结果(JSON):", result)# 5. 提取Excel下载链接(腾讯云会生成临时Excel文件,有效期1小时)import jsonresp_dict = json.loads(result)excel_url = resp_dict["ExcelUrl"]print("表格Excel下载链接:", excel_url)# (可选)下载Excel到本地import requestsexcel_response = requests.get(excel_url)with open("table_result.xlsx", "wb") as f:f.write(excel_response.content)print("Excel已保存到本地:table_result.xlsx")# 调用函数(替换为你的SecretId、SecretKey和图片路径)
tencent_ocr_table(image_path="test_table.png",  # 扫描版表格图片(或单页PDF)secret_id="xxxxxxx",secret_key="xxxxxxx"
)
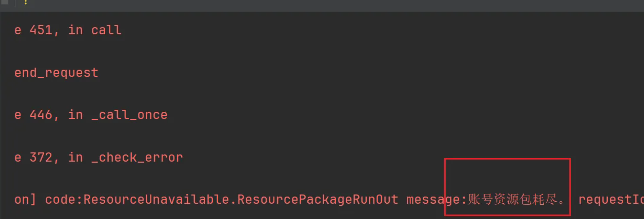
这个是需要付费的,所以这不演示了
3.3.2 PaddleOCR(开源本地,免费无联网)
PaddleOCR 是百度开源的 OCR 工具,中文识别精度高,表格识别模块支持本地部署,步骤如下:
- 前置准备:
○ 安装依赖:pip install paddlepaddle paddleocr;
○ 自动下载预训练模型(首次运行时会自动下载,无需手动配置)。 - 代码实现(识别 PDF / 图片中的表格):
from paddleocr import PaddleOCR
import osdef paddle_ocr_table(input_path, output_dir="paddle_ocr_result"):# 1. 初始化OCR模型(指定语言为中文,开启表格识别)# use_angle_cls=True:自动纠正倾斜图片;table=True:开启表格识别ocr = PaddleOCR(use_angle_cls=True, lang="ch", table=True)# 2. 创建输出目录(保存识别结果和Excel)os.makedirs(output_dir, exist_ok=True)# 3. 调用表格识别接口(支持图片或多页PDF)# 若输入是PDF,会自动处理每一页;output excel_path:指定Excel保存路径result = ocr.ocr_table(img_path=input_path,output excel_path=os.path.join(output_dir, "table_result.xlsx"))# 4. 解析识别结果(result包含每个单元格的文本和位置)print("表格识别完成,结果如下:")for page_idx, page_result in enumerate(result):print(f"\n第{page_idx+1}页表格:")# page_result[0]:表格文本内容(二维列表,对应行和列)# page_result[1]:表格位置信息(暂用不到)table_text = page_result[0]for row_idx, row in enumerate(table_text):print(f"第{row_idx+1}行:", row)print(f"\nExcel文件已保存到:{os.path.join(output_dir, 'table_result.xlsx')}")# 调用函数(输入可以是图片路径,或多页PDF路径)
paddle_ocr_table(input_path="test_table.pdf",  # 支持多页PDF或图片output_dir="my_ocr_result"
)
四、优化点
4.1 图片预处理
如表格倾斜、模糊,可以先通过工具(如 OpenCV)进行‘倾斜矫正’‘降噪’‘增阿强对比度’
安装依赖:pip install opencv-python numpy matplotlib
import cv2
import numpy as np
import matplotlib.pyplot as pltdef preprocess_table_image(image_path, output_path="processed_table.jpg"):"""预处理表格图片:倾斜矫正、降噪、增强对比度:param image_path: 原始图片路径:param output_path: 处理后图片保存路径:return: 处理后的图片"""# 1. 读取图片并转为灰度图img = cv2.imread(image_path)if img is None:raise ValueError(f"无法读取图片: {image_path}")gray = cv2.cvtColor(img, cv2.COLOR_BGR2GRAY)plt.figure(figsize=(15, 10))plt.subplot(2, 3, 1)plt.imshow(gray, cmap='gray')plt.title('1. 原始灰度图')# 2. 降噪处理(根据图片质量选择合适的方法)# 方法1:中值滤波(适合去除椒盐噪声)denoised = cv2.medianBlur(gray, ksize=3)# 方法2:高斯滤波(适合去除高斯噪声)# denoised = cv2.GaussianBlur(gray, (3, 3), 0)plt.subplot(2, 3, 2)plt.imshow(denoised, cmap='gray')plt.title('2. 降噪后')# 3. 增强对比度(自适应阈值处理)# 适合光照不均匀的图片,将灰度图转为二值图(黑白)thresh = cv2.adaptiveThreshold(denoised, 255, cv2.ADAPTIVE_THRESH_GAUSSIAN_C,  # 高斯加权计算阈值cv2.THRESH_BINARY_INV,  # 反二进制阈值(文字为白,背景为黑)11,  # 块大小2    # 常数,用于调整阈值)plt.subplot(2, 3, 3)plt.imshow(thresh, cmap='gray')plt.title('3. 对比度增强后')# 4. 检测表格轮廓,用于倾斜角度计算# 查找轮廓contours, _ = cv2.findContours(thresh, cv2.RETR_EXTERNAL, cv2.CHAIN_APPROX_SIMPLE)# 筛选出面积最大的轮廓(假设是表格边框)if contours:largest_contour = max(contours, key=cv2.contourArea)# 计算最小外接矩形(获取倾斜角度)rect = cv2.minAreaRect(largest_contour)angle = rect[-1]# 调整角度(OpenCV角度范围处理)if angle < -45:angle = 90 + angleelif angle > 45:angle = angle - 90# 5. 倾斜矫正if abs(angle) > 0.5:  # 角度大于0.5度才进行矫正(h, w) = thresh.shape[:2]center = (w // 2, h // 2)# 计算旋转矩阵M = cv2.getRotationMatrix2D(center, angle, 1.0)# 执行旋转(保持原图大小)rotated = cv2.warpAffine(thresh, M, (w, h),flags=cv2.INTER_CUBIC,borderMode=cv2.BORDER_REPLICATE  # 边缘填充方式)else:rotated = threshplt.subplot(2, 3, 4)plt.imshow(rotated, cmap='gray')plt.title(f'4. 倾斜矫正后 (角度: {angle:.2f}°)')else:# 如果未检测到轮廓,直接使用阈值处理后的图片rotated = threshplt.subplot(2, 3, 4)plt.imshow(rotated, cmap='gray')plt.title('4. 未检测到轮廓,跳过矫正')# 6. 最终处理:去除小噪点(可选)# 创建结构元素kernel = cv2.getStructuringElement(cv2.MORPH_ELLIPSE, (2, 2))# 形态学闭运算(填充小空洞)processed = cv2.morphologyEx(rotated, cv2.MORPH_CLOSE, kernel)# 形态学开运算(去除小噪点)processed = cv2.morphologyEx(processed, cv2.MORPH_OPEN, kernel)plt.subplot(2, 3, 5)plt.imshow(processed, cmap='gray')plt.title('5. 去除小噪点后')# 保存处理后的图片cv2.imwrite(output_path, processed)print(f"处理完成,图片已保存至: {output_path}")plt.tight_layout()plt.show()return processed# 示例用法
if __name__ == "__main__":# 替换为你的表格图片路径(支持倾斜、模糊的表格图片)input_image = "tilted_blurry_table.jpg"# 执行预处理processed_img = preprocess_table_image(input_image)
4.2 选择合适的接口
中文表格优先使用 PaddleOCR 或百度云 OCR;
英文/多语言 表格 有限用阿里云或者谷歌的 OCR
复杂表格(合并单元格,嵌套表格),优先使用阿里云的云服务接口
4.3 ‘可编辑’ PDF 和 ‘扫描版’ PDF
可编辑(如 Word 导出的 PDF),优先使用 pdfplumber 直接提取表格,无需使用 OCR
扫描版的 PDF,其本质是图片,需要使用 OCR 接口