Ansible Playbook 编写指南:从入门到 Roles 模块化
1. Playbook 骨架一览
Ansible Playbook 是 YAML 格式的任务剧本,核心组成:
| 关键字 | 作用 |
|---|---|
hosts | 目标主机或主机组 |
remote_user | 远程执行任务的用户 |
tasks | 要执行的任务列表 |
handlers | 被 notify 触发的后续动作 |
vars | 局部变量 |
roles | 引入可复用的角色 |
运行示例:
---     #yaml文件以---开头,以表明这是一个yaml文件,可省略
- name: first play1     #定义一个play的名称,可省略gather_facts: false    #设置不进行facts信息收集,这可以加快执行速度,可省略hosts: webservers    #指定要执行任务的被管理主机组,如多个主机组用冒号分隔remote_user: root    #指定被管理主机上执行任务的用户tasks:     #定义任务列表,任务列表中的各任务按次序逐个在hosts中指定的主机上执行- name: test connection    #自定义任务名称ping:     #使用 module: [options] 格式来定义一个任务- name: disable selinuxcommand: '/sbin/setenforce 0'    #command模块和shell模块无需使用key=value格式ignore_errors: True     #如执行命令的返回值不为0,就会报错,tasks停止,可使用ignore_errors忽略失败的任务- name: disable firewalldservice: name=firewalld state=stopped    #使用 module: options 格式来定义任务,option使用key=value格式- name: install httpdyum: name=httpd state=latest- name: install configuration file for httpdcopy: src=/opt/httpd.conf dest=/etc/httpd/conf/httpd.conf    #这里需要一个事先准备好的/opt/httpd.conf文件notify: "restart httpd"    #如以上操作后为changed的状态时,会通过notify指定的名称触发对应名称的handlers操作- name: start httpd serviceservice: enabled=true name=httpd state=startedhandlers:     #handlers中定义的就是任务,此处handlers中的任务使用的是service模块- name: restart httpd    #notify和handlers中任务的名称必须一致service: name=httpd state=restarted
##Ansible在执行完某个任务之后并不会立即去执行对应的handler,而是在当前play中所有普通任务都执行完后再去执行handler,这样的好处是可以多次触发notify,但最后只执行一次对应的handler,从而避免多次重启。
#
运行结果
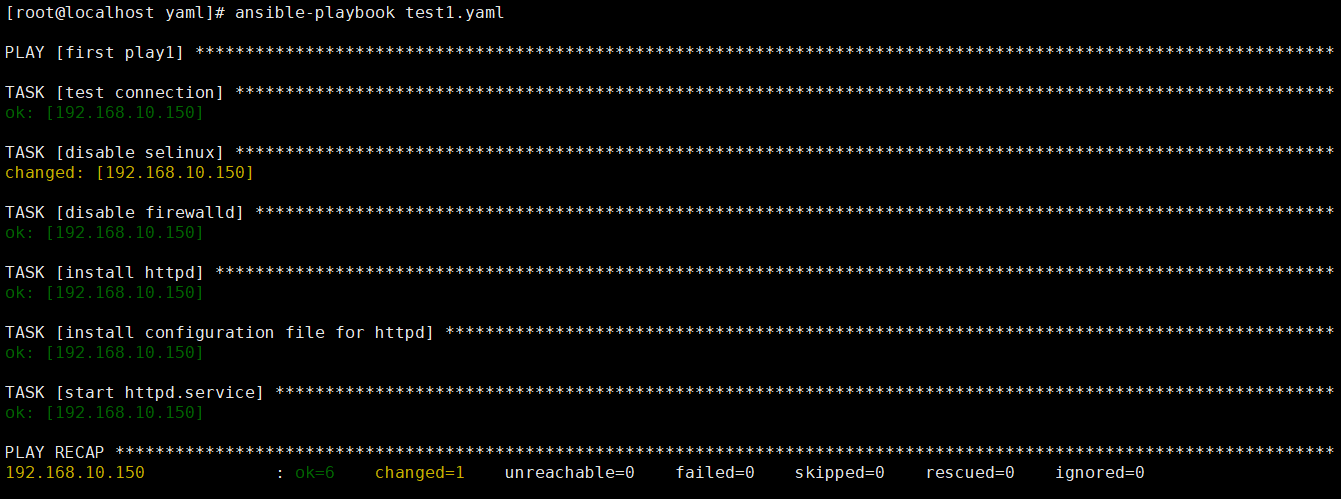
在运行 Playbook 时,可以使用一些常用参数来调整执行行为:
ansible-playbook test1.yaml  # 运行 playbook
ansible-playbook test1.yaml --syntax-check  # 检查语法
ansible-playbook test1.yaml --list-task  # 查看任务列表
ansible-playbook test1.yaml --list-hosts  # 查看影响的主机
ansible-playbook test1.yaml --start-at-task='install httpd'  # 从指定任务开始执行
安装mariadb
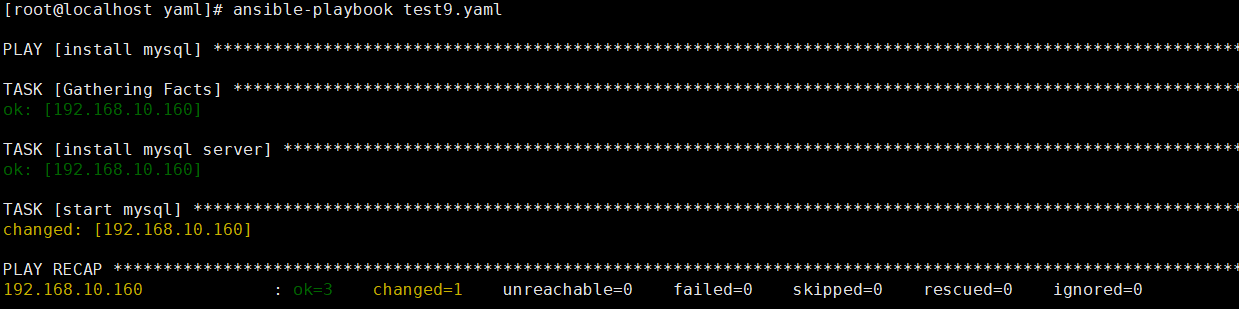
- name: install mysqlhosts: dbserverstasks:- name: install mysql serveryum:name: mariadb,mariadb-serverstate: latestbecome: yes- name: start mysqlservice:name: mariadbstate: startedbecome: yes
解释:

运行结果:
2. 常用命令行参数
| 参数 | 说明 |
|---|---|
-k | 交互输入 SSH 密码 |
-K | 交互输入 sudo 密码 |
-e | 传递额外变量 |
--start-at-task='xxx' | 从指定任务开始执行 |
--list-tasks | 仅列出任务不执行 |
--list-hosts | 查看会命中哪些主机 |
3. 变量与传参
在剧本里定义:
vars:pkg: httpdsvc: httpd使用变量:
- name: install packageyum: name={{ pkg }} state=present脚本:
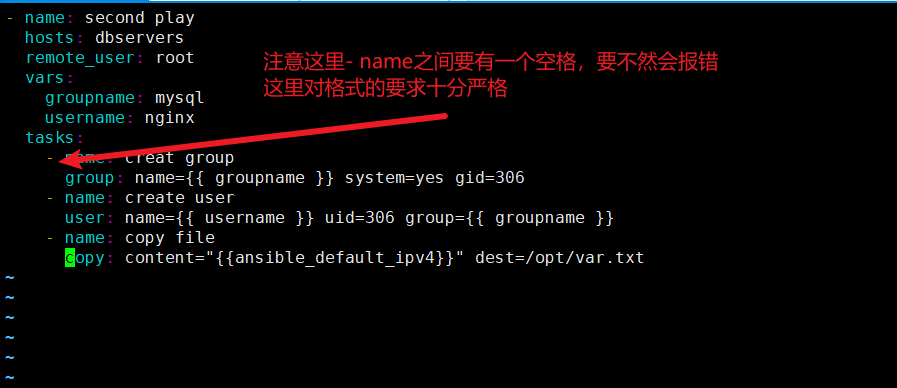
- name: second playhosts: dbserversremote_user: rootvars: groupname: mysqlusername: nginxtasks:- name: creat groupgroup: name={{ groupname }} system=yes gid=306- name: create useruser: name={{ username }} uid=306 group={{ groupname }}- name: copy filecopy: content="{{ansible_default_ipv4}}" dest=/opt/var.txt
代码展示:
在命令行中,变量也可以通过 -e 参数传递:
ansible-playbook test1.yaml -e "username=nginx"运行结果:
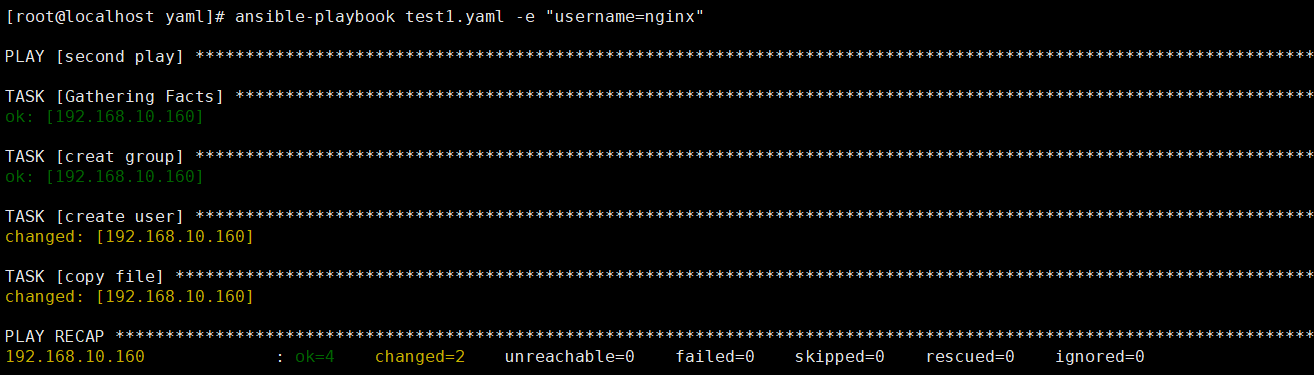
在dbservers(192.168.10.160)中展示的结果

4. 条件判断 when
仅对满足条件的主机执行任务:
- name: reboot only web01command: /sbin/rebootwhen: inventory_hostname == "web01"脚本代码
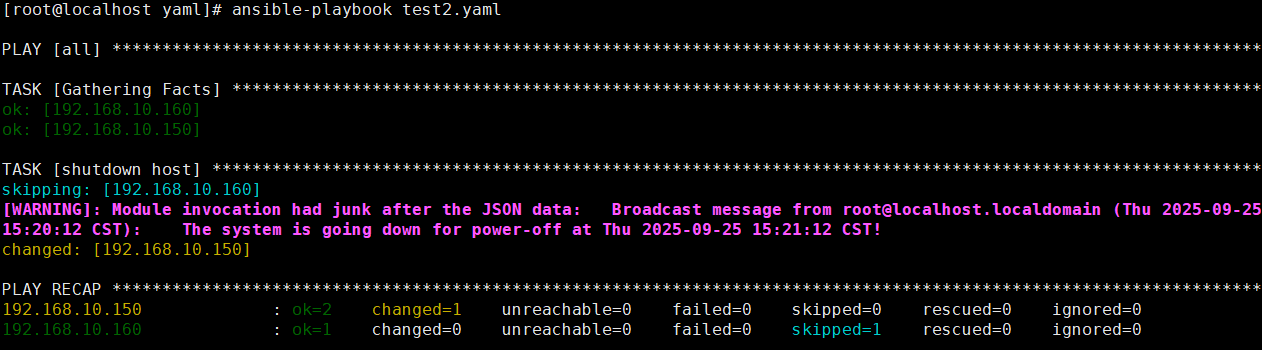
---
- hosts: allremote_user: roottasks:- name: shutdown hostcommand: /sbin/shutdownwhen: ansible_default_ipv4.address == '192.168.10.150'
运行结果:
5. 循环: with_items vs loop
批量创建用户:
---
- name: play1hosts: dbserversgather_facts: falsetasks:- name: create directoriesfile:path: "{{item}}"state: directorywith_items:- /tmp/test1- /tmp/test2- name: add usersuser: name={{item.name}} state=present groups={{item.groups}}with_items:- name: test1groups: wheel- name: test2groups: root
运行结果:
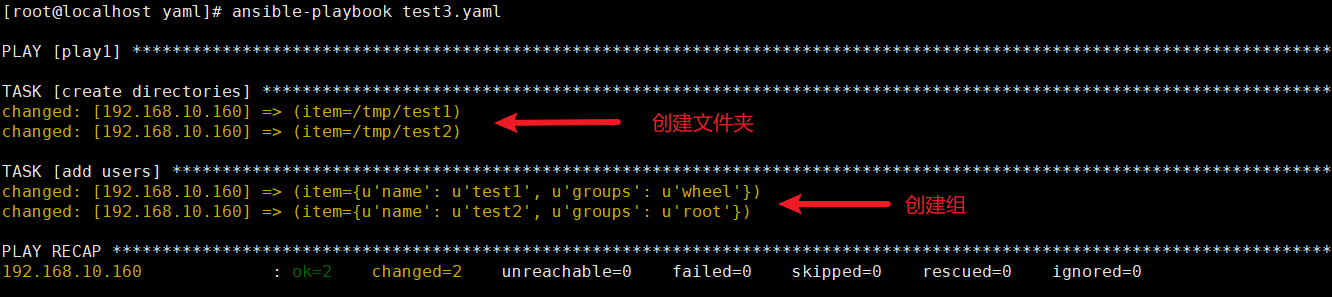
在dbservers中查看
[root@localhost nginx-1.20.2]# ls -ld /tmp/test1 /tmp/test2 && id test1 && id test2
drwxr-xr-x. 2 root root 6 9月  25 15:33 /tmp/test1
drwxr-xr-x. 2 root root 6 9月  25 15:33 /tmp/test2
uid=1001(test1) gid=1002(test1) 组=1002(test1),10(wheel)
uid=1002(test2) gid=1003(test2) 组=1003(test2),0(root)
6. 模板(Template)
在控制端准备模板
#先准备一个以 .j2 为后缀的 template 模板文件,设置引用的变量
cp /etc/httpd/conf/httpd.conf /opt/httpd.conf.j2vim /opt/httpd.conf.j2
Listen {{http_port}}				#42行,修改
ServerName {{server_name}}			#95行,修改
DocumentRoot "{{root_dir}}"          #119行,修改
主机清单里给变量:
vim /etc/ansible/hosts
[webservers]
192.168.10.14 http_port=80 server_name=www.accp.com root_dir=/etc/httpd/htdocs
剧本引用:
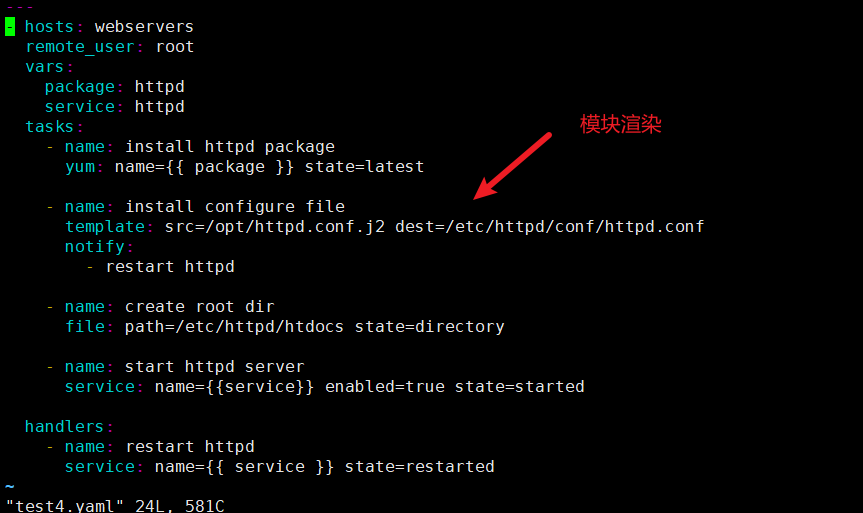
---
- hosts: webserversremote_user: rootvars:package: httpdservice: httpdtasks:- name: install httpd packageyum: name={{ package }} state=latest- name: install configure filetemplate: src=/opt/httpd.conf.j2 dest=/etc/httpd/conf/httpd.confnotify:- restart httpd- name: create root dirfile: path=/etc/httpd/htdocs state=directory- name: start httpd serverservice: name={{service}} enabled=true state=startedhandlers:- name: restart httpdservice: name={{ service }} state=restarted
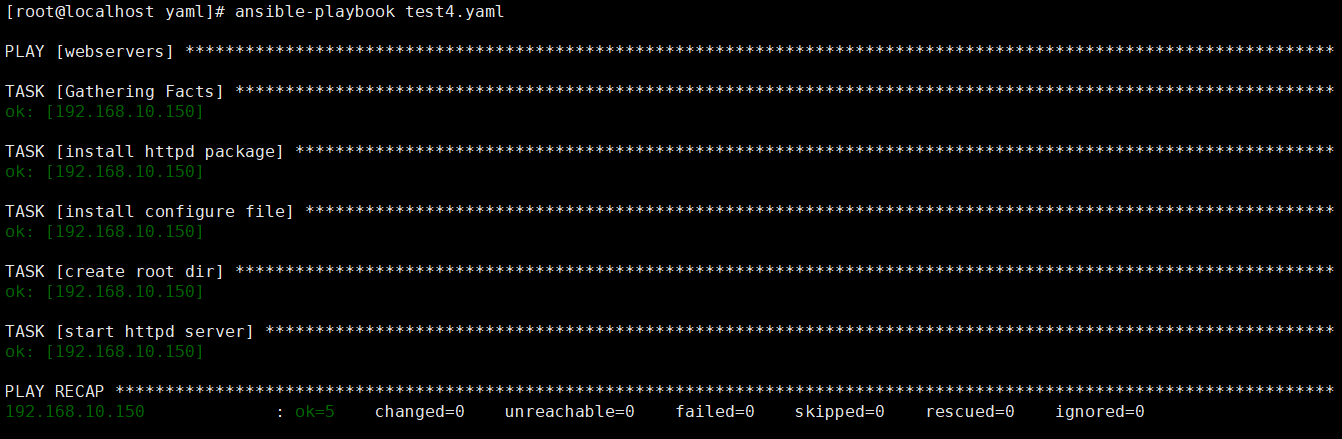
运行结果:
7. Tags:只跑指定任务
---
- hosts: webserversremote_user: roottasks:- name: Copy hosts filecopy: src=/etc/hosts dest=/opt/hoststags:- only- name: touch filefile: path=/opt/testhost state=touchtags:- always- name: Copy zcx filecopy: src=/opt/httpd.conf.bak dest=/opt/zcxtags:- zcx- name: Copy yyq filecopy: src=/opt/httpd.conf.bak dest=/opt/yyqtags:- yyq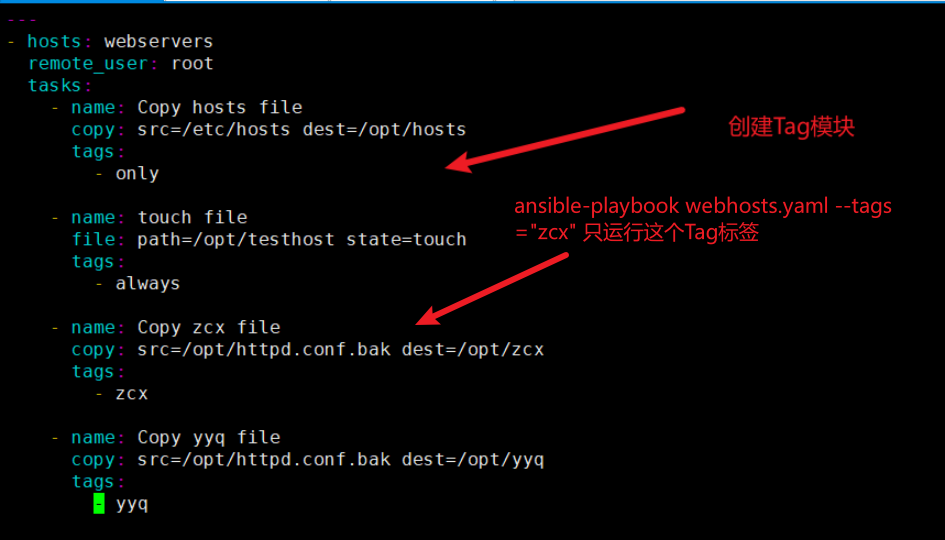
执行:
ansible-playbook webhosts.yaml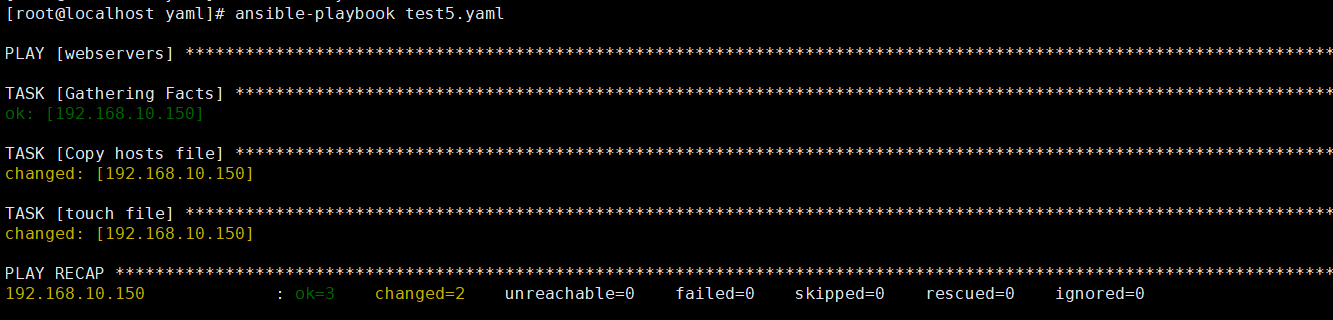
webservers(192.168.10.150)里面查看

设置标签
ansible-playbook test5.yaml --tags="zcx"webservers(192.168.10.150)里面查看
只会在/opt下面有一个zcx的脚本
8. Handlers:一次性重启
任务 notify → 所有任务结束后再执行 handler,避免重复重启。
tasks:- name: install cfgtemplate: src=httpd.conf.j2 dest=/etc/httpd/conf/httpd.confnotify: restart httpdhandlers:- name: restart httpdservice: name=httpd state=restarted9. Roles:模块化复用
创建文件夹
[root@localhost yaml]# mkdir /etc/ansible/roles/httpd/{files,templates,tasks,handlers,vars,defaults,meta} -p
[root@localhost yaml]# mkdir /etc/ansible/roles/mysql/{files,templates,tasks,handlers,vars,defaults,meta} -p
[root@localhost yaml]# mkdir /etc/ansible/roles/php/{files,templates,tasks,handlers,vars,defaults,meta} -p
[root@localhost yaml]#
[root@localhost yaml]# touch /etc/ansible/roles/httpd/{defaults,vars,tasks,meta,handlers}/main.yml
[root@localhost yaml]# touch /etc/ansible/roles/mysql/{defaults,vars,tasks,meta,handlers}/main.yml
[root@localhost yaml]# touch /etc/ansible/roles/php/{defaults,vars,tasks,meta,handlers}/main.yml
官方目录结构:
[root@localhost ansible]# tree roles/
roles/
├── httpd
│   ├── defaults
│   │   └── main.yml
│   ├── files
│   ├── handlers
│   │   └── main.yml
│   ├── meta
│   │   └── main.yml
│   ├── tasks
│   │   └── main.yml
│   ├── templates
│   └── vars
│       └── main.yml
├── mysql
│   ├── defaults
│   │   └── main.yml
│   ├── files
│   ├── handlers
│   │   └── main.yml
│   ├── meta
│   │   └── main.yml
│   ├── tasks
│   │   └── main.yml
│   ├── templates
│   └── vars
│       └── main.yml
└── php├── defaults│   └── main.yml├── files├── handlers│   └── main.yml├── meta│   └── main.yml├── tasks│   └── main.yml├── templates└── vars└── main.yml24 directories, 15 files
httpd:
vim /etc/ansible/roles/httpd/tasks/main.yml
- name: install apacheyum: name={{pkg}} state=latest
- name: start apacheservice: enabled=true name={{svc}} state=started//定义变量:可以定义在全局变量中,也可以定义在roles角色变量中,一般定义在角色变量中
vim /etc/ansible/roles/httpd/vars/main.yml
pkg: httpd
svc: httpd
mysql:
vim /etc/ansible/roles/mysql/tasks/main.yml
- name: install mysqlyum: name={{pkg}} state=latest
- name: start mysqlservice: enabled=true name={{svc}} state=startedvim /etc/ansible/roles/mysql/vars/main.yml
pkg:- mariadb- mariadb-server
svc: mariadb
php:
vim /etc/ansible/roles/php/tasks/main.yml
- name: install phpyum: name={{pkg}} state=latest
- name: start php-fpmservice: enabled=true name={{svc}} state=startedvim /etc/ansible/roles/php/vars/main.yml
pkg:- php- php-fpm
svc: php-fpm
编写roles:
[root@localhost ansible]# cat /etc/ansible/site.yaml
---
- hosts: webserversremote_user: rootroles:- httpd- mysql- php
运行:
cd /etc/ansible
ansible-playbook site.yml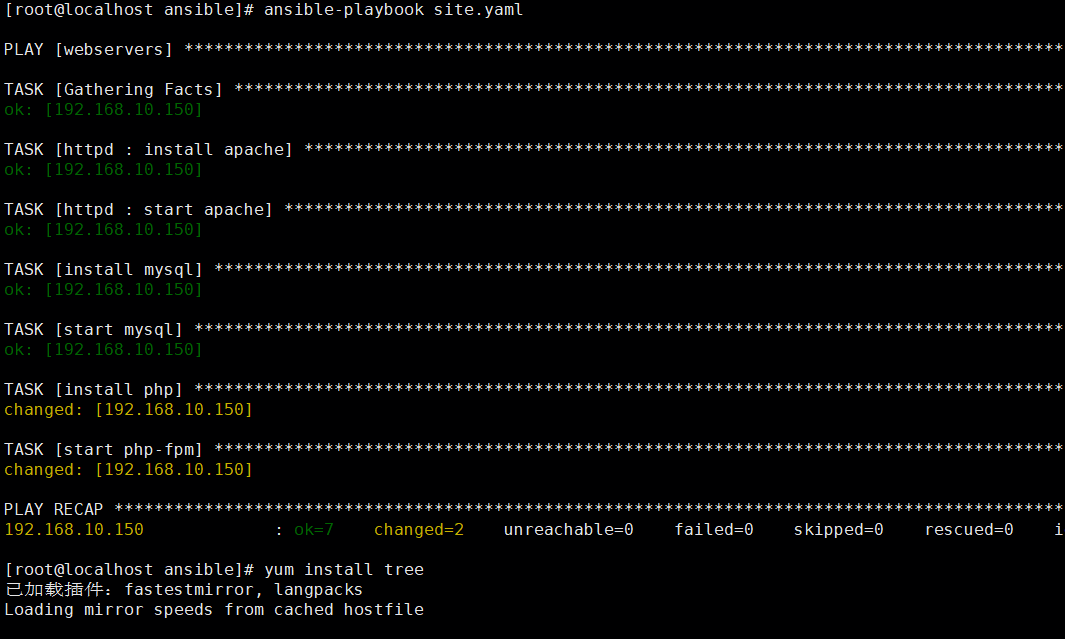
10. 快速调试技巧
| 目的 | 命令 |
|---|---|
| 仅语法检查 | ansible-playbook xxx.yml --syntax-check |
| 空跑(不真正改变) | ansible-playbook xxx.yml --check |
| 逐步调试 | ansible-playbook xxx.yml --step |
| 从指定任务开始 | ansible-playbook xxx.yml --start-at-task='install httpd' |
| 查看 diff | ansible-playbook xxx.yml --diff |
结语
掌握 Playbook → Variables → Templates → Tags → Roles 这条主线后,你就能写出可维护、可复用、可扩展的 Ansible 自动化代码。
建议把文中示例保存到本地,跑通一次,再根据自己的业务场景逐步拆解、组合,很快即可形成一套完整的自动化运维体系。
录制文件:https://meeting.tencent.com/crm/2yX3JXV095
密码:WFCS