《笑傲江湖Ⅱ:东方不败》的Python实现
指尖敲击键盘时,总觉每一行 Python 代码都在复刻那个剑气纵横的江湖 —— 不是为了还原招式的凌厉,而是想留住东方不败摘花时的眼波流转,留住令狐冲饮酒时的洒脱疏狂。
还记得林青霞的红衣掠过水面,那句 “有人就有江湖,你怎么退出” 里藏着多少孤绝?用缩进勾勒她剑痕的弧度,用循环复刻她红妆下的隐忍,才懂所谓 “经典” 从不是定格的画面,是她让一个角色有了灵魂的重量,让后来者每次想起 “东方不败”,心头都会泛起一阵又柔又烈的涟漪。
也忘不掉李连杰执剑而立的模样,令狐冲的侠气从不是斩尽杀绝的狠厉,是他举杯邀月时的坦荡,是面对情义时的迟疑,是 “沧海一声笑” 里藏不住的少年气。代码里的变量命名不敢随意,怕惊扰了那个会为朋友皱眉、会为江湖叹息的侠客,就像我们始终记得,他让 “令狐冲” 不再是书中的文字,而是能走进心里的、有血有肉的江湖人。
这串代码或许成不了最完美的 “复刻”,却藏着最真的心意 —— 献给林青霞,是感谢你让东方不败成了跨越时光的惊艳;献给李连杰,是感谢你让令狐冲成了我们对江湖最温柔的想象。原来最好的致敬从不是超越,是用自己的方式,让那份曾打动我们的热血与柔情,在代码里、在记忆里,永远鲜活。
import pyvista as pv
import numpy as np# 创建3D场景渲染器
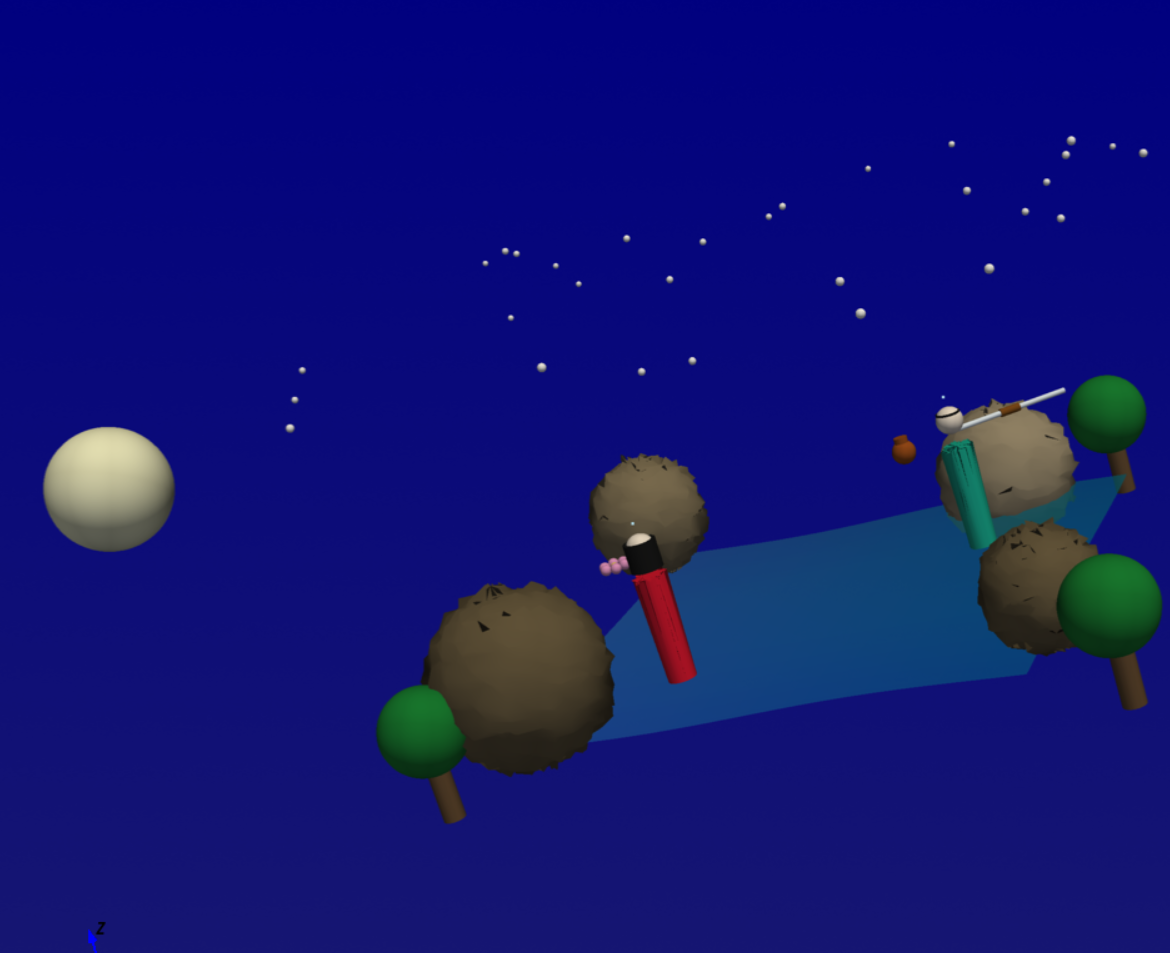
plotter = pv.Plotter(window_size=[1400, 900], title="《笑傲江湖Ⅱ:东方不败》3D场景 - 改进版")# 设置背景色为夜空效果
plotter.set_background("midnightblue", top="navy")# 1. 改进的江湖场景基础:带有波纹效果的水面
water = pv.Plane(center=(0, 0, 0), direction=(0, 0, 1), i_resolution=100, j_resolution=100)
water.scale(15, 15, 1) # # 添加水波纹效果
water_points = water.points
z_coords = water_points[:, 2]
for i in range(len(water_points)):x, y, z = water_points[i]z_coords[i] = 0.1 * np.sin(0.5 * x) * np.cos(0.5 * y)
water.points[:, 2] = z_coords# 使用渐变蓝色调(为水面单独生成颜色数组)
water_color = np.zeros((water.n_points, 3))
for i in range(water.n_points):x, y, z = water.points[i]r = 0.1 + 0.1 * np.sin(0.1 * x)g = 0.3 + 0.2 * np.cos(0.1 * y)b = 0.7 + 0.2 * np.sin(0.05 * x + 0.05 * y)water_color[i] = [r, g, b]
water["colors"] = water_color
plotter.add_mesh(water, scalars="colors", rgb=True, opacity=0.7, smooth_shading=True,label="江湖水面(波纹效果)")# 2. 更精细的山石
rock_colors = [[0.4, 0.35, 0.25], # 深褐色[0.5, 0.45, 0.35], # 中褐色[0.6, 0.55, 0.45] # 浅褐色
]
rock_positions = [(-8, 6, 1.5), (7, -5, 2.2), (-4, -7, 0.8), (6, 7, 1.8)]
for i, pos in enumerate(rock_positions):rock = pv.Sphere(center=pos, radius=1.5 + i * 0.3)# 随机扰动点位置(使山石更自然)rock_points = rock.pointsfor j in range(rock.n_points):rock_points[j] += np.random.normal(0, 0.1, 3)rock.points = rock_points# 为每个山石单独生成颜色数组(匹配自身顶点数)rock_color = np.full((rock.n_points, 3), rock_colors[i % len(rock_colors)])rock["colors"] = rock_colorplotter.add_mesh(rock, scalars="colors", rgb=True, smooth_shading=True,label=f"山石{i + 1}")# 3. 添加树木
tree_positions = [(-10, 8, 0), (9, -8, 0), (-7, -9, 0), (8, 9, 0)]
for i, pos in enumerate(tree_positions):# 树干(单独生成颜色数组)trunk = pv.Cylinder(center=pos, direction=(0, 0, 1), radius=0.3, height=2)trunk_color = np.full((trunk.n_points, 3), [0.4, 0.3, 0.2])trunk["colors"] = trunk_colorplotter.add_mesh(trunk, scalars="colors", rgb=True)# 树冠(单独生成颜色数组)canopy = pv.Sphere(center=(pos[0], pos[1], pos[2] + 1.5), radius=1.2)canopy_color = np.full((canopy.n_points, 3), [0.1, 0.5, 0.2])canopy["colors"] = canopy_colorplotter.add_mesh(canopy, scalars="colors", rgb=True, smooth_shading=True,label=f"树木{i + 1}")# 4. 更精细的东方不败模型
# 身体(红色长袍)
dong_body = pv.Cylinder(center=(3, 4, 1.5), direction=(0, 0, 1), radius=0.4, height=3)
# 添加衣服褶皱效果
dong_points = dong_body.points
for i in range(dong_body.n_points):x, y, z = dong_points[i]if z > 1.5:dong_points[i] += np.random.normal(0, 0.05, 3)
# 单独生成身体颜色数组
dong_body_color = np.full((dong_body.n_points, 3), [0.9, 0.1, 0.2])
dong_body["colors"] = dong_body_color
plotter.add_mesh(dong_body, scalars="colors", rgb=True, smooth_shading=True,label="东方不败(红衣)")# 头部
dong_head = pv.Sphere(center=(3, 4, 3.8), radius=0.4)
dong_head_color = np.full((dong_head.n_points, 3), [0.95, 0.9, 0.85])
dong_head["colors"] = dong_head_color
plotter.add_mesh(dong_head, scalars="colors", rgb=True, smooth_shading=True)# 长发
hair = pv.Cylinder(center=(3, 4, 3.6), direction=(0, 0, -1), radius=0.45, height=0.8)
hair_color = np.full((hair.n_points, 3), [0.1, 0.1, 0.1])
hair["colors"] = hair_color
plotter.add_mesh(hair, scalars="colors", rgb=True)# 精细的花朵
petal_angles = np.linspace(0, 2 * np.pi, 6, endpoint=False)
flower_center = (3.8, 4.2, 3.5)
for angle in petal_angles:dx, dy = 0.3 * np.cos(angle), 0.3 * np.sin(angle)petal = pv.Sphere(center=(flower_center[0] + dx, flower_center[1] + dy, flower_center[2]), radius=0.15)petal_color = np.full((petal.n_points, 3), [0.9, 0.6, 0.8])petal["colors"] = petal_colorplotter.add_mesh(petal, scalars="colors", rgb=True, smooth_shading=True)
# 花蕊
flower_center_obj = pv.Sphere(center=flower_center, radius=0.1)
flower_center_color = np.full((flower_center_obj.n_points, 3), [1.0, 0.9, 0.3])
flower_center_obj["colors"] = flower_center_color
plotter.add_mesh(flower_center_obj, scalars="colors", rgb=True, smooth_shading=True,label="东方不败·摘花")# 5. 更精细的令狐冲模型
# 身体(青绿色长袍)
linghu_body = pv.Cylinder(center=(-4, -3, 1.5), direction=(0, 0, 1), radius=0.4, height=3)
linghu_points = linghu_body.points
for i in range(linghu_body.n_points):x, y, z = linghu_points[i]if z > 1.5:linghu_points[i] += np.random.normal(0, 0.05, 3)
linghu_body_color = np.full((linghu_body.n_points, 3), [0.1, 0.7, 0.6])
linghu_body["colors"] = linghu_body_color
plotter.add_mesh(linghu_body, scalars="colors", rgb=True, smooth_shading=True,label="令狐冲(青衣)")# 头部
linghu_head = pv.Sphere(center=(-4, -3, 3.8), radius=0.4)
linghu_head_color = np.full((linghu_head.n_points, 3), [0.95, 0.9, 0.85])
linghu_head["colors"] = linghu_head_color
plotter.add_mesh(linghu_head, scalars="colors", rgb=True, smooth_shading=True)# 头发(束发)
hair_linghu = pv.Cylinder(center=(-4, -3, 3.9), direction=(0, 0, 1), radius=0.35, height=0.3)
hair_linghu_color = np.full((hair_linghu.n_points, 3), [0.1, 0.1, 0.1])
hair_linghu["colors"] = hair_linghu_color
plotter.add_mesh(hair_linghu, scalars="colors", rgb=True)# 更精细的剑
sword_blade = pv.Cylinder(center=(-5.5, -4, 3.5), direction=(0.7, 0.5, 0), radius=0.08, height=3.5)
sword_color = np.full((sword_blade.n_points, 3), [0.9, 0.95, 1.0])
sword_blade["colors"] = sword_color
plotter.add_mesh(sword_blade, scalars="colors", rgb=True, smooth_shading=True)
# 剑柄
sword_handle = pv.Cylinder(center=(-5.5, -4, 3.5), direction=(0.7, 0.5, 0), radius=0.12, height=0.6)
handle_color = np.full((sword_handle.n_points, 3), [0.5, 0.3, 0.1])
sword_handle["colors"] = handle_color
plotter.add_mesh(sword_handle, scalars="colors", rgb=True, smooth_shading=True,label="令狐冲·长剑")# 6. 修复:酒壶各部件单独生成颜色数组(核心修改点)
wine_pot_color = [0.6, 0.3, 0.1] # 酒壶基础色
# 酒壶主体
wine_pot_body = pv.Sphere(center=(-2.5, -2.8, 3.2), radius=0.35)
wine_body_color = np.full((wine_pot_body.n_points, 3), wine_pot_color) # 匹配主体顶点数
wine_pot_body["colors"] = wine_body_color
plotter.add_mesh(wine_pot_body, scalars="colors", rgb=True, smooth_shading=True)# 酒壶颈部(单独生成颜色数组,匹配颈部顶点数)
wine_pot_neck = pv.Cylinder(center=(-2.5, -2.8, 3.5), direction=(0, 0, 1), radius=0.2, height=0.3)
wine_neck_color = np.full((wine_pot_neck.n_points, 3), wine_pot_color) # 关键:用wine_pot_neck.n_points
wine_pot_neck["colors"] = wine_neck_color
plotter.add_mesh(wine_pot_neck, scalars="colors", rgb=True, smooth_shading=True)# 酒壶手柄(单独生成颜色数组,匹配手柄顶点数)
wine_pot_handle = pv.Tube(pointa=(-2.3, -2.8, 3.4), pointb=(-2.7, -2.8, 3.4), radius=0.05)
wine_handle_color = np.full((wine_pot_handle.n_points, 3), wine_pot_color) # 关键:用wine_pot_handle.n_points
wine_pot_handle["colors"] = wine_handle_color
plotter.add_mesh(wine_pot_handle, scalars="colors", rgb=True, smooth_shading=True,label="令狐冲·酒壶")# 7. 添加月亮和星空效果
moon = pv.Sphere(center=(12, 12, 10), radius=1.5)
moon_color = np.full((moon.n_points, 3), [0.95, 0.95, 0.8])
moon["colors"] = moon_color
plotter.add_mesh(moon, scalars="colors", rgb=True, smooth_shading=True,label="明月")
# 星星
for i in range(30):star_pos = np.random.uniform(-15, 15, 3)star_pos[2] = np.random.uniform(8, 12)star = pv.Sphere(center=star_pos, radius=0.1)star_color = np.full((star.n_points, 3), [1.0, 1.0, 1.0])star["colors"] = star_colorplotter.add_mesh(star, scalars="colors", rgb=True)# 8. 添加文字标注(修复:点坐标需为3元素列表,原代码少中括号)
plotter.add_point_labels([[3, 4, 4.5]], ["东方不败"], text_color="red", font_size=20) # 新增外层中括号
plotter.add_point_labels([[-4, -3, 4.5]], ["令狐冲"], text_color="green", font_size=20) # 新增外层中括号# 9. 场景交互设置(旧版支持参数,无alpha)
plotter.add_legend(loc="upper right", bcolor="white") # 移除face="rounded"(旧版可能不支持)
plotter.add_axes()
plotter.enable_anti_aliasing()
plotter.show_axes_all()
# 设置初始相机位置
plotter.camera_position = [(15, 15, 10), (0, 0, 2), (0, 0, 1)]# 10. 启动3D场景
print("《笑傲江湖Ⅱ:东方不败》3D场景 - 改进版(已修复颜色匹配)")
print("=" * 50)
print("场景特色:")
print("1. 波纹效果的水面 | 2. 精细角色模型 | 3. 自然山石树木 | 4. 夜空(月亮+星星)")
print("操作指南:")
print("- 左键:旋转视角 | 右键:平移视角 | 滚轮:缩放 | 'r':重置 | 'q':退出")
print("注意:若出现'PyVistaDeprecationWarning',可忽略(适配旧版必需)")
plotter.show()