Windows 系统部署 清华团队开源的 Kronos 金融 K 线基础模型——基于 EPGF 架构
【EPGF 白皮书】路径治理驱动的多版本 Python 架构—— Windows 环境治理与 AI 教学开发体系
【00】EPGF 架构搭建教程之 总揽篇
【收藏级】Windows AI 本地开发「完全体」环境搭建清单
Windows 系统部署 Kronos 金融 K 线基础模型 ——基于 EPGF 架构

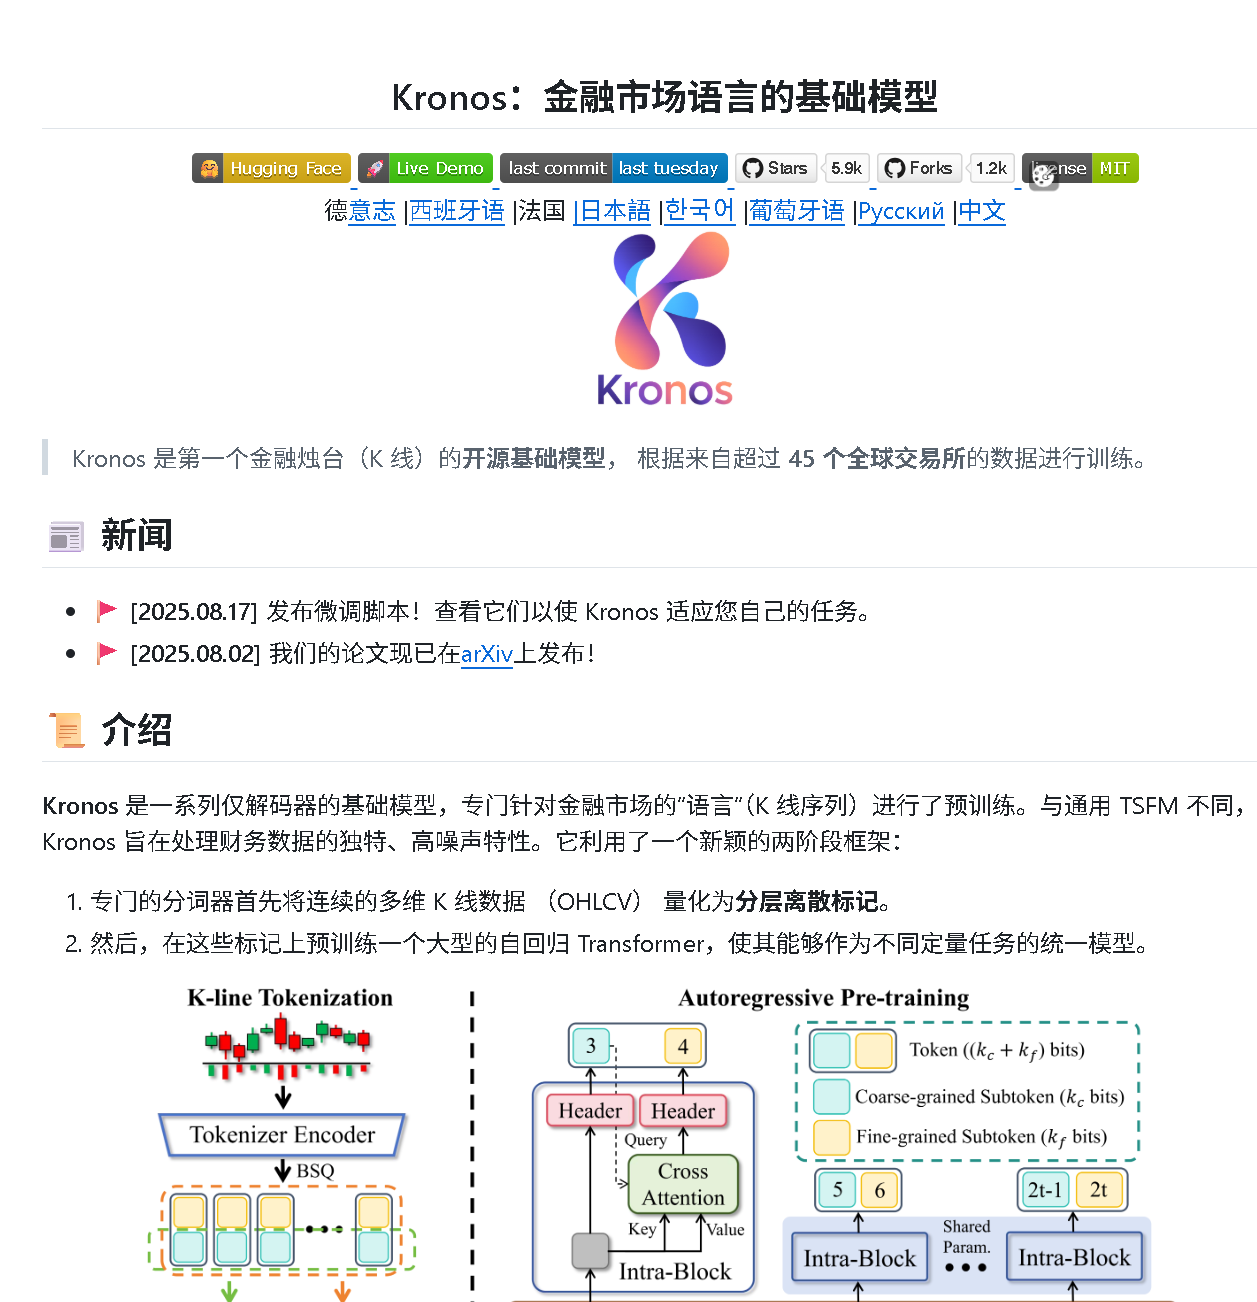
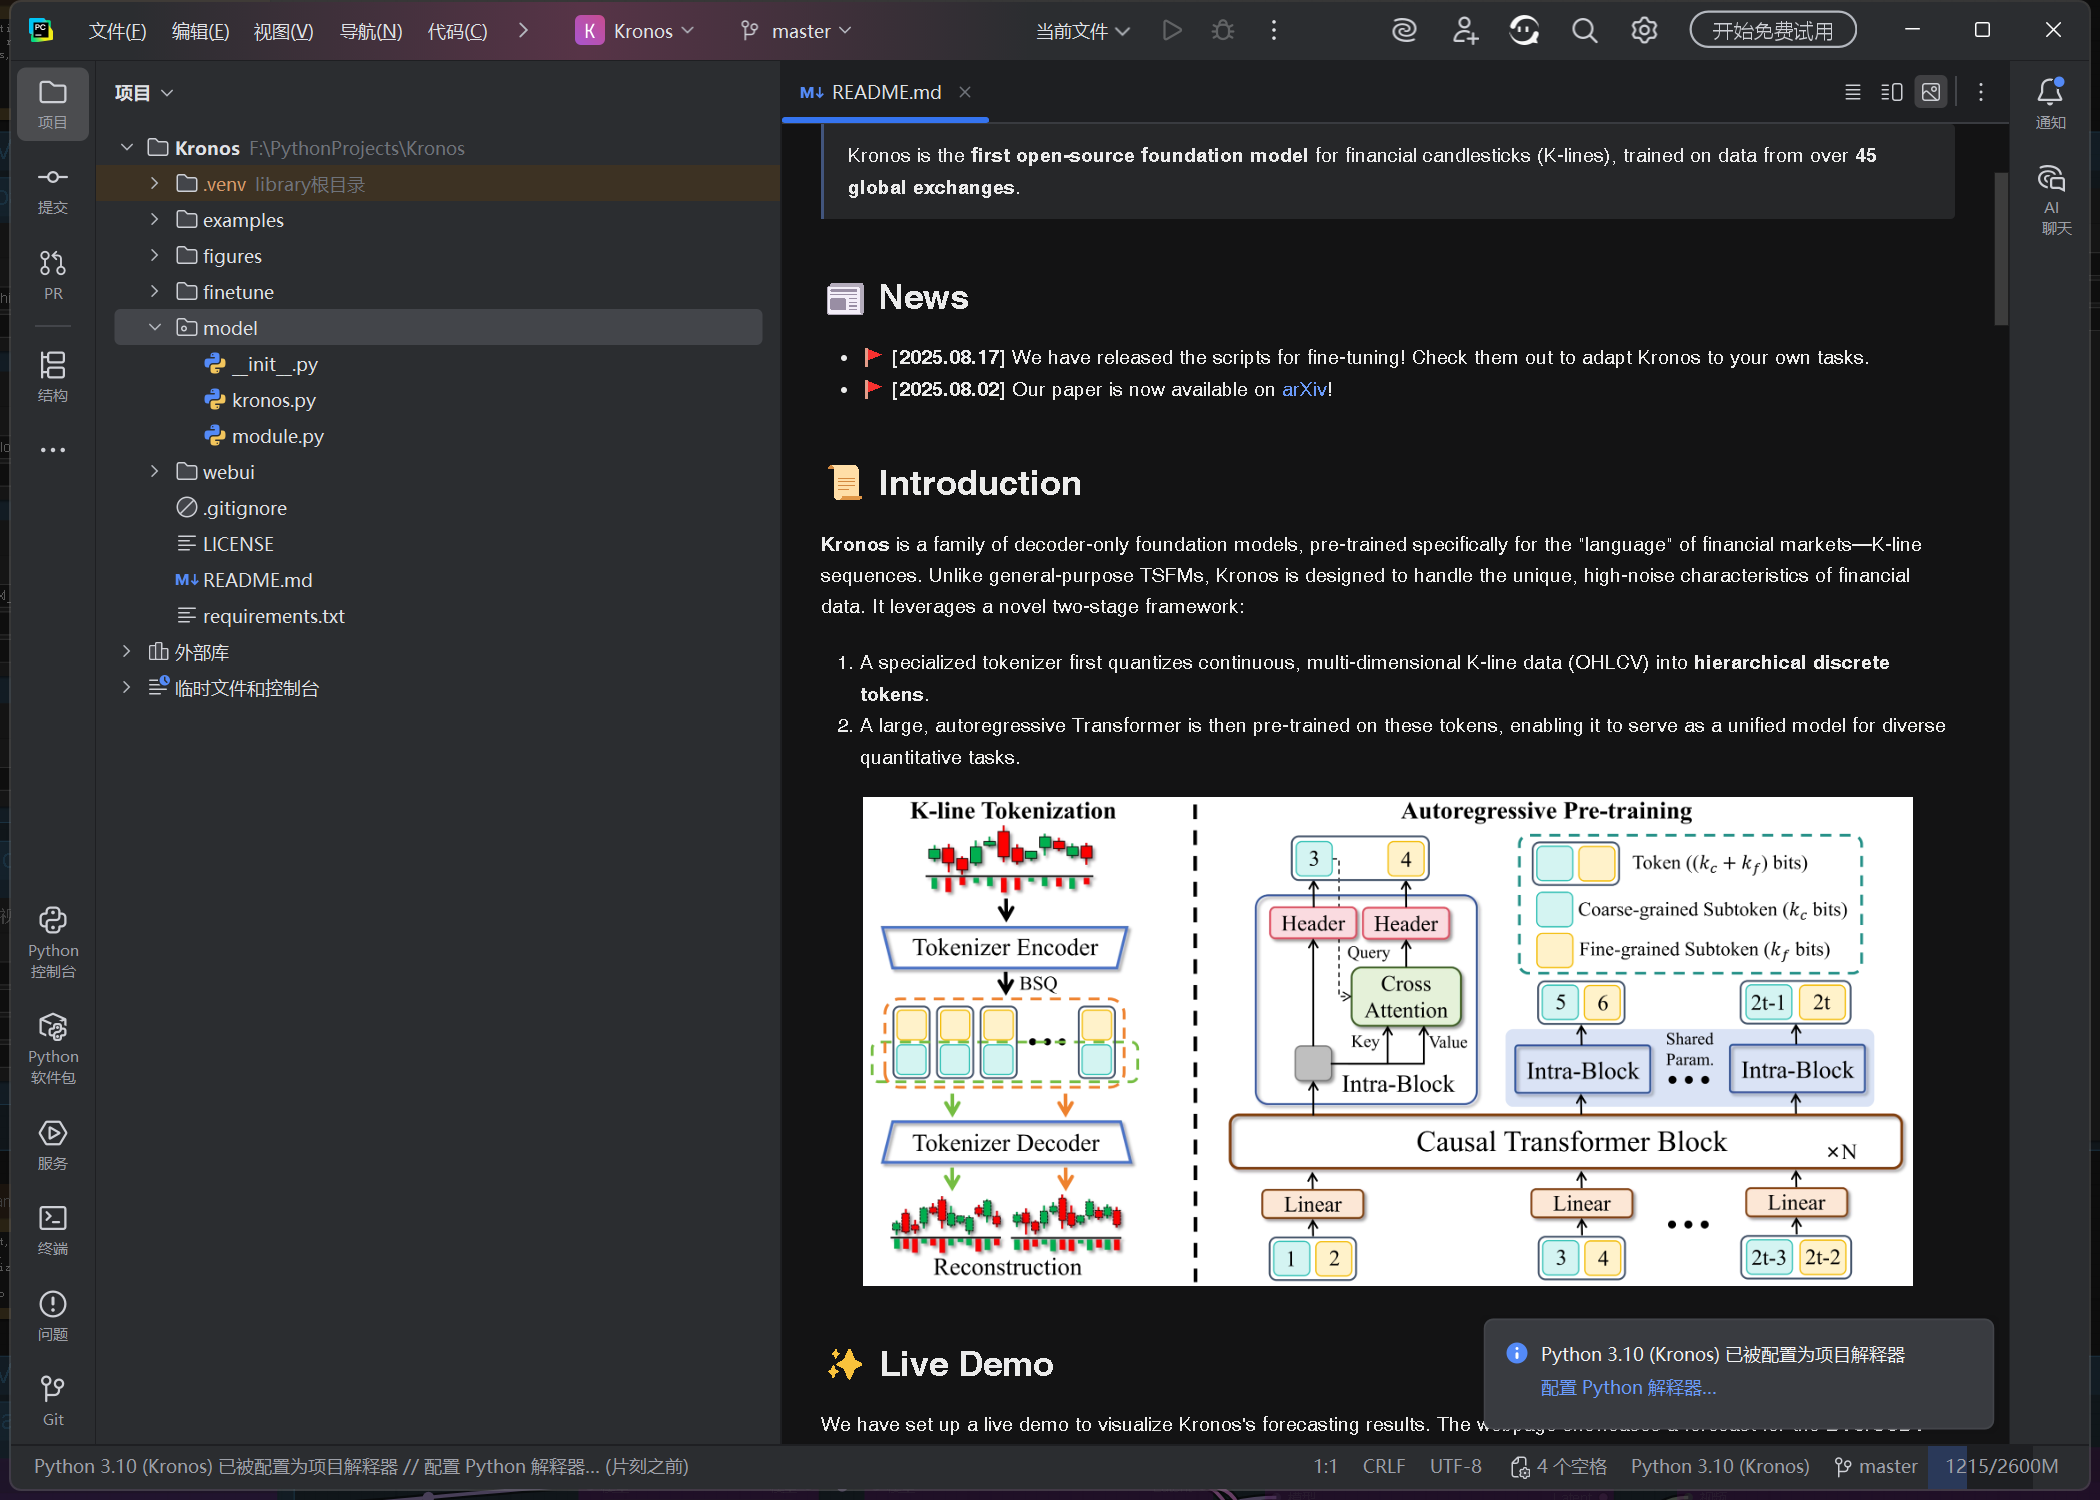
Kronos 仓库介绍
Kronos 是一个针对金融 K 线序列的开源基础模型项目,专为金融市场 "语言" 设计。以下是该仓库的主要信息:
项目概述
Kronos 是首个针对金融烛台图(K 线)的开源基础模型,训练数据来自超过 45 个全球交易所。它采用两阶段框架:
- 专用分词器将连续的多维 K 线数据(OHLCV)量化为分层离散令牌
- 大型自回归 Transformer 在这些令牌上进行预训练,可作为多种量化任务的统一模型
模型家族
项目提供了一系列不同规模的预训练模型,均可从 Hugging Face Hub 获取:
| 模型 | 分词器 | 上下文长度 | 参数 | 开源状态 |
|---|---|---|---|---|
| Kronos-mini | Kronos-Tokenizer-2k | 2048 | 4.1M | ✅ |
| Kronos-small | Kronos-Tokenizer-base | 512 | 24.7M | ✅ |
| Kronos-base | Kronos-Tokenizer-base | 512 | 102.3M | ✅ |
| Kronos-large | Kronos-Tokenizer-base | 512 | 499.2M | ❌ |
主要功能
- 金融市场 K 线序列预测
- 提供 Web UI 界面可视化预测结果
- 支持在自定义数据上进行微调
- 包含完整的模型训练、预测和回测流程
一、EPGF 架构与 Python 环境准备
推荐使用 EPGF 架构下的多版本 Python 管理方案,确保环境路径可控、可迁移、可复现。示例路径结构如下:
D:\
└── A\                     # Anaconda 安装根目录└── envs\py310\        # Conda 虚拟环境:Python 3.10└── python.exe     # 解释器路径
此路径将作为 PyCharm 和命令行的基础解释器。
二、克隆 Kronos 仓库
shiyu-coder/Kronos:Kronos:金融市场语言的基础模型
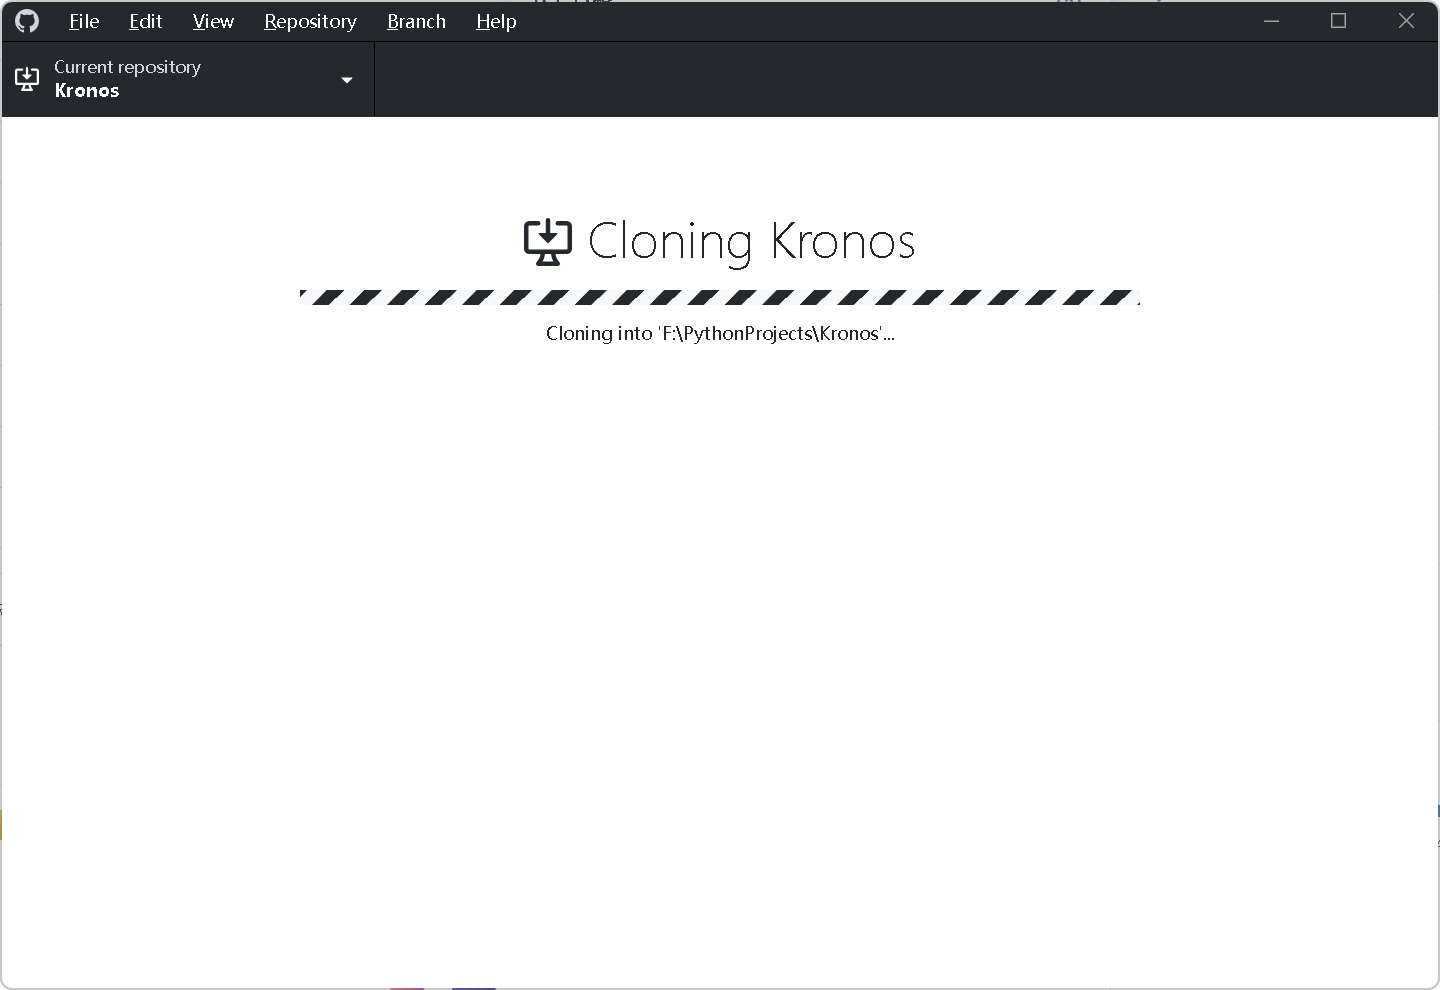
步骤 1:使用 GitHub Desktop 克隆项目
-
启动 GitHub Desktop
-
点击 Clone a repository → 选择 URL
-
输入:
-
Repository URL:
https://github.com/shiyu-coder/Kronos.git -
Local Path:
F:\PythonProjects\Kronos
-
-
点击 Clone 开始克隆,等待完成。
步骤 2:在 PyCharm 打开项目
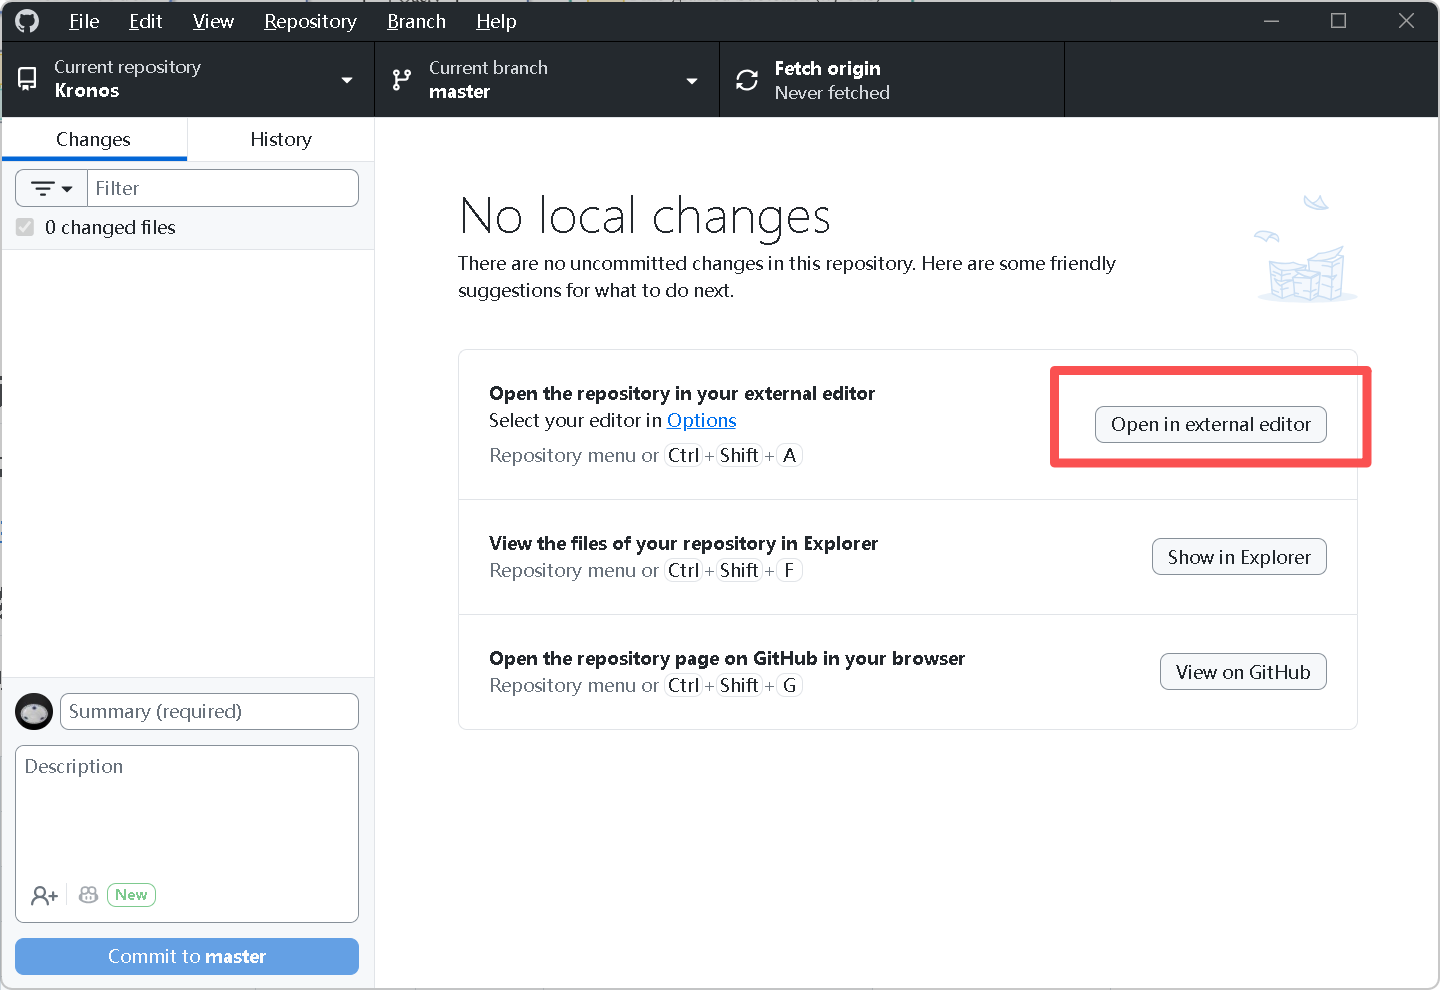
在 GitHub Desktop 右侧点击 Open in external editor,项目将自动在 PyCharm 打开。
三、创建本地虚拟环境
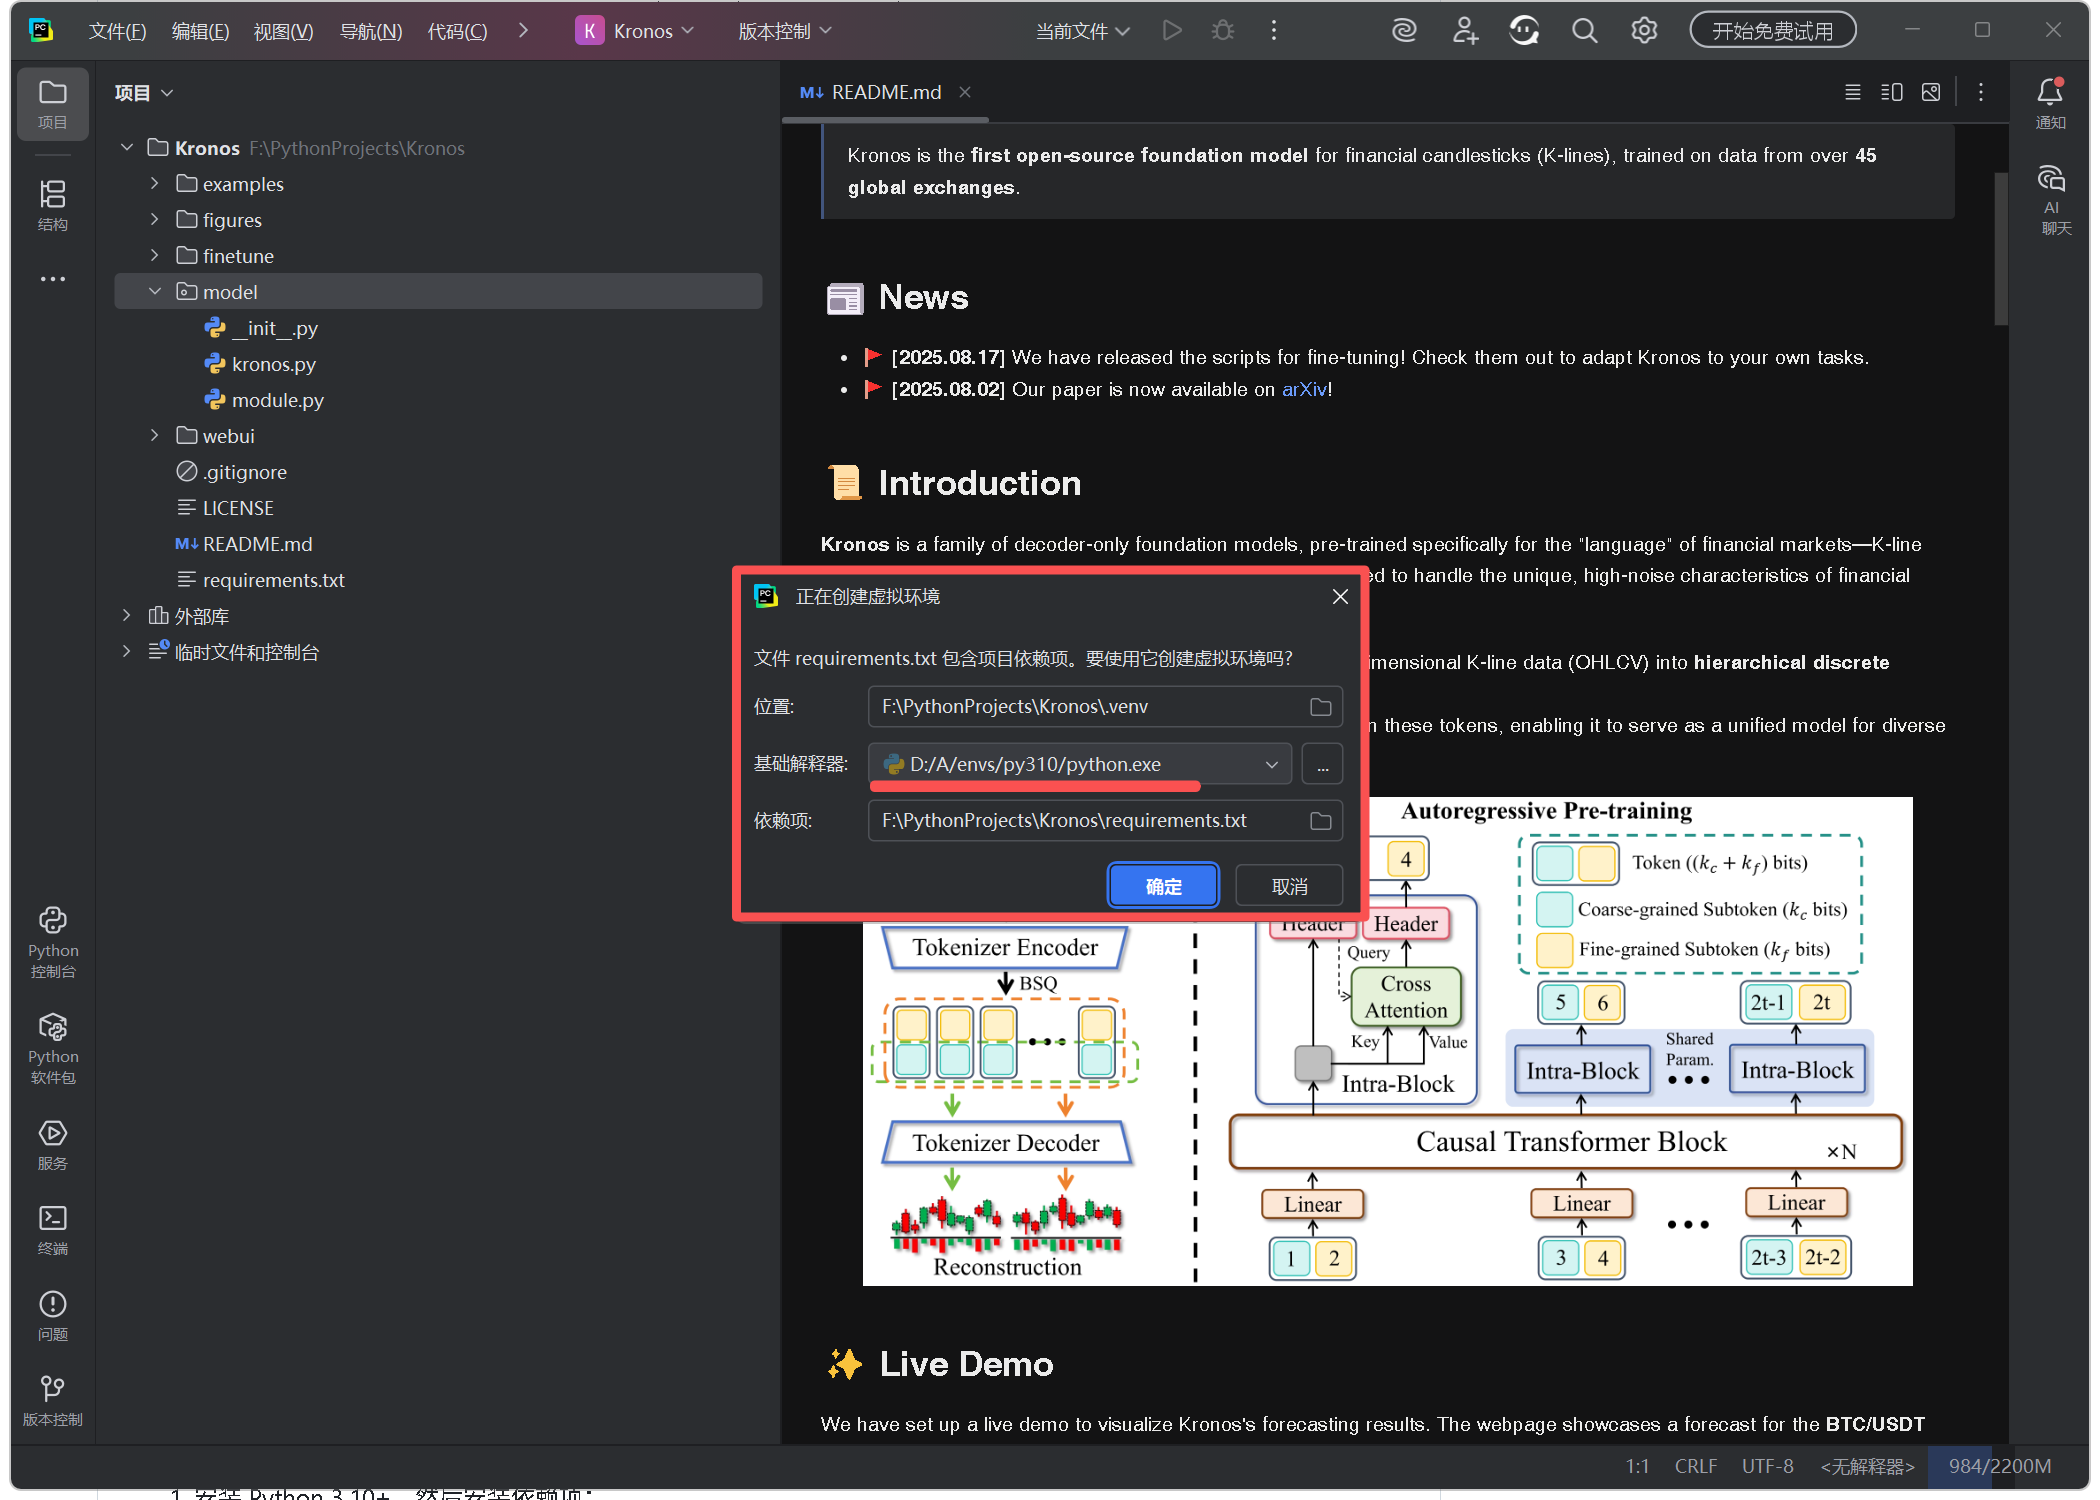
PyCharm 会检测到 requirements.txt,提示创建虚拟环境。
确认以下配置:
-
位置:
F:\PythonProjects\Kronos\.venv -
基础解释器:选择
D:\A\envs\py310\python.exe -
依赖文件:
requirements.txt
点击 OK,PyCharm 会自动:
-
创建
.venv虚拟环境 -
安装初始依赖
创建完成后,PyCharm 底部状态栏应显示:
Python 3.10 (.venv)
四、替换 requirements.txt 并重新安装依赖
-
1. 打开项目根目录的
requirements.txt -
2. 替换内容为以下版本(包含 CUDA 支持及 QLib 量化、 WebUI 等所需库):
alembic==1.16.5
annotated-types==0.7.0
anyio==4.10.0
argon2-cffi==25.1.0
argon2-cffi-bindings==25.1.0
arrow==1.3.0
asttokens==3.0.0
async-lru==2.0.5
async-timeout==5.0.1
attrs==25.3.0
Authlib==1.6.4
babel==2.17.0
beautifulsoup4==4.13.5
bleach==6.2.0
blinker==1.9.0
cachetools==5.5.2
certifi==2025.8.3
cffi==2.0.0
charset-normalizer==3.4.3
clarabel==0.11.1
click==8.3.0
cloudpickle==3.1.1
colorama==0.4.6
comm==0.2.3
contourpy==1.3.2
cryptography==45.0.7
cvxpy==1.7.2
cycler==0.12.1
cyclopts==3.24.0
databricks-sdk==0.65.0
debugpy==1.8.17
decorator==5.2.1
defusedxml==0.7.1
dill==0.4.0
dnspython==2.8.0
docker==7.1.0
docstring_parser==0.17.0
docutils==0.22.2
einops==0.8.1
email-validator==2.3.0
exceptiongroup==1.3.0
executing==2.2.1
fastapi==0.117.1
fastjsonschema==2.21.2
fastmcp==2.12.3
filelock==3.19.1
fire==0.7.1
Flask==3.1.2
flask-cors==6.0.1
fonttools==4.60.0
fqdn==1.5.1
fsspec==2025.9.0
gitdb==4.0.12
GitPython==3.1.45
google-auth==2.40.3
graphene==3.4.3
graphql-core==3.2.6
graphql-relay==3.2.0
greenlet==3.2.4
gym==0.26.2
gym-notices==0.1.0
h11==0.16.0
hf-xet==1.1.10
httpcore==1.0.9
httpx==0.28.1
httpx-sse==0.4.1
huggingface-hub==0.33.1
idna==3.10
importlib_metadata==8.7.0
ipykernel==6.30.1
ipython==8.37.0
ipywidgets==8.1.7
isodate==0.7.2
isoduration==20.11.0
itsdangerous==2.2.0
jedi==0.19.2
Jinja2==3.1.6
joblib==1.5.2
json5==0.12.1
jsonpointer==3.0.0
jsonschema==4.25.1
jsonschema-path==0.3.4
jsonschema-specifications==2025.9.1
jupyter==1.1.1
jupyter-console==6.6.3
jupyter-events==0.12.0
jupyter-lsp==2.3.0
jupyter_client==8.6.3
jupyter_core==5.8.1
jupyter_server==2.17.0
jupyter_server_terminals==0.5.3
jupyterlab==4.4.7
jupyterlab_pygments==0.3.0
jupyterlab_server==2.27.3
jupyterlab_widgets==3.0.15
kiwisolver==1.4.9
lark==1.2.2
lazy-object-proxy==1.12.0
lightgbm==4.6.0
loguru==0.7.3
Mako==1.3.10
markdown-it-py==4.0.0
MarkupSafe==3.0.2
matplotlib==3.9.3
matplotlib-inline==0.1.7
mcp==1.14.1
mdurl==0.1.2
mistune==3.1.4
mlflow==3.4.0
mlflow-skinny==3.4.0
mlflow-tracing==3.4.0
more-itertools==10.8.0
mpmath==1.3.0
narwhals==2.5.0
nbclient==0.10.2
nbconvert==7.16.6
nbformat==5.10.4
nest-asyncio==1.6.0
networkx==3.4.2
notebook==7.4.5
notebook_shim==0.2.4
numpy==2.2.6
openapi-core==0.19.5
openapi-pydantic==0.5.1
openapi-schema-validator==0.6.3
openapi-spec-validator==0.7.2
opentelemetry-api==1.37.0
opentelemetry-proto==1.37.0
opentelemetry-sdk==1.37.0
opentelemetry-semantic-conventions==0.58b0
osqp==1.0.4
overrides==7.7.0
packaging==25.0
pandas==2.2.2
pandocfilters==1.5.1
parse==1.20.2
parso==0.8.5
pathable==0.4.4
pillow==11.3.0
platformdirs==4.4.0
plotly==6.3.0
prometheus_client==0.23.1
prompt_toolkit==3.0.52
protobuf==6.32.1
psutil==7.1.0
pure_eval==0.2.3
pyarrow==21.0.0
pyasn1==0.6.1
pyasn1_modules==0.4.2
pycparser==2.23
pydantic==2.11.9
pydantic-settings==2.10.1
pydantic_core==2.33.2
Pygments==2.19.2
pymongo==4.15.1
pyparsing==3.2.4
pyperclip==1.10.0
pyqlib==0.9.7
python-dateutil==2.9.0.post0
python-dotenv==1.1.1
python-json-logger==3.3.0
python-multipart==0.0.20
python-redis-lock==4.0.0
pytz==2025.2
pywin32==311
pywinpty==3.0.0
PyYAML==6.0.2
pyzmq==27.1.0
redis==6.4.0
referencing==0.36.2
requests==2.32.5
rfc3339-validator==0.1.4
rfc3986-validator==0.1.1
rfc3987-syntax==1.1.0
rich==14.1.0
rich-rst==1.3.1
rpds-py==0.27.1
rsa==4.9.1
ruamel.yaml==0.18.15
ruamel.yaml.clib==0.2.12
safetensors==0.6.2
scikit-learn==1.7.2
scipy==1.15.3
scs==3.2.8
Send2Trash==1.8.3
six==1.17.0
smmap==5.0.2
sniffio==1.3.1
soupsieve==2.8
SQLAlchemy==2.0.43
sqlparse==0.5.3
sse-starlette==3.0.2
stack-data==0.6.3
starlette==0.48.0
sympy==1.14.0
termcolor==3.1.0
terminado==0.18.1
threadpoolctl==3.6.0
tinycss2==1.4.0
tomli==2.2.1
torch==2.8.0+cu129
torchvision==0.23.0+cu129
tornado==6.5.2
tqdm==4.67.1
traitlets==5.14.3
types-python-dateutil==2.9.0.20250822
typing-inspection==0.4.1
typing_extensions==4.15.0
tzdata==2025.2
uri-template==1.3.0
urllib3==2.5.0
uvicorn==0.36.0
waitress==3.0.2
wcwidth==0.2.13
webcolors==24.11.1
webencodings==0.5.1
websocket-client==1.8.0
Werkzeug==3.1.1
widgetsnbextension==4.0.14
win32_setctime==1.2.0
zipp==3.23.0
-
3. 保存文件,重新安装依赖:
pip install -r requirements.txt
五、验证 PyTorch CUDA 加速
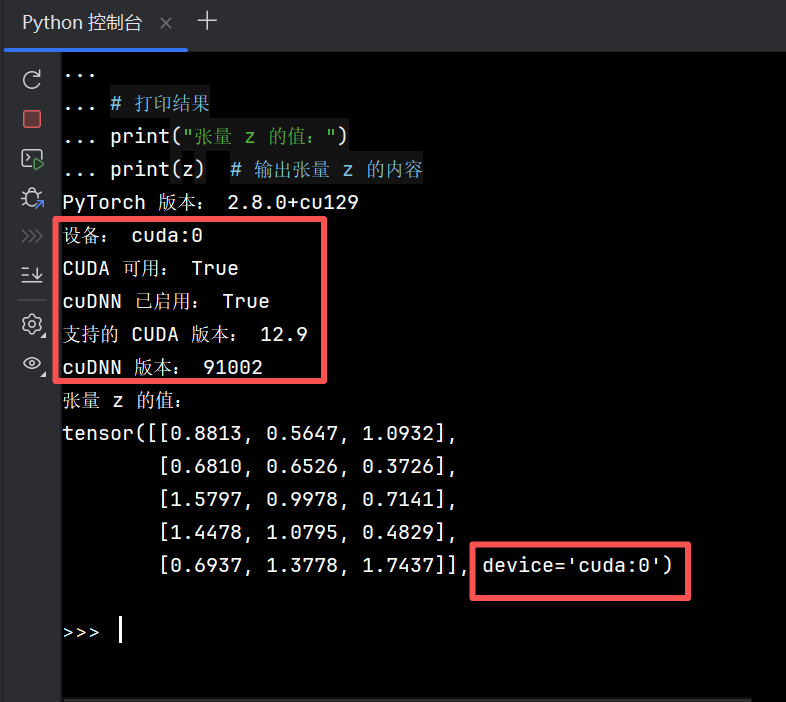
在 PyCharm 终端执行以下脚本,验证 CUDA 环境是否生效:
import torchprint("PyTorch 版本:", torch.__version__)
device = torch.device("cuda:0" if torch.cuda.is_available() else "cpu")
print("设备:", device)
print("CUDA 可用:", torch.cuda.is_available())
print("cuDNN 已启用:", torch.backends.cudnn.enabled)
print("支持的 CUDA 版本:", torch.version.cuda)
print("cuDNN 版本:", torch.backends.cudnn.version())x = torch.rand(5, 3).to(device)
y = torch.rand(5, 3).to(device)
z = x + y
print("张量 z 的值:")
print(z)
✅ 期望输出:
-
设备:cuda:0 -
CUDA 可用:True -
张量计算无报错
如果 CUDA 验证失败,执行以下操作重新安装:
PyTorch 开始使用
pip uninstall torch torchvision torchaudio -y
pip3 install torch torchvision --index-url https://download.pytorch.org/whl/cu129
再重新运行上述验证脚本。
六、准备测试的数据集
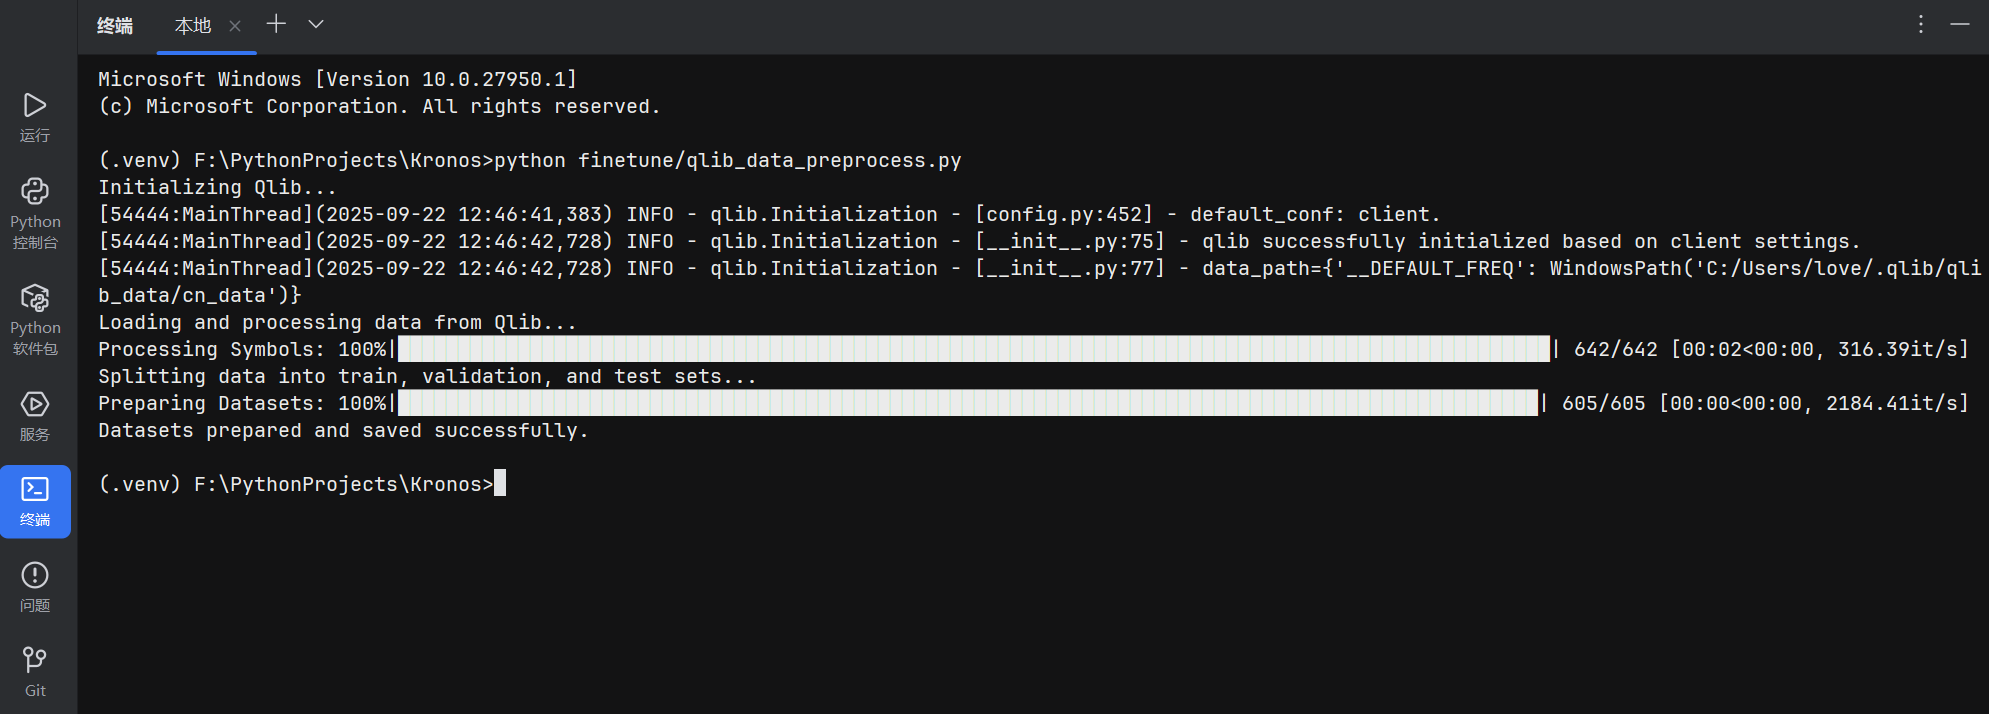
(一)按 README.md 准备数据集
python finetune/qlib_data_preprocess.py输出示例:
Microsoft Windows [Version 10.0.27950.1]
(c) Microsoft Corporation. All rights reserved.(.venv) F:\PythonProjects\Kronos>python finetune/qlib_data_preprocess.py
Initializing Qlib...
[54444:MainThread](2025-09-22 12:46:41,383) INFO - qlib.Initialization - [config.py:452] - default_conf: client.
[54444:MainThread](2025-09-22 12:46:42,728) INFO - qlib.Initialization - [__init__.py:75] - qlib successfully initialized based on client settings.
[54444:MainThread](2025-09-22 12:46:42,728) INFO - qlib.Initialization - [__init__.py:77] - data_path={'__DEFAULT_FREQ': WindowsPath('C:/Users/love/.qlib/qlib_data/cn_data')}
Loading and processing data from Qlib...
Processing Symbols: 100%|████████████████████████████████████████████████████████████████████████████████████████████████| 642/642 [00:02<00:00, 316.39it/s]
Splitting data into train, validation, and test sets...
Preparing Datasets: 100%|███████████████████████████████████████████████████████████████████████████████████████████████| 605/605 [00:00<00:00, 2184.41it/s]
Datasets prepared and saved successfully.(.venv) F:\PythonProjects\Kronos>
(二)准备测试数据
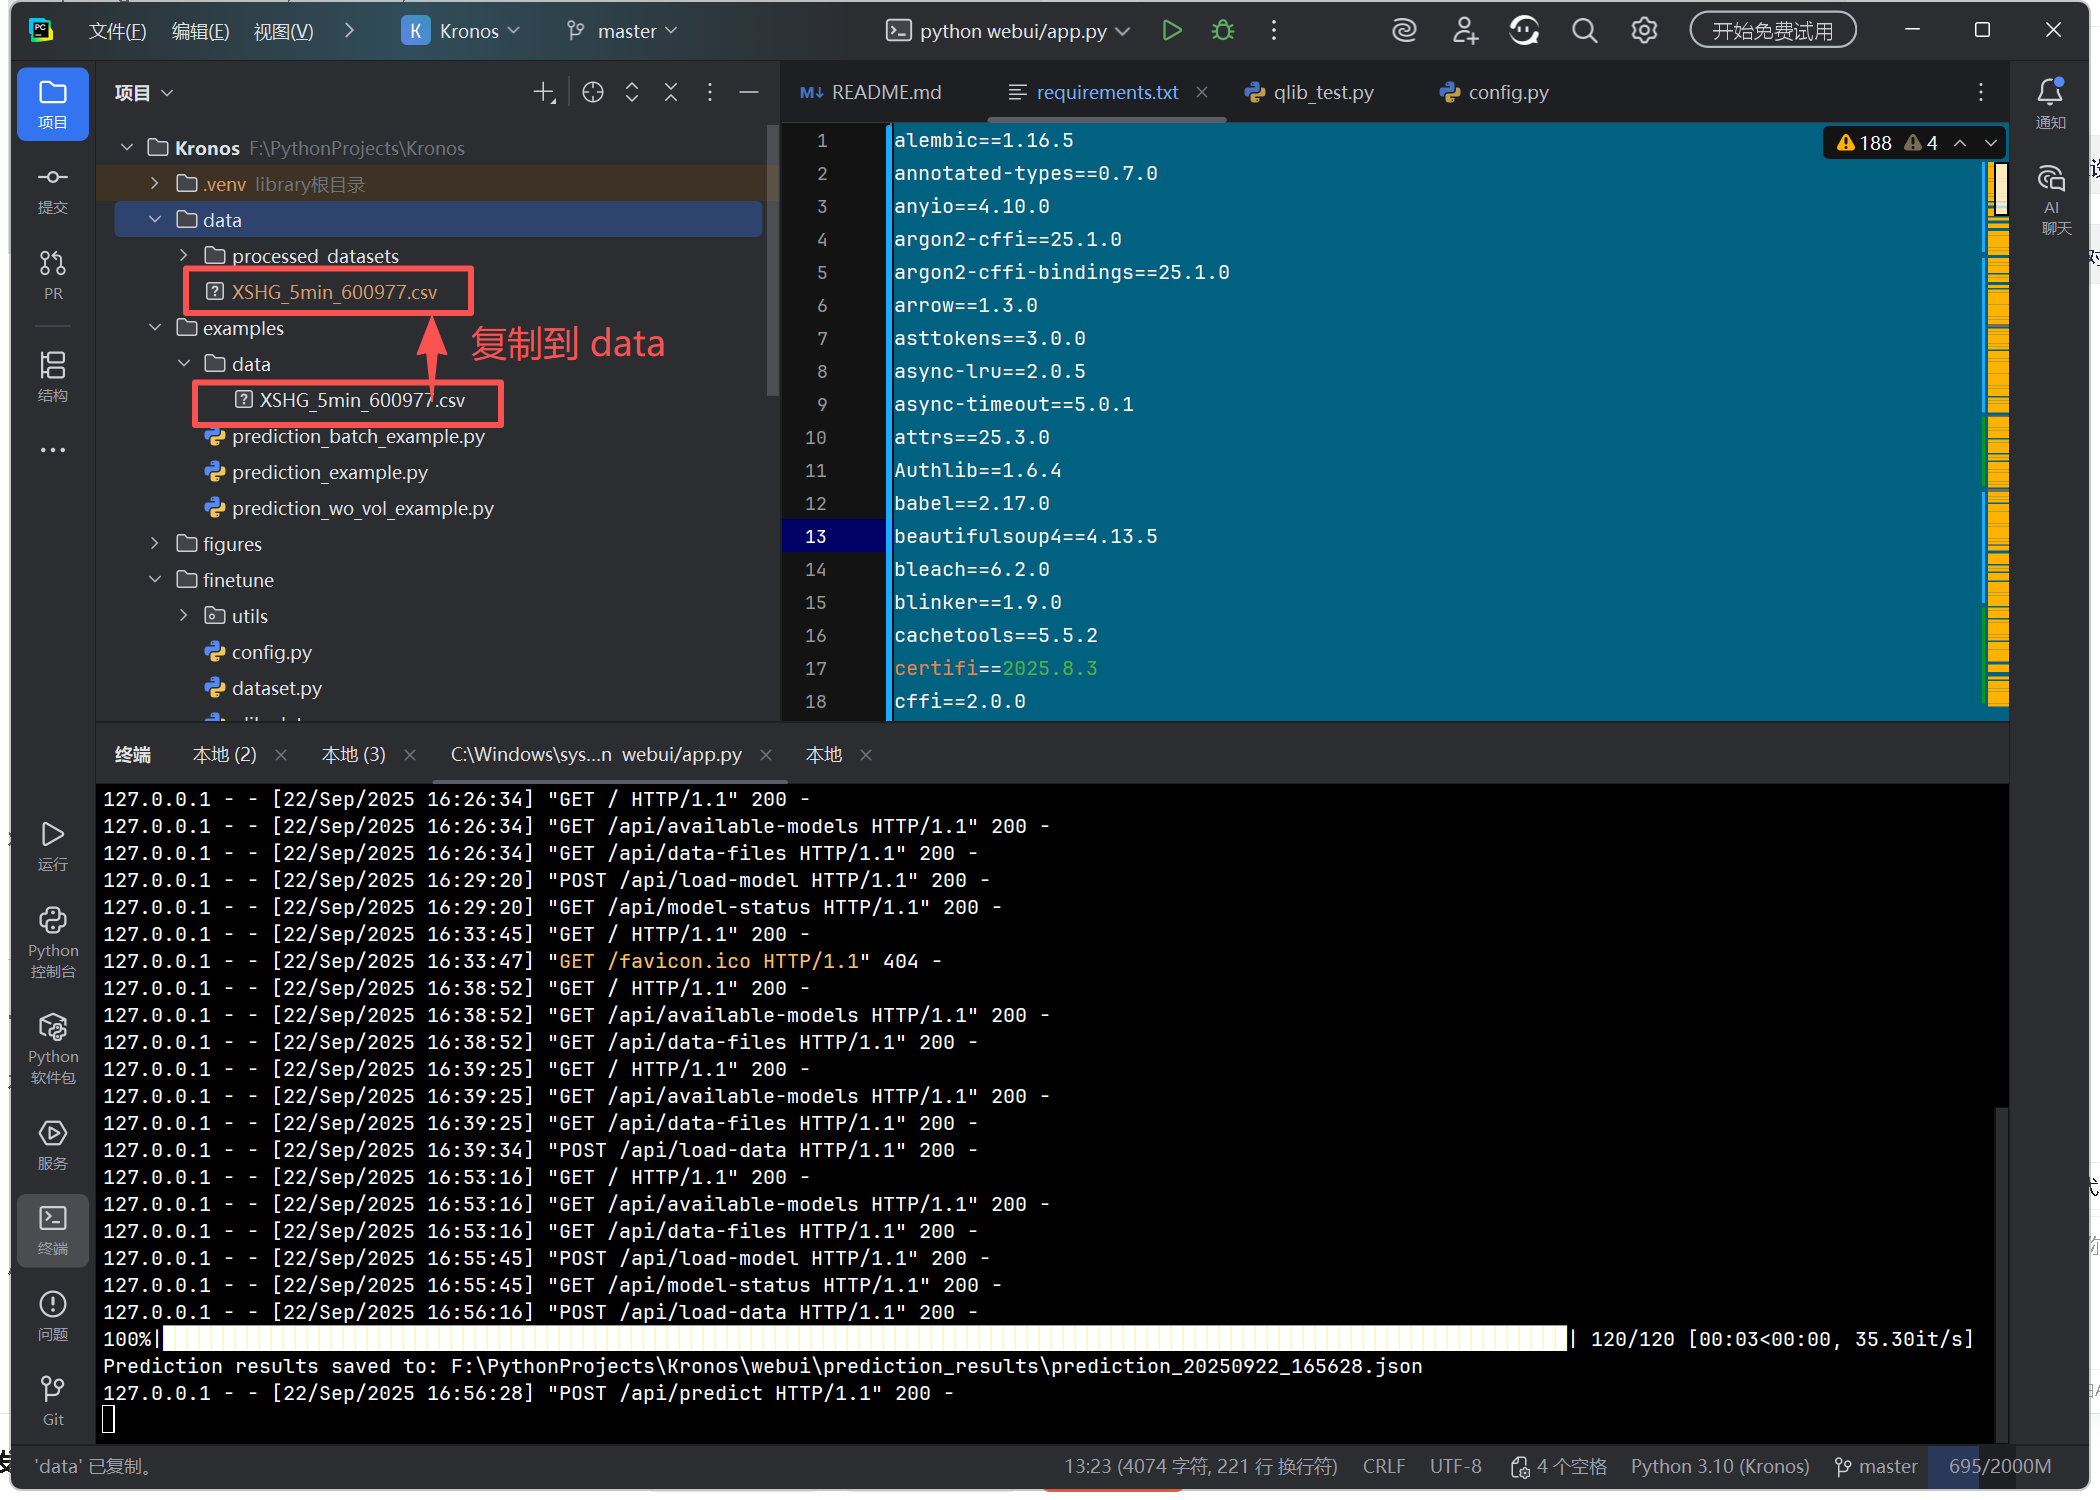
将 examples/data/XSHG_5min_600977.csv 示例文件 复制到 data 文件夹下(或自行按 .csv 格式模板 准备数据)
七、启动 Kronos WebUI
在项目根目录执行:
python webui/app.py
启动成功后输出示例:
Starting Kronos Web UI...
Model availability: True
Tip: You can load Kronos model through /api/load-model endpoint* Serving Flask app 'app'* Debug mode: on
WARNING: This is a development server. Do not use it in a production deployment. Use a production WSGI server instead.* Running on all addresses (0.0.0.0)* Running on http://127.0.0.1:7070* Running on http://192.168.1.5:7070
Press CTRL+C to quit* Restarting with stat
Starting Kronos Web UI...
Model availability: True
Tip: You can load Kronos model through /api/load-model endpoint* Debugger is active!* Debugger PIN: 267-370-062
浏览器会自动打开控制面板,或手动访问:
http://localhost:7070
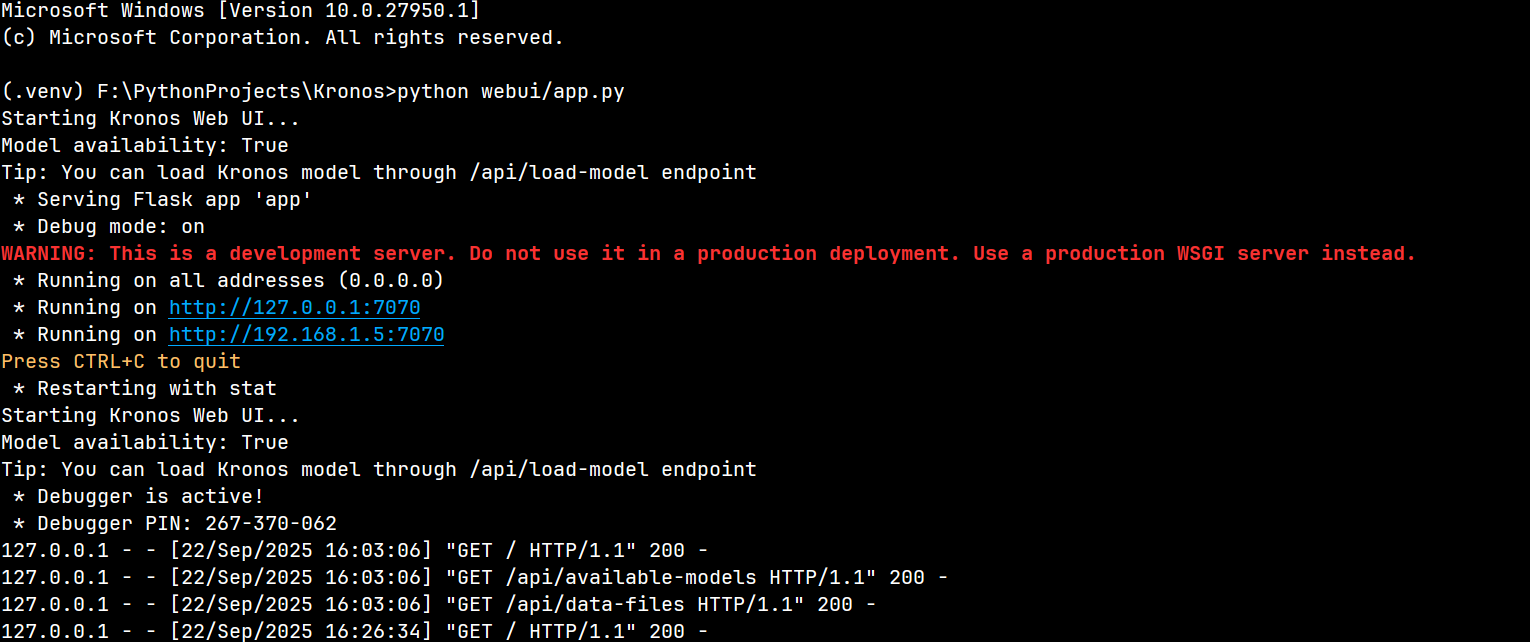
警告信息为:
“WARNING: This is a development server. Do not use it in a production deployment. Use a production WSGI server instead.”
其含义是:当前启动的是开发环境服务器,不建议在正式的生产环境中使用。提示用户应改用专门的生产级 WSGI 服务器(如 Gunicorn、uWSGI 等)来部署应用。
这是因为 Flask 自带的开发服务器主要用于开发和调试阶段,存在性能较低、安全性不足、不支持高并发等问题,无法满足生产环境中对稳定性、安全性和性能的要求。
八、WebUI 测试与模型加载
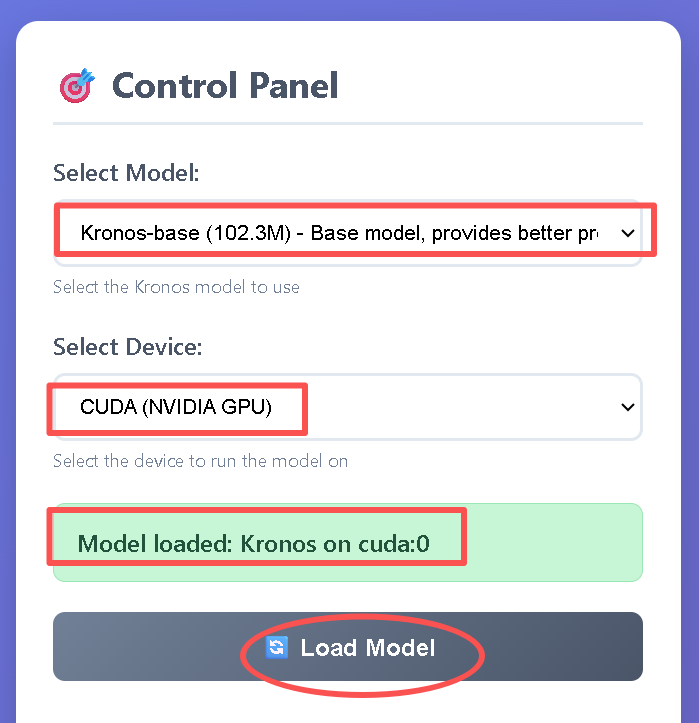
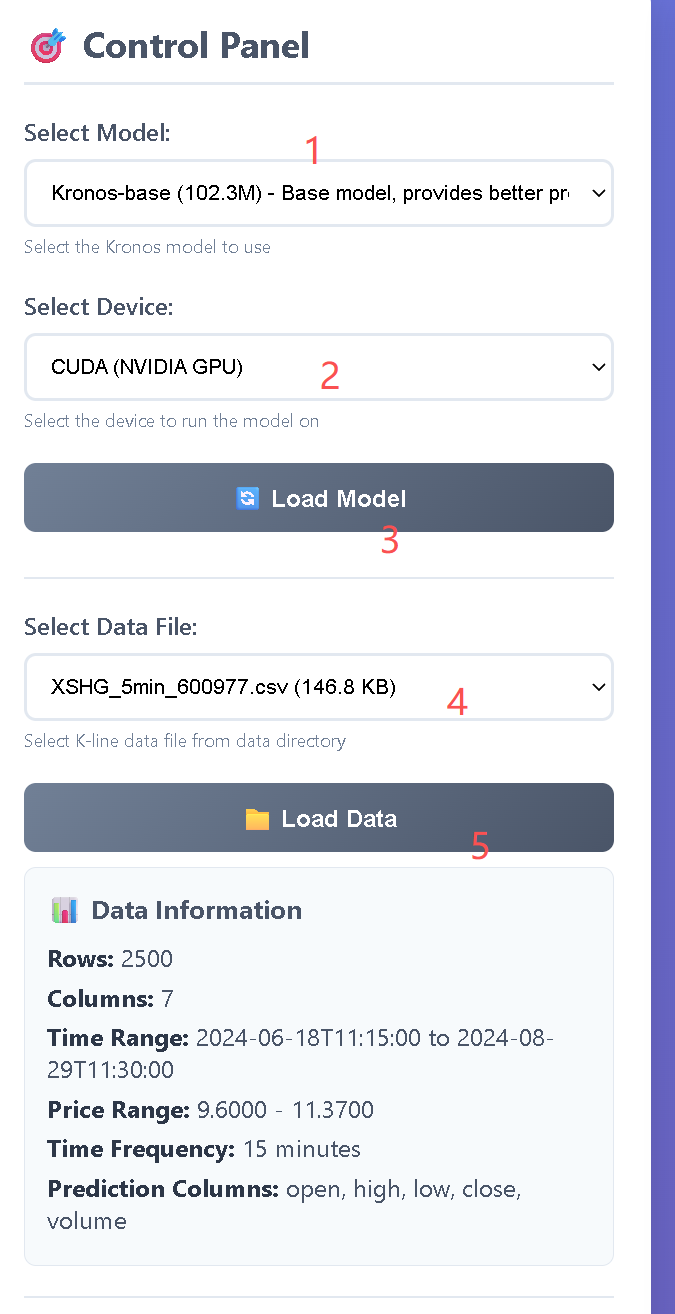
在浏览器界面依次操作:
-
Select Model → 比如选择
Kronos-base (102.3M) -
Select Device → 选择
CUDA (NVIDIA GPU) -
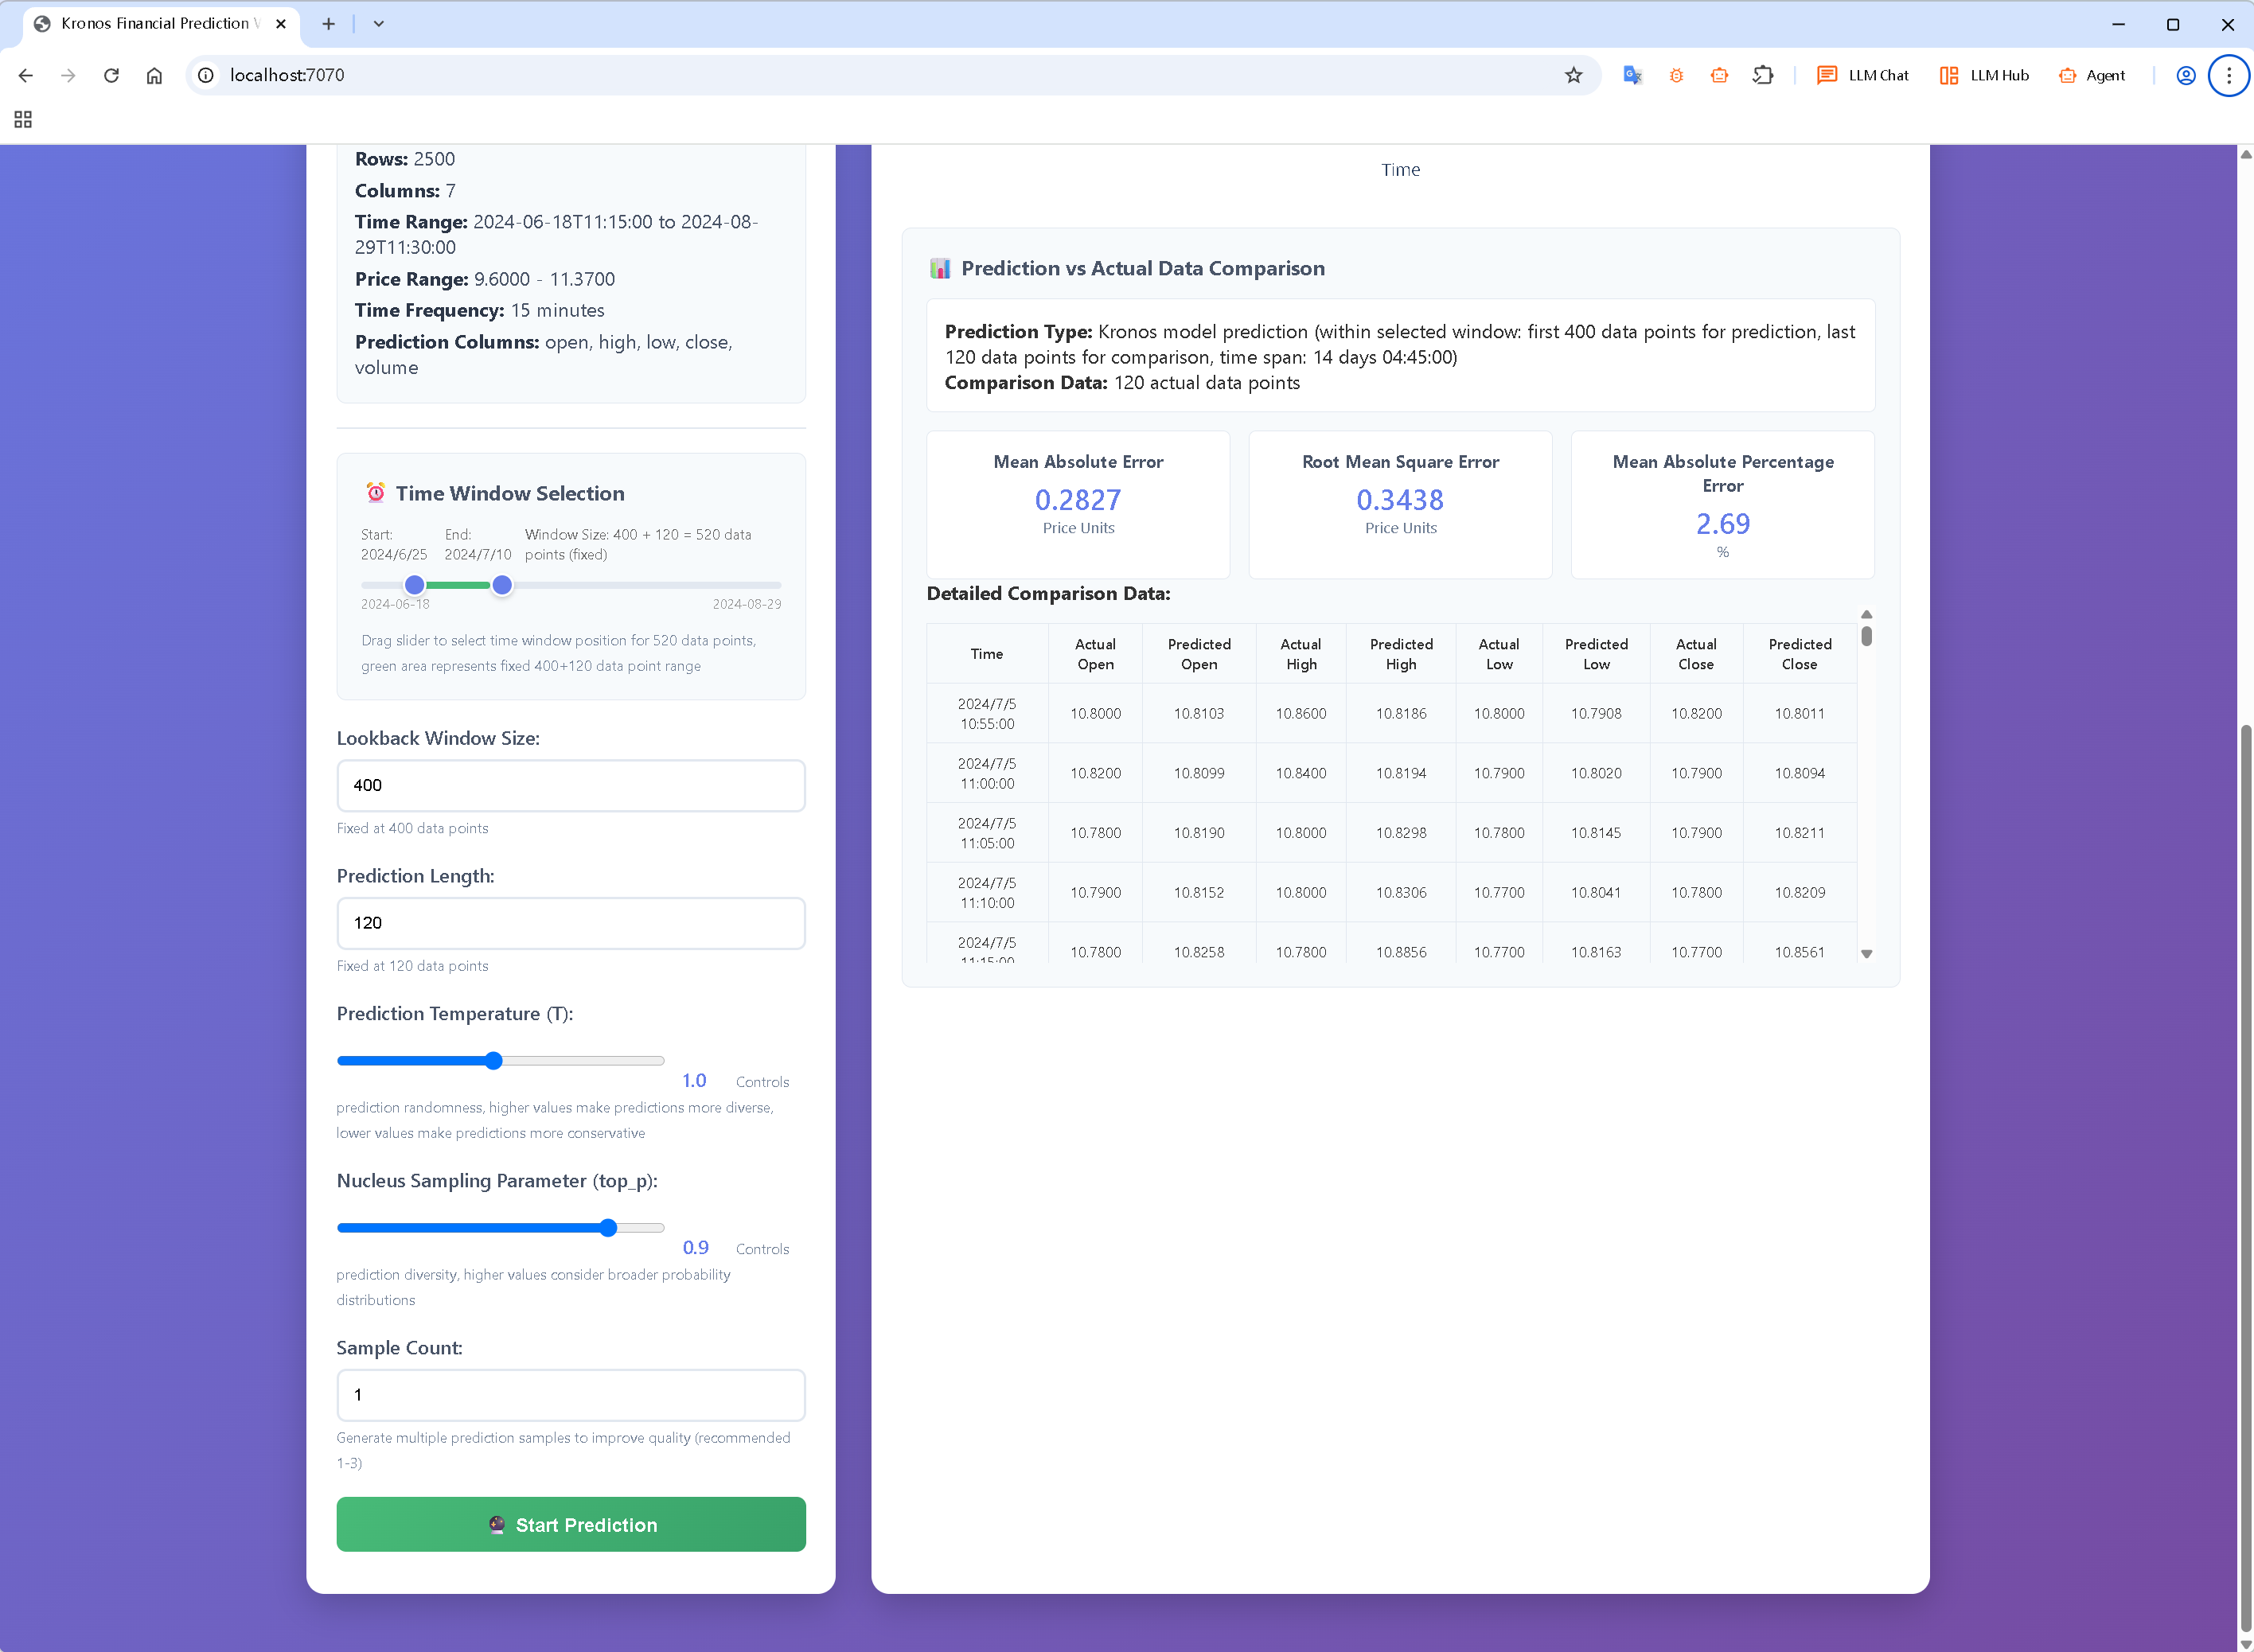
点击 Load Model,确认 CUDA 设备能成功加载模型
-
Select Data File → 从
data/目录选择 K-line 数据文件 -
点击 Load Data 加载数据
-
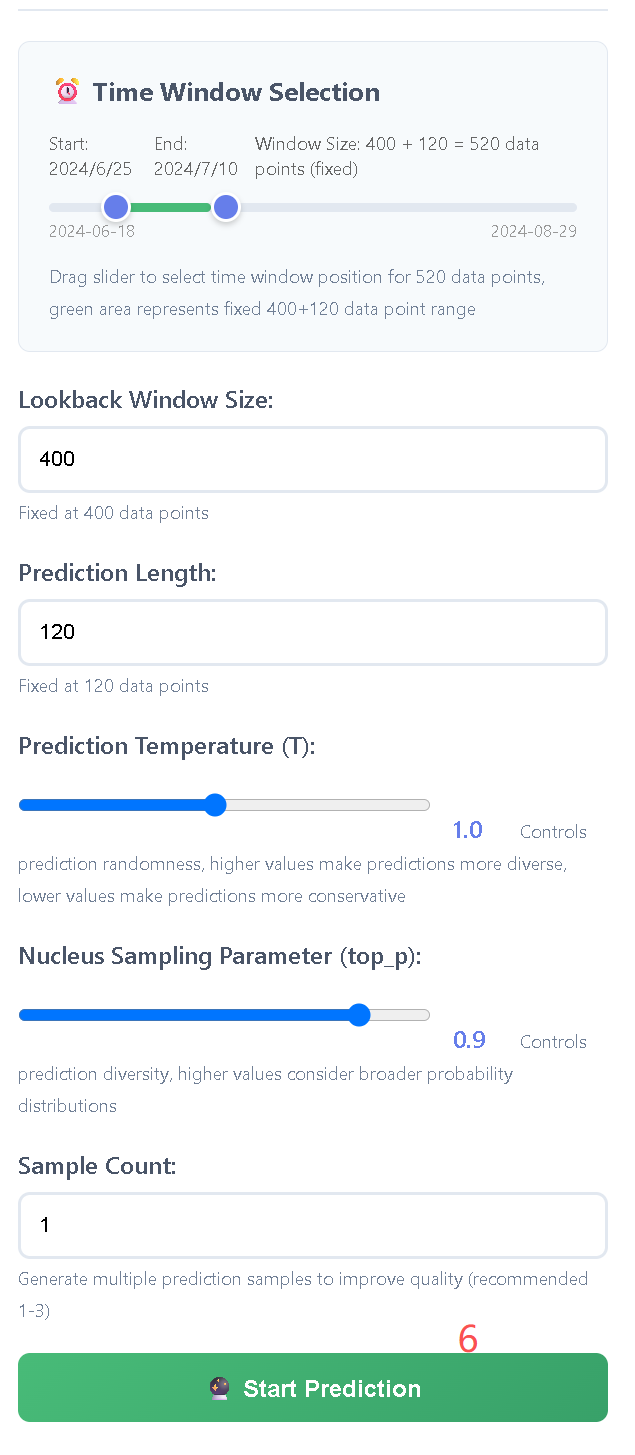
下拉页面 点击 Start Prediction 进入推理测试
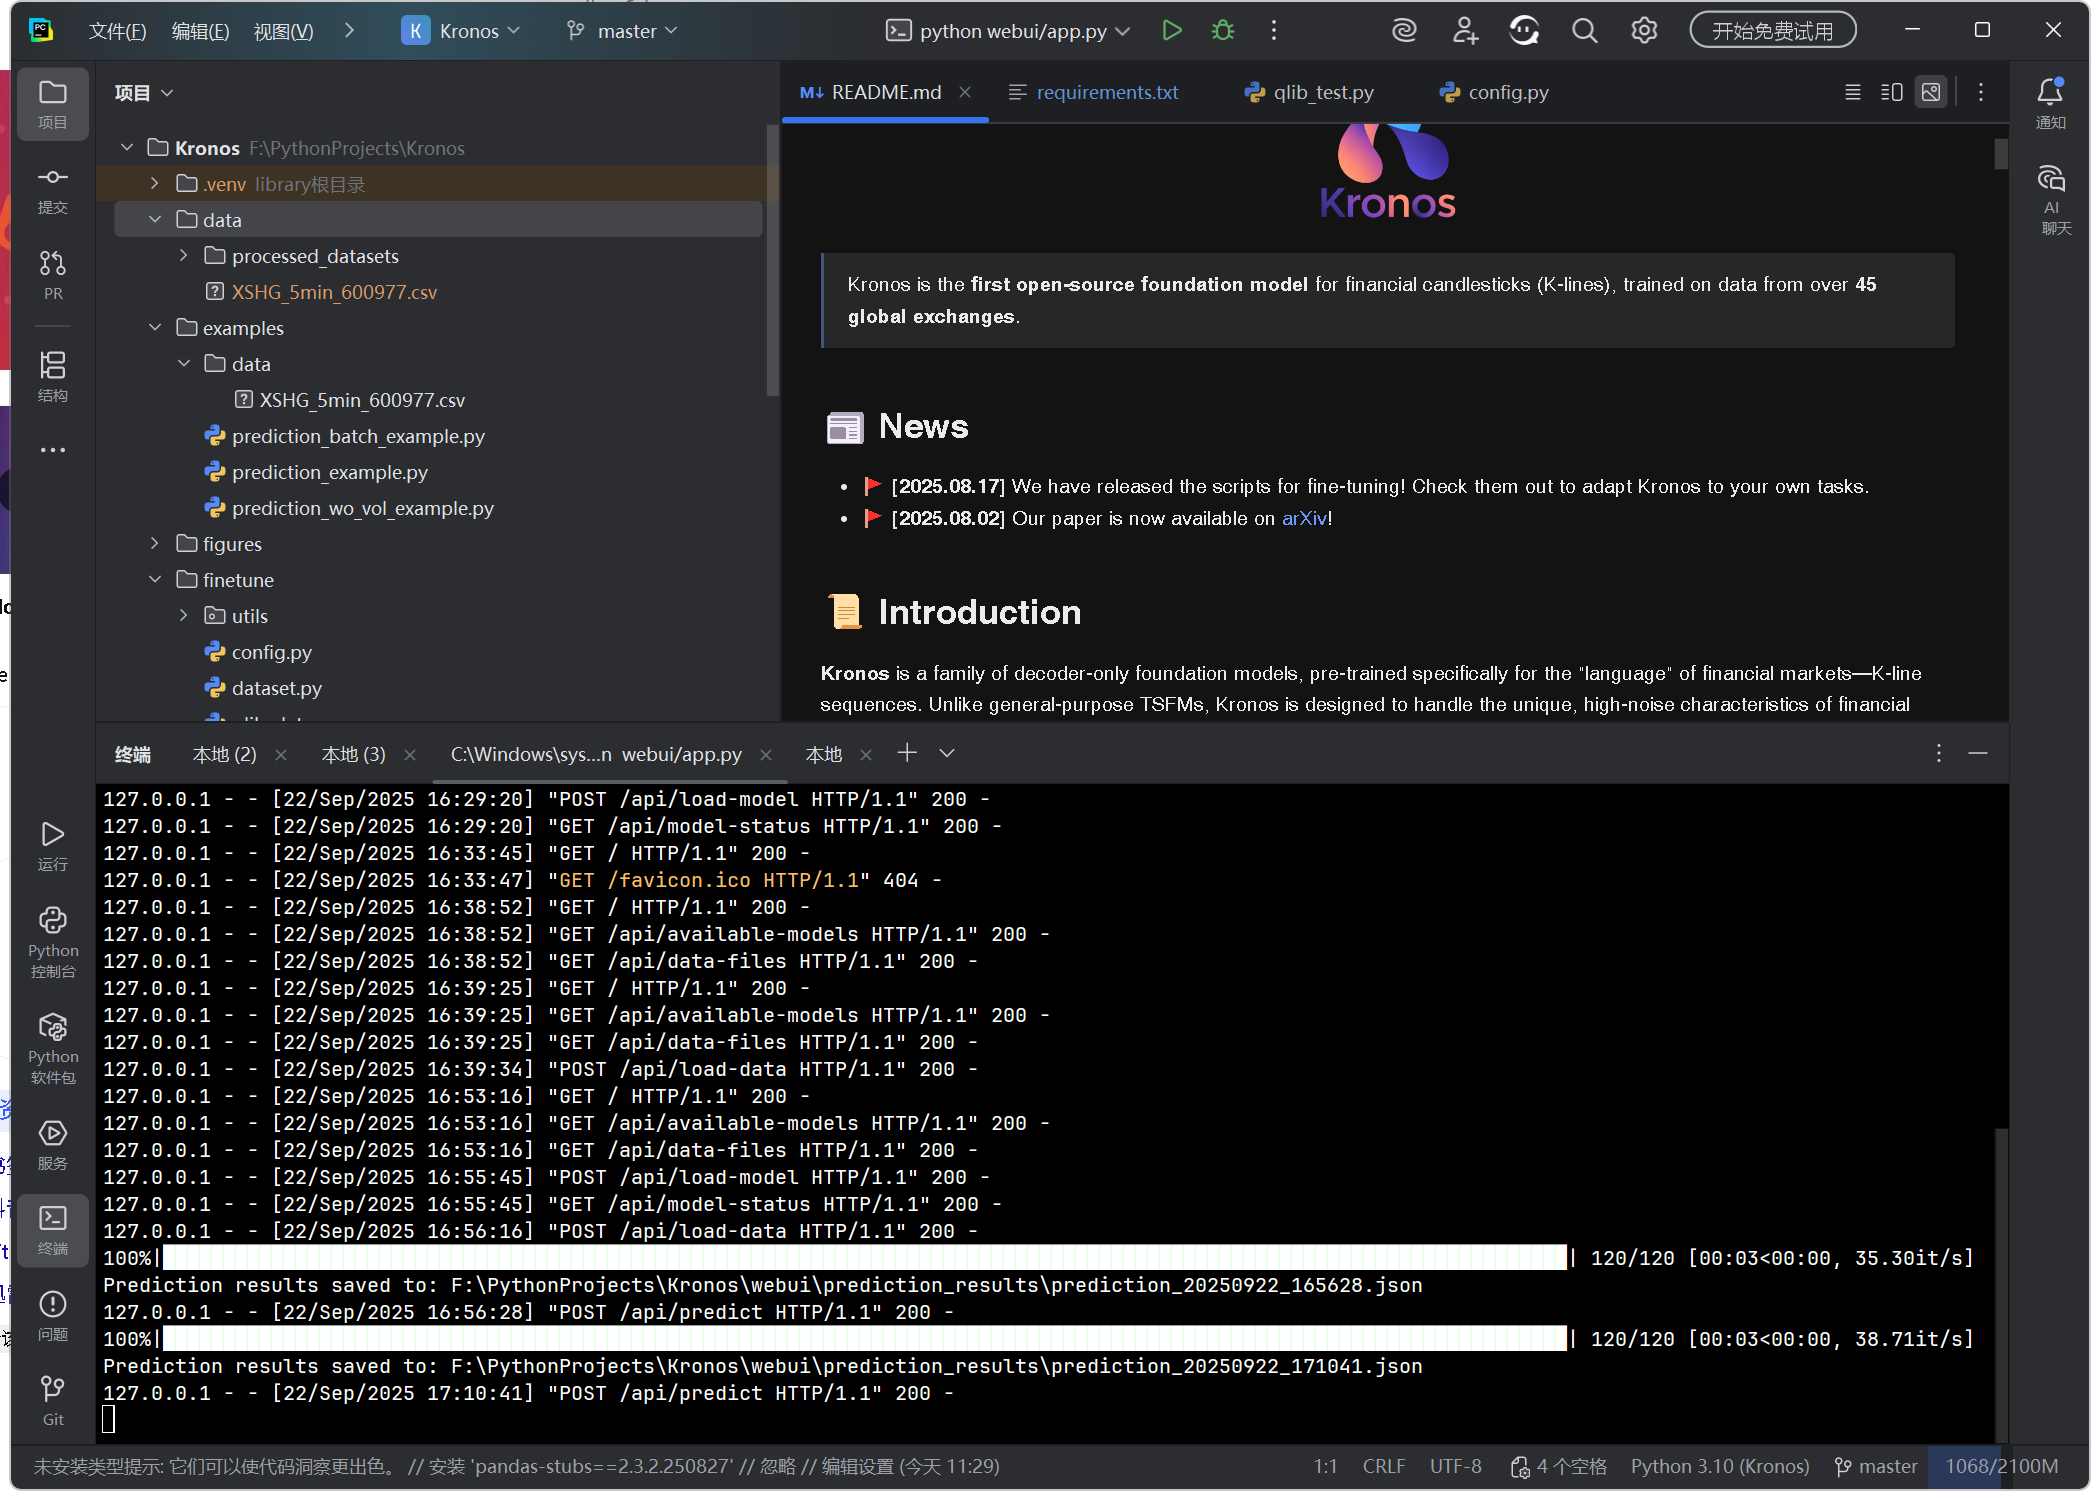
如果模型和设备加载成功,终端应持续打印请求日志,说明 WebUI 工作正常。

九、总结
通过以上步骤,你已完成:
-
✅ 基于 EPGF 架构的 Conda +
.venv环境创建 -
✅ requirements.txt 替换及依赖安装
-
✅ PyTorch CUDA 环境验证
-
✅ Kronos WebUI 启动与浏览器测试
现在你的 Kronos 环境已支持 GPU 加速推理,可以开始量化研究与策略测试。
