C#实现高性能拍照(旋转)与水印添加功能完整指南
C#实现高性能拍照(旋转)与水印添加功能完整指南
1. 概述
在工业检测、质量追溯等应用场景中,经常需要对产品进行拍照并添加相关信息水印。本文将详细介绍如何使用C#实现一个高性能的拍照和水印添加功能,包含完整的代码实现和优化技巧。
2. 功能架构设计
本功能主要分为以下几个模块:
相机控制与分辨率设置
图像捕获与处理
水印信息生成与添加
文件保存与UI更新
3. 核心代码实现
3.1 主拍照方法
/// <summary>
/// 拍照并添加水印信息
/// </summary>
/// <returns>保存的图片路径,失败返回空字符串</returns>
private string TakePictures()
{Console.WriteLine("开始拍照");string filePath = string.Empty;try{this.Dispatcher.Invoke(() =>{// 1. 设置UI背景ImgBox.Background = new SolidColorBrush(System.Windows.Media.Color.FromRgb(75, 76, 69));// 2. 设置相机分辨率if (!SetCameraResolutionWithoutStop(3840, 2160)){Console.WriteLine("设置分辨率失败");return;}// 3. 检查视频帧有效性if (player?.GetCurrentVideoFrame()?.GetHbitmap() == IntPtr.Zero){Console.WriteLine("获取视频帧失败");return;}// 4. 获取并处理图像using (var hBitmap = new SafeHBitmapHandle(player.GetCurrentVideoFrame().GetHbitmap())){BitmapSource bitmapSource = CreateBitmapSourceFromHBitmap(hBitmap);if (bitmapSource == null){Console.WriteLine("创建BitmapSource失败");return;}// 5. 旋转图像(如果需要)if (ShouldRotateImage()){bitmapSource = RotateImage(bitmapSource, 180);}// 6. 保存图像filePath = GenerateFilePath();if (string.IsNullOrEmpty(filePath)){Console.WriteLine("生成文件路径失败");return;}SaveImageToFile(bitmapSource, filePath);// 7. 添加水印AddWatermarkToImage(filePath, currentScanCodeRecord);// 8. 更新UI显示UpdateImageDisplay(filePath);Console.WriteLine($"照片已保存到: {Path.GetFullPath(filePath)}");SystemInfo.WriteFile($"照片已保存到: {Path.GetFullPath(filePath)}", "生产日志");}});return filePath;}catch (Exception ex){Console.WriteLine($"照片保存出错: {ex}");SystemInfo.WriteFile($"照片保存出错: {ex}", "Error");return string.Empty;}
}
3.2 安全HBITMAP处理类
// 安全释放HBITMAP的包装类
private class SafeHBitmapHandle : IDisposable
{private readonly IntPtr _hBitmap;private bool _disposed = false;public SafeHBitmapHandle(IntPtr hBitmap){_hBitmap = hBitmap;}public static implicit operator IntPtr(SafeHBitmapHandle handle) => handle._hBitmap;public void Dispose(){if (!_disposed && _hBitmap != IntPtr.Zero){DeleteObject(_hBitmap);_disposed = true;}GC.SuppressFinalize(this);}~SafeHBitmapHandle(){Dispose();}[System.Runtime.InteropServices.DllImport("gdi32.dll")]private static extern bool DeleteObject(IntPtr hObject);
}
4. 关键技术点详解
4.1 相机分辨率设置
private bool SetCameraResolutionWithoutStop(int width, int height)
{try{if (player?.VideoSource is not VideoCaptureDevice videoDevice)return false;var targetResolution = videoDevice.VideoCapabilities?.FirstOrDefault(cap => cap.FrameSize.Width == width && cap.FrameSize.Height == height);if (targetResolution != null){videoDevice.VideoResolution = targetResolution;Console.WriteLine($"已设置分辨率为: {width}x{height}");return true;}Console.WriteLine($"未找到 {width}x{height} 分辨率支持");return false;}catch (Exception ex){Console.WriteLine($"设置分辨率失败: {ex.Message}");return false;}
}技术要点:
使用
VideoCaptureDevice类控制相机设备通过
VideoCapabilities枚举设备支持的分辨率采用异常处理确保程序稳定性
4.2 图像处理与旋转
private BitmapSource RotateImage(BitmapSource source, double angle)
{try{RotateTransform rotateTransform = new RotateTransform(angle);return new TransformedBitmap(source, rotateTransform);}catch{return source;}
}
4.3 文件路径生成策略
private string GenerateFilePath()
{try{string basePath = ConfigurationManager.AppSettings["PicFileLoad"] ?? string.Empty;if (string.IsNullOrEmpty(basePath))return string.Empty;string dateFolder = DateTime.Now.ToString("yyyy-MM-dd");string codeFolder = string.IsNullOrEmpty(OldCode) ? "null" : OldCode;string directoryPath = Path.Combine(basePath, "photos", "Input", dateFolder, codeFolder);if (!Directory.Exists(directoryPath))Directory.CreateDirectory(directoryPath);return Path.Combine(directoryPath, $"photo_{DateTime.Now:yyyyMMddHHmmss}.jpg");}catch{return string.Empty;}
}目录结构设计:
basePath/
├── photos/
│   ├── Input/
│   │   ├── 2023-11-20/
│   │   │   ├── ProductCode001/
│   │   │   └── ProductCode002/
│   │   └── 2023-11-21/
4.4 高质量图像保存
private void SaveImageToFile(BitmapSource bitmapSource, string filePath)
{try{using (FileStream fs = new FileStream(filePath, FileMode.Create)){JpegBitmapEncoder encoder = new JpegBitmapEncoder { QualityLevel = 95 };encoder.Frames.Add(BitmapFrame.Create(bitmapSource));encoder.Save(fs);}}catch (Exception ex){Console.WriteLine($"保存图像失败: {ex.Message}");throw;}
}
5. 智能水印实现
5.1 水印添加核心方法
private void AddWatermarkToImage(string imagePath, t_ScanCodeRecord record)
{try{using (var originalImage = Image.FromFile(imagePath))using (var watermarkImage = new Bitmap(originalImage.Width, originalImage.Height))using (var graphics = Graphics.FromImage(watermarkImage)){// 设置高质量绘制graphics.SmoothingMode = System.Drawing.Drawing2D.SmoothingMode.HighQuality;graphics.InterpolationMode = System.Drawing.Drawing2D.InterpolationMode.HighQualityBicubic;graphics.PixelOffsetMode = System.Drawing.Drawing2D.PixelOffsetMode.HighQuality;// 绘制原始图像graphics.DrawImage(originalImage, 0, 0, originalImage.Width, originalImage.Height);// 添加水印string watermarkText = FormatShippingInfo(record);AddTextWatermark(graphics, watermarkText, originalImage.Width, 80);// 保存处理后的图像watermarkImage.Save(imagePath, System.Drawing.Imaging.ImageFormat.Jpeg);}}catch (Exception ex){Console.WriteLine($"添加水印失败: {ex.Message}");throw;}
}
5.2 智能文本格式化
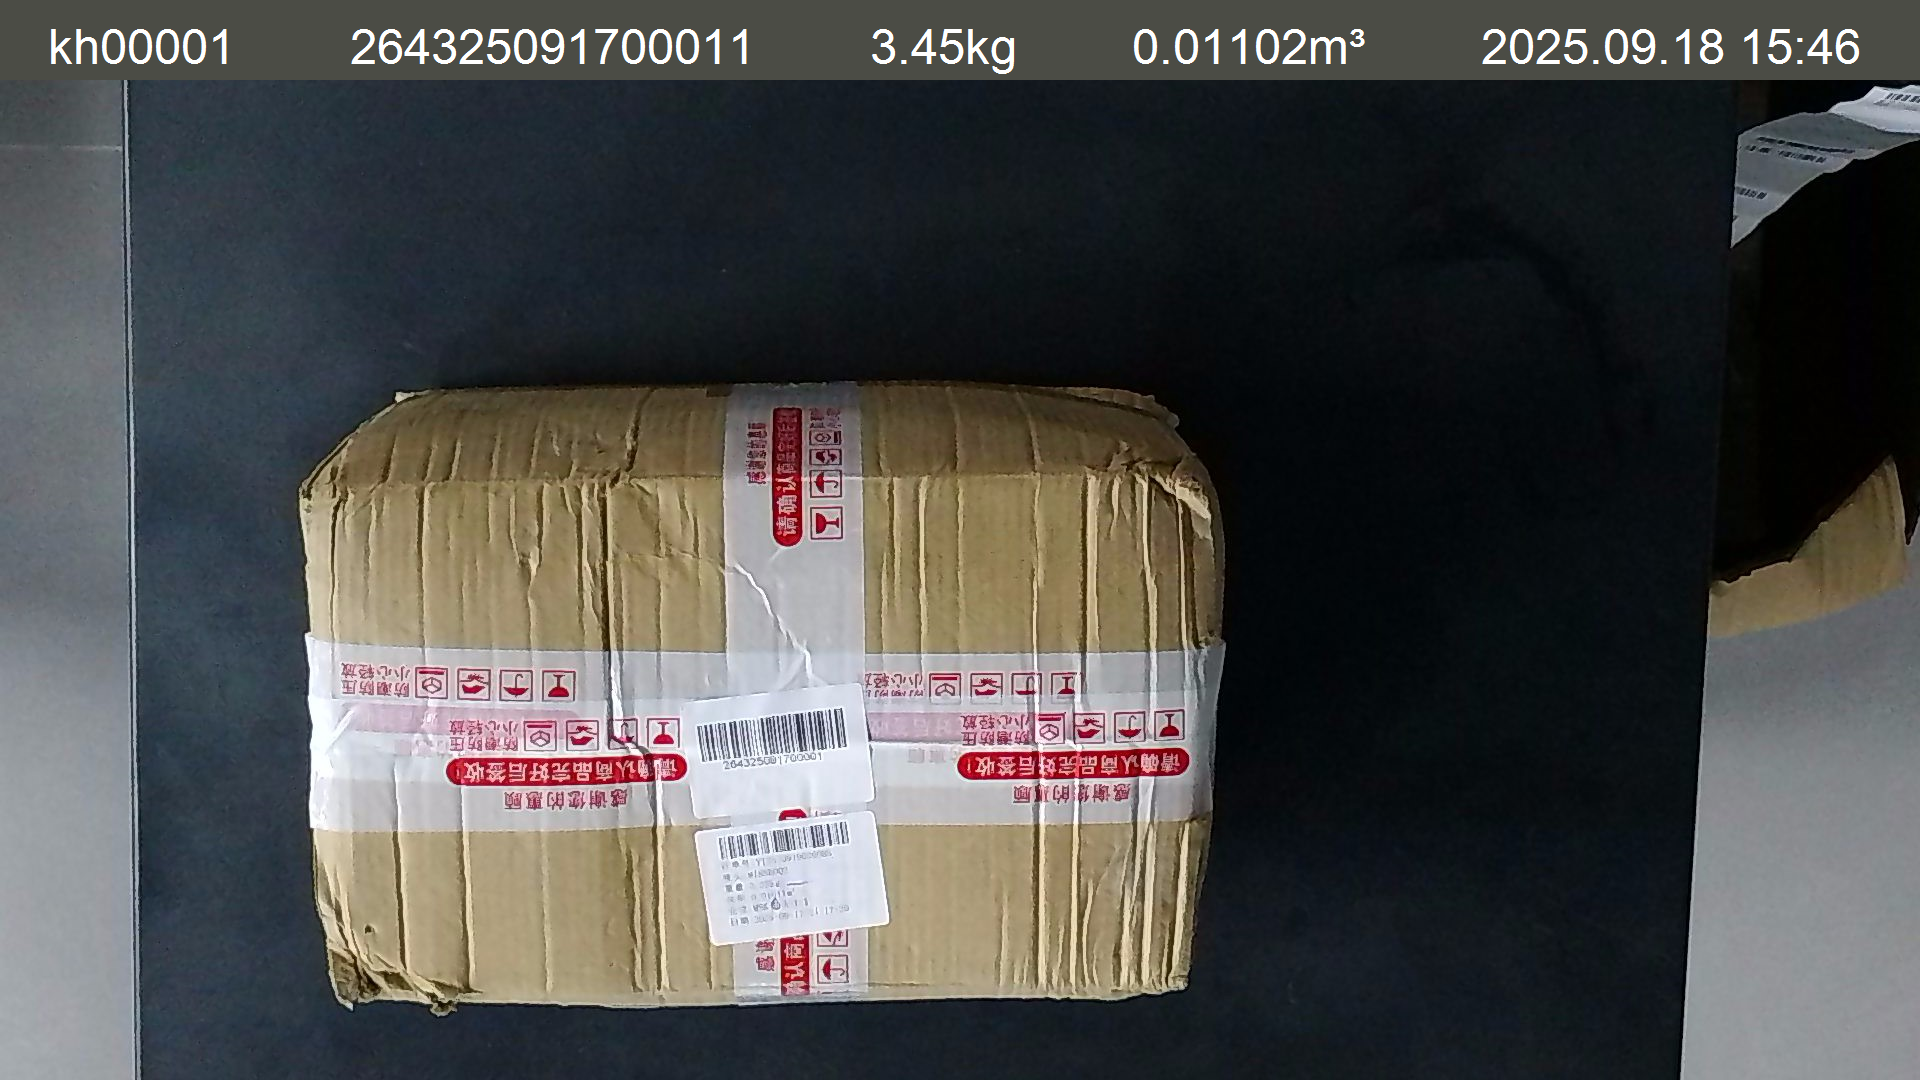
public string FormatShippingInfo(t_ScanCodeRecord record)
{if (record == null) return string.Empty;string[] parts = {record.shipping_mark ?? string.Empty,record.code ?? string.Empty,$"{record.weight}kg",$"{record.volume}m³",DateTime.Now.ToString("yyyy.MM.dd HH:mm")};// 计算显示长度(考虑中英文)int[] partLengths = parts.Select(GetDisplayLength).ToArray();int totalLength = partLengths.Sum();// 计算间隔int totalGaps = 126 - totalLength;int gapCount = 4;int baseGapSize = totalGaps / gapCount;int extraSpace = totalGaps % gapCount;// 构建结果var result = new StringBuilder();for (int i = 0; i < parts.Length; i++){result.Append(parts[i]);if (i < gapCount){int currentGapSize = baseGapSize + (extraSpace > 0 ? 1 : 0);result.Append(' ', currentGapSize);if (extraSpace > 0) extraSpace--;}}Console.WriteLine($"最终长度: {GetDisplayLength(result.ToString())}/126");return result.ToString();
}// 计算字符串显示长度(支持中英文混合)
private int GetDisplayLength(string text)
{if (string.IsNullOrEmpty(text)) return 0;return text.Sum(c => c >= 0x4E00 && c <= 0x9FA5 ? 2 : 1);
}
6. 性能优化技巧
资源管理:使用
using语句和SafeHBitmapHandle确保资源正确释放异常处理:完善的异常处理机制保证程序稳定性
配置化:通过配置文件管理路径、旋转设置等参数
高质量渲染:设置合适的图形渲染参数保证图像质量
日志记录:详细的日志记录便于问题排查
7. 实际应用建议
相机选型:根据实际需求选择合适分辨率的工业相机
存储规划:考虑图片数量和大小,合理规划存储空间
性能监控:监控拍照过程的耗时,优化瓶颈环节
错误处理:增加重试机制应对临时性故障
内存管理:定期清理不必要的资源,防止内存泄漏
8. 总结
本文详细介绍了C#实现拍照和水印添加功能的完整方案,涵盖了从相机控制、图像处理到文件保存的各个环节。代码中体现了良好的资源管理、异常处理和性能优化实践,可以直接应用于工业检测、质量追溯等实际场景。
通过合理的架构设计和细节处理,这个方案能够稳定高效地完成拍照和水印添加任务,为后续的图像分析和数据处理提供可靠的基础。