机器学习 - Kaggle项目实践(7)NLP with Disaster Tweets 灾难消息
Natural Language Processing with Disaster Tweets | Kaggle
任务 判断一句话是否关于灾难predicting whether a given tweet is about a real disaster or not
预处理清洗掉网页信息中的无效符号;
编码方式有:词袋模型、TF-IDF、GloVe、BERT
再利用机器学习分类模型如岭回归、逻辑回归、支持向量机、随机森林;也可以用双头LSTM等深度学习模型
目录
简单版:词袋模型编码+岭分类器拟合
优化一 text清洗:删除无效符号
1. TF-IDF编码 + 预处理 + 三种分类模型
1.1 TF-IDF向量化
1.2 三种分类模型比较
1.3 交叉验证评估分数
2. GloVe+双头LSTM
2.1 text所有单词->词库corpus
2.2 用GloVe 构建embedding_dict 词->向量 字典
2.3 text -> 数值序列
2.4 embedding_matrix 数值->向量 准备词嵌入层
2.5 双向LSTM文本分类模型
2.6 划分训练数据+训练
3. BERT编码 + 训练微调
3.1 文本编码函数
3.2 模型构建函数
3.3 加载预训练数据
3.4 模型训练
3.5 加载参数 预测0-1 & 提交
简单版:词袋模型编码+岭分类器拟合
词袋模型 (Bag-of-Words):把每条推文拆成单词(或 n-gram),统计每个词在语料中的出现次数。
得到 稀疏矩阵 使用 岭回归分类器 (Ridge Classifier):线性模型 + L2 正则化,适合高维稀疏数据。
Disaster Tweets | Kaggle
导入数据 并分别查看 非灾难推文和灾难推文 的前5条
import numpy as np
import pandas as pd
train_df = pd.read_csv("/kaggle/input/nlp-getting-started/train.csv")
test_df = pd.read_csv("/kaggle/input/nlp-getting-started/test.csv")# 查看非灾难推文的前5条
non_disaster_tweets = train_df[train_df["target"] == 0]["text"]
print("非灾难推文示例:")
print(non_disaster_tweets.head())# 查看灾难推文的前5条
disaster_tweets = train_df[train_df["target"] == 1]["text"]
print("\n灾难推文示例:")
print(disaster_tweets.head())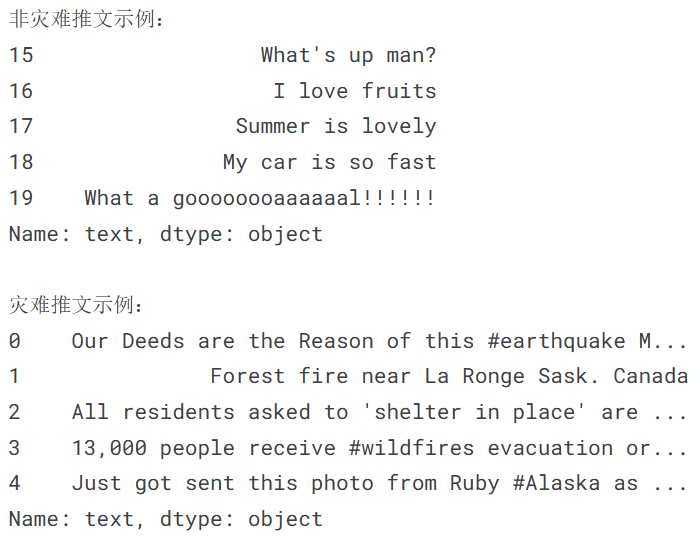
词袋模型(Bag-of-Words) 词频统计 进行 fit + transform
from sklearn import feature_extraction, linear_model, model_selection, preprocessing# CountVectorizer() 词袋模型 fit+transform
count_vectorizer = feature_extraction.text.CountVectorizer()
train_vectors = count_vectorizer.fit_transform(train_df["text"])
test_vectors = count_vectorizer.transform(test_df["text"])
岭分类器 (Ridge Classifier) 进行对 train 向量 fit ; 对 test 向量 predict 并保存结果
# 岭分类器 拟合+预测
clf = linear_model.RidgeClassifier(solver='lsqr')
clf.fit(train_vectors, train_df["target"])sample_submission = pd.read_csv("/kaggle/input/nlp-getting-started/sample_submission.csv")
sample_submission["target"] = clf.predict(test_vectors)
sample_submission.to_csv("submission.csv", index=False)
优化一 text清洗:删除无效符号
文本清理函数:移除URL + HTML标签 + 表情符号 + 标点符号
import re
import stringdef clean_text(text):if not isinstance(text, str):return text# 1. 移除URLurl_pattern = re.compile(r'https?://\S+|www\.\S+')text = url_pattern.sub(r'', text)# 2. 移除HTML标签html_pattern = re.compile(r'<.*?>')text = html_pattern.sub(r'', text)# 3. 移除表情符号emoji_pattern = re.compile("["u"\U0001F600-\U0001F64F"  # emoticonsu"\U0001F300-\U0001F5FF"  # symbols & pictographsu"\U0001F680-\U0001F6FF"  # transport & map symbolsu"\U0001F1E0-\U0001F1FF"  # flags (iOS)u"\U00002702-\U000027B0"u"\U000024C2-\U0001F251""]+", flags=re.UNICODE)text = emoji_pattern.sub(r'', text)# 4. 移除标点符号table = str.maketrans('', '', string.punctuation)text = text.translate(table)return textdf['text'] = df['text'].apply(lambda x: clean_text(x))
进行数据导入和预处理text之后 还可以有以下3种进阶处理方式。
1. TF-IDF编码 + 预处理 + 三种分类模型
Disaster Tweets-tfidf | Kaggle
1.1 TF-IDF向量化
# TF-IDF向量化(带参数调优)
from sklearn.feature_extraction.text import TfidfVectorizer
tfidf_vectorizer = TfidfVectorizer(max_features=10000,ngram_range=(1, 2),  # 包含unigram和bigramstop_words='english',min_df=2,max_df=0.8
)train_vectors = tfidf_vectorizer.fit_transform(train_df['cleaned_text'])
test_vectors = tfidf_vectorizer.transform(test_df['cleaned_text'])
1.2 三种分类模型比较
转化后的向量 用三种模型分类(逻辑回归 支持向量机 随机森林)
from sklearn.linear_model import LogisticRegression
from sklearn.svm import LinearSVC
from sklearn.ensemble import RandomForestClassifier# 1. Logistic Regression(逻辑回归)
print("训练Logistic Regression...")
lr_clf = LogisticRegression(C=1.0,solver='liblinear',random_state=42,max_iter=1000
)
lr_clf.fit(train_vectors, train_df["target"])# 2. Linear SVC(支持向量机)
print("训练Linear SVC...")
svc_clf = LinearSVC(C=0.5,random_state=42,max_iter=1000
)
svc_clf.fit(train_vectors, train_df["target"])# 3. 随机森林(适合集成学习)
print("训练Random Forest...")
rf_clf = RandomForestClassifier(n_estimators=100,max_depth=20,random_state=42,n_jobs=-1
)
rf_clf.fit(train_vectors, train_df["target"])
1.3 交叉验证评估分数
交叉验证比较模型F1分数
from sklearn.model_selection import cross_val_score
from sklearn.metrics import accuracy_score# 交叉验证评估
print("\n模型交叉验证得分:")
models = {'LogisticRegression': lr_clf,'LinearSVC': svc_clf,'RandomForest': rf_clf
}for name, model in models.items():scores = cross_val_score(model, train_vectors, train_df["target"], cv=5, scoring='f1')print(f"{name}: F1得分 = {scores.mean():.4f} (±{scores.std():.4f})")
LinearSVC 支持向量机分数最高,用它预测最后结果
sample_submission = pd.read_csv("/kaggle/input/nlp-getting-started/sample_submission.csv")
sample_submission["target"] = svc_clf.predict(test_vectors) # 使用svc
sample_submission.to_csv("submission.csv", index=False)
2. GloVe+双头LSTM
Disaster Tweets GloVe+Bidirectional LSTM | Kaggle
2.1 text所有单词->词库corpus
对每条tweet进行分词处理word_tokenize(tweet) ; 转换为小写word.lower();
将处理后的单词列表添加到词库corpus中
from tqdm import tqdm
from nltk.tokenize import word_tokenize
corpus=[]
for tweet in tqdm(df['text']):words=[word.lower() for word in word_tokenize(tweet)]corpus.append(words)
2.2 用GloVe 构建embedding_dict 词->向量 字典
embedding_dict={} # 字典
with open('/kaggle/input/glove-global-vectors-for-word-representation/glove.6B.100d.txt','r') as f:for line in f:values=line.split()word = values[0] # 词vectors=np.asarray(values[1:],'float32') # 向量embedding_dict[word]=vectors
f.close()
2.3 text -> 数值序列
Tokenizer()根据词库corpus构建词汇表;
将文本转换为数值序列 并填充为相同的长度tweet_pad
from tensorflow.keras.preprocessing.text import Tokenizer
from tensorflow.keras.preprocessing.sequence import pad_sequencesMAX_LEN = 50
tokenizer_obj = Tokenizer()
tokenizer_obj.fit_on_texts(corpus)
sequences = tokenizer_obj.texts_to_sequences(corpus)tweet_pad = pad_sequences(sequences, maxlen=MAX_LEN, truncating='post', padding='post')
tweet_pad[0][0:] # 第一句话示例
2.4 embedding_matrix 数值->向量 准备词嵌入层
word_index 为词汇表中 词->数值 的映射;embedding_dict 为 词->向量
结合得embedding_matrix 数值->向量的映射,作为后续深度学习的词嵌入层
word_index=tokenizer_obj.word_index
num_words=len(word_index)+1 # 词汇表词个数
embedding_matrix=np.zeros((num_words,100)) # 每个词 长度为100的向量for word,i in tqdm(word_index.items()):if i < num_words:emb_vec=embedding_dict.get(word)if emb_vec is not None: # 在GloVe中有对应向量 就填入embedding_matrix[i]=emb_vec
2.5 双向LSTM文本分类模型
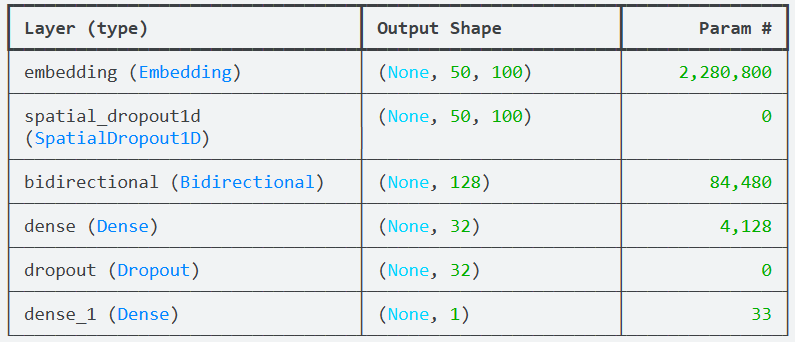
Embedding + Dropout + Bidirectional LSTM + Dense Layer + Output Layer
from tensorflow.keras.models import Sequential
from tensorflow.keras.layers import Embedding, LSTM, Dense, SpatialDropout1D, Bidirectional, Dropout
from tensorflow.keras.initializers import Constant
from tensorflow.keras.optimizers import Adam
from tensorflow.keras.regularizers import l2model = Sequential()# 嵌入层 利用之前的embedding_matrix
embedding = Embedding(num_words, 100,embeddings_initializer=Constant(embedding_matrix),trainable=False  # 保持预训练词向量不变
)
model.add(embedding)# 空间dropout
model.add(SpatialDropout1D(0.3))# 双向LSTM
model.add(Bidirectional(LSTM(64,dropout=0.3, recurrent_dropout=0.3,return_sequences=False  # 只返回最后输出
)))# 添加全连接层
model.add(Dense(32, activation='relu', kernel_regularizer=l2(0.001)))
model.add(Dropout(0.5))# 输出层
model.add(Dense(1, activation='sigmoid'))# 优化器
optimizer = Adam(learning_rate=1e-4,  # 降低学习率beta_1=0.9,beta_2=0.999,epsilon=1e-7
)# 编译模型
model.compile(loss='binary_crossentropy',optimizer=optimizer,metrics=['accuracy', 'precision', 'recall']
)model.build(input_shape=(None, MAX_LEN))
model.summary()
2.6 划分训练数据+训练
from sklearn.model_selection import train_test_split
train=tweet_pad[:tweet.shape[0]]
test=tweet_pad[tweet.shape[0]:]
X_train,X_test,y_train,y_test=train_test_split(train,tweet['target'].values,test_size=0.2)
print('Shape of train',X_train.shape)
print("Shape of Validation ",X_test.shape)
history=model.fit(X_train,y_train,batch_size=4,epochs=15,validation_data=(X_test,y_test),verbose=2)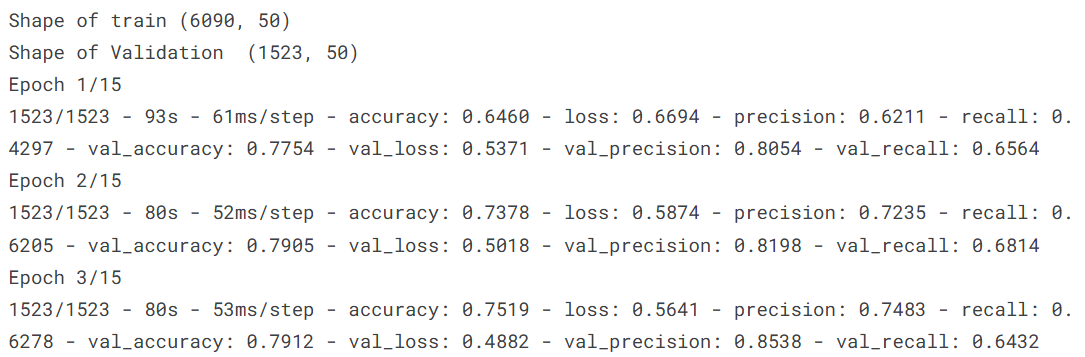
预测+提交
pred_GloVe = model.predict(test)
sample_submission = pd.read_csv("/kaggle/input/nlp-getting-started/sample_submission.csv")
sample_submission["target"] = pred_GloVe.round().astype('int')  # 使用LSTM预测结果
sample_submission.to_csv("submission.csv", index=False)
3. BERT编码 + 训练微调
Disaster NLP: Keras BERT using TFHub | Kaggle BERT using TFHub
需要先构造 文本-> BERT格式-> 模型结构
(原kaggle代码 使用的那个网页的tokenizer现在停止服务了 仅学习思路)
3.1 文本编码函数
把一批文本转成 BERT 输入格式:
-
input_ids:单词对应的词表ID。 -
input_mask:是否是padding。 有效位置为1,padding为0。 -
segment_ids:句子编号(这里只有一个句子,所以全0)。
句子前后分别补上 [CLS]和[SEP] ;统一长度为max_len 缺失部分padding补0
def bert_encode(texts, tokenizer, max_len=512):all_tokens = []all_masks = []all_segments = []for text in texts:text = tokenizer.tokenize(text) # 分词text = text[:max_len-2] # 截断,留出[CLS]和[SEP]位置input_sequence = ["[CLS]"] + text + ["[SEP]"] # 加上特殊符号pad_len = max_len - len(input_sequence)tokens = tokenizer.convert_tokens_to_ids(input_sequence) # 转换成词表IDtokens += [0] * pad_len # paddingpad_masks = [1] * len(input_sequence) + [0] * pad_len # mask:真实token=1, pad=0segment_ids = [0] * max_len # 句子分段标记(单句子任务全0)all_tokens.append(tokens)all_masks.append(pad_masks)all_segments.append(segment_ids)return np.array(all_tokens), np.array(all_masks), np.array(all_segments)
3.2 模型构建函数
模型接受了bert_encode 形式的三个输入之后;送到bert_layer 得到sequence_outout
第0个token 为原始的[CLS]向量 被用作句子级别特征,并给sigmoid + binary_crossentropy 进行二分类
def build_model(bert_layer, max_len=512):# 1) 三个输入:token id, attention mask, token type ids(segment ids)input_word_ids = Input(shape=(max_len,), dtype=tf.int32, name="input_word_ids")input_mask = Input(shape=(max_len,), dtype=tf.int32, name="input_mask")segment_ids = Input(shape=(max_len,), dtype=tf.int32, name="segment_ids")# 2) 把这三个输入送入 BERT 层,得到 BERT 的输出# 通常 bert_layer(...) 返回 (pooled_output, sequence_output)# pooled_output: shape (batch, hidden_size) — [CLS] 的一个投影(有时经过 dense + tanh)# sequence_output: shape (batch, seq_len, hidden_size) — 每个 token 的最后一层隐藏向量_, sequence_output = bert_layer([input_word_ids, input_mask, segment_ids])# 3) 取 sequence_output 的第 0 个 token(对应 [CLS])作为句子级别表示# clf_output shape -> (batch_size, hidden_size)clf_output = sequence_output[:, 0, :] # 取[CLS]向量# 4) 在 [CLS] 向量上接一个全连接单元,输出一个值并通过 sigmoid -> 概率(用于二分类)out = Dense(1, activation='sigmoid')(clf_output) # 二分类# 5) 把输入和输出组装成 Keras Model,并编译model = Model(inputs=[input_word_ids, input_mask, segment_ids], outputs=out)model.compile(Adam(lr=1e-5), loss='binary_crossentropy', metrics=['accuracy'])return model3.3 加载预训练数据
BERT参数;分词器加载;训练测试数据加载
# BERT参数 并允许训练微调
module_url = "https://tfhub.dev/tensorflow/bert_en_uncased_L-24_H-1024_A-16/1"
bert_layer = hub.KerasLayer(module_url, trainable=True)# 从BERT层拿到词表和是否转换为小写。初始化分词器。
vocab_file = bert_layer.resolved_object.vocab_file.asset_path.numpy() # 词表
do_lower_case = bert_layer.resolved_object.do_lower_case.numpy() # 是否转换为小写
tokenizer = tokenization.FullTokenizer(vocab_file, do_lower_case) # 分词器# 加载训练和测试数据;输入进行encode
train = pd.read_csv("/kaggle/input/nlp-getting-started/train.csv")
test = pd.read_csv("/kaggle/input/nlp-getting-started/test.csv")
submission = pd.read_csv("/kaggle/input/nlp-getting-started/sample_submission.csv")
train_input = bert_encode(train.text.values, tokenizer, max_len=160)
test_input = bert_encode(test.text.values, tokenizer, max_len=160)
train_labels = train.target.values
3.4 模型训练
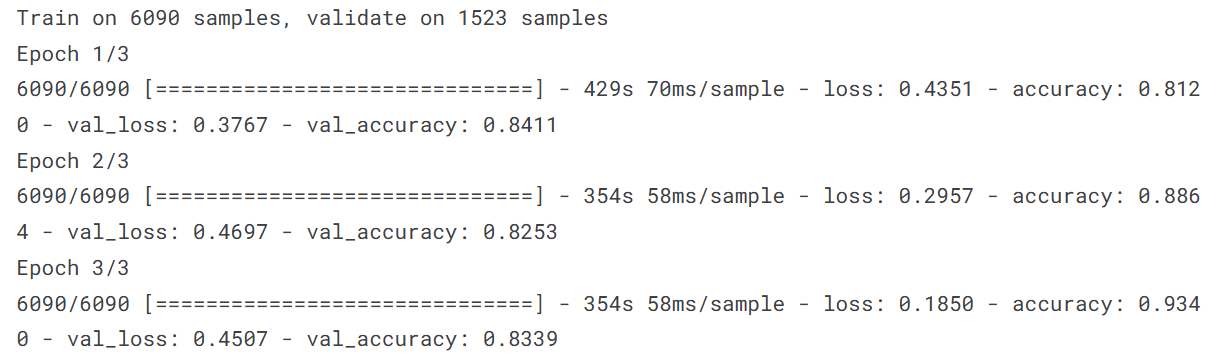
model = build_model(bert_layer, max_len=160)checkpoint = ModelCheckpoint('model.h5', monitor='val_loss', save_best_only=True)train_history = model.fit(train_input, train_labels,validation_split=0.2,epochs=3,callbacks=[checkpoint],batch_size=16
)
3.5 加载参数 预测0-1 & 提交
model.load_weights('model.h5')
test_pred = model.predict(test_input)
submission['target'] = test_pred.round().astype(int)
submission.to_csv('submission.csv', index=False)