自由学习记录(87)
High-level shader language (HLSL) - Win32 apps | Microsoft Learn
Where to go next
- Programming guide for HLSL
- Reference for HLSL
https://docs.unity3d.com/2021.3/Documentation/Manual/SL-ShaderPrograms.html
URP 里 LightMode 的取值确实是一小撮被管线识别的固定集合,管线只会在相应阶段挑这些值的 Pass 来执行。 Unity Documentation
官方文档把这些值写死在列表里(如 UniversalForward、UniversalGBuffer、UniversalForwardOnly、DepthOnly、DepthNormalsOnly、ShadowCaster、Meta、Universal2D 等),并明确“如果不写 LightMode,URP 会把它当作 SRPDefaultUnlit”。 Unity Documentation+1
这意味着在 URP 下你不能像随意起名字那样让任意 Pass 自动被 DrawRenderers 使用,而是必须用这些受支持的标签来让它参与对应阶段。 Unity Documentation
但“内置管线里你随便写一个 Pass 它都会执行”并不准确:内置(Built-in)同样靠 LightMode 预定义值来决定哪些 Pass 会被在哪个渲染路径里用(例如 ForwardBase、ForwardAdd、Deferred、ShadowCaster 等)。 Unity User Manual
在 Built-in 的前向渲染里,ForwardBase 负责主光/环境等,每一盏逐像素附加灯都会额外触发一次 ForwardAdd Pass(也就是“一灯一 Pass”的多次绘制)。 Unity Documentation+1
换句话说,Built-in 也不是“写了就都跑”,而是识别特定 LightMode 的 Pass并按渲染路径规则调用;不匹配的 Pass 不会被这条流水线自动使用。 Unity User Manual
URP 的 LightMode 是在控制 Pass 数量
这句话可以这样更精确地理解:URP 用有限的 LightMode 值来控制“哪些类别的 Pass 会被管线在特定阶段挑出来执行”,从而间接限制了“对象随渲染自动执行的 Pass 种类/数量”。 Unity Documentation
如果同一个着色器既要在 URP 的前向也要在延迟里渲染,你需要各写一个对应标签的 Pass(例如 UniversalForward + UniversalGBuffer),URP 文档明确了这种“双写”的做法而不是让你随便加任意命名的 Pass。 Unity Documentation
另外,很多实践资料也提醒:URP 只会使用第一个 UniversalForward Pass 来做受光渲染,想叠更多效果应改走其它机制(例如额外 Renderer Feature 或把多 Pass 拆材质),否则还会破坏 SRP Batcher 兼容。
当你确实需要“多一步”而 URP 的受支持 LightMode 又不覆盖时,正确方式是通过 Scriptable Renderer Feature/Render Pass 把自定义全屏或筛选绘制插到帧图里,而不是在同一个对象着色器里随意添加未被识别的 Pass。 Unity Documentation
Unity 在 URP 手册里给了两条官方路径:写一个 ScriptableRenderPass 并用 ScriptableRendererFeature 注入,或订阅 RenderPipelineManager 事件并用 EnqueuePass 注入,这两者都会把你的自定义步骤插入到正确时机执行。 Unity User ManualUnity Documentation
结论:URP 的 LightMode 是有限集合并用于选择/限定会被自动执行的对象 Pass;Built-in 也靠 LightMode 管理 Pass,只是它的前向路径允许通过 ForwardAdd “一灯一 Pass”地拓展次数,看起来更“多 Pass”。 Unity Documentation+1
要在 URP 里“多做一步”,用Renderer Feature + 自定义 Render Pass插入,而不是靠未被识别的 LightMode 或随意命名的 Pass。 Unity Documentation
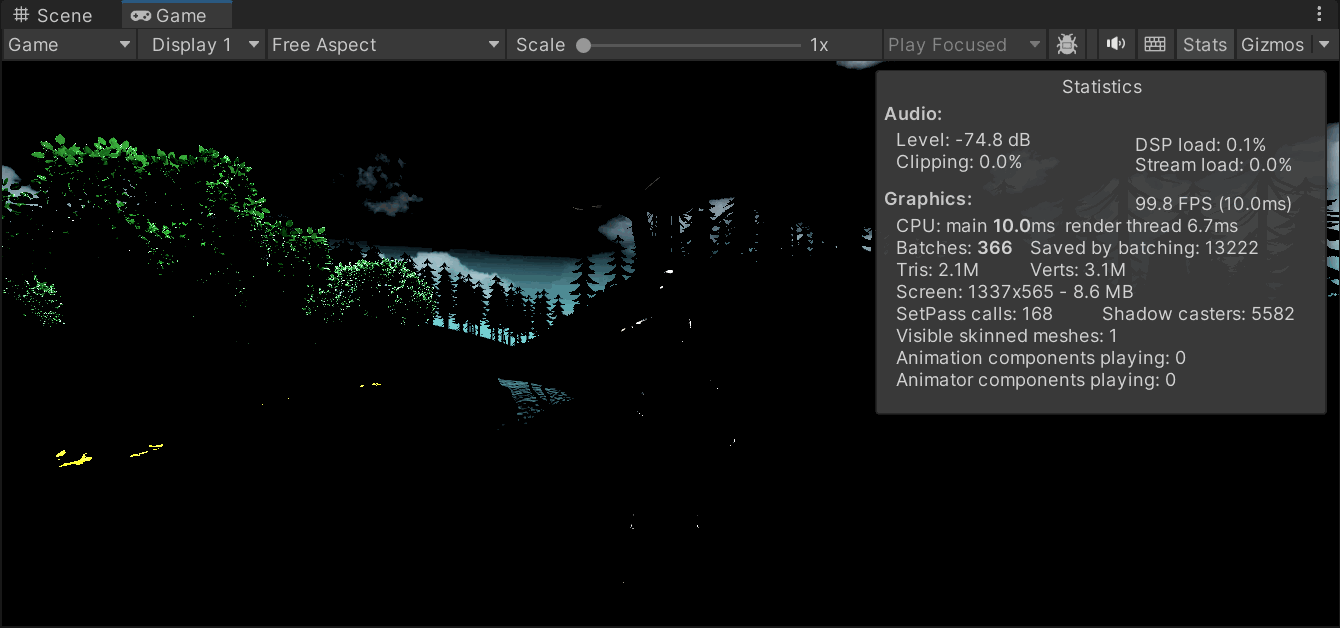
SetPass call 是什么:它统计的是**一帧里 Unity 切换“要用的着色器 Pass”**的次数
Draw call 是什么:它是向 GPU 提交一次绘制命令(画一批几何体)的计数,Unity 在渲染物体时就会产生 draw calls(包括非批处理与动态/静态批处理的批次)
Unity 把“批次(Batches)”作为 draw calls 的统计口径,并在渲染分析中同时显示 Batches 与 SetPass Calls 两个指标。 Unity Documentation
两者的关系:一次 SetPass 之后可以发出多次 draw calls(多个批次),尤其当多个物体共享同一材质/Pass 并被批处理到一起时。 Unity Documentation+1
同一个物体也可能触发多次 SetPass,比如材质/着色器包含多个 Pass(多通道渲染、阴影/法线/前向加成等),每个被用到的 Pass 都会计一次 SetPass。 Unity Documentation
常常更关心 SetPass:SetPass 代表GPU 绑定/状态切换的成本;SRP Batcher 的目的就是把“Bind+Draw”的序列成批提交,减少 draw 之间的 GPU 设置开销,从而显著降低 SetPass 相关的 CPU/GPU 开销。 Unity Documentation
material.SetFloat("_LuminanceThreshold", luminanceThreshold);int rtW = src.width / downSample;//降sampleint rtH = src.height / downSample;RenderTexture buffer0 = RenderTexture.GetTemporary(rtW, rtH, 0);buffer0.filterMode = FilterMode.Bilinear;Graphics.Blit(src, dest, material, 0);shader侧
v2f vertExtractBright(appdata_img v){v2f o;o.pos = UnityObjectToClipPos(v.vertex);o.uv = v.texcoord;return o;}fixed luminance(fixed4 color){return 0.2125 * color.r + 0.7154 * color.g + 0.0721 * color.b;}fixed4 fragExtractBright(v2f i) : SV_Target{fixed4 c = tex2D(_MainTex, i.uv);fixed val = clamp(luminance(c) - _LuminanceThreshold, 0.0, 1.0);return c * val;}第一次frag之后,用高斯模糊的竖直水平算子高斯核遍历buffer0,对非黑的区域进行遍历
而做法是把最后iteration后的图再当做一张tex传给最后的combinepass
直接add到原图src上
//重复的使用高斯kernel,是cs里面做的for (int i = 0; i < iterations; i++){material.SetFloat("_BlurSize", 1.0f + i * blurSpread);RenderTexture buffer1 = RenderTexture.GetTemporary(rtW, rtH, 0);// Render the vertical passGraphics.Blit(buffer0, buffer1, material, 1);RenderTexture.ReleaseTemporary(buffer0);buffer0 = buffer1;buffer1 = RenderTexture.GetTemporary(rtW, rtH, 0);// Render the horizontal passGraphics.Blit(buffer0, buffer1, material, 2);RenderTexture.ReleaseTemporary(buffer0);buffer0 = buffer1;}material.SetTexture("_Bloom", buffer0);按位或赋值运算符 |=,意思是“把右边这个标志位并入左边已有的标志位”,等价于:
GetComponent<Camera>().depthTextureMode =GetComponent<Camera>().depthTextureMode | DepthTextureMode.Depth;
也就是 a |= b 等价于 a = a | b,| 是按位或运算。Microsoft Learn+1Stack Overflow
为什么要用 |= 而不是普通的 =?因为 Camera.depthTextureMode 是个“可组合的标志枚举(flags enum)”,可以同时打开多个模式,比如 Depth、DepthNormals、MotionVectors;用 |= 可以在不覆盖已有模式的情况下再“加一项”。用普通 = 会把之前设置的标志全部改没,只留下你赋的那个。
struct v2fBloom{float4 pos : SV_POSITION;half4 uv : TEXCOORD0;};v2fBloom vertBloom(appdata_img v){v2fBloom o;o.pos = UnityObjectToClipPos(v.vertex);o.uv.xy = v.texcoord;o.uv.zw = v.texcoord;#if UNITY_UV_STARTS_AT_TOPif (_MainTex_TexelSize.y < 0.0)o.uv.w = 1.0 - o.uv.w;#endifreturn o;}fixed4 fragBloom(v2fBloom i) : SV_Target{return tex2D(_MainTex, i.uv.xy) + tex2D(_Bloom, i.uv.zw);}-
添加一个标志(保留已有)
cam.depthTextureMode |= DepthTextureMode.Depth; // 只“加”Depth位这是设置标志位的常见用法。Stack Overflow
-
一次添加多个标志
cam.depthTextureMode |= DepthTextureMode.Depth | DepthTextureMode.DepthNormals;枚举的这些位可以合并使用。Unity Documentation
-
移除一个标志(清除某位)
cam.depthTextureMode &= ~DepthTextureMode.Depth; // 与上取反,清掉Depth位清位的惯用法是
&= ~FLAG。Stack Overflow -
完全覆盖(不保留旧值)
cam.depthTextureMode = DepthTextureMode.Depth; // 覆盖,只留Depth这会丢弃之前可能开启的其它位(比如 DepthNormals/MotionVectors)。可用,但含义不同。Unity Documentation
另外,开启相机的深度纹理是有性能代价的,官方文档也专门提醒“生成深度纹理会产生开销”,所以只在需要的效果里启用。Unity Documentation
参考:Unity 的 DepthTextureMode/Camera.depthTextureMode 文档(说明这是可组合的标志枚举),以及 C# 对 |/|= 和按位操作的定义与枚举标志位的惯用法。
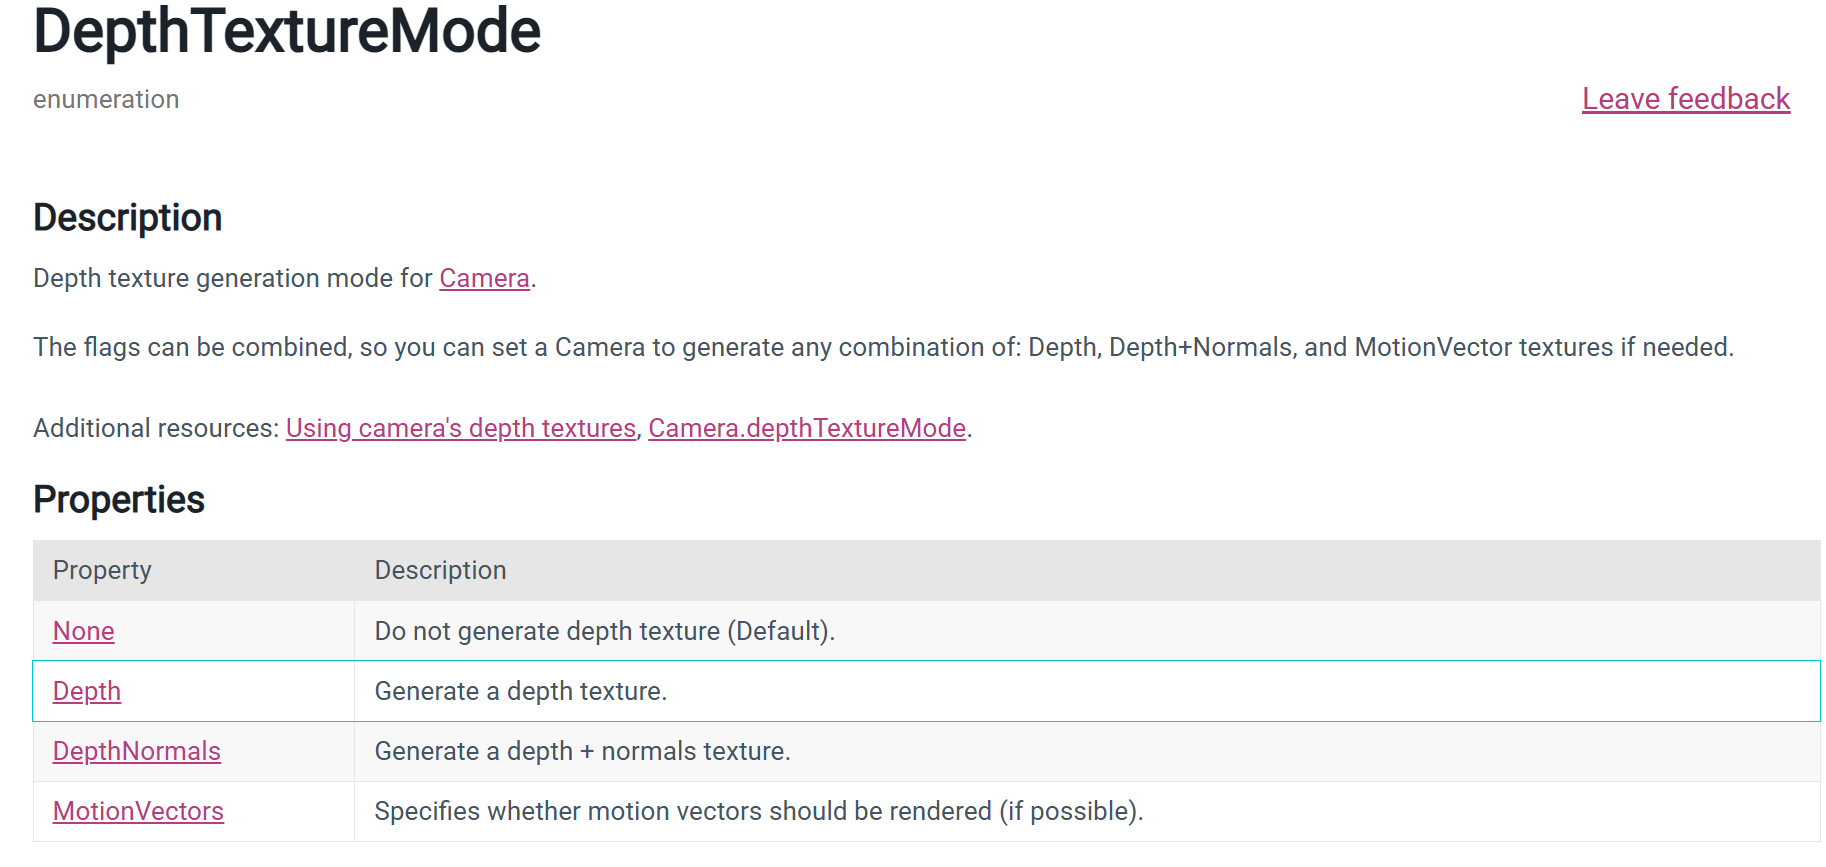
combine意思是一次可以生成四张种类的图是吗,那normal+depth这个模式意思是说由法线算出的深度图,而不是法线和深度图各一张?
DepthNormals 不是“由法线推导出的深度图”。它表示 Unity 生成一张 同时包含深度与视空间法线 的屏幕纹理,并把它作为全局纹理 _CameraDepthNormalsTexture 提供给着色器。Unity Documentation
如果你同时把 Depth 和 DepthNormals 两个标志都打开,Unity 会同时提供 _CameraDepthTexture(只含深度,编码方式不同)和 _CameraDepthNormalsTexture(一张里同时含深度+法线)两张全局纹理——这样做是允许的,也是“可组合”的字面含义。Unity Documentation
补充(URP 情况):在 URP 中是否生成深度纹理由 URP Renderer/Asset 的“Depth Texture”开关控制,生成的名字为 _CameraDepthTexture;无需通过 Camera.depthTextureMode = Depth。Unity Documentation
而“法线纹理”在 URP 10+ 由一个叫 DepthNormals Pass 的阶段按需生成,名字是 _CameraNormalsTexture;如果你的自定义 RenderPass 需要它,可在 ConfigureInput(ScriptableRenderPassInput.Normal) 里声明依赖,URP 就会创建这张纹理。Unity Documentation+1cyanilux.com
Game 视图里的 “Display 1…8” 下拉框不是直接“选用哪台相机”,而是选择预览“哪块显示器(Display)”。 你要先在每台相机的 Target Display 上把它分配到某个 Display;Game 视图再切到对应的 Display 来看。Unity Documentation
全局雾效配上噪声,冯书里的做法觉得有一点不好,就是雾是随着视角变化,而不是在场景里像物体一样的自然 的变化
但这实现的了吗,还是会挺复杂的
你之所以“轻易就采到那张图”,是因为引擎在前面已经做了工作(并付出了代价):要么跑了一个深度/法线预通道,要么做了深度拷贝,并把结果作为全局贴图提供给后续的 shader。Deferred 的存在价值在于它为“多灯、多材质属性”的逐像素光照提供了可扩展的计算与存储方式,这和“只有一张 depth+normals”完全不是一个量级的能力范畴,因此并不会被“随手就能采样一张图”所取代。
“能采到一张深度+法线图” 和 “用它把整场景的光照都算完”。
你的直觉里有两件事混在了一起:“能采到一张深度+法线图” 和 “用它把整场景的光照都算完”。前者确实很方便,但后者基本不可行/不经济。
为什么它不能取代“写一堆 shader 做光照”
-
信息严重不够
做 PBR 逐像素光照至少还需要 Albedo/Metallic/Smoothness/Specular/Emission 等材质参数;这些都不在 Depth+Normals 里。真正的 Deferred Shading 会把这些属性写进 G-buffer(多张 RT),之后再在屏幕空间算光。Unity Documentation+1 -
只能看见“屏幕上可见的表面”(典型的屏幕空间局限)
屏幕空间算法只处理当前可见像素:看不见屏幕外/被遮挡的几何,因此很多全局效果(遮蔽、反射、间接光、阴影)都会缺信息、出边缘伪影或不稳定。Unity DocumentationWikipediaLearnOpenGL -
透明物体、体积、次表面等都不在这张图里
这张图主要覆盖不透明几何;而延迟/屏幕空间技术本身就很难优雅处理透明(只能前向单独再算)。3D Game Engine Programming -
生成它本身就有成本
生成深度/法线通常要跑预通道或拷贝,带来带宽/内存与额外 Pass 的开销;URP 也只在确实有人用到时才去生成。它不是“零成本随时可取”。RedditUnity Documentation
“那我用它在屏幕空间把灯全算了不就行?”——这其实叫 Light Pre-Pass(Deferred Lighting)
-
经典做法是 3 个阶段:① 几何写 深度+法线(+镜面幂);② 按灯体积在屏幕空间累加“光照缓冲”;③ 再第二次画几何,用材质 Albedo/Metallic… 去采光照缓冲合成最终颜色。听起来像你设想的方案,但它仍需要再画一次几何,并不比正常的 Deferred Shading 更“省很多”。Gamedev Coder Diary
-
Unity 也把 Deferred Lighting(Light Pre-Pass) 标为“Legacy”(Unity 5 起弃用),推荐直接用 Deferred Shading;原因之一就是需要两次几何遍历且特性受限。Unity Documentation
什么时候该用这张图、什么时候不该
-
合适:屏幕空间类后效(SSAO/边缘检测/景深/雾等),它们只需要几何关系(深度+法线),不需要完整材质。URP 的 SSAO 就是用 DepthNormals。Unity Documentation
-
不合适:想“用一张 Depth+Normals 就完成全场景光照”。完整光照要么前向/前向+(直接在物体 shader 里用材质参数算),要么延迟(把材质多属性写入 G-buffer,再统一算灯)。这两类各有适用面,并不是被一张图替代的关系。LearnOpenGLUnity Documentation
-
R、G 通道:存的是视空间法线(view-space normals),采用特殊编码(Unity 文档早期明确为 stereographic projection)。Unity Documentation+1
-
B、A 通道:存的是深度,把一个 16-bit 深度值打包到两个 8-bit 通道里。Unity Documentation
-
Unity 在
UnityCG.cginc里提供了解码函数DecodeDepthNormal,可一次从该纹理像素里取回“0..1 的深度”和“视空间法线”。Unity Documentation
-
Built-in(内置管线)— 替换着色器/第二台相机:
用 Camera.SetReplacementShader 或一台只渲染指定 Layer 的相机,将目标物体画到一张 RT(纯色遮罩);随后在图像效果里用这张 RT 做描边并回贴。替换着色器与相机文档均支持该工作流。Unity Documentation+1 -
Stencil(模板缓冲)变体:
也可让目标物体在其材质 Pass 写入 Stencil,然后全屏描边 Pass 通过 Stencil Test 只在这些像素处运行。注意:Stencil 不能像普通纹理那样采样/膨胀,若你要做“向外扩一圈”的描边,通常还是用可采样的 Mask RT更灵活。Unity Documentation+1
-
给人物写模板(Mask)
用人物材质的额外 Pass(或用 Render Objects 覆盖材质)在不改颜色的情况下写入模板值,如Ref=1 / Pass Replace;设置ColorMask 0、ZWrite Off以免影响画面。这样人物覆盖到的屏幕像素,模板里就被标记为 1。Unity Documentation+1 -
在全屏后处理里按模板测试
你的全屏描边材质里加Stencil { Ref 1 Comp Equal Pass Keep },这样只有模板==1 的像素才会执行/写出效果,其它像素直接跳过,实现“只描边人物”。把这个全屏 Pass 通过 Full Screen Pass Renderer Feature 注入到合适时机(一般 AfterRenderingTransparents 或 AfterRendering)。Unity Documentation+1 -
保证有可用的深度/模板附件
Stencil 不是纹理,不能采样;它存在于深度/模板附件里(通常 24-bit 深度 + 8-bit 模板)。如果你把相机渲染到自建的 RenderTexture,需创建带 Stencil 的格式,否则后处理阶段做不了模板测试。Unity DocumentationUnity Discussion
不改人物材质,用“替换着色器/额外相机”先把人物写进 Stencil,再在你的全屏后处理里 Stencil{Ref 1 Comp Equal} 只处理这些像素。Unity Documentation+1Unity User Manual
URP:项目里不建议继续用 Standard(URP 会把它映射到 Lit),通常做法是用 Render Objects Renderer Feature 给“人物层”覆写一个只写 Stencil、ColorMask 0 的材质,然后照样在全屏后效里按模板测试。
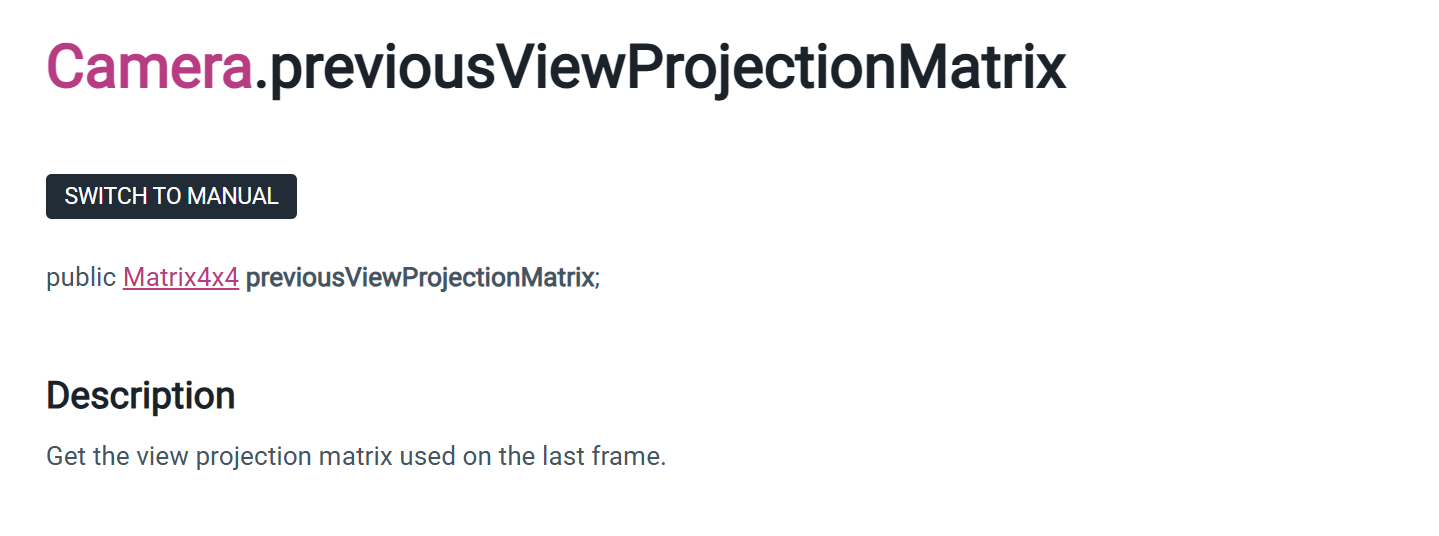
Matrix4x4 currentViewProjectionMatrix = camera.projectionMatrix * camera.worldToCameraMatrix;
var VP = camera.projectionMatrix * camera.worldToCameraMatrix;
视图矩阵 V(world→camera)和投影矩阵 P(camera→clip)合成成视投矩阵 VP(world→clip):顶点只要乘一次 VP 就能直接进裁剪/透视除法阶段了。Unity 把 worldToCameraMatrix 明确叫“view matrix”
顶点进 GPU 的门票:shader 里常见 mul(UNITY_MATRIX_VP, float4(posWS,1))
“clip → 透视除法 → NDC”做完透视除法(除以 w)后就到 NDC,最后 viewport 映射进屏幕坐标。
高级特效都用到 VP/VP⁻¹
VP 的逆矩阵配合深度纹理重建像素的世界坐标(体积雾、SSAO、软粒子等都靠它)
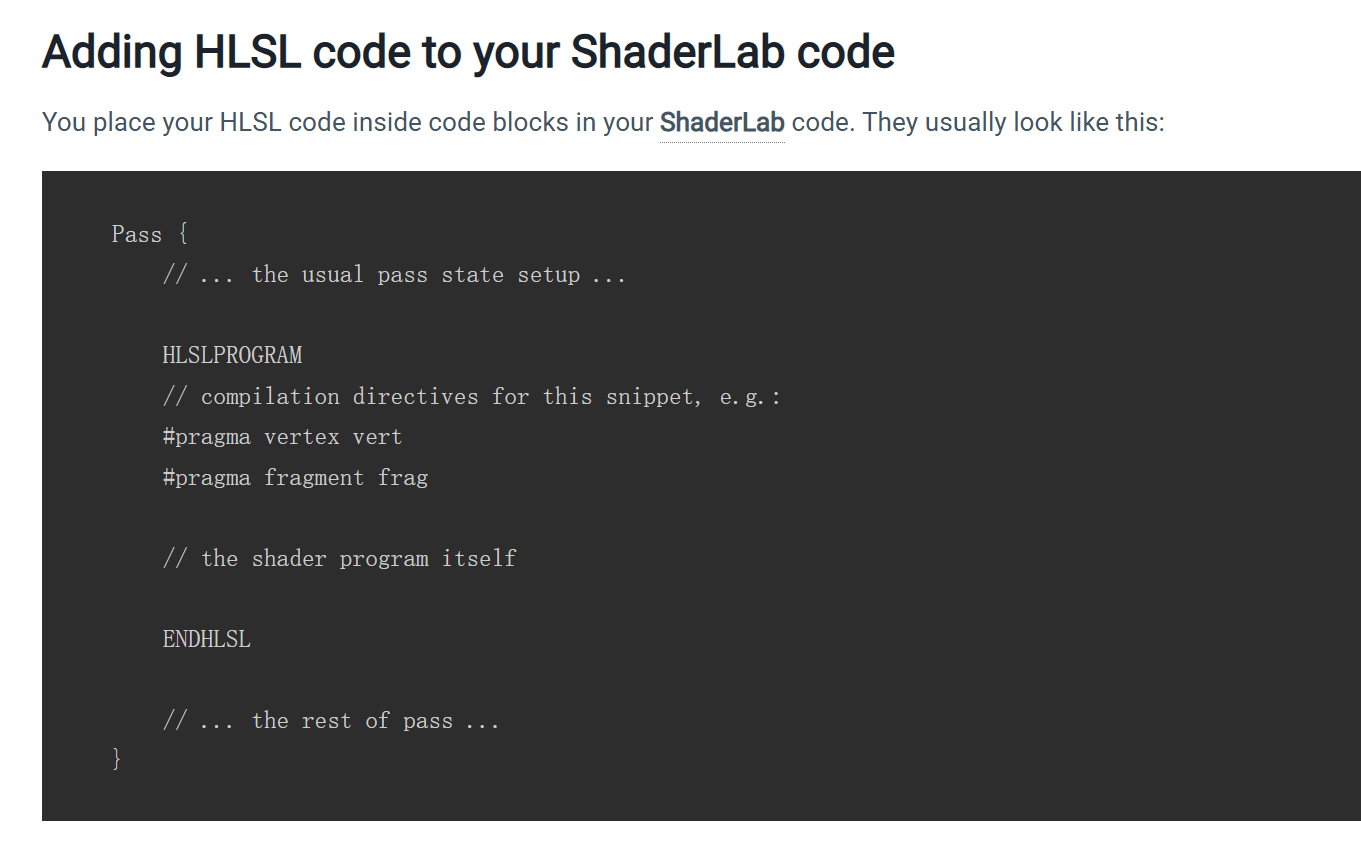
In the HLSLPROGRAM block, add the include declaration for the depth texture shader header. For example, place it under the existing include declaration for Core.hlsl.
#include "Packages/com.unity.render-pipelines.universal/ShaderLibrary/Core.hlsl"// The DeclareDepthTexture.hlsl file contains utilities for sampling the Camera
// depth texture.
#include "Packages/com.unity.render-pipelines.universal/ShaderLibrary/DeclareDepthTexture.hlsl"
The DeclareDepthTexture.hlsl file contains functions for sampling the Camera depth texture. This example uses the SampleSceneDepth function for sampling the Z coordinate for pixels.
In the fragment shader, to calculate the UV coordinates for sampling the depth buffer, divide the pixel location by the render target resolution _ScaledScreenParams. The property _ScaledScreenParams.xy takes into account any scaling of the render target, such as Dynamic Resolution.
float2 UV = IN.positionHCS.xy / _ScaledScreenParams.xy;VP 行/列直接提取视锥平面做剔除(或直接用 Unity 的 API)
上/下一帧 VP能做重投影(TAA、运动矢量、时间滤波)。Unity 甚至直接暴露了 Camera.previousViewProjectionMatrix。Unity Documentation
there are some situations where the Editor cannot do this for you
https://docs.unity3d.com/2018.4/Documentation/Manual/SL-PlatformDifferences.html
Render Texture coordinates
Vertical Texture coordinate conventions differ between two types of platforms: Direct3D-like and OpenGL-like.
- Direct3D-like: The coordinate is 0 at the top and increases downward. This applies to Direct3D, Metal and consoles.
- OpenGL-like: The coordinate is 0 at the bottom and increases upward. This applies to OpenGL and OpenGL ES.
This difference tends not to have any effect on your project, other than when rendering into a Render Texture
. When rendering into a Texture on a Direct3D-like platform, Unity internally flips rendering upside down. This makes the conventions match between platforms, with the OpenGL-like platform convention the standard.
这种差异通常不会对您的项目产生影响,除了在渲染到渲染纹理时。渲染纹理是一种在运行时创建和更新的特殊纹理类型。要使用它们,首先创建一个新的渲染纹理,并将您的相机之一指定为渲染到其中。然后您可以在材质中使用渲染纹理,就像使用常规纹理一样。
Image Effects and rendering in UV space are two common cases in the Shaders where you need to take action to ensure that the different coordinate conventions do not create problems in your project.
图像效果和UV空间中的渲染是着色器中需要采取行动以确保不同坐标约定不会在项目中造成问题的两个常见情况。
If your Image Effect is a simple one that processes one Render Texture at a time, Graphics.Blit deals with the inconsistent coordinates. However, if you’re processing more than one Render Texture together in your Image Effect, the Render Textures are likely to come out at different vertical orientations in Direct3D-like platforms and when you use anti-aliasing. To standardize the coordinates, you need to manually “flip” the screen Texture upside down in your Vertex Shader
// Flip sampling of the Texture:
// The main Texture
// texel size will have negative Y).#if UNITY_UV_STARTS_AT_TOP
if (_MainTex_TexelSize.y < 0)uv.y = 1-uv.y;
#endif
A similar situation occurs with GrabPass. The resulting render Texture might not actually be turned upside down on Direct3D-like (non-OpenGL-like) platforms. If your Shader code samples GrabPass Textures, use the ComputeGrabScreenPos function from the UnityCG include file.
“在 UV 空间下渲染(Rendering in UV space)”指的是:把网格按它的 UV 展开到一张 2D 纹理上进行光栅化,让片元位置直接用 (u,v) 来当作“屏幕坐标”,把结果写进一张贴图(通常是 RenderTexture/烘焙纹理),而不是像平时那样按摄像机的投影视图去渲染到屏幕。换句话说,这是一种贴图空间 / 纹理空间(texture-space)渲染。
-
Microsoft’s HLSL
consthas much the same meaning as it does in C# and C++ in that the variable declared is read-only within its scope but can be initialized in any way. -
Microsoft的HLSL中的const与C#和C++中的含义相似,即声明的变量在其作用域内是只读的,但可以以任何方式初始化。
-
OpenGL’s GLSL
constmeans that the variable is effectively a compile time constant, and so it must be initialized with compile time constraints (either literal values or calculations on otherconsts). -
OpenGL的GLSL中的const表示变量实际上是编译时常量,因此必须使用编译时约束(无论是字面值还是其他const的计算)来初始化。
最好遵循OpenGL的GLSL语义,只有当变量真正不变时才将其声明为const。避免用其他可变值初始化const变量(例如,在函数中的局部变量)。这与不可变相反。只有本地包和嵌入包是可变的。
For example if you use cbuffer or Unity’s constant buffer macro, depending on the constant buffer’s data layout and the graphics API, a float3 might become a float4, or a float might become a float2.
例如,如果你使用cbuffer或Unity的常量缓冲区宏,根据常量缓冲区的数据布局和图形API,float3可能变成float4,或者float可能变成float2。
You can do the following to make sure all graphics APIs compile a buffer with the same data layout:您可以通过以下方法确保所有图形API使用相同的数据布局来编译缓冲区:
- Use
float4andfloat4x4instead offloat3andfloat3x3, becausefloat4variables are the same size on all graphics APIs, whilefloat3variables can become a different size on some graphics APIs. - 使用float4和float4x4代替float3和float3x3,因为float4变量在所有图形API中大小相同,而float3变量在某些图形API中可能会变成不同的大小。
- Declare variables in decreasing size order, for example
float4thenfloat2thenfloat, so all graphics APIs structure the data in the same way. - 声明变量时按大小递减的顺序,例如先声明float4,然后是float2,最后是float,这样所有图形API都以相同的方式结构化数据。
For example:
cbuffer myConstantBuffer { float4x4 matWorld;float4 vObjectPosition; // Uses a float4 instead of a float3float arrayIndex;
}
-----怪不得那里有各种填充的类型,我还觉得可能不需要或者是搞错了才不用的
没想到不同的graphic API才是这个原因,,,,,删了反而不一定好
不过我记得那个时候也有这个疑惑,也搜了,但是回答里没有我想要的答案,,现在才看出来,是当时回答里不精细还是说,,,,,,
我提问有问题?,检索信息的时候没有挑出重要的链接去看
Semantics used by Shaders着色器使用的语义
To get Shaders working on all platforms, some Shader values should use these semantics:
为了使着色器在所有平台上都能工作,一些着色器值应使用以下语义:
-
Vertex Shader output (clip space) position:
SV_POSITION. Sometimes Shaders use POSITION semantics to get Shaders working on all platforms. Note that this does not not work on Sony PS4 or with tessellation. -
顶点着色器输出(裁剪空间)位置:SV_POSITION。有时着色器使用POSITION语义来使着色器在所有平台上工作。注意,这不在索尼PS4上或与细分曲面一起工作。
-
Fragment Shader output color:
SV_Target. Sometimes Shaders useCOLORorCOLOR0to get Shaders working on all platforms. Note that this does not work on Sony PS4. -
片段着色器输出颜色:SV_Target。有时着色器使用COLOR或COLOR0来使着色器在所有平台上工作。注意,这不在索尼PS4上工作。
When rendering Meshes as Points, output PSIZE semantics from the vertex Shader (for example, set it to 1). Some platforms, such as OpenGL ES or Metal, treat point size as “undefined” when it’s not written to from the Shader.
当将网格渲染为点时,从顶点着色器输出PSIZE语义(例如,将其设置为1)。一些平台,如OpenGL ES或Metal,当从着色器未写入时,将点大小视为“未定义”。
High-level shader language (HLSL) - Win32 apps | Microsoft Learn
Shader "Unlit/Show UVs"
{SubShader{Pass{CGPROGRAM#pragma vertex vert#pragma fragment fragstruct v2f {float2 uv : TEXCOORD0;float4 pos : SV_POSITION;};v2f vert (float4 vertex : POSITION, // vertex position inputfloat2 uv : TEXCOORD0 // first texture coordinate input){v2f o;o.pos = UnityObjectToClipPos(vertex);o.uv = uv;return o;}fixed4 frag (v2f i) : SV_Target{return fixed4(i.uv, 0, 0);}ENDCG}}
}
The function frag has a return type of fixed4 (low precision RGBA color). As it only returns a single value, the semantic is indicated on the function itself, : SV_Target.
It is also possible to return a structure with the outputs. The fragment shader above could be rewritten this way too, and it would do exactly the same:
struct fragOutput {fixed4 color : SV_Target;
};
fragOutput frag (v2f i)
{fragOutput o;o.color = fixed4(i.uv, 0, 0);return o;
}
Returning structures from the fragment shader is mostly useful for shaders that don’t just return a single color.
xxxx
Additional semantics supported by the fragment shader outputs are as follows.
SV_TargetN: Multiple render targets
SV_Target1, SV_Target2, etc.: These are additional colors written by the shader. This is used when rendering into more than one render target at once (known as the Multiple Render Targets rendering technique, or MRT). SV_Target0 is the same as SV_Target.
SV_Depth: Pixel shader depth output
Usually the fragment shader does not override the Z buffer value, and a default value is used from the regular triangle rasterization.
However, for some effects it is useful to output custom Z buffer depth values per pixel.
Note that on many GPUs this turns off some depth buffer optimizations, so don’t override Z buffer value without a good reason. The cost incurred by SV_Depth varies depending on the GPU architecture, but overall it’s fairly similar to the cost of alpha testing (using the built-in clip() function in HLSL). need to render shaders that modify depth after all regular opaque shaders. For example, by using the AlphaTest rendering queue.
The depth output value needs to be a single float.
xxxxxx
Vertex shader outputs and fragment shader inputs
A vertex shader needs to output the final clip space position of a vertex, so that the GPU knows where on the screen to rasterize it, and at what depth. This output needs to have the SV_POSITION semantic, and be of a float4 type.
许多现代GPU并不真正关心这些变量的语义是什么;然而,一些旧系统(最值得注意的是,Direct3D 9上的着色器模型2 GPU)确实有一些关于语义的特殊规则:
TEXCOORD0, TEXCOORD1等用于表示任意高精度数据,如纹理坐标和位置。
COLOR0 and COLOR1 semantics on vertex outputs and fragment inputs are for low-precision, 0–1 range data (like simple color values).
COLOR0和COLOR1语义在顶点输出和片段输入中用于表示低精度、0-1范围内的数据(如简单的颜色值)。
For best cross platform support, label vertex outputs and fragment inputs as TEXCOORDn semantics.为了实现最佳跨平台支持,将顶点输出和片段输入标记为TEXCOORDn语义。
Up to 8 interpolators: OpenGL ES 2.0 (Android), Direct3D 11 9.x level (Windows Phone) and Direct3D 9 shader model 2.0 (old PCs). Since the interpolator count is limited, but each interpolator can be a 4-component vector, some shaders pack things together to stay within limits. For example, two texture coordinates can be passed in one float4 variable (.xy for one coordinate, .zw for the second coordinate).
- 最多8个插值器:OpenGL ES 2.0(Android)、Direct3D 11 9.x级别(Windows Phone)和Direct3D 9着色器模型2.0(旧PC)。由于插值器数量有限,但每个插值器可以是一个4分量向量,一些着色器会将事物打包在一起以保持在限制内。例如,两个纹理坐标可以放在一个float4变量中(.xy用于一个坐标,.zw用于第二个坐标)。
Up to 10 interpolators: Direct3D 9 shader model 3.0 (#pragma target 3.0).
- 最多10个插值器:Direct3D 9着色器模型3.0 (#pragma target 3.0)。
Up to 16 interpolators: OpenGL ES 3.0 (Android), Metal (iOS).
- 最多16个插值器:OpenGL ES 3.0(Android)、Metal(iOS)。
Up to 32 interpolators: Direct3D 10 shader model 4.0 (#pragma target 4.0).
- 最多32个插值器:Direct3D 10着色器模型4.0(#pragma target 4.0)。
无论您的特定目标硬件是什么,出于性能考虑,通常使用尽可能少的插值器是个好主意。
Screen space pixel position: VPOS
A fragment shader can receive position of the pixel being rendered as a special VPOS semantic. This feature only exists starting with shader model 3.0, so the shader needs to have the #pragma target 3.0 compilation directive.
片段着色器可以接收正在渲染的像素的位置作为一个特殊的VPOS语义。 此功能仅从着色器模型3.0开始存在,因此着色器需要具有#pragma target 3.0编译指令。
在不同平台上,屏幕空间位置输入的基本类型不同,因此为了最大程度的可移植性,请使用 UNITY_VPOS_TYPE 类型(在大多数平台上将是 float4,在 Direct3D 9 上将是 float2)。
此外,使用像素位置语义使得在同一顶点到片段结构中同时拥有裁剪空间位置(SV_POSITION)和VPOS变得困难。因此,顶点着色器应该将裁剪空间位置作为单独的“out”变量输出。
So the vertex shader should output the clip space position as a separate “out” variable.
Shader "Unlit/Screen Position"
{Properties{_MainTex ("Texture", 2D) = "white" {}}SubShader{Pass{CGPROGRAM#pragma vertex vert#pragma fragment frag#pragma target 3.0// note: no SV_POSITION in this structstruct v2f {float2 uv : TEXCOORD0;};v2f vert (float4 vertex : POSITION, // vertex position inputfloat2 uv : TEXCOORD0, // texture coordinate inputout float4 outpos : SV_POSITION // clip space position output){v2f o;o.uv = uv;outpos = UnityObjectToClipPos(vertex);return o;}sampler2D _MainTex;fixed4 frag (v2f i, UNITY_VPOS_TYPE screenPos : VPOS) : SV_Target{// screenPos.xy will contain pixel integer coordinates.// use them to implement a checkerboard pattern that skips rendering// 4x4 blocks of pixels// checker value will be negative for 4x4 blocks of pixels// in a checkerboard patternscreenPos.xy = floor(screenPos.xy * 0.25) * 0.5;float checker = -frac(screenPos.r + screenPos.g);// clip HLSL instruction stops rendering a pixel if value is negativeclip(checker);// for pixels that were kept, read the texture and output itfixed4 c = tex2D (_MainTex, i.uv);return c;}ENDCG}}
}
都是 HLSL 语义(semantic)
片元函数能“额外加参数”吗?
能,但必须带合法语义:要么是从顶点阶段传来的插值量(例如 TEXCOORDn),要么是系统值语义(system-value),比如:
-
UNITY_VPOS_TYPE screenPos : VPOS→ 获得当前像素的屏幕像素坐标(需要#pragma target 3.0;类型跨平台不同,用UNITY_VPOS_TYPE最稳)
UNITY_VFACE_TYPE face : VFACE/SV_IsFrontFace → 判断正反面渲染。
struct v2f
{ float4 pos:SV_POSITION; float2 uv:TEXCOORD0; };
v2f vert(appdata v)
{ v2f o;
o.pos=UnityObjectToClipPos(v.vertex);
o.uv=v.uv;
return o; }fixed4 frag(v2f i):SV_Target
{ ... }
顶点阶段一定要写出 SV_POSITION;放返回结构或单独 out 都行。
struct v2f
{ float2 uv:TEXCOORD0; };// 不带 SV_POSITIONv2f vert(float4 v:POSITION, float2 uv:TEXCOORD0,out float4 outpos:SV_POSITION)
{ // 单独写出裁剪空间位置
v2f o;
o.uv=uv;
outpos=UnityObjectToClipPos(v);
return o;
}#pragma target 3.0
fixed4 frag(v2f i, UNITY_VPOS_TYPE screenPos:VPOS):SV_Target
{// screenPos.xy 是像素坐标(不同平台类型不同,用 UNITY_VPOS_TYPE)...
}
HLSL 里,每个跨阶段的输入/输出都必须带语义,编译器据此把它们绑定到硬件寄存器/插值器通道;语义说的是“这是什么”,而非“变量名”。因此你可以在片元函数参数列表里声明额外的带语义的参数,例如 TEXCOORDn(自定义插值量)或 VPOS/SV_Position(系统值)。Microsoft LearnStack Overflow