@mcp.tool如何从函数定义映射到llm系统输入
llm是如何获熟mcp tool定义的function函数,比如以下mcp示例的get_whether,又如何决定调用那个mcp function。
这里通过跟踪langchain_ollama、qwen_agent源代码进行分析。
from mcp.server.fastmcp import FastMCPmcp = FastMCP(name="weather",)@mcp.tool()
def get_weather(city: str) -> str:"""获取指定城市的天气信息"""# 简单模拟数据,实际应用中应该调用对应的APIweather_data = {"北京": "晴天,温度 22°C","上海": "多云,温度 25°C", "广州": "小雨,温度 28°C","深圳": "阴天,温度 26°C"}return weather_data.get(city, f"{city} 的天气数据暂不可用")@mcp.resource("resource://cities")
def get_cities():"""返回支持查询天气的城市列表"""cities = ["北京", "上海", "广州", "深圳"]return f"Cities: {', '.join(cities)}"@mcp.resource("resource://{city}/weather")
def get_city_weather(city: str) -> str:return f"Weather for {city}"
1 langchain agent
如下langchain agent代码所示,mcp定义的工具tools,是和模型model一起送入langchain agent,辅助agent响应用户问题。
from mcp import ClientSession, StdioServerParameters
from mcp.client.stdio import stdio_client
from langchain_mcp_adapters.tools import load_mcp_tools
from langgraph.prebuilt import create_react_agent
import asyncioserver_params = StdioServerParameters(command="python", args=["server.py"])
async def run_agent():async with stdio_client(server_params) as (read, write):async with ClientSession(read, write) as session:await session.initialize()tools = await load_mcp_tools(session)agent = create_react_agent(model, tools)agent_response = await agent.ainvoke({"messages": [{"role": "user", "content": "上海天气如何?"},]})
2 langchain_ollama
这里model为ollama,最终调用langchain_ollama,实际为langchain_ollama/chat_models.py定义的ChatOllama(BaseChatModel)。
经过跟踪,tools保存在kwars参数中,最后在_acreate_chat_stream中,通过self._chat_params(messages, stop, **kwargs)将tools参数融合在chat_params,再通过self.async_client直接调用ollama llm。
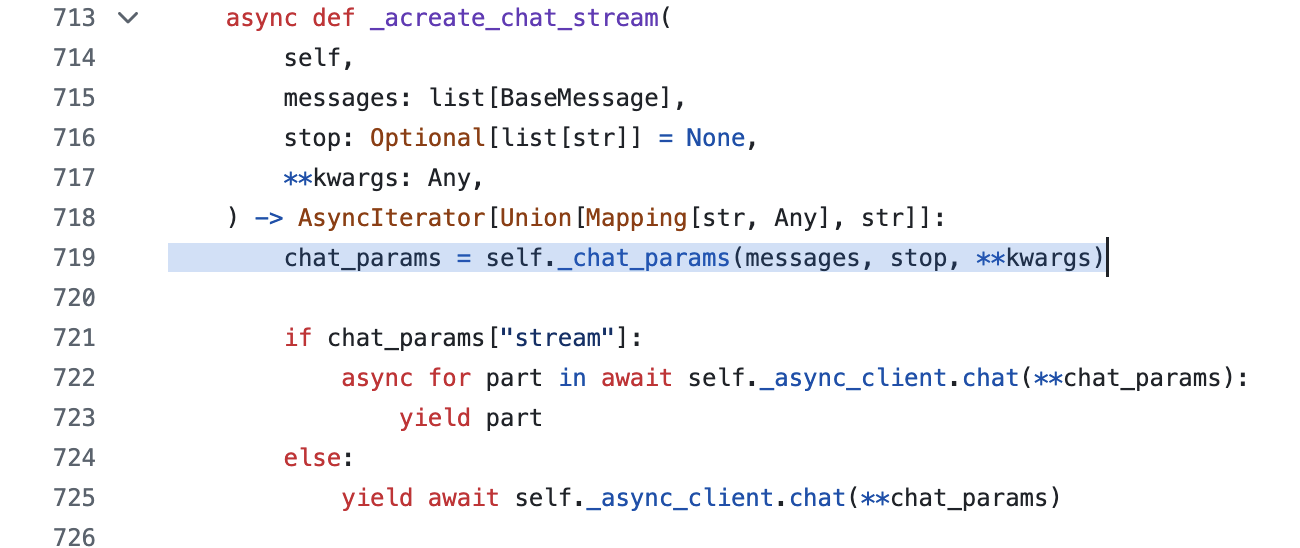
self._chat_params融合tools过程代码如下。
def _chat_params(self,messages: list[BaseMessage],stop: Optional[list[str]] = None,**kwargs: Any,) -> dict[str, Any]:ollama_messages = self._convert_messages_to_ollama_messages(messages)if self.stop is not None and stop is not None:msg = "`stop` found in both the input and default params."raise ValueError(msg).....params = {"messages": ollama_messages,"stream": kwargs.pop("stream", True),"model": kwargs.pop("model", self.model),"think": kwargs.pop("reasoning", self.reasoning),"format": kwargs.pop("format", self.format),"options": Options(**options_dict),"keep_alive": kwargs.pop("keep_alive", self.keep_alive),**kwargs,}if tools := kwargs.get("tools"):params["tools"] = toolsreturn paramshttps://github.com/langchain-ai/langchain/blob/master/libs/partners/ollama/langchain_ollama/chat_models.py
langchain_ollama将messges和tools提交给ollama llm,并没有详细说明llm处理tools的过程。
3 llm如何处理tools
ollama使用go开发,代码组织和langchain_llama有较大不同,llm处理tools代码隐藏在细节中,不太好直接分析。
这里借用Qwen-Agent示例llm处理tools的过程,两者原理一致。
1)tools整合进system message
以下为Qwen-Agent处理tool工具函数的具体过程,代码链接如下。
https://github.com/QwenLM/Qwen-Agent/blob/main/qwen_agent/llm/fncall_prompts/qwen_fncall_prompt.py#L74
可见tool最终是被整合到system message中,这解释了为什么llm能看到这些tool,并能依据上下文决策合适tool的原因。
2)整合结果示例
参考网络资料,整合后输入到llm的messages示例如下
[Message({'role': 'system', 'content': '你是一个有用的帮手,可以使用合适的工具解决我的我问题
# 工具
## 你拥有如下工具:
### get_current_weather
get_current_weather: 基于给定的城市获取天气 输入参数:{"type": "object", "properties": {"location": {"type": "string", "description": "城市名称"}}, "required": ["location"]}
### get_current_time
get_current_time: 获取当前时间 输入参数:{}
## 你可以在回复中插入零次、一次或多次以下命令以调用工具:
✿FUNCTION✿: 工具名称,必须是[get_current_weather,get_current_time]之一。
✿ARGS✿: 工具输入
✿RESULT✿: 工具结果,需将图片用渲染出来。
✿RETURN✿: 根据工具结果进行回复'}),Message({'role': 'user', 'content': '上海天气如何'})]
3)整合过程代码示例
整合过程代码如下
#*******************************tool function整合模版*******************************
FN_NAME = '✿FUNCTION✿'
FN_ARGS = '✿ARGS✿'
FN_RESULT = '✿RESULT✿'
FN_EXIT = '✿RETURN✿'
FN_STOP_WORDS = [FN_RESULT, FN_EXIT]FN_CALL_TEMPLATE_INFO_ZH = """# 工具## 你拥有如下工具:{tool_descs}"""FN_CALL_TEMPLATE_INFO_EN = """# Tools## You have access to the following tools:{tool_descs}"""FN_CALL_TEMPLATE_FMT_ZH = """## 你可以在回复中插入零次、一次或多次以下命令以调用工具:%s: 工具名称,必须是[{tool_names}]之一。
%s: 工具输入
%s: 工具结果
%s: 根据工具结果进行回复,需将图片用渲染出来""" % (FN_NAME,FN_ARGS,FN_RESULT,FN_EXIT,
)FN_CALL_TEMPLATE_FMT_EN = """## When you need to call a tool, please insert the following command in your reply, which can be called zero or multiple times according to your needs:%s: The tool to use, should be one of [{tool_names}]
%s: The input of the tool
%s: Tool results
%s: Reply based on tool results. Images need to be rendered as """ % (FN_NAME,FN_ARGS,FN_RESULT,FN_EXIT,
)FN_CALL_TEMPLATE_FMT_PARA_ZH = """## 你可以在回复中插入以下命令以并行调用N个工具:%s: 工具1的名称,必须是[{tool_names}]之一
%s: 工具1的输入
%s: 工具2的名称
%s: 工具2的输入
...
%s: 工具N的名称
%s: 工具N的输入
%s: 工具1的结果
%s: 工具2的结果
...
%s: 工具N的结果
%s: 根据工具结果进行回复,需将图片用渲染出来""" % (FN_NAME,FN_ARGS,FN_NAME,FN_ARGS,FN_NAME,FN_ARGS,FN_RESULT,FN_RESULT,FN_RESULT,FN_EXIT,
)FN_CALL_TEMPLATE_FMT_PARA_EN = """## Insert the following command in your reply when you need to call N tools in parallel:%s: The name of tool 1, should be one of [{tool_names}]
%s: The input of tool 1
%s: The name of tool 2
%s: The input of tool 2
...
%s: The name of tool N
%s: The input of tool N
%s: The result of tool 1
%s: The result of tool 2
...
%s: The result of tool N
%s: Reply based on tool results. Images need to be rendered as """ % (FN_NAME,FN_ARGS,FN_NAME,FN_ARGS,FN_NAME,FN_ARGS,FN_RESULT,FN_RESULT,FN_RESULT,FN_EXIT,
)FN_CALL_TEMPLATE = {'zh': FN_CALL_TEMPLATE_INFO_ZH + '\n\n' + FN_CALL_TEMPLATE_FMT_ZH,'en': FN_CALL_TEMPLATE_INFO_EN + '\n\n' + FN_CALL_TEMPLATE_FMT_EN,'zh_parallel': FN_CALL_TEMPLATE_INFO_ZH + '\n\n' + FN_CALL_TEMPLATE_FMT_PARA_ZH,'en_parallel': FN_CALL_TEMPLATE_INFO_EN + '\n\n' + FN_CALL_TEMPLATE_FMT_PARA_EN,
}def get_function_description(function: Dict, lang: Literal['en', 'zh']) -> str:"""Text description of function"""tool_desc_template = {'zh': '### {name_for_human}\n\n{name_for_model}: {description_for_model} 输入参数:{parameters} {args_format}','en': '### {name_for_human}\n\n{name_for_model}: {description_for_model} Parameters: {parameters} {args_format}'}tool_desc = tool_desc_template[lang]name = function.get('name', None)name_for_human = function.get('name_for_human', name)name_for_model = function.get('name_for_model', name)assert name_for_human and name_for_modelif name_for_model == 'code_interpreter':args_format = {'zh': '此工具的输入应为Markdown代码块。','en': 'Enclose the code within triple backticks (`) at the beginning and end of the code.',}else:args_format = {'zh': '此工具的输入应为JSON对象。','en': 'Format the arguments as a JSON object.',}args_format = function.get('args_format', args_format[lang])return tool_desc.format(name_for_human=name_for_human,name_for_model=name_for_model,description_for_model=function['description'],parameters=json.dumps(function['parameters'], ensure_ascii=False),args_format=args_format).rstrip()#*************************将tool信息整合进system message**************************
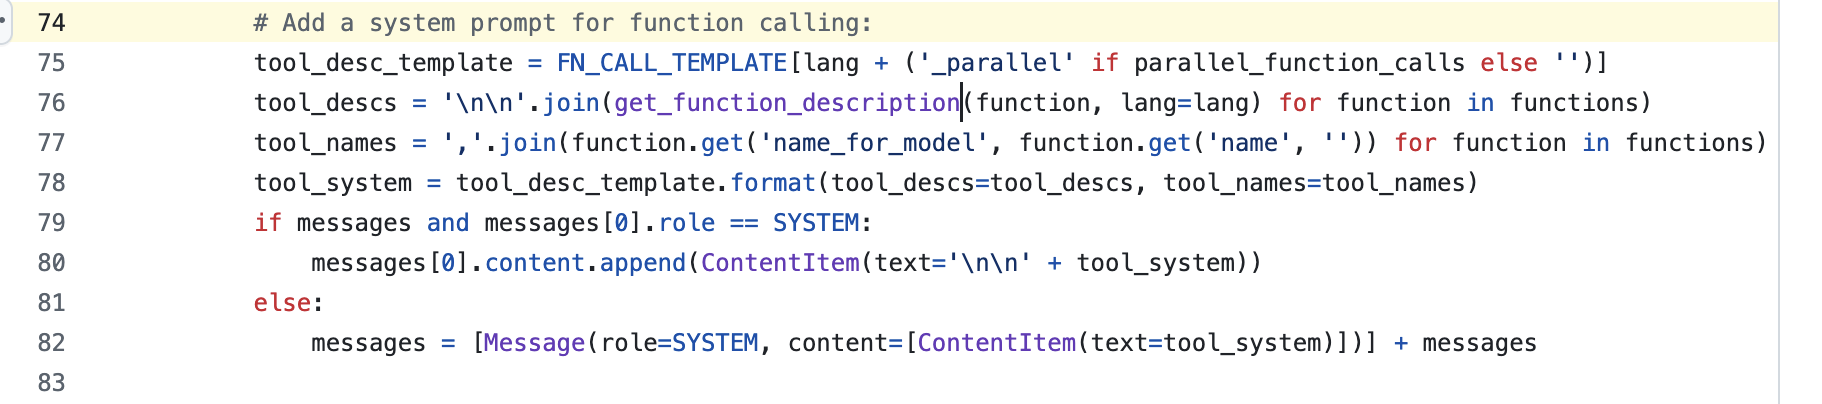
## 基于以上模版和组合函数,将tool信息整合进system message# Add a system prompt for function calling:tool_desc_template = FN_CALL_TEMPLATE[lang + ('_parallel' if parallel_function_calls else '')]tool_descs = '\n\n'.join(get_function_description(function, lang=lang) for function in functions)tool_names = ','.join(function.get('name_for_model', function.get('name', '')) for function in functions)tool_system = tool_desc_template.format(tool_descs=tool_descs, tool_names=tool_names)if messages and messages[0].role == SYSTEM:messages[0].content.append(ContentItem(text='\n\n' + tool_system))else:messages = [Message(role=SYSTEM, content=[ContentItem(text=tool_system)])] + messages4)llm回复解析
将本节第二部分示例的内容输入llm,llm会回复如下所示的内容
✿FUNCTION✿: get_current_weather
✿ARGS✿: {"location": "上海"}
✿RESULT✿: 上海当前天气:晴,温度28摄氏度,湿度65%,东南风3级
✿RETURN✿: 上海现在是晴天,气温28度,湿度65%,东南风3级,请注意防晒。
显然,返回内容格式清晰,可以很快就转化为如下所示的tool_calls。
tool_calls=[{'name': 'get_current_weather', 'args': {'name': '上海'}, 'id': '11621a7f-6a7a-442e-81ed-e9a1454ebc1b', 'type': 'tool_call'}
reference
---
langchain_ollama/chat_models.py
https://github.com/langchain-ai/langchain/blob/master/libs/partners/ollama/langchain_ollama/chat_models.py
qwen_fucall_prompt.py
https://github.com/QwenLM/Qwen-Agent/blob/main/qwen_agent/llm/fncall_prompts/qwen_fncall_prompt.py
详解大模型是如何理解并使用 tools ?
https://blog.csdn.net/2301_81940605/article/details/140063364
Qwen3
https://github.com/QwenLM/Qwen3
Qwen-Agent
https://github.com/QwenLM/Qwen-Agent
qwen2.5-max
https://qwenlm.github.io/blog/qwen2.5-max/