企业高性能web服务器——Nginx
Nginx介绍
Nginx是一个高性能的HTTP和反向代理服务器,也是一个邮件代理服务器。由俄罗斯的程序设计师Igor Sysoev所开发,官方测试nginx能够支撑5万并发链接,并且cpu、内存等资源消耗却非常低,运行非常稳定。所以其特点是占有内存少,并发能力强,事实上Nginx的并发能力确实在同类型的网页服务器中表现较好。
Nginx基础特性
模块化设计,较好的扩展性
高可靠性
支持热部署:不停机更新配置文件,升级版本,更换日志文件
低内存消耗:10000个keep-alive连接模式下的非活动连接,仅需2.5M内存
event-driven,aio,mmap,sendfile
nginx的进程结构
web 请求处理机制
多进程方式:服务器每接收到一个客户端请求就有服务器的主进程生成一个子进程响应客户端,直
到用户关闭连接,这样的优势是处理速度快,子进程之间相互独立,但是如果访问过大会导致服务
器资源耗尽而无法提供请求
多线程方式:与多进程方式类似,但是每收到一个客户端请求会有服务进程派生出一个线程和此客
户端进行交互,一个线程的开销远远小于一个进程,因此多线程方式在很大程度减轻了 web 服务器
对系统资源的要求,但是多线程也有自己的缺点,即当多个线程位于同一个进程内工作的时候,可
以相互访问同样的内存地址空间,所以他们相互影响,一旦主进程挂掉则所有子线程都不能工作
了, IIS服务器使用了多线程的方式,需要间隔一段时间就重启一次才能稳定。Nginx 是多进程组织模型,而且是一个由 Master 主进程和 Worker 工作进程组成。
主进程 (master process) 的功能:
对外接口:接收外部的操作(信号)
对内转发:根据外部的操作的不同,通过信号管理 Worker
监控:监控 worker 进程的运行状态,worker 进程异常终止后,自动重启 worker 进程
读取Nginx 配置文件并验证其有效性和正确性
建立、绑定和关闭socket连接
按照配置生成、管理和结束工作进程
接受外界指令,比如重启、升级及退出服务器等指令
不中断服务,实现平滑升级,重启服务并应用新的配置
开启日志文件,获取文件描述符
不中断服务,实现平滑升级,升级失败进行回滚处理
编译和处理perl脚本
工作进程( worker process )的功能:
所有 Worker 进程都是平等的
实际处理:网络请求,由 Worker 进程处理
Worker进程数量:一般设置为核心数,充分利用CPU资源,同时避免进程数量过多,导致进程竞争
CPU资源,
增加上下文切换的损耗
接受处理客户的请求
将请求依次送入各个功能模块进行处理
I/O调用,获取响应数据
与后端服务器通信,接收后端服务器的处理结果
缓存数据,访问缓存索引,查询和调用缓存数据
发送请求结果,响应客户的请求
接收主程序指令,比如重启、升级和退出等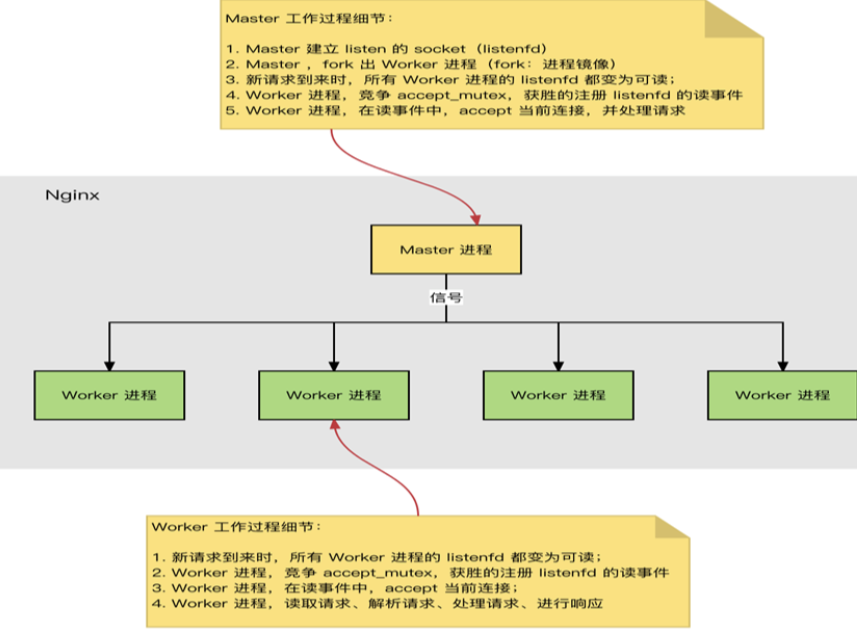
Nginx模块介绍
核心模块:是 Nginx 服务器正常运行必不可少的模块,提供错误日志记录 、配置文件解析 、事件 驱动机制 、进程管理等核心功能
标准HTTP模块:提供 HTTP 协议解析相关的功能,比如: 端口配置 、 网页编码设置 、 HTTP响应 头设置 等等
可选HTTP模块:主要用于扩展标准的 HTTP 功能,让 Nginx 能处理一些特殊的服务,比如: Flash
多媒体传输 、解析 GeoIP 请求、 网络传输压缩 、 安全协议 SSL 支持等
邮件服务模块:主要用于支持 Nginx 的 邮件服务 ,包括对 POP3 协议、 IMAP 协议和 SMTP协议的 支持
Stream服务模块: 实现反向代理功能,包括TCP协议代理
第三方模块:是为了扩展 Nginx 服务器应用,完成开发者自定义功能,比如: Json 支持、 Lua 支 持等
nginx的安装
Nginx 版本
Mainline version 主要开发版本,一般为奇数版本号,比如1.19
Stable version 当前最新稳定版,一般为偶数版本,如:1.20
Legacy versions 旧的稳定版,一般为偶数版本,如:1.18
Nginx安装可以使用yum或源码安装,但是推荐使用源码编译安装
yum 的版本比较旧
编译安装可以更方便自定义相关路径
使用源码编译可以自定义相关功能,更方便业务的上的使用
[root@Nginx ~]# dnf install gcc pcre-devel zlib-devel openssl-devel -y
[root@Nginx nginx-1.24.0]# useradd -s /sbin/nologin -M nginx
[root@Nginx nginx]# tar zxf nginx-1.24.0.tar.gz
[root@Nginx nginx-1.24.0]# useradd -s /sbin/nologin -M nginx
[root@Nginx nginx]# cd nginx-1.24.0/
[root@Nginx nginx-1.24.0]# ls
auto CHANGES.ru configure html Makefile objs src
CHANGES conf contrib LICENSE man README
[root@Nginx nginx-1.24.0]# ./configure --prefix=/usr/local/nginx \
--user=nginx \ # 指定nginx运行用户
--group=nginx \ # 指定nginx运行组
--with-http_ssl_module \ # 支持https://
--with-http_v2_module \ # 支持http版本2
--with-http_realip_module \ # 支持ip透传
--with-http_stub_status_module \ # 支持状态页面
--with-http_gzip_static_module \ # 支持压缩
--with-pcre \ # 支持正则
--with-stream \ # 支持tcp反向代理
--with-stream_ssl_module \ # 支持tcp的ssl加密
--with-stream_realip_module # 支持tcp的透传ip
[root@Nginx nginx-1.24.0]# make && make install
配置nginx的启动文件
[root@Nginx ~]# vim /lib/systemd/system/nginx.service
[Unit]
Description=The NGINX HTTP and reverse proxy server
After=syslog.target network-online.target remote-fs.target nss-lookup.target
Wants=network-online.target
[Service]
Type=forking
PIDFile=/usr/local/nginx/logs/nginx.pid
ExecStartPre=/usr/local/nginx/sbin/nginx -t
ExecStart=/usr/local/nginx/sbin/nginx
ExecReload=/usr/local/nginx/sbin/nginx -s reload
ExecStop=/bin/kill -s QUIT $MAINPID
PrivateTmp=true
[Install]
WantedBy=multi-user.target
[root@Nginx ~]# systemctl daemon-reload
[root@Nginx ~]# systemctl start nginx
核心配置示例
1、新建一个PCweb站点
(1)、在总配置文件中定义子配置文件路径
use 指定nginx的工作模式。nginx支持的工作模式有 select 、 poll 、 kqueue 、 epoll、 rtsig 和 /dev/poll 。其中 select 和 poll 都是标准的工作模式, kqueue 和 epoll 是高效的工作模式,不同的是 epoll 用在Linux平台上,而 kqueue 用在BSD系统中,因为Mac基于BSD,所以Mac也得用这个模式,对于Linux系统,epoll工作模式是首选。
vim /usr/local/nginx/conf/nginx.conf
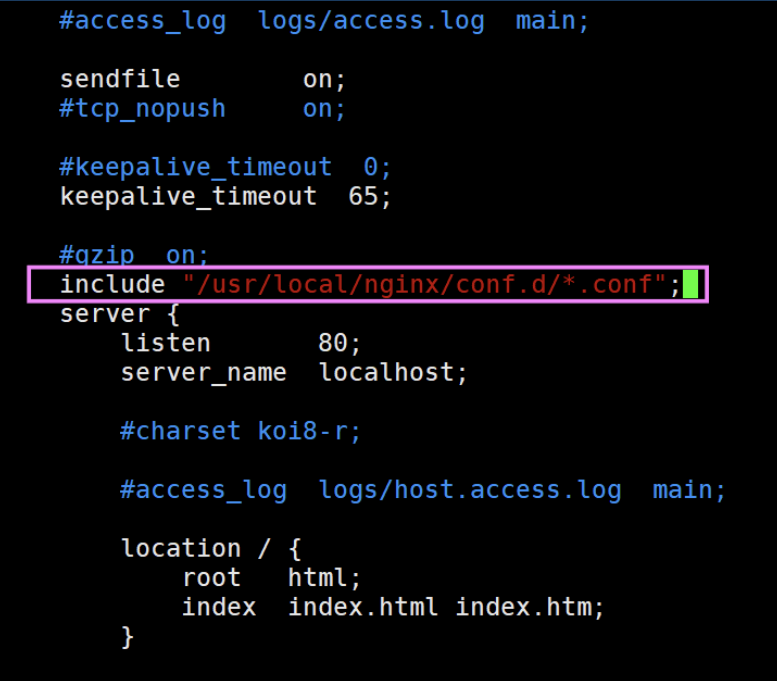
新建子配置文件路径并编辑子配置文件
mkdir /usr/local/nginx/conf.d
vim /usr/local/nginx/conf.d/vhost.conf#写入网站首页内容
echo www.bjhzj.org:hello world! > /data/web/html/index.html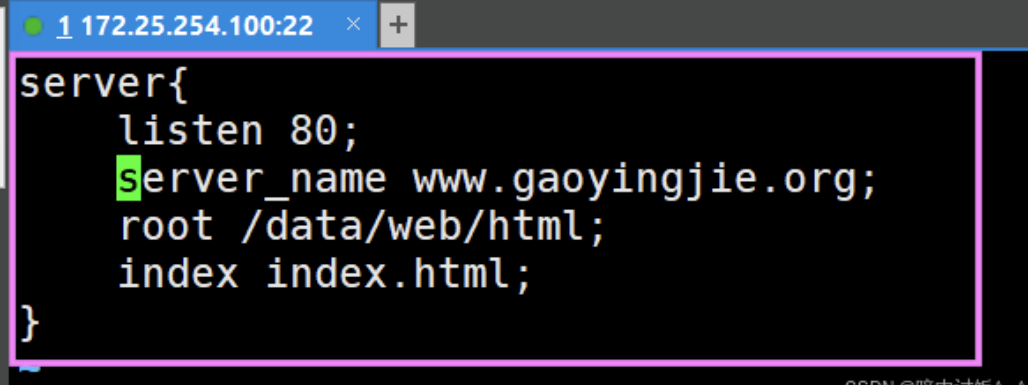
配置访问不同路径的网页内容
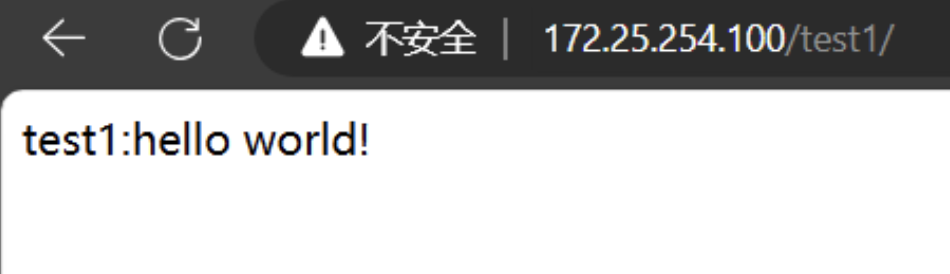
vim /usr/local/nginx/conf.d/vhost.conf#写入该路径的网页内容
echo test1:hello world! > /data/web/test1/index.html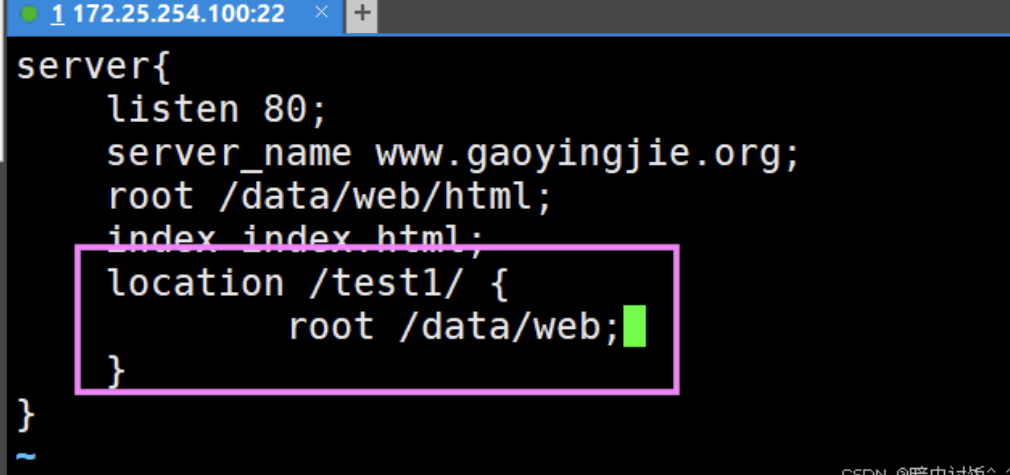
创建软连接,定义路径别名
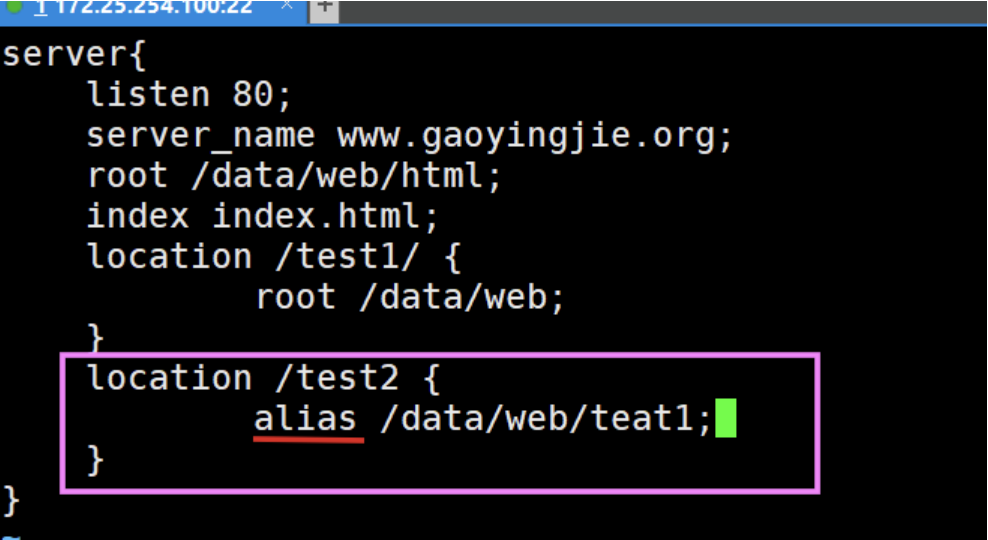
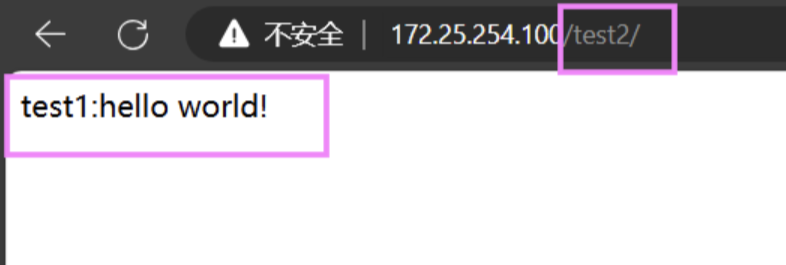
location 的详细使用
vim /usr/local/nginx/conf.d/vhost.conf
echo web2/test/index.html > /data/web2/test/index.html
nginx -s reload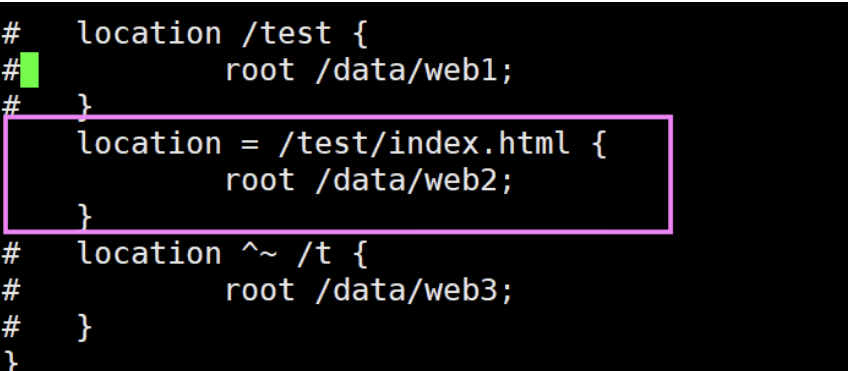
区分大小写:~
[root@nginx ~]# vim /usr/local/nginx/conf.d/vhost.conf [root@nginx ~]# mkdir /data/web3/HTML
[root@nginx ~]# mkdir /data/web3/html[root@nginx ~]# echo html/HTML > /data/web3/html/index.html
[root@nginx ~]# nginx -s reload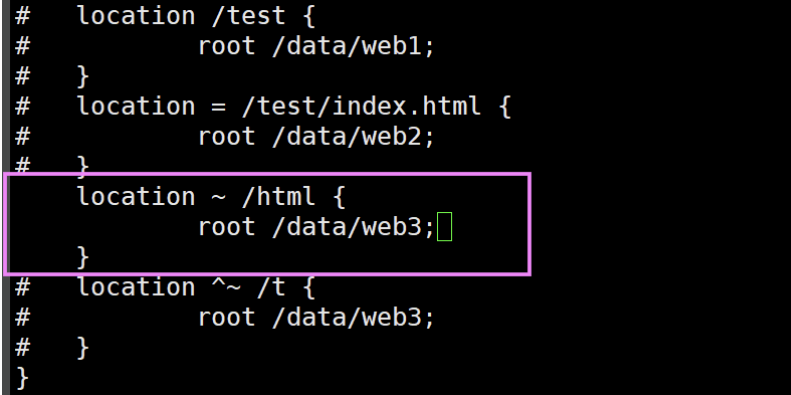
不区分大小写:~*
[root@nginx ~]# vim /usr/local/nginx/conf.d/vhost.conf
[root@nginx ~]# echo ~*:html/HTML > /data/web3/html/index.html 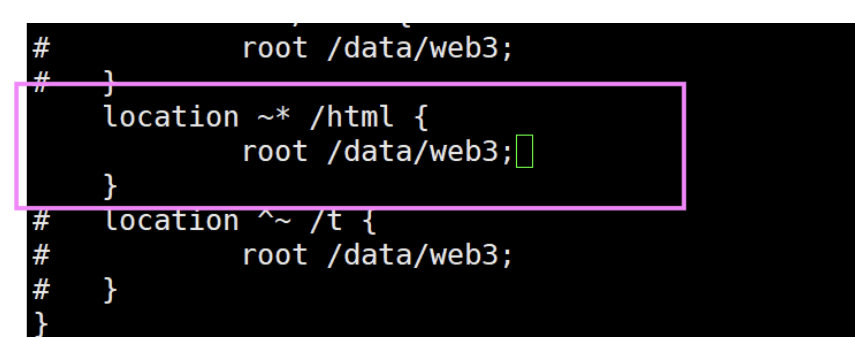
用户认证
htpasswd -cm /usr/local/nginx/.htpasswd admin
vim /usr/local/nginx/conf.d/vhost.conf
mkdir /data/web/gyj -p
echo bjh > /data/web/bjh/index.html
nginx -s reload
自定义错误页面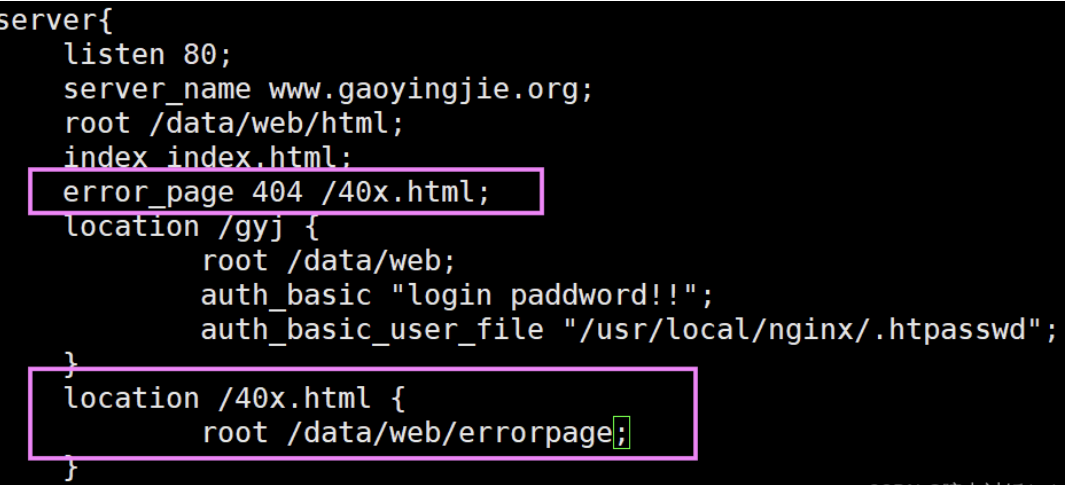
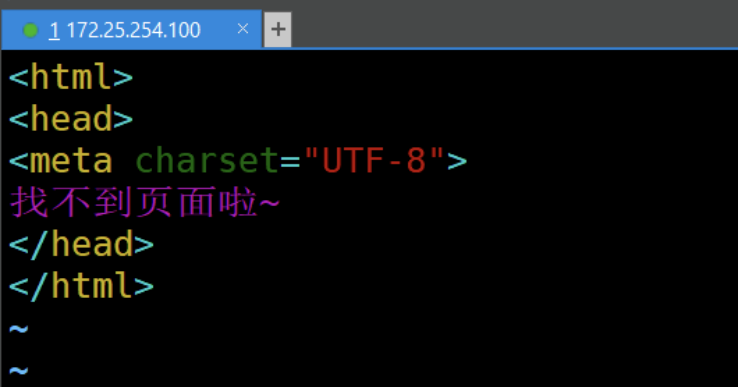
自定义错误日志
[root@nginx ~]# ll /usr/local/nginx/logs/
[root@nginx ~]# vim /usr/local/nginx/conf.d/vhost.conf
[root@nginx ~]# mkdir /var/log/gaoyingjie.org[root@nginx ~]#cat /var/log/gaoyingjie.org/access.log
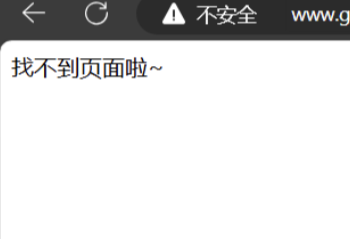
[root@nginx ~]#cat /var/log/gaoyingjie.org/error.log检测文件是否存在
若不存在则定义到defaul.html页面
编辑配置文件
vim /usr/local/nginx/conf.d/vhost.conf
mkdir /data/web/html/error
echo error default > /data/web/html/error/default.html
curl www.gaoyingjie.org/123.html  #不存在123.html文件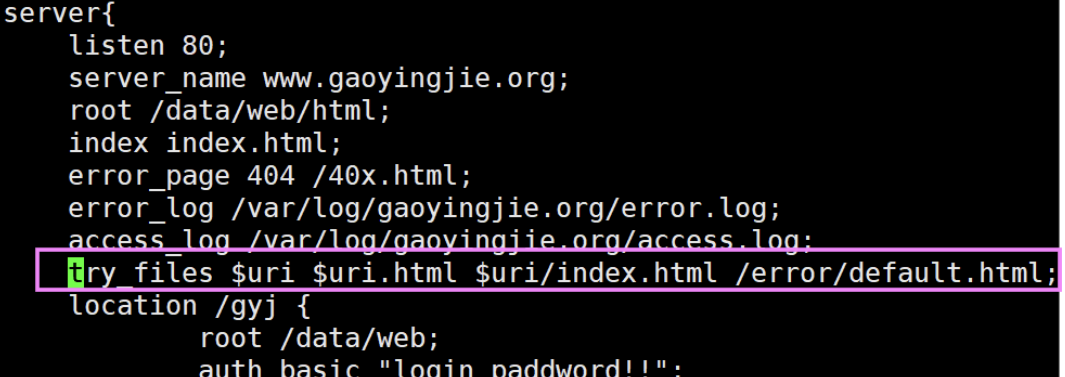
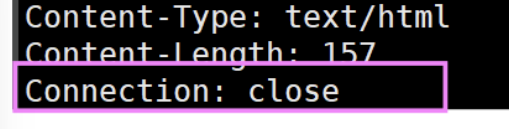
测试 nginx的长链接
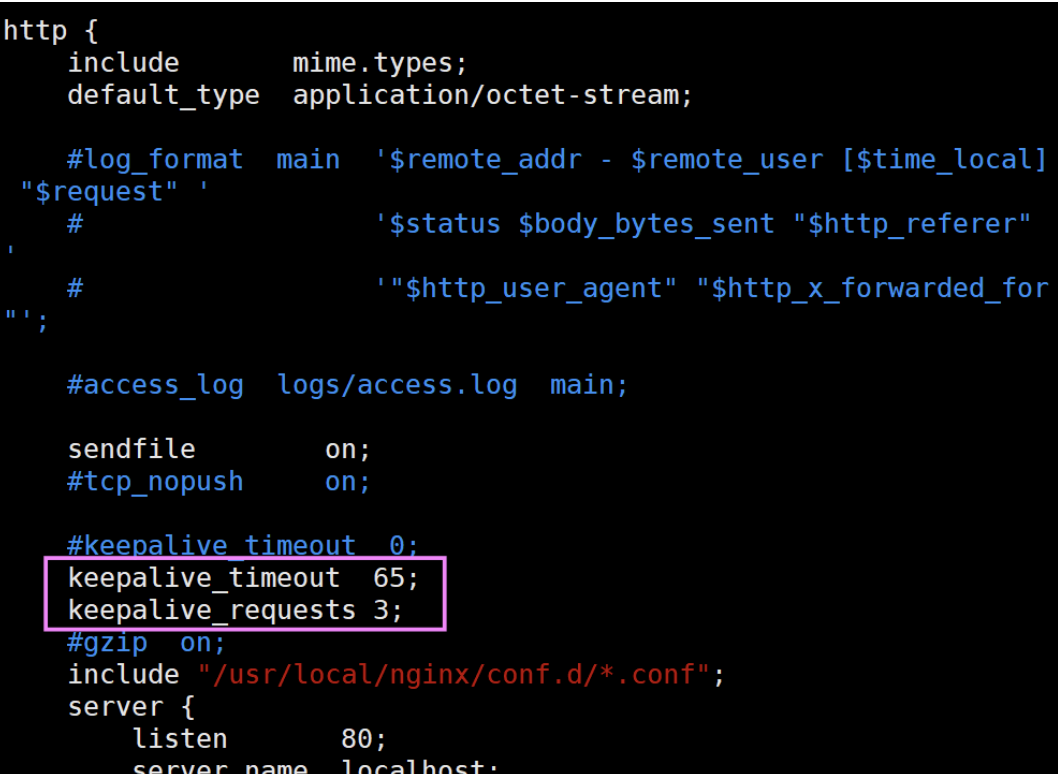
 nginx 做为下载服务器

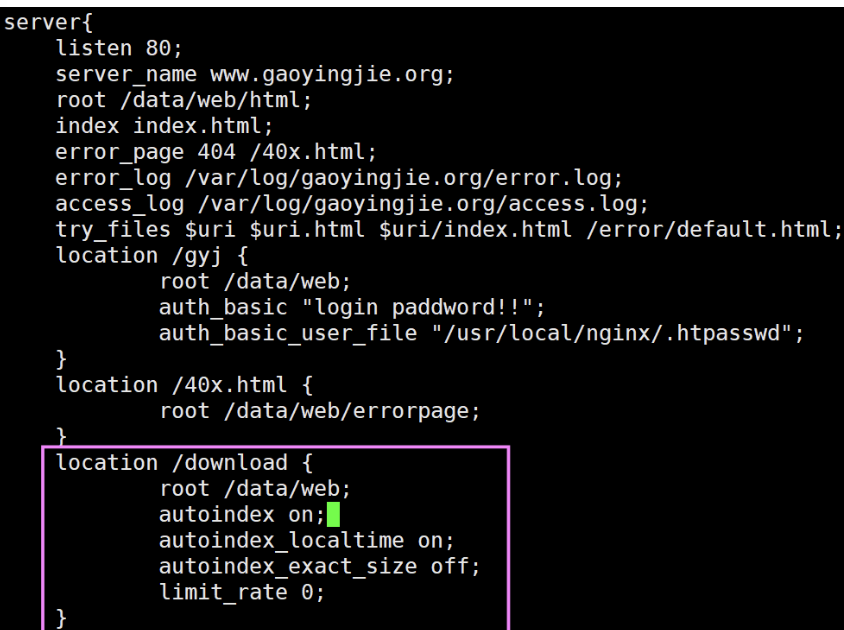 输入www.gaoyingjie.org/download进去下载页
nginx的状态页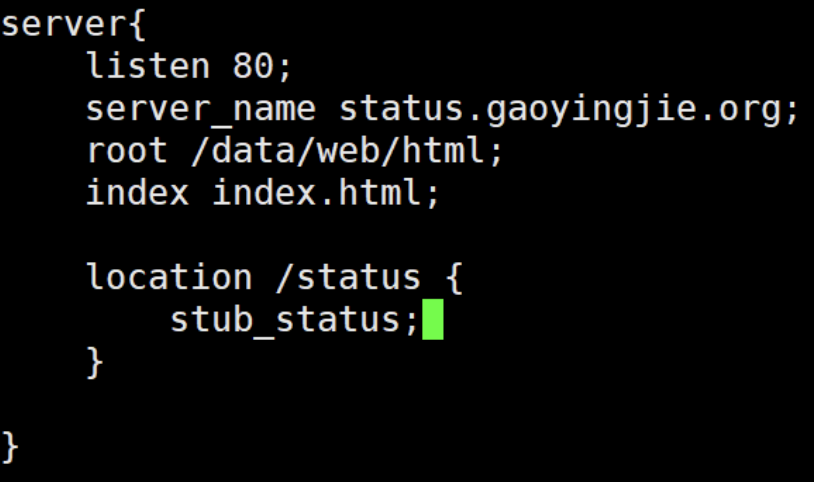
nginx的变量使用
添加echo模块
上传echo模块的压缩包,查看已安装好的配置文件和模块:
nginx -V重新编译模块:
[root@nginx ~]# nginx -V
nginx version: nginx/1.24.0
built by gcc 11.4.1 20230605 (Red Hat 11.4.1-2) (GCC)
built with OpenSSL 3.0.7 1 Nov 2022
TLS SNI support enabled
configure arguments: --prefix=/usr/local/nginx --user=nginx --user=nginx --with-http_ssl_module --with-http_v2_module --with-http_realip_module --with-http_stub_status_module --with-http_gzip_static_module --with-pcre --with-stream --with-stream_realip_module #将--add-module=/root/echo-nginx-module-0.63添加到已编译的模块后面重新编译
[root@nginx nginx-1.24.0]# ./configure --prefix=/usr/local/nginx --user=nginx --user=nginx --with-http_ssl_module --with-http_v2_module --with-http_realip_module --with-http_stub_status_module --with-http_gzip_static_module --with-pcre --with-stream --with-stream_realip_module --add-module=/root/echo-nginx-module-0.63[root@nginx nginx-1.24.0]#make &&make install
内置变量
编辑子配置文件:
[root@php ~]# vim /usr/local/nginx/conf.d/vhosts.conf
[root@php ~]# mkdir /data/web/html/var
[root@php ~]# echo /data/web/html/var > /data/web/html/var/index.html
[root@php ~]# curl www.gaoyingjie.org/var?name=gyj&&id=6666
自定义变量
假如需要自定义变量名称和值,使用指令 set $variable value;
指定 key 并给其定义一个变量,变量可以调用 Nginx 内置变量赋值给 key ,另外set 定义格式为 set $key value , value 可以是 text, variables 和两者的组合。
编辑子配置文件:
[root@php ~]# vim /usr/local/nginx/conf.d/vhosts.conf[root@php ~]# curl www.gaoyingjie.org/varnginx rewrite的相关功能
rewrite模块指令
if指令
= # 比较变量和字符串是否相等,相等时 if 指令认为该条件为 true ,反之为 false
!= # 比较变量和字符串是否不相等,不相等时 if 指令认为条件为 true ,反之为 false
~ # 区分大小写字符,可以通过正则表达式匹配,满足匹配条件为真,不满足匹配条件为假
!~ # 区分大小写字符 , 判断是否匹配,不满足匹配条件为真,满足匹配条件为假
~* # 不区分大小写字符,可以通过正则表达式匹配,满足匹配条件为真,不满足匹配条件为假
!~* # 不区分大小字符 , 判断是否匹配,满足匹配条件为假,不满足匹配条件为真
-f 和 !-f # 判断请求的文件是否存在和是否不存在
-d 和 !-d # 判断请求的目录是否存在和是否不存在
-x 和 !-x # 判断文件是否可执行和是否不可执行
-e 和 !-e # 判断请求的文件或目录是否存在和是否不存在 ( 包括文件,目录,软链接 )
# 注意:
# 如果 $ 变量的值为空字符串或 0 ,则 if 指令认为该条件为 false ,其他条件为 true 。
#nginx 1.0.1 之前 $ 变量的值如果以 0 开头的任意字符串会返回 false
编辑配置文件:
[root@php ~]# vim /usr/local/nginx/conf.d/vhosts.conf
[root@php ~]# nginx -s reload
[root@php ~]# mkdir /data/web/html/{test1,test2}
[root@php ~]# echo /data/web/html/test1 > /data/web/html/test1/index.html
[root@php ~]# echo /data/web/html/test2 > /data/web/html/test2/index.htmlrewrite案例
rewirte正则表达式格式:
. # 匹配除换行符以外的任意字符
\w # 匹配字母或数字或下划线或汉字
\s # 匹配任意的空白符
\d # 匹配数字
\b # 匹配单词的开始或结束
^ # 匹配字付串的开始
$ # 匹配字符串的结束
* # 匹配重复零次或更多次
+ # 匹配重复一次或更多次
? # 匹配重复零次或一次
(n) # 匹配重复 n 次
{n,} # 匹配重复 n 次或更多次
{n,m} # 匹配重复 n 到 m 次
*? # 匹配重复任意次,但尽可能少重复
+? # 匹配重复 1 次或更多次,但尽可能少重复
?? # 匹配重复 0 次或 1 次,但尽可能少重复
{n,m}? # 匹配重复 n 到 m 次,但尽可能少重复
{n,}? # 匹配重复 n 次以上,但尽可能少重复
\W # 匹配任意不是字母,数字,下划线,汉字的字符
\S # 匹配任意不是空白符的字符
\D # 匹配任意非数字的字符
\B # 匹配不是单词开头或结束的位置
[^x] # 匹配除了 x 以外的任意字符
[^lee] # 匹配除了 magedu 这几个字母以外的任意字符
rewrite案例:break与last
break:用于中断当前相同作用域(location)中的其他 Nginx 配置 与该指令处于同一作用域的Nginx 配置中,位于它前面的配置生效 位于后面的 ngx_http_rewrite_module 模块中指令就不再执行 Nginx服务器在根据配置处理请求的过程中遇到该指令的时候,回到上一层作用域继续向下读取配置,该指令可以在server 块和 locationif 块中使用。
编辑配置文件:
[root@php ~]# vim /usr/local/nginx/conf.d/vhosts.conf
[root@php ~]# nginx -s reload
测试:
[root@php ~]# mkdir /data/web/html/break
[root@php ~]# echo /data/web/html/break > /data/web/html/break/index.html
[root@php ~]# mkdir /data/web/html/last
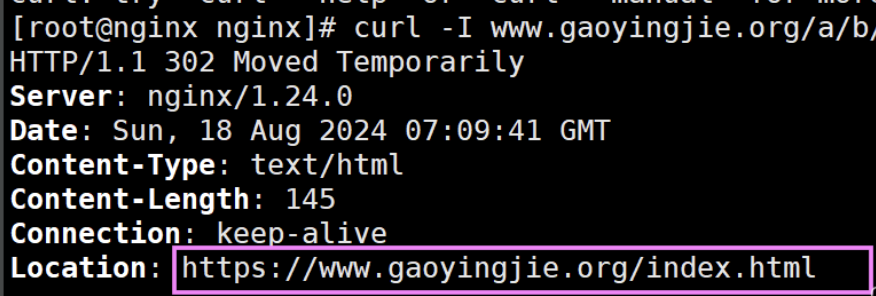
[root@php ~]# echo /data/web/html/last > /data/web/html/last/index.htmlrewrite案例:自动跳转https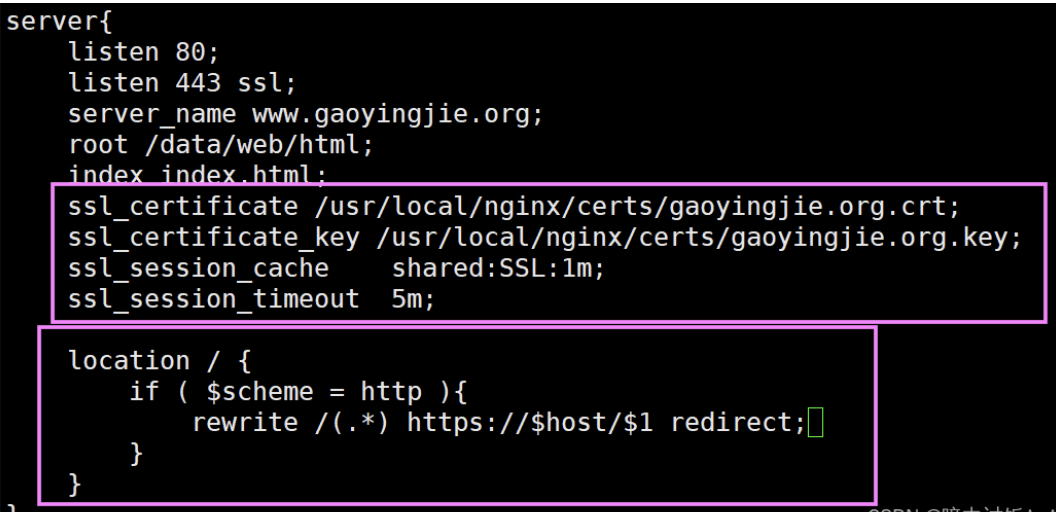
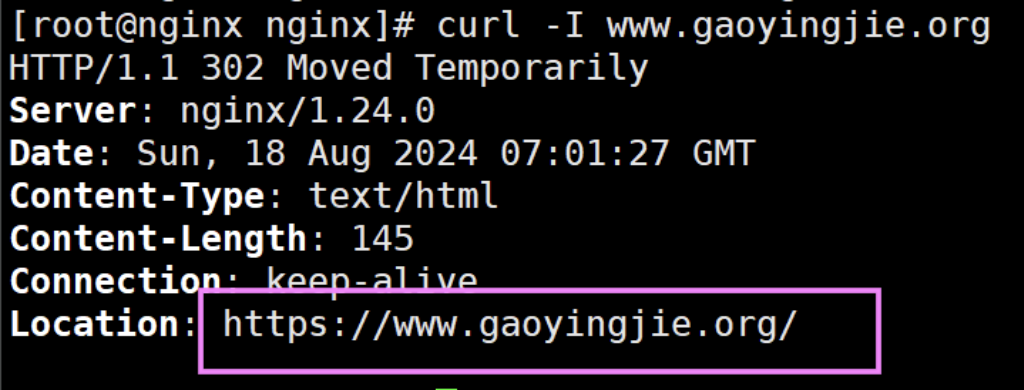 判断文件是否存在:
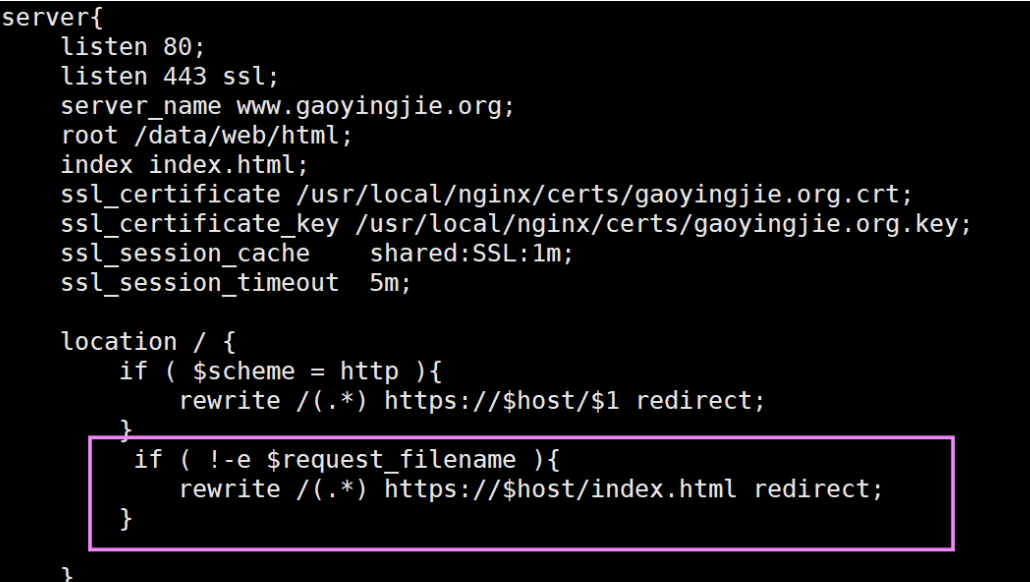
nginx防盗链
准备一个web服务器(172.25.254.10),写入网站内容,在该站点盗取另一个(172.25.254.100)的图片资源。
<html><head><meta http-equiv=Content-Type content="text/html;charset=utf-8"><title>盗链</title>
</head><body><img src="http://www.gaoyingjie.org/images/1.png" ><h1 style="color:red">欢迎大家</h1><p><a href=http://www.gaoyingjie.org</a>出门见喜</p></body></html>
在172.25.254.100的服务器的images文件夹内上传图片1.png。
浏览器输入:http://172.25.254.10可以看到该站点自动连接到100服务器的图片
实现防盗链
配置文件:
在100服务器http的发布目录内上传盗链图片,意味着当其他站点盗链1.png时,会自动替换成盗链图片。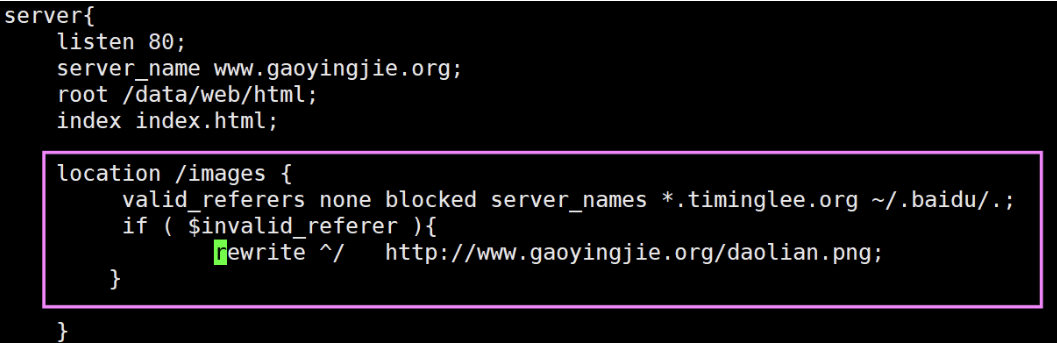
重启nginx后,再次访问:http://172.25.254.10,就会出现盗链图片。
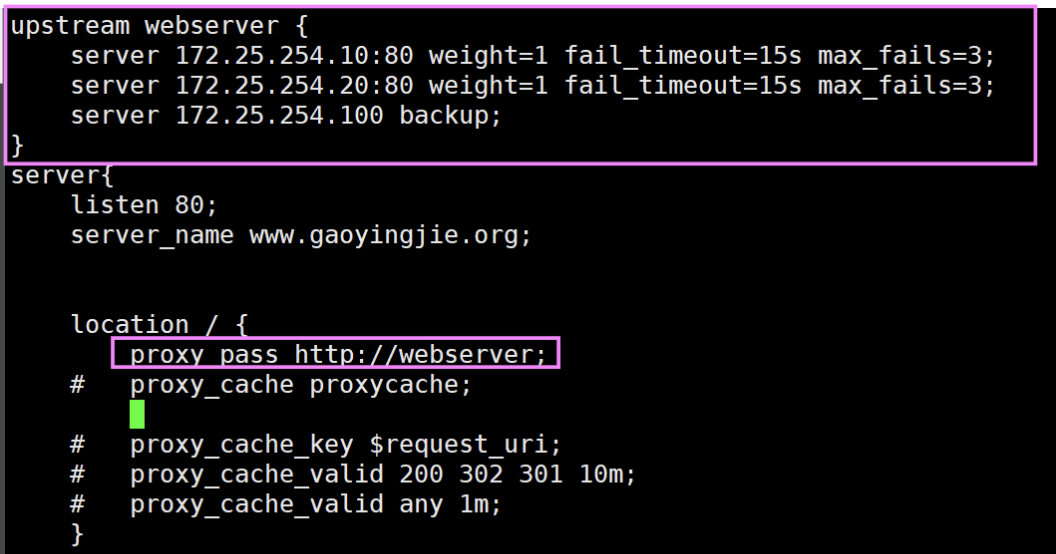
nginx的反向代理
指定location实现反向代理(动静分离)
参数介绍:
proxy_pass;
# 用来设置将客户端请求转发给的后端服务器的主机
# 可以是主机名 ( 将转发至后端服务做为主机头首部 ) 、 IP 地址:端口的方式
# 也可以代理到预先设置的主机群组,需要模块 ngx_http_upstream_module 支持
proxy_pass_header field;
# 透传
# 默认 nginx 在响应报文中不传递后端服务器的首部字段 Date, Server, X-Pad, X-Accel 等参数
# 如果要传递的话则要使用 proxy_pass_header field 声明将后端服务器返回的值传递给客户端
#field 首部字段大小不敏感
# 示例 : 透传后端服务器的 Server 和 Date 首部给客户端 , 同时不再响应报中显示前端服务器的 Server 字段
proxy_pass_header Server;
proxy_pass_header Date;
proxy_pass_request_body on | off;
# 是否向后端服务器发送 HTTP 实体部分 , 可以设置在 http,server 或 location 块,默认即为开启
proxy_pass_request_headers on | off;
# 是否将客户端的请求头部转发给后端服务器,可以设置在 http,server 或 location 块,默认即为开启
proxy_set_header;
# 可更改或添加客户端的请求头部信息内容并转发至后端服务器,比如在后端服务器想要获取客户端的真实 IP 的
时候,就要更改每一个报文的头部
proxy_connect_timeout time;
# 配置 nginx 服务器与后端服务器尝试建立连接的超时时间,默认为 60 秒
用法如下: proxy_connect_timeout 6s;
#60s 为自定义 nginx 与后端服务器建立连接的超时时间 , 超时会返回客户端 504 响应码
proxy_read_timeout time;
# 配置 nginx 服务器向后端服务器或服务器组发起 read 请求后,等待的超时时间,默认 60s
proxy_send_timeout time;
# 配置 nginx 项后端服务器或服务器组发起 write 请求后,等待的超时 时间,默认 60s
proxy_http_version 1.0;
# 用于设置 nginx 提供代理服务的 HTTP 协议的版本,默认 http 1.0
proxy_ignore_client_abort off;
# 当客户端网络中断请求时, nginx 服务器中断其对后端服务器的请求。即如果此项设置为 on 开启,则服务器、
会忽略客户端中断并一直等着代理服务执行返回,如果设置为 off ,则客户端中断后 Nginx 也会中断客户端请求
并立即记录 499 日志,默认为 off 。
准备两台webserver,172.25.254.10、172.25.254.20,在10上安装php,并写入内容
vim/var/www/index.php
在20上写入网站首页内容并修改端口为8080:
echo static:172.25.254.20 > /var/www/html/static/index.htmlvim /etc/httpd/conf/httpd.conf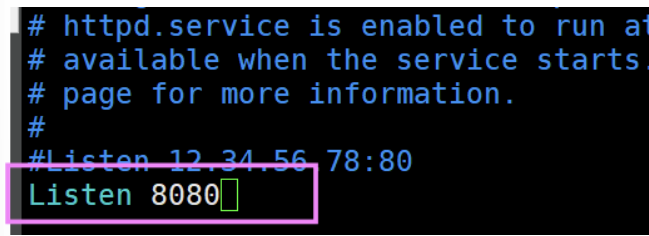
在100上nginx配置文件: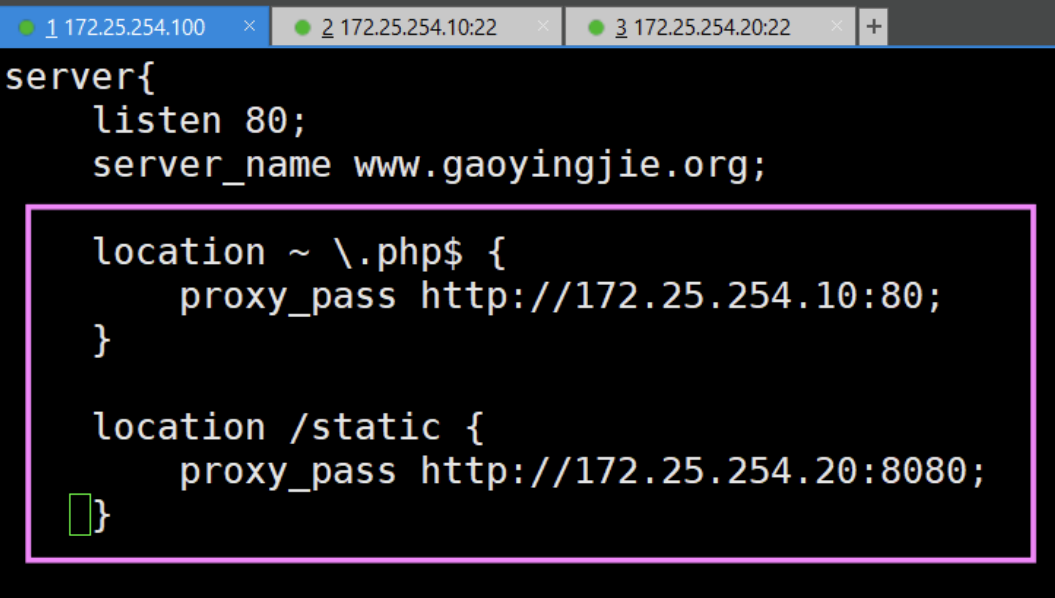 、
、
反向代理的缓存功能
缓存配置:在nginx的总配置文件http块内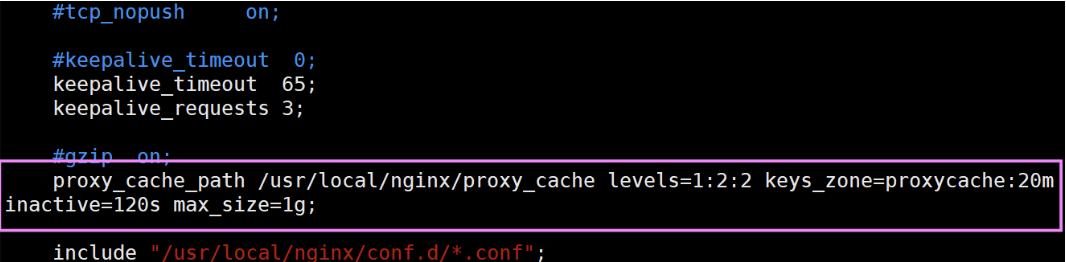
子配置文件: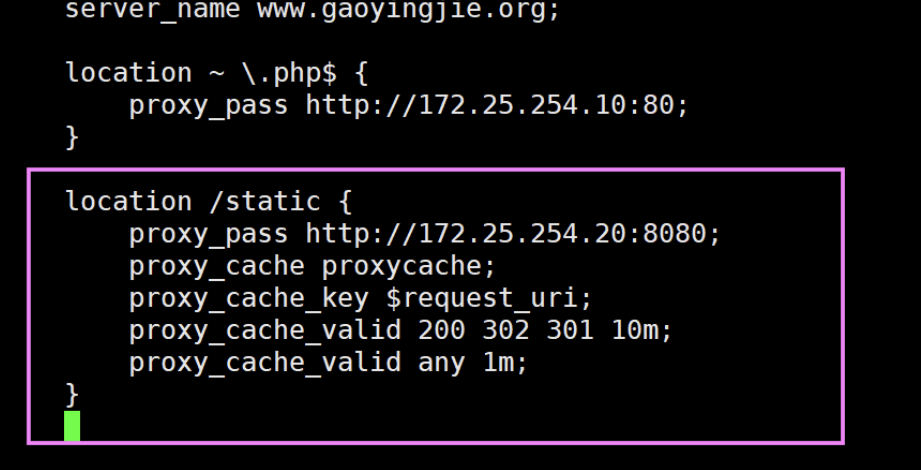

检测:验证缓存目录结构及文件大小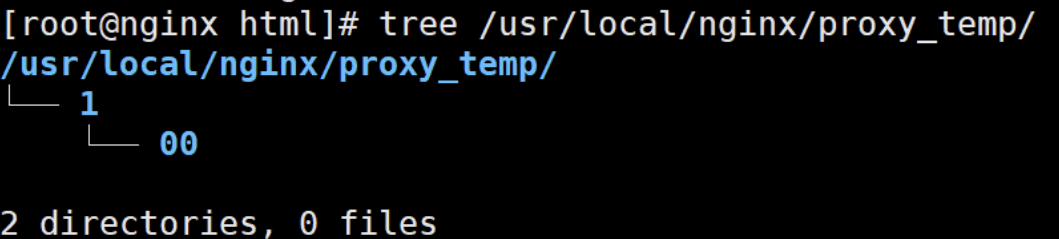
nginx的负载均衡
实验环境
| 主机 | IP |
| nginx | 172.25.254.100 |
| apache(server) | 172.25.254.10 |
| apache1(server) | 172.25.254.20 |
部署后端的两台server
#server1
[root@apache20 ~]# yum install httpd -y
[root@apache20 ~]# echo "web1 172.25.254.10" > /var/www/html/index.html
[root@apache20 ~]# systemctl enable --now httpd
#server2
[root@apache30 ~]# yum install httpd -y
[root@apache30 ~]# echo "web2 172.25.254.20" >> /var/www/html/index.html
[root@apache30 ~]# systemctl enable --now httpd#访问测试
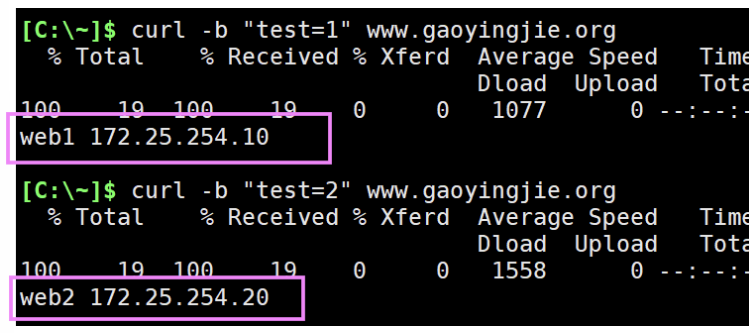
[root@centos8 ~]# curl http://172.25.254.20
web1 172.25.254.10
[root@centos8 ~]# curl http://172.25.254.30
web2 172.25.254.20基于cookie的会话绑定
检测:基于cookie值的变化而访问不同的服务器,cookie值相同则访问相同服务器,实现会话绑定
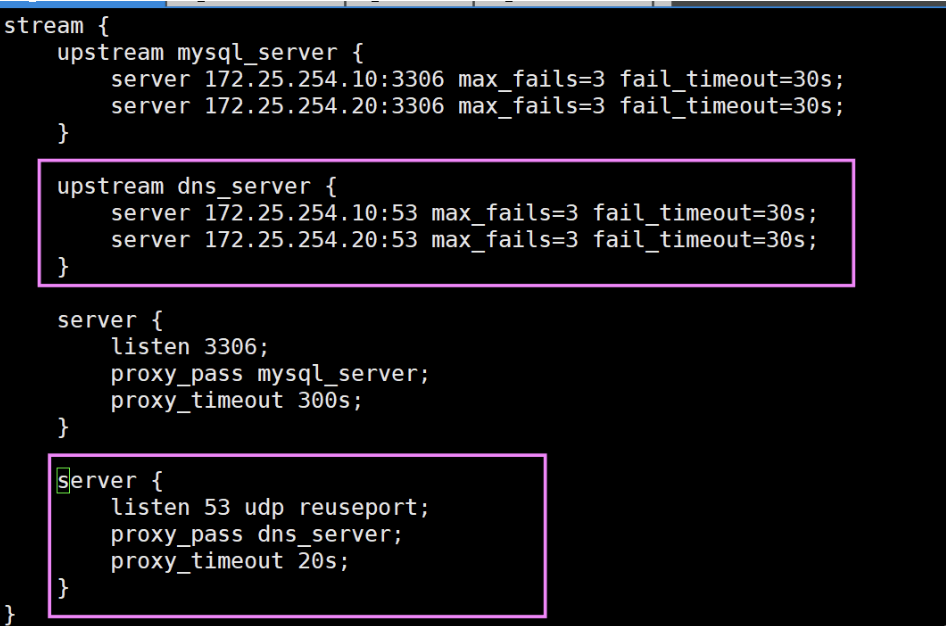
实现nginx的四层负载均衡
[root@apache20 ~]# yum install mariadb-server -y
[root@apache20 ~]# vim /etc/my.cnf.d/mariadb-server.cnf
#server1
[root@server1 ~]# mysql -e "grant all on *.* to gyj@'%' identified by 'gyj';"#server2
[root@server2 ~]#  mysql -e "grant all on *.* to gyj@'%' identified by 'gyj';"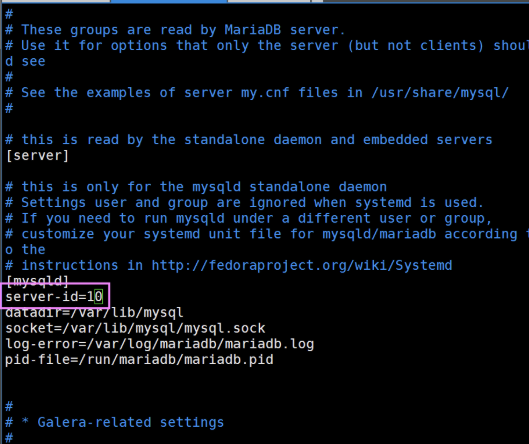
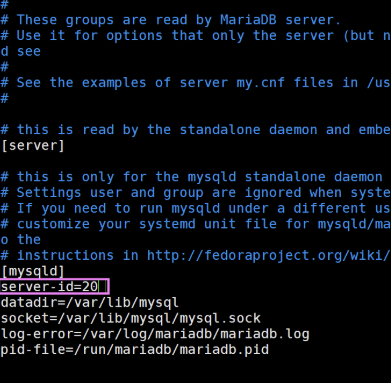
在两台server中开启mysql,查看server_id:
mysql -ugyj -pgyj -h 172.25.254.10 -e "select @@server_id"
配置nginx:
vim /usr/local/nginx/conf.d/tcp.conf
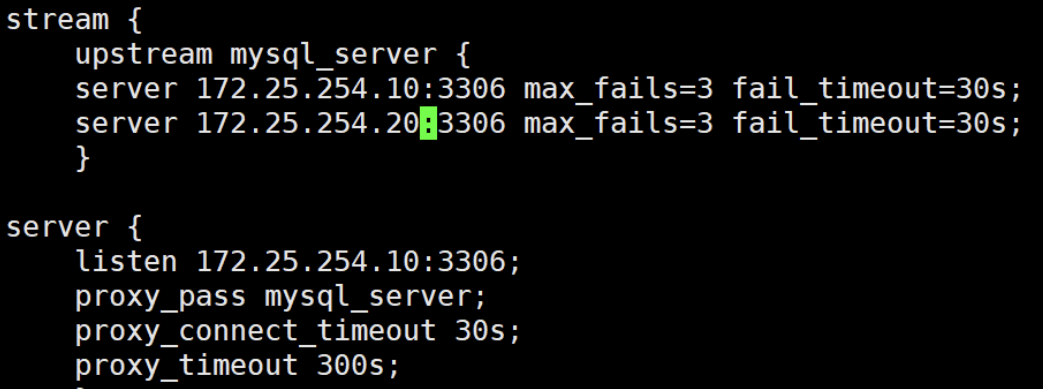
因为该配置文件tcp.conf为四层代理,故在总配置文件的http块之外加上子配置文件路径
vim /usr/local/nginx/conf/nginx.conf

在100主机上下载mariadb客户端:
dnf install mariadb -y重启nginx并访问测试:
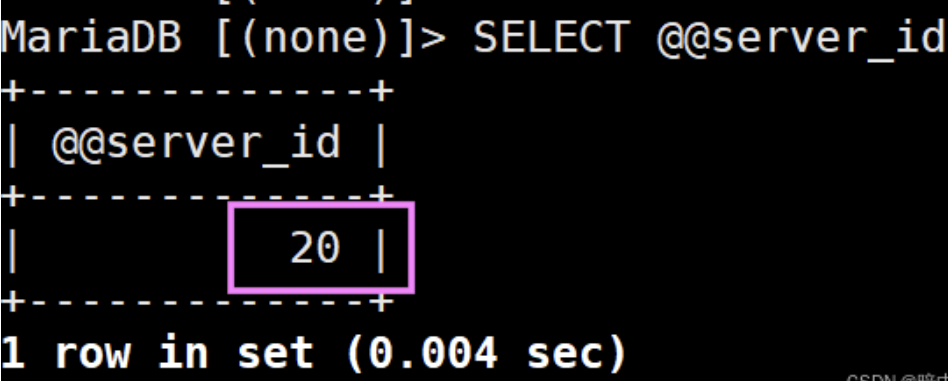
mysql -u gyj -pgyj -h 172.25.254.100一次登录为server_id为10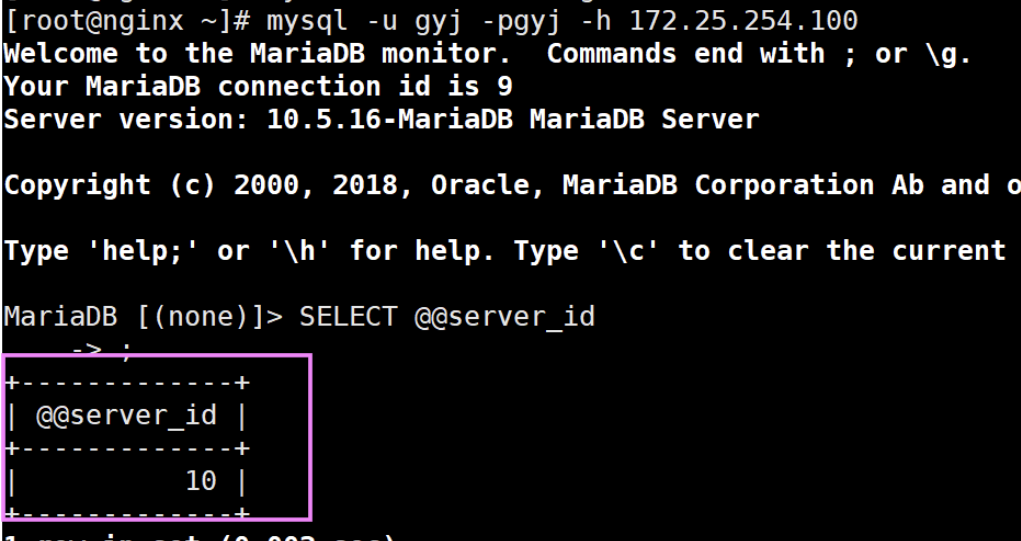
二次登录为20:
dns
在后端两台server下载dns,并且修改配置文件
vim /etc/named.conf
vim /etc/named.rfc1912.zones 
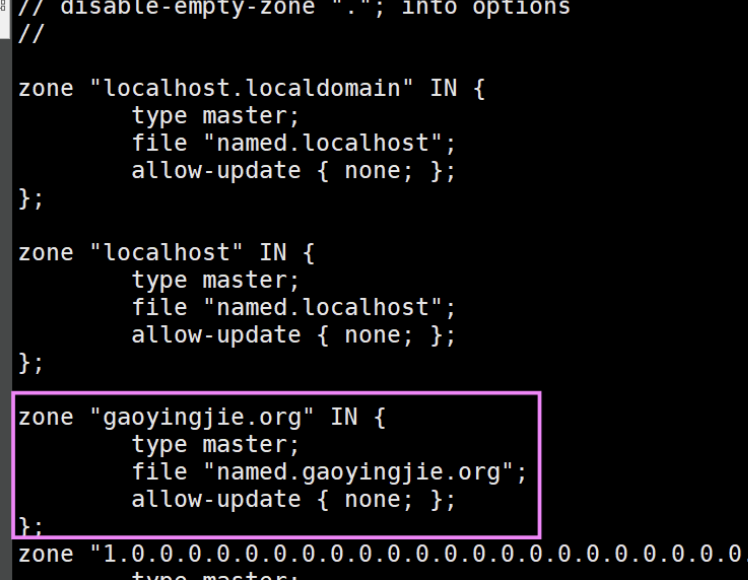
配置named.gaoyingjie.org文件:
cd /var/named/
cp named.localhost named.gaoyingjie.org -p
vim named.gaoyingjie.org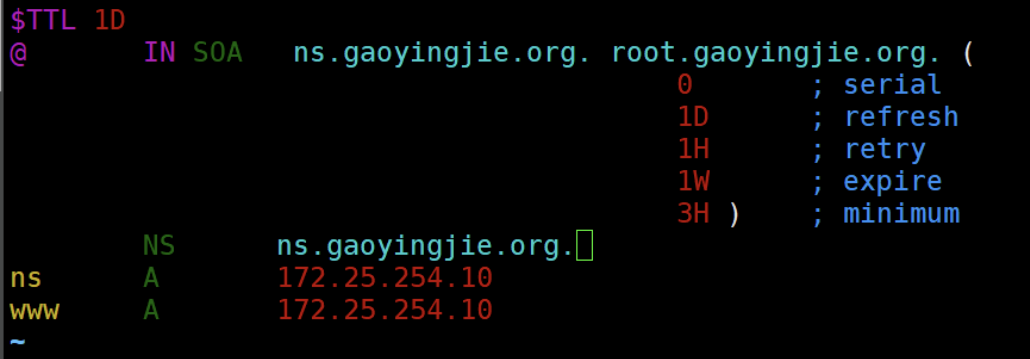
将这台10server的配置文件远程复制到另一台server20:
scp -p /etc/nama.{conf,rfc1912.zones} root@172.25.254.20:/etc/配置20的named.gaoyingjie.org文件
[root@apache1 named]# cp named.localhost named.gaoyingjie.org
[root@apache1 named]# vim named.gaoyingjie.org
dig www.gaoyingjie.org 172.25.254.10
dig www.gaoyingjie.org 172.25.254.20修改nginx的配置文件:
vim /usr/local/nginx/conf.d/tcp.conf
启动两台server的dns,并且查看是否解析成功:
dig www.gaoyingjie.org 172.25.254.10
dig www.gaoyingjie.org 172.25.254.20