windows内核研究(软件调试-内存断点)
软件调试
内存断点
无论是软件断点,内存断点,还是硬件断点,其本质就是让指定位置发生异常
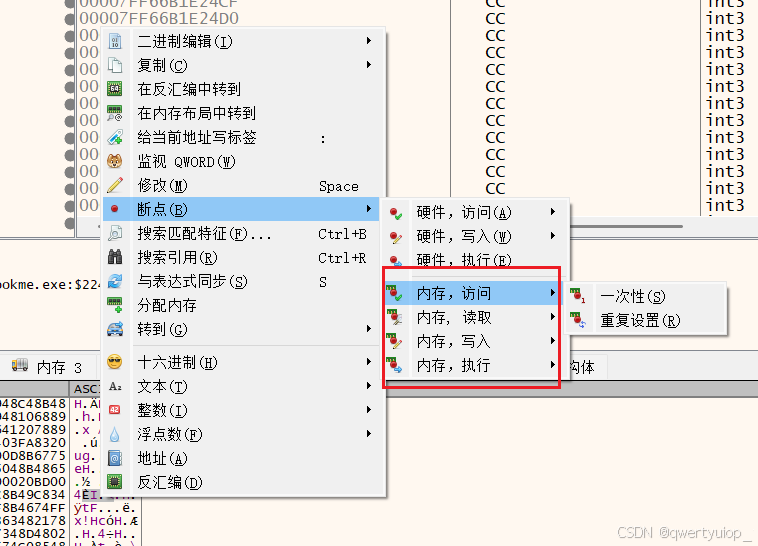
在x64dbg中可以选择一块内存对当前的内存的访问、读取、写入、执行操作下不同的断点
通过VirtualProtectEx函数就可以进行设置,本质上就是设置页的属性
BOOL VirtualProtectEx([in]  HANDLE hProcess,[in]  LPVOID lpAddress,[in]  SIZE_T dwSize,[in]  DWORD  flNewProtect,[out] PDWORD lpflOldProtect
);
当flNewProtect的属性被PAGE_NOACCESS,当前内存一但访问就会发生异常,这就是内存访问断点,这里观察PTE,此时P位为0,同理当要设置内存写入断点时,只需要把flNewProtect属性改PAGE_READONLY,(PTE P = 1 R/W = 0)设置为只读,一但有人写入这里,就会触发异常
代码测试
#include<iostream>
#include<windows.h>
#include <stdint.h>
#include <capstone/capstone.h>
#define DEBUGGR_PROCESS L"C:\\Users\\BananaLi\\Desktop\\HookMe.exe"// 保存原始字节
BYTE originalByte;
BYTE int3 = 0xCC;  // INT3 断点指令HANDLE g_hDebugThread;
HANDLE g_hDebugProcess;
BOOL bInitCapstone = TRUE;
CONTEXT context = { 0 };
BOOL bIsSystemInt3 = TRUE; // 第一次为系统断点 ntdll!LdrInitializeThunk
DWORD dwContinue DBG_CONTINUE;LPVOID lpAddress;
//HANDLE hProcess;DWORD pDwOriginalProtect; // 原保护标志指针void DisassembleHex(HANDLE g_hDebugProcess, LPVOID address, size_t size);
BOOL WaitForUserCommand();// 定义 Capstone 函数指针类型
typedef unsigned int (*cs_open_fn)(unsigned int arch, unsigned int mode, void** handle);
typedef unsigned int (*cs_disasm_fn)(void* handle, const uint8_t* code, size_t code_size, uint64_t address, size_t count, cs_insn** insn);
typedef void (*cs_free_fn)(cs_insn* insn, size_t count);
typedef unsigned int (*cs_close_fn)(void** handle);// 设置内存访问断点
void setMemoryBreakPoint(DEBUG_EVENT* pDebugEvent) {lpAddress = pDebugEvent->u.CreateProcessInfo.lpStartAddress;// 访问断点 PTE 的P位=0,表示禁止访问,任何对当前地址的访问都会导致异常,只要触发异常,就会被我们调用器捕获printf("设置内存访问断点地址:0x%llx\n",lpAddress);MEMORY_BASIC_INFORMATION mbi;if (VirtualQueryEx(g_hDebugProcess, lpAddress, &mbi, sizeof(mbi))) {// 确保区域状态为MEM_COMMITVirtualProtectEx(g_hDebugProcess, lpAddress, 8, PAGE_NOACCESS, &pDwOriginalProtect);}}// 访问冲突异常处理函数
BOOL AccessViolationExcptionProc(EXCEPTION_DEBUG_INFO* pExceptionInfo) {// 需要考虑的事情// 1.我们可以对任意大小内存设置内存断点// 2.假如我设置的一块内存断点,它们不在一个分页上,该怎么处理?BOOL bRet = FALSE;DWORD dwAccessFlag;		// 访问类型 0读 1写 8执行DWORD64 dwAccessAddr;		// 引发异常的 内存地址DWORD dwProtect = NULL;// 获取异常信息,修改内存属性dwAccessFlag = pExceptionInfo->ExceptionRecord.ExceptionInformation[0]; // 访问类型dwAccessAddr = pExceptionInfo->ExceptionRecord.ExceptionInformation[1];	// 异常地址printf("内存断点:0x%llx,\t 0x%llx\n", dwAccessFlag, dwAccessAddr);if (dwAccessAddr == (DWORD64)lpAddress) {VirtualProtectEx(g_hDebugProcess, (LPVOID)dwAccessAddr, 8, pDwOriginalProtect, &dwProtect); // 还原属性}// 获取线程上下文context.ContextFlags = CONTEXT_FULL | CONTEXT_DEBUG_REGISTERS;BOOL aa = GetThreadContext(g_hDebugThread, &context);printf("error:%d\n", GetLastError());printf("rip的值:0x%p\n\n", context.Rip);// 内存访问异常不需要修正ripSetThreadContext(g_hDebugThread, &context);// 反汇编代码 和 显示寄存器信息。。。DisassembleHex(g_hDebugProcess, lpAddress,16);// 等待用户输入命令while (bRet == FALSE) {bRet = WaitForUserCommand();}return bRet;
}void DisassembleHex(HANDLE g_hDebugProcess, LPVOID address, size_t size) {// 1. 加载 capstone.dllHMODULE capstone_dll = LoadLibrary(L"C:\\Users\\BananaLi\\Desktop\\capstone_x64.dll");if (!capstone_dll) {printf("Failed to load capstone.dll! Error: %d\n", GetLastError());}// 2. 获取函数指针cs_open_fn cs_open = (cs_open_fn)GetProcAddress(capstone_dll, "cs_open");cs_disasm_fn cs_disasm = (cs_disasm_fn)GetProcAddress(capstone_dll, "cs_disasm");cs_free_fn cs_free = (cs_free_fn)GetProcAddress(capstone_dll, "cs_free");cs_close_fn cs_close = (cs_close_fn)GetProcAddress(capstone_dll, "cs_close");if (!cs_open || !cs_disasm || !cs_free || !cs_close) {printf("Failed to get Capstone functions!\n");FreeLibrary(capstone_dll);}// 3. 初始化 Capstone(x64 模式)void* handle;if (cs_open(CS_ARCH_X86, CS_MODE_64, &handle) != CS_ERR_OK) {printf("Failed to initialize Capstone!\n");FreeLibrary(capstone_dll);}// 2. 从内存读取指令字节uint8_t code[32];SIZE_T bytesRead;if (!ReadProcessMemory(g_hDebugProcess, address, code, size, &bytesRead) || bytesRead != size) {printf("Failed to read memory at 0x%p\n", address);cs_close(&handle);return;}// 3. 反汇编cs_insn* insn;size_t count = cs_disasm(handle, code, bytesRead, (uint64_t)address, 0, &insn);if (count > 0) {printf("Disassembly at 0x%p:\n", address);printf("Address    | Bytes       | Assembly\n");printf("----------------------------------\n");for (size_t i = 0; i < count; i++) {printf("0x%08llx | ", insn[i].address);for (size_t j = 0; j < insn[i].size; j++) {printf("%02x ", insn[i].bytes[j]);}printf("%*s | %s %s\n",(int)(15 - insn[i].size * 3), "",insn[i].mnemonic,insn[i].op_str);}cs_free(insn, count);}else {printf("Failed to disassemble at 0x%p\n", address);}// 4. 关闭引擎cs_close(&handle);
}BOOL WaitForUserCommand() {// 模拟调试器等待用户输入命令printf("请输入命令:\n");system("pause");return TRUE;
}BOOL Int3ExcptionProc(EXCEPTION_DEBUG_INFO* pExceptionInfo) {BOOL bRet = FALSE;// 第一次为系统断点if (bIsSystemInt3) {bIsSystemInt3 = FALSE;return TRUE;}else {// 恢复原码BOOL nnn = WriteProcessMemory(g_hDebugProcess, pExceptionInfo->ExceptionRecord.ExceptionAddress, &originalByte, 1, NULL);printf("error : %d\n", GetLastError());// 显示断点位置printf("Int 3断点地址:0x%p\n",pExceptionInfo->ExceptionRecord.ExceptionAddress);// 获取线程上下文context.ContextFlags = CONTEXT_FULL | CONTEXT_DEBUG_REGISTERS;GetThreadContext(g_hDebugThread, &context);// 修正ripcontext.Rip--;printf("rip的值:0x%p\n\n", context.Rip);SetThreadContext(g_hDebugThread, &context);FlushInstructionCache(GetCurrentProcess(),(LPCVOID)context.Rip,1);printf("------------还原后的正确汇编指令------------\n");// 从断点位置解释反汇编代码DisassembleHex(g_hDebugProcess, lpAddress,16);// 等待用户输入命令while (bRet == FALSE) {bRet = WaitForUserCommand();}}return bRet;
}void setInt3BreakPoint(DEBUG_EVENT* pDebugEvent) {// 获取进程入口点地址LPTHREAD_START_ROUTINE lpStartAddress = (LPTHREAD_START_ROUTINE)pDebugEvent->u.CreateProcessInfo.lpStartAddress;/*hProcess = pDebugEvent->u.CreateProcessInfo.hProcess; */lpAddress = pDebugEvent->u.CreateProcessInfo.lpStartAddress;printf("断点位置:0x%p\n",lpAddress);DWORD64 oldAddressData;ReadProcessMemory(g_hDebugProcess, lpAddress, &oldAddressData, sizeof(DWORD64), NULL);printf("保存前断点地址对应的硬编码:%llx\n" , oldAddressData);// 1. 保存原始字节ReadProcessMemory(g_hDebugProcess, lpAddress, &originalByte, sizeof(BYTE), NULL);printf("保存的originalByte:%llx\n", originalByte);// 2. 写入INT3指令WriteProcessMemory(g_hDebugProcess, lpAddress, &int3, sizeof(BYTE), NULL);ReadProcessMemory(g_hDebugProcess, lpAddress, &oldAddressData, sizeof(DWORD64), NULL);printf("保存后断点地址对应的硬编码:%llx\n\n", oldAddressData);printf("------------设置软件断点后的汇编指令------------\n");// 从断点位置解释反汇编代码DisassembleHex(g_hDebugProcess, lpAddress, 16);// 3. 刷新指令缓存FlushInstructionCache(g_hDebugProcess, lpAddress, sizeof(BYTE));
}// 异常过滤器
BOOL ExceptionHandler(DEBUG_EVENT* pDebugEvent) {BOOL bRet = TRUE;// 得到异常信息EXCEPTION_DEBUG_INFO exceptionInfo = pDebugEvent->u.Exception;// 得到线程句柄// 判断 异常类型switch (exceptionInfo.ExceptionRecord.ExceptionCode) {// int 3 异常case EXCEPTION_BREAKPOINT: {printf("断点异常\n");bRet = Int3ExcptionProc(&exceptionInfo);break;}// 0xC0000005 访问冲突异常case EXCEPTION_ACCESS_VIOLATION: {printf("访问异常\n");bRet = AccessViolationExcptionProc(&exceptionInfo);break;}// 还有很多其他的异常类型可以处理。。。}return bRet;}int main() {BOOL nIsContinue = TRUE;DEBUG_EVENT debugEvent = { 0 };BOOL bRet = TRUE;// 1.创建调试进程STARTUPINFO startUpInfo = { 0 };PROCESS_INFORMATION pInfo = { 0 };GetStartupInfo(&startUpInfo);bRet = CreateProcess(DEBUGGR_PROCESS, NULL, NULL, NULL, TRUE, DEBUG_PROCESS || DEBUG_ONLY_THIS_PROCESS, NULL, NULL, &startUpInfo, &pInfo);if (bRet == FALSE) {printf("创建调试进程失败,错误码:%d\n",GetLastError());return 0;}// 调试循环(主框架)while (nIsContinue) {// 2.等待调试事件bRet = WaitForDebugEvent(&debugEvent, INFINITE);if (bRet == FALSE) {printf("等待调试事件失败,错误码:%d\n", GetLastError());return 0;}// 得到线程句柄g_hDebugThread = OpenThread(THREAD_ALL_ACCESS, FALSE, debugEvent.dwThreadId);// 得到进程句柄g_hDebugProcess = OpenProcess(PROCESS_ALL_ACCESS, FALSE, debugEvent.dwProcessId);switch (debugEvent.dwDebugEventCode) {case EXCEPTION_DEBUG_EVENT: {// 处理异常bRet = ExceptionHandler(&debugEvent);if (!bRet)dwContinue = DBG_EXCEPTION_NOT_HANDLED;break;}case CREATE_PROCESS_DEBUG_EVENT: {// 在OPE入口设置断点//setInt3BreakPoint(&debugEvent);// 在OPE入口设置内存访问断点setMemoryBreakPoint(&debugEvent);break;}case EXIT_PROCESS_DEBUG_EVENT: {nIsContinue = FALSE;break;}case CREATE_THREAD_DEBUG_EVENT: {break;}case EXIT_THREAD_DEBUG_EVENT: {break;}case LOAD_DLL_DEBUG_EVENT: {break;}case UNLOAD_DLL_DEBUG_EVENT: {break;}default:break;}// 让被调试程序继续运行bRet = ContinueDebugEvent(debugEvent.dwProcessId, debugEvent.dwThreadId, dwContinue);}return 0;
}
效果展示
