从零构建:Jenkins与Kubernetes集成的完整指南
一、jenkins实现k8s集成项目流程
1.项目背景
应公司领导要求,将测试环境上线K8S集群,并集成Jenkins实现自动的代码发布和回滚。
2.项目流程
- 部署jenkins服务
- K8S项目推送代码到gitee
- Jenkins构建docker镜像并推送到harbor仓库
- K8S项目迁移到K8S
- Jenkins回滚镜像
二、部署jenkins服务
1. Jenkins的安裝方式
参考官方文档:Jenkins安装
2. 修改软件源
参考链接:阿里云Ubuntu 镜像
#方便后期汉化
root@ubuntu211:~# localectl set-locale LANG=en_US.UTF-8
#修改软件源
root@ubuntu211:~# cat /etc/apt/sources.list
deb https://mirrors.aliyun.com/ubuntu/ focal main restricted universe multiverse
deb-src https://mirrors.aliyun.com/ubuntu/ focal main restricted universe multiversedeb https://mirrors.aliyun.com/ubuntu/ focal-security main restricted universe multiverse
deb-src https://mirrors.aliyun.com/ubuntu/ focal-security main restricted universe multiversedeb https://mirrors.aliyun.com/ubuntu/ focal-updates main restricted universe multiverse
deb-src https://mirrors.aliyun.com/ubuntu/ focal-updates main restricted universe multiversedeb https://mirrors.aliyun.com/ubuntu/ focal-backports main restricted universe multiverse
deb-src https://mirrors.aliyun.com/ubuntu/ focal-backports main restricted universe multiverse
3. 部署jdk环境
root@ubuntu211:~# netplan apply
root@ubuntu211:~#
root@ubuntu211:~# ping baidu.com  # 检查能否正常联网
PING baidu.com (39.156.66.10) 56(84) bytes of data.
64 bytes from 39.156.66.10 (39.156.66.10): icmp_seq=1 ttl=128 time=7.37 ms
...#更新源
root@ubuntu211:~# apt-get update #安装jdk
root@ubuntu211:~# apt-get -y install openjdk-11-jdk-headlessroot@ubuntu211:~# java --version
openjdk 11.0.20.1 2023-08-24
OpenJDK Runtime Environment (build 11.0.20.1+1-post-Ubuntu-0ubuntu120.04)
OpenJDK 64-Bit Server VM (build 11.0.20.1+1-post-Ubuntu-0ubuntu120.04, mixed mode, sharing)
4. 安装Jenkins
root@ubuntu211:~# dpkg -i jenkins_2.375.3_all.deb 5. 查看状态
#启动并设置开机自启
root@ubuntu211:~# systemctl enable --now jenkins.service
#查看状态
root@ubuntu211:~# systemctl status jenkins.service
● jenkins.service - Jenkins Continuous Integration ServerLoaded: loaded (/lib/systemd/system/jenkins.service; enabled; vendor preset: enabled)Active: active (running) since Mon 2023-09-18 07:54:45 UTC; 54s agoMain PID: 5641 (java)Tasks: 49 (limit: 4558)Memory: 1.2GCGroup: /system.slice/jenkins.service└─5641 /usr/bin/java -Djava.awt.headless=true -jar /usr/share/java/jenkins.war --webroot=/var/cache/jenkins/war --httpPo>Sep 18 07:54:19 ubuntu211 jenkins[5641]: c845614ed9534b3b8d7caacb32ef926e
Sep 18 07:54:19 ubuntu211 jenkins[5641]: This may also be found at: /var/lib/jenkins/secrets/initialAdminPassword
6. 浏览器访问并页面上修改密码
http://10.0.0.211:8080/
#查看初始密码
root@ubuntu211:~# cat /var/lib/jenkins/secrets/initialAdminPassword
c845614ed9534b3b8d7caacb32ef926e
7. 修改Jenkins的运行账号
root@ubuntu211:~# grep User /lib/systemd/system/jenkins.service
User=jenkins
root@ubuntu211:~#
root@ubuntu211:~# grep Group /lib/systemd/system/jenkins.service
Group=jenkins
root@ubuntu211:~#
root@ubuntu211:~# sed -i '/User=/s#jenkins#root#' /lib/systemd/system/jenkins.service
root@ubuntu211:~#
root@ubuntu211:~# sed -i '/Group=/s#jenkins#root#' /lib/systemd/system/jenkins.service
root@ubuntu211:~#
root@ubuntu211:~# grep User /lib/systemd/system/jenkins.service
User=root
root@ubuntu211:~#
root@ubuntu211:~# grep Group /lib/systemd/system/jenkins.service
Group=root
root@ubuntu211:~#
8. 重启Jenkins验证运行用户是否修改成功
root@ubuntu211:~# systemctl daemon-reload
root@ubuntu211:~#
root@ubuntu211:~# systemctl restart jenkins.service
root@ubuntu211:~#
root@ubuntu211:~# ps -ef | grep jenkins
root        5840       1 53 10:25 ?        00:00:09 /usr/bin/java -Djava.awt.headless=true -jar /usr/share/java/jenkins.war --webroot=/var/cache/jenkins/war --httpPort=8080
root        5975    1171  0 10:26 pts/0    00:00:00 grep --color=auto jenkins
root@ubuntu211:~#
9. 修改Jenkins国内的镜像源
root@ubuntu211:~# sed -i.bak 's#updates.jenkins.io/download#mirrors.tuna.tsinghua.edu.cn/jenkins#g' /var/lib/jenkins/updates/default.json
root@ubuntu211:~#
root@ubuntu211:~# sed -i 's#www.google.com#www.baidu.com#g' /var/lib/jenkins/updates/default.json
root@ubuntu211:~#
root@ubuntu211:~# ll /var/lib/jenkins/updates/default.json*
-rw-r--r-- 1 jenkins jenkins 2824940 Jun 26 10:30 /var/lib/jenkins/updates/default.json
-rw-r--r-- 1 jenkins jenkins 2807876 Jun 26 10:14 /var/lib/jenkins/updates/default.json.bak
root@ubuntu211:~#
三、K8S项目推送代码到gitee
1.gitee创建项目
项目名称为yiliao,我这里已提前上传至gitee了,下面讲解一下上传过程。

2. 源代码编译
#安装git工具
[root@harbor250 ~]# yum -y install git# Git 全局设置
[root@harbor250 ~]# git config --global user.name "liux"
[root@harbor250 ~]# git config --global user.email "8054563+liuxing88@user.noreply.gitee.com"#初始化代码仓库
[root@harbor250 ~]# mkdir liux-yiliao && cd liux-yiliao
[root@harbor250 liux-yiliao]# git init
Initialized empty Git repository in /root/liux-yiliao/.git/#上传源代码
[root@harbor250 liux-yiliao]# unzip yiliao.zip
[root@harbor250 liux-linux86]# rm -f  yiliao.zip #编写Dockerfile编译脚本
[root@harbor250 liux-yiliao]# cat Dockerfile
FROM harbor.liux.com/liux-web/nginx:1.25.1-alpineLABEL author=liuxing \email=1573374330@qq.comEXPOSE 80ADD . /usr/share/nginx/html
[root@harbor250 liux-yiliao]# cat build.sh
#!/bin/bashtag=$1
docker build -t  harbor.liux.com/liux-jenkins/yiliao:v${tag:-1} .docker push harbor.liux.com/liux-jenkins/yiliao:v${tag:-1}
3. 源代码提交至本地仓库
[root@harbor250 liux-yiliao]# git add .
[root@harbor250 liux-yiliao]# git commit -m 'yiliao demo first commit'
4. 提交代码到远程仓库
#移除已关联的远程仓库
[root@harbor250 liux-yiliao]# git remote remove origin
[root@harbor250 liux-yiliao]# git remote add origin https://gitee.com/liuxing88/liux-yiliao.git
[root@harbor250 liux-yiliao]# git remote -v
origin https://gitee.com/liuxing88/liux-yiliao.git (fetch)
origin https://gitee.com/liuxing88/liux-yiliao.git (push)
[root@harbor250 liux-yiliao]# git push -u origin "master"
Username for 'https://gitee.com': liuxing88
Password for 'https://liuxing88@gitee.com':
Counting objects: 92, done.
Delta compression using up to 2 threads.
Compressing objects: 100% (92/92), done.
Writing objects: 100% (92/92), 1.48 MiB | 1.37 MiB/s, done.
Total 92 (delta 11), reused 0 (delta 0)
remote: Powered by GITEE.COM [GNK-6.4]
To https://gitee.com/liuxing88/liux-yiliao.git* [new branch] master -> master
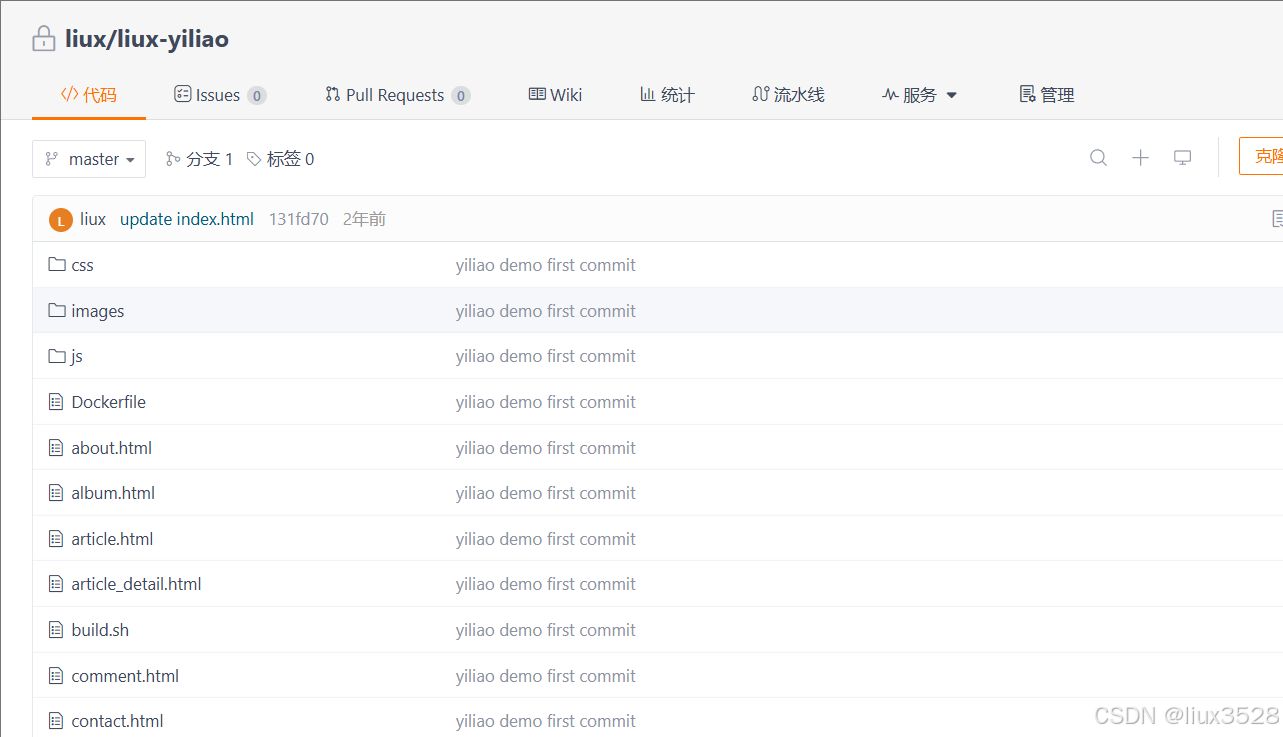
Branch master set up to track remote branch master from origin.5. 查看上传的代码
https://gitee.com/liuxing88/liux-yiliao
三、Jenkins构建docker镜像并推送到harbor仓库
1.jenkins服务器中安装docker环境
#我这里docker是一键式安装,脚本都打包好了的
root@jenkins211:~#  tar xf docker-20.10.tar.gz
root@jenkins211:~#
root@jenkins211:~# ./install-docker.sh install
2.添加docker的hosts解析
root@jenkins211:~# echo 10.0.0.250 harbor.liux.com >> /etc/hosts3.harbor安装部署
参考链接:docker专栏管理
4.添加harbor的证书文件到Jenkins节点
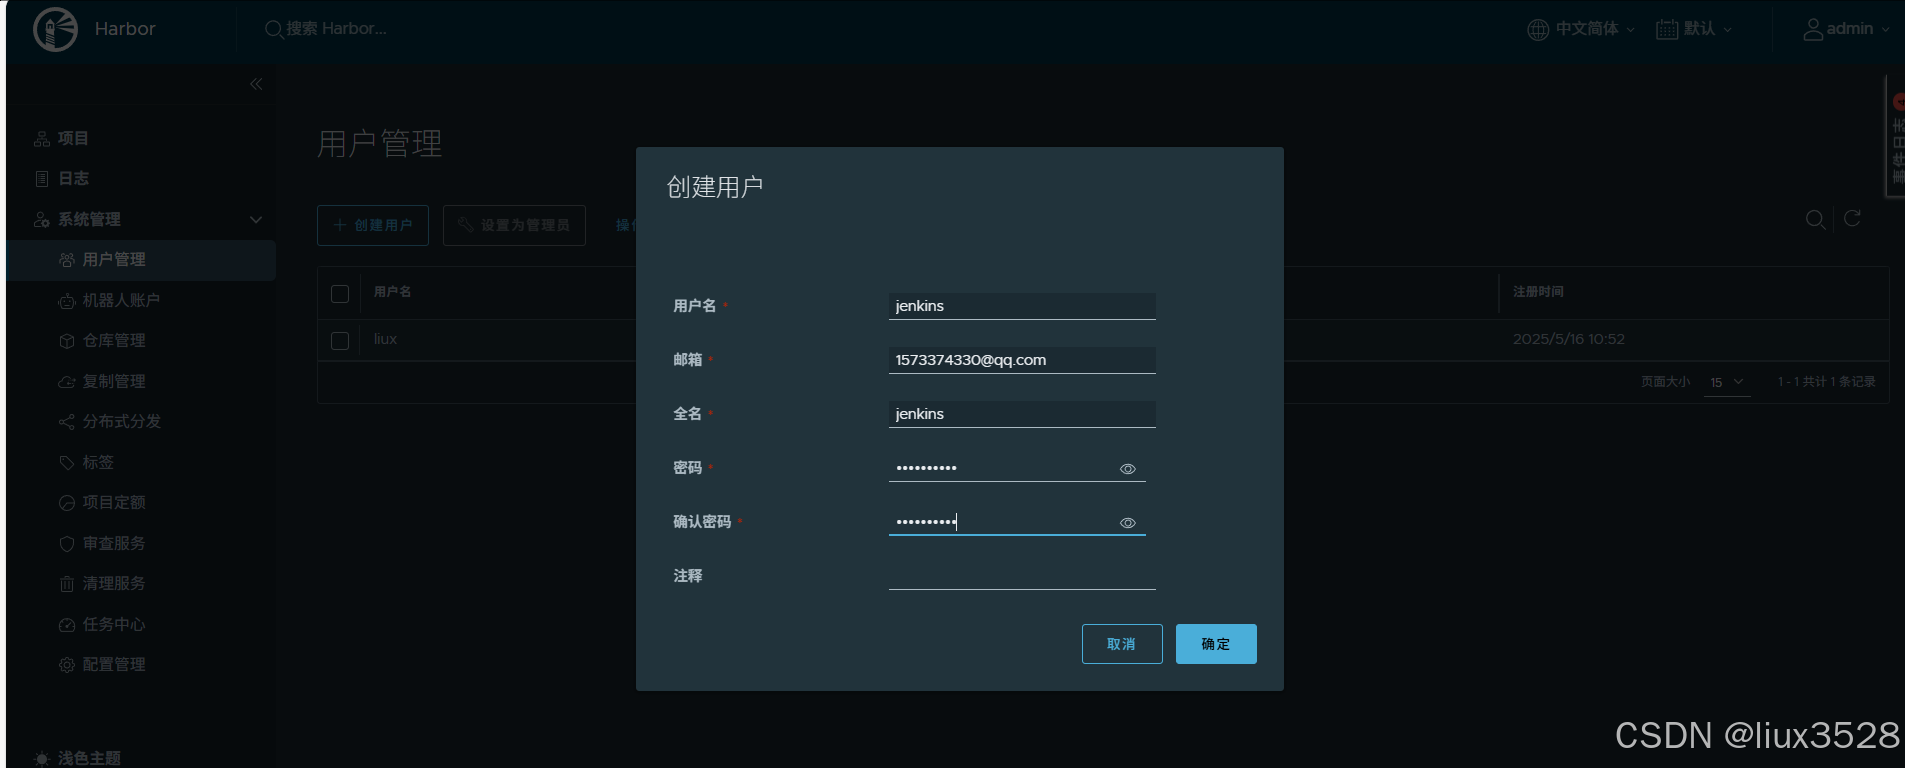
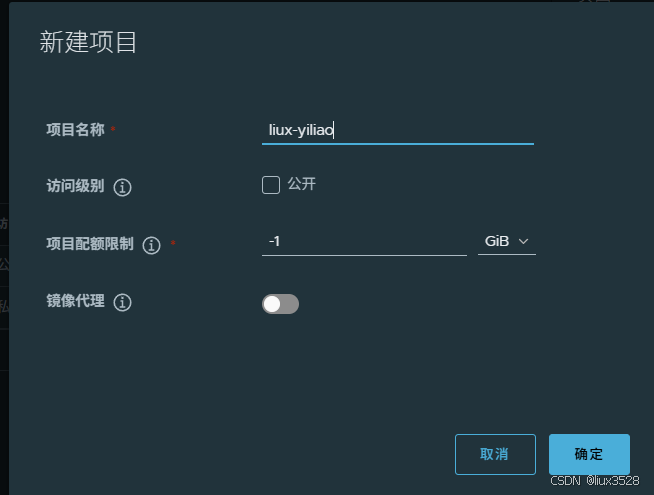
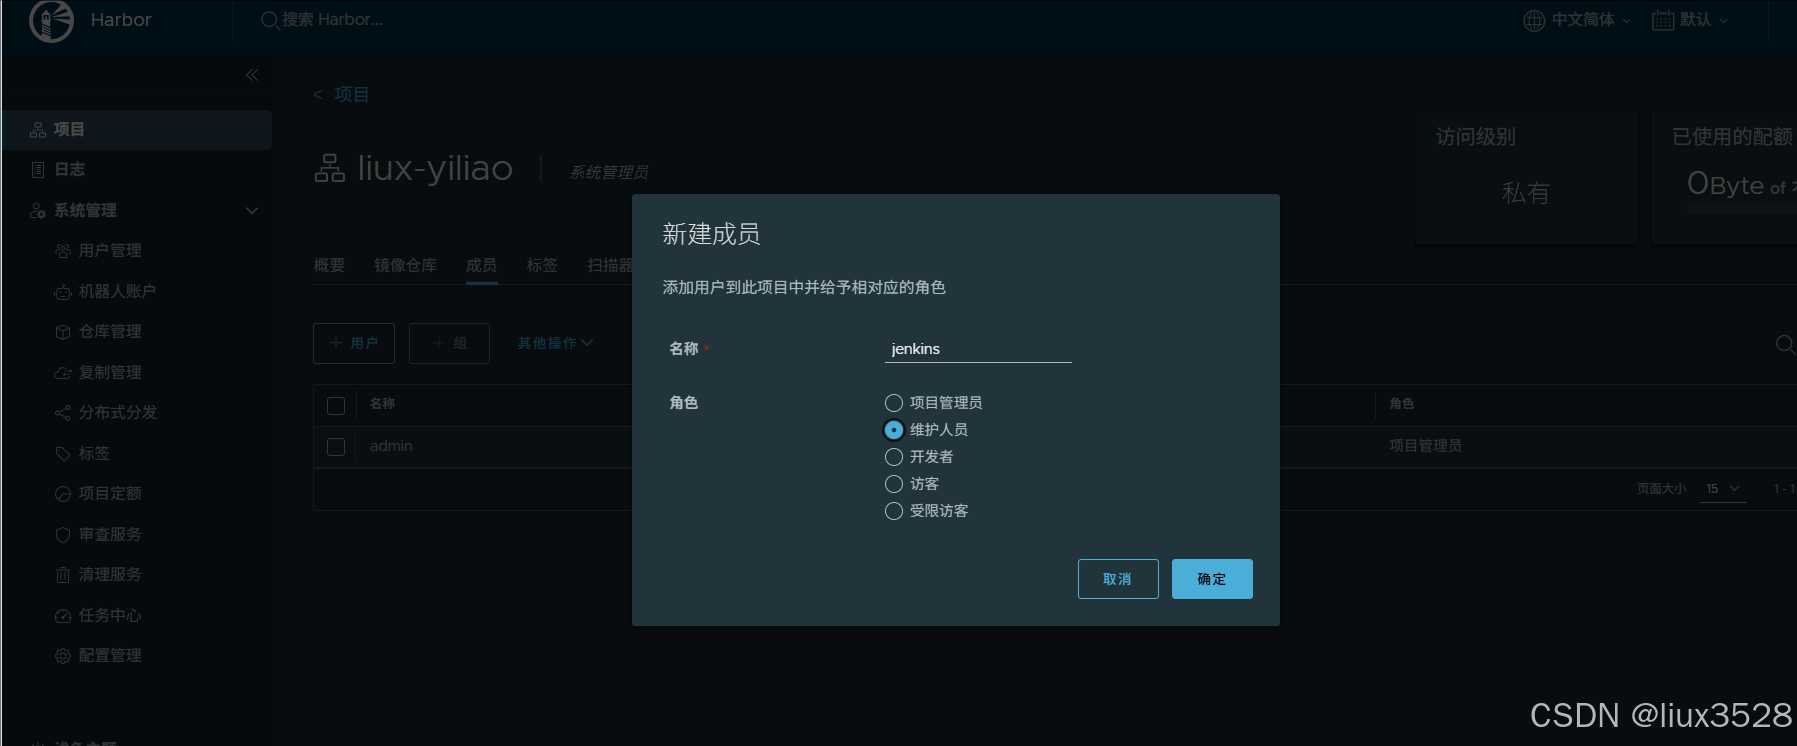
[root@harbor250 client]# scp -r /etc/docker/certs.d/ 10.0.0.211:/etc/docker/5.habor服务创建Jenkins普通用户和liux-yiliao项目
- 创建用户 用户名: jenkins 密 码: Linux@2023
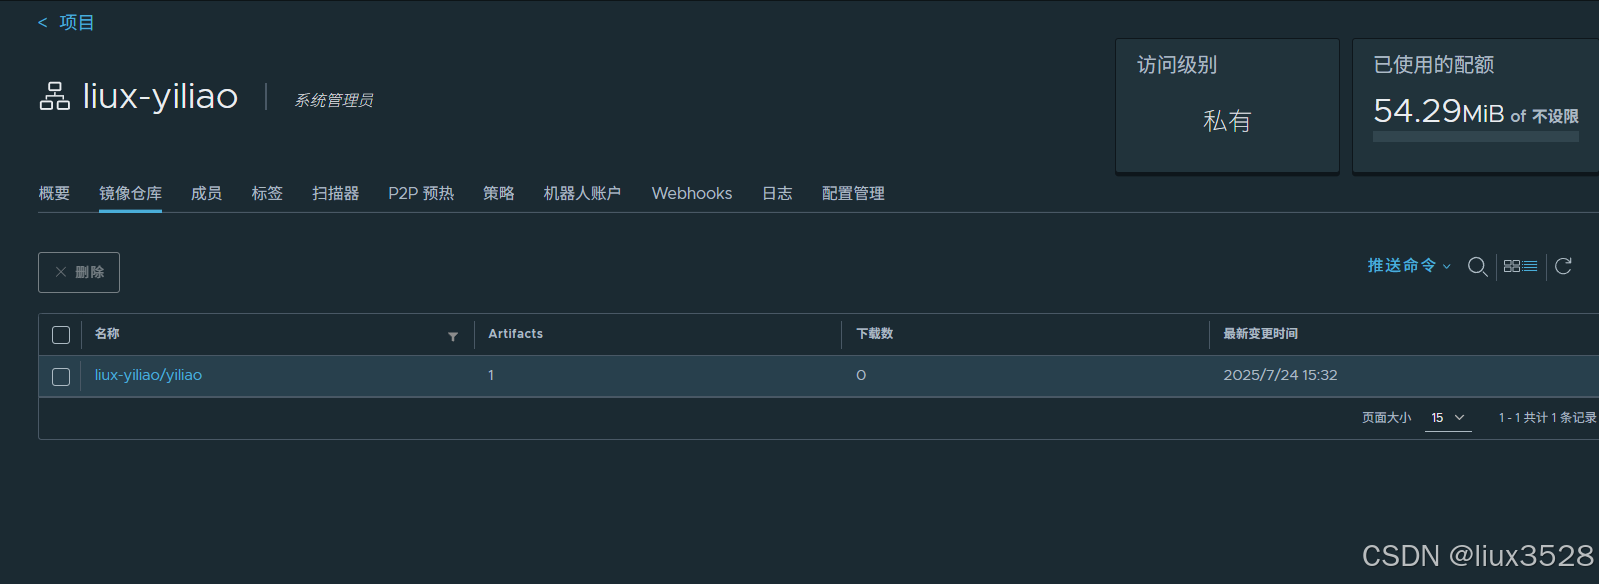
- 创建项目liux-yiliao项目
- 给liux-yiliao项目添加jenkins用户为成员
6.Jenkins服务器登录harbor私有仓库
root@jenkins211:~# docker login -u jenkins -p Linux@2023 harbor.liux.com
WARNING! Using --password via the CLI is insecure. Use --password-stdin.
WARNING! Your password will be stored unencrypted in /root/.docker/config.json.
Configure a credential helper to remove this warning. See
https://docs.docker.com/engine/reference/commandline/login/#credentials-storeLogin Succeeded#注意自签名证书需要在docker配置中添加insecure-registry
root@jenkins211 docker:~#  vim /etc/docker/daemon.json
"insecure-registries": ["harbor.liux.com"]#重启生效
root@jenkins211 docker:~# systemctl restart docker
7.Jenkins服务器上构建gitee项目
#克隆项目
root@jenkins211:~# git clone https://gitee.com/liuxing88/liux-yiliao.git
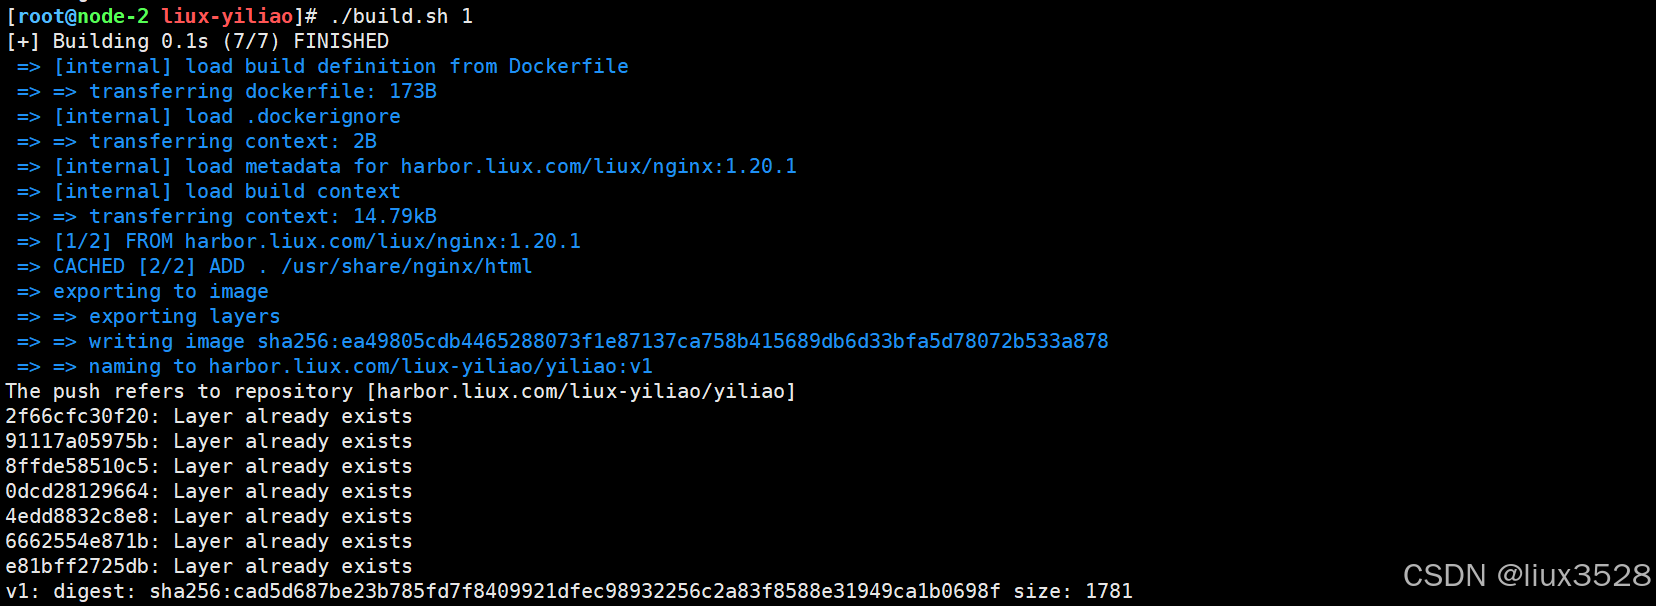
root@jenkins211:~# cd liux-yiliao/#构建并推送镜像到harbor
root@jenkins211:~# ./build.sh 1结果如下图所示:
四、项目迁移到K8S
1.Jenkins服务器上安装kubectl工具
#配置kubectl软件源
root@jenkins211:~# cat <<EOF >/etc/apt/sources.list.d/kubernetes.list
deb http://mirrors.ustc.edu.cn/kubernetes/apt kubernetes-xenial main
EOF#安装apt-key认证信息
root@jenkins211:~# curl -s https://mirrors.aliyun.com/kubernetes/apt/doc/apt-key.gpg | apt-key add -#更新软件源
apt-get update#验证是否支持软件源,查看支持的kubectl版本
apt-cache madison kubectl#安装指定的kubectl版本
root@jenkins211:~# apt-get -y install kubectl=1.23.17-00#验证kubectl的版本号,该步骤只能获取到Client Version信息,而无法获取到Server Version,属于正常现象。继续进行下一步即可解决。
root@jenkins211:~# kubectl version#master231节点将管理员的kubeconfig文件移动到Jenkins节点。
[root@master231 ~]# scp /root/.kube/config 10.0.0.211:/root/.kube/#再次验证kubectl的版本号
[root@master231 ~]# kubectl version
Client Version: version.Info{Major:"1", Minor:"23", GitVersion:"v1.23.1", GitCommit:"86ec240af8cbd1b60bcc4c03c20da9b98005b92e", GitTreeState:"clean", BuildDate:"2021-12-16T11:41:01Z", GoVersion:"go1.17.5", Compiler:"gc", Platform:"linux/amd64"}
Server Version: version.Info{Major:"1", Minor:"23", GitVersion:"v1.23.1", GitCommit:"86ec240af8cbd1b60bcc4c03c20da9b98005b92e", GitTreeState:"clean", BuildDate:"2021-12-16T11:34:54Z", GoVersion:"go1.17.5", Compiler:"gc", Platform:"linux/amd64"}
2.master创建harbor的登录凭据信息
[root@master-1 liux-yiliao]# kubectl create secret docker-registry harbor-jenkins --docker-username=jenkins --docker-password=Linux@2023 --docker-email=jenkins@liux.com --docker-server=harbor.liux.com
secret/harbor-jenkins created
3.创建deployment资源
[root@master-1 ~]# cat deploy-yiliao.yaml
apiVersion: apps/v1
kind: Deployment
metadata:name: deploy-yiyao
spec:replicas: 3selector:matchExpressions:- key: appsvalues:- "yiyao"operator: Intemplate:metadata:labels:apps: yiyaospec:imagePullSecrets: - name: harbor-jenkinscontainers:- name: yiyaoimage: harbor.liux.com/liux-yiliao/yiliao:v1[root@master-1 ~]# kubectl apply -f deploy-yiliao.yaml
deployment.apps/deploy-yiyao created[root@master-1 ~]# kubectl get pods -o wide
NAME                                      READY   STATUS             RESTARTS      AGE    IP           NODE     NOMINATED NODE   READINESS GATES
deploy-yiyao-6fc9669d65-7z7lw             1/1     Running            0             6s     10.244.1.2   node-2   <none>           <none>
deploy-yiyao-6fc9669d65-kxjwk             1/1     Running            0             6s     10.244.1.5   node-2   <none>           <none>
deploy-yiyao-6fc9669d65-t6jx8             1/1     Running            0             6s     10.244.1.3   node-2   <none>           <none>
4.创建service资源
[root@master-1 ~]# cat svc-yiliao.yaml
apiVersion: v1
kind: Service
metadata:name: svc-yiyao
spec:type: NodePortselector:apps: yiyaoports:- port: 80targetPort: 80nodePort: 30080
[root@master-1 ~]# kubectl apply -f svc-yiliao.yaml
service/svc-yiyao created
[root@master-1 ~]# kubectl get svc
NAME         TYPE        CLUSTER-IP   EXTERNAL-IP   PORT(S)        AGE
kubernetes   ClusterIP   10.0.0.1     <none>        443/TCP        7d3h
svc-yiyao    NodePort    10.0.0.178   <none>        80:30080/TCP   4s
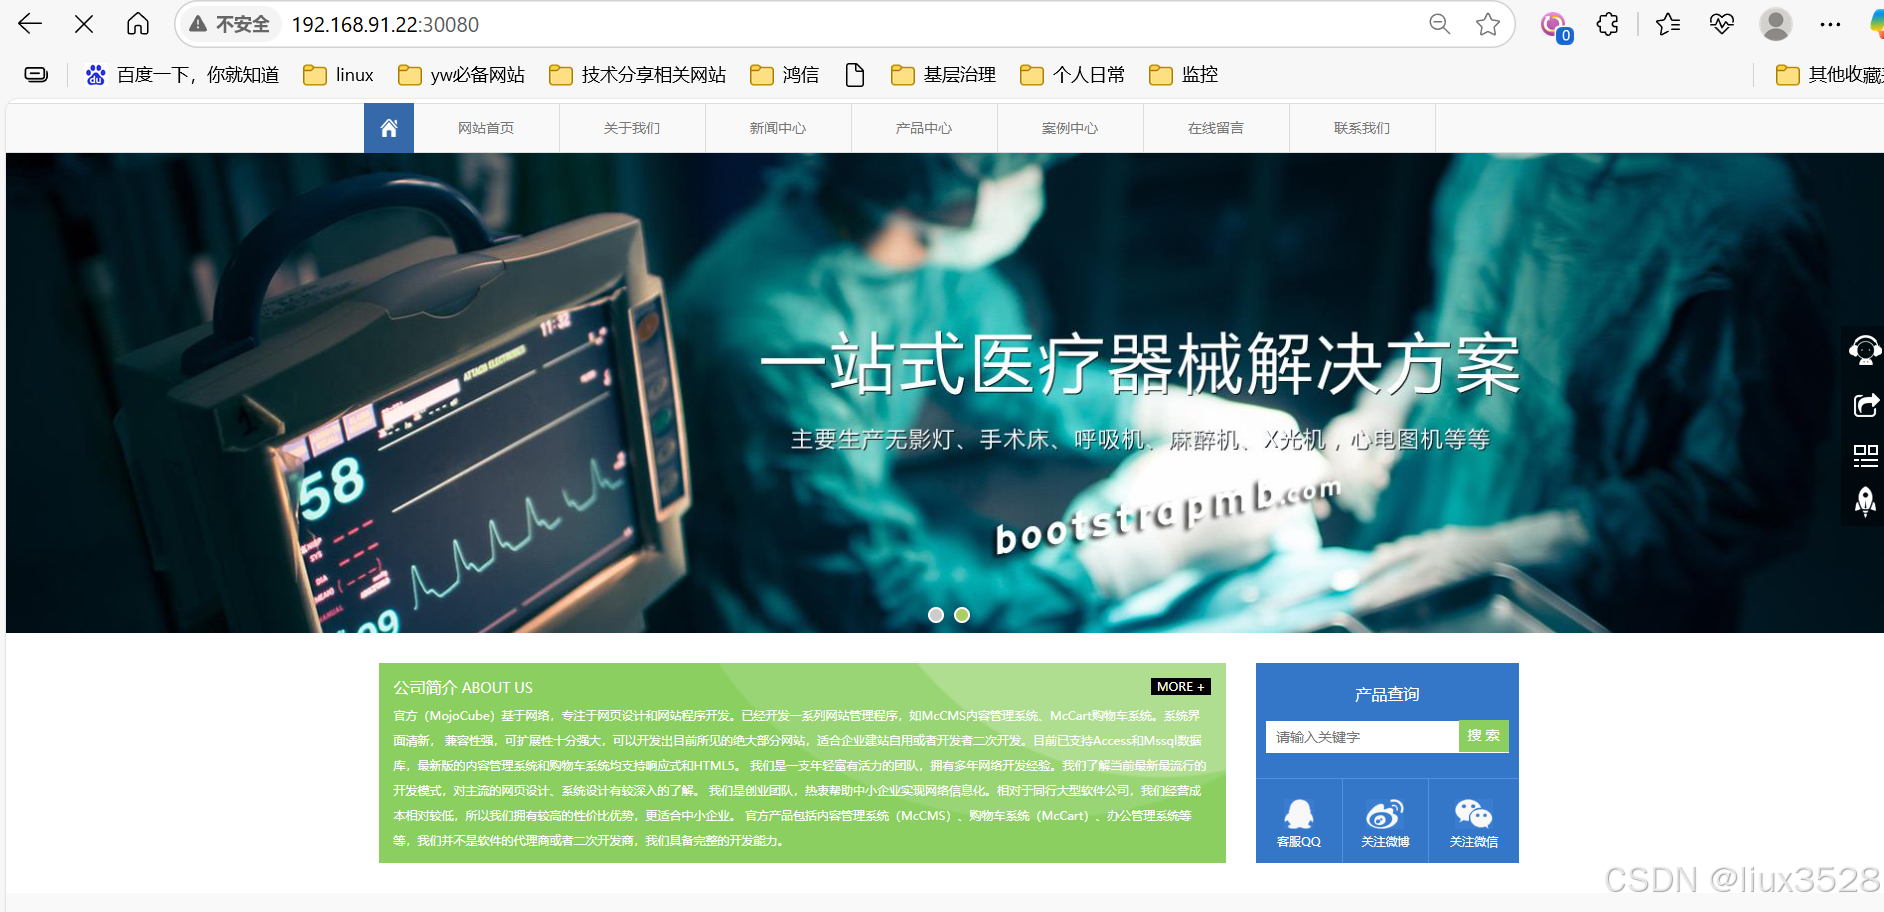
如下图所示,已经手动成功部署了医疗项目。

5.Jenkins配置部署
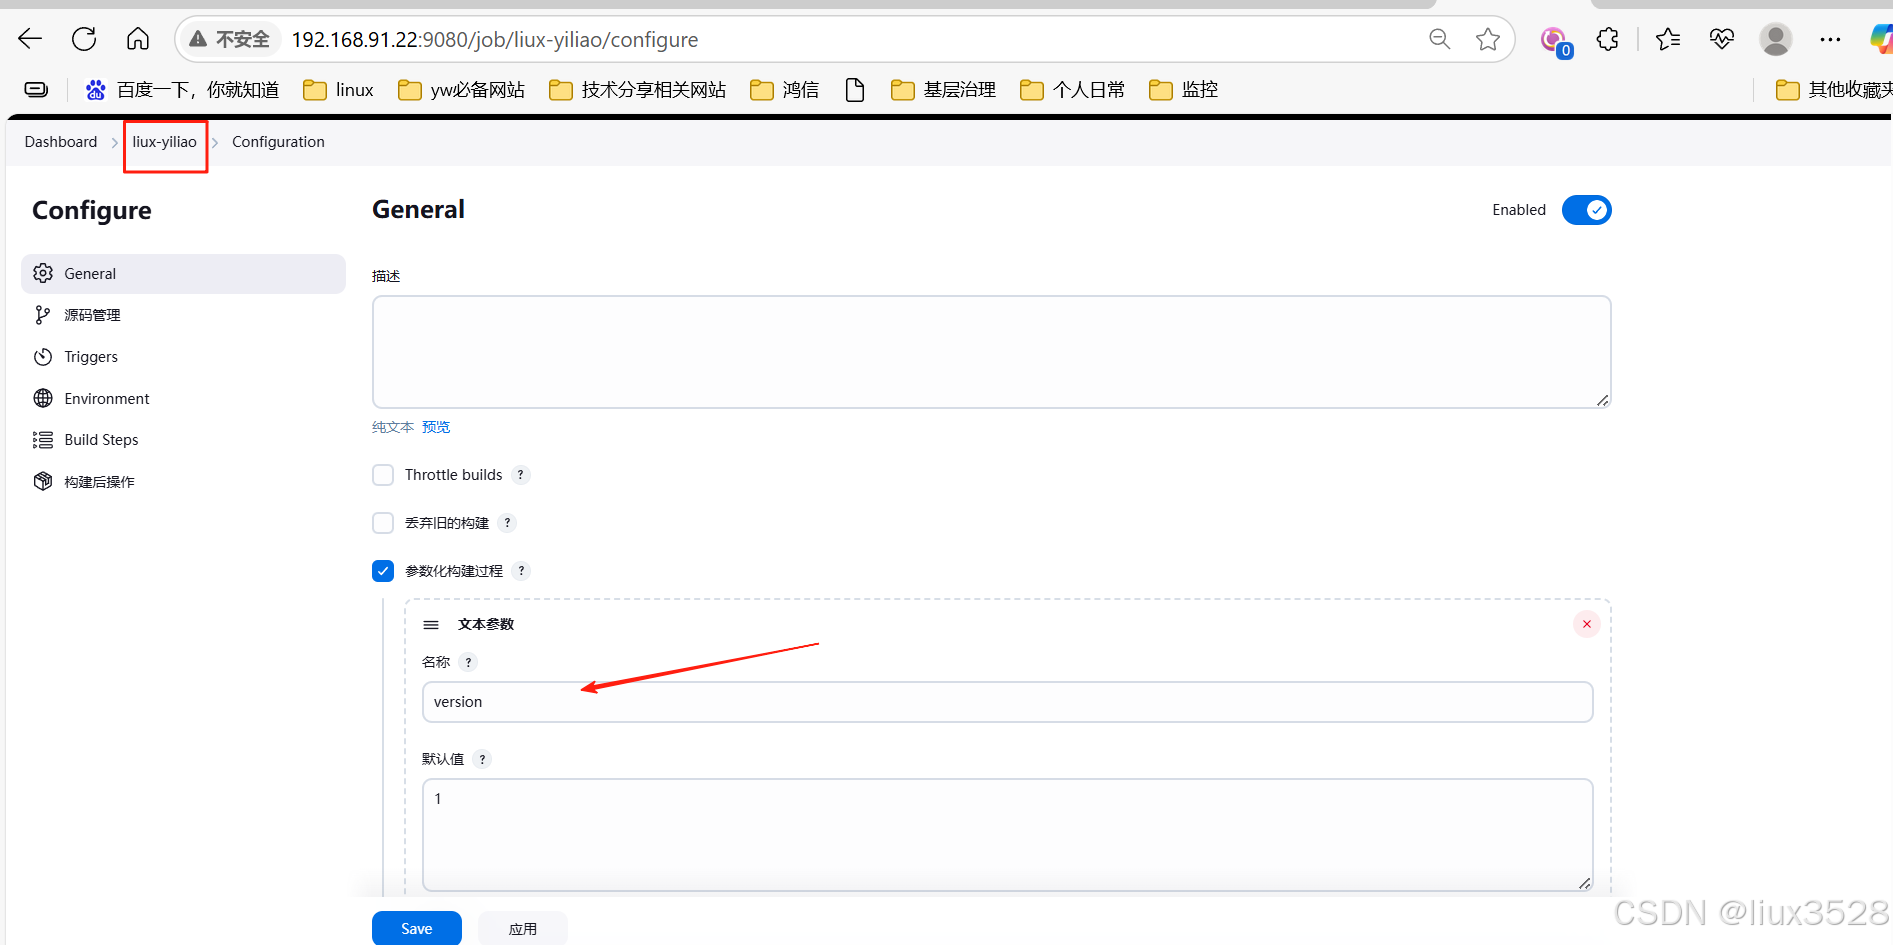
- 创建项目,配置参数化构建
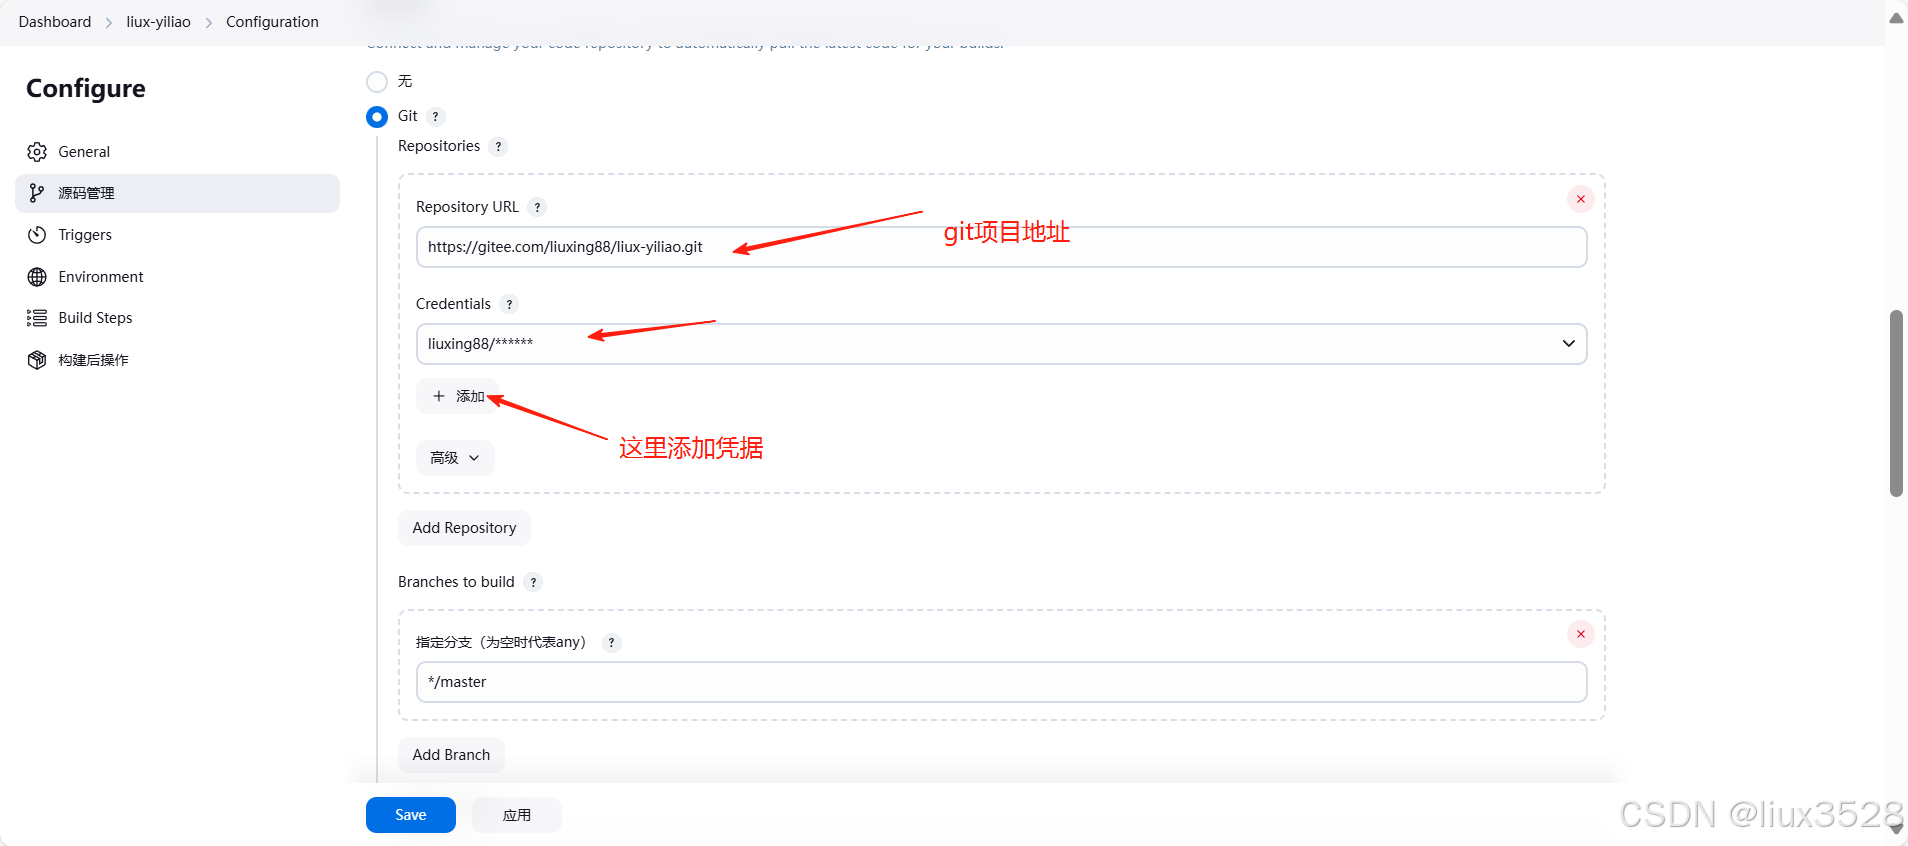
- 配置git信息拉取项目
- 配置需要执行的shell脚本
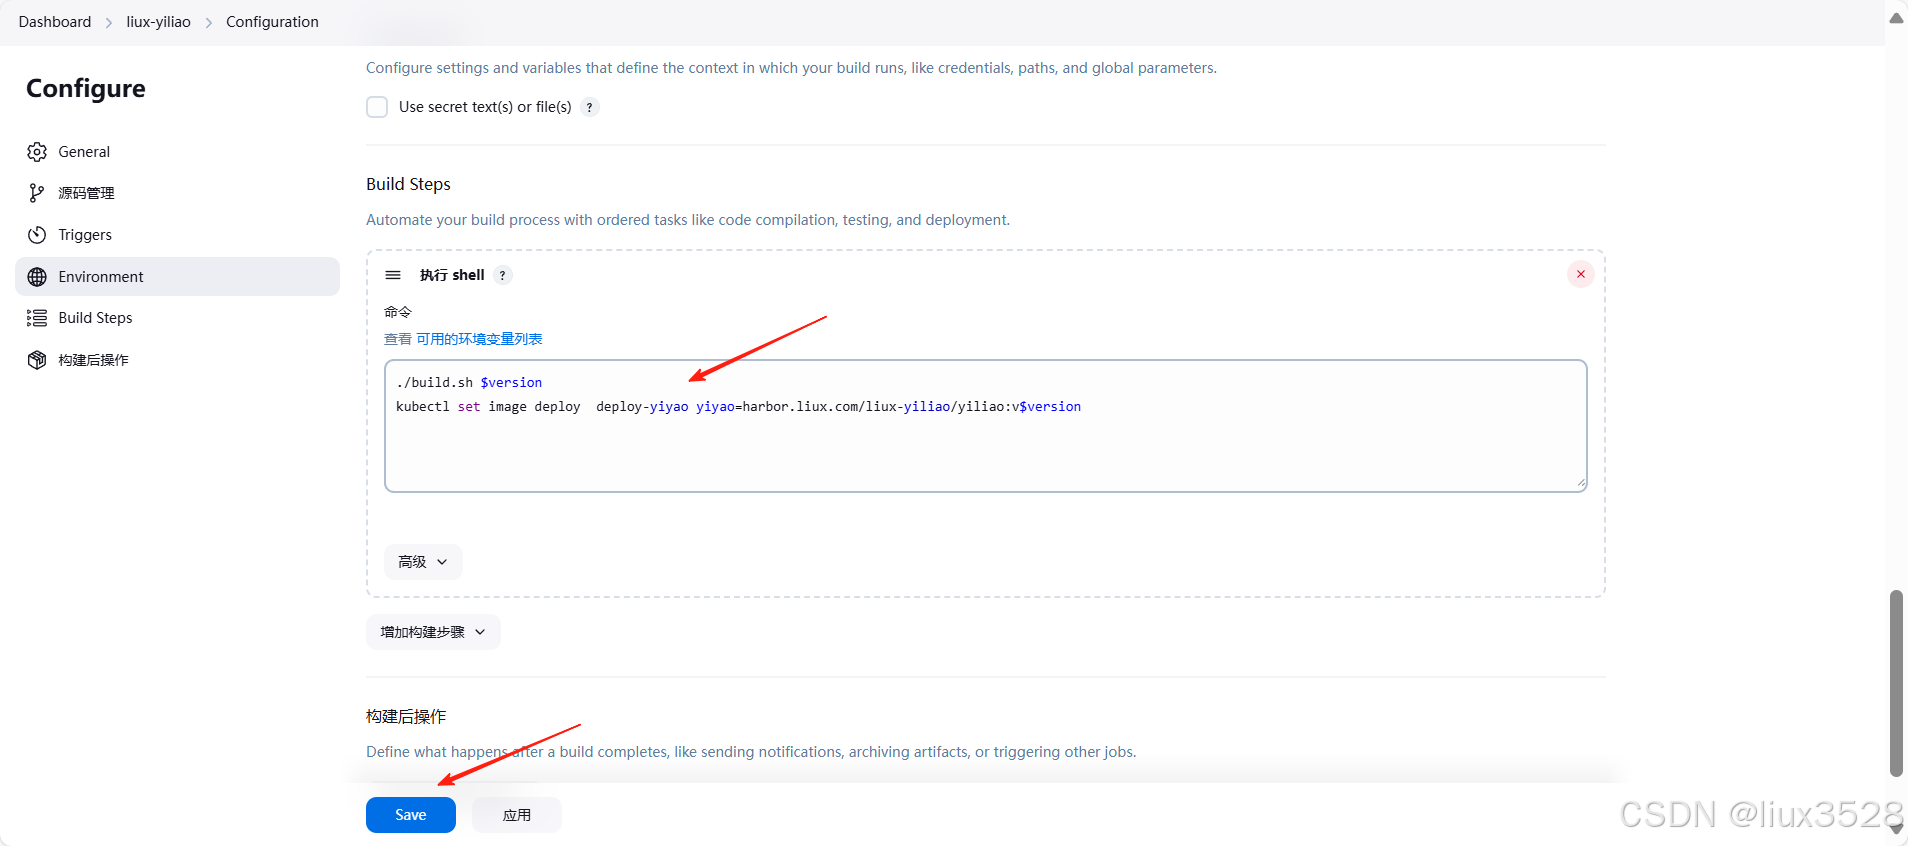
./build.sh $version
kubectl set image deploy  deploy-yiyao yiyao=harbor.liux.com/liux-yiliao/yiliao:v$version
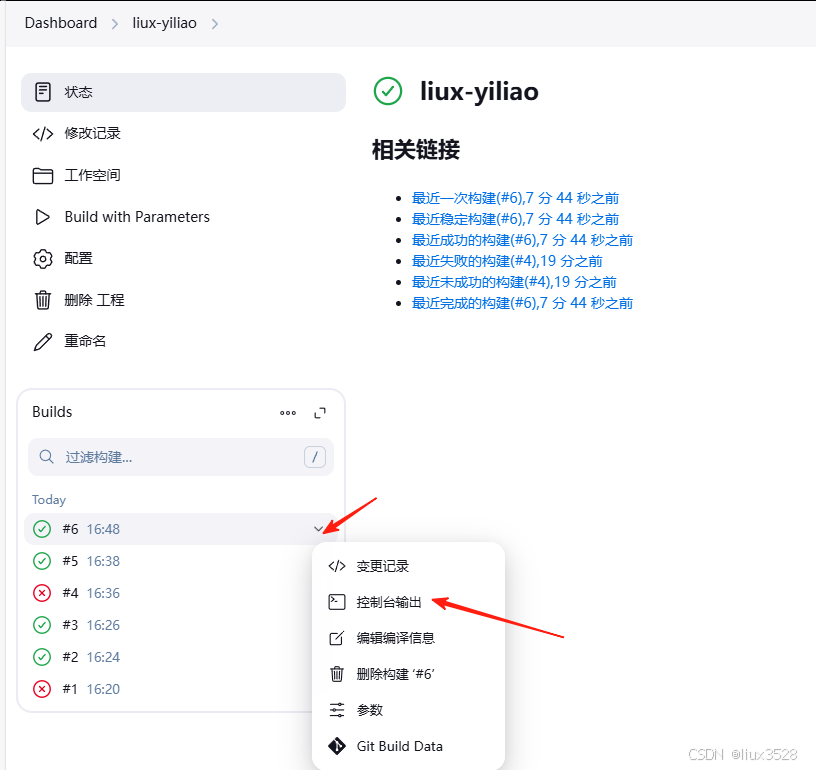
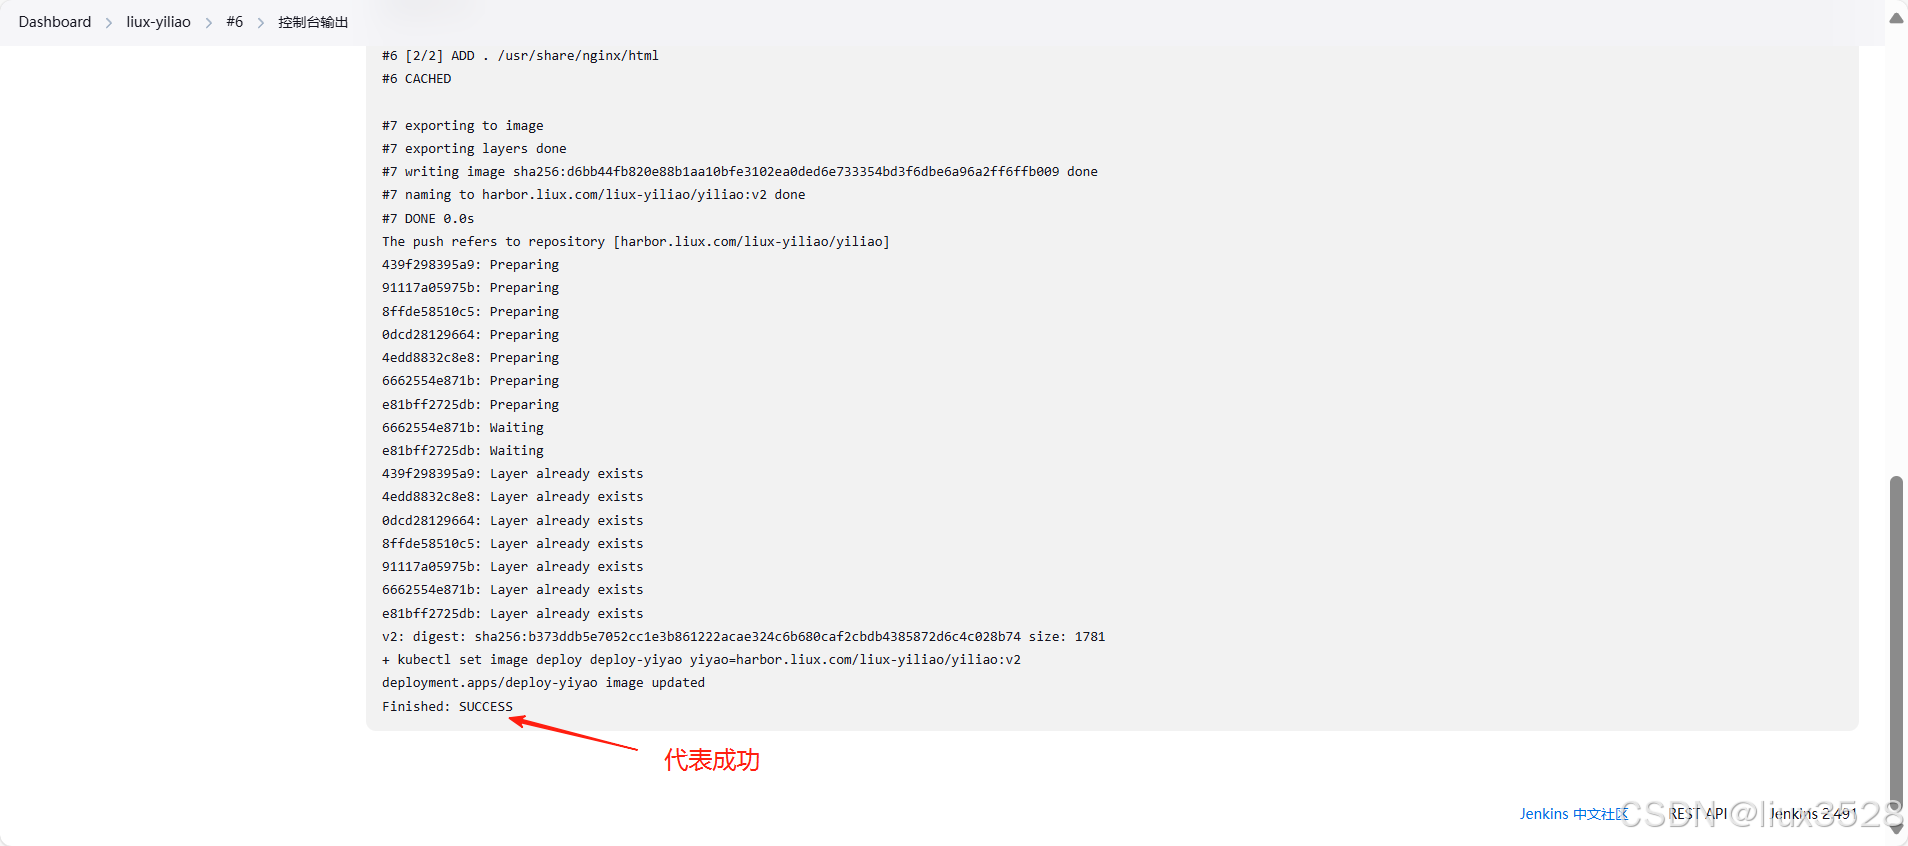
- build执行

- 查看控制台日志
6.访问测试
[root@master-1 ~]# kubectl get pods,svc,endpoints
NAME                                          READY   STATUS             RESTARTS      AGE
pod/deploy-yiyao-584f54f8dd-fg228             1/1     Running            0             11m
pod/deploy-yiyao-584f54f8dd-gbw8n             1/1     Running            0             11m
pod/deploy-yiyao-584f54f8dd-lzsh2             1/1     Running            0             11m
pod/deploy-yiyao-58fcb67d8f-5pn5m             0/1     ImagePullBackOff   0             10m
pod/nfs-client-provisioner-56cc478696-x8r6c   1/1     Running            3 (56m ago)   2d1hNAME                 TYPE        CLUSTER-IP   EXTERNAL-IP   PORT(S)        AGE
service/kubernetes   ClusterIP   10.0.0.1     <none>        443/TCP        7d4h
service/svc-yiyao    NodePort    10.0.0.178   <none>        80:30080/TCP   50mNAME                       ENDPOINTS                                                  AGE
endpoints/fuseim.pri-ifs   <none>                                                     2d1h
endpoints/kubernetes       192.168.91.18:6443,192.168.91.19:6443,192.168.91.20:6443   7d4h
endpoints/svc-yiyao        10.244.0.2:80,10.244.1.2:80,10.244.1.3:80                  50m
使用节点ip:30080访问业务。
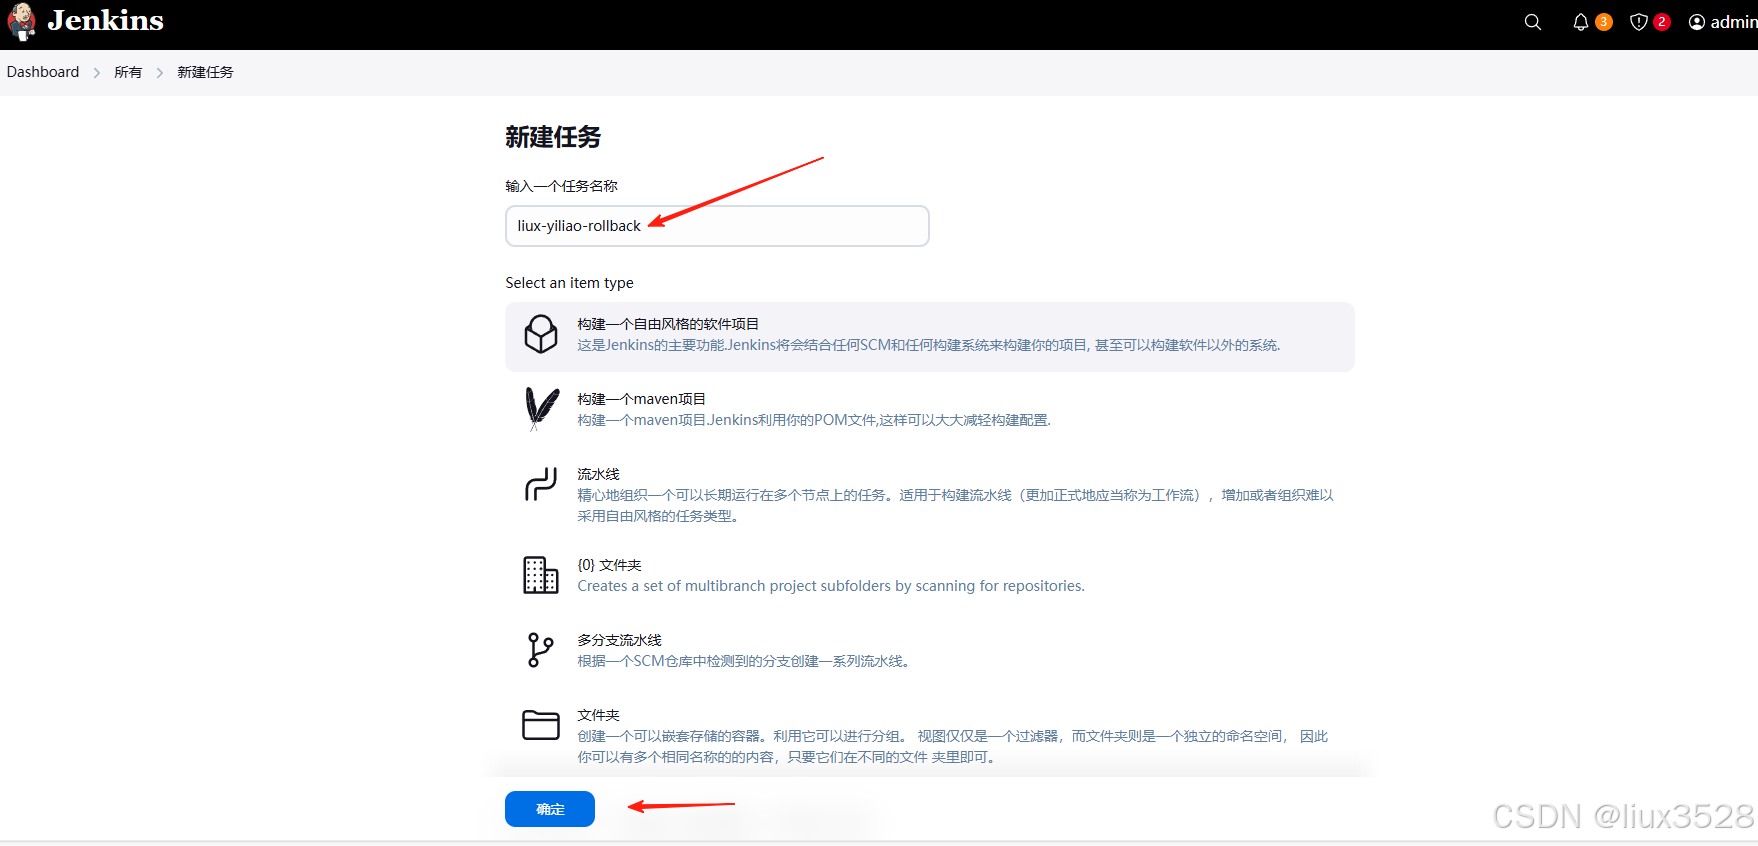
7.Jenkins回滚镜像
- 新建一个项目liux-yiliao-rollback
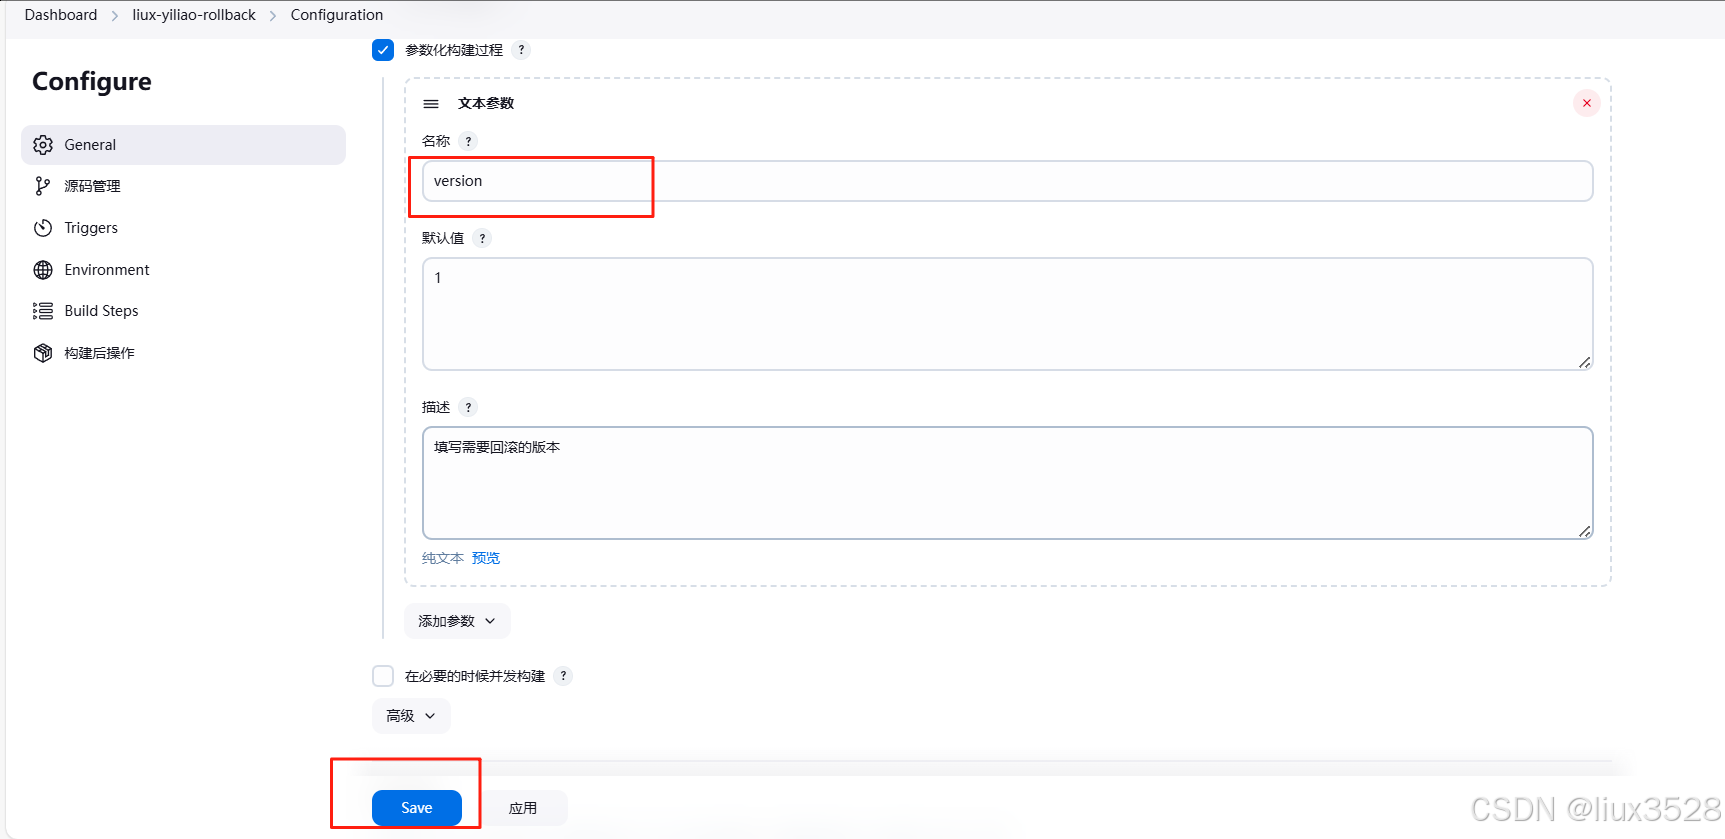
- 配置回滚版本参数
- 配置回滚脚本
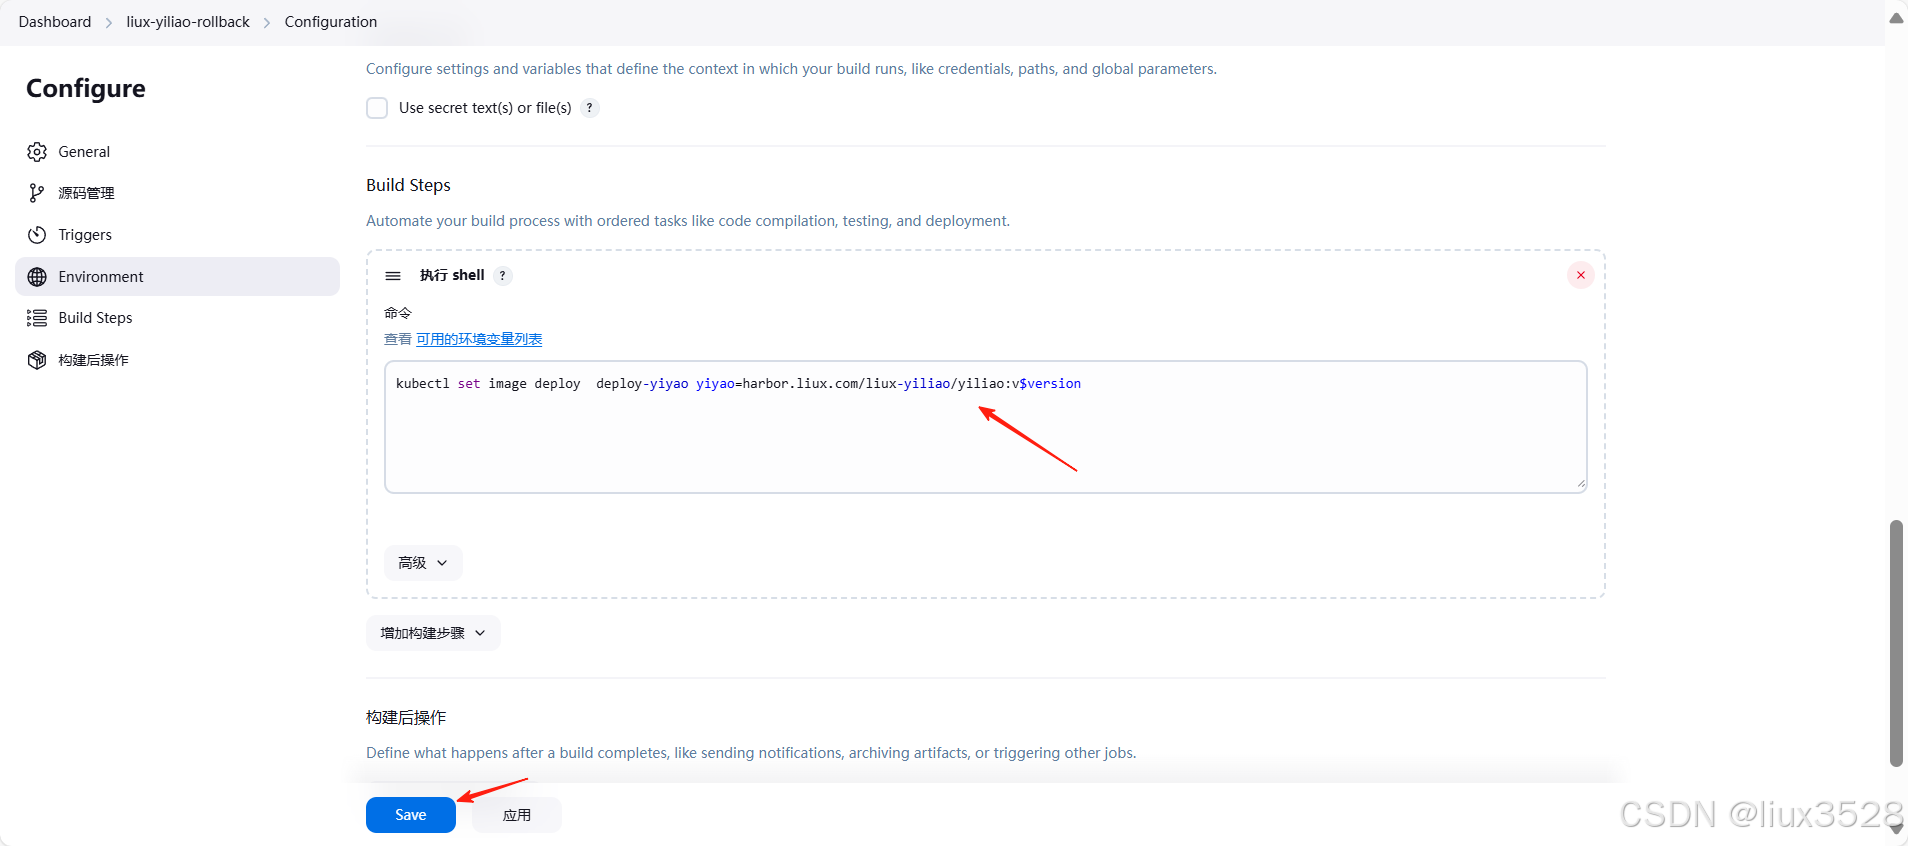
kubectl set image deploy deploy-yiyao yiyao=harbor.liux.com/liux-yiliao/yiliao:v$version- 测试回滚效果
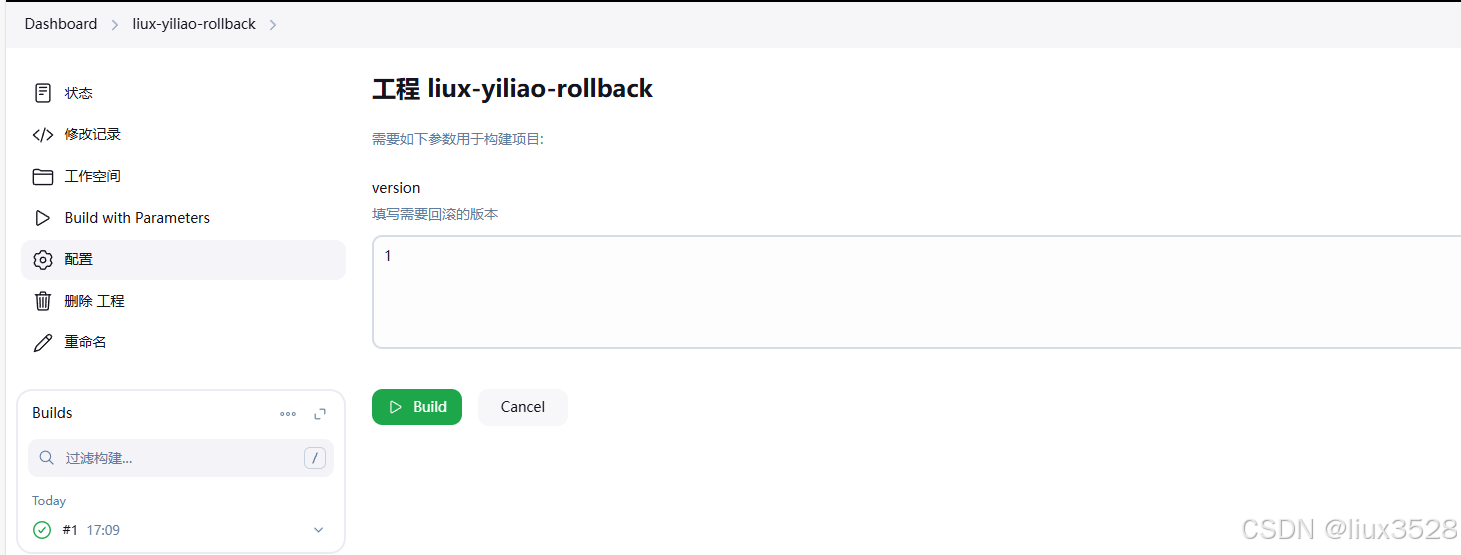
如下图所示,发现已经回滚到第一个版本了
[root@node-2 liux-yiliao]# kubectl edit deploy deploy-yiyao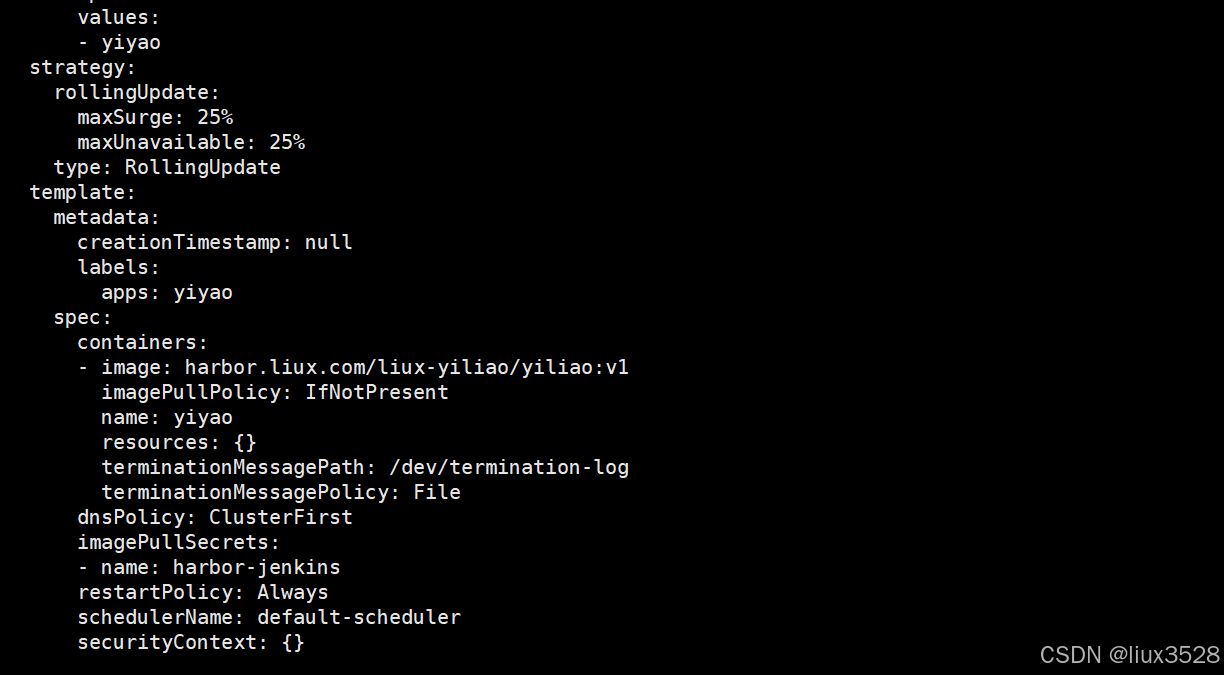
本文详细介绍了Jenkins与Kubernetes(K8S)的集成部署流程。首先在Ubuntu系统上部署Jenkins服务,包括修改软件源、安装JDK环境、配置国内镜像源等步骤。然后通过Git将医疗项目代码推送到Gitee代码仓库,并编写Dockerfile和构建脚本。接着配置Jenkins与Harbor私有仓库集成,实现Docker镜像的自动构建和推送。最后在K8S集群中创建Deployment和Service资源,通过Jenkins实现项目的自动化部署和版本回滚功能。整个流程涵盖了从代码管理到持续集成再到容器化部署的完整DevOps实践,实现了测试环境的自动化发布和回滚能力。