OpenLayers 快速入门(三)Source 对象补充
看过的知识不等于学会。唯有用心总结、系统记录,并通过温故知新反复实践,才能真正掌握一二
作为一名摸爬滚打三年的前端开发,开源社区给了我饭碗,我也将所学的知识体系回馈给大家,助你少走弯路!
OpenLayers、Leaflet 快速入门 ,每周保持更新 2 个案例
Cesium 快速入门,每周保持更新 4 个案例
OpenLayers 快速入门(一)Map对象
OpenLayers 快速入门(二)Layer 对象
OpenLayers 快速入门(三)Source 对象补充
OpenLayers 快速入门(四)View 对象
OpenLayers 快速入门(五)Controls 对象
OpenLayers 快速入门(六)Interaction 对象
OpenLayers 快速入门(七)矢量数据
OpenLayers 快速入门(八)事件系统
OpenLayers 快速入门(九)Extent 介绍
OpenLayers 快速入门(十)常用 API 补充
Source 源
Source 是 OpenLayers 的数据引擎,负责获取和转换原始地理数据,与 Layer 协同工作实现地图可视化。
设计哲学:Source 处理数据获取,Layer 负责渲染呈现。
我们已经在 Layer 部分介绍了大部分 Source,这里补充了聚类(Cluster)的用法
Source 类型
| Source 子类 | 描述 | 常用场景 |
|---|---|---|
ol/source/Image | 抽象基类,用于单一图像的源(如静态地图)。 | 不直接使用,而是使用其子类。 |
ol/source/ImageArcGISRest | 从 ArcGIS REST 服务获取图像。 | 使用 ArcGIS REST 服务作为图层源。 |
ol/source/ImageCanvas | 基于 HTML Canvas 元素的图像源。 | 动态生成图像(如绘制实时数据)。 |
ol/source/ImageMapGuide | 从 MapGuide 服务器获取图像。 | 使用 MapGuide 服务器提供的地图服务。 |
ol/source/ImageStatic | 用于加载静态图像的源。 | 加载单张图片(如航拍图、历史地图)作为图层。 |
ol/source/ImageWMS | 用于 WMS 服务的图像源。 | 加载 WMS 服务提供的地图图片。 |
ol/source/Raster | 用于处理其他源的数据,生成栅格输出。 | 对多个源进行像素级操作(如图像融合、计算)。 |
ol/source/Source | 所有源的抽象基类。 | 不直接使用。 |
ol/source/Tile | 抽象基类,用于基于瓦片的源。 | 不直接使用,而是使用其子类。 |
ol/source/TileArcGISRest | 从 ArcGIS REST 服务获取瓦片。 | 使用 ArcGIS REST 服务作为瓦片图层源。 |
ol/source/TileDebug | 用于调试的瓦片源,显示瓦片的边界和编号。 | 调试瓦片坐标和加载情况。 |
ol/source/TileImage | 基类,用于通过 URL 模板加载瓦片的源。 | 通常用于自定义瓦片源,或作为其他瓦片源的基础。 |
ol/source/TileJSON | 从 TileJSON 配置加载瓦片。 | 使用 TileJSON 格式定义的瓦片地图服务(如 Mapbox)。 |
ol/source/TileWMS | 用于 WMS 服务的瓦片源(当 WMS 服务支持瓦片时)。 | 加载 WMS 服务提供的瓦片地图。 |
ol/source/UrlTile | 抽象基类,用于通过 URL 模板加载瓦片的源。 | 不直接使用。 |
ol/source/Vector | 用于矢量数据的源,可以包含多个矢量要素(Feature)。 | 加载矢量数据(GeoJSON、KML 等)或动态添加矢量要素。 |
ol/source/VectorTile | 用于矢量瓦片的源。 | 加载矢量瓦片数据(如 Mapbox Vector Tiles)。 |
ol/source/XYZ | 用于 XYZ 格式的瓦片源(如 OpenStreetMap、Google Maps 等)。 | 加载常见的在线瓦片地图服务。 |
ol/source/WMTS | 用于 OGC WMTS(Web Map Tile Service)服务的瓦片源。 | 加载符合 WMTS 标准的瓦片地图服务。 |
ol/source/OSM | 预定义的 OpenStreetMap 瓦片源,继承自 XYZ。 | 快速加载 OpenStreetMap 地图。 |
ol/source/BingMaps | 用于加载 Bing Maps 的瓦片源。 | 使用 Bing Maps 作为底图。 |
ol/source/CartoDB | 用于加载 CartoDB 地图的瓦片源。 | 使用 CartoDB 提供的地图服务。 |
ol/source/Cluster | 用于聚类矢量数据的源。 | 对矢量数据进行聚类,提高可视化效果。 |
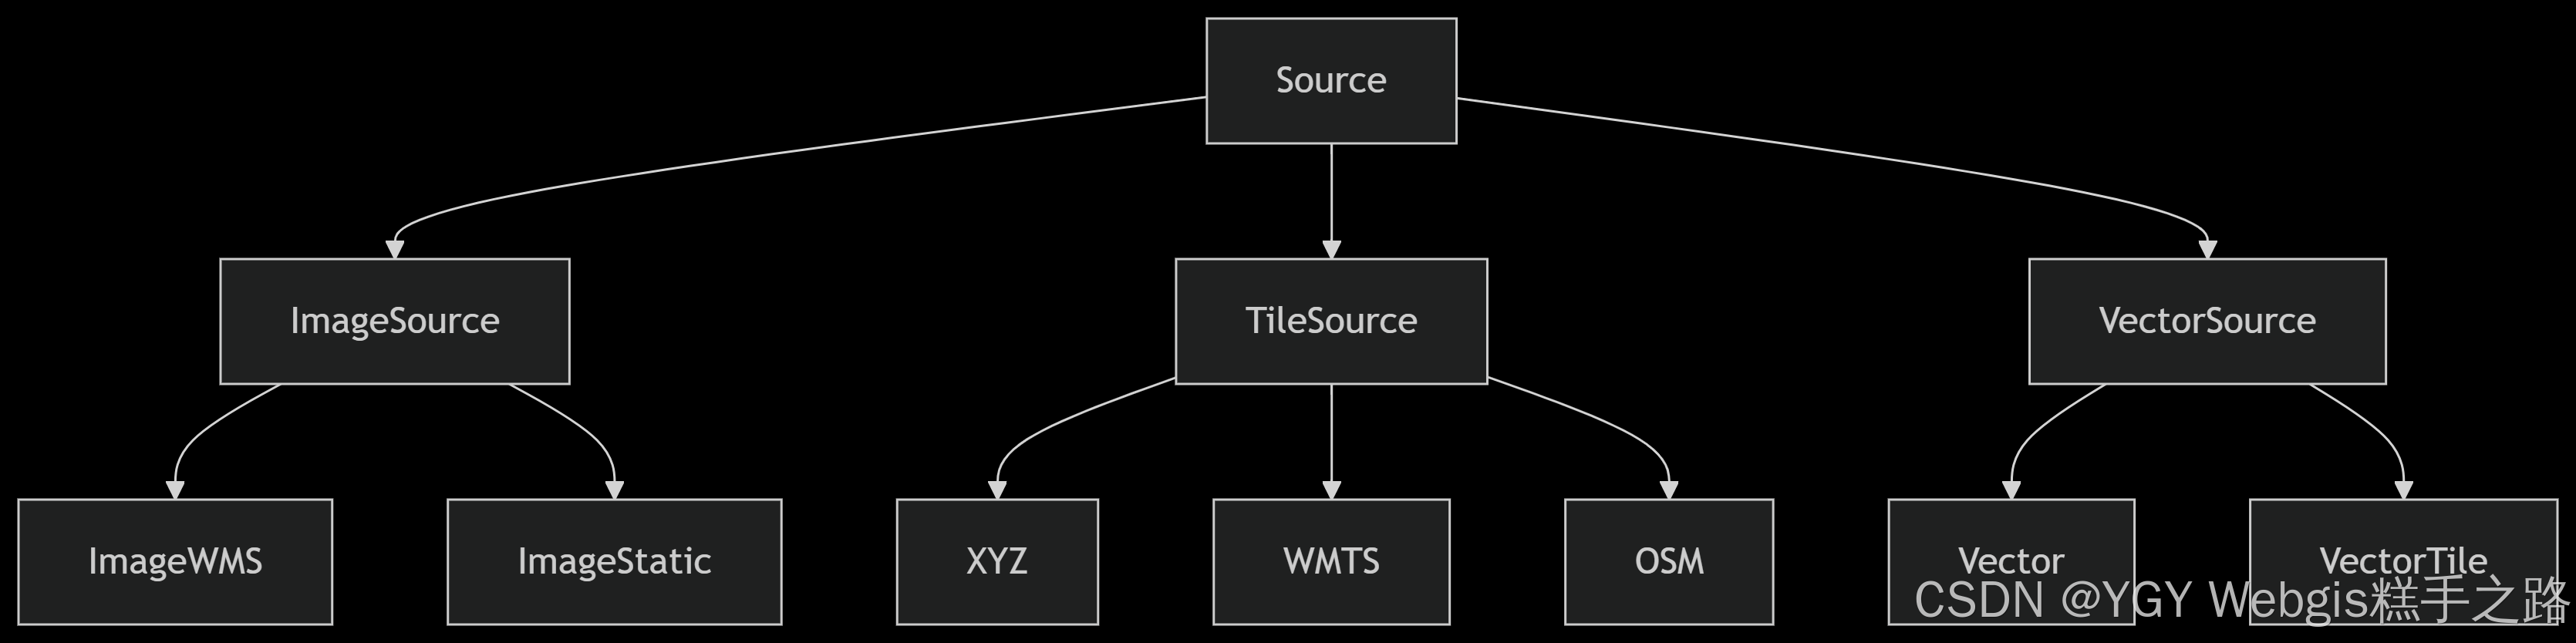
Source 介绍
Source 类型很多,常用的下图中的几种我们在 Layer 中已经介绍完
补充介绍聚类(Cluster)
聚类数据源在项目中比较常用,这里补充介绍一下。ol/source/Cluster类中定义了聚类的相关属性和方法。
属性
| 属性名 | 类型 | 默认值 | 作用 |
|---|---|---|---|
| source | VectorSource | 必填 | 原始点数据源 |
| distance | number | 20 | 聚类像素距离(决定聚合程度) |
| geometryFunction | function | 点几何 | 自定义要素几何处理逻辑 |
| minDistance | number | 0 | 最小聚类距离(避免过近聚合) |
| createCluster | function | 点几何 | 自定义要素几何处理逻辑 |
:::details 展开代码
<template><div ref="mapContainer" id="map"></div>
</template><script setup>
import { ref, onMounted } from "vue";
import Map from "ol/Map";
import View from "ol/View";
import { Cluster, Vector as VectorSource } from "ol/source";
import { Vector as VectorLayer, Tile as TileLayer } from "ol/layer";
import { Point } from "ol/geom";
import Feature from "ol/Feature";
import XYZ from "ol/source/XYZ";
import { Style, Circle, Text, Fill, Icon } from "ol/style";
import "ol/ol.css";const mapContainer = ref(null);// 1. 创建原始点数据源(模拟1000个随机点)
const rawSource = new VectorSource();
for (let i = 0; i < 1000; i++) {const point = new Point([116.3 + Math.random() * 1.0, // 经度范围:116.3~117.339.8 + Math.random() * 0.8, // 纬度范围:39.8~40.6]);rawSource.addFeature(new Feature(point));
}// 2. 创建聚类数据源(核心)
const clusterSource = new Cluster({source: rawSource,distance: 40, // 像素距离,值越大聚类越少
});// 3. 动态样式函数(根据聚类点数设置不同样式)
const clusterStyle = (feature) => {const size = feature.get("features").length;let color, radius, image;if (size === 1) {// color = "rgba(0, 150, 255, 0.8)";// radius = 6;// 实际情况这里更多的是logoreturn new Style({image: new Icon({anchor: [0.5, 1],src: "/src/assets/local.png", // 使用本地图片scale: 0.5, // 缩放图标大小}),});} else if (size < 20) {color = "rgba(50, 200, 100, 0.8)";radius = 10;image = new Circle({radius,fill: new Fill({ color }),});} else {color = "rgba(255, 70, 70, 0.8)";radius = 15 + Math.min(size / 10, 10);image = new Circle({radius,fill: new Fill({ color }),});}return new Style({image,text: new Text({text: size.toString(),fill: new Fill({ color: "#fff" }),font: "bold 12px sans-serif",}),});
};onMounted(() => {new Map({target: mapContainer.value,layers: [new TileLayer({// 设置高德地图为数据源底图source: new XYZ({// 设置路网图层url: "https://webrd04.is.autonavi.com/appmaptile?lang=zh_cn&size=1&scale=1&style=7&x={x}&y={y}&z={z}",}),}),new VectorLayer({source: clusterSource,style: clusterStyle, // 应用动态样式}),],view: new View({center: [116.5, 40.0],zoom: 8,projection: "EPSG:4326",}),});
});
</script>
<style scoped>
#map {position: absolute;top: 0;bottom: 0;width: 100%;
}
</style>
:::
效果图参考