Spring核心机制:@Bean注解与依赖注入的终极实践指南
一、方法注解
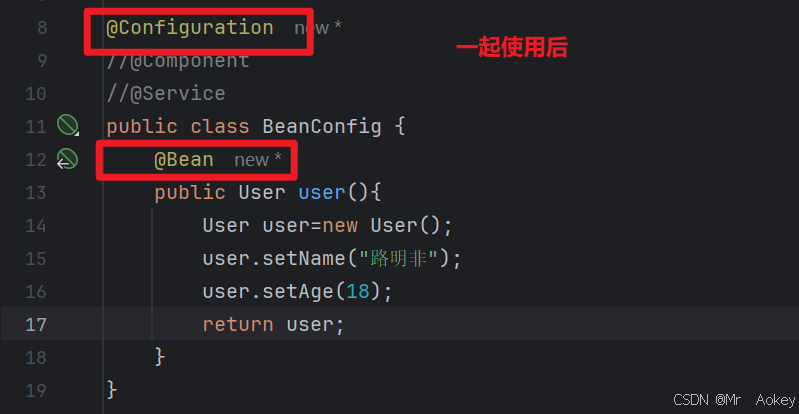
1.1、@Bean
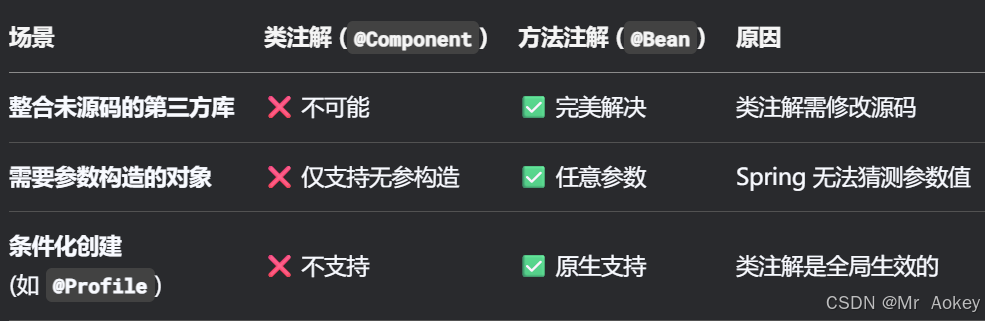
在之前的讲解中,我们了解到通过类注解可以将类交由Spring管理。然而,当我们使用第三方库中的类时,由于无法直接添加类注解或其他限制条件,这时候就需要借助@Bean方法注解来实现同样的功能。
public class BeanConfig {@Beanpublic User user(){User user=new User();user.setName("路明非");user.setAge(18);return user;}
}尝试获取bean对象中的user:
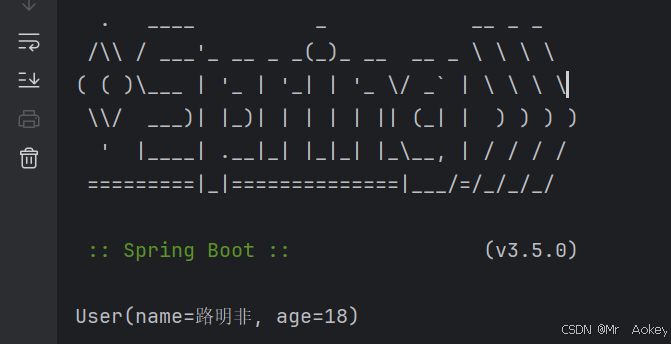
@SpringBootApplication
public class SpringDemo3Application {public static void main(String[] args) {ApplicationContext context=SpringApplication.run(SpringDemo3Application.class, args);BeanConfig beanConfig=context.getBean(BeanConfig.class);User user=beanConfig.user();System.out.println(user);}
}
运行结果:获取不到该对象

为什么呢???
 如下:
如下:
控制台正常输出我们预期的结果了
1.2、定义多个对象
1.2.1、构造方法注解
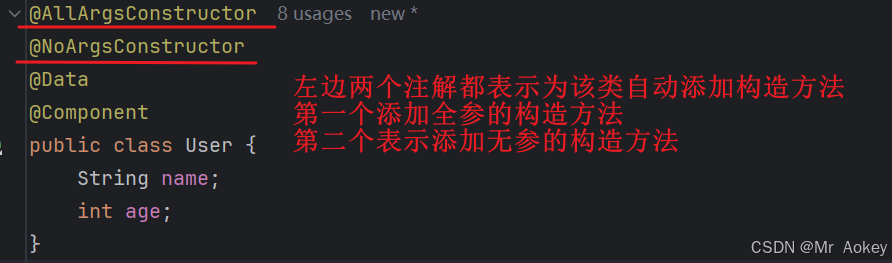
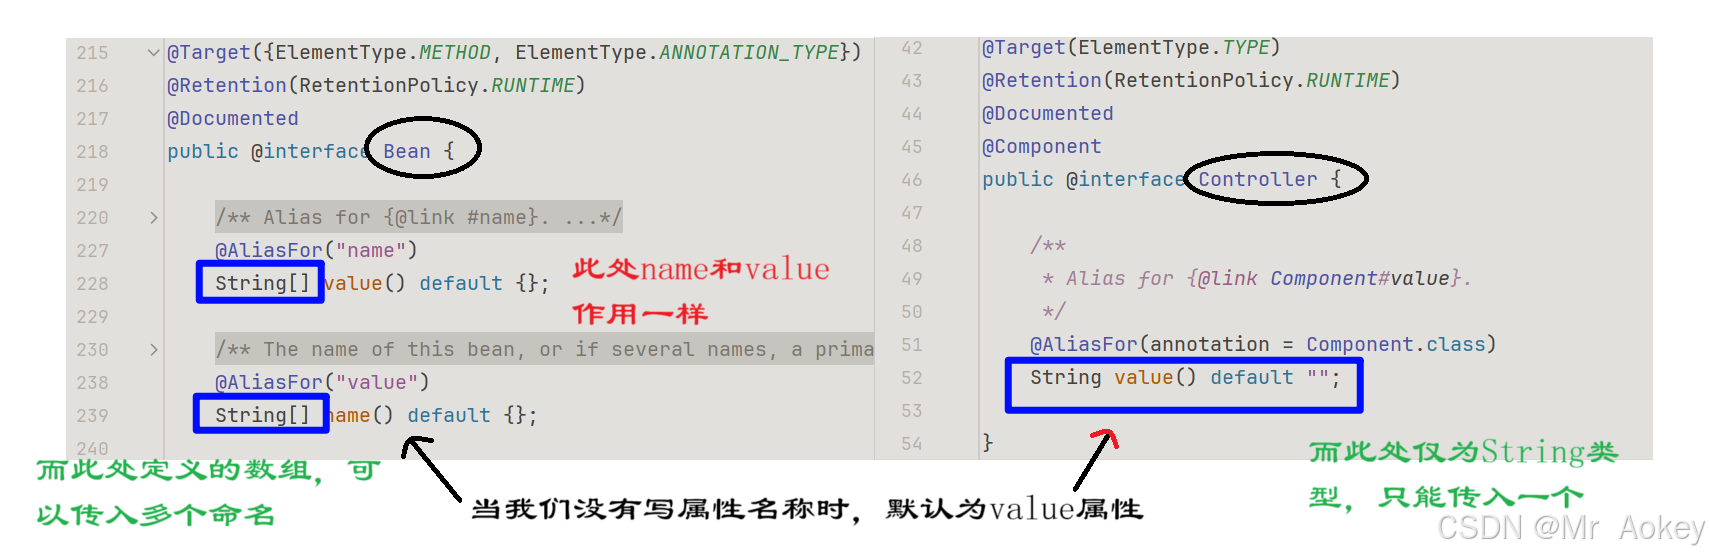
@AllArgsConstructor 和 @NoArgsConstructor 是用于自动生成类构造方法的注解,功能类似于 @Data 注解。
回顾@Data注解功能:
在类上添加
@Data注解时,Lombok 会在编译期自动生成以下方法:(1)toString()
(2)equals(Object object)
(3)hashCode()
(4)所有字段的 getter 方法
(5)所有非 final 字段的 setter 方法
(6)一个包含使用 final 字段的构造器
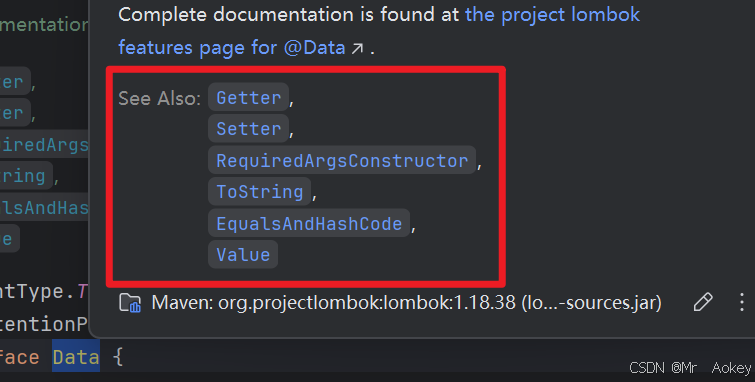
我们可以看到 @Data 注解为我们自动添加 Getter 、Setter等方法、但没有我们想要的构造方法 ,所以我们为User类添加该注解

1.2.2、获取Bean对象
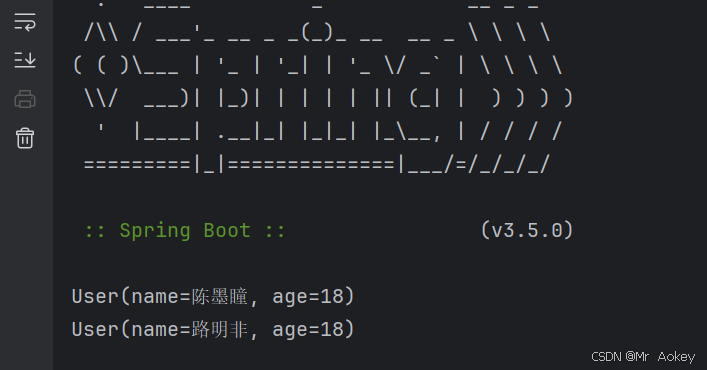
此时,User类就存在两个对象了,我们尝试获取Bean对象,运行下述代码
@SpringBootApplication
public class SpringDemo3Application {public static void main(String[] args) {ApplicationContext context=SpringApplication.run(SpringDemo3Application.class, args);User student1=context.getBean(User.class);System.out.println(student1);}
}
运行结果显示:没有可用类型为...合适的Bean,期望匹配单个Bean,但发现两个“user、user1”,从报错信息中可以看到@Bean注解的bean,bean的名称就是它的方法名

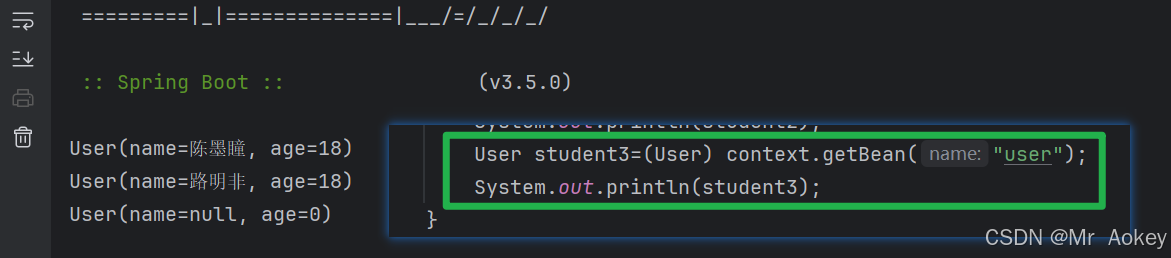
那么我们根据bean的名称来获取bean对象
@SpringBootApplication
public class SpringDemo3Application {public static void main(String[] args) {ApplicationContext context=SpringApplication.run(SpringDemo3Application.class, args);User student1=(User) context.getBean("user1");System.out.println(student1);User student2=(User) context.getBean("user");System.out.println(student2);}
}
可以看出@Bean可以针对同一个类,定义多个对象
1.3、重命名Bean
1.3.1、替换原始类名
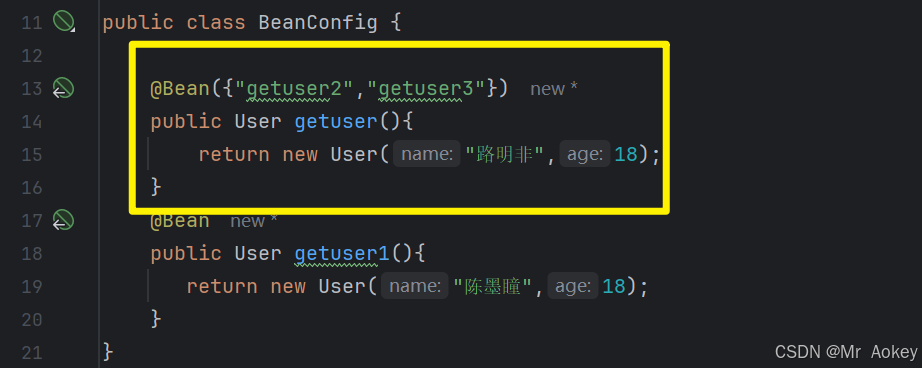
@Configuration
public class BeanConfig {@Bean("getuser2")public User getuser(){return new User("路明非",18);}@Beanpublic User getuser1(){return new User("陈墨瞳",18);}
}
@SpringBootApplication
public class SpringDemo3Application {public static void main(String[] args) {ApplicationContext context=SpringApplication.run(SpringDemo3Application.class, args);User student1=(User) context.getBean("getuser1");System.out.println(student1);User student2=(User) context.getBean("getuser");System.out.println(student2);}
}我们给路明非的Bean对象进行了重命名的操作,再次按照方法名尝试获取Bean对象:

从代码中可以看到,我们可以成功获取名为 getuser1 的 Bean 对象。需要注意的是,要获取路明非的信息,必须使用重命名操作。此外,观察上述代码可以发现小奥奇修改了方法名。这是因为在测试过程中发现,即使替换了原始的 user 名称,执行后续代码时仍会生成参数为空的 User 对象。这是由于 Spring 框架自动创建了 User 实例,但未提供任何初始化值,所以保留了 Java 的默认值(null 和 0)。
1.3.2、多名替换
我们可以对类进行多次重命名,当获取Bean对象时,使用任意一个名称都能成功获取该对象。这是因为:
二、DI详解
依赖注入是⼀个过程,是指 IoC 容器在创建 Bean 时,去提供运行时所依赖的资源,而资源指的就是对象,在上面程序案例中,我们使用了 @Autowired 这个注解,完成了依赖注入的操作
简单来说,就是把对象取出来放到某个类的属性中,关于依赖注入,Spring 给我们提供了如下三种方式:
2.1、属性注入
UserController类:
@org.springframework.stereotype.Controller
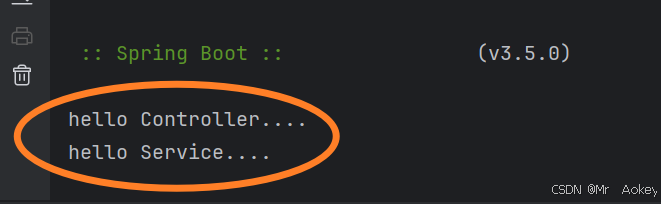
public class UserController {@Autowiredprivate UserService service;public void print(){System.out.println("hello Controller....");service.print();}
}
UserService类:
@org.springframework.stereotype.Service
public class UserService {public void print(){System.out.println("hello Service....");}
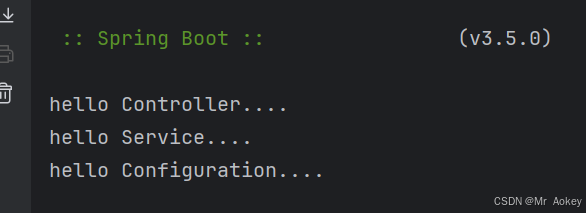
}获取UserController中的print()方法:
@SpringBootApplication
public class SpringDemo3Application {public static void main(String[] args) {ApplicationContext context=SpringApplication.run(SpringDemo3Application.class, args);UserController userController=context.getBean(UserController.class);userController.print();}
}
运行结果:
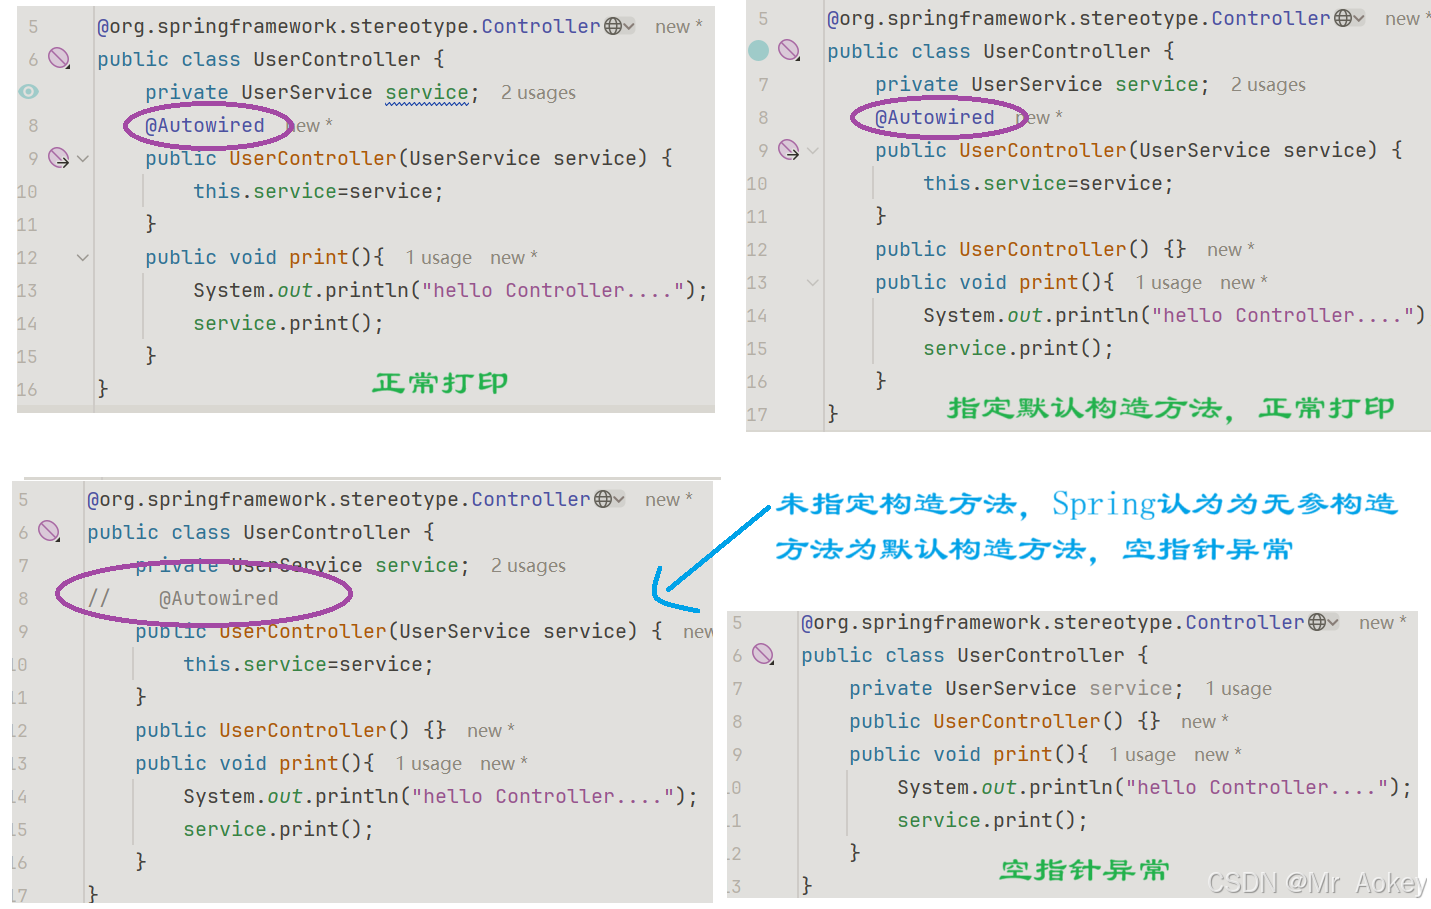
2.2、构造方法注入
构造方法注入是在类的构造方法中实现注入,如下代码所示:
@org.springframework.stereotype.Controller
public class UserController {private UserService service;@Autowiredpublic UserController(UserService service) {this.service=service;}public void print(){System.out.println("hello Controller....");service.print();}
}注意:如果类中只有一个构造方法,上述代码中的 @Autowired 注解是可以省略的,但是如果存在多个构造方法,我们就必须加上 @Autowired 注解指定那个是默认的构造方法
我们移除无参构造方法,添加两个有参构造方法且不使用 @Autowired 注解,然后观察运行结果:
@org.springframework.stereotype.Controller
public class UserController {private UserService service;private UserConfig config;public UserController(UserService service) {this.service=service;}
//    @Autowiredpublic UserController(UserService service, UserConfig config) {this.service=service;this.config=config;}public void print(){System.out.println("hello Controller....");service.print();config.print();}
}
我们使用 @Autowired 注解指定后发现就能输出预期结果了:

2.3、Setter注入
Setter注入和属性注入类似,就是在生成 set 方法时加上 @Autowired 注解
@org.springframework.stereotype.Controller
public class UserController {private UserService service;@Autowiredpublic void setService(UserService service) {this.service = service;}public void print(){System.out.println("hello Controller....");service.print();}
}
当然若不加注解会报错:

2.4、三种方式的优缺点分析
属性注入:
优点:简洁,使用方便
缺点:
功能性问题:无法注入一个不可变的对象(final 修饰的对象)
通用性问题:只能适应于 IoC 容器
设计原则问题:更容易违背单一设计原则
构造方法注入:
优点:
可注入不可变对象
注入的对象不会被修改
注入对象会被完全初始化(因为依赖对象是在构造方法中执行的,而构造方法是在对象创建之初执行的,因此被注入的对象在使用之前,会被完全初始化)
通用性更好
缺点:
注入多个对象时,代码会比较繁琐
Setter 注入:
优点:
符合单一职责的设计原则,可以对该对象重新进行配置或者注入
缺点:
不能注入不可变对象(final 修饰的对象)
注入的对象可被修改
2.5、@Autowired引发的问题
定义一个学生类:
@NoArgsConstructor
@AllArgsConstructor
@Data
public class Student {String name;int age;
}
在 AllStudent 类中创建路明非的学生实例,使用@Bean注解将该对象交由Spring容器管理,并对bean进行重命名
@Component
public class AllStudent {@Bean({"s2","s3"})public Student S1(){return new Student("路明非",18);}
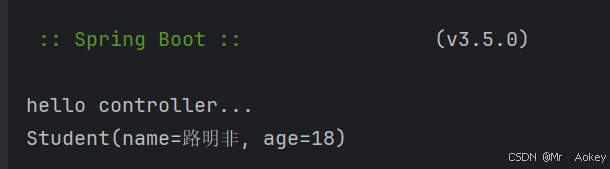
}在 ControllerDemo1 类中定义 Student 类并完成注入,需注意此处学生对象命名为 "s1"。
@Controller
public class ControllerDemo1 {@Autowiredprivate Student s1;public void print(){System.out.println("hello controller...");System.out.println(s1);}
}最后尝试获取Bean对象
@SpringBootApplication
public class SpringDemo3Application {public static void main(String[] args) {ApplicationContext context = SpringApplication.run(SpringDemo3Application.class, args);ControllerDemo1 demo1 = (ControllerDemo1) context.getBean(ControllerDemo1.class);demo1.print();}
}测试运行结果显示成功获取了路明非对象,这表明代码中的变量名"s1"并不影响最终结果。当系统中仅存在一个学生对象时(学生类型的Bean,或者说没有候选Bean),Spring框架会自动根据类型进行依赖注入,变量命名可以自由选择。
那么,当我们再次添加一个学生实例后,此时注入的学生是哪一个呢???
@Component
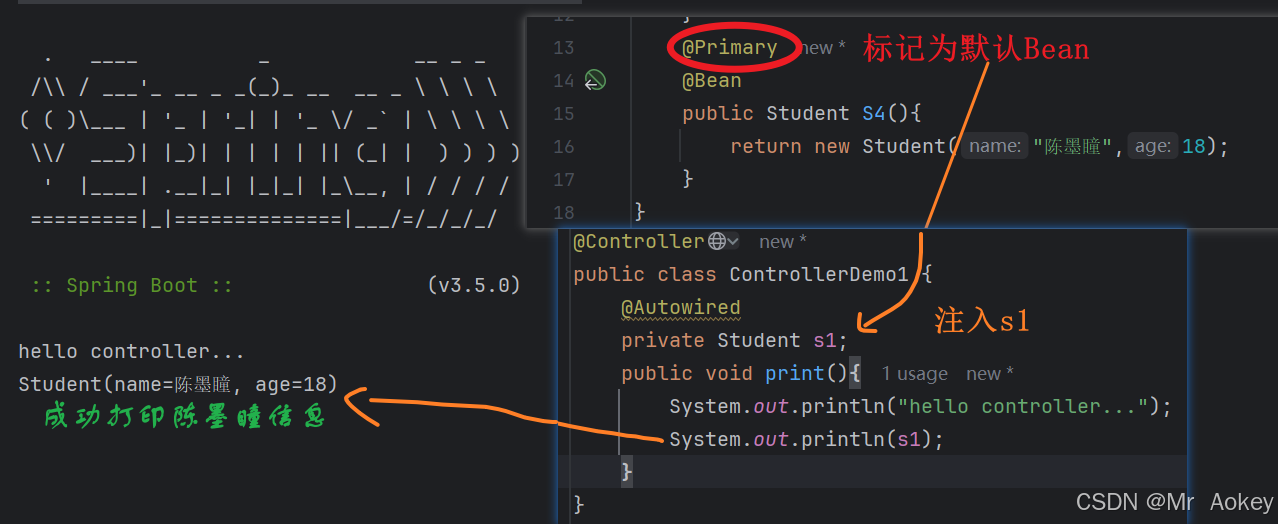
public class AllStudent {@Bean({"s2","s3"})public Student S1(){return new Student("路明非",18);}@Beanpublic Student S4(){return new Student("陈墨瞳",18);}
}我们点击运行后,观察结果:
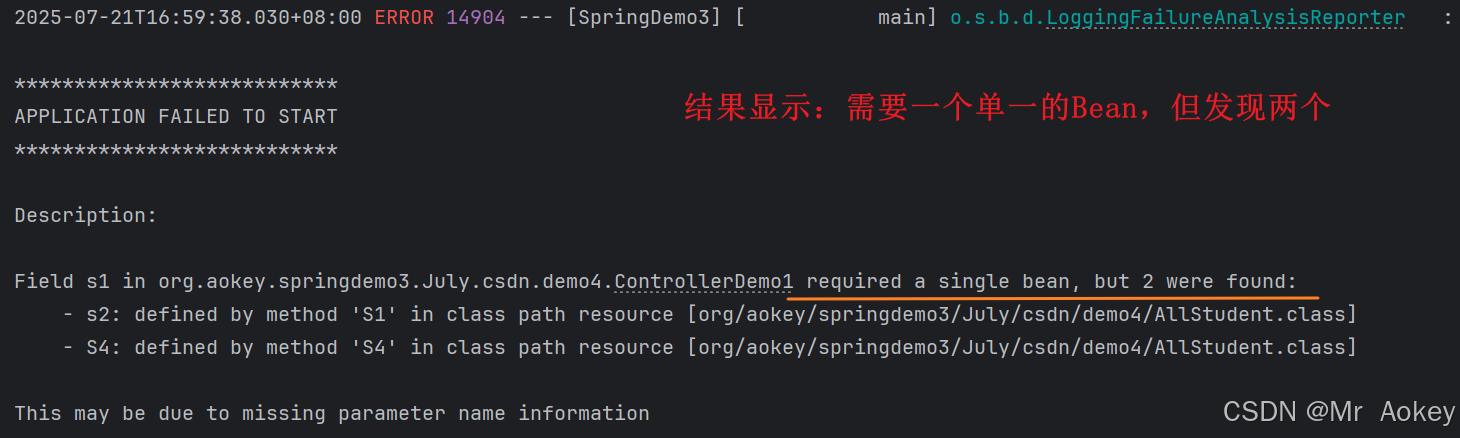
报错信息下方提示:"Consider marking one of the beans as @Primary, updating the consumer to accept multiple beans, or using @Qualifier to identify the bean that should be consumed"。这表明可以通过以下方式解决:
- 使用@Primary注解标记默认Bean
- 使用@Qualifier指定具体Bean
我们将按照这些建议进行测试验证
2.5.1、 @Primary
 2.5.2、@Qualifier
在需要注入的对象上方添加 @Qualifier 注解,可以明确指定要传入的具体对象。但需注意,@Qualifier不能单独使用,必须与@Autowired配合使用
@Controller
public class ControllerDemo1 {@Qualifier("S4")@Autowiredprivate Student s1;public void print(){System.out.println("hello controller...");System.out.println(s1);}
}
该注解比较适用于参数注入 :

2.5.3、@Resource
使用 @Resource 注解时,会按照bean名称进行注入。可以通过name属性来指定需要注入的bean名称
@Controller
public class ControllerDemo1 {@Resource(name="S4")private Student s1;public void print(){System.out.println("hello controller...");System.out.println(s1);}
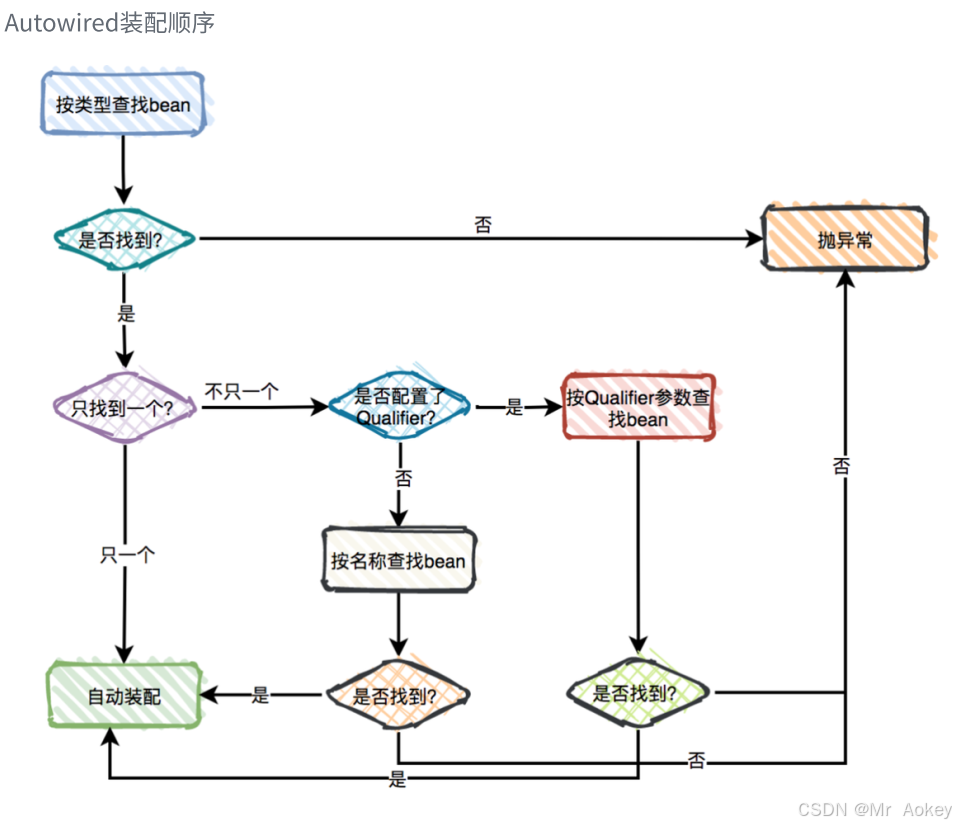
}2.6、Autowired装配顺序