【基于PaddlePaddle训练的车牌识别系统】
基于飞浆的车牌检测系统
效果展示
车牌检查系统效果展示
登录界面

登录后的效果

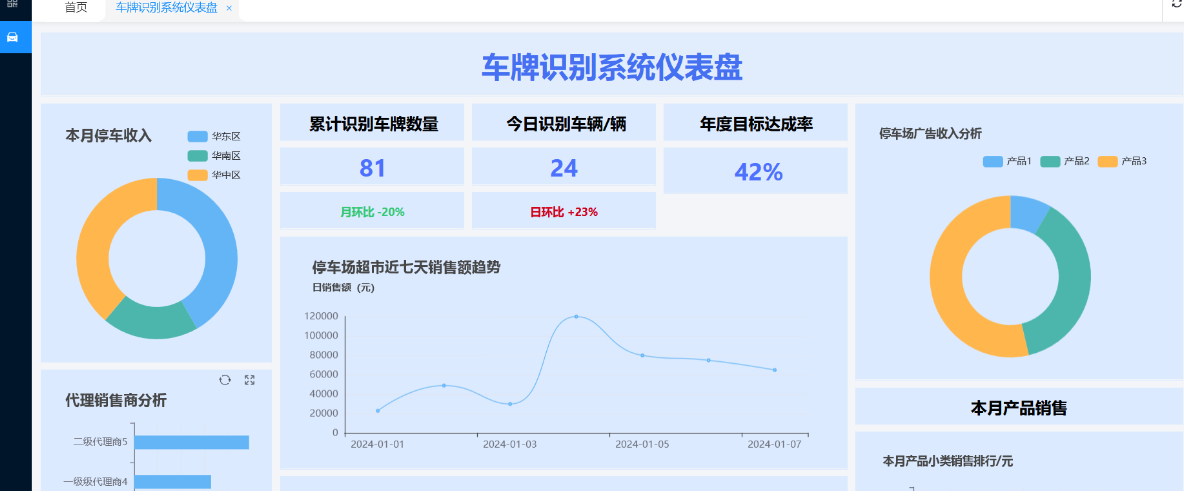
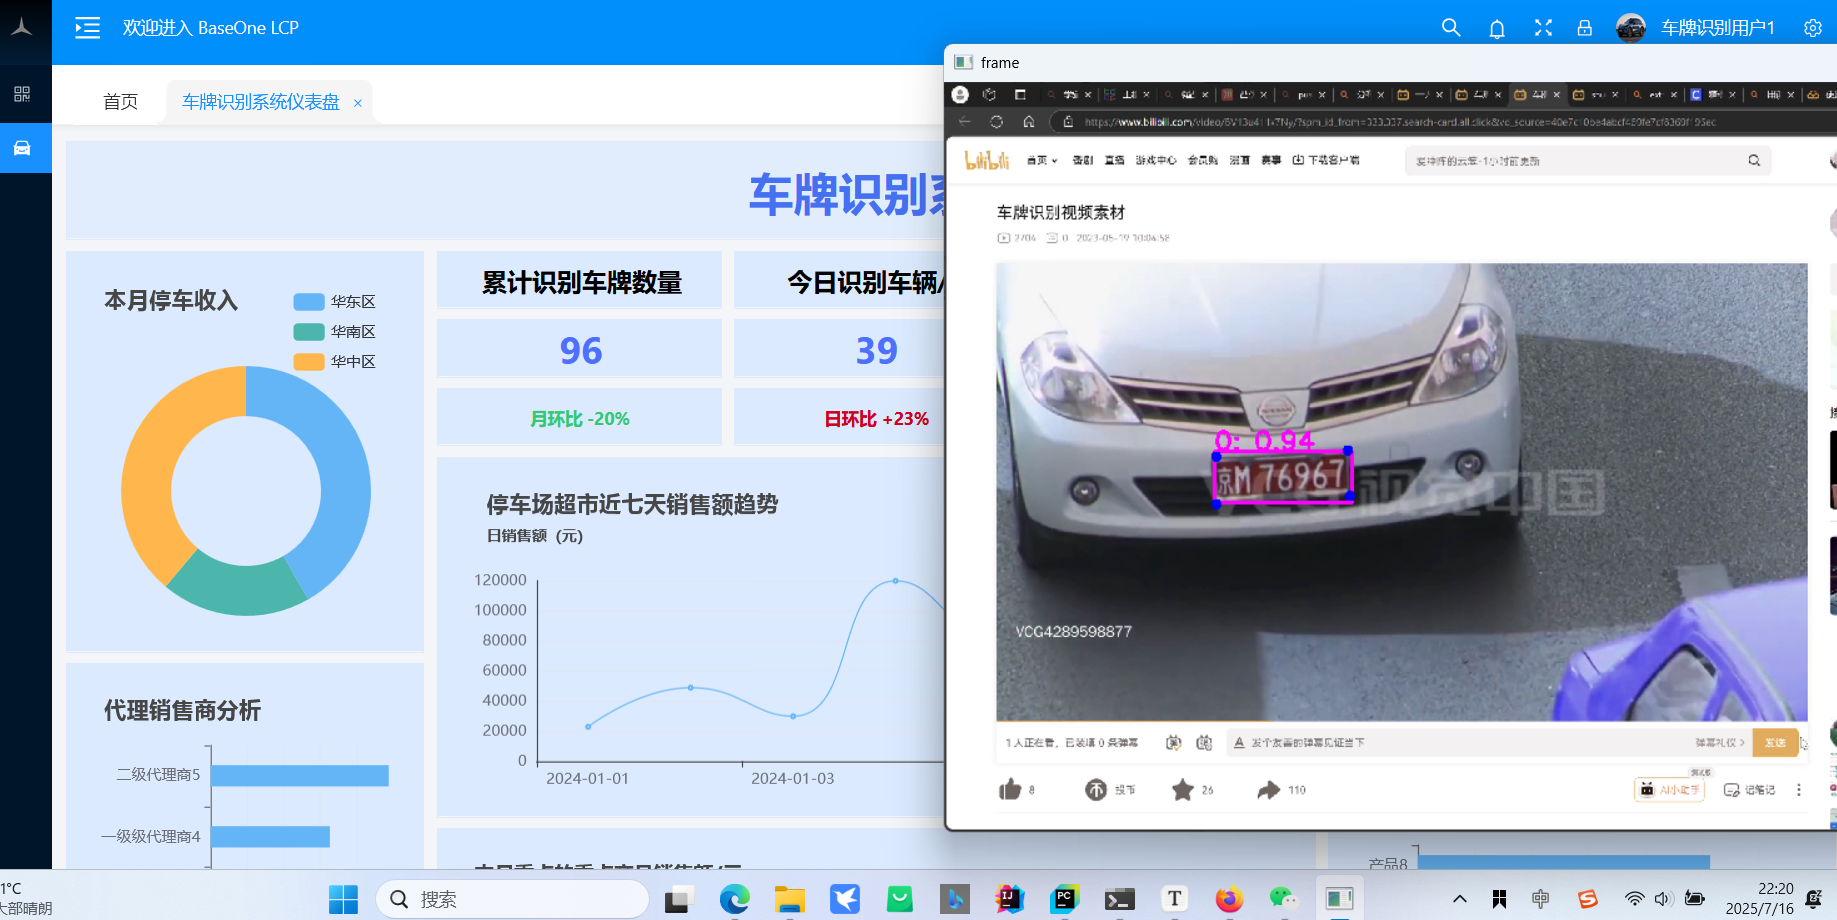
车牌的仪表盘
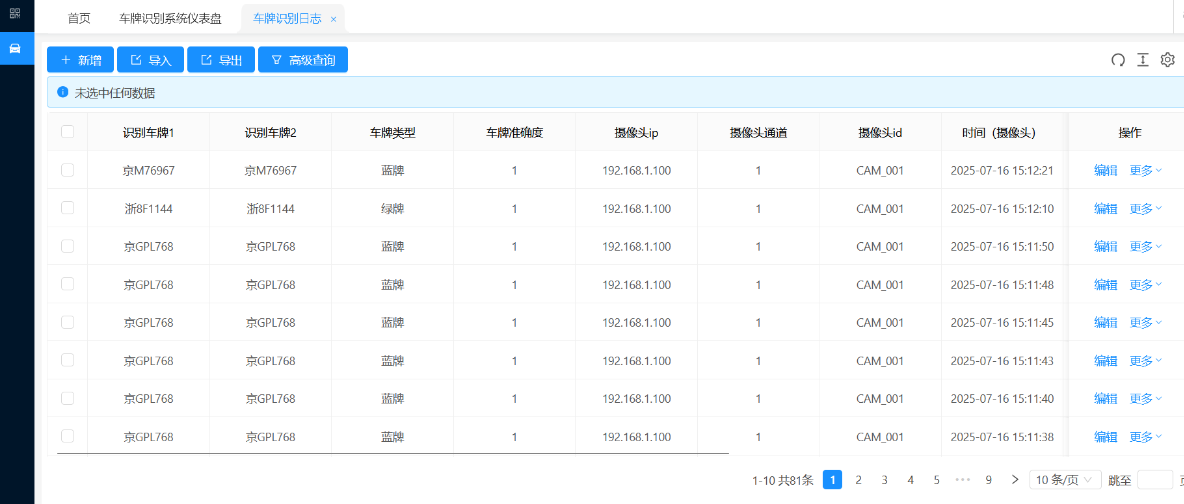
车牌识别日志
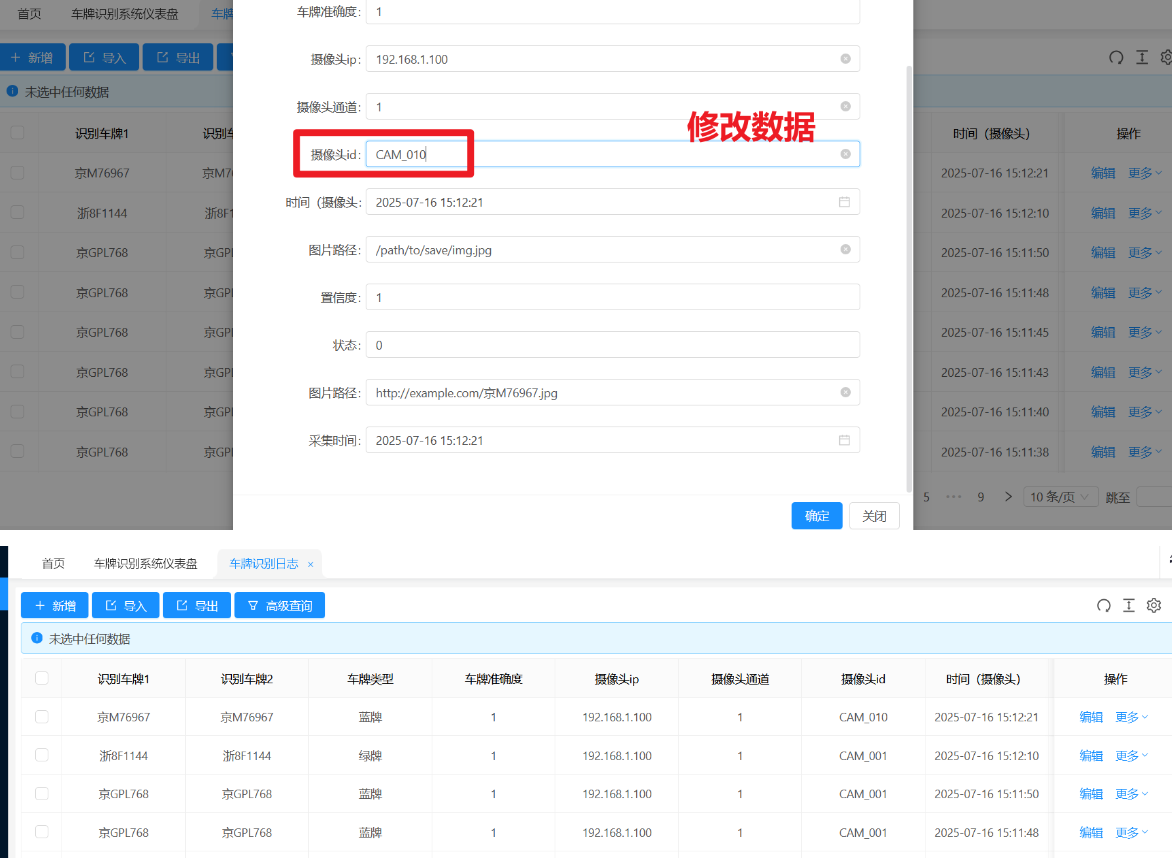
修改数据
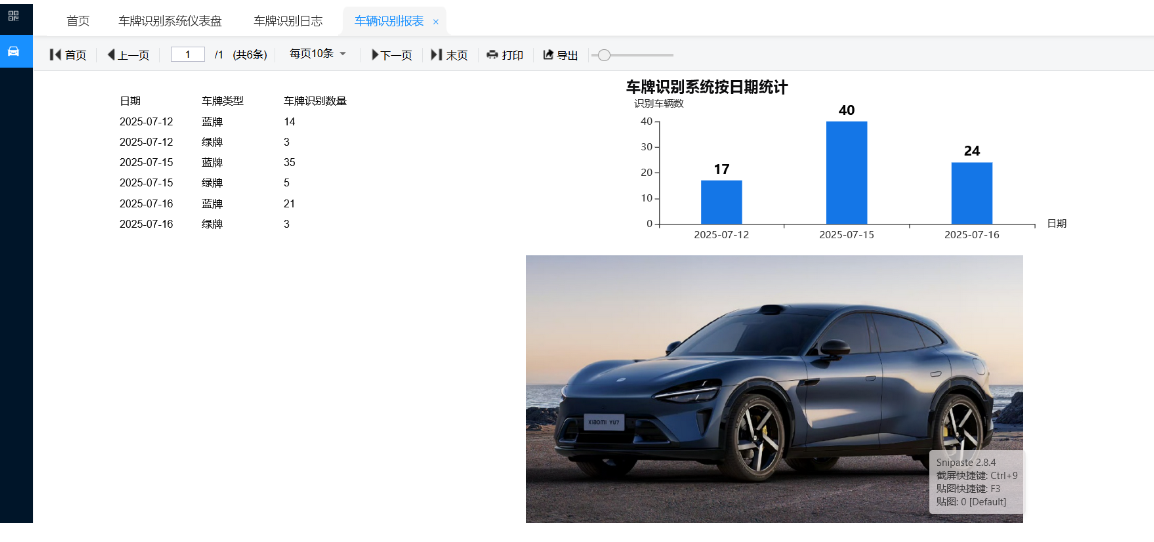
统计报表
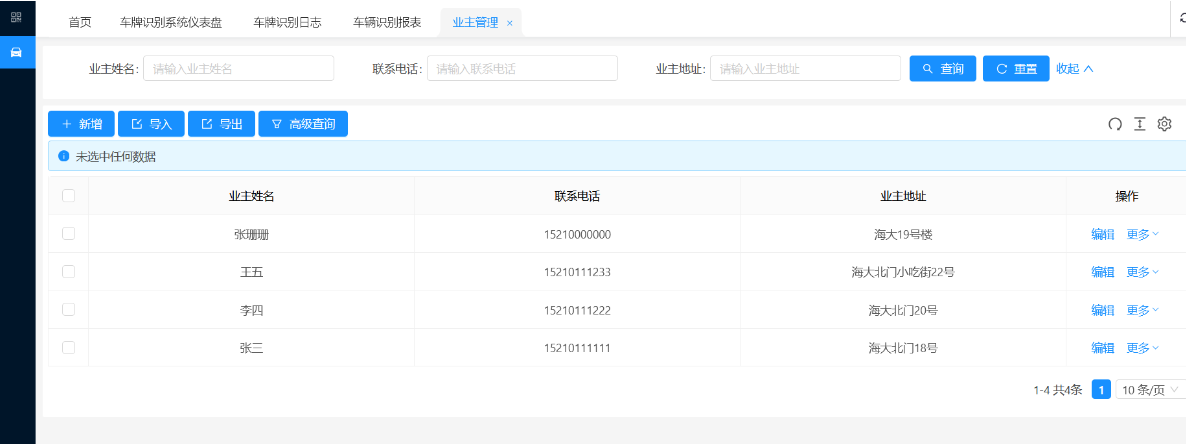
业主管理
车牌识别演示

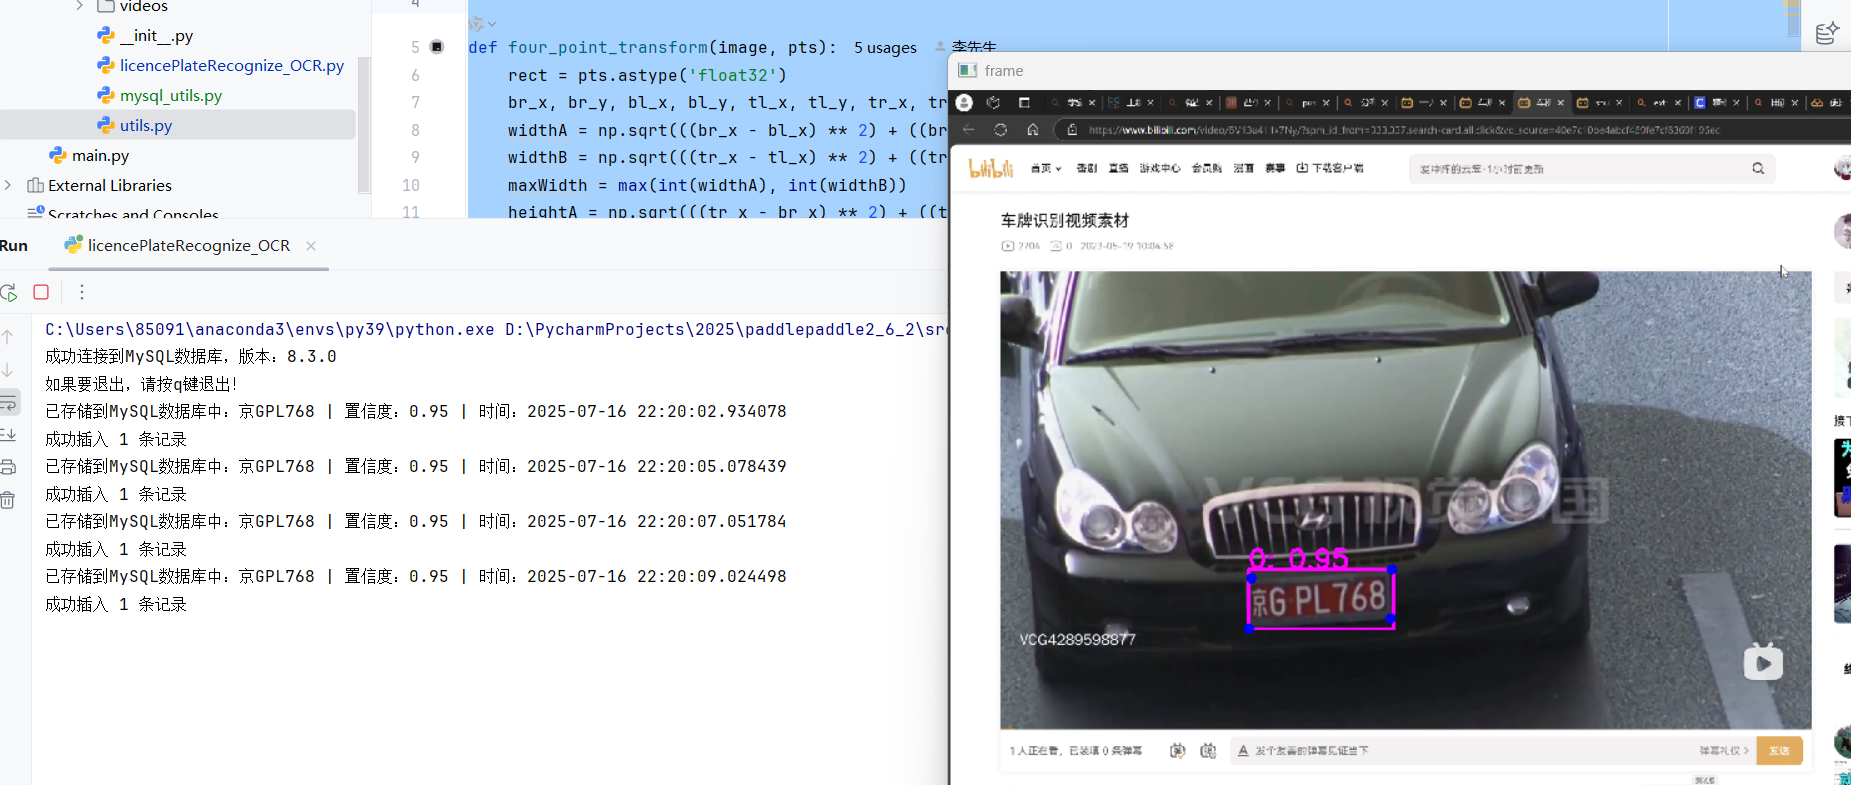
基于PaddlePaddle训练的车牌识别模型进行后台部署
部署代码如下:
licencePlateRecognize_OCR.py
# -*- coding: utf-8 -*-
# @Time : 2025/7/16 10:55
# @Author   : pblh123@126.com
# @File : paddlepaddle2_6_2_licencePlateRecognize_OCR.py
# @Describe : 车牌识别代码部署代码from datetime import datetime
import cv2
import numpy as np
import onnxruntime
from src.day8.mysql_utils import get_mysql_connection, insert_plate_records
from utils import pre_process, post_process, draw_boxes, draw_points, four_point_transform# 代码的重要配置
"""车牌识别部分"""
CHARS = ['京', '沪', '津', '渝', '冀', '晋', '蒙', '辽', '吉', '黑','苏', '浙', '皖', '闽', '赣', '鲁', '豫', '鄂', '湘', '粤','桂', '琼', '川', '贵', '云', '藏', '陕', '甘', '青', '宁','新','0', '1', '2', '3', '4', '5', '6', '7', '8', '9','A', 'B', 'C', 'D', 'E', 'F', 'G', 'H', 'J', 'K','L', 'M', 'N', 'P', 'Q', 'R', 'S', 'T', 'U', 'V','W', 'X', 'Y', 'Z', 'I', 'O', '-']
# ONNX 模型路径(保持与视频处理相同)
detection_onnx_path = "models/License_Plate_Detection_best.onnx"
lprnet_chosen_path = "models/lprnet_chosen_mymodel.onnx"
lprnet_green_path = "models/lprnet_green_mymodel.onnx"# -------------------------- 摄像头信息(示例) --------------------------
# 实际需根据硬件获取(如通过SDK或配置文件)
camera_info = {"ip": "192.168.1.100",  # 摄像头IP"channel": "1",  # 摄像头通道"id": "CAM_001"  # 摄像头ID
}# 从配置或环境变量获取(示例使用硬编码,实际建议用配置文件)
mysql_config = {"host": "localhost","port": 3306,"user": "root","password": "root","database": "jeecg-boot",  # 需提前创建数据库"charset": "utf8mb4"
}def reprocess(pred):"""Parameterspred: numpy.ndarrayThe prediction output of the LPRNet model.Returns-------strThe recognized license plate number."""pred_data = pred[0]pred_label = np.argmax(pred_data, axis=0)no_repeat_blank_label = []pre_c = pred_label[0]if pre_c != len(CHARS) - 1:  # 非空白no_repeat_blank_label.append(pre_c)for c in pred_label:  # dropout repeate label and blank labelif (pre_c == c) or (c == len(CHARS) - 1):if c == len(CHARS) - 1:pre_c = ccontinueno_repeat_blank_label.append(c)pre_c = cchar_list = [CHARS[i] for i in no_repeat_blank_label]return ''.join(char_list)def process_video(video_path,confidence_threshold=0.95):"""Parametersvideo_path: strThe path to the video file.confidence_threshold: floatThe minimum confidence threshold for plate recognition.Returns-------None"""# 加载 ONNX 模型providers = ['CPUExecutionProvider']sess_detect = onnxruntime.InferenceSession(detection_onnx_path, providers=providers)# 打开视频cap = cv2.VideoCapture(video_path)if not cap.isOpened():print(f"无法打开视频文件:{video_path}")return# 设置窗口大小window_width = 1000window_height = 600cv2.namedWindow('frame', cv2.WINDOW_NORMAL)cv2.resizeWindow('frame', window_width, window_height)# 存储上一次检测到的车牌信息last_plates = []frame_counter = 0while True:ret, frame = cap.read()if not ret:breakframe_counter += 1# 图片预处理img_data, scale, padd_data = pre_process(frame, img_size=640)  # RGB# 使用 ONNXRuntime 推理ort_inputs = {sess_detect.get_inputs()[0].name: img_data}result = sess_detect.run(None, ort_inputs)result = np.array(result)  # (1, 1, 25200, 14)result = np.squeeze(result)# 后处理confidence = 0.4iou = 0.3hw = frame.shape[:2]boxes, landmarks, confs, classes = post_process(result, confidence, iou, scale, padd_data[0], padd_data[1], hw)# 框选出每个车牌plate_img = []for i in range(len(classes)):plate_img.append(four_point_transform(frame, landmarks[i]))# 可视化color = (255, 0, 255)img = draw_boxes(frame, boxes, confs, classes, color, thickness=5)img_out = draw_points(img, landmarks, (0, 0, 255), 10)img_out = img_out[:, :, ::-1]  # BGR -> RGB# 显示结果cv2.imshow('frame', img_out)# 车牌识别部分current_plates = []for i in range(len(classes)):# print(f'第{i}个识别结果,识别类别{classes[i]}')# 图像预处理img_data = plate_img[i][:, :, ::-1]  # BGR to RGBimg_data = cv2.resize(img_data, (94, 24))img_data = (img_data - 127.5) / 127.5  # 归一化img_data = np.transpose(img_data, (2, 0, 1))  # HWC to CHWimg_data = np.expand_dims(img_data, 0)  # to BCHWimg_data = np.array(img_data, dtype=np.float32)# 加载识别模型# 这里给了两个车牌识别模型,一个是通用的识别模型,一个是针对绿牌的识别模型if int(classes[i]) == 0:sess_recog = onnxruntime.InferenceSession(lprnet_chosen_path, providers=providers)elif int(classes[i]) == 1:sess_recog = onnxruntime.InferenceSession(lprnet_green_path, providers=providers)else:continueort_inputs_recog = {sess_recog.get_inputs()[0].name: img_data}result_recog, = sess_recog.run(None, ort_inputs_recog)# 解析结果plate_str = reprocess(result_recog)if confs[i] > confidence_threshold:current_plates.append((plate_str, confs[i]))# 检测车牌变化并打印if current_plates != last_plates and (frame_counter % 20 == 0):last_plates = current_platesfor plate, conf in current_plates:print(f'识别到车牌号:{plate},置信度:{conf:.2f}')if cv2.waitKey(1) & 0xFF == ord('q'):break# 释放资源cap.release()cv2.destroyAllWindows()def process_camera(confidence_threshold=0.95):"""Parametersconfidence_threshold: floatThe minimum confidence threshold for plate recognition.Returns-------None"""# 加载 ONNX 模型(与视频处理相同)providers = ['CPUExecutionProvider']sess_detect = onnxruntime.InferenceSession(detection_onnx_path, providers=providers)# 打开摄像头(修改点1:使用0表示默认摄像头)cap = cv2.VideoCapture(0)if not cap.isOpened():print("无法打开摄像头")return# 窗口设置(与视频处理相同)window_width = 1000window_height = 600cv2.namedWindow('frame', cv2.WINDOW_NORMAL)cv2.resizeWindow('frame', window_width, window_height)# 存储上一次检测信息(与视频处理相同)last_plates = []frame_counter = 0print("需要关闭摄像头请按q键")while True:# 读取摄像头帧(修改点2:添加retry逻辑)ret, frame = cap.read()if not ret:print("摄像头读取失败,正在重试...")cap.release()cap = cv2.VideoCapture(0)continueframe_counter += 1# 图片预处理img_data, scale, padd_data = pre_process(frame, img_size=640)  # RGB# 使用 ONNXRuntime 推理ort_inputs = {sess_detect.get_inputs()[0].name: img_data}result = sess_detect.run(None, ort_inputs)result = np.array(result)  # (1, 1, 25200, 14)result = np.squeeze(result)# 后处理confidence = 0.4iou = 0.3hw = frame.shape[:2]boxes, landmarks, confs, classes = post_process(result, confidence, iou, scale, padd_data[0], padd_data[1], hw)# 框选出每个车牌plate_img = []for i in range(len(classes)):plate_img.append(four_point_transform(frame, landmarks[i]))# 可视化color = (255, 0, 255)img = draw_boxes(frame, boxes, confs, classes, color, thickness=5)img_out = draw_points(img, landmarks, (0, 0, 255), 10)img_out = img_out[:, :, ::-1]  # BGR -> RGB# 显示结果cv2.imshow('frame', img_out)# 车牌识别部分current_plates = []for i in range(len(classes)):# print(f'第{i}个识别结果,识别类别{classes[i]}')# 图像预处理img_data = plate_img[i][:, :, ::-1]  # BGR to RGBimg_data = cv2.resize(img_data, (94, 24))img_data = (img_data - 127.5) / 127.5  # 归一化img_data = np.transpose(img_data, (2, 0, 1))  # HWC to CHWimg_data = np.expand_dims(img_data, 0)  # to BCHWimg_data = np.array(img_data, dtype=np.float32)# 加载识别模型# 这里给了两个车牌识别模型,一个是通用的识别模型,一个是针对绿牌的识别模型if int(classes[i]) == 0:sess_recog = onnxruntime.InferenceSession(lprnet_chosen_path, providers=providers)elif int(classes[i]) == 1:sess_recog = onnxruntime.InferenceSession(lprnet_green_path, providers=providers)else:continueort_inputs_recog = {sess_recog.get_inputs()[0].name: img_data}result_recog, = sess_recog.run(None, ort_inputs_recog)# 解析结果plate_str = reprocess(result_recog)if confs[i] > confidence_threshold:current_plates.append((plate_str, confs[i]))# 检测车牌变化并打印if current_plates != last_plates and (frame_counter % 20 == 0):last_plates = current_platesfor plate, conf in current_plates:print(f'识别到车牌号:{plate},置信度:{conf:.2f}')# 退出逻辑(保持原有逻辑)if cv2.waitKey(1) & 0xFF == ord('q'):break# 释放资源(保持原有逻辑)cap.release()cv2.destroyAllWindows()def process_video_2_mysql(video_path, confidence_threshold=0.95):"""Parametersvideo_path: strThe path to the video file.confidence_threshold: floatThe minimum confidence threshold for plate recognition.Returns-------None"""# 获取MySQL连接mysql_conn = get_mysql_connection(**mysql_config)if not mysql_conn:print("数据库连接失败,程序终止")return# 加载 ONNX 模型providers = ['CPUExecutionProvider']sess_detect = onnxruntime.InferenceSession(detection_onnx_path, providers=providers)# 打开视频cap = cv2.VideoCapture(video_path)if not cap.isOpened():print(f"无法打开视频文件:{video_path}")mysql_conn.close()  # 关闭数据库连接return# 设置窗口大小window_width = 1000window_height = 600cv2.namedWindow('frame', cv2.WINDOW_NORMAL)cv2.resizeWindow('frame', window_width, window_height)# 存储上一次检测到的车牌信息last_plates = []frame_counter = 0print("如果要退出,请按q键退出!")while True:ret, frame = cap.read()if not ret:breakframe_counter += 1# 图片预处理img_data, scale, padd_data = pre_process(frame, img_size=640)  # RGB# 使用 ONNXRuntime 推理ort_inputs = {sess_detect.get_inputs()[0].name: img_data}result = sess_detect.run(None, ort_inputs)result = np.array(result)  # (1, 1, 25200, 14)result = np.squeeze(result)# 后处理confidence = 0.4iou = 0.3hw = frame.shape[:2]boxes, landmarks, confs, classes = post_process(result, confidence, iou, scale, padd_data[0], padd_data[1], hw)# 框选出每个车牌plate_img = []for i in range(len(classes)):plate_img.append(four_point_transform(frame, landmarks[i]))# 可视化color = (255, 0, 255)img = draw_boxes(frame, boxes, confs, classes, color, thickness=5)img_out = draw_points(img, landmarks, (0, 0, 255), 10)img_out = img_out[:, :, ::-1]  # BGR -> RGB# 显示结果cv2.imshow('frame', img_out)# 车牌识别部分current_plates = []for i in range(len(classes)):# 图像预处理img_data = plate_img[i][:, :, ::-1]  # BGR to RGBimg_data = cv2.resize(img_data, (94, 24))img_data = (img_data - 127.5) / 127.5  # 归一化img_data = np.transpose(img_data, (2, 0, 1))  # HWC to CHWimg_data = np.expand_dims(img_data, 0)  # to BCHWimg_data = np.array(img_data, dtype=np.float32)# 加载识别模型if int(classes[i]) == 0:sess_recog = onnxruntime.InferenceSession(lprnet_chosen_path, providers=providers)elif int(classes[i]) == 1:sess_recog = onnxruntime.InferenceSession(lprnet_green_path, providers=providers)else:continueort_inputs_recog = {sess_recog.get_inputs()[0].name: img_data}result_recog, = sess_recog.run(None, ort_inputs_recog)# 解析结果plate_str = reprocess(result_recog)if confs[i] > confidence_threshold:current_plates.append((plate_str, confs[i]))# -------------------------- 存储到MySQL --------------------------if current_plates != last_plates and (frame_counter % 20 == 0):last_plates = current_plates.copy()# 构造待插入的记录列表records_to_insert = []for plate, conf in current_plates:camera_time1 = datetime.now()  # 模拟摄像头采集时间record = {"res_plate_number": plate,  # 识别车牌1(主结果)"e2e_plate_number": plate,  # 识别车牌2(备用,示例用主结果填充)"e2e_plate_type": "蓝牌" if plate.startswith("京") else "绿牌",  # 车牌类型(示例逻辑)这里是实例不正确的代码"e2e_plate_confidence": float(conf),  # 置信度"camera_ip": camera_info["ip"],  # 摄像头IP"camera_channel": camera_info["channel"],  # 摄像头通道"camera_id": camera_info["id"],  # 摄像头ID"camera_time": camera_time1,  # 摄像头采集时间(当前时间)"res_plate_img_path": "/path/to/save/img.jpg",  # 图片保存路径(示例,需实现截图功能)"res_plate_crop_confidence": float(conf),  # 裁剪置信度(示例用原置信度)"status": 0,  # 状态(0=成功)"plate_url": f"http://example.com/{plate}.jpg",  # 图片URL(示例)"e2e_plate_time": datetime.now()  # 采集时间(与camera_time一致)}records_to_insert.append(record)print(f"已存储到MySQL数据库中:{plate} | 置信度:{conf:.2f} | 时间:{camera_time1}")# 插入数据库if records_to_insert:insert_success = insert_plate_records(mysql_conn, records_to_insert)if not insert_success:print("数据插入失败,检查数据库连接或字段格式")# 按'q'键退出if cv2.waitKey(1) & 0xFF == ord('q'):break# 释放资源cap.release()cv2.destroyAllWindows()mysql_conn.close()  # 关闭数据库连接def process_camera_2_mysql(camera_id=0, confidence_threshold=0.95):"""Parameterscamera_id: strThe id of camera.confidence_threshold: floatThe minimum confidence threshold for plate recognition.Returns-------None"""# 获取MySQL连接mysql_conn = get_mysql_connection(**mysql_config)if not mysql_conn:print("数据库连接失败,程序终止")return# 加载 ONNX 模型providers = ['CPUExecutionProvider']sess_detect = onnxruntime.InferenceSession(detection_onnx_path, providers=providers)# 打开视频cap = cv2.VideoCapture(camera_id)if not cap.isOpened():print(f"无法打开摄像头:{camera_id}")mysql_conn.close()  # 关闭数据库连接return# 设置窗口大小window_width = 1000window_height = 600cv2.namedWindow('frame', cv2.WINDOW_NORMAL)cv2.resizeWindow('frame', window_width, window_height)# 存储上一次检测到的车牌信息last_plates = []frame_counter = 0print("如果要退出,请按q键退出!")while True:ret, frame = cap.read()if not ret:breakframe_counter += 1# 图片预处理img_data, scale, padd_data = pre_process(frame, img_size=640)  # RGB# 使用 ONNXRuntime 推理ort_inputs = {sess_detect.get_inputs()[0].name: img_data}result = sess_detect.run(None, ort_inputs)result = np.array(result)  # (1, 1, 25200, 14)result = np.squeeze(result)# 后处理confidence = 0.4iou = 0.3hw = frame.shape[:2]boxes, landmarks, confs, classes = post_process(result, confidence, iou, scale, padd_data[0], padd_data[1], hw)# 框选出每个车牌plate_img = []for i in range(len(classes)):plate_img.append(four_point_transform(frame, landmarks[i]))# 可视化color = (255, 0, 255)img = draw_boxes(frame, boxes, confs, classes, color, thickness=5)img_out = draw_points(img, landmarks, (0, 0, 255), 10)img_out = img_out[:, :, ::-1]  # BGR -> RGB# 显示结果cv2.imshow('frame', img_out)# 车牌识别部分current_plates = []for i in range(len(classes)):# 图像预处理img_data = plate_img[i][:, :, ::-1]  # BGR to RGBimg_data = cv2.resize(img_data, (94, 24))img_data = (img_data - 127.5) / 127.5  # 归一化img_data = np.transpose(img_data, (2, 0, 1))  # HWC to CHWimg_data = np.expand_dims(img_data, 0)  # to BCHWimg_data = np.array(img_data, dtype=np.float32)# 加载识别模型if int(classes[i]) == 0:sess_recog = onnxruntime.InferenceSession(lprnet_chosen_path, providers=providers)elif int(classes[i]) == 1:sess_recog = onnxruntime.InferenceSession(lprnet_green_path, providers=providers)else:continueort_inputs_recog = {sess_recog.get_inputs()[0].name: img_data}result_recog, = sess_recog.run(None, ort_inputs_recog)# 解析结果plate_str = reprocess(result_recog)if confs[i] > confidence_threshold:current_plates.append((plate_str, confs[i]))# -------------------------- 存储到MySQL --------------------------if current_plates != last_plates and (frame_counter % 20 == 0):last_plates = current_plates.copy()# 构造待插入的记录列表records_to_insert = []for plate, conf in current_plates:camera_time1 = datetime.now()  # 模拟摄像头采集时间record = {"res_plate_number": plate,  # 识别车牌1(主结果)"e2e_plate_number": plate,  # 识别车牌2(备用,示例用主结果填充)"e2e_plate_type": "蓝牌" if plate.startswith("京") else "绿牌",  # 车牌类型(示例逻辑)这里是实例不正确的代码"e2e_plate_confidence": float(conf),  # 置信度"camera_ip": camera_info["ip"],  # 摄像头IP"camera_channel": camera_info["channel"],  # 摄像头通道"camera_id": camera_info["id"],  # 摄像头ID"camera_time": camera_time1,  # 摄像头采集时间(当前时间)"res_plate_img_path": "/path/to/save/img.jpg",  # 图片保存路径(示例,需实现截图功能)"res_plate_crop_confidence": float(conf),  # 裁剪置信度(示例用原置信度)"status": 0,  # 状态(0=成功)"plate_url": f"http://example.com/{plate}.jpg",  # 图片URL(示例)"e2e_plate_time": datetime.now()  # 采集时间(与camera_time一致)}records_to_insert.append(record)print(f"已存储到MySQL数据库中:{plate} | 置信度:{conf:.2f} | 时间:{camera_time1}")# 插入数据库if records_to_insert:insert_success = insert_plate_records(mysql_conn, records_to_insert)if not insert_success:print("数据插入失败,检查数据库连接或字段格式")# 按'q'键退出if cv2.waitKey(1) & 0xFF == ord('q'):break# 释放资源cap.release()cv2.destroyAllWindows()mysql_conn.close()  # 关闭数据库连接def main():# 示例调用# process_video("videos/video.mp4")# process_camera()process_video_2_mysql("videos/video.mp4")if __name__ == '__main__':main()
mysql_utils.py
# -*- coding: utf-8 -*-
# @Time : 2025/7/16 20:58
# @Author   : pblh123@126.com
# @File : paddlepaddle2_6_2_mysql_utils.py.py
# @Describe : todoimport pymysql
from datetime import datetimedef get_mysql_connection(host: str = 'localhost',  # MySQL服务器地址port: int = 3306,  # MySQL端口user: str = 'root',  # 用户名password: str = 'root',  # 密码database: str = None,  # 数据库名charset: str = 'utf8mb4'  # 字符集
) -> pymysql.connections.Connection:"""创建并返回MySQL数据库连接对象参数:host: MySQL服务器IP地址(默认localhost)port: MySQL服务端口(默认3306)user: 登录用户名(默认root)password: 登录密码database: 要连接的数据库名(默认test_db)charset: 字符集(默认utf8mb4)返回:pymysql.connections.Connection: MySQL连接对象(连接成功时)None: 连接失败时返回None"""try:# 创建连接对象conn = pymysql.connect(host=host,port=port,user=user,password=password,database=database,charset=charset,cursorclass=pymysql.cursors.DictCursor  # 返回字典格式结果)# 测试连接(执行简单查询)with conn.cursor() as cursor:cursor.execute("SELECT VERSION()")version = cursor.fetchone()['VERSION()']print(f"成功连接到MySQL数据库,版本:{version}")return connexcept pymysql.MySQLError as e:print(f"MySQL连接失败:{str(e)}")return Noneexcept Exception as e:print(f"创建MySQL连接时发生未知错误:{str(e)}")return Noneimport pymysql
from typing import Union, List, Dictdef mysql_sql_execute(sql: str, params: tuple = None) -> Union[int, List[Dict]]:"""执行 MySQL SQL 语句(支持查询和修改操作)参数:sql: 要执行的 SQL 语句(支持 SELECT、INSERT、UPDATE、DELETE 等)params: SQL 语句的参数(可选,用于防止 SQL 注入)返回:若为查询操作(SELECT):返回结果列表(每个元素为字典,键为字段名)若为修改操作(INSERT/UPDATE/DELETE):返回受影响的行数异常时返回 -1 并打印错误信息"""conn = Nonecursor = None# 定义所有返回结果的关键字(不区分大小写)query_keywords = {'select', 'show', 'describe', 'explain'}try:# 获取数据库连接(使用之前定义的 get_mysql_connection 函数)conn = get_mysql_connection()if not conn:print("数据库连接失败")return -1# 创建游标(使用 DictCursor 以便返回字典格式结果)cursor = conn.cursor(pymysql.cursors.DictCursor)# 处理 SQL 语句(去除前后空格,转换为小写判断关键字)sql_clean = sql.strip().lower()# 拆分 SQL 语句for sql_part in sql_clean.strip().split(';'):sql_part = sql_part.strip()if not sql_part:continue# 执行单条 SQLif params:affected_rows = cursor.execute(sql_part, params)else:affected_rows = cursor.execute(sql_part)# 判断是否为查询操作(返回结果的语句)is_query = any(sql_part.startswith(keyword) for keyword in query_keywords)if is_query:result = cursor.fetchall()return resultelse:conn.commit()print(f"SQL语句:{sql_part}执行成功")except pymysql.MySQLError as e:# 发生错误时回滚事务if conn:conn.rollback()print(f"SQL 执行失败(MySQL 错误): {str(e)}")return -1except Exception as e:# 其他异常处理if conn:conn.rollback()print(f"SQL 执行失败(未知错误): {str(e)}")return -1finally:# 确保游标和连接关闭if cursor:cursor.close()if conn:conn.close()def insert_plate_records(conn: pymysql.connections.Connection, records: list):"""将车牌识别记录批量插入MySQL数据库参数:conn: MySQL连接对象(需已成功连接)records: 待插入的记录列表(每个元素为字典)返回:bool: 插入成功返回True,失败返回False"""if not conn or not records:print("无效的数据库连接或记录列表")return False# 定义插入SQL模板(根据表结构调整字段)sql = """INSERT INTO plate_recognize (res_plate_number, e2e_plate_number, e2e_plate_type, e2e_plate_confidence, camera_ip, camera_channel, camera_id, camera_time, res_plate_img_path, res_plate_crop_confidence, status, plate_url, e2e_plate_time) VALUES (%s, %s, %s, %s, %s, %s, %s, %s, %s, %s, %s, %s, %s)"""try:with conn.cursor() as cursor:# 批量插入(参数化为元组列表)batch_data = [(record.get('res_plate_number'),  # res_plate_numberrecord.get('e2e_plate_number'),  # e2e_plate_numberrecord.get('e2e_plate_type'),  # e2e_plate_typerecord.get('e2e_plate_confidence'),  # e2e_plate_confidencerecord.get('camera_ip'),  # camera_iprecord.get('camera_channel'),  # camera_channelrecord.get('camera_id'),  # camera_idrecord.get('camera_time'),  # camera_time(datetime对象)record.get('res_plate_img_path'),  # res_plate_img_pathrecord.get('res_plate_crop_confidence'),  # res_plate_crop_confidencerecord.get('status', 0),  # status(默认0)record.get('plate_url'),  # plate_urlrecord.get('e2e_plate_time')  # e2e_plate_time(datetime对象)) for record in records]cursor.executemany(sql, batch_data)conn.commit()  # 提交事务print(f"成功插入 {len(batch_data)} 条记录")return Trueexcept pymysql.MySQLError as e:conn.rollback()  # 回滚事务print(f"插入失败,事务已回滚:{str(e)}")return Falseexcept Exception as e:conn.rollback()print(f"插入时发生未知错误:{str(e)}")return Falsedef main():create_plate_recognize_sql = """CREATE TABLE `jeecg-boot`.`plate_recognize` (`id` bigint NOT NULL AUTO_INCREMENT,`res_plate_number` varchar(40) CHARACTER SET utf8mb4 COLLATE utf8mb4_general_ci NULL DEFAULT NULL COMMENT '识别车牌1',`e2e_plate_number` varchar(40) CHARACTER SET utf8mb4 COLLATE utf8mb4_general_ci NULL DEFAULT NULL COMMENT '识别车牌2',`e2e_plate_type` varchar(40) CHARACTER SET utf8mb4 COLLATE utf8mb4_general_ci NULL DEFAULT NULL COMMENT '车牌类型',`e2e_plate_confidence` float NULL DEFAULT NULL COMMENT '车牌准确度',`camera_ip` varchar(40) CHARACTER SET utf8mb4 COLLATE utf8mb4_general_ci NULL DEFAULT NULL COMMENT '摄像头IP',`camera_channel` varchar(20) CHARACTER SET utf8mb4 COLLATE utf8mb4_general_ci NULL DEFAULT NULL COMMENT '摄像头通道',`camera_id` varchar(20) CHARACTER SET utf8mb4 COLLATE utf8mb4_general_ci NULL DEFAULT NULL COMMENT '摄像头ID',`camera_time` datetime NULL DEFAULT NULL COMMENT '时间(摄像头)',`res_plate_img_path` varchar(255) CHARACTER SET utf8mb4 COLLATE utf8mb4_general_ci NULL DEFAULT NULL COMMENT '图片路径',`res_plate_crop_confidence` float NULL DEFAULT NULL COMMENT '置信度',`status` int NULL DEFAULT NULL COMMENT '状态',`plate_url` varchar(255) CHARACTER SET utf8mb4 COLLATE utf8mb4_general_ci NULL DEFAULT NULL COMMENT '图片路径',`e2e_plate_time` datetime NULL DEFAULT NULL COMMENT '采集时间',PRIMARY KEY (`id`) USING BTREE) ENGINE = InnoDB AUTO_INCREMENT = 1 CHARACTER SET = utf8mb4 COLLATE = utf8mb4_general_ci ROW_FORMAT = DYNAMIC;"""mysql_sql_execute(create_plate_recognize_sql)if __name__ == '__main__':main()
utils.py
import cv2
import numpy as np
import colorsysdef four_point_transform(image, pts):rect = pts.astype('float32')br_x, br_y, bl_x, bl_y, tl_x, tl_y, tr_x, tr_y = rectwidthA = np.sqrt(((br_x - bl_x) ** 2) + ((br_y - bl_y) ** 2))widthB = np.sqrt(((tr_x - tl_x) ** 2) + ((tr_y - tl_y) ** 2))maxWidth = max(int(widthA), int(widthB))heightA = np.sqrt(((tr_x - br_x) ** 2) + ((tr_y - br_y) ** 2))heightB = np.sqrt(((tl_x - bl_x) ** 2) + ((tl_y - bl_y) ** 2))maxHeight = max(int(heightA), int(heightB))rect =  np.array([[tl_x, tl_y], [tr_x, tr_y], [br_x, br_y], [bl_x, bl_y]], dtype='float32')dst = np.array([[0, 0],[maxWidth - 1, 0],[maxWidth - 1, maxHeight - 1],[0, maxHeight - 1]], dtype = "float32")M = cv2.getPerspectiveTransform(rect, dst)warped = cv2.warpPerspective(image, M, (maxWidth, maxHeight))return warpeddef resize_padd(img, size, color=(114, 114, 114)):h, w = img.shape[0:2]  # hw# resizer = size / max(h, w)if r != 1:interp = cv2.INTER_LINEAR if r > 1 else cv2.INTER_AREAimg = cv2.resize(img, (round(w * r), round(h * r)), interpolation=interp)# paddn_h, n_w = img.shape[0:2]padd_h = size - n_hpadd_w = size - n_wpadd_h /= 2padd_w /= 2top, bottom = int(round(padd_h - 0.1)), int(round(padd_h + 0.1))left, right = int(round(padd_w - 0.1)), int(round(padd_w + 0.1))img = cv2.copyMakeBorder(img, top, bottom, left, right, cv2.BORDER_CONSTANT, value=color)return img, r, (left, top)### 自己加的,不进行裁剪
def resize_padd_scale(img, size, color=(114, 114, 114)):h, w = img.shape[0:2]  # hw# 计算缩放比例r = min(size / h, size / w)# 调整图像大小不进行裁剪interp = cv2.INTER_LINEAR if r > 1 else cv2.INTER_AREAimg = cv2.resize(img, (round(w * r), round(h * r)), interpolation=interp)# 计算填充信息,但这里不再需要填充信息,可以将 padd_data 设为 Nonepadd_data = Nonereturn img, r, padd_data
###def cxcywh2xyxys(cxcywh, scale, left, top, img_hw):out = np.zeros_like(cxcywh)x1 = cxcywh[:, 0] - (cxcywh[:, 2] / 2) - leftx2 = cxcywh[:, 0] + (cxcywh[:, 2] / 2) - lefty1 = cxcywh[:, 1] - (cxcywh[:, 3] / 2) - topy2 = cxcywh[:, 1] + (cxcywh[:, 3] / 2) - topout[:, 0] = np.clip(x1/scale, 0, img_hw[1])out[:, 1] = np.clip(y1/scale, 0, img_hw[0])out[:, 2] = np.clip(x2/scale, 0, img_hw[1])out[:, 3] = np.clip(y2/scale, 0, img_hw[0])return outdef scale_landmarks(landmarks, scale, left, top, img_hw):out = np.zeros_like(landmarks)out[:, [0,2,4,6]] = landmarks[:, [0,2,4,6]] - leftout[:, [1,3,5,7]] = landmarks[:, [1,3,5,7]] - topout = np.clip(out/scale, 0, img_hw[1])return outdef nms(boxes, confs, iou_thresh=0.3):x1 = boxes[:, 0]y1 = boxes[:, 1]x2 = boxes[:, 2]y2 = boxes[:, 3]areas = (x2 - x1 + 1) * (y2 - y1 + 1)order = confs.flatten().argsort()[::-1]keep = []while order.size > 0:i = order[0]keep.append(i)xx1 = np.maximum(x1[i], x1[order[1:]])xx2 = np.minimum(x2[i], x2[order[1:]])yy1 = np.maximum(y1[i], y1[order[1:]])yy2 = np.minimum(y2[i], y2[order[1:]])w = np.maximum(0.0, xx2 - xx1)h = np.maximum(0.0, yy2 - yy1)inter = w * hovr = inter / (areas[i] + areas[order[1:]] - inter)inds = np.where(ovr <= iou_thresh)[0]order = order[inds + 1]return keepdef pre_process(img_raw, img_size=640):img_data, scale, padd_data = resize_padd(img_raw, img_size)img_data = img_data / 255.0  # 归一化img_data = img_data[..., ::-1]  # BGR -> RGB格式img_data = np.transpose(img_data, (2, 0, 1))  # HWC to CHWimg_data = np.expand_dims(img_data, 0)  # to BCHWnp_data = np.array(img_data, dtype=np.float32)return np_data, scale, padd_data### 后来改的,可删,唯一区别在于resize_padd -> resize_padd_scale
def pre_process_scale(img_raw, img_size=640):img_data, scale, padd_data = resize_padd_scale(img_raw, img_size)img_data = img_data / 255.0  # 归一化img_data = img_data[..., ::-1]  # BGR -> RGB格式img_data = np.transpose(img_data, (2, 0, 1))  # HWC to CHWimg_data = np.expand_dims(img_data, 0)  # to BCHWnp_data = np.array(img_data, dtype=np.float32)return np_data, scale, padd_data
###def post_process(pred, conf_thred, iou_thred, scale, left, top, img_hw):"""过滤低置信度结果, 缩放回原图尺寸, nms"""true_conf = pred[:, 4:5] * pred[:, 13:]if isinstance(conf_thred, list):  # 不同类可使用不同的置信度mask = true_conf >= np.array(conf_thred)else:mask = true_conf >= conf_thredmask = np.sum(mask, axis=-1) > 0boxes = cxcywh2xyxys(pred[mask][:, 0:4], scale, left, top, img_hw)landmarks = scale_landmarks(pred[mask][:, 5:13], scale, left, top, img_hw)confs = np.max(true_conf[mask], axis=-1)classes = np.argmax(pred[mask][:, 13:], axis=-1)# 所有分类一起做nmsc = classes.reshape((-1, 1)) * 1000  # 或者是其他大于max([w, h])的数nms_boxes = boxes + ckeep = nms(nms_boxes, confs, iou_thred)confs = confs[keep]boxes = boxes[keep]landmarks = landmarks[keep]classes = classes[keep]return boxes, landmarks, confs, classesdef get_color_list(label_list):# 根据标签生成颜色color_list = []hues = np.linspace(0, 1, len(label_list) + 1)for hue in hues.tolist():rgb = [int(c * 255) for c in colorsys.hsv_to_rgb(hue, 1.0, 1.0)]color_list.append(rgb)return color_listdef draw_boxes(img, boxes, confs, labels, color, thickness=1):for bbox, cls, conf in zip(boxes, labels, confs):x1, y1, x2, y2 = bboxcv2.rectangle(img, (int(x1), int(y1)), (int(x2), int(y2)), color, thickness)label = f"{cls}: {conf:.2f}"cv2.putText(img, label, (int(x1), int(y1) - 2), cv2.FONT_HERSHEY_SIMPLEX, thickness / 3, color, thickness)return imgdef draw_points(img, points, color, thickness=2):points_list = []for landmarks in points:for i in range(len(landmarks) // 2):points_list.append((landmarks[2*i].round().astype(np.int32), landmarks[2*i+1].round().astype(np.int32)))for i, p in enumerate(points_list):cv2.circle(img, p, thickness, color, -1)return img