RabbitMQ的使用--项目创建、五种工作模式、高级特性
1.首先是创建项目
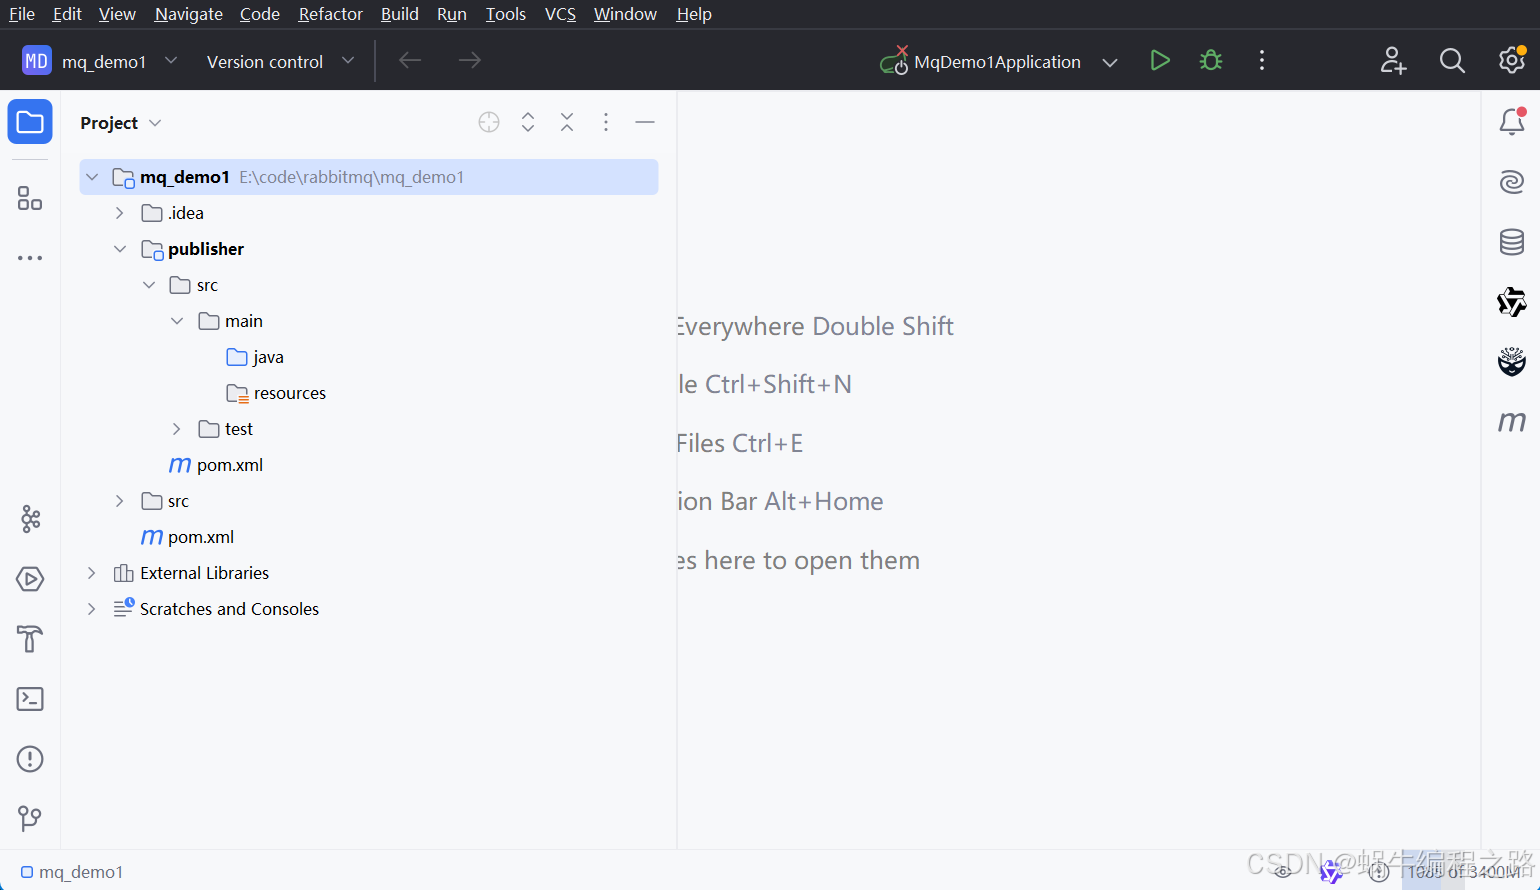
在一个父工程 mq_demo 的基础上建立两个子模块,生产者模块publisher,消费者模块 consumer
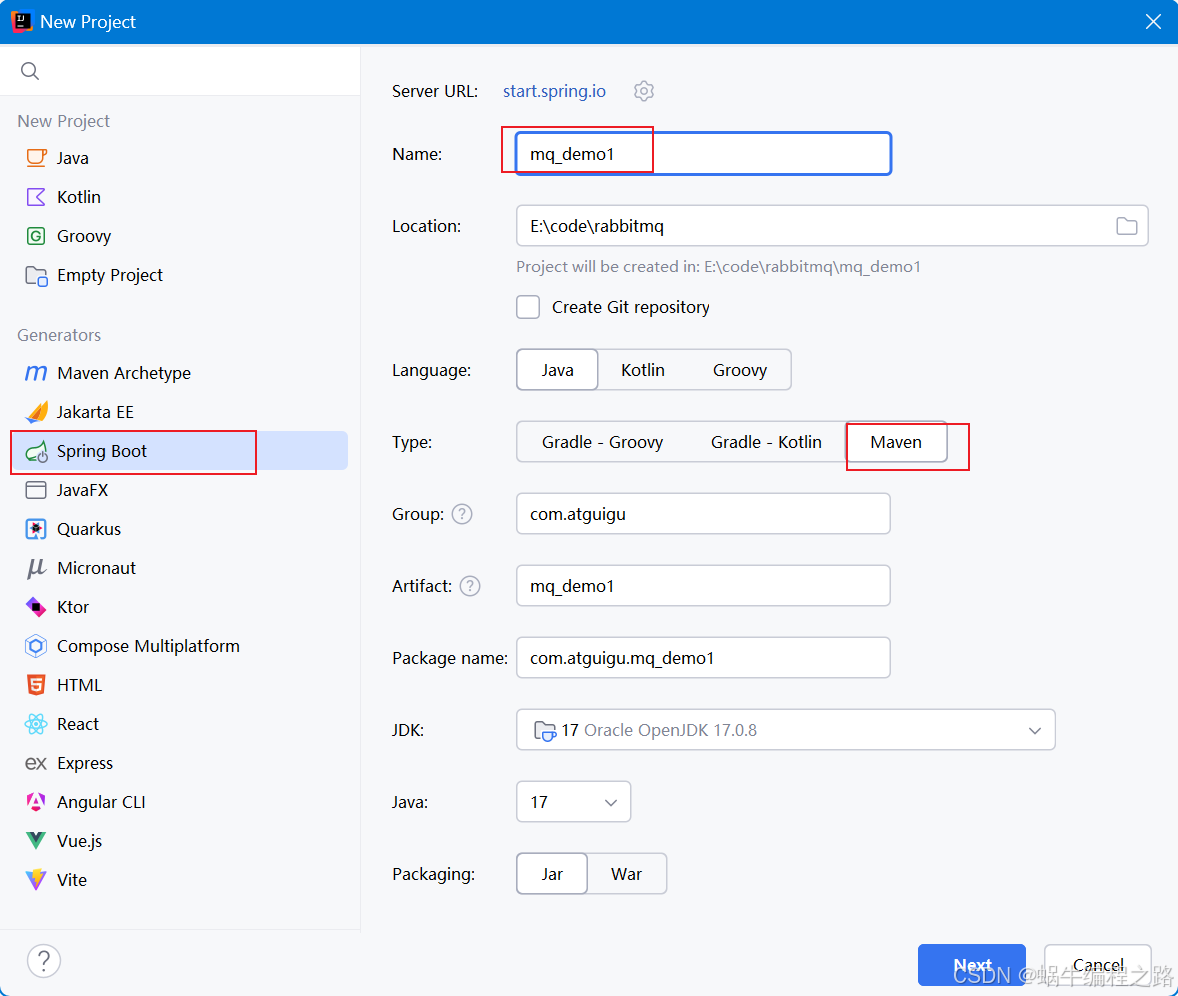
创建项目:
建立成功:
删除多余文件
创建子模块1:publisher(生产者模块)
右键-----new ----module
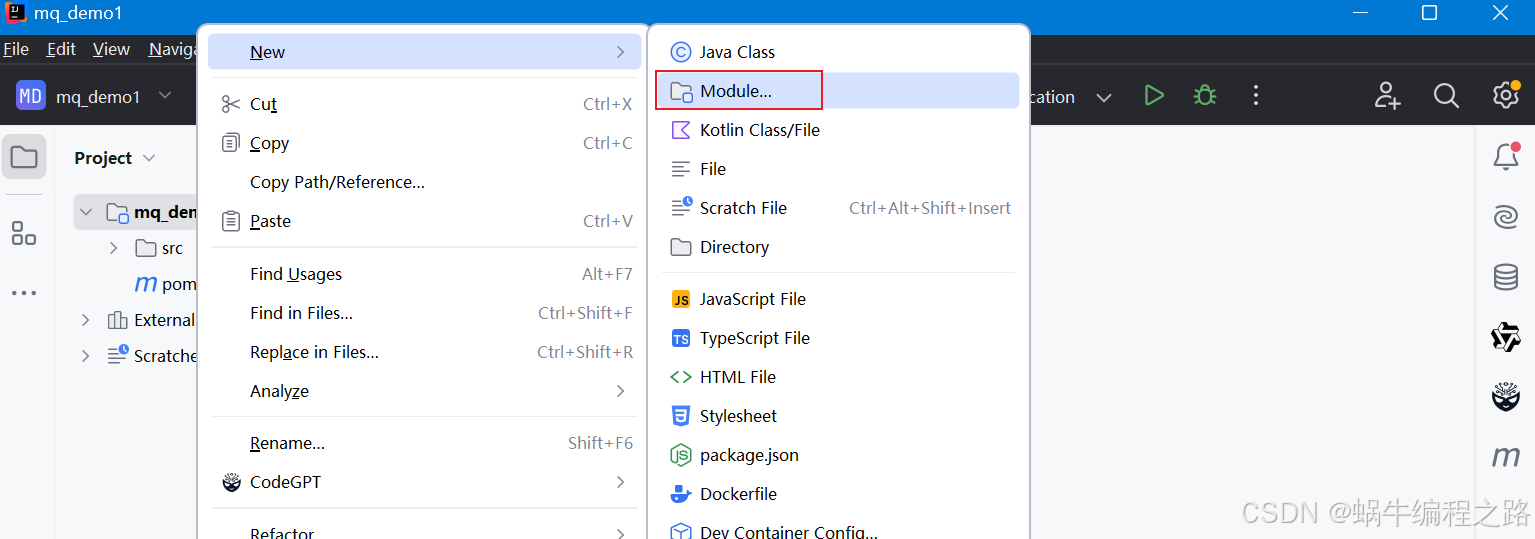
选中Java,填写publisher,选中maven,确认父模块
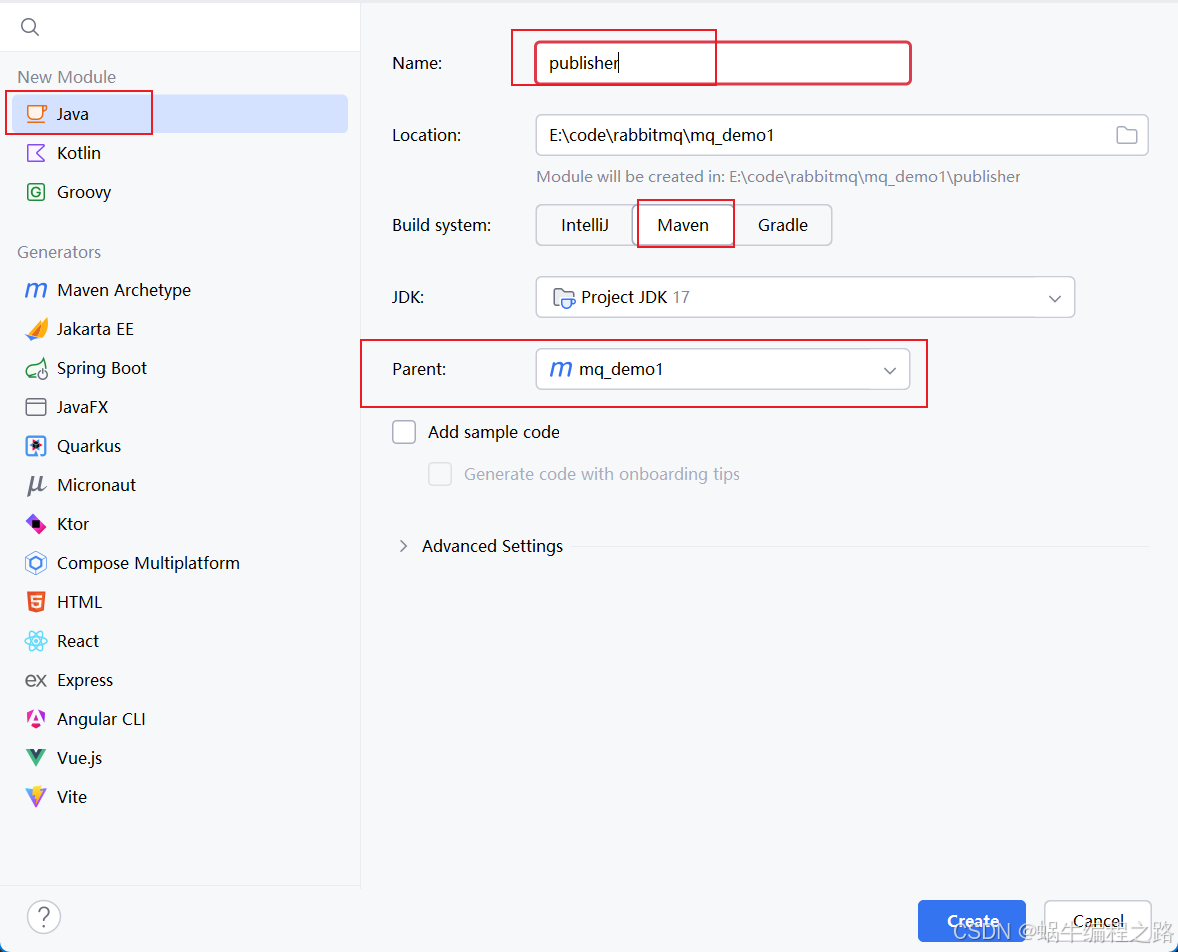
创建成功
同理:创建子模块2:consumer(消费者模式)
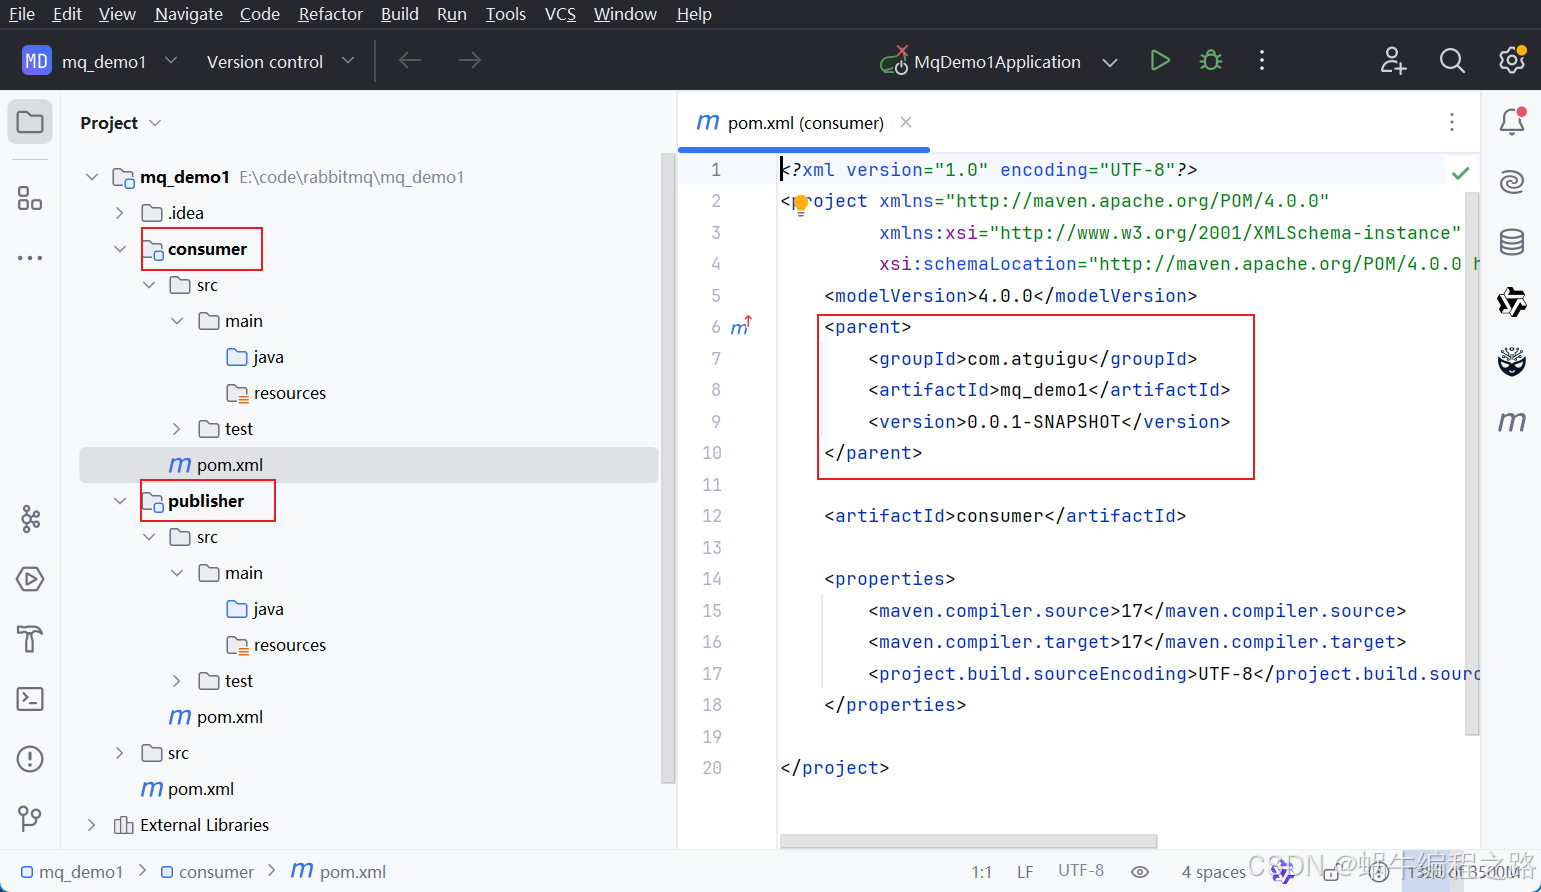
至此:项目创建完毕
2.进行基本配置(pom.xml、application.yml)
引入依赖:父模块引入依赖,子模块共享父模块依赖
pom.xml
<dependencies><!--AMQP依赖,包含 rabbitmq --><dependency><groupId>org.springframework.boot</groupId><artifactId>spring-boot-starter-amqp</artifactId></dependency><!--单元测试--><dependency><groupId>junit</groupId><artifactId>junit</artifactId><version>4.13.2</version><scope>test</scope></dependency><dependency><groupId>org.springframework.boot</groupId><artifactId>spring-boot-starter</artifactId></dependency><dependency><groupId>org.projectlombok</groupId><artifactId>lombok</artifactId><optional>true</optional></dependency><dependency><groupId>org.springframework.boot</groupId><artifactId>spring-boot-starter-test</artifactId><scope>test</scope></dependency></dependencies>
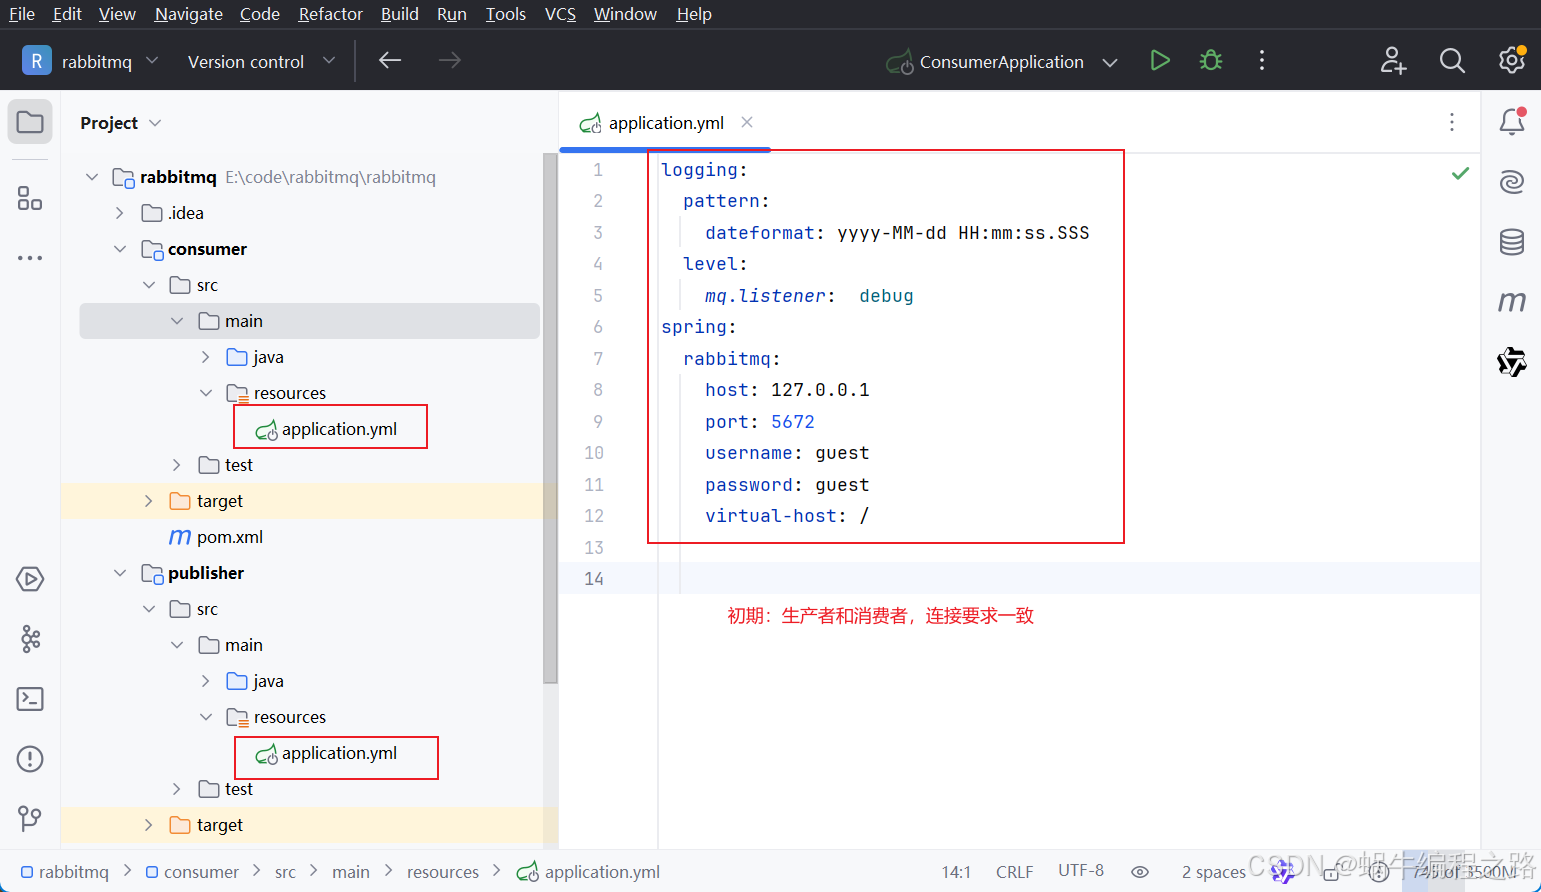
application.yml
logging:pattern:dateformat: yyyy-MM-dd HH:mm:ss.SSSlevel:mq.listener:  debug
spring:rabbitmq:host: 127.0.0.1port: 5672username: guestpassword: guestvirtual-host: /
结构图:
建立具体的包结构,以及要用的一些类
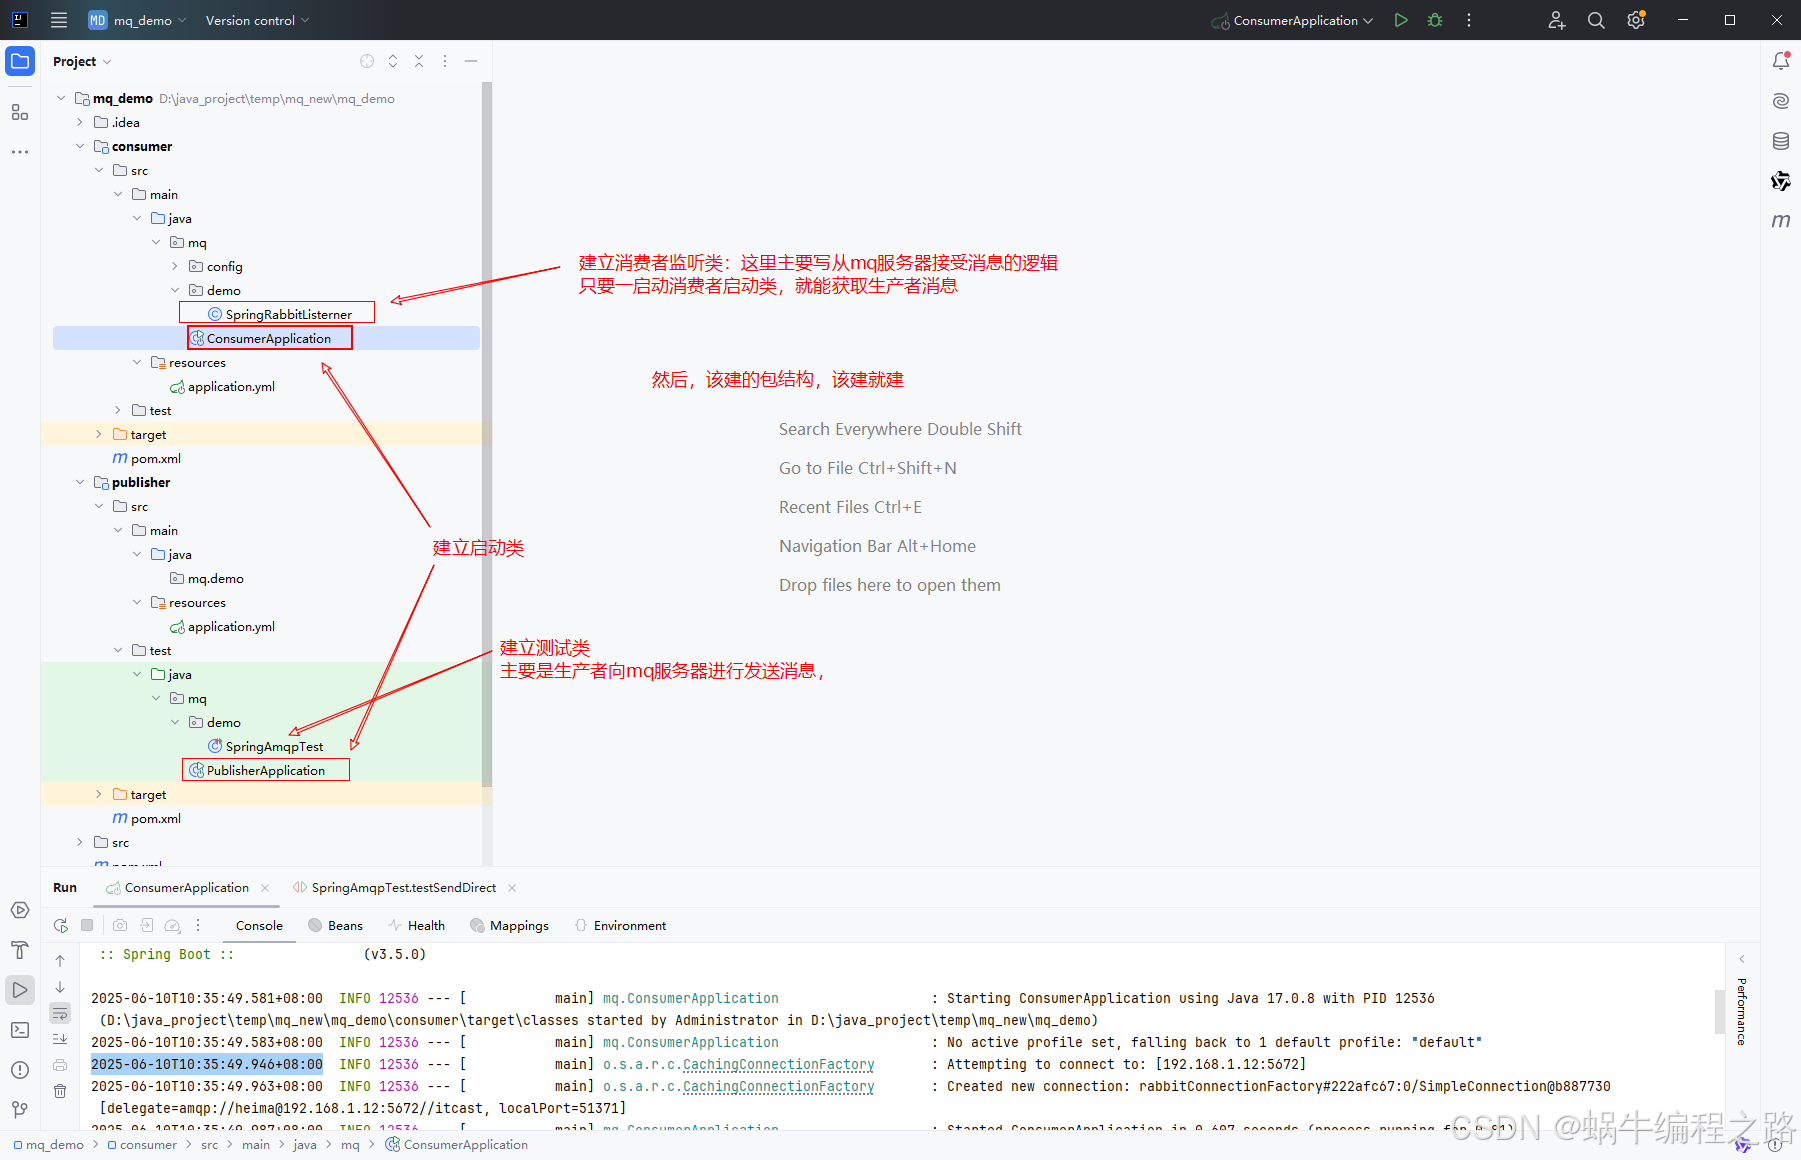
消费者启动类:ConsumerApplication.class
@SpringBootApplication
public class ConsumerApplication {public static void main(String[] args) {SpringApplication.run(ConsumerApplication.class, args);}}
生产者启动类:PublisherApplication.class
@SpringBootApplication
public class PublisherApplication {public static void main(String[] args) {org.springframework.boot.SpringApplication.run(PublisherApplication.class, args);}
}
消费者监听类:SpringRabbitListerner.class
@Component
public class SpringRabbitListerner {@RabbitListener(queues = "queue.simple")public void listenSimpleQueueMessage(String msg){System.out.println("简单模式-消费者消费消息:"+msg);}
}
生产者启动类:SpringAmqpTest.class
@ExtendWith(SpringExtension.class)
@SpringBootTest
public class SpringAmqpTest {@Autowiredprivate RabbitTemplate  rabbitTemplate;@Testpublic void testSendSimpleMessage() {String simpleQueue = "queue.simple";String message = "hello world";rabbitTemplate.convertAndSend(simpleQueue,message);}
}
做到这里,就已经可以进行mq的消息进行发送和获取了。
3.Spring AMQP的五种工作模式
生产者启动类:SpringAmqpTest.class
@ExtendWith(SpringExtension.class)
@SpringBootTest
public class SpringAmqpTest {@Autowiredprivate RabbitTemplate  rabbitTemplate;@Testpublic void testSendSimpleMessage() {String simpleQueue = "queue.simple";String message = "hello world";rabbitTemplate.convertAndSend(simpleQueue,message);}@Testpublic void testSendWorkQueue(){String workQueue = "queue.work";for(int i=1 ;i<=10;i++){String message = "hello world.."+i;rabbitTemplate.convertAndSend(workQueue,message);}}@Testpublic void testSendFanout(){String fanoutExchange = "amq.fanout";String message = "hello world fanout..";rabbitTemplate.convertAndSend(fanoutExchange,"",message);}@Testpublic void testSendDirect(){String directExchange = "amq.direct";String message = "hello world direct..";rabbitTemplate.convertAndSend(directExchange,"red",message);}}
消费者监听类:SpringRabbitListerner.class
@Component
public class SpringRabbitListerner {@RabbitListener(queues = "queue.simple")public void listenSimpleQueueMessage(String msg){System.out.println("简单模式-消费者消费消息:"+msg);}@RabbitListener(queues = "queue.work")public void listenWorkQueueMessage1(String msg){System.out.println("工作模式-消费者消费消息:"+msg);}@RabbitListener(queues = "queue.work")public void listenWorkQueueMessage2(String msg){System.out.println("工作模式-消费者消费消息2:"+msg);}@RabbitListener(queues = "queue.fanout1")public  void listenFanoutQueueMessage1(String msg){System.out.println("发布订阅模式-消费者1消费消息:"+msg);}@RabbitListener(queues = "queue.fanout2")public  void listenFanoutQueueMessage2(String msg){System.out.println("发布订阅模式-消费者2消费消息:"+msg);}@RabbitListener(queues = "queue.direct1")public void listenDirectQueueMessage(String msg){System.out.println("路由模式-消费者消费消息:"+msg);}@RabbitListener(queues = "queue.direct2")public void listenTopicQueueMessage1(String msg){System.out.println("路由模式-消费者1消费消息:"+msg);}}
所用到的配置类:
主要是建立交换机、建立队列、绑定交换机和队列关系的
订阅者模式
@Configuration
public class FunoutConfig {@Beanpublic FanoutExchange fanoutExchange() {return new FanoutExchange("amq.fanout");}@Beanpublic Queue  queue1() {return new Queue("queue.fanout1");}@Beanpublic Queue   queue2() {return new Queue("queue.fanout2");}@Beanpublic Binding binding1(Queue queue1, FanoutExchange fanoutExchange) {return BindingBuilder.bind(queue1).to(fanoutExchange);}@Beanpublic Binding binding2(Queue queue2, FanoutExchange fanoutExchange) {return BindingBuilder.bind(queue2).to(fanoutExchange);}}
路由模式
@Configuration
public class DirectConfig {@Beanpublic DirectExchange directExchange(){return new DirectExchange("amq.direct");}@Beanpublic Queue directQueue1(){return new Queue("queue.direct1");}@Beanpublic Queue directQueue2(){return new Queue("queue.direct2");}@Beanpublic Binding  directBinding1(Queue queue1, DirectExchange directExchange){return BindingBuilder.bind(queue1).to(directExchange).with("yellow");}@Beanpublic Binding  directBinding2(Queue queue2, DirectExchange directExchange){return BindingBuilder.bind(queue2).to(directExchange).with("red");}}
2025-6-13
4.mq的高级特性:
1、消息的安全性问题----生产者、消费者确认、mq持久化
2、延迟队列----做定时任务
3、惰性队列----处理数据积压
3、模拟集群----处理单点崩溃
4.1 消息队列的安全性问题:
生产者确认:生产者发送消息---到交换机+到队列---返回ack给mq生产者发送消息---没到交换机---返回nack给mq生产者发送消息---到交换机,没到队列---返回ack,触发回调
模块剥离:(代码部分)
1.生产者确认机制
yml配置:
	logging:pattern:dateformat: yyyy-MM-dd HH:mm:ss.SSSlevel:com.example.demo: debug
spring:rabbitmq:host: 127.0.0.1port: 5672username: guestpassword: guestvirtual-host: /#springAMQP 实现生产者确认publisher-confirm-type: correlated #simple 同步等待confirm结果,直到超时;correlated:异步回调,定义confirmcollback,MQ返回结果时,会回调ConfirmCallbackpublisher-returns: true # 开启publish-return 功能,同样是基于callback机制,不过是定义ReturnCallbacktemplate:mandatory: true # 定义消息路由失败时的策略。true,则调用ReturnCallback;false则直接丢弃消息
消息到交换机—ack的回应
package mq.demo;import lombok.extern.slf4j.Slf4j;
import org.junit.Test;
import org.junit.runner.RunWith;
import org.springframework.amqp.rabbit.connection.CorrelationData;
import org.springframework.amqp.rabbit.core.RabbitTemplate;
import org.springframework.beans.factory.annotation.Autowired;
import org.springframework.boot.test.context.SpringBootTest;
import org.springframework.test.context.junit4.SpringRunner;
import java.util.UUID;@RunWith(SpringRunner.class)
@SpringBootTest
@Slf4j
public class SpringPublisherTest {@Autowiredprivate RabbitTemplate rabbitTemplate;@Testpublic void simpleSendMessage(){//1.准备消息String  msg = "hello spring amqp";//2.准备CorrelationDate//2.1消息idCorrelationData correlationData = new CorrelationData(UUID.randomUUID().toString());//2.2准备ConfirmCallbackrabbitTemplate.setConfirmCallback((correlationData1, ack, cause) -> {if (ack) {log.info("消息确认成功,ID: {}", correlationData1 != null ? correlationData1.getId() : "无ID");} else {log.error("消息确认失败,ID: {}, 原因: {}", correlationData1 != null ? correlationData1.getId() : "无ID", cause);}});rabbitTemplate.convertAndSend("amq.direct","yellow",msg,correlationData);}
}
消息到了交换机ack----消息没到队列 ,路由发送失败—触发回调
package mq.config;import lombok.extern.slf4j.Slf4j;
import org.springframework.amqp.rabbit.core.RabbitTemplate;
import org.springframework.beans.BeansException;
import org.springframework.context.ApplicationContext;
import org.springframework.context.ApplicationContextAware;
import org.springframework.context.annotation.Configuration;@Slf4j
@Configuration
public class CommonConfig implements ApplicationContextAware {@Overridepublic void setApplicationContext(ApplicationContext applicationContext) throws BeansException {//获取rabbitmq对象RabbitTemplate rabbitTemplate = applicationContext.getBean(RabbitTemplate.class);//配置 ReturnCallback 当发送者发送消息到MQ,MQ返回失败,会调用此方法(记住;是路由发送失败)rabbitTemplate.setReturnsCallback(msg -> {//记录日志log.error("消息发送到队列失败!" +"响应码:{}" +"失败原因:{}" +"交换机:{}" +"路由key:{}",msg.getReplyCode(),msg.getReplyText(),msg.getExchange(),msg.getRoutingKey());});}
}
持久化:解决mq宕机造成的交换机丢失、队列丢失、消息丢失
消费者确认:
消费者收到消息—消费者处理消息—消费者返回ack
消费者收到消息—消费者处理消息—消费者应该返回nack
针对第二种情况:衍生出消费者确认机制
1.none,mq发完消息,自动删除,不等ack
2.手动处理,try-catch,然后自己捕捉异常,捕捉到了返回给mq服务器nack
3.自动处理,auto;系统自己捕捉异常,然后返回nack、
针对消费者确认机制:可能出现循环的问题
解决办法:配上retry机制,设定本地重试
1.消费者自己处理,耗尽次数,自动放弃消息
2.耗尽次数,返还消息给mq队列,循环
3.耗尽次数,将消息送到error交换机
模块剥离:(代码部分)
logging:pattern:dateformat: yyyy-MM-dd HH:mm:ss.SSSlevel:mq.listener:  debug
spring:rabbitmq:host: 127.0.0.1port: 5672username: guestpassword: guestvirtual-host: /listener:simple:prefetch: 1#acknowledge-mode: none  #关闭ack,MQ假定消费者获取消息后会成功处理。因此消息投递后立即被删除acknowledge-mode: auto #自动ack模式,由spring检测listener代码是否出现异常,没有异常则返回ack,有异常则返回nack#acknowledge-mode: manual #手动ack,需要在业务代码结束后,调用api发送ackretry:enabled: true # 开启消费者失败重试initial-interval: 1000ms  #初试的失败等待时长为1秒multiplier: 3 #  失败重试的间隔倍数(下次失败的等待时长倍数),下次等待时长 = multiplier * last-intervalmax-attempts: 4 #  最大失败重试次数
配置error交换机,次数耗尽,就把消息送到error交换机,
package mq.demo.config;import org.springframework.amqp.core.Binding;
import org.springframework.amqp.core.DirectExchange;
import org.springframework.amqp.core.Queue;
import org.springframework.amqp.rabbit.core.RabbitTemplate;
import org.springframework.amqp.rabbit.retry.MessageRecoverer;
import org.springframework.amqp.rabbit.retry.RepublishMessageRecoverer;
import org.springframework.context.annotation.Bean;
import org.springframework.context.annotation.Configuration;@Configuration
public class ErrorMessageConfig {@Beanpublic DirectExchange  errorMessageExchange() {return new DirectExchange("error.direct");}@Beanpublic Queue errorMessageQueue() {return new Queue("error.queue");}@Beanpublic Binding errorMessageBinding() {return new Binding("error.queue",Binding.DestinationType.QUEUE,"error.direct","error",null);}@Beanpublic MessageRecoverer republicMessageRecoverer(RabbitTemplate rabbitTemplate) {return new RepublishMessageRecoverer(rabbitTemplate, "error.direct", "error");}}
4.2.延迟队列:
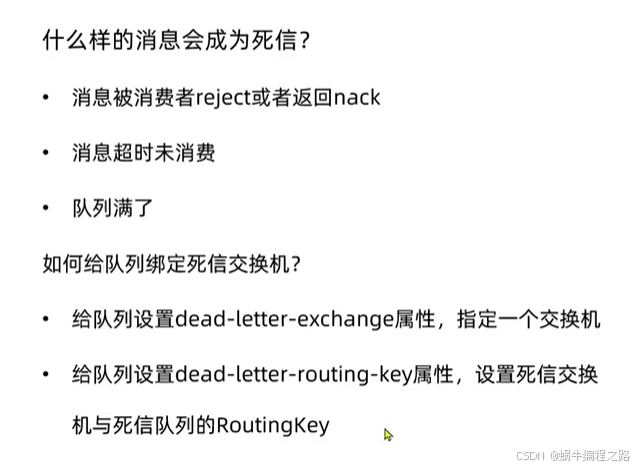
初始死信交换机:当一个队列中的消息满足下列情况之一时,可以成为死信(dead letter)
1、消费者使用basic.reject或basic.nack声明消费失败,并且消息的requeue的参数设置为false
2、消息是一个过期消息,超时无人消费
3、要投递的队列消息堆积满了,最早的消息可能成为死信
如果该队列配置了dead-letter-exchange属性,指定了一个交换机,那么队列中的死信就会投递到这个交换机,这个交换机称为死信交换机(Dead Letter Exchange,简称DLX)。
死信交换机的运行原理
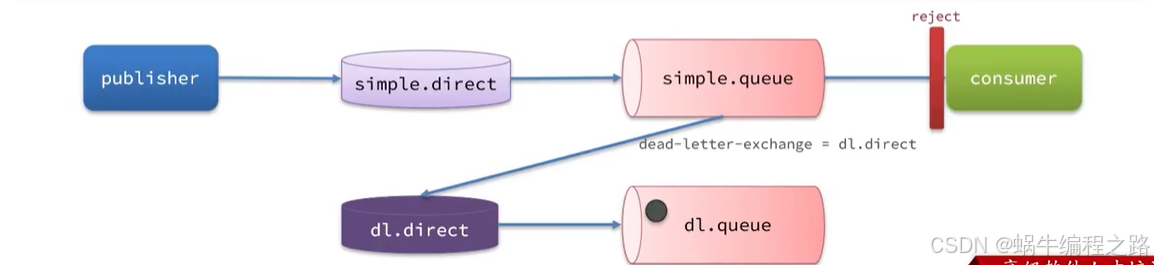
小总结(和上面的有所重复)
TTL:延迟队列
TTL,也就是Time-To-Live。如果一个队列中的消息TTL结束仍未消费,则会变成死信,ttl超时分为两种情况
1、消息所在的队列设置了存活时间
2、消息本身设置了存活时间
TTL的运行原理:如图
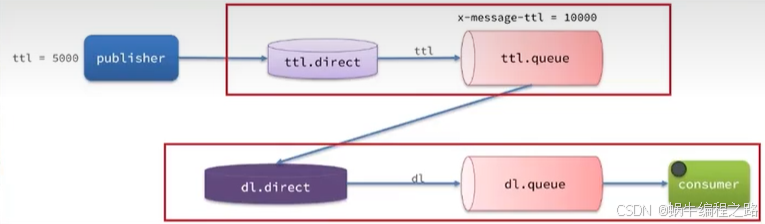
模块剥离:(代码部分)
首先绑定死信交换机和死信队列,并设置消费者去消费消息

@RabbitListener(bindings = @QueueBinding(value = @Queue(name = "dl.queue"),exchange = @Exchange(value = "dl.direct"),//默认是direct持久化key = "dl"))public void listenDlQueue(String msg){log.info("测试死信队列,接收到了延迟消息,消息内容为:{}"+msg);}然后建立延迟交换机和延迟队列的绑定,在延迟队列上再绑定死信交换机
附上代码:
package mq.demo.config;import org.springframework.amqp.core.*;
import org.springframework.context.annotation.Bean;
import org.springframework.context.annotation.Configuration;@Configuration
public class TTLMessage {@Beanpublic DirectExchange ttlExchange() {return new DirectExchange("ttl.direct");}@Beanpublic Queue ttlQueue() {return QueueBuilder.durable("ttl.queue").ttl(10000).deadLetterExchange("dl.direct").deadLetterRoutingKey("dl").build();}@Beanpublic Binding bindingTTLQueue(DirectExchange ttlExchange, Queue ttlQueue) {return BindingBuilder.bind(ttlQueue).to(ttlExchange).with("ttl");}
}
发送消息:代码
package mq.demo;import lombok.extern.slf4j.Slf4j;
import org.junit.Test;
import org.junit.runner.RunWith;
import org.springframework.amqp.core.Message;
import org.springframework.amqp.core.MessageBuilder;
import org.springframework.amqp.core.MessageDeliveryMode;
import org.springframework.amqp.rabbit.connection.CorrelationData;
import org.springframework.amqp.rabbit.core.RabbitTemplate;
import org.springframework.beans.factory.annotation.Autowired;
import org.springframework.boot.test.context.SpringBootTest;
import org.springframework.test.context.junit4.SpringRunner;import java.nio.charset.StandardCharsets;
import java.util.UUID;@RunWith(SpringRunner.class)
@SpringBootTest
@Slf4j
public class SpringPublisherTest {@Autowiredprivate RabbitTemplate rabbitTemplate;@Testpublic void testTTLMessage(){//1.准备消息Message message = MessageBuilder.withBody("hello ttl amqp".getBytes(StandardCharsets.UTF_8))//.setExpiration("5000") 设置延迟时间.setDeliveryMode(MessageDeliveryMode.PERSISTENT).build();//2.发送消息rabbitTemplate.convertAndSend("ttl.direct","ttl",message);}
}
mq呈现的状态和idea控制台的输出结果为:
publisher:生产者发送消息
ttl:延迟队列首先收到消息
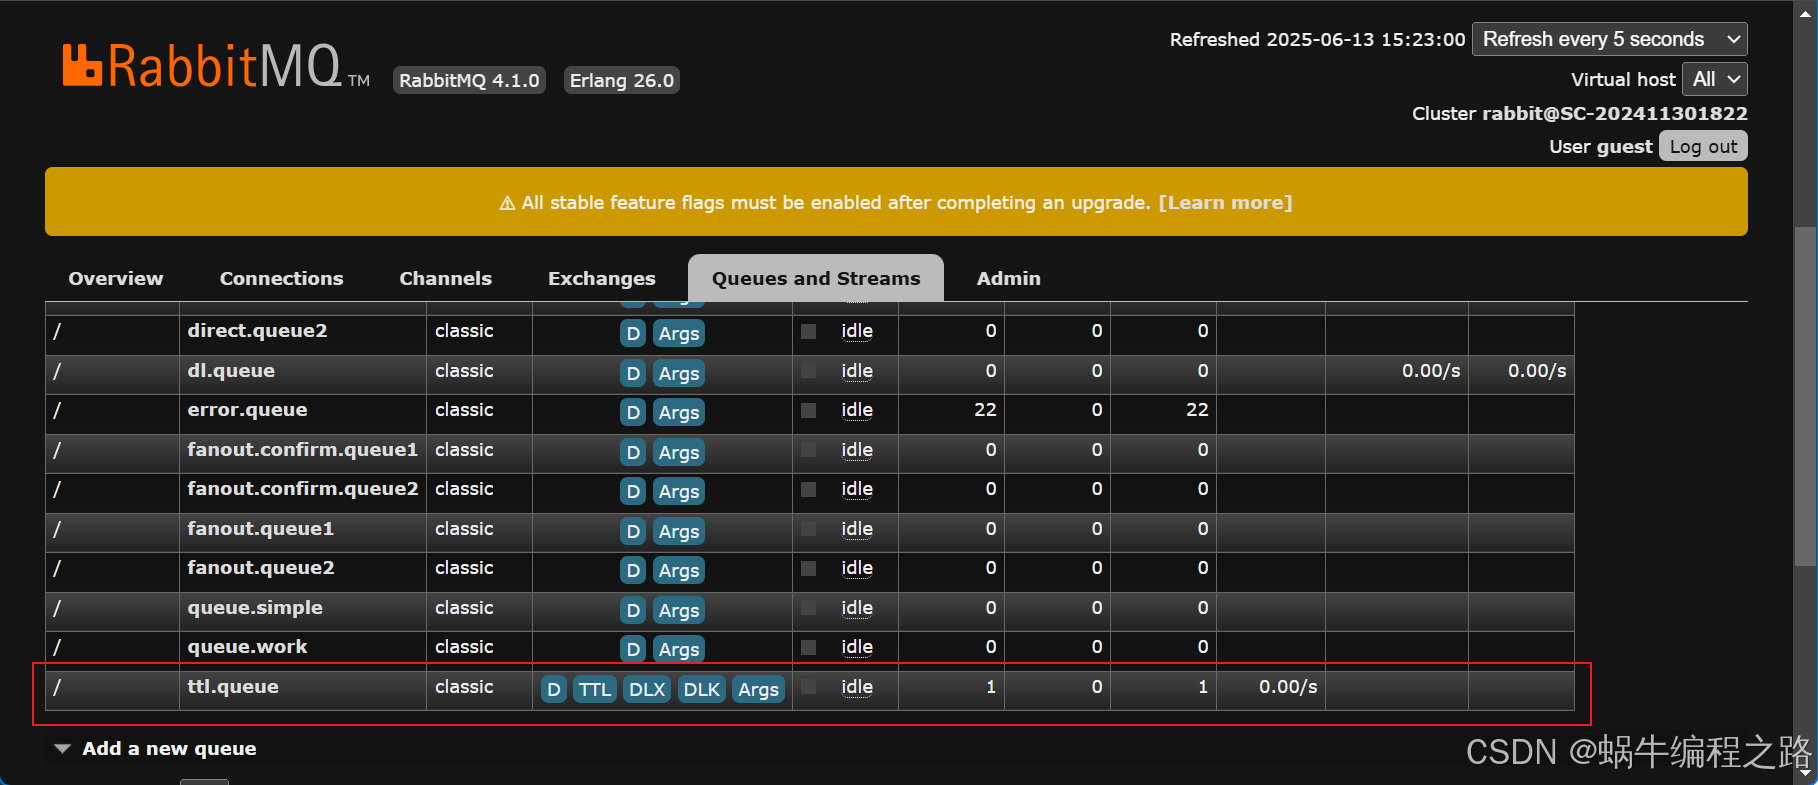
然后,再指定时间没有人消息该消息,消息自动转为死信,并进入指定的延迟队列
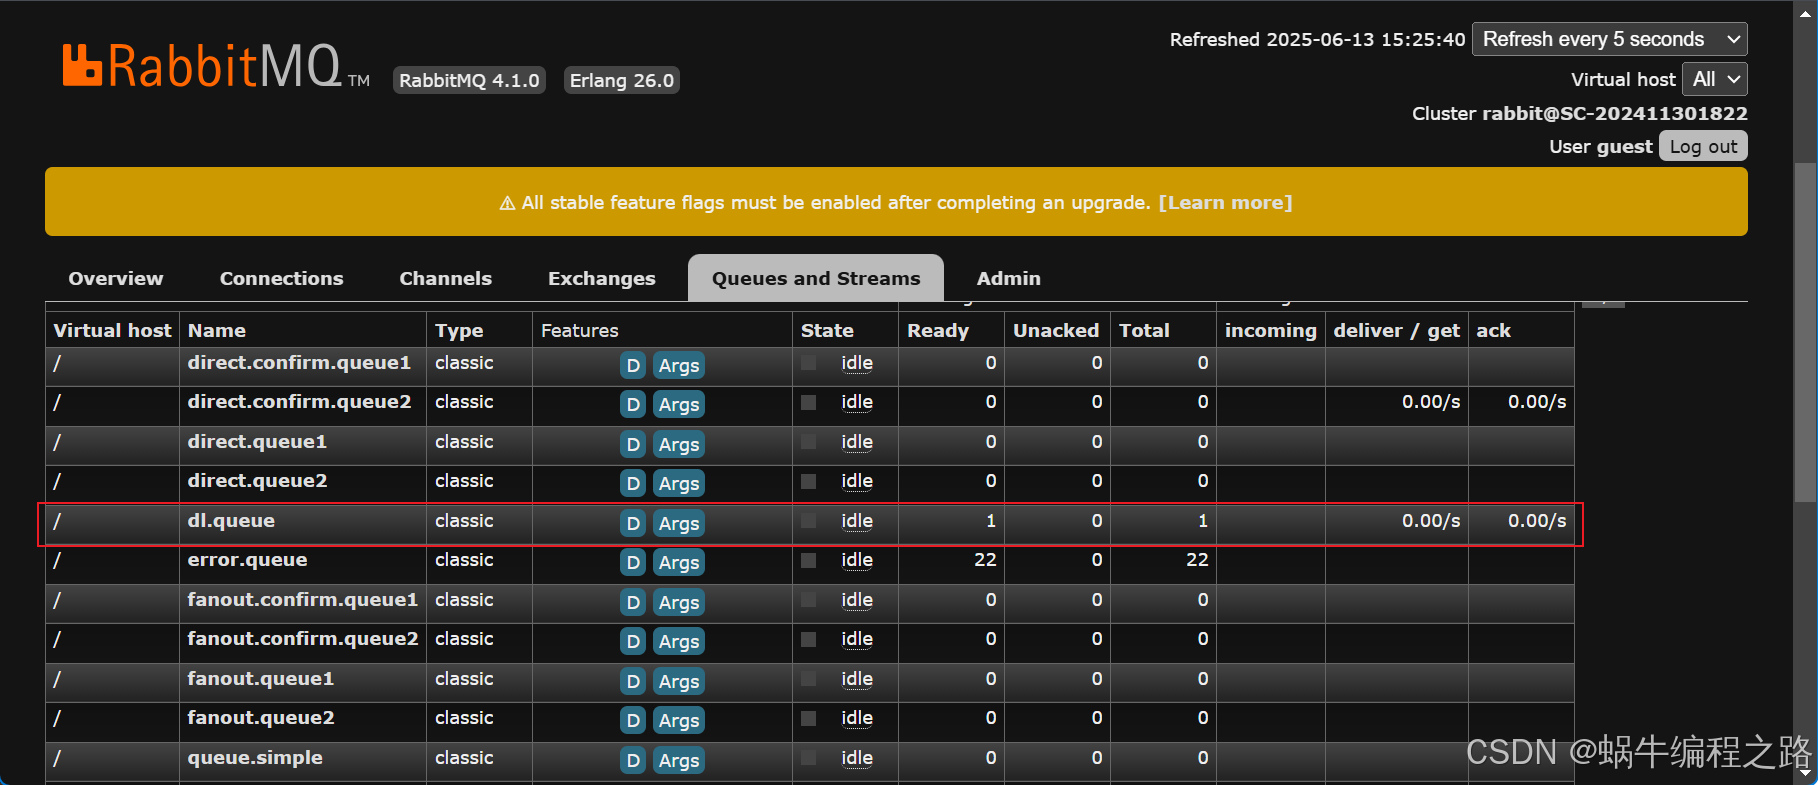
然后被idea消费,在idea控制台进行打印

评价:就是我这里的思维逻辑是优点混乱的
1.我发送消息的前提是我mq里面得有已经建好的队列和交换机以及它们之间的绑定关系,所以我应该是先启动消费者的启动类,将这些交换机和队列存到bean工厂里面去。形成对象,并且在mq里面呈现出来
2.我运行了很多次,才弄好了,
3.我项目如果是就是一个单一的项目,不涉及微服务,不分那么多微服务模块,这个时候我应该怎么写。
4.3 惰性队列
消息堆积问题:1.当生产者发送消息的速度超过了消费者处理消息的速度,就会导致队列中的消息堆积,直到队列存储消息达到上限。最早接收到的消息,可能成为死信,会被丢弃,这就是消息堆积问题。2.解决消息堆积有三种思路:1、增加更多消费者,提高消费者消费速度(就是5种模式的第二种--工作者模式work)2、在消费者内开启线程池加快消息处理速度3、扩大队列容积,提高堆积上限3.惰性队列特征:1、接收到消息后直接存入磁盘而非内存2、消费者要消费消息时才会从磁盘中读取并加载到内存3、支持数百万条的消息存储
惰性队列
两种声明方式:
1、基于@Bean
package mq.demo.config;import org.springframework.amqp.core.Queue;
import org.springframework.amqp.core.QueueBuilder;
import org.springframework.context.annotation.Bean;
import org.springframework.context.annotation.Configuration;@Configuration
public class LazyConfig {@Beanpublic Queue lazyQueue() {return QueueBuilder.durable("lazy.queue").lazy().build();}@Beanpublic Queue normalQueue() {return QueueBuilder.durable("normal.queue").build();}}
2、基于注解(略)
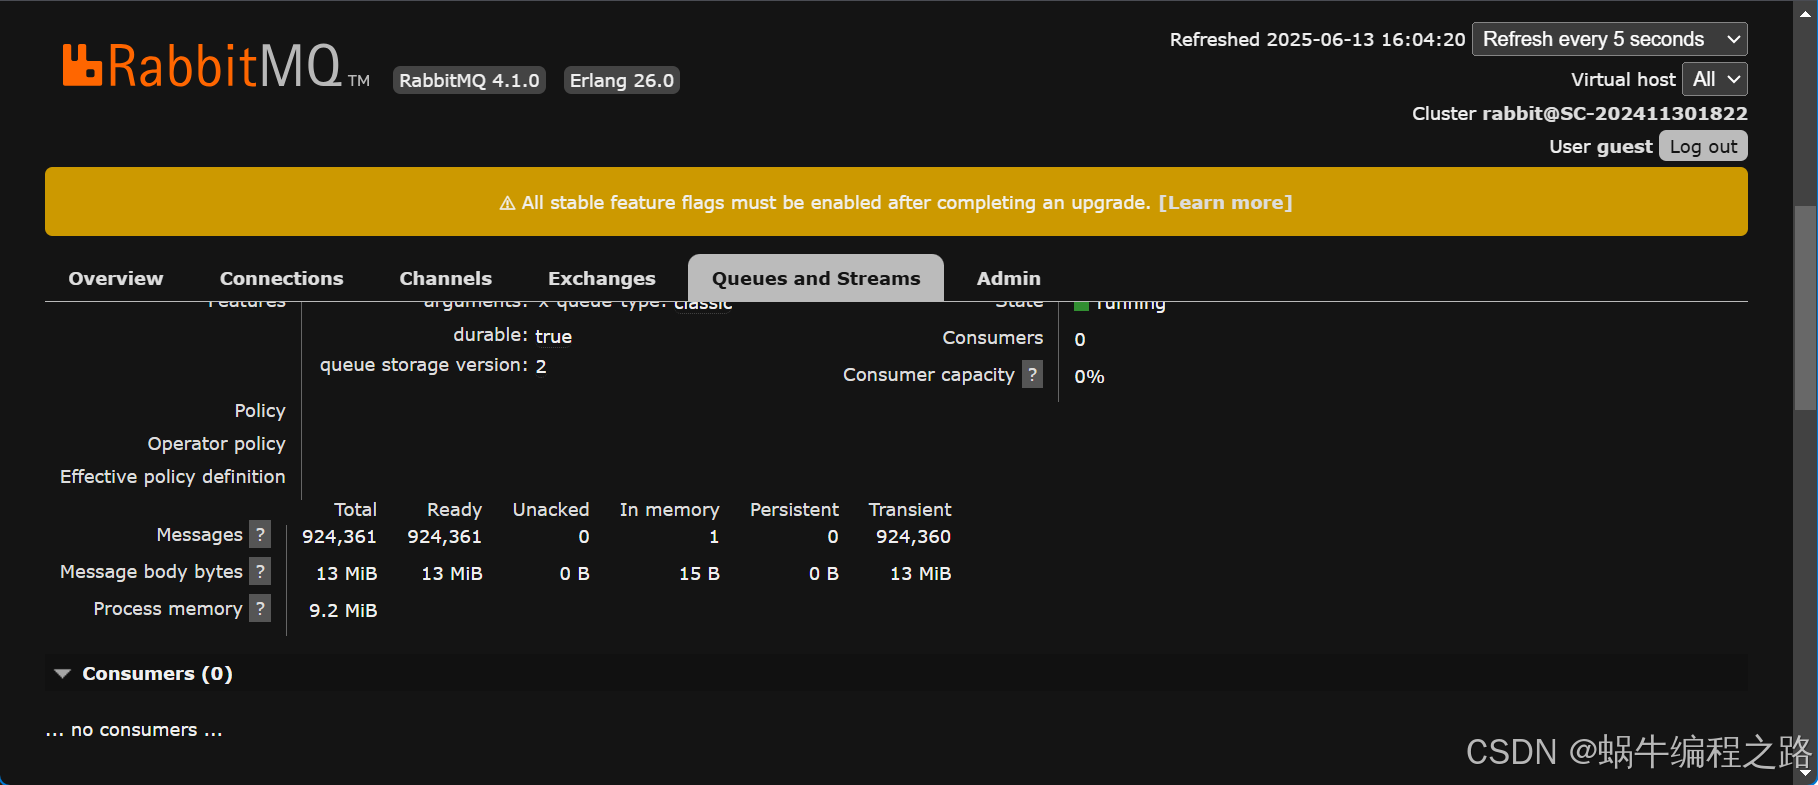
给建立好的两个队列各发送100万条信息
附上代码:
@Testpublic void testLazyMessage(){//2.发送消息for (int i = 1; i <= 1000000; i++){//1.准备消息Message message = MessageBuilder.withBody("hello lazy amqp".getBytes(StandardCharsets.UTF_8)).setDeliveryMode(MessageDeliveryMode.NON_PERSISTENT).build();rabbitTemplate.convertAndSend("lazy.queue",message);}}@Testpublic void testNormalMessage(){//2.发送消息for (int i = 1; i <= 1000000; i++){//1.准备消息Message message = MessageBuilder.withBody("hello lazy amqp".getBytes(StandardCharsets.UTF_8)).setDeliveryMode(MessageDeliveryMode.NON_PERSISTENT).build();rabbitTemplate.convertAndSend("normal.queue",message);}}
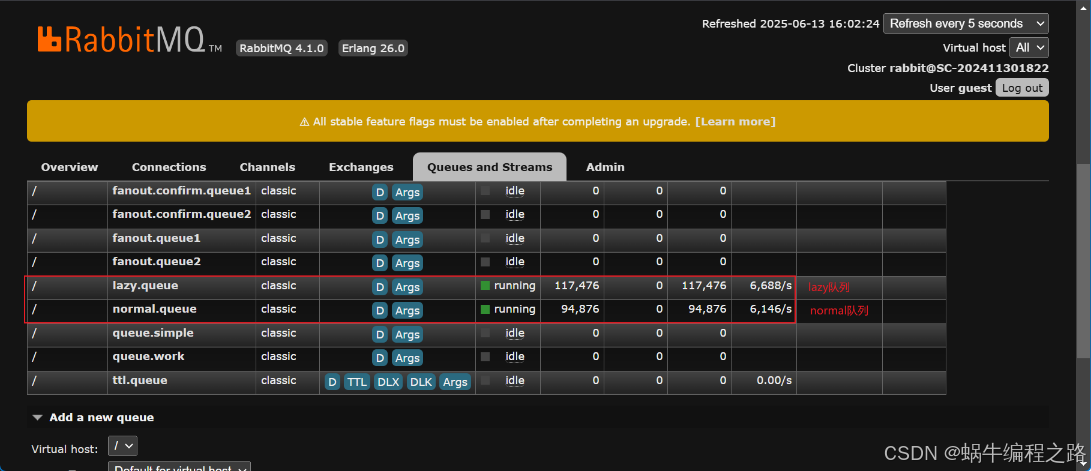
lazy队列的话,他是直接发送到磁盘的,不进内存
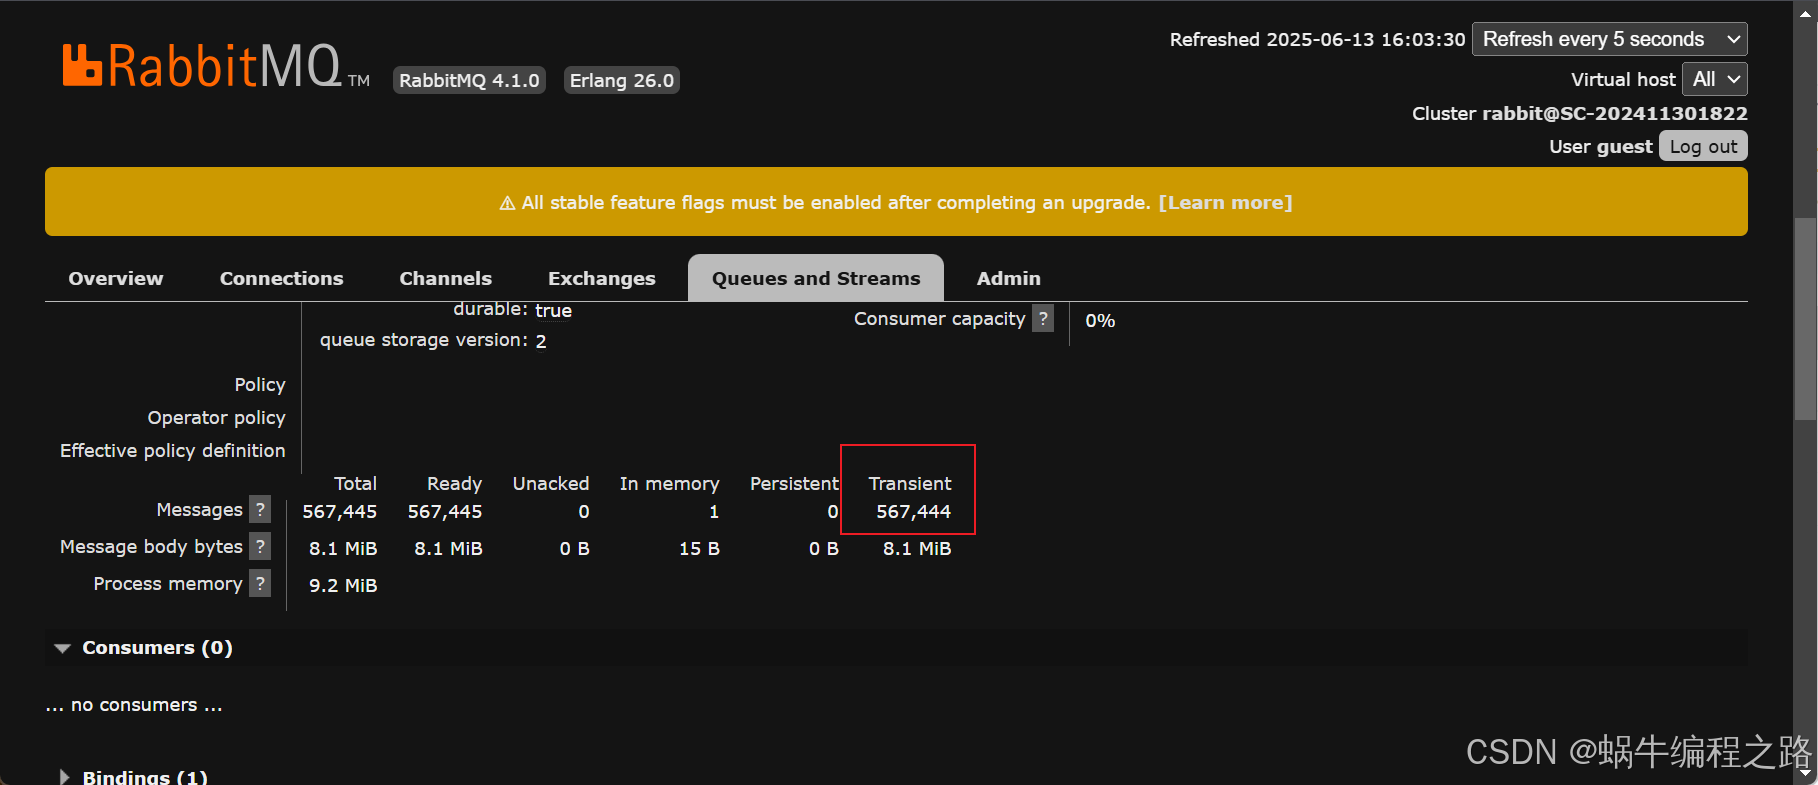
normal队列的话,进内存大概3万条,超过了就刷进磁盘
(下面这张图数据里没有pageout)数据有些不准确
normal的话,应该是in memory进内存一部分,超过了就进磁盘