jupyterhub的浅浅使用-重点在解决无法登录
jupyterhub的浅浅使用-重点在解决无法登录
- jupyterhub的浅浅使用-重点在解决无法登录
- 1、jupyterhub是什么
- 2、创建Dockerfile
- 3、启动容器
- 3.1、生成配置文件`jupyterhub --generate-config`
- 3.2、运行容器
- 3.3、进入容器配置用户密码
- 3.4、访问`127.0.0.1:8000`并登录
- 4、后台创建的用户无法访问hub问题
- 5、api使用
- 5.1 在web页面生成token,并保存
- 5.2 使用token调用api
参考:https://mp.weixin.qq.com/s/jxTqlk0NXFcn-RPonQfsYg
jupyterhub的浅浅使用-重点在解决无法登录
无意中需要搭建一下jupyterhub,这个之前也没听说过,之前只听说过jupyter notebook,当然也没咋用过。
1、jupyterhub是什么

- 专为公司、教室和研究实验室设计的笔记本电脑的多用户
jupyter notebook版本 - 我的理解就是:公用一套python环境,支持多用户
jupyter notebook。类似和一台服务器虚拟化成众多虚拟机一样的概念。
2、创建Dockerfile
FROM quay.io/jupyterhub/jupyterhub:latest
RUN apt update &&  apt install vim net-tools lsof -y
RUN pip install jupyterhub-idle-culler jupyter_server jupyterlab
构建 docker build -t jupyterhub:1.0.0 .
3、启动容器
3.1、生成配置文件jupyterhub --generate-config
然后终端执行下面命令创建jupyterhub_config.py配置文件:
jupyterhub --generate-config -f /etc/jupyterhub/jupyterhub_config.py
执行完上述操作,在/etc/jupyterhub路径下会生成一个名为jupyterhub_config.py
的文件,使用vim或者nano等文本编辑工具打开jupyterhub_config.py文件
追加配置
import sys
c.Authenticator.allowed_users = {'root','admin'}
c.Authenticator.admin_users = {'root','admin'}  # 管理员用户
# 管理员是否有权在各自计算机上以其他用户身份登录,以进行调试,此选项通常用于 JupyterHub 的托管部署,以避免在启动服务之前手动创建所有用户
c.JupyterHub.admin_access = True
c.PAMAuthenticator.open_sessions = False # 解决多用户同时登录问题。
c.Spawner.args = ['--allow-root']  # 允许root用户使用
c.LocalAuthenticator.create_system_users = True  # 允许创建其他用户
c.Spawner.notebook_dir = '~'  # 设置工作目录
c.Spawner.default_url = '/lab'c.JupyterHub.extra_log_file = '/etc/jupyterhub/jupyterhub.log' # 指定额外的日志
c.JupyterHub.pid_file='/etc/jupyterhub/jupyterhub.pid' # 指定pid文件位置
c.JupyterHub.db_url='/etc/jupyterhub/jupyterhub.sqlite' # 指定数据库文件位置
c.JupyterHub.cookie_secret_file='/etc/jupyterhub/jupyterhub_cookie_secret'  # 指定cookie_secret文件位置
c.ConfigurableHTTPProxy.pid_file='/etc/jupyterhub/jupyterhub-proxy.pid' # 设置proxy.pid文件位置# 设置用户一小时内无使用则关闭jupyterlab服务
c.JupyterHub.services = [{'name': 'idle-culler','command': [sys.executable, '-m', 'jupyterhub_idle_culler', '--timeout=1800'],}
]c.JupyterHub.load_roles = [{"name": "list-and-cull",  # name the role"services": ["idle-culler",  # assign the service to this role],"scopes": [# declare what permissions the service should have"list:users",  # list users"read:users:activity",  # read user last-activity"admin:servers",  # start/stop servers],}
]
3.2、运行容器
docker run -itd --hostname=jupyterhub \
-v /etc/jupyterhub:/etc/jupyterhub \
--name=jupyterhub-new -p 8000:8000 jupyterhub:1.0.0 \
jupyterhub --ip 0.0.0.0 -f /etc/jupyterhub/jupyterhub_config.py
3.3、进入容器配置用户密码
默认hub使用的是PAM的认证,需要linux用户的账号和密码。因为容器里面没有用户的密码,所以需要创建
- 创建用户
useradd -m user_name - 创建密码
paaawd user_name
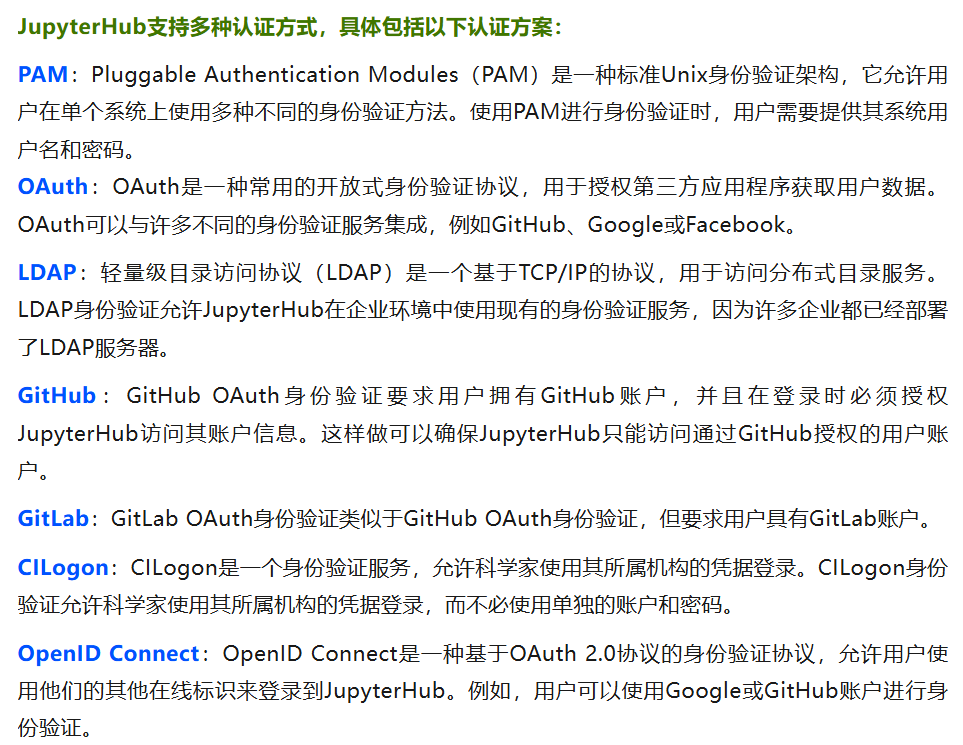
hub支持的认证如下:
3.4、访问127.0.0.1:8000并登录
使用admin或者root登录成功【注意要操作上一步骤的给root设置密码,创建admin用户和密码】
4、后台创建的用户无法访问hub问题
在linux后台使用
- 创建用户
useradd -m user_name - 创建密码
paaawd user_name
后在web上无法登录。
解决:需要在hub的web页面上创建用户,然后在容器中使用paaawd user_name配置密码,才能在web页面登录。猜测这个是DB的原因。

5、api使用
API文档: https://jupyterhub.readthedocs.io/en/stable/reference/rest-api.html
5.1 在web页面生成token,并保存
5.2 使用token调用api
注意换成你的token。
- 调用
curl -X GET -H "Authorization: token 8a14793766e74b8ab48669f87d4b31b7" http://127.0.0.1:8000/hub/api/user
- 返回
{"pending": null,"server": "/user/tom1/","admin": false,"groups": [],"roles": ["user"],"last_activity": "2025-05-28T09:52:30.195982Z","name": "tom1","created": "2025-05-28T08:33:38.295913Z","kind": "user","servers": {"": {"name": "","full_name": "tom1/","last_activity": "2025-05-28T09:50:54.605630Z","started": "2025-05-28T08:35:56.168903Z","pending": null,"ready": true,"stopped": false,"url": "/user/tom1/","user_options": {},"progress_url": "/hub/api/users/tom1/server/progress","full_url": null,"full_progress_url": null}},"token_id": "a8","session_id": null,"scopes": ["access:servers!user=tom1","delete:servers!user=tom1","read:servers!user=tom1","read:shares!user=tom1","read:tokens!user=tom1","read:users!user=tom1","read:users:activity!user=tom1","read:users:groups!user=tom1","read:users:name!user=tom1","read:users:shares!user=tom1","servers!user=tom1","tokens!user=tom1","users:activity!user=tom1","users:shares!user=tom1"]
}