YOLOv5白皮书 common.py 文件解读
- **🍨 本文为[🔗365天深度学习训练营](https://mp.weixin.qq.com/s/rnFa-IeY93EpjVu0yzzjkw) 中的学习记录博客**
- **🍖 原作者:[K同学啊](https://mtyjkh.blog.csdn.net/)**
前言
文件位置:./models/common.py
该文件是实现YOLO算法中各个模块的地方,如果我们需要修改某一模块,那么就需要修改这个文件中对应模块的定义。
0:导入需要的包和基本配置
import math                # 数学函数模块
from copy import copy      # 数据拷贝模块 分浅拷贝和深拷贝
from pathlib import Path   # Path将str转换为Path对象 使字符串路径易于操作的模块import numpy  as np        # numpy数组操作模块
import pandas as pd        # panda数组操作模块
import requests            # Python的HTTP客户端库
import torch               # pytorch深度学习框架
import torch.nn as nn      # 专门为神经网络设计的模块化接口
from PIL import Image      # 图像基础操作模块
from torch.cuda import amp # 混合精度训练模块from utils.datasets    import letterbox
from utils.general     import non_max_suppression, make_divisible, scale_coords, increment_path, xyxy2xywh, save_one_box
from utils.plots       import colors, plot_one_box
from utils.torch_utils import time_synchronized`
1.基本组件
1.1 : autopad
这个模块可以根据输入的卷积核计算该卷积模块所需的pad值。将会用于下面会讲到的Conv函数和Classify函数中。
def autopad(k, p=None):"""用于Conv函数和Classify函数中根据卷积核大小k自动计算卷积核padding数(0填充)v5中只有两种卷积:1、下采样卷积:conv3x3 s=2 p=k//2=1 2、feature size不变的卷积:conv1x1 s=1 p=k//2=1:params k: 卷积核的kernel_size:return p: 自动计算的需要pad值(0填充)"""if p is None:p = k // 2 if isinstance(k, int) else [x // 2 for x in k] # 自动计算pad数return p
1.2 : Conv
这个函数是整个网络中最基础的组件,由卷积层+BN层+激活函数 组成,具体结构如图:
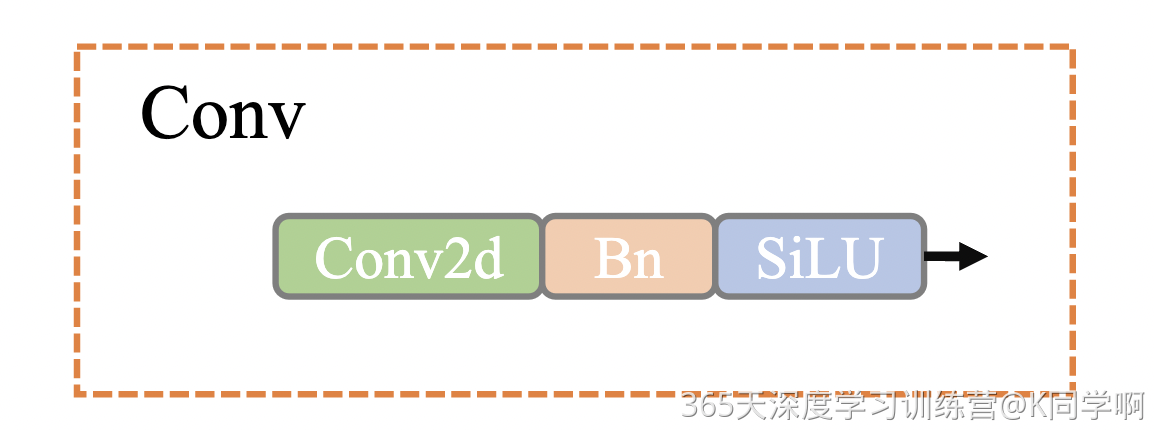
class Conv(nn.Module):def __init__(self, c1, c2, k=1, s=1, p=None, g=1, act=True):"""在Focus、Bottleneck、BottleneckCSP、C3、SPP、DWConv、TransformerBloc等模块中调用Standard convolution conv+BN+act:params c1: 输入的channel值:params c2: 输出的channel值:params k: 卷积的kernel_size:params s: 卷积的stride:params p: 卷积的padding 一般是None 可以通过autopad自行计算需要pad的padding数:params g: 卷积的groups数 =1就是普通的卷积 >1就是深度可分离卷积:params act: 激活函数类型 True就是SiLU()/Swish False就是不使用激活函数类型是nn.Module就使用传进来的激活函数类型"""super(Conv, self).__init__()self.conv = nn.Conv2d(c1, c2, k, s, autopad(k, p), groups=g, bias=False) # convself.bn = nn.BatchNorm2d(c2) # bnself.act = nn.SiLU() if act is True else (act if isinstance(act, nn.Module) else nn.Identity()) # activation#前向计算,网络执行的顺序是根据forward函数来决定的:conv+BN+silu def forward(self, x):return self.act(self.bn(self.conv(x)))# 用于model类的fuse函数,conv+BN,加速推理,一般用于测试实验或者验证阶段def fuseforward(self, x):"""用于Model类的fuse函数融合conv+bn 加速推理 一般用于测试/验证阶段"""return self.act(self.conv(x))
另外这个类中还有一个特殊函数fuseforward,这是一个前向加速推理模块,在前向传播过程中,通过融合conv+bn层,达到加速推理的作用,一般用于测试或验证阶段。
1.3:Focus
Focus模块是作者自己设计出来,为了减少浮点数和提高速度,而不是增加featuremap的,本质就是将图像进行切片,类似于下采样取值,将原图像的宽高信息切分,聚合到channel通道中,结构如下显示:
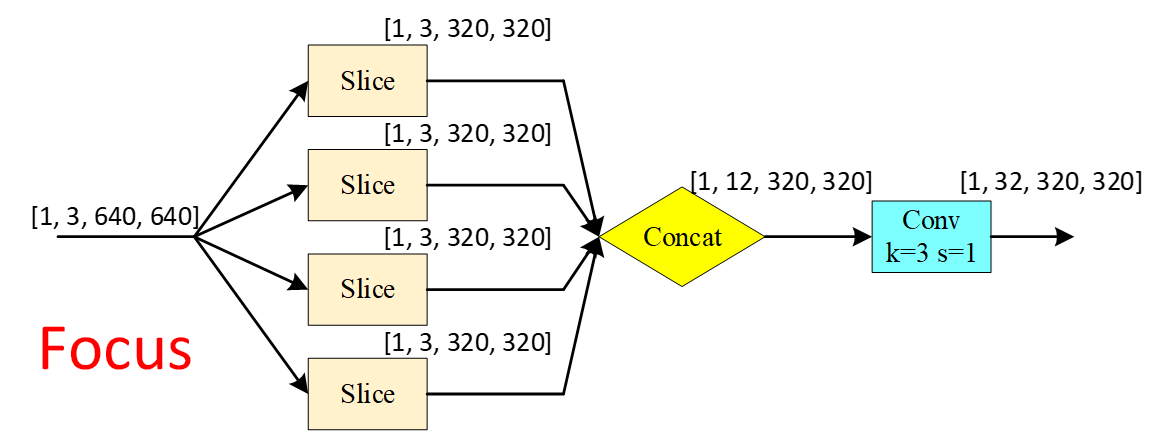
class Focus(nn.Module):def __init__(self, c1, c2, k=1, s=1, p=None, g=1, act=True):"""在yolo.py的parse_model函数中被调用理论:从高分辨率图像中,周期性的抽出像素点重构到低分辨率图像中,即将图像相邻的四个位置进行堆叠,聚焦wh维度信息到c通道空,提高每个点感受野,并减少原始信息的丢失,该模块的设计主要是减少计算量加快速度。Focus wh information into c-space 把宽度w和高度h的信息整合到c空间中先做4个slice 再concat 最后再做Convslice后 (b,c1,w,h) -> 分成4个slice 每个slice(b,c1,w/2,h/2)concat(dim=1)后 4个slice(b,c1,w/2,h/2)) -> (b,4c1,w/2,h/2)conv后 (b,4c1,w/2,h/2) -> (b,c2,w/2,h/2):params c1: slice后的channel:params c2: Focus最终输出的channel:params k: 最后卷积的kernel:params s: 最后卷积的stride:params p: 最后卷积的padding:params g: 最后卷积的分组情况 =1普通卷积 >1深度可分离卷积:params act: bool激活函数类型 默认True:SiLU()/Swish False:不用激活函数"""super(Focus, self).__init__()self.conv = Conv(c1 * 4, c2, k, s, p, g, act) # concat后的卷积(最后的卷积)# self.contract = Contract(gain=2) # 也可以调用Contract函数实现slice操作def forward(self, x):# x(b,c,w,h) -> y(b,4c,w/2,h/2) 有点像做了个下采样return self.conv(torch.cat([x[..., ::2, ::2], x[..., 1::2, ::2], x[..., ::2, 1::2], x[..., 1::2, 1::2]], 1))# return self.conv(self.contract(x))
1.4:Bottleneck
模型结构:

class Bottleneck(nn.Module):def __init__(self, c1, c2, shortcut=True, g=1, e=0.5):"""在BottleneckCSP和yolo.py的parse_model中调用Standard bottleneck Conv+Conv+shortcut:params c1: 第一个卷积的输入channel:params c2: 第二个卷积的输出channel:params shortcut: bool 是否有shortcut连接 默认是True:params g: 卷积分组的个数 =1就是普通卷积 >1就是深度可分离卷积:params e: expansion ratio e*c2就是第一个卷积的输出channel=第二个卷积的输入channel"""super(Bottleneck, self).__init__()c_ = int(c2 * e) # hidden channelsself.cv1 = Conv(c1, c_, 1, 1) # 1x1self.cv2 = Conv(c_, c2, 3, 1, g=g) # 3x3self.add = shortcut and c1 == c2 # shortcut=True and c1 == c2 才能做shortcutdef forward(self, x):return x + self.cv2(self.cv1(x)) if self.add else self.cv2(self.cv1(x))
1.5: BottleneckCSP
这个模块是由Bottleneck模块和CSP结构组成。这个模块和C3模块等效,具体结构如下
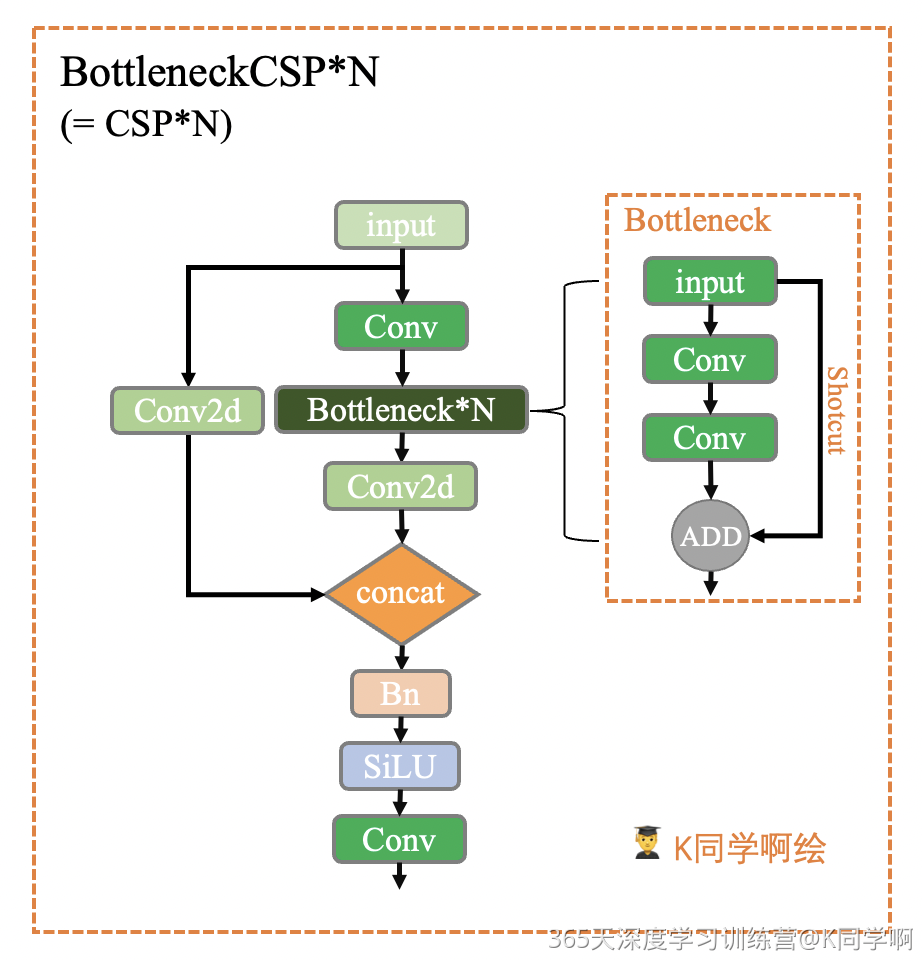
class BottleneckCSP(nn.Module):def __init__(self, c1, c2, n=1, shortcut=True, g=1, e=0.5):"""在C3模块和yolo.py的parse_model模块调用CSP Bottleneck https://github.com/WongKinYiu/CrossStagePartialNetworks:params c1: 整个BottleneckCSP的输入channel:params c2: 整个BottleneckCSP的输出channel:params n: 有n个Bottleneck:params shortcut: bool Bottleneck中是否有shortcut,默认True:params g: Bottleneck中的3x3卷积类型 =1普通卷积 >1深度可分离卷积:params e: expansion ratio c2xe=中间其他所有层的卷积核个数/中间所有层的输入输出channel数"""# ch_in, ch_out, number, shortcut, groups, expansionsuper(BottleneckCSP, self).__init__()c_ = int(c2 * e) # hidden channelsself.cv1 = Conv(c1, c_, 1, 1) self.cv2 = nn.Conv2d(c1, c_, 1, 1, bias=False)self.cv3 = nn.Conv2d(c_, c_, 1, 1, bias=False)self.cv4 = Conv(2 * c_, c2, 1, 1)self.bn = nn.BatchNorm2d(2 * c_) # applied to cat(cv2, cv3) 2*c_self.act = nn.LeakyReLU(0.1, inplace=True)# 叠加n次Bottleneckself.m = nn.Sequential(*[Bottleneck(c_, c_, shortcut, g, e=1.0) for _ in range(n)])def forward(self, x):y1 = self.cv3(self.m(self.cv1(x)))y2 = self.cv2(x)return self.cv4(self.act(self.bn(torch.cat((y1, y2), dim=1))))
1.6:C3
这个模块是一种简化版的BottleneckCSP,因为除了Bottleneck部分只有3个卷积,可以减少参数,所以取名C3。
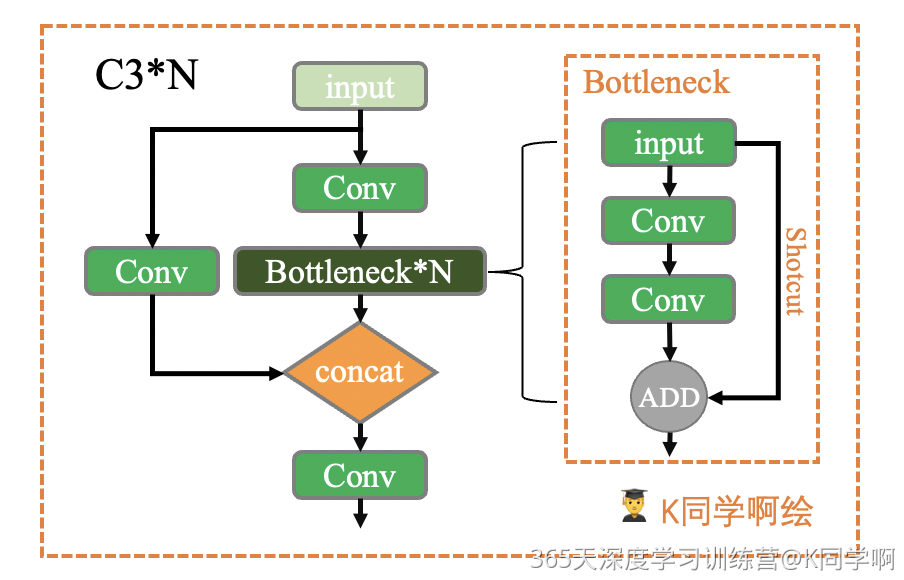
class C3(nn.Module):def __init__(self, c1, c2, n=1, shortcut=True, g=1, e=0.5):"""在C3TR模块和yolo.py的parse_model模块调用CSP Bottleneck with 3 convolutions:params c1: 整个BottleneckCSP的输入channel:params c2: 整个BottleneckCSP的输出channel:params n: 有n个Bottleneck:params shortcut: bool Bottleneck中是否有shortcut,默认True:params g: Bottleneck中的3x3卷积类型 =1普通卷积 >1深度可分离卷积:params e: expansion ratio c2xe=中间其他所有层的卷积核个数/中间所有层的输入输出channel数"""super(C3, self).__init__()c_ = int(c2 * e) # hidden channelsself.cv1 = Conv(c1, c_, 1, 1)self.cv2 = Conv(c1, c_, 1, 1)self.cv3 = Conv(2 * c_, c2, 1) # act=FReLU(c2)self.m = nn.Sequential(*[Bottleneck(c_, c_, shortcut, g, e=1.0) for _ in range(n)])# 实验性 CrossConv# self.m = nn.Sequential(*[CrossConv(c_, c_, 3, 1, g, 1.0, shortcut) for _ in range(n)])def forward(self, x):return self.cv3(torch.cat((self.m(self.cv1(x)), self.cv2(x)), dim=1))
1.7:SPP
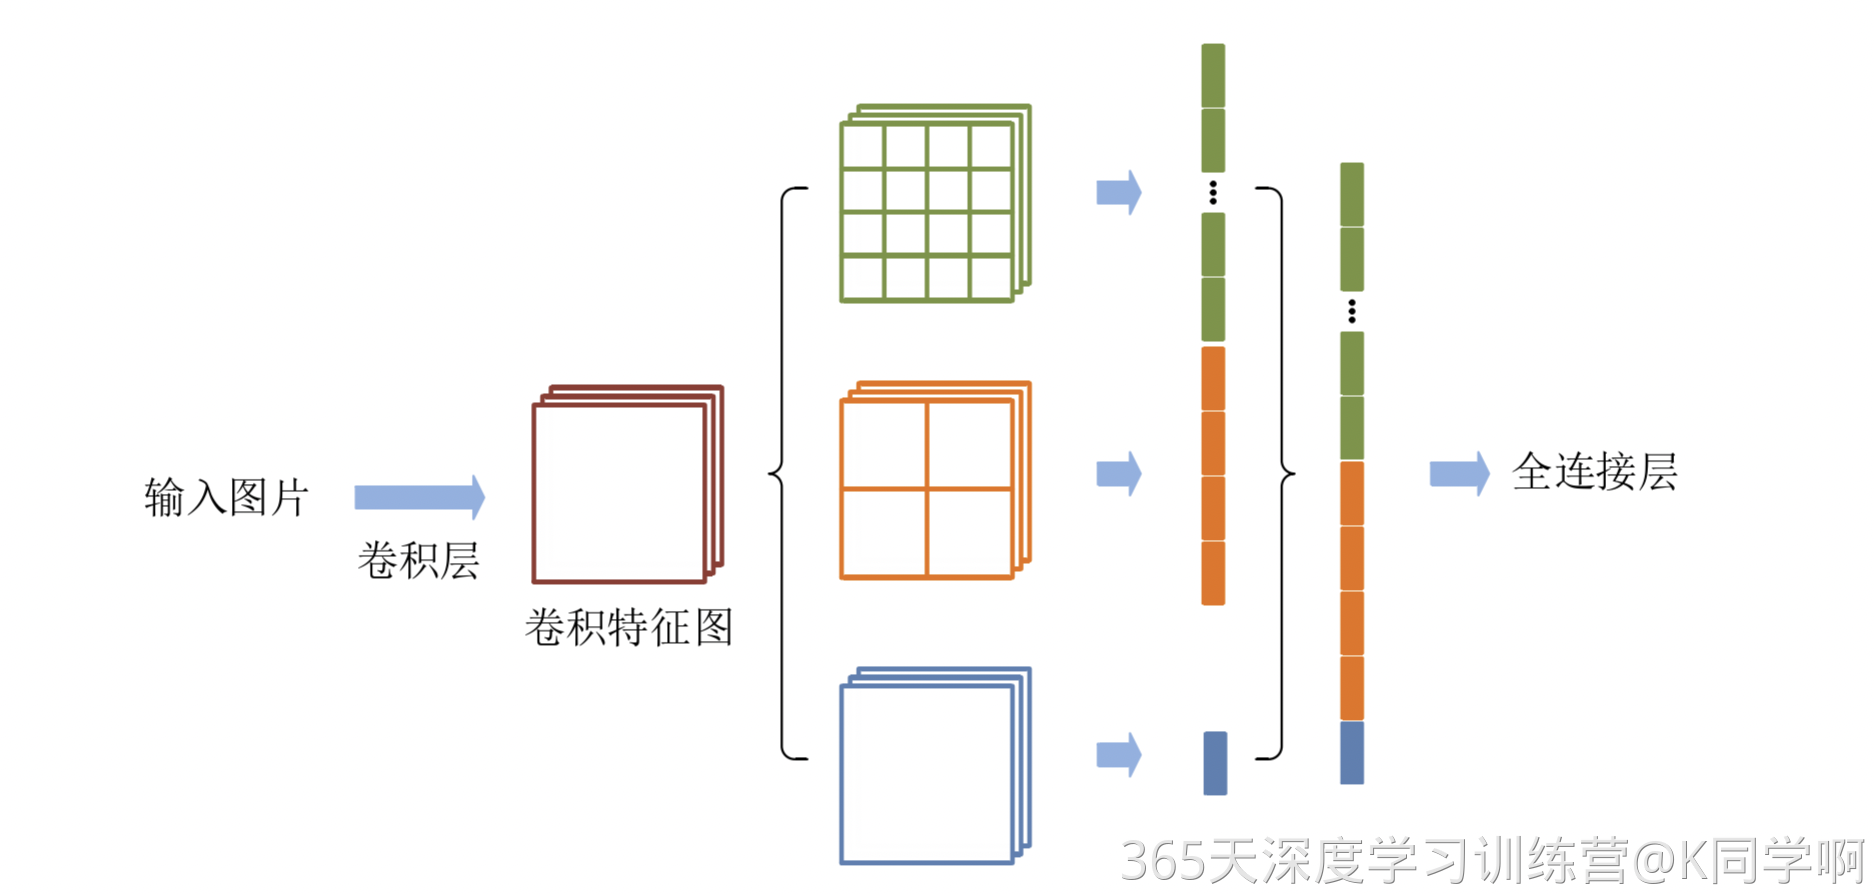
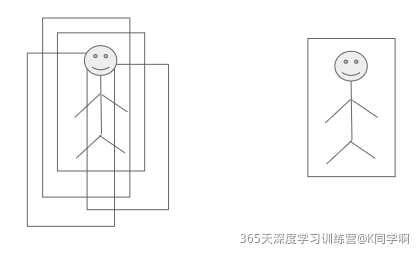
高层网络层的感受野的语义信息表征能力强,低层网络层的感受野空间细节信息表征能力强。空间金字塔池化(spatial pyramid pooling,spp)是目标检测算法中对高层特征进行多尺度池化以增加感受野的重要措施之一。经典的空间金字塔池化模块首先将输入的卷积特征分成不同的尺寸,然后每个尺寸提取固定维度的特征,最后将这些特征拼接成一个固定的维度,如图所示。输入的卷积特征图的大小为(w,h),第一层空间金字塔采用4x4的刻度对特征图进行划分,其将输入的特征图分成了16个块,每块的大小为(w/4,h/4); 第二层空间金字塔采用2x2刻度对特征图进行划分,其将特征图分为4个块,每块大小为(w/2,h/2);第三层空间金字塔将整张特征图作为一块,进行特征提取操作,最终的特征向量为21 = 16+4+1维。
SPP模块具体的结构如下所示:
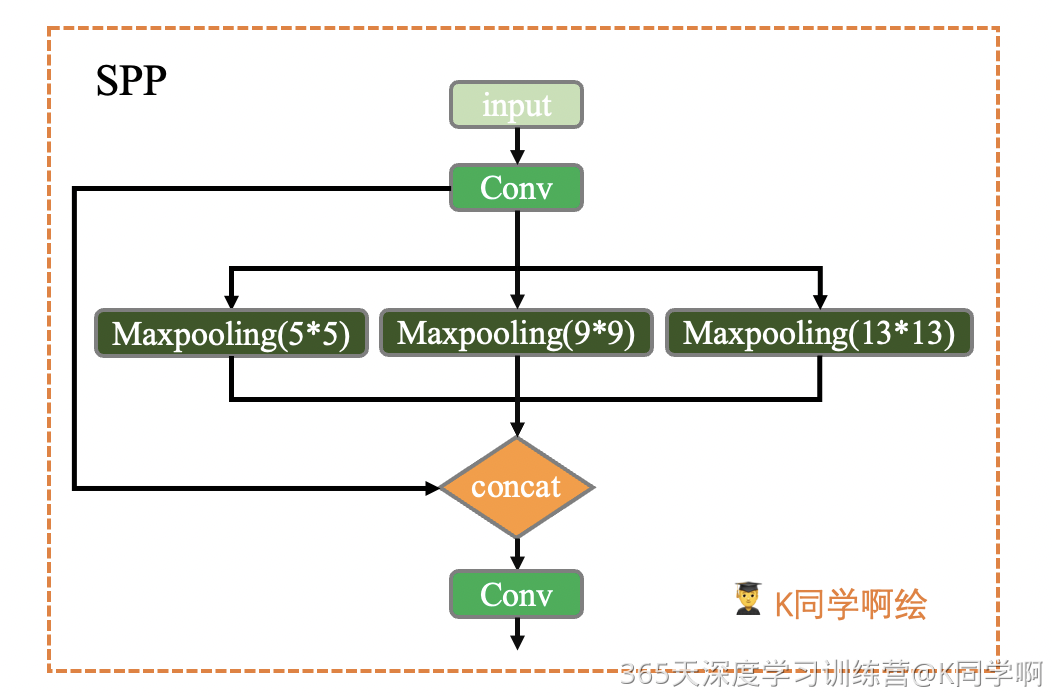
class SPP(nn.Module):def __init__(self, c1, c2, k=(5, 9, 13)):"""在yolo.py的parse_model模块调用空间金字塔池化 Spatial pyramid pooling layer used in YOLOv3-SPP:params c1: SPP模块的输入channel:params c2: SPP模块的输出channel:params k: 保存着三个maxpool的卷积核大小 默认是(5, 9, 13)"""super(SPP, self).__init__()c_ = c1 // 2 # hidden channelsself.cv1 = Conv(c1, c_, 1, 1) # 第一层卷积self.cv2 = Conv(c_ * (len(k) + 1), c2, 1, 1) # 最后一层卷积 +1是因为有len(k)+1个输入self.m = nn.ModuleList([nn.MaxPool2d(kernel_size=x, stride=1, padding=x // 2) for x in k]) def forward(self, x):x = self.cv1(x)return self.cv2(torch.cat([x] + [m(x) for m in self.m], 1))1.8: Concat
这个函数是将自身(a list of tensors) 按照某个维度进行concat,常用来合并前后两个feature map。
class Concat(nn.Module):def __init__(self, dimension=1):"""在yolo.py的parse_model模块调用Concatenate a list of tensors along dimension:params dimension: 沿着哪个维度进行concat"""super(Concat, self).__init__()self.d = dimensiondef forward(self, x):# x: a list of tensorsreturn torch.cat(x, self.d)
1.9 :Contract,Expand
这两个函数用于改变feature map维度。
1)Contract 函数改变输入特征的shape,将feature map 的w 和 h 维度(缩小)channel维度(放大)。如 x(1,64,80,80) to x(1,256,40,40).
2)Expand 函数也是改变输入特征的 shape,不过与 Contract 的相反, 是将 channel 维度(变小)的数据扩展到W和H维度(变大)。如:x(1,64,80,80) to x(1,16,160,160)。
class Contract(nn.Module):"""用在yolo.py的parse_model模块 用的不多改变输入特征的shape 将w和h维度(缩小)的数据收缩到channel维度上(放大)Contract width-height into channels, i.e. x(1,64,80,80) to x(1,256,40,40)"""def __init__(self, gain=2):super().__init__()self.gain = gaindef forward(self, x):N, C, H, W = x.size() # 1 64 80 80s = self.gain # 2x = x.view(N, C, H // s, s, W // s, s) # x(1,64,40,2,40,2)# permute: 改变tensor的维度顺序x = x.permute(0, 3, 5, 1, 2, 4).contiguous() # x(1,2,2,64,40,40)# .view: 改变tensor的维度return x.view(N, C * s * s, H // s, W // s) # x(1,256,40,40)class Expand(nn.Module):"""用在yolo.py的parse_model模块 用的不多改变输入特征的shape 将channel维度(变小)的数据扩展到W和H维度(变大)Expand channels into width-height, i.e. x(1,64,80,80) to x(1,16,160,160)"""def __init__(self, gain=2):super().__init__()self.gain = gaindef forward(self, x):N, C, H, W = x.size() # 1 64 80 80s = self.gain # 2x = x.view(N, s, s, C // s ** 2, H, W) # x(1,2,2,16,80,80)x = x.permute(0, 3, 4, 1, 5, 2).contiguous() # x(1,16,80,2,80,2)return x.view(N, C // s ** 2, H * s, W * s) # x(1,16,160,160)
2:重要类
下面的几个函数都是属于模型的扩展模块。yolov5的作者将搭建模型的函数功能写得很齐全。不光包含搭建模型部分,还考虑到了各个方面其他的功能,比如给模型搭载nms功能,给模型封装成包含前处理,推理,后处理的模块(预处理 +推理+nms),二次分类等等功能。
2.1:非极大值抑制(NMS)
非极大值抑制(Non-maximum Suppression)的作用简单说就是模型检测出了很多框,我应该留哪些。
YOLOv5 中使用NMS算法来移除一些网络预测时生成的多余检测框,该算法的核心思想是指搜索局部得分最大值预测并移除与局部最大值预测框重叠超过一定阈值的检测框,需要注意的是,NMS算法对所有待检测目标类别分别执行。
这个模块是给模型搭载NMS功能,直接调用的./utils/general.py 文件的 non_max_suppression()函数。
class NMS(nn.Module):"""在yolo.py中Model类的nms函数中使用NMS非极大值抑制 Non-Maximum Suppression (NMS) module给模型model封装nms 增加模型的扩展功能 但是我们一般不用 一般是在前向推理结束后再调用non_max_suppression函数"""conf = 0.25 # 置信度阈值 confidence thresholdiou = 0.45 # iou阈值 IoU thresholdclasses = None # 是否nms后只保留特定的类别 (optional list) filter by classmax_det = 1000 # 每张图片的最大目标个数 maximum number of detections per imagedef __init__(self):super(NMS, self).__init__()def forward(self, x):""":params x[0]: [batch, num_anchors(3个yolo预测层), (x+y+w+h+1+num_classes)]直接调用的是general.py中的non_max_suppression函数给model扩展nms功能"""return non_max_suppression(x[0], self.conf, iou_thres=self.iou, classes=self.classes, max_det=self.max_det)
2.2:AutoShape
这个模块是一个模型扩展模块,给模型封装成包含前处理,推理,后处理的模块。
class AutoShape(nn.Module):# YOLOv5 input-robust model wrapper for passing cv2/np/PIL/torch inputs. Includes preprocessing, inference and NMS# YOLOv5模型包装器,用于传递 cv2/np/PIL/torch 输入,# 包括预处理(preprocessing), 推理(inference) and NMSconf = 0.25 # NMS confidence thresholdiou = 0.45 # NMS IoU thresholdagnostic = False # NMS class-agnosticmulti_label = False # NMS multiple labels per boxclasses = None # (optional list) filter by class, i.e. = [0, 15, 16] for COCO persons, cats and dogsmax_det = 1000 # maximum number of detections per imageamp = False # Automatic Mixed Precision (AMP) inferencedef __init__(self, model, verbose=True):super().__init__()if verbose:LOGGER.info('Adding AutoShape... ')copy_attr(self, model, include=('yaml', 'nc', 'hyp', 'names', 'stride', 'abc'), exclude=()) # copy attributesself.dmb = isinstance(model, DetectMultiBackend) # DetectMultiBackend() instanceself.pt = not self.dmb or model.pt # PyTorch model# 开启验证模式self.model = model.eval()if self.pt:m = self.model.model.model[-1] if self.dmb else self.model.model[-1] # Detect()m.inplace = False # Detect.inplace=False for safe multithread inferencem.export = True # do not output loss valuesdef _apply(self, fn):# Apply to(), cpu(), cuda(), half() to model tensors that are not parameters or registered buffersself = super()._apply(fn)if self.pt:m = self.model.model.model[-1] if self.dmb else self.model.model[-1] # Detect()m.stride = fn(m.stride)m.grid = list(map(fn, m.grid))if isinstance(m.anchor_grid, list):m.anchor_grid = list(map(fn, m.anchor_grid))return self@smart_inference_mode()def forward(self, ims, size=640, augment=False, profile=False):# Inference from various sources. For size(height=640, width=1280), RGB images example inputs are:# file: ims = 'data/images/zidane.jpg' # str or PosixPath# URI: = 'https://ultralytics.com/images/zidane.jpg'# OpenCV: = cv2.imread('image.jpg')[:,:,::-1] # HWC BGR to RGB x(640,1280,3)# PIL: = Image.open('image.jpg') or ImageGrab.grab() # HWC x(640,1280,3)# numpy: = np.zeros((640,1280,3)) # HWC# torch: = torch.zeros(16,3,320,640) # BCHW (scaled to size=640, 0-1 values)# multiple: = [Image.open('image1.jpg'), Image.open('image2.jpg'), ...] # list of imagesdt = (Profile(), Profile(), Profile())with dt[0]:if isinstance(size, int): # expandsize = (size, size)p = next(self.model.parameters()) if self.pt else torch.empty(1, device=self.model.device) # paramautocast = self.amp and (p.device.type != 'cpu') # Automatic Mixed Precision (AMP) inference# 图片如果是tensor格式 说明是预处理过的, # 直接正常进行前向推理即可 nms在推理结束进行(函数外写)if isinstance(ims, torch.Tensor): # torchwith amp.autocast(autocast):return self.model(ims.to(p.device).type_as(p), augment=augment) # inference# Pre-processn, ims = (len(ims), list(ims)) if isinstance(ims, (list, tuple)) else (1, [ims]) # number, list of imagesshape0, shape1, files = [], [], [] # image and inference shapes, filenamesfor i, im in enumerate(ims):f = f'image{i}' # filenameif isinstance(im, (str, Path)): # filename or uriim, f = Image.open(requests.get(im, stream=True).raw if str(im).startswith('http') else im), imim = np.asarray(exif_transpose(im))elif isinstance(im, Image.Image): # PIL Imageim, f = np.asarray(exif_transpose(im)), getattr(im, 'filename', f) or ffiles.append(Path(f).with_suffix('.jpg').name) if im.shape[0] < 5: # image in CHWim = im.transpose((1, 2, 0)) # reverse dataloader .transpose(2, 0, 1)im = im[..., :3] if im.ndim == 3 else cv2.cvtColor(im, cv2.COLOR_GRAY2BGR) # enforce 3ch inputs = im.shape[:2] # HWCshape0.append(s) # image shapeg = max(size) / max(s) # gainshape1.append([int(y * g) for y in s])ims[i] = im if im.data.contiguous else np.ascontiguousarray(im) # updateshape1 = [make_divisible(x, self.stride) for x in np.array(shape1).max(0)] # inf shapex = [letterbox(im, shape1, auto=False)[0] for im in ims] # padx = np.ascontiguousarray(np.array(x).transpose((0, 3, 1, 2))) # stack and BHWC to BCHWx = torch.from_numpy(x).to(p.device).type_as(p) / 255 # uint8 to fp16/32with amp.autocast(autocast):# Inferencewith dt[1]:y = self.model(x, augment=augment) # forward# Post-processwith dt[2]:y = non_max_suppression(y if self.dmb else y[0],self.conf,self.iou,self.classes,self.agnostic,self.multi_label,max_det=self.max_det) # NMSfor i in range(n):scale_boxes(shape1, y[i][:, :4], shape0[i])return Detections(ims, y, files, dt, self.names, x.shape)
2.3:Detections
class Detections:# YOLOv5 detections class for inference results# YOLOv5推理结果检测类def __init__(self, ims, pred, files, times=(0, 0, 0), names=None, shape=None):super().__init__()d = pred[0].device # devicegn = [torch.tensor([*(im.shape[i] for i in [1, 0, 1, 0]), 1, 1], device=d) for im in ims] # normalizationsself.ims = ims # list of images as numpy arraysself.pred = pred # list of tensors pred[0] = (xyxy, conf, cls)self.names = names # class namesself.files = files # image filenamesself.times = times # profiling timesself.xyxy = pred # xyxy pixelsself.xywh = [xyxy2xywh(x) for x in pred] # xywh pixelsself.xyxyn = [x / g for x, g in zip(self.xyxy, gn)] # xyxy normalizedself.xywhn = [x / g for x, g in zip(self.xywh, gn)] # xywh normalizedself.n = len(self.pred) # number of images (batch size)self.t = tuple(x.t / self.n * 1E3 for x in times) # timestamps (ms)self.s = tuple(shape) # inference BCHW shapedef _run(self, pprint=False, show=False, save=False, crop=False, render=False, labels=True, save_dir=Path('')):s, crops = '', []for i, (im, pred) in enumerate(zip(self.ims, self.pred)):s += f'\nimage {i + 1}/{len(self.pred)}: {im.shape[0]}x{im.shape[1]} ' # stringif pred.shape[0]:for c in pred[:, -1].unique():n = (pred[:, -1] == c).sum() # detections per classs += f"{n} {self.names[int(c)]}{'s' * (n > 1)}, " # add to strings = s.rstrip(', ')if show or save or render or crop:annotator = Annotator(im, example=str(self.names))for *box, conf, cls in reversed(pred): # xyxy, confidence, classlabel = f'{self.names[int(cls)]} {conf:.2f}'if crop:file = save_dir / 'crops' / self.names[int(cls)] / self.files[i] if save else Nonecrops.append({'box': box,'conf': conf,'cls': cls,'label': label,'im': save_one_box(box, im, file=file, save=save)})else: # all othersannotator.box_label(box, label if labels else '', color=colors(cls))im = annotator.imelse:s += '(no detections)'im = Image.fromarray(im.astype(np.uint8)) if isinstance(im, np.ndarray) else im # from npif show:display(im) if is_notebook() else im.show(self.files[i])if save:f = self.files[i]im.save(save_dir / f) # saveif i == self.n - 1:LOGGER.info(f"Saved {self.n} image{'s' * (self.n > 1)} to {colorstr('bold', save_dir)}")if render:self.ims[i] = np.asarray(im)if pprint:s = s.lstrip('\n')return f'{s}\nSpeed: %.1fms pre-process, %.1fms inference, %.1fms NMS per image at shape {self.s}' % self.tif crop:if save:LOGGER.info(f'Saved results to {save_dir}\n')return crops@TryExcept('Showing images is not supported in this environment')def show(self, labels=True):self._run(show=True, labels=labels) # show resultsdef save(self, labels=True, save_dir='runs/detect/exp', exist_ok=False):save_dir = increment_path(save_dir, exist_ok, mkdir=True) # increment save_dirself._run(save=True, labels=labels, save_dir=save_dir) # save resultsdef crop(self, save=True, save_dir='runs/detect/exp', exist_ok=False):save_dir = increment_path(save_dir, exist_ok, mkdir=True) if save else Nonereturn self._run(crop=True, save=save, save_dir=save_dir) # crop resultsdef render(self, labels=True):self._run(render=True, labels=labels) # render resultsreturn self.imsdef pandas(self):# return detections as pandas DataFrames, i.e. print(results.pandas().xyxy[0])new = copy(self) # return copyca = 'xmin', 'ymin', 'xmax', 'ymax', 'confidence', 'class', 'name' # xyxy columnscb = 'xcenter', 'ycenter', 'width', 'height', 'confidence', 'class', 'name' # xywh columnsfor k, c in zip(['xyxy', 'xyxyn', 'xywh', 'xywhn'], [ca, ca, cb, cb]):a = [[x[:5] + [int(x[5]), self.names[int(x[5])]] for x in x.tolist()] for x in getattr(self, k)] # updatesetattr(new, k, [pd.DataFrame(x, columns=c) for x in a])return newdef tolist(self):# return a list of Detections objects, i.e. 'for result in results.tolist():'r = range(self.n) # iterablex = [Detections([self.ims[i]], [self.pred[i]], [self.files[i]], self.times, self.names, self.s) for i in r]# for d in x:# for k in ['ims', 'pred', 'xyxy', 'xyxyn', 'xywh', 'xywhn']:# setattr(d, k, getattr(d, k)[0]) # pop out of listreturn xdef print(self):LOGGER.info(self.__str__())def __len__(self): # override len(results)return self.ndef __str__(self): # override print(results)return self._run(pprint=True) # print resultsdef __repr__(self):return f'YOLOv5 {self.__class__} instance\n' + self.__str__()
2.4: Classify
这是一个二级分类模块,比如说做车牌的识别,先识别出车牌,如果想对车牌上的字进行识别,就需要二级分类。
class Classify(nn.Module):# YOLOv5 classification head, i.e. x(b,c1,20,20) to x(b,c2)def __init__(self, c1, c2, k=1, s=1, p=None, g=1): # ch_in, ch_out, kernel, stride, padding, groups"""这是一个二级分类模块, 什么是二级分类模块? 比如做车牌的识别, 先识别出车牌, 如果想对车牌上的字进行识别, 就需要二级分类进一步检测.如果对模型输出的分类再进行分类, 就可以用这个模块. 不过这里这个类写的比较简单, 若进行复杂的二级分类, 可以根据自己的实际任务可以改写, 这里代码不唯一."""super().__init__()c_ = 1280 # efficientnet_b0 sizeself.conv = Conv(c1, c_, k, s, autopad(k, p), g)self.pool = nn.AdaptiveAvgPool2d(1) # to x(b,c_,1,1)self.drop = nn.Dropout(p=0.0, inplace=True)self.linear = nn.Linear(c_, c2) # to x(b,c2)def forward(self, x):if isinstance(x, list):x = torch.cat(x, 1)return self.linear(self.drop(self.pool(self.conv(x)).flatten(1)))