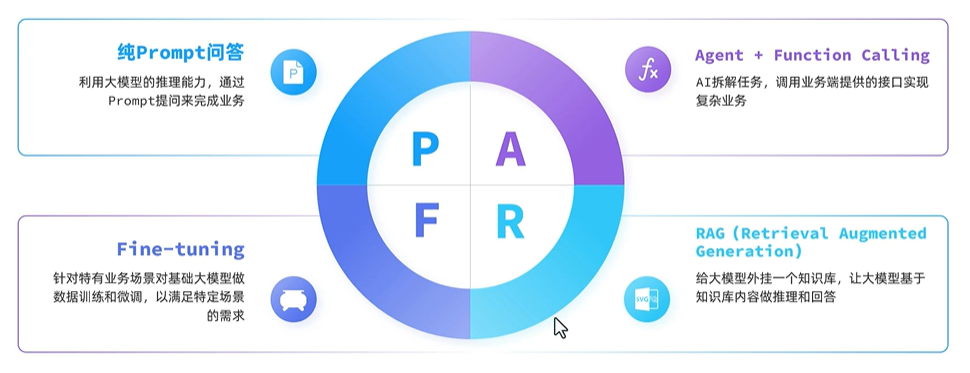
Spring AI 核心工作流
1、Spring AI 是什么?
简介:Spring AI 是 Spring 团队近年来推出的一个新项目,旨在为 Java 开发者简化与 AI(尤其是大语言模型,LLMs)交互的开发过程。它通过提供一致的 API、模型抽象和集成支持,使得开发者可以方便地使用像 OpenAI、Azure OpenAI、Hugging Face、Ollama、LangChain 等服务。
- Spring Al是一个AI工程领域的应用程序框架;
- Spring A1 是 AI工程的应用框架。其目标是将 Spring生态系统设计原则(如可移植性和模块化设计)应用于AI 领域,并促进使用 POJO 作为应用程序的构建块到 AI 领域。
- 它的目标是将Spring生态系统的设计原则应用于 A1 领域,比如Spring生态系统的可移植性和模块化设计,并促进使用 POJO 作为应用程序的构建块到 A 领域;
- Spring Al 的核心是提供了开发 A1大模型应用所需的基本抽象模型,这些抽象拥有多种实现方式,使得开发者可以用很少的代码改动就能实现组件的轻松替换;
- 简言之,Spring Al 是一个 A1 工程师的应用相架,它提供了一个友好的 AP!和开发 AI应用的抽象,旨在简化A1大模型应用的开发工作。
Spring AI 的主要功能
- 第一、对主流 A1大模型供应商提供了支持,比如:OpenA、DeepSeek、Microsoft、Ollama、Amazon、Google HuggingFace等。
- 第二、 支持AI大模型类型包括:聊天、文本到图像、文本到声音等,
- 第三、支持主流的Embedding Models(嵌入横型)和向量数据库,比如:Azure Vector Search、Chroma、Milvus、Neo4j、Redis、Pinecone、PostgreSQL/PGVector 等。
- 第四、 把 A1 大模型输出映射到简单的Java 对象(POJOs)上。
- 第五、支持了函数调用(Function caling)功能。
- 第六、为数据工程提供 ETL(数据抽取、转换和加载)框架。
- 第七、 支持 Spring Boot 自动配置和快速启动,便于运行 A 模型和管理向量库。
2、🌟 Spring AI 的核心工作流主要包括以下几个组成部分:
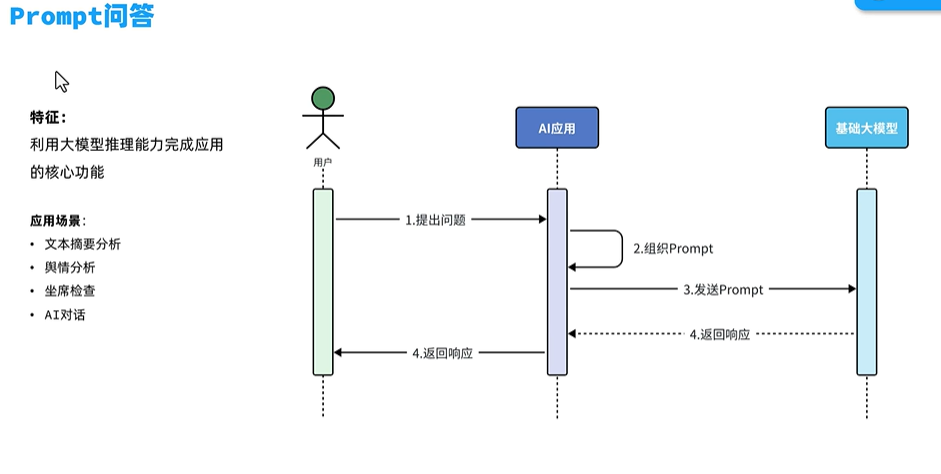
1️⃣ PromptTemplate(提示模板)
PromptTemplate 是 Spring AI 中的一个重要组件,它允许开发者使用模板引擎(如 Mustache 或 SpEL)动态生成提示词(prompt)。
PromptTemplate template = new PromptTemplate("Tell me a joke about {{subject}}");
String prompt = template.render(Map.of("subject", "Java"));
这简化了 prompt 的管理和重用,是构建智能应用的第一步。
2️⃣ ChatClient(聊天客户端)
这是 Spring AI 的核心接口之一,负责向 LLM 发送请求并获取响应。它支持同步和异步模式,可选择使用 OpenAI、Azure OpenAI、Hugging Face 等提供者。
ChatClient client = new OpenAiChatClient(...);
ChatResponse response = client.call(new Prompt("What is the capital of France?"));
System.out.println(response.getResult().getOutput());
3️⃣ Model Abstraction(模型抽象)
Spring AI 提供统一的模型抽象接口(如 ChatModel, EmbeddingModel),以支持多种底层 AI 服务的无缝切换。你可以轻松从 OpenAI 切换到本地模型或其他云端模型,无需改动业务逻辑。
4️⃣ Output Parsers(输出解析器)
支持将 LLM 输出结构化地解析为 Java 对象,方便与现有系统集成。例如可以将 LLM 输出转换成 POJO 或 Map。
StructuredOutputParser<MyResult> parser = new JsonOutputParser<>(MyResult.class);
MyResult result = parser.parse(response.getResult().getOutput());
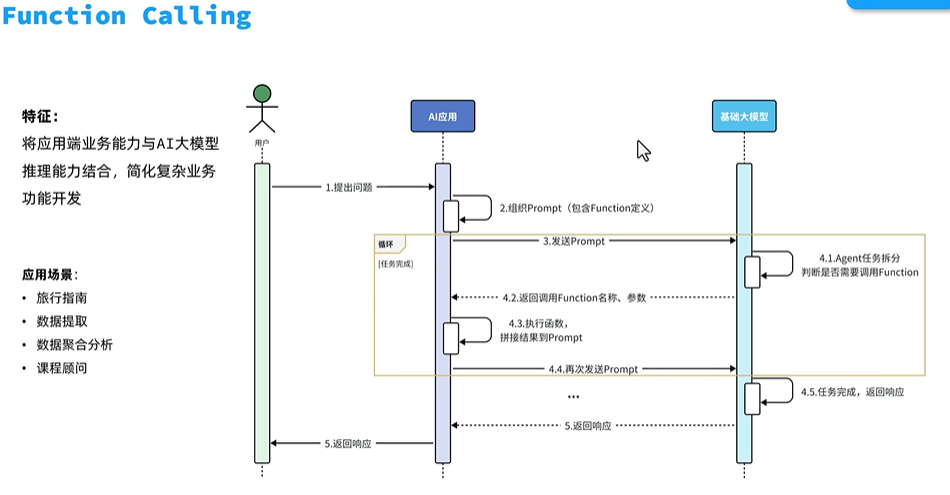
5️⃣ Tools & Chains(工具和链)
Spring AI 正在集成更多“Agent”工作流和 LangChain 风格的 Chain 机制,用于构建多步骤推理、多工具组合的复杂任务执行流。
例如,可以构建一个多步骤的问答流程:
Chain chain = new SequentialChain(new PromptTemplate("Question: {{question}} -> Step 1:"),new PromptTemplate("Based on Step 1, Step 2 is:")
);
String result = chain.run(Map.of("question", "如何用Spring AI构建问答系统?"));
6️⃣ Embedding Support(向量嵌入)
Spring AI 提供了 EmbeddingModel 接口,用于将文本转换为向量,常用于 RAG(检索增强生成)应用中,支持与 PostgreSQL (pgvector)、Milvus、Weaviate 等向量数据库集成。
EmbeddingModel model = new OpenAiEmbeddingModel(...);
List<Float> vector = model.embed("Spring AI 是什么?");
7️⃣ 配置简洁(Spring Boot Integration)
使用 spring-boot-starter-spring-ai,开发者只需配置 application.yml 即可快速上手:
spring:ai:openai:api-key: your-keychat:model: gpt-4
🎯 应用场景
-
智能客服 / 问答系统
-
RAG(检索增强生成)
-
文本摘要和分析
-
代码生成 / 补全
-
智能表单填写
-
自然语言控制业务流程
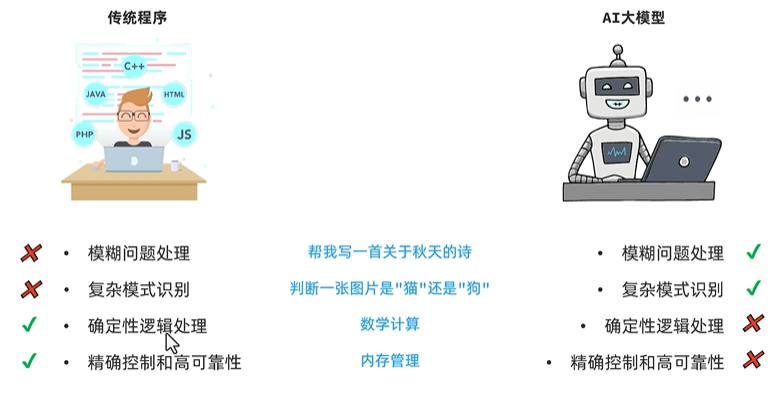
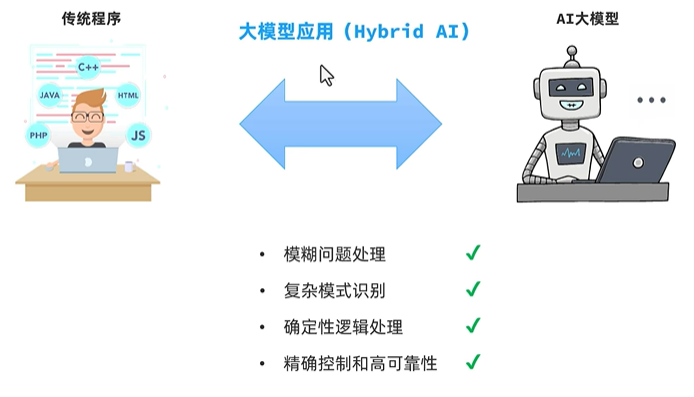
3、AI应用开发技术架构:
对比传统应用和AI应用:
4、商业案例:
我找了一些基于Spring AI的成熟的商业项目的案例:
目前,Spring AI 作为一个新兴框架,主要在 企业内部应用开发、AI 助手、RAG 知识问答系统 等场景中开始快速落地,尚未形成大量对外公开的完整“商业项目”案例,但已经有一些比较成熟、可借鉴的企业级项目原型或实践应用。
✅ 案例 1:企业知识库问答系统(RAG)
公司类型:金融、法律、咨询类企业内部系统
🔹 场景:
-
员工或客户可以在系统中提问,比如“XXX合同模板有哪些条款?”
-
系统根据公司内部文档、政策、合规库,结合 LLM 回答问题。
🔹 技术实现:
-
Spring Boot + Spring AI + pgvector/PostgreSQL
-
文档上传(PDF/Word) → 分块 → 嵌入 → 存入向量库
-
使用
ChatClient查询和回答 -
支持用户权限、上下文管理、多轮对话
🔹 商业价值:
-
替代传统 FAQ 系统,提升知识利用率
-
降低人工客服负担
-
落地快,适合中大型企业内部部署
✅ 案例 2:CRM 智能助手
公司类型:SaaS CRM 服务商
🔹 场景:
-
在 CRM 系统中嵌入 AI 助手
-
用户可以自然语言下达指令:
-
“列出上周未跟进的潜在客户”
-
“总结与客户A的邮件交流”
-
🔹 技术实现:
-
Spring AI 的
ChatClient+Function Calling -
Spring Data JPA 与数据库交互
-
嵌入式 UI + LangChain4j 进行 Agent 构建
🔹 商业价值:
-
提升使用体验
-
降低数据分析门槛
-
增强产品差异化竞争力
✅ 案例 3:保险行业文档解析与风险审阅系统
公司类型:保险科技 / 合同管理平台
🔹 场景:
-
用户上传保险合同、保单
-
系统自动解析条款、归类内容
-
提出潜在风险点和客户注意事项
🔹 技术实现:
-
Spring AI + PromptTemplate + EmbeddingModel
-
多步 Chain 流程:提取 → 分析 → 生成摘要
-
结合正则表达式 + 结构化解析器(JSON OutputParser)
🔹 商业价值:
-
减少人工审阅时间
-
快速响应客户问题
-
提高业务流程自动化程度
✅ 案例 4:政府/高校智能政策问答系统
机构类型:政府服务平台 / 校园信息门户
🔹 场景:
-
面向公民或学生开放的智能问答窗口
-
问“我是低保家庭,怎么申请助学金?”
-
问“研究生补助政策2024年标准是多少?”
🔹 技术实现:
-
Spring AI + 向量数据库 + 页面 UI 组件(Thymeleaf/Vue)
-
结合本地 PDF 文档(RAG)
-
支持中文 Prompt 工程和内容过滤
🔹 商业价值:
-
减轻人工窗口压力
-
7x24 小时服务
-
降低行政服务成本
📌 实际项目开源参考
虽然大多数真实的商业项目是私有的,但你可以参考以下开源/半商业项目以构建类似系统:
-
LangChain4j + Spring Boot 示例项目:构建 RAG 问答系统
GitHub: https://github.com/langchain4j/langchain4j -
Spring AI 官方 demo 项目:包含 ChatClient、PromptTemplate 等使用范例
GitHub: https://github.com/spring-projects/spring-ai -
Haystack(用于 RAG) + Java 客户端整合(可借助 Spring AI 进行替换)
📌 总结
| 应用场景 | 商业价值 | Spring AI 角色 |
|---|---|---|
| 内部知识问答 | 降本增效 | ChatClient + Embedding + pgvector |
| 智能客服助手 | 减少人工 + 更高服务质量 | PromptTemplate + Function Calling |
| 智能合同审阅 | 自动化文档流程 | OutputParser + ChatModel |
| 政策法规答疑 | 公共服务效率提升 | Embedding + 多轮对话 + Prompt |
我觉还不够具体:
💼 1. Jasper AI — AI 文案写作助手
🧠 概念:
-
基于 GPT 模型的营销文案生成工具,专注写广告、社媒贴文、邮件、博客。
💰 商业化成果:
-
获得超 1.25 亿美元融资
-
收费 SaaS,企业客户超 10 万
-
月收入超千万美元(ARR 级别)
🌟 哇塞亮点:
-
模板丰富,10 秒生成 SEO 优化文案
-
多语言支持,全球化营销利器
-
定制品牌语调(Brand Voice)
💼 2. Synthesia — AI 视频生成平台
🧠 概念:
-
输入文本,一键生成有“人脸 + 声音”的视频内容(AI 数字人)
💰 商业化成果:
-
超过 50,000 企业客户(包括可口可乐、Amazon、Nike 等)
-
每年数千万美元营收
-
已被广泛用于企业培训、产品演示、客服说明
🌟 哇塞亮点:
-
无需摄像机、演员,几分钟生成高质量视频
-
可选 AI 主播、语音克隆
-
极大降低企业视频制作成本(从 $10,000 → $100)
💼 3. LegalMation — AI 自动生成法律文件
🧠 概念:
-
专为律师设计,自动起草应诉文书、答辩状、法庭动议
💰 商业化成果:
-
被多家大型律所、保险公司采用
-
美国法律市场高度认可,节省人工成本 > 90%
🌟 哇塞亮点:
-
3 分钟生成 10 页法律文书
-
遵循法院格式,自动引用法条
-
全程符合合规、可溯源
💼 4. Runway ML — AI 视频/图像创作平台
🧠 概念:
-
用 AI 生成视频、图像、动画,适用于电影制作、内容创作、社交媒体
💰 商业化成果:
-
拥有数百万创作者
-
与《Everything Everywhere All at Once》团队合作制作视频
🌟 哇塞亮点:
-
文生视频(Text to Video)
-
擦除视频中的人物/物体
-
图像转风格化动画(Image2Video)
💼 5. GitHub Copilot — AI 编程助手(由 OpenAI 提供模型)
🧠 概念:
-
基于代码上下文,实时补全、建议、生成代码
💰 商业化成果:
-
GitHub 企业用户广泛部署
-
单独订阅 $10/月,数百万开发者使用
-
微软年报中作为核心 AI 商业项目之一
🌟 哇塞亮点:
-
几乎改变了程序员的编码方式
-
编程效率提升 30%+
-
已嵌入 Visual Studio、JetBrains、VS Code 等 IDE
🔚 总结:什么样的 AI 应用能商业化成功?
| 特征 | 解释 |
|---|---|
| 高频使用场景 | 写作、编程、视频制作、法律文书、企业培训等 |
| 强可替代性 | 替代原本昂贵、重复、耗时的人力工作 |
| 界面易用、体验直观 | 用户无需懂 AI,点点按钮就能用 |
| 收费模型清晰(SaaS) | 订阅制、按量付费,客户粘性高 |
| 明显 ROI | 用 AI 可节省大量时间和成本,形成销售闭环 |
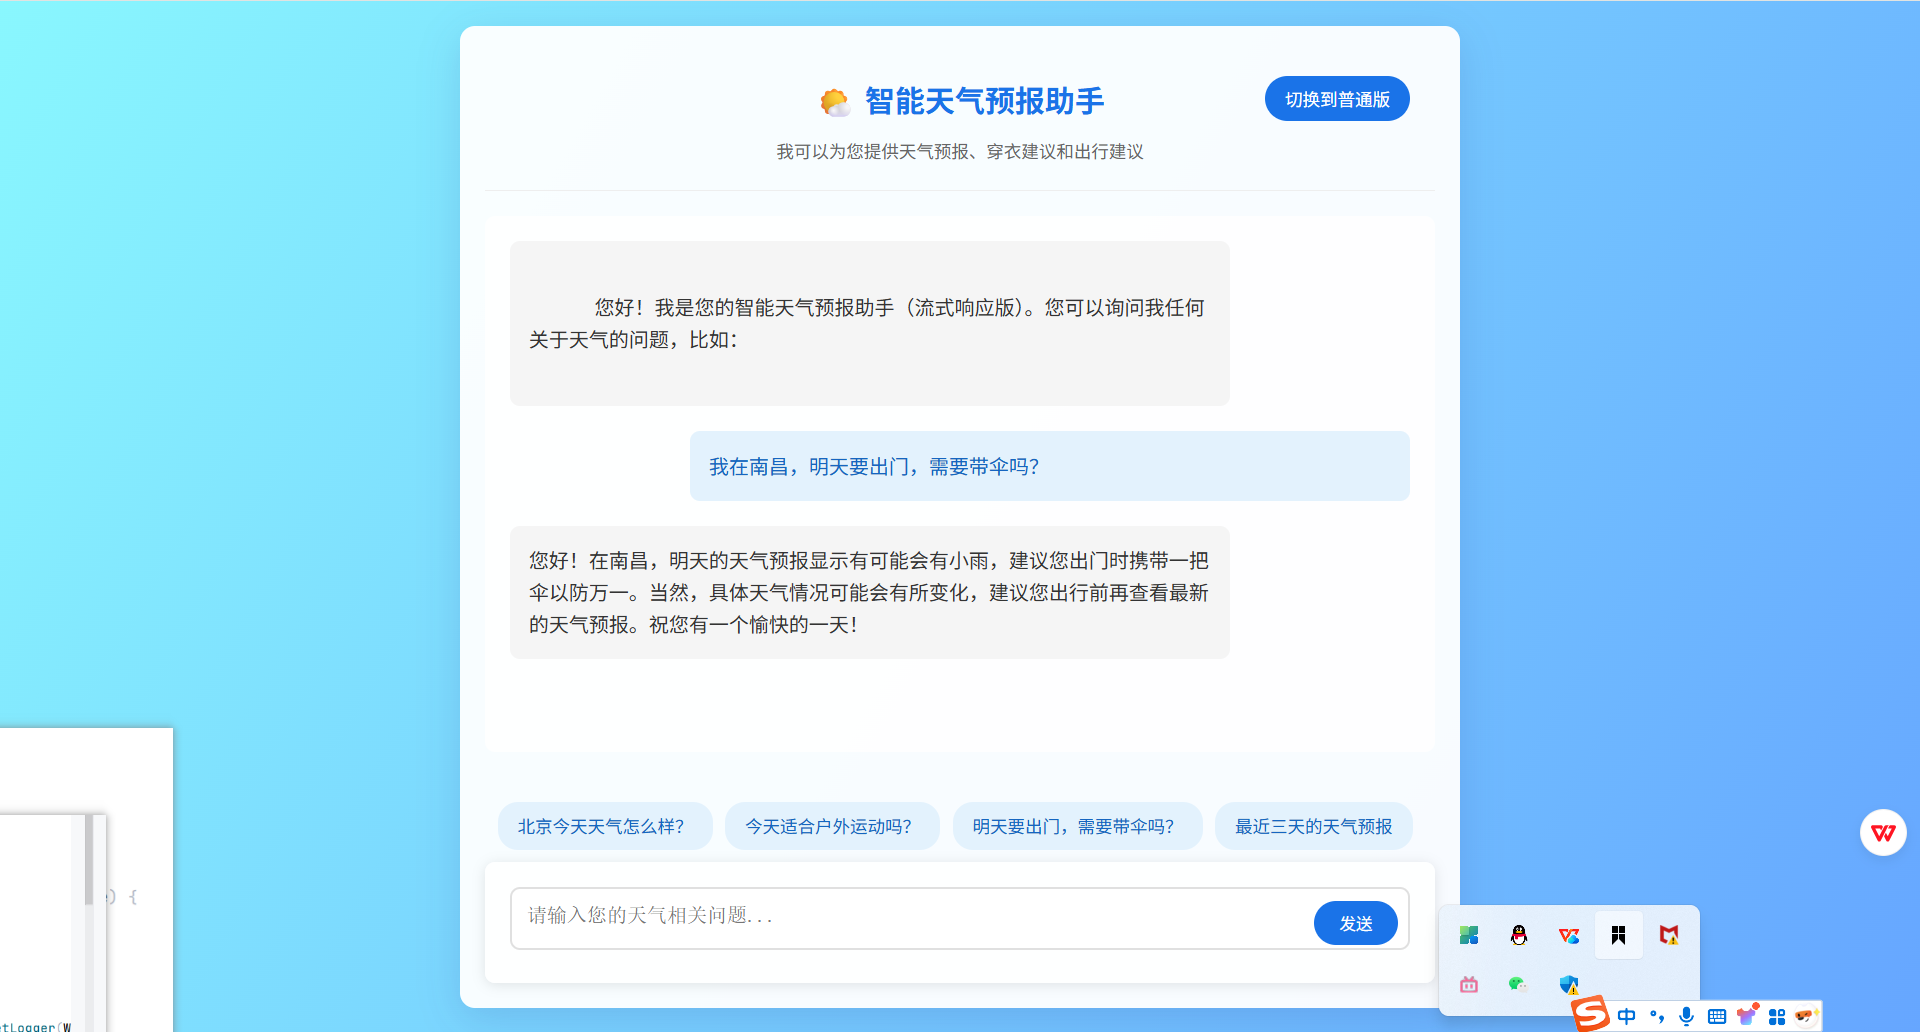
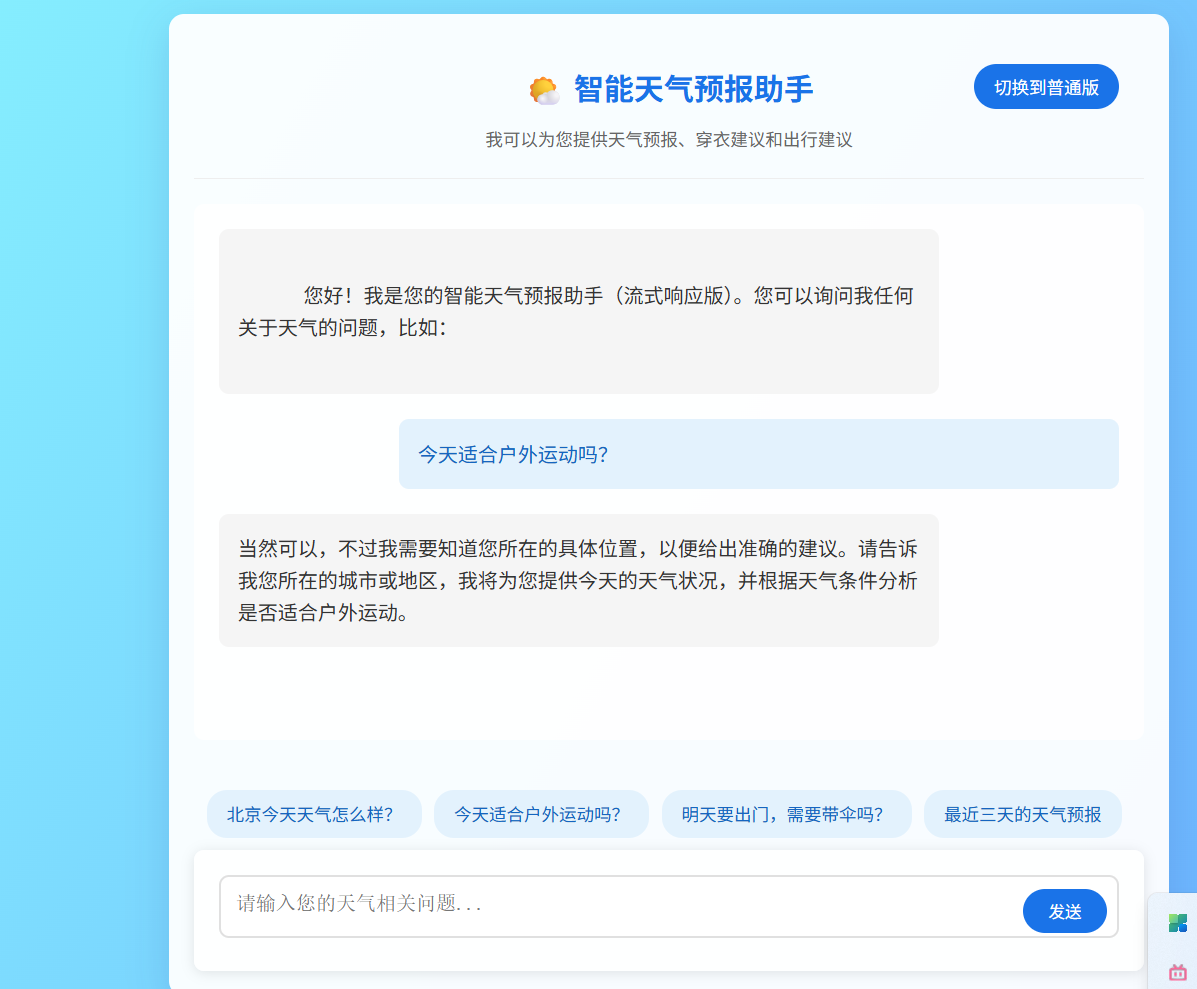
5、经典案例分析:(智能天气预报助手)
案例介绍:
该助手借助 Spring AI 的特性结合人工智能技术,为用户提供准确、便捷且个性化的天气信息服务,可广泛应用于日常生活提醒、出行规划、农业生产参考等多个场景。
5.1、环境搭建
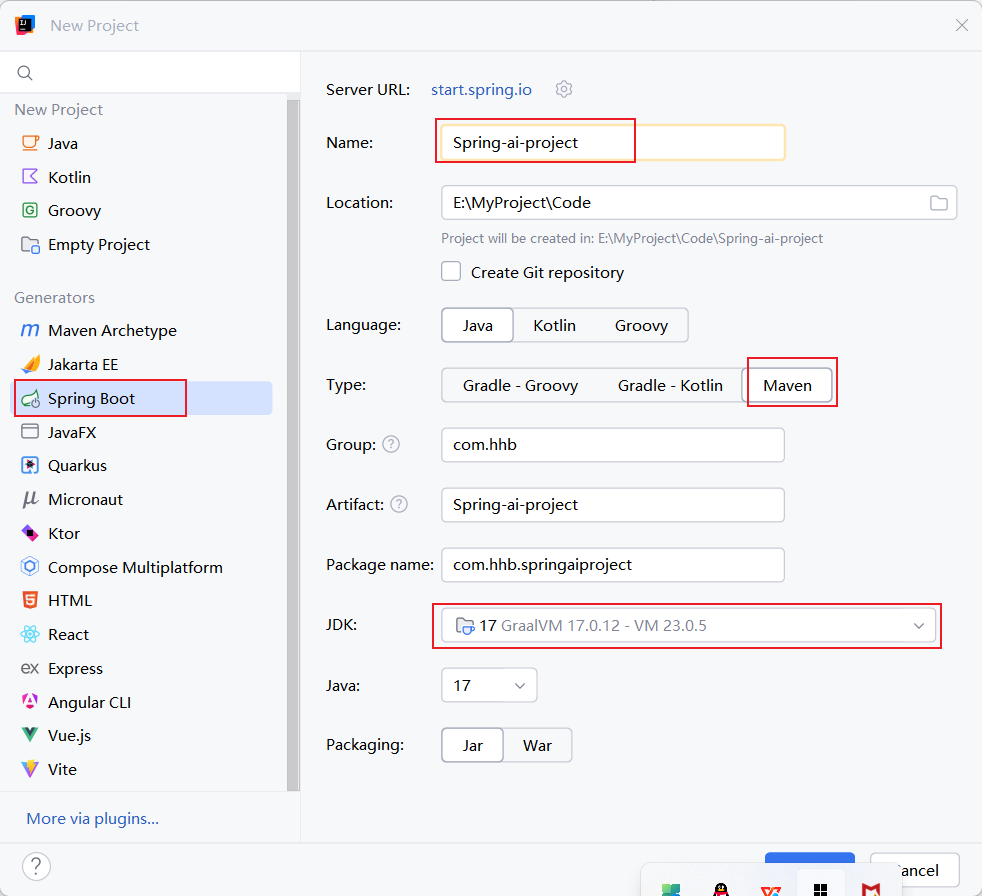
1、创建Spring Boot项目,并命名好项目名称。
2、我们使用Maven来做为我们项目管理的工具。
3、注意JDK一定要选择17以上的版本。
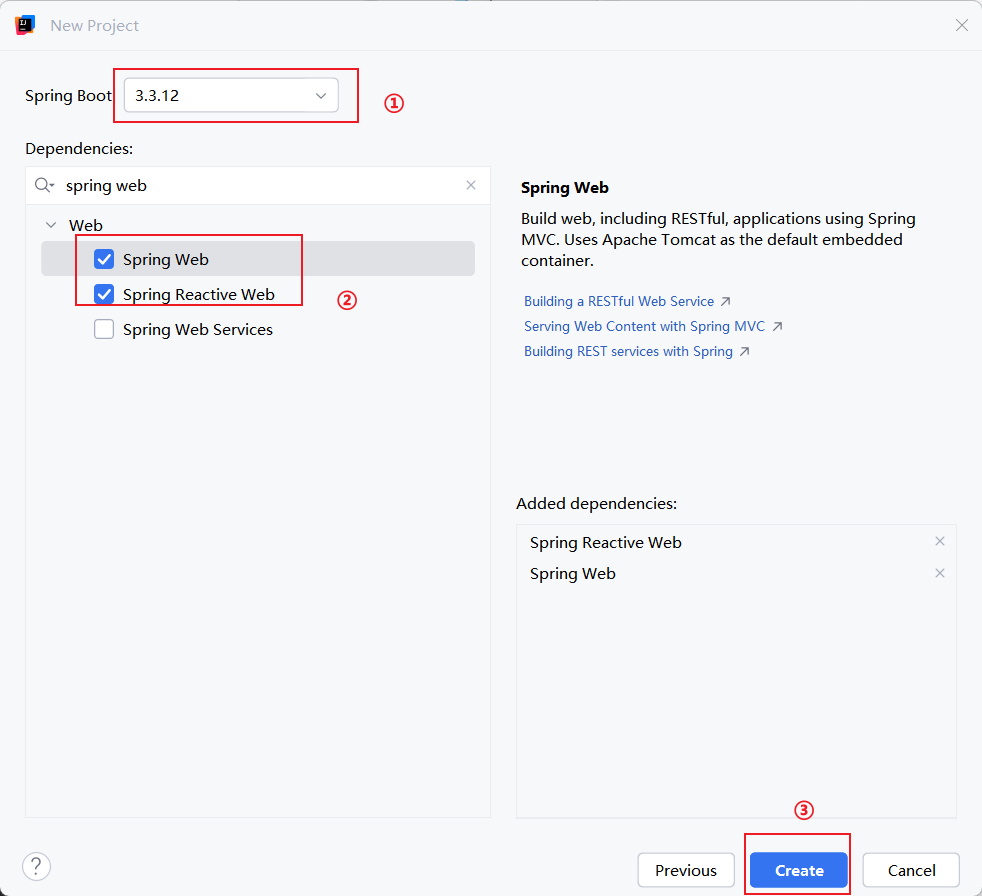
先选版本号为3.2.x和3.3.x的版本的, 别问为什么?问就是官方要求!然后记得勾选 spring web 和 spring reactive web 选项,分别支持 mvc模式 和 webflux模式,最后创建。
创建完项目后,在pom.xml文件中添加依赖。这是一个依赖库,方便后面导依赖坐标的。
这边的代码我我们放到pom.xml最后面去:
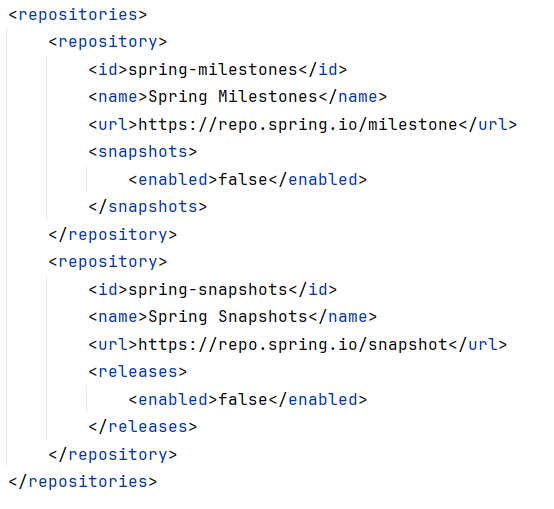
这里复制一下
<repositories><repository><id>spring-milestones</id><name>Spring Milestones</name><url>https://repo.spring.io/milestone</url><snapshots><enabled>false</enabled></snapshots></repository><repository><id>spring-snapshots</id><name>Spring Snapshots</name><url>https://repo.spring.io/snapshot</url><releases><enabled>false</enabled></releases></repository>
</repositories>
接下来添加 spring-ai 所有的 bom,用来锁定依赖版本,目前可选版本有 1.0.0-SNAPSHOT 和 1.0.0-M6。1.0.0-M6 中包含一些未正式发布的特性,这里我们先使用 spring-ai-bom:先用M2的
<dependencyManagement><dependencies><dependency><groupId>org.springframework.ai</groupId><artifactId>spring-ai-bom</artifactId><version>1.0.0-M2</version><type>pom</type><scope>import</scope></dependency></dependencies></dependencyManagement>然后去智谱AI 智谱的官网 那里拿到申请一个API KEY,然后复制,后面是要用的。

做好命名。跟我的一样就行!
然后引入依赖:
<!--引入智谱AI大模型坐标--><dependency><groupId>org.springframework.ai</groupId><artifactId>spring-ai-zhipuai-spring-boot-starter</artifactId><version>1.0.0-M2</version> <!-- 使用已发布的稳定里程碑版本 --></dependency><!--引入日志查看信息log4j--><dependency><groupId>org.springframework.boot</groupId><artifactId>spring-boot-starter-logging</artifactId></dependency>我们将刚才智谱 AI 的 API KEY 配置到配置文件 src\main\resources 中,默认的配置文件为 properties 文件,可读性和可配置性都不加,将它删除,重新创建一个 application.yml 文件。顺便把日志框架也配好,等下我们要进行测试,将如下内容配置到文件中:
spring:ai:zhipuai:api-key: ${ZHIPU_API_KEY}chat:options:model: GLM-4-Flashlogging:level:com.hhb.springaiproject.Controller.WeatherController: DEBUG这里千万不要把 API KEY 直接写入到配置文件中,如果后续提交到 github 等 git 仓库中,API KEY 相当于就暴露出去了,非常不安全。所以这里我们使用占位符,在启动命令的环境变量中去配置内容:

点最后一个编辑配置
点击去找到环境变量:
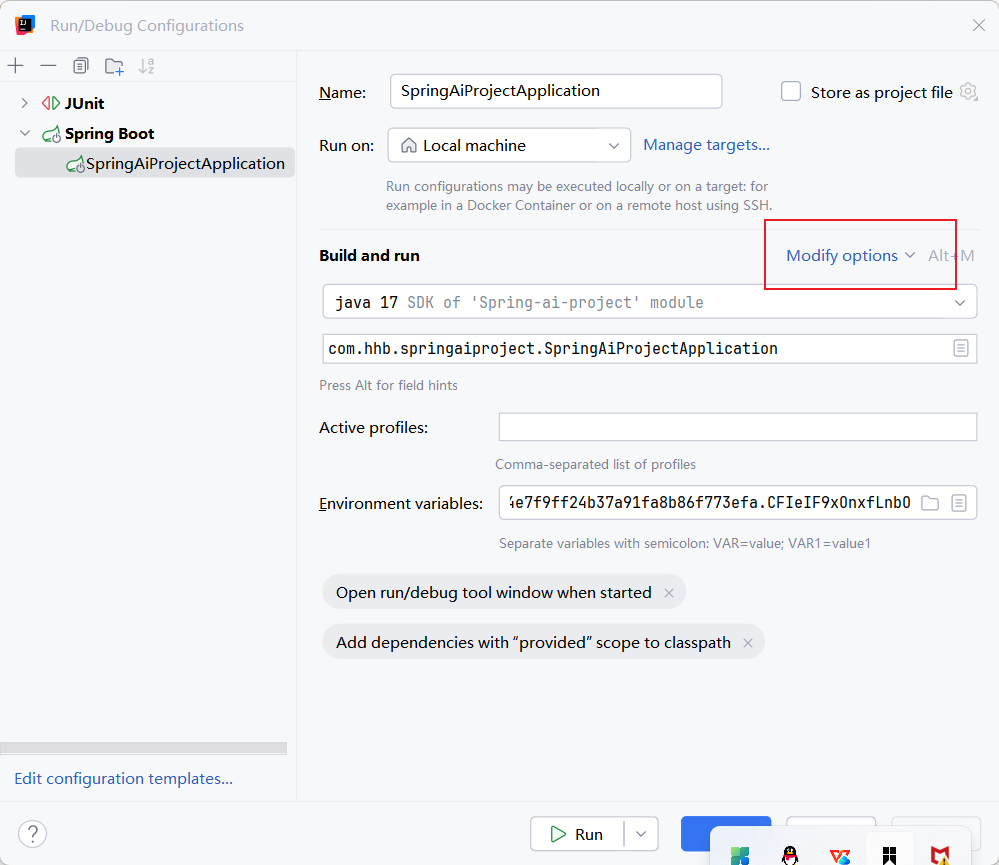
找到之后点击一下:

这样子配置好环境变量
点击保存就可以了
5.2、后端代码的编写
好了,前置工作都已经完成了,接下来我们来编写后端代码。创建 WeatherController 用来处理前端发送的请求:
然后自己import一些接口就行了
@RestController
@RequestMapping("/weather")
public class WeatherController {// 添加日志记录器private static final Logger log = LoggerFactory.getLogger(WeatherController.class);// 系统提示词,定义机器人的角色和行为private static final String SYSTEM_PROMPT = """你是一个专业的天气预报机器人,擅长:1. 查询当前天气状况2. 提供未来几小时/天的天气预测3. 建议合适的穿衣搭配4. 分析天气对出行的影响请始终以专业、友好的口吻回答问题。如果问题与天气无关,请礼貌地提醒用户你是一个天气预报助手。""";public WeatherController(ZhiPuAiChatModel chatModel) {this.chatModel = chatModel;}private final ZhiPuAiChatModel chatModel;@GetMapping("/generate")@ResponseBodypublic ResponseEntity<String> generate(@RequestParam("message") String message) {try {String prompt = SYSTEM_PROMPT + "\n用户问题:" + message;String result = chatModel.call(prompt);return ResponseEntity.ok(result);} catch (Exception e) {// 记录详细错误信息log.error("Failed to generate weather response", e);// 返回友好提示return ResponseEntity.status(HttpStatus.INTERNAL_SERVER_ERROR).body("天气查询出现错误,请稍后重试。");}}/*** 生成流式天气相关回复* @param message 用户输入的消息* @return AI回复的流式响应*/@GetMapping(value = "/generateStream", produces = MediaType.TEXT_EVENT_STREAM_VALUE)public Flux<String> generateStream(@RequestParam(value = "message") String message) {// 构建提示词,加入系统角色定义String promptText = SYSTEM_PROMPT + "\n用户问题:" + message;var prompt = new Prompt(new UserMessage(promptText));Flux<ChatResponse> stream = this.chatModel.stream(prompt);return stream.map(e -> e.getResult().getOutput().getContent());}
}
代码解读:
1.依赖注入
private final ZhiPuAiChatModel chatModel;public WeatherController(ZhiPuAiChatModel chatModel) {this.chatModel = chatModel;}
- 构造函数注入:Spring 推荐的方式,保证依赖不可变(
final修饰符),避免空指针异常。 ZhiPuAiChatModel:Spring AI 的组件,封装了与智谱 AI 模型的交互逻辑(如 API 调用、参数处理)。
2.系统提示词定义
private static final String SYSTEM_PROMPT = """你是一个专业的天气预报机器人,擅长:1. 解答天气相关的问题2. 提供天气预报建议// ... 其他提示 ...""";
- 关键作用:
- 角色定义:明确 AI 的领域边界(只处理天气问题)。
- 安全控制:当用户提问非天气问题时,触发礼貌拒绝逻辑。
- 风格控制:确保回复的专业性和友好性。
3.接口实现
chatModel.call() 内部机制:
1.认证:自动添加智谱 API 密钥(通常通过 ZhiPuAiChatModel 配置类设置)。
2.HTTP 调用:向智谱 API 端点(如 https://api.zhipu.ai/v4/chat/completions)发送 POST 请求。
3.参数封装:将 prompt 包装为模型所需的 JSON 格式
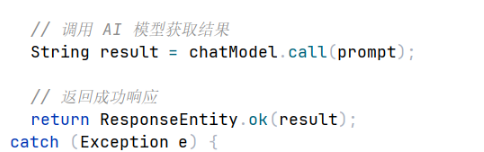
此外,为了让大模型输出更加美观,符合生产需求,我们加入的异常处理:
try {// 构建完整的提示词,包含系统提示和用户消息String prompt = SYSTEM_PROMPT + "\n用户问题:" + message;// 调用 AI 模型获取结果String result = chatModel.call(prompt);// 返回成功响应return ResponseEntity.ok(result);} catch (Exception e) {// 记录错误日志log.error("Failed to generate weather response", e);// 返回错误提示信息return ResponseEntity.status(HttpStatus.INTERNAL_SERVER_ERROR).body("天气查询出现错误,请稍后重试。");}这样可以捕获异常的处理。
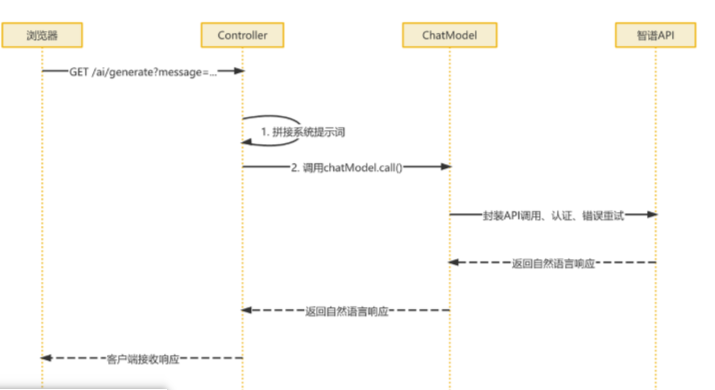
4、整体的工作流就是:
5、测试
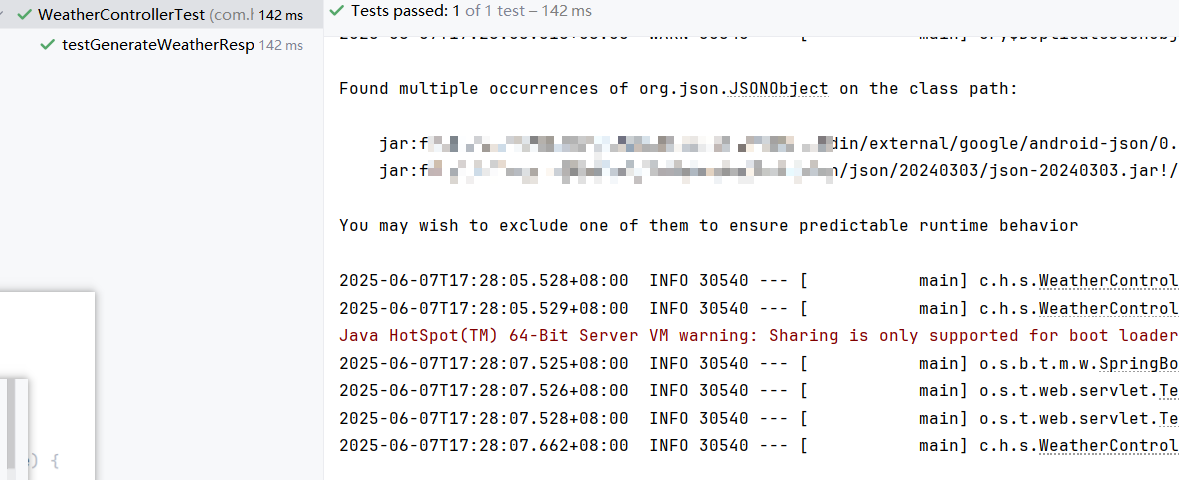
接下就是测试一下我们写的代码有没有问题,在 src/test/java 下创建对应的测试类 WeatherControllerTest.java。
@WebMvcTest(controllers = WeatherController.class)
public class WeatherControllerTest {@Autowiredprivate MockMvc mockMvc;@MockBeanprivate ZhiPuAiChatModel chatModel;@Testpublic void testGenerateWeatherResponse() throws Exception {String message = "北京今天天气如何?";String expectedResponse = "mock-response";// 模拟 chatModel.call(...) 的返回值when(chatModel.call(anyString())).thenReturn(expectedResponse);mockMvc.perform(get("/weather/generate").param("message", message)).andExpect(status().isOk()).andExpect(content().string(expectedResponse)); // 现在应匹配成功}
}
然后运行起来,这样就表示测试成功了。
5.3、前端代码的编写
在你的 Spring Boot 项目中,通常将前端资源放在 src/main/resources/static 目录下。在这个目录下创建就行了,叫做weather.html.
<!DOCTYPE html>
<html lang="zh-CN"><head><meta charset="UTF-8"><meta name="viewport" content="width=device-width, initial-scale=1.0"><title>智能天气预报助手 - 流式响应版</title><style>/* 全局样式 */* {margin: 0;padding: 0;box-sizing: border-box;}body {font-family: -apple-system, BlinkMacSystemFont, "Segoe UI", Roboto, "Helvetica Neue", Arial, sans-serif;line-height: 1.6;color: #333;background: linear-gradient(120deg, #89f7fe 0%, #66a6ff 100%);}/* 聊天容器 */.chat-container {max-width: 800px;margin: 20px auto;padding: 20px;height: calc(100vh - 40px);display: flex;flex-direction: column;background-color: rgba(255, 255, 255, 0.95);border-radius: 12px;box-shadow: 0 8px 32px rgba(31, 38, 135, 0.15);}/* 头部标题 */.chat-header {text-align: center;padding: 20px 0;margin-bottom: 20px;border-bottom: 1px solid #eee;position: relative;}.chat-header h1 {color: #1a73e8;font-size: 24px;margin-bottom: 10px;}.chat-header p {color: #666;font-size: 14px;}/* 切换按钮 */.switch-mode {position: absolute;right: 20px;top: 20px;padding: 8px 16px;background-color: #1a73e8;color: white;border: none;border-radius: 20px;cursor: pointer;font-size: 14px;transition: all 0.3s;}.switch-mode:hover {background-color: #1557b0;transform: translateY(-2px);}/* 消息区域 */.messages-container {flex: 1;overflow-y: auto;margin-bottom: 20px;padding: 20px;background-color: rgba(255, 255, 255, 0.8);border-radius: 8px;}/* 消息样式 */.message {margin-bottom: 20px;padding: 15px;border-radius: 8px;max-width: 80%;white-space: pre-wrap;word-wrap: break-word;}.user-message {background-color: #e3f2fd;margin-left: auto;color: #1565c0;}.assistant-message {background-color: #f5f5f5;margin-right: auto;color: #333;}/* 输入区域 */.input-container {position: relative;padding: 20px;background-color: rgba(255, 255, 255, 0.9);border-radius: 8px;box-shadow: 0 2px 10px rgba(0, 0, 0, 0.1);}#message-input {width: 100%;padding: 12px;border: 2px solid #e0e0e0;border-radius: 8px;resize: none;height: 50px;font-size: 16px;transition: border-color 0.3s;}#message-input:focus {border-color: #1a73e8;outline: none;}#send-button {position: absolute;right: 30px;bottom: 30px;padding: 8px 20px;background-color: #1a73e8;color: white;border: none;border-radius: 20px;cursor: pointer;transition: all 0.3s;}#send-button:hover {background-color: #1557b0;transform: translateY(-2px);}#send-button:disabled {background-color: #cccccc;cursor: not-allowed;transform: none;}/* 示例问题区域 */.example-questions {margin-top: 10px;padding: 10px;display: flex;flex-wrap: wrap;gap: 10px;}.example-question {background-color: #e3f2fd;color: #1565c0;padding: 8px 16px;border-radius: 16px;font-size: 14px;cursor: pointer;transition: all 0.3s;}.example-question:hover {background-color: #1a73e8;color: white;}/* 打字动画 */.typing {display: inline-block;margin-left: 4px;}.typing span {display: inline-block;width: 6px;height: 6px;background-color: #666;border-radius: 50%;margin: 0 2px;animation: typing 1s infinite;}.typing span:nth-child(2) {animation-delay: 0.2s;}.typing span:nth-child(3) {animation-delay: 0.4s;}@keyframes typing {0%,100% {transform: translateY(0);}50% {transform: translateY(-4px);}}</style>
</head><body>
<div class="chat-container"><div class="chat-header"><h1>🌤️ 智能天气预报助手</h1><p>我可以为您提供天气预报、穿衣建议和出行建议</p><button class="switch-mode" onclick="window.location.href='weather.html'">切换到普通版</button></div><div class="messages-container" id="messages"><!-- 欢迎消息 --><div class="message assistant-message">您好!我是您的智能天气预报助手(流式响应版)。您可以询问我任何关于天气的问题,比如:</div></div><div class="example-questions"><div class="example-question" onclick="askExample(this)">北京今天天气怎么样?</div><div class="example-question" onclick="askExample(this)">今天适合户外运动吗?</div><div class="example-question" onclick="askExample(this)">明天要出门,需要带伞吗?</div><div class="example-question" onclick="askExample(this)">最近三天的天气预报</div></div><div class="input-container"><textarea id="message-input" placeholder="请输入您的天气相关问题..." rows="1"onkeydown="if(event.keyCode === 13 && !event.shiftKey) { event.preventDefault(); sendMessage(); }"></textarea><button id="send-button" onclick="sendMessage()">发送</button></div>
</div><script>// DOM 元素const messagesContainer = document.getElementById('messages');const messageInput = document.getElementById('message-input');const sendButton = document.getElementById('send-button');// 示例问题点击处理function askExample(element) {messageInput.value = element.textContent;sendMessage();}// 工具函数:创建消息元素function createMessageElement(content, isUser) {const messageDiv = document.createElement('div');messageDiv.className = `message ${isUser ? 'user-message' : 'assistant-message'}`;messageDiv.textContent = content;return messageDiv;}// 创建打字动画元素function createTypingIndicator() {const typingDiv = document.createElement('div');typingDiv.className = 'message assistant-message';typingDiv.innerHTML = '正在查询天气信息<div class="typing"><span></span><span></span><span></span></div>';return typingDiv;}// 发送消息async function sendMessage() {const message = messageInput.value.trim();if (!message) return;// 禁用输入和发送按钮messageInput.disabled = true;sendButton.disabled = true;// 显示用户消息messagesContainer.appendChild(createMessageElement(message, true));messageInput.value = '';// 显示打字动画const typingIndicator = createTypingIndicator();messagesContainer.appendChild(typingIndicator);messagesContainer.scrollTop = messagesContainer.scrollHeight;try {// 创建新的助手消息容器const assistantMessage = document.createElement('div');assistantMessage.className = 'message assistant-message';// 创建 EventSourceconst eventSource = new EventSource(`/weather/generateStream?message=${encodeURIComponent(message)}`);// 移除打字动画并添加消息容器typingIndicator.remove();messagesContainer.appendChild(assistantMessage);// 处理消息事件eventSource.onmessage = function (event) {assistantMessage.textContent += event.data;messagesContainer.scrollTop = messagesContainer.scrollHeight;};// 处理错误eventSource.onerror = function (error) {console.error('EventSource错误:', error);eventSource.close();if (!assistantMessage.textContent) {assistantMessage.textContent = '抱歉,发生了一些错误,请稍后重试。';}// 重新启用输入和发送按钮messageInput.disabled = false;sendButton.disabled = false;messageInput.focus();};// 处理完成eventSource.addEventListener('complete', function (event) {eventSource.close();messageInput.disabled = false;sendButton.disabled = false;messageInput.focus();});} catch (error) {console.error('API调用错误:', error);const errorMessage = document.createElement('div');errorMessage.className = 'message assistant-message';errorMessage.textContent = '抱歉,发生了一些错误,请稍后重试。';messagesContainer.appendChild(errorMessage);// 重新启用输入和发送按钮messageInput.disabled = false;sendButton.disabled = false;messageInput.focus();}}// 页面加载完成后聚焦到输入框window.onload = () => {messageInput.focus();};
</script>
</body>
</html>
最后我们启动项目,让打开谷歌浏览器,访问地址:
http://localhost:8080/weather.html