前端面试真题(第一集)
目录标题
- 1、跨域问题及解决方法
- 同源策略
- 生产环境解决方案
- 开发环境解决方案
- 其他解决方案
- 2、组件间通信方式
- Vue2中的组件通信方式
- Vue3中的组件通信方式
- 通用注意事项
- 3、微信小程序生命周期
- 微信小程序原生生命周期
- UniApp生命周期
- 4、微信小程序授权登录流程
- 登录流程
- 手机号获取
- 5、防抖与节流
- 防抖(Debounce)示例
- 节流(Throttle)示例
- 注意事项
- 拓展
1、跨域问题及解决方法
同源策略
同源策略是浏览器的重要安全机制,限制来自不同源的文档或脚本进行交互。"同源"指协议、域名、端口完全相同。该策略会阻止跨域AJAX请求、Cookie访问等行为,但允许嵌入资源(如<img>、<script>标签)。
生产环境解决方案
① CORS(跨域资源共享)
CORS是W3C标准,通过HTTP头部实现跨域访问控制。后端需配置响应头:服务器在响应头中设置 Access-Control-Allow-Origin 允许特定域或所有域(*)访问。需处理预检请求(OPTIONS)。
Access-Control-Allow-Origin: https://example.com
Access-Control-Allow-Methods: GET, POST, PUT
Access-Control-Allow-Headers: Content-Type
示例Node.js实现:
// 中间件设置CORS头
// Node.js Express示例
const express = require('express');
const app = express();// 中间件设置CORS头
app.use((req, res, next) => {// 允许的源(实际项目应配置允许的具体域名)res.header('Access-Control-Allow-Origin', 'https://your-client-domain.com'); // 允许的HTTP方法res.header('Access-Control-Allow-Methods', 'GET, POST, PUT, DELETE');// 允许的请求头res.header('Access-Control-Allow-Headers', 'Content-Type, Authorization');// 允许携带cookie(需前端同时设置withCredentials)res.header('Access-Control-Allow-Credentials', 'true');// 预检请求缓存时间res.header('Access-Control-Max-Age', '86400');next();
});// 处理OPTIONS预检请求
app.options('*', (req, res) => {res.sendStatus(200);
});app.listen(3000, () => console.log('Server running with CORS enabled'));
② Nginx反向代理
通过Nginx将不同域的请求代理到同源地址:
server {listen 80;server_name your-domain.com;location /api/ {# 反向代理到实际后端服务proxy_pass http://backend-service:3000;# 添加CORS头add_header 'Access-Control-Allow-Origin' '$http_origin';add_header 'Access-Control-Allow-Methods' 'GET, POST, OPTIONS';add_header 'Access-Control-Allow-Headers' 'DNT,User-Agent,X-Requested-With,Content-Type';# 处理OPTIONS预检请求if ($request_method = 'OPTIONS') {add_header 'Access-Control-Max-Age' 1728000;add_header 'Content-Type' 'text/plain; charset=utf-8';add_header 'Content-Length' 0;return 204;}}
}
开发环境解决方案
代理服务器
Vite/webpack等工具支持代理设置(vite.config.js示例):
以下是对 vue.config.js 文件中代理配置的详细代码注释:
代理配置代码注释
// vue.config.js
module.exports = {// 开发服务器配置devServer: {// 代理配置proxy: {// 代理规则名称,可以自定义,这里使用 '/api' 作为示例'/api': {// 目标服务器地址,这里是后端服务的实际地址target: 'http://localhost:3000',// 是否修改请求头中的host为目标URL// 设置为true时,请求头中的host会改为target的域名changeOrigin: true,// 路径重写规则pathRewrite: {// 正则表达式,匹配请求路径中的/api前缀并替换为空字符串// 例如:/api/user => /user'^/api': ''}}}}
}
配置说明
target: 指定后端API服务器的地址,所有匹配的请求都会被转发到该地址。changeOrigin: 修改请求头中的host字段为目标URL。某些后端服务可能会验证host字段,开启此选项可避免被拦截。pathRewrite: 重写请求路径,常用于去除或替换前缀。^/api表示匹配以/api开头的路径,替换为空字符串后,实际请求的路径将不再包含/api。
使用场景示例
假设前端请求/api/users,代理会将请求转发到http://localhost:3000/users(路径中的/api被移除)。
其他解决方案
① JSONP
利用<script>标签不受同源限制的特性,仅支持GET请求:
function handleResponse(data) {console.log(data);
}
const script = document.createElement('script');
script.src = 'https://api.example.com/data?callback=handleResponse';
document.body.appendChild(script);
② WebSocket 协议代码注释
WebSocket 协议允许客户端与服务器建立双向通信通道,不受同源策略限制。以下代码注释详细说明了其使用方法:
// 创建 WebSocket 连接,协议为 wss(WebSocket Secure)
const socket = new WebSocket('wss://example.com');// 监听来自服务器的消息事件
socket.onmessage = (event) => {// 将接收到的数据(event.data)解析为 JSON 对象并打印console.log(JSON.parse(event.data));
};
postMessage 跨窗口通信代码注释
postMessage 是一种跨窗口通信的 API,允许不同源窗口之间安全传递数据:
// 发送方代码
// 向父窗口(window.parent)发送数据 'data',目标源为 'https://target-origin.com'
window.parent.postMessage('data', 'https://target-origin.com');// 接收方代码
// 监听 'message' 事件
window.addEventListener('message', (event) => {// 验证消息来源是否为可信源 'https://trusted-origin.com'if (event.origin === 'https://trusted-origin.com') {// 打印接收到的数据console.log(event.data);}
});
③ document.domain 的基本概念
document.domain 是浏览器同源策略(Same-Origin Policy)中的一个属性,允许具有相同顶级域名的子域之间通过脚本进行通信。通过设置该属性,子域可以放宽同源限制,实现跨子域的数据交互。
适用场景
- 父子域通信:例如
a.example.com需要与b.example.com共享数据。 - 跨子域窗口操作:如
iframe嵌入不同子域的页面时访问彼此的内容。 - 仅限于同一顶级域名(如
.com、.org),且需双方页面主动设置相同值。
代码示例与注释
// 假设当前页面为 a.example.com,需与 b.example.com 通信
// 将文档域设置为顶级域名,允许跨子域访问
document.domain = 'example.com';// 验证是否设置成功
console.log(document.domain); // 输出: example.com
注意事项
- 仅适用于子域间通信:无法用于完全不同的域名(如
example.com与other.com)。 - 需双方页面同步设置:通信的双方必须同时设置相同的
document.domain值。 - 安全性限制:现代浏览器可能要求域名包含有效的公共后缀(如
example.com而非自定义的localhost)。
总结
CORS需后端配合,简单请求与预检请求的处理逻辑不同。
JSONP仅支持GET请求,安全性较低。
生产环境中避免使用 Access-Control-Allow-Origin: *,应指定具体域名。
大部分浏览器仍支持 document.domain,但部分新版本可能限制其使用。 优先考虑 PostMessage 或 CORS 等更安全的方案。
2、组件间通信方式
在Vue2和Vue3中,组件间通信方式既有共性也有差异。以下是常见方法的分类和实现示例:
Vue2中的组件通信方式
**Props / $emit**
父组件通过props向子组件传递数据,子组件通过$emit触发事件通知父组件。
<!-- 父组件 -->
<template><ChildComponent :message="parentMsg" @update="handleUpdate"/>
</template><script>
export default {data() {return { parentMsg: 'Hello' }},methods: {handleUpdate(val) {this.parentMsg = val}}
}
</script><!-- 子组件 -->
<script>
export default {props: ['message'],methods: {sendMessage() {this.$emit('update', 'New message')}}
}
</script>
$parent / $children
直接访问父/子组件实例(不推荐,破坏组件封装性)。
// 子组件中访问父组件
this.$parent.someMethod()// 父组件中访问子组件
this.$children[0].someMethod()
$refs
通过引用直接操作子组件。
<template><ChildComponent ref="child"/>
</template><script>
export default {methods: {callChildMethod() {this.$refs.child.someMethod()}}
}
</script>
Event Bus
创建一个中央事件总线。
// eventBus.js
import Vue from 'vue'
export const EventBus = new Vue()// 组件A
EventBus.$emit('event-name', data)// 组件B
EventBus.$on('event-name', data => {})
Vuex
状态管理库,适合复杂应用。
// store.js
export default new Vuex.Store({state: { count: 0 },mutations: {increment(state) {state.count++}}
})// 组件中使用
this.$store.commit('increment')
Vue3中的组件通信方式
Props / emits
Vue3中更规范的写法,需要显式声明emits。
父传子基础数据传递
<!-- Parent.vue -->
<template><Child title="用户信息" :userData="user" />
</template><script setup>
import { ref } from 'vue'
const user = ref({ name: '张三', age: 25 })
</script><!-- Child.vue -->
<script setup>
defineProps({title: String,userData: Object
})
</script>
子传父事件触发
<!-- Parent.vue -->
<template><Counter @increment="handleIncrement" />
</template><script setup>
const handleIncrement = (step) => {console.log('收到步长:', step)
}
</script><!-- Counter.vue -->
<script setup>
const emit = defineEmits(['increment'])
const clickHandler = () => {emit('increment', 5)
}
</script>
provide / inject
跨层级组件通信。
// 祖先组件
import { provide } from 'vue'
provide('key', value)// 后代组件
import { inject } from 'vue'
const value = inject('key')
mitt
替代Event Bus的方案。
// event.js
import mitt from 'mitt'
export const emitter = mitt()// 组件A
emitter.emit('event', data)// 组件B
emitter.on('event', data => {})
Pinia
Vue3推荐的状态管理库。
// store.js
export const useStore = defineStore('main', {state: () => ({ count: 0 }),actions: {increment() {this.count++}}
})// 组件中使用
const store = useStore()
store.increment()
Teleport
DOM结构层面的"通信"。
<teleport to="#modal-container"><ModalComponent/>
</teleport>
通用注意事项
- 简单父子通信优先使用
props/emits - 跨层级通信考虑
provide/inject - 全局状态管理在复杂场景下使用Vuex(Pinia)
- 事件总线适用于小型应用,但要注意及时清理监听
- Vue3的组合式API提供了更灵活的代码组织方式
3、微信小程序生命周期
微信小程序原生生命周期
微信小程序的生命周期分为应用级、页面级和组件级三种。
应用生命周期
App({
onLaunch(options) {}, // 初始化时触发,全局只触发一次
onShow(options) {}, // 小程序启动或从后台进入前台时触发
onHide() {}, // 小程序从前台进入后台时触发
onError(error) {}, // 脚本错误或API调用失败时触发
onPageNotFound(res) {} // 页面不存在时触发
})
页面生命周期
Page({
data: {}, // 页面初始数据
onLoad(options) {}, // 页面加载时触发,一个页面只调用一次
onShow() {}, // 页面显示/切入前台时触发
onReady() {}, // 页面初次渲染完成时触发
onHide() {}, // 页面隐藏/切入后台时触发
onUnload() {}, // 页面卸载时触发
onPullDownRefresh() {}, // 下拉刷新时触发
onReachBottom() {}, // 页面上拉触底时触发
onShareAppMessage() {} // 用户点击右上角转发时触发
})
组件生命周期
Component({
lifetimes: {
attached() {}, // 组件实例进入页面节点树时触发
detached() {}, // 组件实例被从页面节点树移除时触发
},
pageLifetimes: {
show() {}, // 组件所在页面显示时触发
hide() {} // 组件所在页面隐藏时触发
}
})
UniApp生命周期
UniApp支持微信小程序的生命周期,同时扩展了Vue的生命周期。
应用生命周期
export default {
onLaunch(options) {}, // 初始化时触发
onShow(options) {}, // 启动或从后台进入前台时触发
onHide() {}, // 从前台进入后台时触发
globalData: {} // 全局数据
}
页面生命周期
export default {
data() { return {} },
onLoad(options) {}, // 页面加载时触发
onShow() {}, // 页面显示时触发
onReady() {}, // 页面初次渲染完成时触发
onHide() {}, // 页面隐藏时触发
onUnload() {}, // 页面卸载时触发
onPullDownRefresh() {}, // 下拉刷新时触发
onReachBottom() {}, // 页面上拉触底时触发
onShareAppMessage() {}, // 用户点击右上角转发时触发
methods: {} // 自定义方法
}
组件生命周期
export default {
props: {},
data() { return {} },
created() {}, // 组件实例刚创建时触发
mounted() {}, // 组件挂载到DOM时触发
destroyed() {}, // 组件销毁时触发
methods: {}
}
生命周期执行顺序
原生小程序页面首次加载时:
onLoad → onShow → onReady
UniApp页面首次加载时:
onLoad → onShow → created → mounted → onReady
组件挂载时:
原生:attached
UniApp:created → mounted
注意事项
- 原生小程序的onLoad和onShow参数包含场景值scene,而UniApp需要通过uni.getLaunchOptionsSync()获取。
- UniApp的页面生命周期与Vue组件生命周期共存,但微信小程序原生组件没有created等Vue生命周期。
- 跨平台开发时建议优先使用UniApp生命周期,如需使用平台特定生命周期,需通过条件编译实现。
4、微信小程序授权登录流程
登录流程
- 自动调用wx.login获取临时code(无需用户授权)
- 用户点击按钮触发wx.getUserProfile获取用户信息(需用户授权)
- 将code和用户加密数据发送到后端换取token
- 保存token和用户信息到本地存储
手机号获取
- 用户点击特殊按钮(open-type=“getPhoneNumber”)触发
- 通过事件对象获取加密数据
- 发送到后端解密获取真实手机号
- 保存手机号到本地存储
uniapp+vue3实现:
<script setup>
import { ref } from 'vue'
import { onLoad } from '@dcloudio/uni-app'const userInfo = ref(null)
const phoneNumber = ref('')
const token = ref('')// 微信登录
const handleLogin = async () => {try {// 1. 获取登录凭证const loginRes = await uni.login()// 2. 获取用户信息(需用户主动触发)const userRes = await uni.getUserProfile({desc: '用于完善会员资料',lang: 'zh_CN'})// 3. 调用后端登录接口const { data } = await uni.request({url: 'YOUR_API_URL/login',method: 'POST',data: {code: loginRes.code,rawData: userRes.rawData,encryptedData: userRes.encryptedData,iv: userRes.iv,signature: userRes.signature}})// 4. 保存登录状态if(data.code === 200) {token.value = data.tokenuserInfo.value = userRes.userInfouni.setStorageSync('token', data.token)uni.setStorageSync('userInfo', userRes.userInfo)uni.showToast({ title: '登录成功' })}} catch (error) {uni.showToast({ title: '登录失败', icon: 'error' })}
}// 获取手机号
const getPhoneNumber = async (e) => {if(!e.detail.code) returntry {const { data } = await uni.request({url: 'YOUR_API_URL/getPhone',method: 'POST',data: { code: e.detail.code }})if(data.code === 200) {phoneNumber.value = data.phoneuni.setStorageSync('phoneNumber', data.phone)}} catch (error) {uni.showToast({ title: '获取手机号失败', icon: 'none' })}
}
</script><template><view class="container"><button @click="handleLogin">微信登录</button><button open-type="getPhoneNumber" @getphonenumber="getPhoneNumber">获取手机号</button></view>
</template>
微信小程序原生实现
// app.js
App({globalData: {userInfo: null,phoneNumber: '',token: ''}
})// pages/login/login.js
Page({data: {loading: false,userInfo: null,phoneNumber: '',token: wx.getStorageSync('token') || ''},onLoad() {if (this.data.token) {this.setData({userInfo: wx.getStorageSync('userInfo')})}},handleLogin() {this.setData({ loading: true })wx.login({success: (res) => {if (res.code) {this._code = res.codewx.getUserProfile({desc: '用于完善会员资料',lang: 'zh_CN',success: (userRes) => {this._requestLogin(userRes)},fail: (err) => {console.error('获取用户信息失败', err)this.setData({ loading: false })}})}},fail: (err) => {console.error('登录失败', err)this.setData({ loading: false })}})},_requestLogin(userRes) {wx.request({url: 'https://your-api.com/login',method: 'POST',data: {code: this._code,rawData: userRes.rawData,encryptedData: userRes.encryptedData,iv: userRes.iv},success: (res) => {if (res.data.code === 200) {this.setData({token: res.data.token,userInfo: userRes.userInfo})wx.setStorageSync('token', res.data.token)wx.setStorageSync('userInfo', userRes.userInfo)}},complete: () => {this.setData({ loading: false })}})},handleGetPhone(e) {if (!e.detail.code) returnif (!this.data.token) returnwx.request({url: 'https://your-api.com/getPhone',method: 'POST',data: { code: e.detail.code },success: (res) => {if (res.data.code === 200) {this.setData({ phoneNumber: res.data.phone })wx.setStorageSync('phoneNumber', res.data.phone)}}})}
})
pages/login/login.wxml
<view class="container"><button bindtap="handleLogin" disabled="{{loading}}"type="primary">{{loading ? '登录中...' : '微信登录'}}</button><button open-type="getPhoneNumber" bindgetphonenumber="handleGetPhone"disabled="{{!token}}"type="primary"style="margin-top: 20px;">获取手机号</button><view wx:if="{{userInfo}}" class="user-info"><image src="{{userInfo.avatarUrl}}" mode="aspectFill"></image><text>{{userInfo.nickName}}</text></view><view wx:if="{{phoneNumber}}" class="phone-info"><text>手机号: {{phoneNumber}}</text></view>
</view>
5、防抖与节流
防抖(Debounce)和节流(Throttle)都是用于优化高频率执行事件的技术,特别是在浏览器环境中处理用户交互(如滚动、输入、调整窗口大小等)时非常有用。
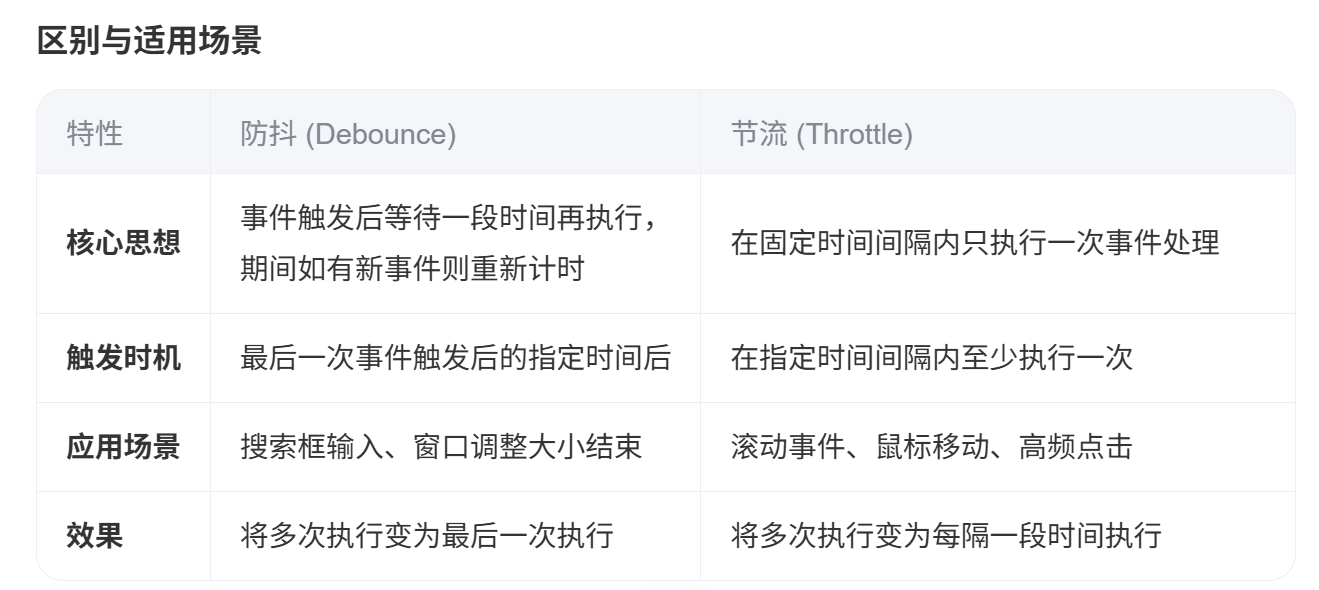
防抖(Debounce)示例
防抖适用于频繁触发的事件(如输入框搜索),只在最后一次操作后延迟执行。
<template><input @input="handleInput" placeholder="输入搜索内容" />
</template><script>
import { debounce } from 'lodash-es';export default {methods: {// 使用lodash的debouncehandleInput: debounce(function(event) {console.log('防抖处理:', event.target.value);// 实际搜索逻辑}, 500),// 手动实现防抖manualDebounce(event) {if (this.timeout) clearTimeout(this.timeout);this.timeout = setTimeout(() => {console.log('手动防抖:', event.target.value);}, 500);}},beforeDestroy() {clearTimeout(this.timeout); // 清除定时器}
};
</script>
节流(Throttle)示例
节流适用于连续触发但需要限制频率的事件(如滚动、窗口大小调整)。
<template><div @scroll="handleScroll" style="height: 200px; overflow-y: scroll"><div style="height: 1000px">滚动区域</div></div>
</template><script>
import { throttle } from 'lodash-es';export default {methods: {// 使用lodash的throttlehandleScroll: throttle(function(event) {console.log('节流滚动事件:', event.target.scrollTop);}, 300),// 手动实现节流manualThrottle(event) {if (!this.throttleFlag) {this.throttleFlag = true;setTimeout(() => {console.log('手动节流:', event.target.scrollTop);this.throttleFlag = false;}, 300);}}},data() {return {throttleFlag: false};}
};
</script>
注意事项
性能优化:推荐使用 lodash-es 的 debounce 或 throttle,避免重复创建函数实例。
生命周期:在 beforeDestroy 或 unmounted 钩子中清除定时器,防止内存泄漏。
Vue 3:在 Composition API 中可结合 onUnmounted 清理:
<script setup>
import { ref, onUnmounted } from 'vue';
import { debounce } from 'lodash-es';const inputValue = ref('');
const debouncedSearch = debounce(() => {console.log('搜索:', inputValue.value);
}, 500);onUnmounted(() => {debouncedSearch.cancel(); // 取消lodash的防抖
});
</script>
拓展
安装 lodash-es 的方法
在 Vue 项目中安装 lodash-es 可以通过 npm 或 yarn 进行安装,以下是具体步骤。
npm install lodash-es
或者使用 yarn:
yarn add lodash-es
使用 lodash-es
安装完成后,可以在 Vue 项目中按需引入 lodash-es 的功能模块。
import { debounce, throttle } from 'lodash-es';
按需加载优化
为了减少打包体积,可以通过 babel 插件 babel-plugin-lodash 实现按需加载。
npm install babel-plugin-lodash --save-dev
然后在 babel.config.js 中配置:
module.exports = {plugins: ['lodash']
};
全局引入(可选)
如果需要全局使用 lodash-es,可以在 Vue 项目的入口文件(如 main.js)中引入并挂载到 Vue 原型上。
import _ from 'lodash-es';
Vue.prototype._ = _;
之后在组件中可以通过 this._ 调用 lodash 的方法。
this._.debounce(() => {// 你的逻辑
}, 300);
注意事项
lodash-es 是 lodash 的 ES 模块版本,更适合现代前端项目。
按需加载可以有效减小打包体积,提升性能。
全局引入会增加打包体积,建议仅在必要时使用。