Security
Security 简介:
Spring 是一个非常流行和成功的 Java 应用开发框架。Spring Security 是 Spring 家族中的一个安全管理框架,提供了一套 Web 应用安全性的完整解决方案。在用户认证方面,Spring Security 框架支持主流的认证方式,包括 HTTP 基本认证、HTTP 表单验证、HTTP 摘要认证、OpenID 和 LDAP(访问协议)等。在用户授权方面,Spring Security 提供了基于角色的访问控制和访问控制列表(Access Control List,ACL),可以对应用中的领域对象进行细粒度的控制。
Spring Security 是针对Spring项目的安全框架,也是Spring Boot底层安全模块默认的技术选型,他可以实现强大的Web安全控制,对于安全控制,我们仅需要引入 spring-boot-starter-security 模块,进行少量的配置,即可实现强大的安全管理!
Spring Security为基于J2EE开发的企业应用软件提供了全面的安全服务,特别是使用Spring开发的企业软件项目,如果你熟悉Spring,尤其是Spring的依赖注入原理,这将帮助你更快掌握Spring Security,目前使用Spring Security有很多原因,通常因为在J2EE的Servlet规范和EJB规范中找不到典型应用场景的解决方案,提到这些规范,特别要指出的是它们不能在WAR或EAR级别进行移植,这样如果你需要更换服务器环境,就要在新的目标环境中进行大量的工作,对你的应用进行重新配置安全,使用Spring Security就解决了这些问题,也为你提供了很多很有用的可定制的安全特性。
Spring Security包含三个主要的组件:SecurityContext、AuthenticationManager、AccessDecisionManager.
记住几个类:
WebSecurityConfigurerAdapter:自定义Security策略
AuthenticationManagerBuilder:自定义认证策略
@EnableWebSecurity:开启WebSecurity模式
Spring Security的两个主要目标是 “认证” 和 “授权”(访问控制):
“认证”(Authentication)
身份验证是关于验证您的凭据,如用户名/用户ID和密码,以验证您的身份。
身份验证通常通过用户名和密码完成,有时与身份验证因素结合使用。
“授权” (Authorization)
授权发生在系统成功验证您的身份后,最终会授予您访问资源(如信息,文件,数据库,资金,位置,几乎任何内容)的完全权限。
这个概念是通用的,而不是只在Spring Security 中存在。
spring security 的核心功能主要包括:
- 认证 (你是谁)
- 授权 (你能干什么)
- 攻击防护 (防止伪造身份)
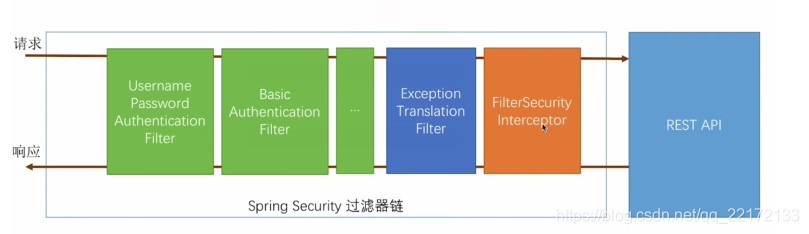
其核心就是一组过滤器链,项目启动后将会自动配置。最核心的就是 Basic Authentication Filter 用来认证用户的身份,一个在spring security中一种过滤器处理一种认证方式。
比如,对于username password认证过滤器来说,
会检查是否是一个登录请求;
是否包含username 和 password (也就是该过滤器需要的一些认证信息) ;
如果不满足则放行给下一个。
下一个按照自身职责判定是否是自身需要的信息,basic的特征就是在请求头中有 Authorization:Basic eHh4Onh4 的信息。中间可能还有更多的认证过滤器。最后一环是 FilterSecurityInterceptor,这里会判定该请求是否能进行访问rest服务,判断的依据是 BrowserSecurityConfig中的配置,如果被拒绝了就会抛出不同的异常(根据具体的原因)。Exception Translation Filter 会捕获抛出的错误,然后根据不同的认证方式进行信息的返回提示。
注意:绿色的过滤器可以配置是否生效,其他的都不能控制。
认证(Authentication)和授权(Authorization)的区别是什么?
Authentication(认证)是验证您的身份的凭据(例如用户名/用户ID和密码),通过这个凭证,系统得以知道系统中存在你这个用户。所以Authentication 被称为身份/用户验证。
Authorization(授权)发生在 Authentication(认证)之后。授权,它主要掌管我们访问系统的权限。比如有些特定资源只能具有权限的人才能访问比如admin,有些对系统资源操作比如删除、添加、更新只能特定人才具有。
这两个一般在我们的系统中被结合在一起使用,目的就是为了保护我们系统的安全性。
比较一下 Spring Security 和 Shiro 各自的优缺点 ?
由于 Spring Boot 官方提供了大量的非常方便的开箱即用的 Starter ,包括 Spring Security 的 Starter ,使得在 Spring Boot 中使用 Spring Security 变得更加容易,甚至只需要添加一个依赖就可以保护所有的接口,所以,如果是 Spring Boot 项目,一般选择 Spring Security 。当然这只是一个建议的组合,单纯从技术上来说,无论怎么组合,都是没有问题的。Shiro 和 Spring Security 相比,主要有如下一些特点:
Spring Security 是一个重量级的安全管理框架;Shiro 则是一个轻量级的安全管理框架
Spring Security 概念复杂,配置繁琐;Shiro 概念简单、配置简单
Spring Security 功能强大;Shiro 功能简单
如何设计一个开放授权平台:
开发授权平台也可以按照认证和授权两个方向来梳理。
1、认证:就可以按照OAuth2.0协议来规划认证的过程
2、授权:首先需要待接入的第三方应用在开放授权平台进行注册,注册需要提供几个必要的信息clintID,消息推送地址,秘钥(一对公私钥,私钥由授权平台自己保存,公钥分发给第三方应用)。
然后,第三方应用引导客户发起请求时,采用公钥进行参数加密,授权开放平台使用对应的私钥解密。
接下来:授权开放平台同步响应第三方应用的只是消息是否处理成功的结果。而真正的业务数据由授权开放平台异步推动给第三方应用预留的推送地址。
什么是认证和授权?如何设计一个权限认证框架?
认证:就是对系统访问者的身份进行确认。用户名密码登录、二维码登录、手机短信登录、指纹、刷脸。。。
授权:就是对系统访问者的行为进行控制。授权通常是在认证之后,对系统内的用户隐私数据进行保护。后台接口访问权限、前台控件的访问权限。
RBAC模型:主题–》角色–》资源–》访问系统的行为。
认证和授权也是对一个权限认证框架进行扩展的两个主要的方面。
UserDetails和UserDetailsService说明:
上面不断提到了UserDetails这个接口,它代表了最详细的用户信息,这个接口涵盖了一些必要的用户信息字段,我们一般都需要对它进行必要的扩展。它和Authentication接口很类似,比如它们都拥有username,authorities,区分他们也是本文的重点内容之一。Authentication的getCredentials()与UserDetails中的getPassword()需要被区分对待,前者是用户提交的密码凭证,后者是用户正确的密码,认证器其实就是对这两者的比对。Authentication中的getAuthorities()实际是由UserDetails的getAuthorities()传递而形成的。还记得Authentication接口中的getUserDetails()方法吗?其中的UserDetails用户详细信息便是经过了AuthenticationProvider之后被填充的
UserDetailsService和AuthenticationProvider两者的职责常常被人们搞混,UserDetailsService只负责从特定的地方加载用户信息,可以是数据库、redis缓存、接口等
Spring Security是如何完成身份认证的:
1)用户名和密码被过滤器获取到,封装成Authentication,通常情况下是UsernamePasswordAuthenticationToken这个实现类。
2)AuthenticationManager 身份管理器负责验证这个Authentication
3)认证成功后,AuthenticationManager身份管理器返回一个被填充满了信息的(包括上面提到的权限信息,身份信息,细节信息,但密码通常会被移除)Authentication实例。
4)SecurityContextHolder安全上下文容器将第3步填充了信息的Authentication,通过SecurityContextHolder.getContext().setAuthentication()方法,设置到其中。
Spring Security是如何完成身份认证的?
1、用户名和密码被过滤器获取到,封装成Authentication,通常情况下是UsernamePasswordAuthenticationToken这个实现类。
2、AuthenticationManager 身份管理器负责验证这个Authentication
3、认证成功后,AuthenticationManager身份管理器返回一个被填充满了信息的(包括上面提到的权限信息,身份信息,细节信息,但密码通常会被移除)Authentication实例。
4、SecurityContextHolder安全上下文容器将第3步填充了信息的Authentication,通过SecurityContextHolder.getContext().setAuthentication(…)方法,设置到其中。
Security 核心组件:
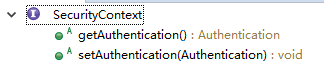
SecurityContext:
安全上下文,用户通过Spring Security 的校验之后,验证信息存储在SecurityContext中,SecurityContext接口只定义了两个方法,实际上其主要作用就是获取Authentication对象(getAuthentication()方法),如果用户未鉴权,那Authentication对象将会是空的。
主要持有Authentication对象,如果用户未鉴权,那Authentication对象将会是空的。该示例可以通过SecurityContextHolder.getContext静态方法获取。
SecurityContext是安全上下文,用户通过Spring Security 的校验之后,验证信息存储在SecurityContext中
当用户通过认证之后,就会为这个用户生成一个唯一的SecurityContext,里面包含用 户的认证信息Authentication。通过SecurityContext我们可以获取到用户的标识 Principle和授权信息GrantedAuthrity。在系统的任何地方只要通过 SecurityHolder.getSecruityContext()就可以获取到SecurityContext。在Shiro中通过 SecurityUtils.getSubject()到达同样的目的
SecurityContextHolder:
保留系统当前的安全上下文细节,其中就包括当前使用系统的用户信息。
每个用户都有自己的SecurityContext,存储在一个SecurityContextHolder中,整个应用就一个SecurityContextHolder。
SecurityContextHolder是SpringSecurity最基本的组件了,是用来存放SecurityContext的对象,默认是使用ThreadLocal实现的,这样就保证了本线程内所有的方法都可以获得SecurityContext对象。
SecurityContextHolder用来获取SecurityContext中保存的数据的工具。通过使用静态方法获取SecurityContext的相对应的数据。
SecurityContextHolder看名知义,是一个holder,用来hold住SecurityContext实例的。在典型的web应用程序中,用户登录一次,然后由其会话ID标识。服务器缓存持续时间会话的主体信息。在Spring Security中,在请求之间存储SecurityContext的责任落在SecurityContextPersistenceFilter上,默认情况下,该上下文将上下文存储为HTTP请求之间的HttpSession属性。它会为每个请求恢复上下文SecurityContextHolder,并且最重要的是,在请求完成时清除SecurityContextHolder。SecurityContextHolder是一个类,他的功能方法都是静态的(static)。
SecurityContextHolder可以设置指定JVM策略(SecurityContext的存储策略),这个策略有三种:
-
MODE_THREADLOCAL:SecurityContext 存储在线程中。
-
MODE_INHERITABLETHREADLOCAL:SecurityContext 存储在线程中,但子线程可以获取到父线程中的 SecurityContext。
-
MODE_GLOBAL:SecurityContext 在所有线程中都相同。
SecurityContextHolder默认使用MODE_THREADLOCAL模式,即存储在当前线程中。
SecurityContext context = SecurityContextHolder.getContext();
SecurityContextHolder它持有的是安全上下文(security context)的信息。当前操作的用户是谁,该用户是否已经被认证,他拥有哪些角色权等等,这些都被保存在SecurityContextHolder中。SecurityContextHolder默认使用ThreadLocal 策略来存储认证信息。看到ThreadLocal 也就意味着,这是一种与线程绑定的策略。在web环境下,Spring Security在用户登录时自动绑定认证信息到当前线程,在用户退出时,自动清除当前线程的认证信息。
获取用户信息:
//test1
Authentication authentication = SecurityContextHolder.getContext().getAuthentication();
if (!authentication.isAuthenticated()){return null;
}Object principal = authentication.getPrincipal();
String username = null;
if (principal instanceof org.springframework.security.core.userdetails.UserDetails){username = ((UserDetails) principal).getUsername();
}else {username = principal.toString();
}
return username;//test2
Object principal = SecurityContextHolder.getContext().getAuthentication().getPrincipal();if (principal instanceof UserDetails) {
String username = ((UserDetails)principal).getUsername();
} else {
String username = principal.toString();
}
getAuthentication()返回认证信息getPrincipal()返回身份信息。UserDetails是Spring对身份信息封装的一个接口
安全上下文 SecurityContext
不知道你有没有留意Spring Security 实战干货:使用 JWT 认证访问接口[4] 中是如何实现 JWT 认证拦截器 JwtAuthenticationFilter 。当服务端对 JWT Token 认证通过后,会将认证用户的信息封装到 UsernamePasswordAuthenticationToken 中 并使用工具类放入安全上下文 SecurityContext 中,当服务端响应用户后又使用同一个工具类将 UsernamePasswordAuthenticationToken 从 SecurityContext 中 clear 掉。我们来简单了解 SecurityContext 具体是个什么东西。
package org.springframework.security.core.context;
import java.io.Serializable;
import org.springframework.security.core.Authentication; public interface SecurityContext extends Serializable {     Authentication getAuthentication();     void setAuthentication(Authentication var1);
}
从源码上来看很简单就是一个 存储 Authentication 的容器。而 Authentication 是一个用户凭证接口用来作为用户认证的凭证使用,通常常用的实现有 认证用户 UsernamePasswordAuthenticationToken 和 匿名用户AnonymousAuthenticationToken。其中 UsernamePasswordAuthenticationToken 包含了 UserDetails , AnonymousAuthenticationToken 只包含了一个字符串 anonymousUser 作为匿名用户的标识。我们通过 SecurityContext 获取上下文时需要来进行类型判断。接下来我们来聊聊操作 SecurityContext 的工具类。
SecurityContext的工具类就是 SecurityContextHolder 。它提供了两个有用的方法:
- setContext 设置当前的 SecurityContext
- getContext 获取当前的 SecurityContext , 进而你可以获取到当前认证用户。
- clearContext 清除当前的 SecurityContext
平常我们通过这三个方法来操作安全上下文 SecurityContext 。你可以直接在代码中使用工具类 SecurityContextHolder 获取用户信息,像下面一样:
public String getCurrentUser() {    Authentication authentication = SecurityContextHolder.getContext().getAuthentication();     if (authentication instanceof AnonymousAuthenticationToken){         return "anonymousUser";     }    UserDetails principal = (UserDetails) authentication.getPrincipal();    return principal.getUsername();
}
通过上面的自定义方法就可以解析到 UserDetails 的用户信息,你可以扩展 UserDetails 使得信息符合你的业务需要。上面方法中的判断是必须的,如果是匿名用户(AnonymousAuthenticationToken)返回的 Principal 类型是一个字符串 anonymousUser 。
SecurityContextHolder 存储策略:
这里也扩展一下知识面,简单讲一下 SecurityContextHolder 是如何存储 SecurityContext 的。SecurityContextHolder 默认有三种存储 SecurityContext 的策略:
- MODE_THREADLOCAL 利用 ThreadLocal 机制来保存每个使用者的 SecurityContext ,缺省策略,平常我们使用这个就行了。
- MODE_INHERITABLETHREADLOCAL 利用 InheritableThreadLocal 机制来保存每个使用者的 SecurityContext 。 多用于多线程环境环境下。
- MODE_GLOBAL 静态机制,作用域为全局。 目前不太常用。
SecurityContext 是 Spring Security 中的一个非常重要类,今天不但介绍 SecurityContext 是什么、有什么作用,也对以前讲过的一些知识进行回顾。也对如何使用 SecurityContextHolder 操作 SecurityContext 进行了讲解。最后也简单讲述了 SecurityContextHolder 三种存储 SecurityContext 的策略和使用场景 。
SecurityContextHolder & SecurityContext

SecurityContextHolder用来存储一次访问的用户信息
SecurityContextHolder通过ThreadLocal来实现,所以是线程安全的
SecurityContextHolder包含了SecurityContext,而SecurityContext包含Autherntication.
SecurityContext context = SecurityContextHolder.createEmptyContext();
Authentication authentication = new TestingAuthenticationToken("username", "password", "ROLE_USER");
context.setAuthentication(authentication);
SecurityContextHolder.setContext(context);
SecurityContextHolder的工作原理:
缺省工作模式 MODE_THREADLOCAL(mode_threadlocal,翻译:本地模式)
我们知道,一个应用同时可能有多个使用者,每个使用者对应不同的安全上下文,那么SecurityContextHolder是怎么保存这些安全上下文的呢 ?缺省情况下,SecurityContextHolder使用了ThreadLocal机制来保存每个使用者的安全上下文。这意味着,只要针对某个使用者的逻辑执行都是在同一个线程中进行,即使不在各个方法之间以参数的形式传递其安全上下文,各个方法也能通过SecurityContextHolder工具获取到该安全上下文。只要在处理完当前使用者的请求之后注意清除ThreadLocal中的安全上下文,这种使用ThreadLocal的方式是很安全的。当然在Spring Security中,这些工作已经被Spring Security自动处理,开发人员不用担心这一点。
这里提到的SecurityContextHolder基于ThreadLocal的工作方式天然很适合Servlet Web应用,因为缺省情况下根据Servlet规范,一个Servlet request的处理不管经历了多少个Filter,自始至终都由同一个线程来完成。
注意 : 这里讲的是一个Servlet request的处理不管经历了多少个Filter,自始至终都由同一个线程来完成;而对于同一个使用者的不同Servlet request,它们在服务端被处理时,使用的可不一定是同一个线程(存在由同一个线程处理的可能性但不确保)。
其他工作模式:
有一些应用并不适合使用ThreadLocal模式,那么还能不能使用SecurityContextHolder了呢?答案是可以的。SecurityContextHolder还提供了其他工作模式。
比如有些应用,像Java Swing客户端应用,它就可能希望JVM中所有的线程使用同一个安全上下文。此时我们可以在启动阶段将SecurityContextHolder配置成全局策略MODE_GLOBAL。
还有其他的一些应用会有自己的线程创建,并且希望这些新建线程也能使用创建者的安全上下文。这种效果,可以通过将SecurityContextHolder配置成MODE_INHERITABLETHREADLOCAL策略达到。
修改SecurityContextHolder的工作模式
综上所述,SecurityContextHolder可以工作在以下三种模式之一:
- MODE_THREADLOCAL (缺省工作模式)
- MODE_GLOBAL(mode_global)
- MODE_INHERITABLETHREADLOCAL(mode_inheritablethreadlocal,翻译:可继承的线程本地 模式)
修改SecurityContextHolder的工作模式有两种方法 :
- 设置一个系统属性(system.properties) : spring.security.strategy;
SecurityContextHolder会自动从该系统属性中尝试获取被设定的工作模式
- 调用SecurityContextHolder静态方法setStrategyName()
程序化方式主动设置工作模式的方法
SecurityContextHolder存储SecurityContext的方式:
1 单机系统:应用从开启到关闭的整个生命周期只有一个用户在使用。由于整个应用只需要保存一个SecurityContext(安全上下文即可)。
2 多用户系统,比如典型的Web系统,整个生命周期可能同时有多个用户在使用。这时候应用需要保存多个SecurityContext(安全上下文),需要利用ThreadLocal进行保存,每个线程都可以利用ThreadLocal获取其自己的SecurityContext,及安全上下文。
SecurityContextHolder
SecurityContextHolder利用了一个SecurityContextHolderStrategy(存储策略)进行上下文的存储。
SecurityContestHolderStrategy.java
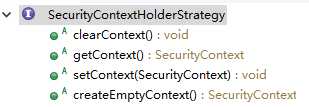
SecurityContextHolderStrategy只是一个接口,这个接口提供创建,清空,获取,设置上下文的操作。以下是其实现类和存储策略。
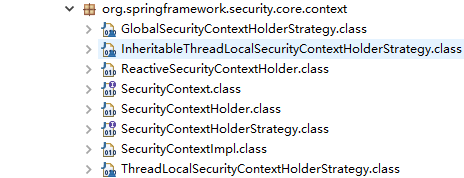
GlobalSecurityContextHolderStrategy(全部源码)
全局的上下文存取策略,只存储一个上下文,对应前面说的单机系统。
ThreadLocalSecurityContextHolderStrategy基于ThreadLocal的存储策略的实现,ThreadLocal实际上用数组存储多个SecurityCentext上下文对象。原理是,ThreadLocal会为每个线程开辟一个存储区域,来存储相应的对象。
使用SecurityContextHolder 获取当前用户信息
在SecurityContextHolder中保存的是当前访问者的信息。Spring Security使用一个Authentication对象来表示这个信息。一般情况下,我们都不需要创建这个对象,在登录过程中,Spring Security已经创建了该对象并帮我们放到了SecurityContextHolder中。从SecurityContextHolder中获取这个对象也是很简单的。比如,获取当前登录用户的用户名,可以这样 :
// 获取安全上下文对象,就是那个保存在 ThreadLocal 里面的安全上下文对象
// 总是不为null(如果不存在,则创建一个authentication属性为null的empty安全上下文对象)
SecurityContext securityContext = SecurityContextHolder.getContext();// 获取当前认证了的 principal(当事人),或者 request token (令牌)
// 如果没有认证,会是 null,该例子是认证之后的情况
Authentication authentication = securityContext.getAuthentication()// 获取当事人信息对象,返回结果是 Object 类型,但实际上可以是应用程序自定义的带有更多应用相关信息的某个类型。
// 很多情况下,该对象是 Spring Security 核心接口 UserDetails 的一个实现类,你可以把 UserDetails 想像
// 成我们数据库中保存的一个用户信息到 SecurityContextHolder 中 Spring Security 需要的用户信息格式的
// 一个适配器。
Object principal = authentication.getPrincipal();
if (principal instanceof UserDetails) {String username = ((UserDetails)principal).getUsername();
} else {String username = principal.toString();
}
使用jwt实现登录功能的时候,我们可以将用户信息保存在安全上下文中
@Overridepublic String login(String username, String password) {String token = null;//密码需要客户端加密后传递try {UserDetails userDetails = loadUserByUsername(username);if(!password.equals(BasicEncryptUtils.decryptByRSA(userDetails.getPassword()))){throw new ServiceException("password.is.not.correct", ResultCode.VALIDATE_FAILED.getCode());}//根据userDetails构建新的AuthenticationUsernamePasswordAuthenticationToken authentication = new UsernamePasswordAuthenticationToken(userDetails, null, userDetails.getAuthorities());//存放authentication到SecurityContextHolderSecurityContextHolder.getContext().setAuthentication(authentication);//使用jwt生成tokentoken = jwtTokenUtil.generateToken(userDetails, RsaUtils.getPrivateKey(propertiesUtils.getPrivateKeyUrl()));//到redis中查看该账号是否之前已经登录if (redisUtil.getValueByKey(CommonConstant.ormis_online_login_user_info+username)!=null){//删掉对应的数据redisUtil.deleteCache(CommonConstant.ormis_online_login_user_info+username);}//重新存储redisUtil.set(CommonConstant.ormis_online_login_user_info+username,token,propertiesUtils.getExpiration());} catch (Exception e) {log.error("login error is {}", e.getMessage());throw new ServiceException(e.getMessage(), ResultCode.VALIDATE_FAILED.getCode());}return token;}
由上面代码可以发现我们获取用户的信息之后,通过SecurityContextHolder.getContext().setAuthentication(authentication);方式将用户相关的信息存放到系统的安全上下文中,并且由于 SecurityContextHolder默认是mode_threadlocal模式,那么会将所有登录的用户信息都保存,每个登录的用户都可以通过SecurityContextHolder.getContext().getAuthentication();方式获取
当前自己保存的用户信息
SecurityContextHolder源码:
本文源代码基于 Spring Security Core 4.x.x
package org.springframework.security.core.context;import org.springframework.util.ReflectionUtils;
import org.springframework.util.StringUtils;import java.lang.reflect.Constructor;/*** 将一个给定的SecurityContext绑定到当前执行线程。* * This class provides a series of static methods that delegate to an instance of* org.springframework.security.core.context.SecurityContextHolderStrategy. The* purpose of the class is to provide a convenient way to specify the strategy that should* be used for a given JVM. This is a JVM-wide setting, since everything in this class is* static to facilitate ease of use in calling code.* * To specify which strategy should be used, you must provide a mode setting. A mode* setting is one of the three valid MODE_ settings defined as* static final fields, or a fully qualified classname to a concrete* implementation of* org.springframework.security.core.context.SecurityContextHolderStrategy that* provides a public no-argument constructor.* * There are two ways to specify the desired strategy mode String. The first* is to specify it via the system property keyed on #SYSTEM_PROPERTY. The second* is to call #setStrategyName(String) before using the class. If neither approach* is used, the class will default to using #MODE_THREADLOCAL, which is backwards* compatible, has fewer JVM incompatibilities and is appropriate on servers (whereas* #MODE_GLOBAL is definitely inappropriate for server use).** @author Ben Alex**/
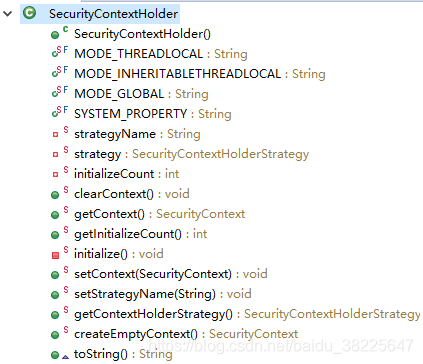
public class SecurityContextHolder {// ~ Static fields/initializers// =====================================================================================// 三种工作模式的定义,每种工作模式对应一种策略public static final String MODE_THREADLOCAL = "MODE_THREADLOCAL";public static final String MODE_INHERITABLETHREADLOCAL = "MODE_INHERITABLETHREADLOCAL";public static final String MODE_GLOBAL = "MODE_GLOBAL";// 类加载时首先尝试从环境属性中获取所指定的工作模式public static final String SYSTEM_PROPERTY = "spring.security.strategy"; private static String strategyName = System.getProperty(SYSTEM_PROPERTY);private static SecurityContextHolderStrategy strategy;// 初始化计数器,初始为0,// 1. 类加载过程中会被初始化一次,此值变为1// 2. 此后每次调用 setStrategyName 会对新的策略对象执行一次初始化,相应的该值会增1private static int initializeCount = 0;static {initialize();}// ~ Methods// =====================================================================================/*** Explicitly clears the context value from the current thread.*/public static void clearContext() {strategy.clearContext();}/*** Obtain the current SecurityContext.** @return the security context (never null)*/public static SecurityContext getContext() {return strategy.getContext();}/*** Primarily for troubleshooting purposes, this method shows how many times the class* has re-initialized its SecurityContextHolderStrategy.** @return the count (should be one unless you've called* #setStrategyName(String) to switch to an alternate strategy.*/public static int getInitializeCount() {return initializeCount;}private static void initialize() {if (!StringUtils.hasText(strategyName)) {// Set default, 设置缺省工作模式/策略 MODE_THREADLOCALstrategyName = MODE_THREADLOCAL;}if (strategyName.equals(MODE_THREADLOCAL)) {strategy = new ThreadLocalSecurityContextHolderStrategy();}else if (strategyName.equals(MODE_INHERITABLETHREADLOCAL)) {strategy = new InheritableThreadLocalSecurityContextHolderStrategy();}else if (strategyName.equals(MODE_GLOBAL)) {strategy = new GlobalSecurityContextHolderStrategy();}else {// Try to load a custom strategytry {Class<?> clazz = Class.forName(strategyName);Constructor<?> customStrategy = clazz.getConstructor();strategy = (SecurityContextHolderStrategy) customStrategy.newInstance();}catch (Exception ex) {ReflectionUtils.handleReflectionException(ex);}}initializeCount++;}/*** Associates a new SecurityContext with the current thread of execution.** @param context the new SecurityContext (may not be null)*/public static void setContext(SecurityContext context) {strategy.setContext(context);}/*** Changes the preferred strategy. Do NOT call this method more than once for* a given JVM, as it will re-initialize the strategy and adversely affect any* existing threads using the old strategy.** @param strategyName the fully qualified class name of the strategy that should be* used.*/public static void setStrategyName(String strategyName) {SecurityContextHolder.strategyName = strategyName;initialize();}/*** Allows retrieval of the context strategy. See SEC-1188.** @return the configured strategy for storing the security context.*/public static SecurityContextHolderStrategy getContextHolderStrategy() {return strategy;}/*** Delegates the creation of a new, empty context to the configured strategy.*/public static SecurityContext createEmptyContext() {return strategy.createEmptyContext();}public String toString() {return "SecurityContextHolder[strategy='" + strategyName + "'; initializeCount="+ initializeCount + "]";}
}
Authentication:
啊反提K神
Authentication(认证信息),主要包含了以下内容
- 用户权限集合 => 可用于访问受保护资源时的权限验证
- 用户证书(密码) => 初次认证的时候,进行填充,认证成功后将被清空
- 细节 => 暂不清楚,猜测应该是记录哪些保护资源已经验证授权,下次不用再验证,等等。
- Pirncipal => 大概就是账号吧
- 是否已认证成功
**Authentication:**用户信息的表示,SecurityContextHolder存储了当前与系统交互的用户信息。Principal(准则)=> 允许通过的规则,即允许访问的规则,基本等价于UserDetails(用户信息)。SecurityContext只保存了Authentication的信息。

Authentication 直译过来是“认证”的意思,在Spring Security 中Authentication用来表示当前用户是谁,一般来讲你可以理解为authentication就是一组用户名密码信息。Authentication也是一个接口。
接口有4个get方法,分别获取:
Authorities, 填充的是用户角色信息。
Credentials,直译,证书。填充的是密码。
Details ,用户信息。
Principal 直译,形容词是“主要的,最重要的”,名词是“负责人,资本,本金”。感觉很别扭,所以,还是不翻译了,直接用原词principal来表示这个概念,其填充的是用户名。
因此可以推断其实现类有这4个属性。这几个方法作用如下:
getAuthorities: 获取用户权限,一般情况下获取到的是用户的角色信息。
getCredentials: 获取证明用户认证的信息,通常情况下获取到的是密码等信息。
getDetails: 获取用户的额外信息,(这部分信息可以是我们的用户表中的信息)
getPrincipal: 获取用户身份信息,在未认证的情况下获取到的是用户名,在已认证的情况下获取到的是 UserDetails (UserDetails也是一个接口,里边的方法有getUsername,getPassword等)。
isAuthenticated: 获取当前 Authentication 是否已认证。
setAuthenticated: 设置当前 Authentication 是否已认证(true or false)。
Authenticatioin中包含了如下信息:
Authorities用户权限集合:可用于访问受保护资源时的权限验证
Credentials:证明委托人的凭据是正确的。这通常是一个密码,但可以是与Authentication Manager相关的任何内容。调用者被期望填充凭证。
Details细节:存储有关身份验证请求的其他详细信息。这些可能是ip地址、证书序列号等。
Pirncipal:被认证主体的身份。对于具有用户名和密码的authentication request,这就是用户名。调用者将填充身份验证请求的主体。Authentication Manager实现通常会返回一个包含丰富信息的身份验证,作为应用程序使用的主体。许多身份验证提供者将创建一个UserDetails对象作为主体。
isAuthenticated:是否已认证成功。
Authorities鉴权对象,该对象主要包含了用户的详细信息(UserDetails)和用户鉴权时所需要的信息,如用户提交的用户名密码、Remember-me Token,或者digest hash值等,按不同鉴权方式使用不同的Authentication实现。
-
Authentication是spring security包中的接口,直接继承自Principal类,而Principal是位于java.security包中的。可以见得,Authentication在spring security中是最高级别的身份/认证的抽象。
-
由这个顶级接口,我们可以得到用户拥有的权限信息列表,密码,用户细节信息,用户身份信息,认证信息。
public interface Authentication extends Principal, Serializable {
//权限信息列表,默认是GrantedAuthority接口的一些实现类,通常是代表权限信息的一系列字符串。Collection<? extends GrantedAuthority> getAuthorities();
//密码信息,用户输入的密码字符串,在认证过后通常会被移除,用于保障安全Object getCredentials();
//细节信息,web应用中的实现接口通常为 WebAuthenticationDetails,它记录了访问者的ip地址和sessionId的值。Object getDetails();
//最重要的身份信息,大部分情况下返回的是UserDetails接口的实现类,也是框架中的常用接口之一。Object getPrincipal();boolean isAuthenticated();void setAuthenticated(boolean var1) throws IllegalArgumentException;
}
- 案例说明:获取用户信息
//getAuthentication()返回了认证信息
//getPrincipal()返回了身份信息,UserDetails便是Spring对身份信息封装的一个接口。
Object principal =SecurityContextHolder.getContext().getAuthentication().getPrincipal();if (principal instanceof UserDetails) {String username = ((UserDetails)principal).getUsername();} else {String username = principal.toString();
/*** Authentication在spring security中是最高级别的身份/认证的抽象*/
public interface Authentication extends Principal, Serializable {/*** 权限信息列表,GrantedAuthority的实现类* @return*/Collection<? extends GrantedAuthority> getAuthorities();/*** 密码信息,用户输入的密码字符串,在认证过后通常会被移除,用于保障安全。* @return*/Object getCredentials();/*** 细节信息,web应用中的实现接口通常为 WebAuthenticationDetails,它记录了访问者的ip地址和sessionId的值* @return*/Object getDetails();/*** 身份信息* @return*/Object getPrincipal();/*** 是否认证* @return*/boolean isAuthenticated();/*** 设置是否认证* @param isAuthenticated* @throws IllegalArgumentException*/void setAuthenticated(boolean isAuthenticated) throws IllegalArgumentException;
}
Authentication是一个接口,用来表示用户认证信息。
该对象主要包含了用户的详细信息(UserDetails)和用户鉴权时所需要的信息,如用户提交的用户名密码、Remember-me Token,或者digest hash值等。按不同鉴权方式使用不同的Authentication实现。
在用户登录认证之前相关信息会封装为一个Authentication具体实现类的对象,在登录认证成功之后又会生成一个信息更全面,包含用户权限等信息的Authentication对象,然后把它保存在 SecurityContextHolder所持有的SecurityContext中,供后续的程序进行调用,如访问权限的鉴定等。
接口中的方法:
从这个接口中,我们可以得到用户身份信息,密码,细节信息,认证信息,以及权限列表,具体的详细解读如下:
-
getAuthorities(): 用户权限信息(权限列表),通常是代表权限的字符串列表;
-
getCredentials(): 用户认证信息(密码信息),由用户输入的密码凭证,认证之后会移出,来保证安全性;
-
getDetails(): 细节信息,Web应用中一般是访问者的ip地址和sessionId;
-
getPrincipal(): 用户身份信息,在未认证的情况下获取到的是用户名,在已认证的情况下获取到的是 UserDetails (UserDetails也是一个接口,里边的方法有getUsername,getPassword等);
-
isAuthenticated: 获取当前 Authentication 是否已认证;
-
setAuthenticated: 设置当前 Authentication 是否已认证(true or false)。
官方文档里说过,当用户提交登陆信息时,会将用户名和密码进行组合成一个实例UsernamePasswordAuthenticationToken,而这个类是Authentication的一个常用的实现类,用来进行用户名和密码的认证,类似的还有RememberMeAuthenticationToken,它用于记住我功能。
先看看这个接口的源码长什么样:
package org.springframework.security.core;// <1>public interface Authentication extends Principal, Serializable { // <1>Collection<? extends GrantedAuthority> getAuthorities(); // <2>Object getCredentials();// <2>Object getDetails();// <2>Object getPrincipal();// <2>boolean isAuthenticated();// <2>void setAuthenticated(boolean var1) throws IllegalArgumentException;
}
<1> Authentication是spring security包中的接口,直接继承自Principal类,而Principal是位于java.security包中的。可以见得,Authentication在spring security中是最高级别的身份/认证的抽象。
<2> 由这个顶级接口,我们可以得到用户拥有的权限信息列表,密码,用户细节信息,用户身份信息,认证信息。
还记得1.1节中,authentication.getPrincipal()返回了一个Object,我们将Principal强转成了Spring Security中最常用的UserDetails,这在Spring Security中非常常见,接口返回Object,使用instanceof判断类型,强转成对应的具体实现类。接口详细解读如下:
- getAuthorities(),权限信息列表,默认是GrantedAuthority接口的一些实现类,通常是代表权限信息的一系列字符串。
- getCredentials(),密码信息,用户输入的密码字符串,在认证过后通常会被移除,用于保障安全。
- getDetails(),细节信息,web应用中的实现接口通常为 WebAuthenticationDetails,它记录了访问者的ip地址和sessionId的值。
- getPrincipal(),敲黑板!!!最重要的身份信息,大部分情况下返回的是UserDetails接口的实现类,也是框架中的常用接口之一。UserDetails接口将会在下面的小节重点介绍。
认证对象,用来封装用户的认证信息(账户状态,用户名,密码,权限等)所有提交给AuthenticationManager的认证请求都会被封装成一个Token的实现,比如 最容易理解的UsernamePasswordAuthenticationToken,其中包含了用户名和密码:
Authentication常用的实现类:
UsernamePasswordAuthenticationToken:用户名密码登录的Token
AnonymousAuthenticationToken:针对匿名用户的Token
RememberMeAuthenticationToken:记住我功能的的Token
UserDetails:
UserDetails,看命知义,是用户信息的意思。其存储的就是用户信息。
UserDetails:构建Authentication对象必须的信息,可以自定义,可能需要访问DB得到
这个接口规范了用户详细信息所拥有的字段,譬如用户名、密码、账号是否过期、是否锁定等。在Spring Security中,获取当前登录的用户的信息,一般情况是需要在这个接口上面进行扩展,用来对接自己系统的用户
其接口方法含义如下:
getAuthorites:获取用户权限,本质上是用户的角色信息。
getPassword: 获取密码。
getUserName: 获取用户名。
isAccountNonExpired: 账户是否过期。
isAccountNonLocked: 账户是否被锁定。
isCredentialsNonExpired: 密码是否过期。
isEnabled: 账户是否可用。
这个接口规范了用户详细信息所拥有的字段,譬如用户名、密码、账号是否过期、是否锁定等。在Spring Security中,获取当前登录的用户的信息,一般情况是需要在这个接口上面进行扩展,用来对接自己系统的用户
public interface UserDetails extends Serializable {Collection<? extends GrantedAuthority> getAuthorities();
//返回用户认证用户的密码String getPassword();String getUsername();boolean isAccountNonExpired();boolean isAccountNonLocked();boolean isCredentialsNonExpired();boolean isEnabled();
}
public interface UserDetails extends Serializable {Collection<? extends GrantedAuthority> getAuthorities();
String getPassword();
String getUsername();
boolean isAccountNonExpired();
boolean isAccountNonLocked();
boolean isCredentialsNonExpired();
boolean isEnabled();
}
UserDetails接口,它代表了最详细的用户信息
public interface UserDetails extends Serializable {/*** 权限* @return*/Collection<? extends GrantedAuthority> getAuthorities();/*** 密码* @return*/String getPassword();/*** 用户名* @return*/String getUsername();/*** 是否账号过期* @return*/boolean isAccountNonExpired();/*** 是否锁定* @return*/boolean isAccountNonLocked();/*** 用户凭证(密码)是否过期* @return*/boolean isCredentialsNonExpired();/*** 启用禁用* @return*/boolean isEnabled();
}
上面不断提到了UserDetails这个接口,它代表了最详细的用户信息,这个接口涵盖了一些必要的用户信息字段,具体的实现类对它进行了扩展。
public interface UserDetails extends Serializable {Collection<? extends GrantedAuthority> getAuthorities();String getPassword();String getUsername();boolean isAccountNonExpired();boolean isAccountNonLocked();boolean isCredentialsNonExpired();boolean isEnabled();
}
它和Authentication接口很类似,比如它们都拥有username,authorities,区分他们也是本文的重点内容之一。Authentication的getCredentials()与UserDetails中的getPassword()需要被区分对待,前者是用户提交的密码凭证,后者是用户正确的密码,认证器其实就是对这两者的比对。Authentication中的getAuthorities()实际是由UserDetails的getAuthorities()传递而形成的。还记得Authentication接口中的getUserDetails()方法吗?其中的UserDetails用户详细信息便是经过了AuthenticationProvider之后被填充的。
UserDetailService:
用户认证通过Provider来做,所以Provider需要拿到系统已经保存的认证信息,获取用户信息的接口spring-security抽象成UserDetailService。
提到了UserDetails就必须得提到UserDetailsService, UserDetailsService也是一个接口。
接口只有一个方法:
loadUserByUsername:用来获取UserDetails。
通常在spring security应用中,我们会自定义一个CustomUserDetailsService来实现UserDetailsService接口,并实现其public UserDetails loadUserByUsername(final String login);方法。我们在实现loadUserByUsername方法的时候,就可以通过查询数据库(或者是缓存、或者是其他的存储形式)来获取用户信息,然后组装成一个UserDetails,(通常是一个org.springframework.security.core.userdetails.User,它继承自UserDetails) 并返回。
用户登陆时传递的用户名和密码也是通过这里这查找出来的用户名和密码进行校验,但是真正的校验不在这里,而是由AuthenticationManager以及AuthenticationProvider负责的,需要强调的是,如果用户不存在,不应返回NULL,而要抛出异常org.springframework.security.core.userdetails.UsernameNotFoundException。
UserDetails这个接口,它代表了最详细的用户信息,这个接口涵盖了一些必要的用户信息字段,我们一般都需要对它进行必要的扩展。它和Authentication接口很类似,比如它们都拥有username,authorities,区分他们也是本文的重点内容之一。Authentication的getCredentials()与UserDetails中的getPassword()需要被区分对待,前者是用户提交的密码凭证,后者是用户正确的密码,认证器其实就是对这两者的比对。Authentication中的getAuthorities()实际是由UserDetails的getAuthorities()传递而形成的。还记得Authentication接口中的getUserDetails()方法吗?其中的UserDetails用户详细信息便是经过了AuthenticationProvider之后被填充的
UserDetailsService和AuthenticationProvider两者的职责常常被人们搞混,UserDetailsService只负责从特定的地方加载用户信息,可以是数据库、redis缓存、接口等。
public interface UserDetailsService {UserDetails loadUserByUsername(String username) throws UsernameNotFoundException;
}
UserDetailsService 和 AuthenticationProvider两者的职责常常被人们搞混,关于他们的问题在文档的FAQ和issues中屡见不鲜。记住一点即可,敲黑板!!!
UserDetailsService只负责从特定的地方(通常是数据库)加载用户信息,仅此而已,记住这一点,可以避免走很多弯路。UserDetailsService常见的实现类有JdbcDaoImpl,InMemoryUserDetailsManager,前者从数据库加载用户,后者从内存中加载用户,也可以自己实现UserDetailsService,通常这更加灵活。
UserDetailsService:通过username构建UserDetails对象,通过loadUserByUsername根据userName获取UserDetail对象 (可以在这里基于自身业务进行自定义的实现 如通过数据库,xml,缓存获取等)
通过扩展这个接口来显示获取我们的用户信息,用户登陆时传递的用户名和密码也是通过这里这查找出来的用户名和密码进行校验,但是真正的校验不在这里,而是由AuthenticationManager以及AuthenticationProvider负责的,需要强调的是,如果用户不存在,不应返回NULL,而要抛出异常UsernameNotFoundException
用户的认证通过Provider来完成,而Provider会通过UserDetailService拿到数据库(或 内存)中的认证信息然后和客户端提交的认证信息做校验。虽然叫Service,但是我更愿 意把它认为是我们系统里经常有的UserDao。
通常在spring security应用中,我们会自定义一个CustomUserDetailsService来实现UserDetailsService接口,并实现其public UserDetails loadUserByUsername(final String login);方法。我们在实现loadUserByUsername方法的时候,就可以通过查询数据库(或者是缓存、或者是其他的存储形式)来获取用户信息,然后组装成一个UserDetails,(通常是一个org.springframework.security.core.userdetails.User,它继承自UserDetails) 并返回。
在实现loadUserByUsername方法的时候,如果我们通过查库没有查到相关记录,需要抛出一个异常来告诉spring security来“善后”。这个异常是org.springframework.security.core.userdetails.UsernameNotFoundException。
**这个接口只提供一个接口:**loadUserByUsername(String username),这个接口非常重要,一般情况我们都是通过扩展这个接口来显示获取我们的用户信息,用户登陆时传递的用户名和密码也是通过这里这查找出来的用户名和密码进行校验,但是真正的校验不在这里,而是由AuthenticationManager以及AuthenticationProvider负责的,需要强调的是,如果用户不存在,不应返回NULL,而要抛出异常UsernameNotFoundException
AuthenticationManager:
啊反提K神 买嫩着:身份验证管理器
AuthenticationManager 的作用就是校验Authentication,如果验证失败会抛出AuthenticationException异常。AuthenticationException是一个抽象类,因此代码逻辑并不能实例化一个AuthenticationException异常并抛出,实际上抛出的异常通常是其实现类,如DisabledException,LockedException,BadCredentialsException等。
BadCredentialsException可能会比较常见,即密码错误的时候。AuthenticationManager 其中可以包含多个AuthenticationProvider
AuthenticationManager 是用于身份认证的主要策略接口,它仅有一个方法;
public interface AuthenticationManager {Authentication authenticate(Authentication authentication)throws AuthenticationException;
}
该接口的方法,可以返回下面的三种数据的任何一个:
- authenticated=true
如果认为输入的主体(可以理解为用户),是有效的,即账号密码角色都对,则验证通过,返回 authenticated=true ;
- AuthenticationException
如果验证没有通过没,则抛出一个 AuthenticationException 异常,这个异常是一个运行时异常,官网文档里面建议,不需要我们代码中捕捉然后处理,我们应该做一个统一处理,让其跳到特定页面(网站全局异常页面)
- null
如果无法决定是否验证成功,则返回 null,为什么会出现无法决定呢,因为一个 AuthenticationManager 实例,可能只管理一部分身份的验证,另外一些身份验证有其他 AuthenticationManager 实例验证,因此这时候,就会返回一个 null;
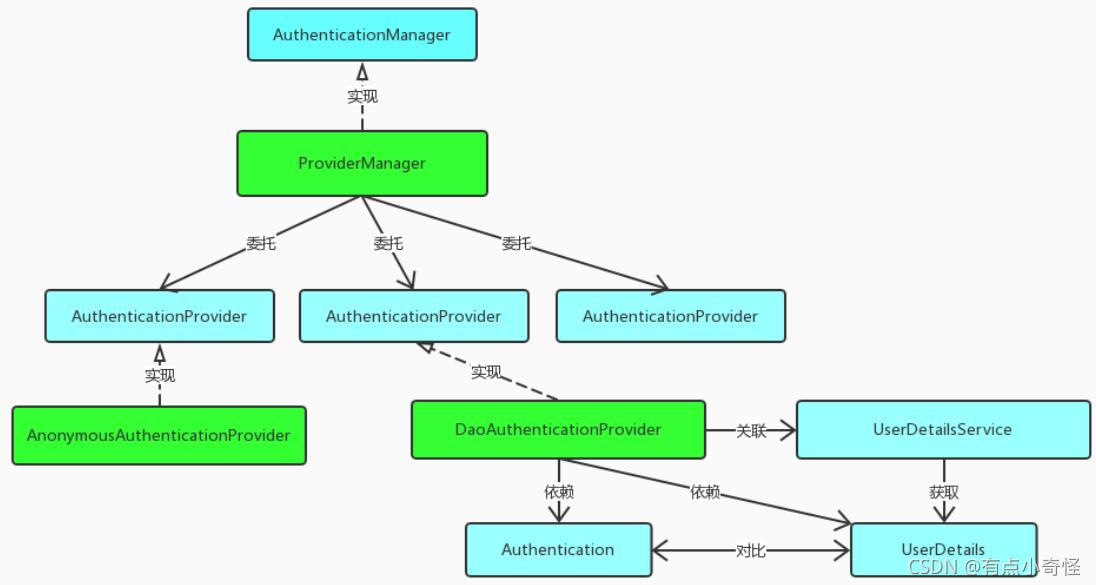
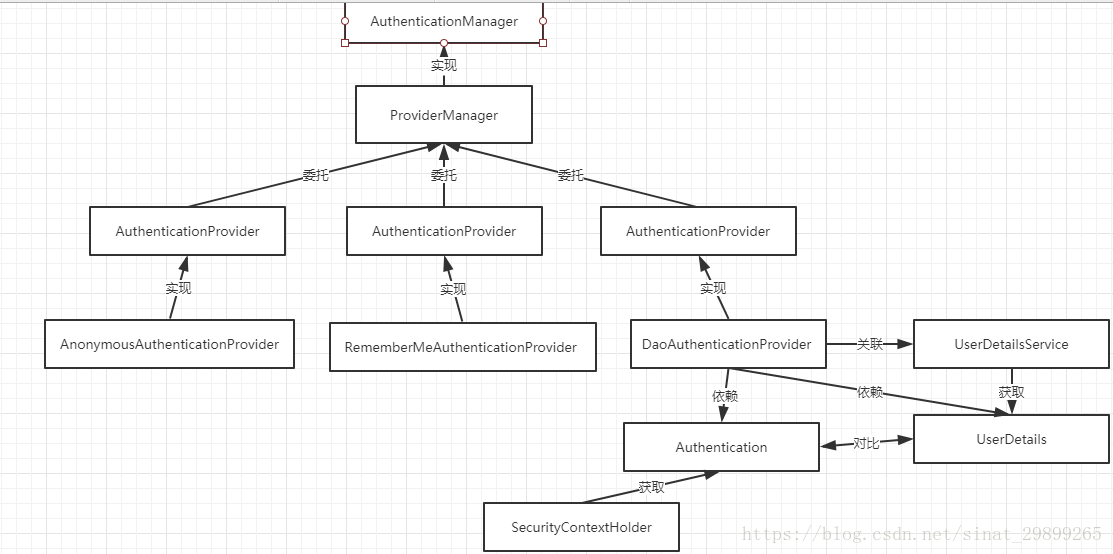
初次接触Spring Security的朋友相信会被AuthenticationManager,ProviderManager,AuthenticationProvider …这么多相似的Spring认证类搞得晕头转向,但只要稍微梳理一下就可以理解清楚它们的联系和设计者的用意。AuthenticationManager(接口)是认证相关的核心接口,也是发起认证的出发点,因为在实际需求中,我们可能会允许用户使用用户名+密码登录,同时允许用户使用邮箱+密码,手机号码+密码登录,甚至,可能允许用户使用指纹登录(还有这样的操作?没想到吧),所以说AuthenticationManager一般不直接认证,AuthenticationManager接口的常用实现类ProviderManager 内部会维护一个List列表,存放多种认证方式,实际上这是委托者模式的应用(Delegate)。也就是说,核心的认证入口始终只有一个:AuthenticationManager,不同的认证方式:用户名+密码(UsernamePasswordAuthenticationToken),邮箱+密码,手机号码+密码登录则对应了三个AuthenticationProvider。这样一来四不四就好理解多了?在默认策略下,只需要通过一个AuthenticationProvider的认证,即可被认为是登录成功。
只保留了关键认证部分的ProviderManager源码:
public class ProviderManager implements AuthenticationManager, MessageSourceAware,InitializingBean {// 维护一个AuthenticationProvider列表private List<AuthenticationProvider> providers = Collections.emptyList();public Authentication authenticate(Authentication authentication)throws AuthenticationException {Class<? extends Authentication> toTest = authentication.getClass();AuthenticationException lastException = null;Authentication result = null;// 依次认证for (AuthenticationProvider provider : getProviders()) {if (!provider.supports(toTest)) {continue;}try {result = provider.authenticate(authentication);if (result != null) {copyDetails(authentication, result);break;}}...catch (AuthenticationException e) {lastException = e;}}// 如果有Authentication信息,则直接返回if (result != null) {if (eraseCredentialsAfterAuthentication&& (result instanceof CredentialsContainer)) {//移除密码((CredentialsContainer) result).eraseCredentials();}//发布登录成功事件eventPublisher.publishAuthenticationSuccess(result);return result;}...//执行到此,说明没有认证成功,包装异常信息if (lastException == null) {lastException = new ProviderNotFoundException(messages.getMessage("ProviderManager.providerNotFound",new Object[] { toTest.getName() },"No AuthenticationProvider found for {0}"));}prepareException(lastException, authentication);throw lastException;}
}
ProviderManager 中的List,会依照次序去认证,认证成功则立即返回,若认证失败则返回null,下一个AuthenticationProvider会继续尝试认证,如果所有认证器都无法认证成功,则ProviderManager 会抛出一个ProviderNotFoundException异常。
到这里,如果不纠结于AuthenticationProvider的实现细节以及安全相关的过滤器,认证相关的核心类其实都已经介绍完毕了:身份信息的存放容器SecurityContextHolder,身份信息的抽象Authentication,身份认证器AuthenticationManager及其认证流程。姑且在这里做一个分隔线。下面来介绍下AuthenticationProvider接口的具体实现。
**AuthenticationManager(接口)是认证相关的核心接口,也是发起认证的出发点,**因为在实际需求中,我们可能会允许用户使用用户名+密码登录,同时允许用户使用邮箱+密码,手机号码+密码登录,甚至,可能允许用户使用指纹登录(还有这样的操作?没想到吧),所以说AuthenticationManager一般不直接认证,AuthenticationManager接口的常用实现类ProviderManager 内部会维护一个List<AuthenticationProvider>列表,存放多种认证方式,实际上这是委托者模式的应用(Delegate)。也就是说,核心的认证入口始终只有一个:AuthenticationManager,不同的认证方式:用户名+密码(UsernamePasswordAuthenticationToken),邮箱+密码,手机号码+密码登录则对应了三个AuthenticationProvider。其中有一个重要的实现类是ProviderManager
它的作用就是校验Authentication,如果验证失败会抛出AuthenticationException异常。AuthenticationException是一个抽象类,因此代码逻辑并不能实例化一个AuthenticationException异常并抛出,实际上抛出的异常通常是其实现类,如DisabledException,LockedException,BadCredentialsException等。BadCredentialsException可能会比较常见,即密码错误的时候。
这个接口只有一个方法:
authenticate:认证。
方法运行后可能会有三种情况:
1)验证成功,返回一个带有用户信息的Authentication。
2)验证失败,抛出一个AuthenticationException异常。
3)无法判断,返回null。
AuthenticationManager是发起认证的出发点,因为在实际需求中,我们可能会允许用户使用用户名+密码登录,同时允许用户使用邮箱+密码,手机号码+密码登录,甚至,可能允许用户使用指纹登录(还有这样的操作?没想到吧),所以说AuthenticationManager一般不直接认证,AuthenticationManager接口的常用实现类ProviderManager 内部会维护一个List列表,存放多种认证方式,实际上这是委托者模式的应用(Delegate)。也就是说,核心的认证入口始终只有一个:AuthenticationManager,不同的认证方式:用户名+密码(UsernamePasswordAuthenticationToken),邮箱+密码,手机号码+密码登录则对应了三个AuthenticationProvider。其中有一个重要的实现类是ProviderManager。
用户认证的管理类,所有的认证请求(比如login)都会通过提交一个封装了到了登录信息的Token对象给 AuthenticationManager的authenticate()方法来实现认证。AuthenticationManager会调用AuthenticationProvider.authenticate进行认证。
当然事情肯定不是它来做,具体校验动作会由AuthenticationManager将请求转发给具体的实现类来做。根据实现反馈的结果再调用具体的Handler来给用户以反馈。认证成功后,返回一个包含了认证信息的Authentication对象。
GrantedAuthority:
哥软提的 鹅搜儿定:授予的权限
该接口表示了当前用户所拥有的权限(或者角色)信息。这些信息由授权负责对象AccessDecisionManager来使用,并决定最终用户是否可以访问某资源(URL或方法调用或域对象)。鉴权时并不会使用到该对象。
GrantedAuthority:对认证主题的应用层面的授权,含当前用户的权限信息,通常使用角色表示
Authentication的getAuthorities()方法返回一个 GrantedAuthority 对象数组。
GrantedAuthority该接口表示了当前用户所拥有的权限(或者角色)信息,用于配置 web授权、方法授权、域对象授权等。该属性通常由UserDetailsService 加载给 UserDetails。这些信息由授权负责对象AccessDecisionManager来使用,并决定最终用户是否可以访问某资源(URL或方法调用或域对象)。鉴权时并不会使用到该对象。
如果一个用户有几千个这种权限,内存的消耗将会是非常巨大的。
Security 中的用户权限接口,自定义权限需要实现该接口。
DaoAuthenticationProvider:
到 啊反提K神 破外的:身份验证提供程序
AuthenticationProvider最最最常用的一个实现便是DaoAuthenticationProvider。顾名思义,Dao正是数据访问层的缩写,也暗示了这个身份认证器的实现思路。主要作用:它获取用户提交的用户名和密码,比对其正确性,如果正确,返回一个数据库中的用户信息(假设用户信息被保存在数据库中)。
按照我们最直观的思路,怎么去认证一个用户呢?用户前台提交了用户名和密码,而数据库中保存了用户名和密码,认证便是负责比对同一个用户名,提交的密码和保存的密码是否相同便是了。在Spring Security中。提交的用户名和密码,被封装成了UsernamePasswordAuthenticationToken,而根据用户名加载用户的任务则是交给了UserDetailsService,在DaoAuthenticationProvider中,对应的方法便是retrieveUser,虽然有两个参数,但是retrieveUser只有第一个参数起主要作用,返回一个UserDetails。还需要完成UsernamePasswordAuthenticationToken和UserDetails密码的比对,这便是交给additionalAuthenticationChecks方法完成的,如果这个void方法没有抛异常,则认为比对成功。比对密码的过程,用到了PasswordEncoder和SaltSource,密码加密和盐的概念相信不用我赘述了,它们为保障安全而设计,都是比较基础的概念。
如果你已经被这些概念搞得晕头转向了,不妨这么理解DaoAuthenticationProvider:它获取用户提交的用户名和密码,比对其正确性,如果正确,返回一个数据库中的用户信息(假设用户信息被保存在数据库中)。

DaoAuthenticationProvider最常用的一个实现类
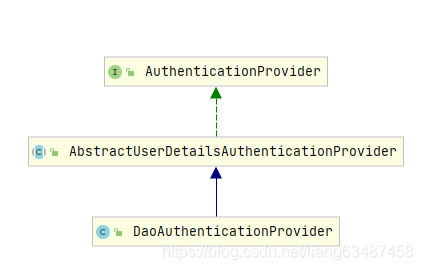
public class DaoAuthenticationProvider extends AbstractUserDetailsAuthenticationProvider {private static final String USER_NOT_FOUND_PASSWORD = "userNotFoundPassword";private PasswordEncoder passwordEncoder;//private UserDetailsService userDetailsService;//检索用户,protected final UserDetails retrieveUser(String username,UsernamePasswordAuthenticationToken authentication)throws AuthenticationException {prepareTimingAttackProtection();try {//UserDetailsService  通过用户名去检索用户,实现中一般从数据库中UserDetails loadedUser = this.getUserDetailsService().loadUserByUsername(username);if (loadedUser == null) {throw new InternalAuthenticationServiceException("UserDetailsService returned null, which is an interface contract violation");}return loadedUser;}catch (UsernameNotFoundException ex) {mitigateAgainstTimingAttack(authentication);throw ex;}catch (InternalAuthenticationServiceException ex) {throw ex;}catch (Exception ex) {throw new InternalAuthenticationServiceException(ex.getMessage(), ex);}}
}
DaoAuthenticationProvider.retrieveUser()只是检索用户,真正认证的逻辑在父类AbstractUserDetailsAuthenticationProvider中
AbstractUserDetailsAuthenticationProvider中的认证代码
Credentials:
可单照四:资格证书
获取密码。
isAuthenticated:
is 鹅反的K滴他
获取是否已经认证过。
Principal:
喷次包:最重要的
获取用户,如果没有认证,那么就是用户名,如果认证了,返回UserDetails。UserDetailsService:
UserDetailsService可以通过loadUserByUsername获取UserDetails对象。该接口供spring security进行用户验证。
通常使用自定义一个CustomUserDetailsService来实现UserDetailsService接口,通过自定义查询UserDetails。
PasswordEncoder:
怕死沃德 英抠定
密码加密器。通常是自定义指定。
.
BCryptPasswordEncoder:
B 快铺他 怕死沃德 英抠定
哈希算法加密
NoOpPasswordEncoder:
NoUp 怕死沃德 英抠定
不使用加密
AuthenticationProvider:
啊反提K神 破外的:身份验证提供程序
AuthenticationProvider 主要用来进行认证操作的类 调用其中的authenticate()方法去进行认证操作
AuthenticationProvider接口提供了两个方法,一个是真正的认证,另一个是满足什么样的身份信息才进行如上认证。
Spring 提供了几种AuthenticationProvider的实现:
- DaoAuthenticationProvider从数据库中读取用户信息验证身份
- AnonymousAuthenticationProvider匿名用户身份认证
- RememberMeAuthenticationProvider已存cookie中的用户信息身份认证
- AuthByAdapterProvider使用容器的适配器验证身份
- CasAuthenticationProvider根据Yale中心认证服务验证身份,用于实现单点登陆
- JaasAuthenticationProvider从JASS登陆配置中获取用户信息验证身份
- RemoteAuthenticationProvider根据远程服务验证用户身份
- RunAsImplAuthenticationProvider对身份已被管理器替换的用户进行验证
- X509AuthenticationProvider从X509认证中获取用户信息验证身份
- TestingAuthenticationProvider单元测试时使用
当然也可以自己实现AuthenticationProvider接口来自定义认证。
这里我们基于最常用的DaoAuthenticationProvider来详细解释一下:
Dao正是数据访问层的缩写,也暗示了这个身份认证器的实现思路。主要作用:它获取用户提交的用户名和密码,比对其正确性,如果正确,返回一个数据库中的用户信息(假设用户信息被保存在数据库中)。
在Spring Security中。提交的用户名和密码,被封装成了UsernamePasswordAuthenticationToken,而根据用户名加载用户的任务则是交给了UserDetailsService,在DaoAuthenticationProvider中,对应的方法便是retrieveUser,虽然有两个参数,但是retrieveUser只有第一个参数起主要作用,返回一个UserDetails。还需要完成UsernamePasswordAuthenticationToken和UserDetails密码的比对,这便是交给additionalAuthenticationChecks方法完成的,如果这个void方法没有抛异常,则认为比对成功。

认证的具体实现类,一个provider是一种认证方式的实现,比如提交的用户名密码我 是通过和DB中查出的user记录做比对实现的,那就有一个DaoProvider;如果我是通 过CAS请求单点登录系统实现,那就有一个CASProvider。按照Spring一贯的作风, 主流的认证方式它都已经提供了默认实现,比如DAO、LDAP、CAS、OAuth2等。 前 面讲了AuthenticationManager只是一个代理接口,真正的认证就是由 AuthenticationProvider来做的。一个AuthenticationManager可以包含多个Provider, 每个provider通过实现一个support方法来表示自己支持那种Token的认证。 AuthenticationManager默认的实现类是ProviderManager。
AuthenticationManager最常用的实现是ProviderManager,它委托一系列AuthenticationProvider实例。AuthenticationProvider有点像AuthenticationManager,但它有一个额外的方法允许调用者查询它是否支持给定的身份验证类型:
public interface AuthenticationProvider {Authentication authenticate(Authentication authentication)throws AuthenticationException;boolean supports(Class<?> authentication);}一个 ProviderManager 支持多种不同验证机制,通过委托多个小弟 AuthenticationProvider 来完成,小弟的方法 supports(Class<?> authentication) ,用于校验传给它的验证身份类型是否支持,如果不支持,则返回 false, 然后 ProviderManager 就会跳过该小弟,询问下一位小弟;(有待考证)
ProviderManager 有一个可选的父级,如果所有小弟都返回 null ,它可以参考。如果父级不可用,则 null 验证会导致 AuthenticationException 。
有时候, web 应用有多个受保护的逻辑组,比如: /db/**、/login/** 等等,每个受保护的逻辑组可能有他们自己的专用的 AuthenticationManager ,通常情况下这些 AuthenticationManager ,都是 ProviderManager ,他们共享一个父级——这个父级是一个全局资源,充当所有的 ProviderManager 的后备资源,也是一个 ProviderManager ,走投无路的时候,就去找老爹;
ProviderManager:
破外的 买嫩着
ProviderManager对象为AuthenticationManager接口的实现类
**ProviderManager是AuthenticationManager常用的实现类。**ProviderManager维护着一个 List<AuthenticationProvider>列表,存放多种认证方式,最终实际的认证工作是由 AuthenticationProvider完成的。在默认策略下,只需要通过一个AuthenticationProvider的认证,即可被认为是登录成功。也就是说,核心的认证入口始终只有一个:AuthenticationManager。
ProviderManager它也不自己处理验证,而是将验证委托给其所配置的AuthenticationProvider列表,然后会依次调用每一个 AuthenticationProvider进行认证,或者通过简单地返回null来跳过验证。如果所有实现都返回null,那么ProviderManager将抛出一个ProviderNotFoundException。这个过程中只要有一个AuthenticationProvider验证成功,就不会再继续做更多验证,会直接以该认证结果作为ProviderManager的认证结果。

ProviderManager代码:
public class ProviderManager implements AuthenticationManager, MessageSourceAware, InitializingBean {//AuthenticationProvider列表private List<AuthenticationProvider> providers;public Authentication authenticate(Authentication authentication) throws AuthenticationException {Class<? extends Authentication> toTest = authentication.getClass();AuthenticationException lastException = null;AuthenticationException parentException = null;Authentication result = null;Authentication parentResult = null;boolean debug = logger.isDebugEnabled();//AuthenticationProvider列表的IteratorIterator var8 = this.getProviders().iterator();//依次认证while(var8.hasNext()) {AuthenticationProvider provider = (AuthenticationProvider)var8.next();//是否支持if (provider.supports(toTest)) {if (debug) {logger.debug("Authentication attempt using " + provider.getClass().getName());}try {//认证result = provider.authenticate(authentication);if (result != null) {this.copyDetails(authentication, result);break;}} catch (InternalAuthenticationServiceException | AccountStatusException var13) {this.prepareException(var13, authentication);throw var13;} catch (AuthenticationException var14) {lastException = var14;}}}if (result == null && this.parent != null) {try {result = parentResult = this.parent.authenticate(authentication);} catch (ProviderNotFoundException var11) {} catch (AuthenticationException var12) {parentException = var12;lastException = var12;}}// 如果有Authentication信息,则直接返回if (result != null) {移除密码if (this.eraseCredentialsAfterAuthentication && result instanceof CredentialsContainer) {((CredentialsContainer)result).eraseCredentials();}// //发布登录成功事件if (parentResult == null) {this.eventPublisher.publishAuthenticationSuccess(result);}return result;//认证失败,包装异常信息} else {if (lastException == null) {lastException = new ProviderNotFoundException(this.messages.getMessage("ProviderManager.providerNotFound", new Object[]{toTest.getName()}, "No AuthenticationProvider found for {0}"));}if (parentException == null) {this.prepareException((AuthenticationException)lastException, authentication);}throw lastException;}}
ProviderManager 中的List,会依照次序去认证,认证成功则立即返回,若认证失败则返回null,下一个AuthenticationProvider会继续尝试认证,如果所有认证器都无法认证成功,则ProviderManager 会抛出一个ProviderNotFoundException异常。
HttpSecurity:
HttpSecurity 常用方法及说明:
| 方法 | 说明 |
|---|---|
| openidLogin() | 用于基于 OpenId 的验证 |
| headers() | 将安全标头添加到响应 |
| cors() | 配置跨域资源共享( CORS ) |
| sessionManagement() | 允许配置会话管理 |
| portMapper() | 允许配置一个PortMapper(HttpSecurity#(getSharedObject(class))),其他提供SecurityConfigurer的对象使用 PortMapper 从 HTTP 重定向到 HTTPS 或者从 HTTPS 重定向到 HTTP。默认情况下,Spring Security使用一个PortMapperImpl映射 HTTP 端口8080到 HTTPS 端口8443,HTTP 端口80到 HTTPS 端口443 |
| jee() | 配置基于容器的预认证。 在这种情况下,认证由Servlet容器管理 |
| x509() | 配置基于x509的认证 |
| rememberMe | 允许配置“记住我”的验证 |
| authorizeRequests() | 允许基于使用 HttpServletRequest 限制访问 |
| requestCache() | 允许配置请求缓存 |
| exceptionHandling() | 允许配置错误处理 |
| securityContext() | 在 HttpServletRequests 之间的 SecurityContextHolder 上设置 SecurityContext 的管理。 当使用WebSecurityConfigurerAdapter 时,这将自动应用 |
| servletApi() | 将 HttpServletRequest 方法与在其上找到的值集成到 SecurityContext 中。 当使用WebSecurityConfigurerAdapter 时,这将自动应用 |
| csrf() | 添加 CSRF 支持,使用 WebSecurityConfigurerAdapter 时,默认启用 |
| logout() | 添加退出登录支持。当使用WebSecurityConfigurerAdapter时,这将自动应用。默认情况是,访问URL”/ logout”,使HTTP Session无效来清除用户,清除已配置的任何#rememberMe()身份验证,清除SecurityContextHolder,然后重定向到”/login?success” |
| anonymous() | 允许配置匿名用户的表示方法。 当与WebSecurityConfigurerAdapter结合使用时,这将自动应用。 默认情况下,匿名用户将使用org.springframework.security.authentication.AnonymousAuthenticationToken表示,并包含角色 “ROLE_ANONYMOUS” |
| formLogin() | 指定支持基于表单的身份验证。如果未指定 FormLoginConfigurer#loginPage(String),则将生成默认登录页面 |
| oauth2Login() | 根据外部OAuth 2.0或OpenID Connect 1.0提供程序配置身份验证 |
| requiresChannel() | 配置通道安全。为了使该配置有用,必须提供至少一个到所需信道的映射 |
| httpBasic() | 配置 Http Basic 验证 |
| addFilterAt() | 在指定的Filter类的位置添加过滤器 |
AuthenticationToken:
啊反提K神 套肯
所有提交给AuthenticationManager的认证请求都会被封装成一个Token的实现,比如最容易理解的UsernamePasswordAuthenticationToken。
AuthenticationManagerBuilder:
啊反提K神 买嫩着 biu的
AuthenticationManagerBuilder 用于创建一个 AuthenticationManager,让我能够轻松的实现内存验证、LADP验证、基于JDBC的验证、添加UserDetailsService、添加AuthenticationProvider。
Security 原理讲解:
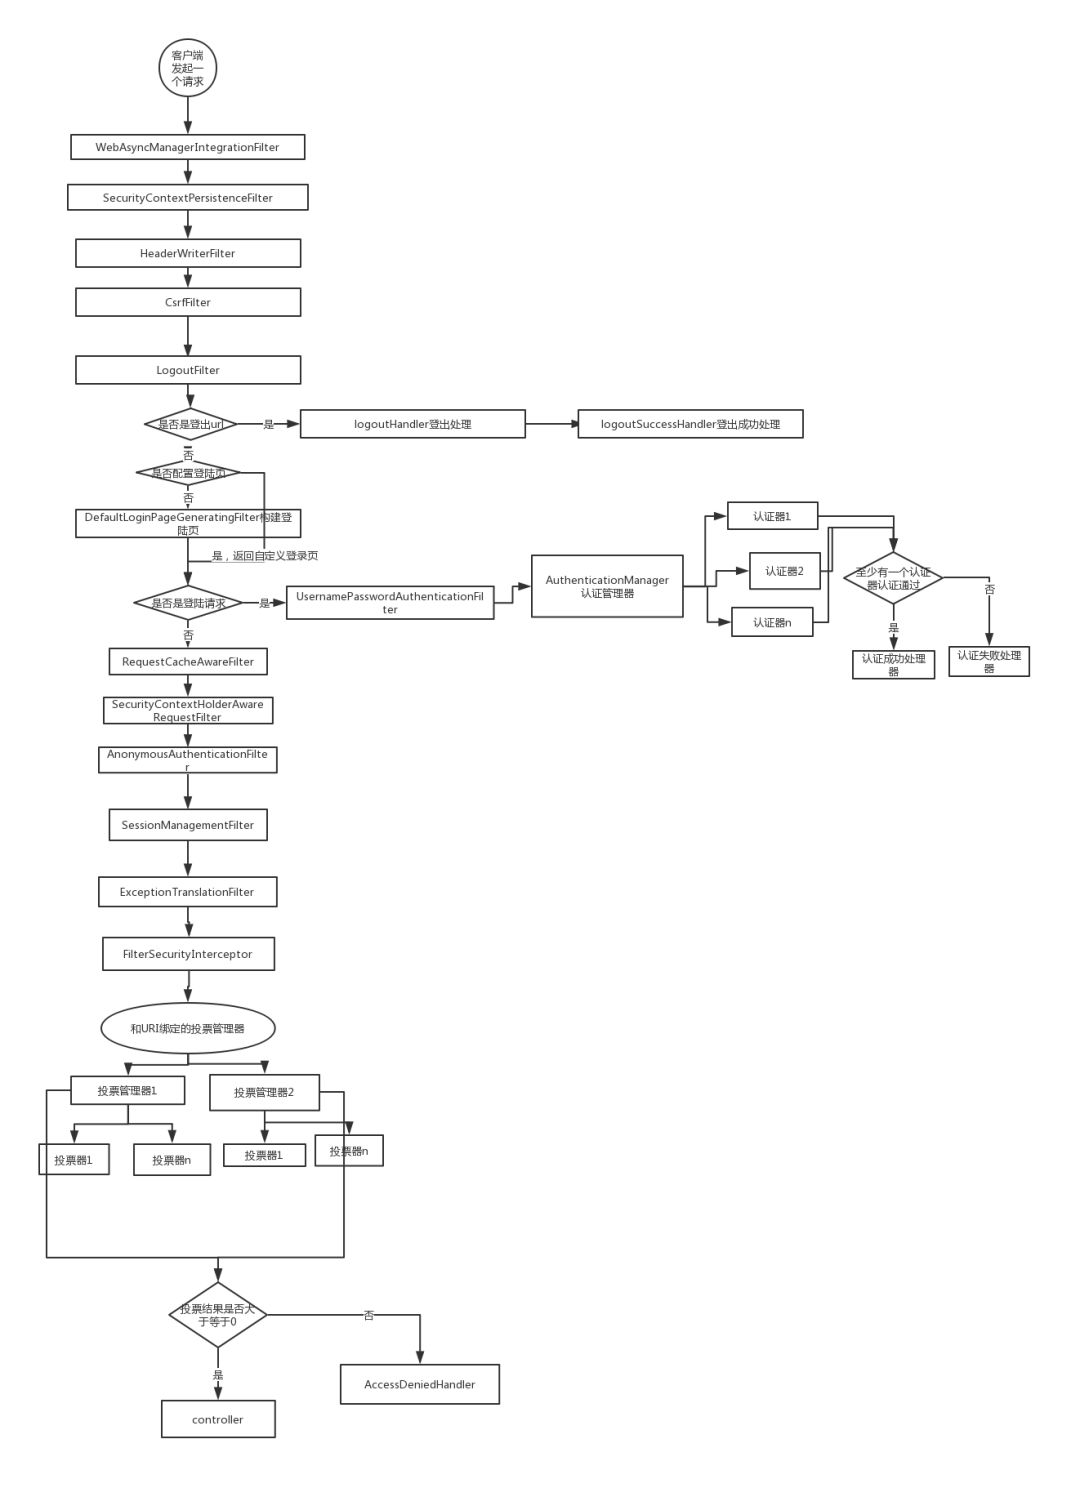
SpringSecurity 过滤器链:
SpringSecurity 采用的是责任链的设计模式,它有一条很长的过滤器链。现在对这条过滤器链的各个进行说明:
- WebAsyncManagerIntegrationFilter:将 Security 上下文与 Spring Web 中用于处理异步请求映射的 WebAsyncManager 进行集成。
- SecurityContextPersistenceFilter:在每次请求处理之前将该请求相关的安全上下文信息加载到 SecurityContextHolder 中,然后在该次请求处理完成之后,将 SecurityContextHolder 中关于这次请求的信息存储到一个“仓储”中,然后将 SecurityContextHolder 中的信息清除,例如在Session中维护一个用户的安全信息就是这个过滤器处理的。
- HeaderWriterFilter:用于将头信息加入响应中。
- CsrfFilter:用于处理跨站请求伪造。
- LogoutFilter:用于处理退出登录。
- UsernamePasswordAuthenticationFilter:用于处理基于表单的登录请求,从表单中获取用户名和密码。默认情况下处理来自 /login 的请求。从表单中获取用户名和密码时,默认使用的表单 name 值为 username 和 password,这两个值可以通过设置这个过滤器的usernameParameter 和 passwordParameter 两个参数的值进行修改。
- DefaultLoginPageGeneratingFilter:如果没有配置登录页面,那系统初始化时就会配置这个过滤器,并且用于在需要进行登录时生成一个登录表单页面。
- BasicAuthenticationFilter:检测和处理 http basic 认证。
- RequestCacheAwareFilter:用来处理请求的缓存。
- SecurityContextHolderAwareRequestFilter:主要是包装请求对象request。
- AnonymousAuthenticationFilter:检测 SecurityContextHolder 中是否存在 Authentication 对象,如果不存在为其提供一个匿名 Authentication。
- SessionManagementFilter:管理 session 的过滤器
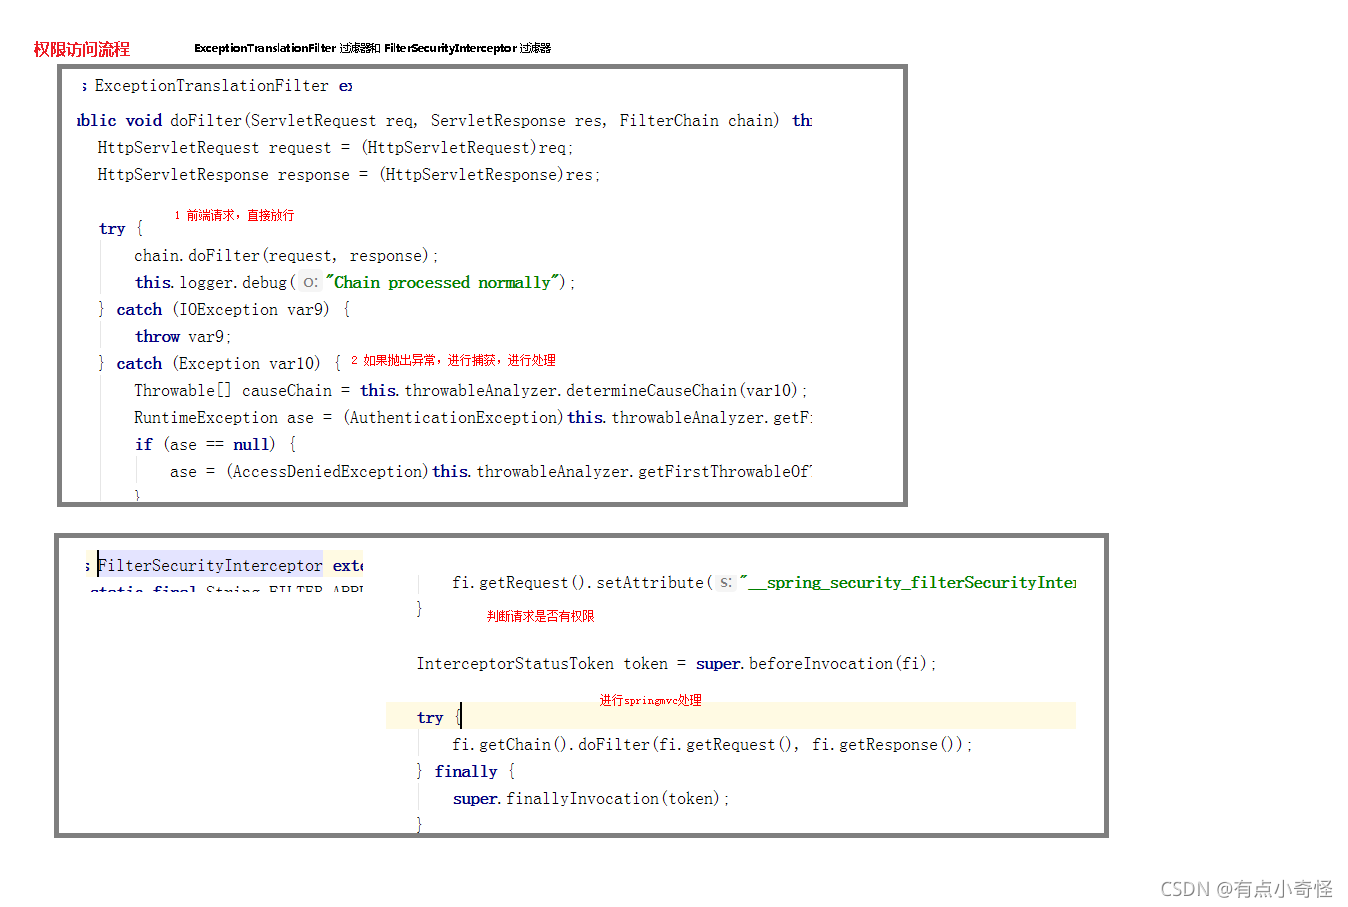
- ExceptionTranslationFilter:处理 AccessDeniedException 和 AuthenticationException 异常。
- FilterSecurityInterceptor:可以看做过滤器链的出口。
- RememberMeAuthenticationFilter:当用户没有登录而直接访问资源时, 从 cookie 里找出用户的信息, 如果 Spring Security 能够识别出用户提供的remember me cookie, 用户将不必填写用户名和密码, 而是直接登录进入系统,该过滤器默认不开启。
SpringSecurity 流程图:
先来看下面一个 Spring Security 执行流程图,只要把 SpringSecurity 的执行过程弄明白了,这个框架就会变得很简单:
工作原理:
Spring Security所解决的问题就是安全访问控制,而安全访问控制功能其实就是对所有进入系统的请求进行拦截,校验每个请求是否能够访问它所期望的资源。根据前边知识的学习,可以通过Filter或AOP等技术来实现,Spring Security对Web资源的保护是靠Filter实现的,所以从这个Filter来入手,逐步深入Spring Security原理。
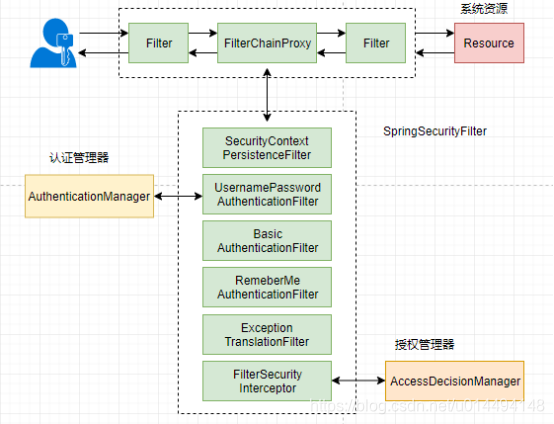
当初始化Spring Security时,会创建一个名为SpringSecurityFilterChain 的Servlet过滤器,类型为org.spriingframework,security.web.FilterChainProxy,它实现了javax.servlet.Filter,因此外部的请求会经过此类。

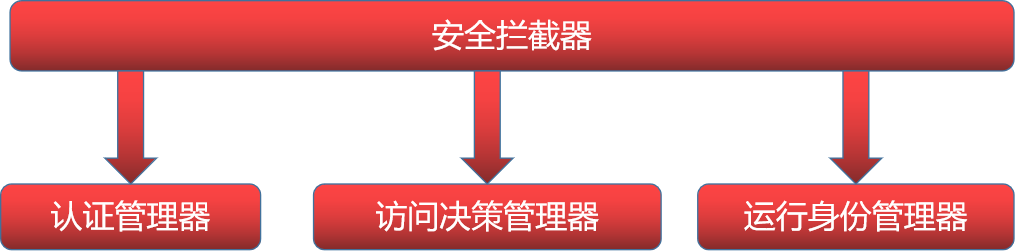
FilterChainProxy 是一个代理,真正起作用的是FilterChainProxy中SecurityFilterChain所包含的各个Filter,同事这些Filter作为Bean被Spring管理,它们是Spring Security核心,各有各的职责,但他们并不直接处理用户的认证,也不直接处理用户的授权,而是把它们交给了认证管理器(AuthenticationManager)和决策管理器(AccessDecisionManager)进行处理,下图是FilterChainProxy相关类的UML图示。

Spring Security功能的实现主要是由一系列过滤器链相互配合完成。

下面介绍过滤器链中主要的几个过滤器及其作用:
**SecurityContextPersistenceFilter:**这个Filter是整个拦截过滤过程的入口和出口(也就是第一个和最后一个拦截器),会在请求开始时从配置好的 SecurityContextRepository 中获取SecurityContext,然后把它设置给SecurityContextHolder。在请求完成后将 SecurityContextHolder 持有的 SecurityContext再保存到配置好的SecurityContextRepository,同事清楚SecurityContextHolder所持有的SecurityContext;
**UsernamePasswordAuthenticationFilter:**用于处理来自表单提交的认证。该表单必须提供对应的用户名和密码,其内部还有登录成功或失败后进行处理的AuthenticationSuccessHandler和AuthenticationFailureHandler,这些都可以根据需求做相关改变;
**FilterSecurityInterceptor:**是用于保护Web资源的,使用AccessDecisionManager对当前用户进行授权访问,前面已经详细介绍过了;
**ExceptionTranslationFilter:**能够捕获来自FilterChain所有的异常,并进行处理。但是它只会处理两类异常:AuthecticationException 和 AccessDeniedException,其它的异常它会继续抛出。

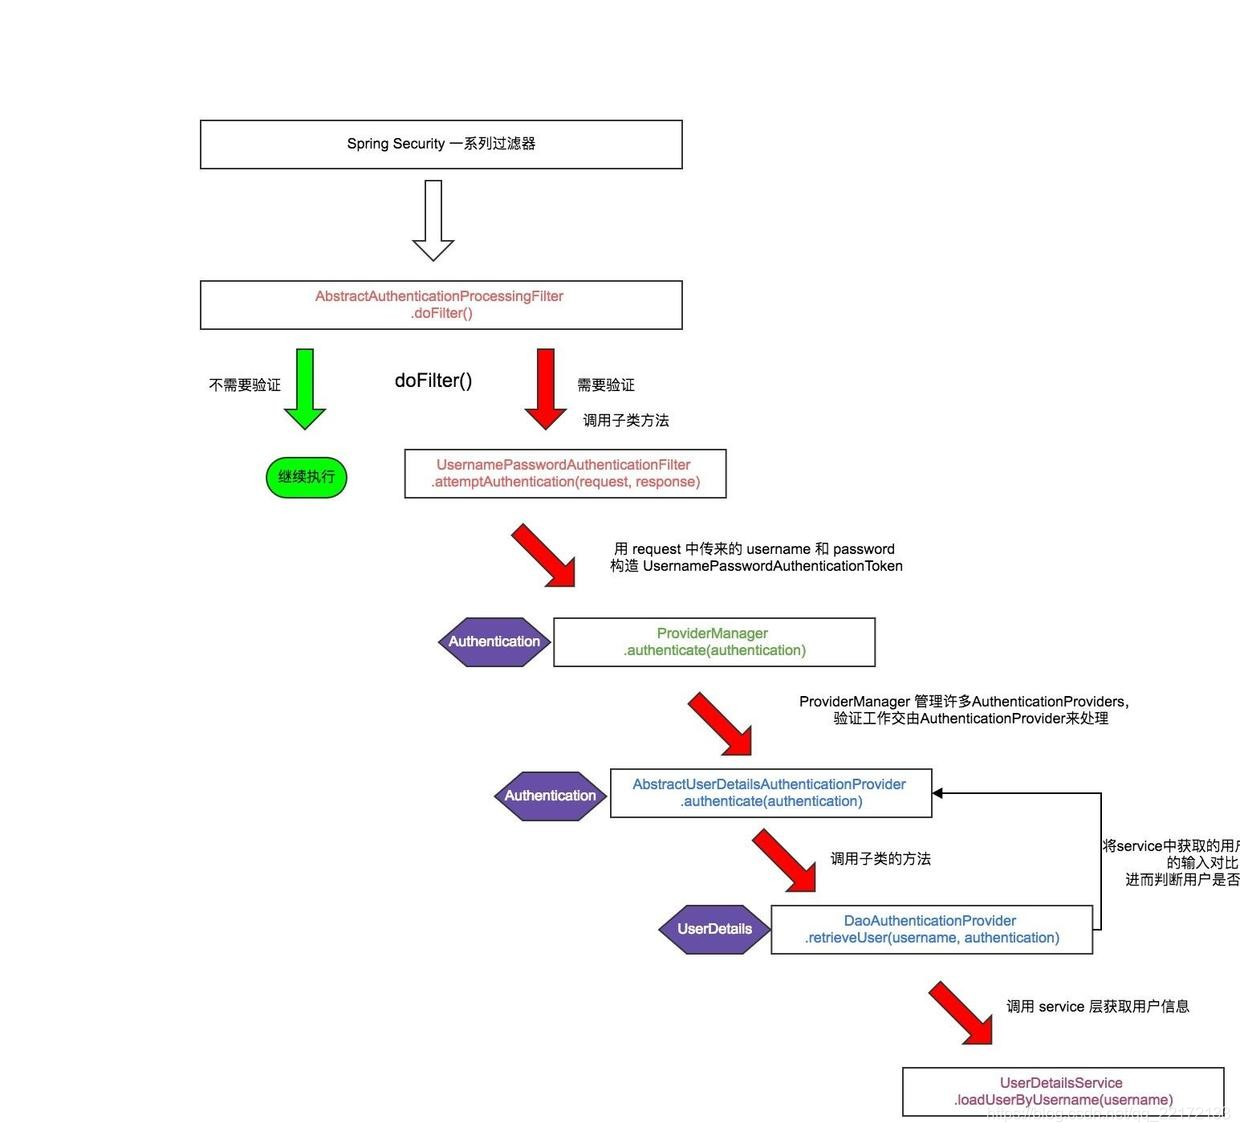
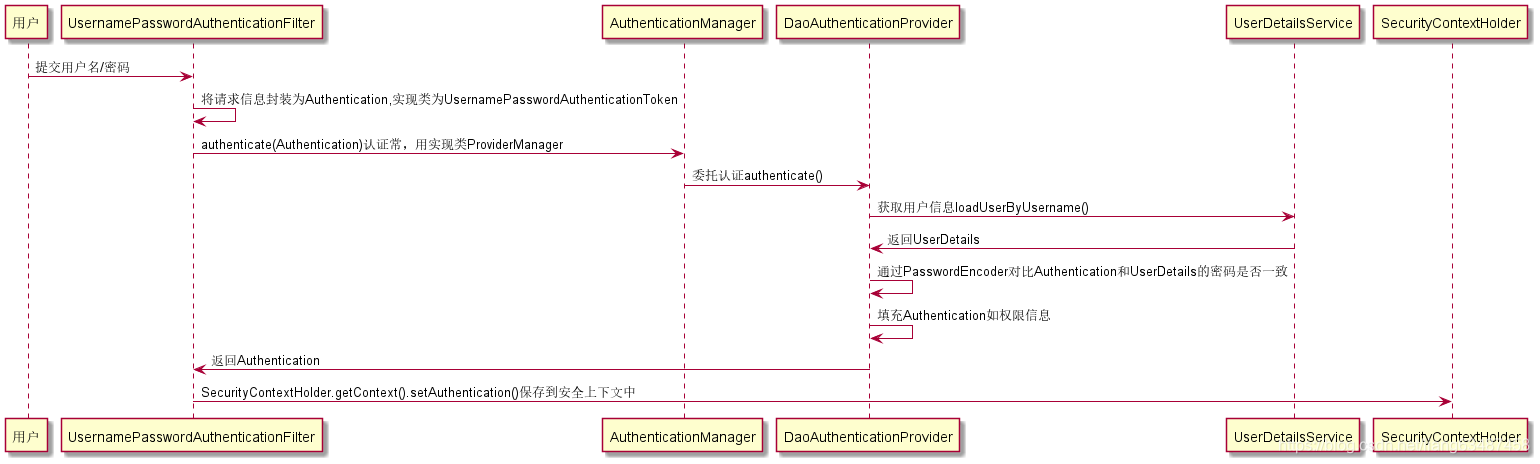
让我们仔细分析认证过程:
- 用户提交用户名、密码被SecurityFilterChain中的UsernamePasswordAuthenticationFilter 过滤器获取到,封装为请求Authentication,通常情况下是UsernamePasswordAuthenticationToken 这个实现类。
- 然后过滤器将 Authentication 提交至认证管理器(AuthenticationManager)进行认证。
- 认证成功后,AuthenticatonManageer 身份管理器返回一个被填充满了信息的(包括上面提到的权限信息,身份信息,细节信息,但密码通常会被移除)Authentication 实例。
- SecurityContextHolder 安全上下文容器将第3步填充了信息的Authentication,通过SecurityContextHolder.getContext().setAuthentication(…)方法,设置到其中。
可以看出AuthenticationManager接口(认证管理器)是认证相关的核心接口,也是发起认证的出发点,它的实现类为ProviderManager。而Spring Security支持多种认证方式,因此ProviderManager维护着一个List<AuthenticationProvider>列表,存放多种认证方式,最终实际的认证工作是由AuthenticationProvider完成的。咱们知道web表单的对应的AuthenticationProvider实现类为DaoAuthenticationProvider,它的内部又维护着一个UserDetailsService负责UserDetails的获取。最终AuthenticationProvider将UserDetails填充至Authentication。
认证核心组件的大体关系如下:

分布式认证需求:
分布式系统的每个服务都会由认证、授权的需求,如果每个服务都实现一套认证授权逻辑会非常冗余,考虑分布式系统共享性的特点,需要由独立的认证服务处理系统认证授权的请求;考虑分布式系统开放性的特点,不仅对系统内部服务提供认证,对第三方系统也要提供认证。分布式认证的需求总结如下:
统一认证授权:
提供独立的认证服务,统一处理认证授权。
无论是不同类型的用户,还是不同种类的客户端(web端,H5,APP),均采用一致的认证、权限、会话机制,实现统一认证授权。
要实现统一则认证方式必须可扩展,支持各种认证需求,比如:用户密码认证、短信验证码、二维码、人脸识别等认证方式,并可以非常灵活的切换。
应用接入认证:
应提供扩展和开放能力,提供安全的系统对接机制,并可开放部分API给接入第三方使用,一方应用(内部 系统服务)和第三方应用(第三方应用)均采用统一机制接入。
校验流程图:


认证流程:
SpringSecurity是基于Filter实现认证和授权,底层通过FilterChainProxy代理去调用各种Filter(Filter链),Filter通过调用AuthenticationManager完成认证 ,通过调用AccessDecisionManager完成授权,SpringSecurity中核心的过滤器链详细如下:
- SecurityContextPersistenceFilter
Filter的入口和出口,它是用来将SecurityContext(认证的上下文,里面有登录成功后的认证授权信息)对象持久到Session的Filter,同时会把SecurityContext设置给SecurityContextHolder方便我们获取用户认证授权信息 - UsernamePasswordAuthenticationFilter
默认拦截“/login”登录请求,处理表单提交的登录认证,将请求中的认证信息包括
username,password等封装成UsernamePasswordAuthenticationToken,然后调用
AuthenticationManager的认证方法进行认证 - BasicAuthenticationFilter
基本认证,支持httpBasic认证方式的Filter - RememberAuthenticationFilter
记住我功能实现的Filter - AnonymousAuthenticationFilter
匿名Filter,用来处理匿名访问的资源,如果用户未登录,SecurityContext中没有Authentication,
就会创建匿名的Token(AnonymousAuthenticationToken),然后通过
SecurityContextHodler设置到SecurityContext中。 - ExceptionTranslationFilter
用来捕获FilterChain所有的异常,进行处理,但是只会处理 AuthenticationException和AccessDeniedException,异常,其他的异常 会继续抛出。 - FilterSecurityInterceptor
用来做授权的Filter,通过父类(AbstractSecurityInterceptor.beforeInvocation)调用
AccessDecisionManager.decide方法对用户进行授权。
认证流程
常是数据库)加载用户信息,UserDetailsService常见的实现类有JdbcDaoImpl,InMemoryUserDetailsManager,前者从数据库加载用户,后者从内存中加载用户,也可以自己实现UserDetailsService,通常这更加灵活。
public interface UserDetailsService {UserDetails loadUserByUsername(String username) throws UsernameNotFoundException;
}
认证流程
如何完成身份认证
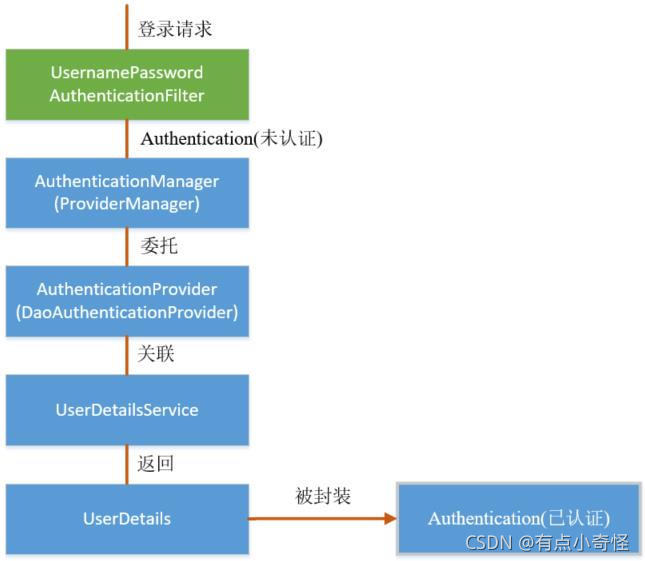
- 用户使用用户名和密码进行登录,Spring Security将获取到的用户名和密码封装成一个Authentication接口的实现类,比如常用的UsernamePasswordAuthenticationToken。
- 将上述产生的Authentication对象传递给AuthenticationManager的实现类ProviderManager进行认证。
- ProviderManager依次调用各个AuthenticationProvider进行认证,认证成功后返回一个封装了用户权限等信息的Authentication对象。
- 将AuthenticationManager返回的Authentication对象赋予给当前的SecurityContext。


1.Http Request
Spring security 定义了一个过滤器链, 当认证请求到达这个链时, 该请求将会穿过这个链条用于认证和授权. 这个链上的可以定义1…N个过滤器, 过滤器的用途是获取请求中的认证信息, 根据认证方式进行路由, 把认证信息传递给对应的认证处理程序进行处理. 下面的示例图显示了Spring security中常用的认证过滤器

不同的过滤器处理不同的认证信息. 例如:
- HTTP Basic 认证请通过过滤器链, 到达 BasicAuthenticationFilter;
- HTTP Digest 认证被 DigestAuthenticationFilter 识别,拦截并处理;
- 表单登录认证被 UsernamePasswordAuthenticationFilter 识别,拦截并处理。
2.基于用户凭证创建 AuthenticationToken

这里我们以最常用表单登录为例子, 用户在登录表单中输入用户名和密码, 并点击确定, 浏览器提交POST请求到服务器, 穿过过滤器链, 被 UsernamePasswordAuthenticationFilter 识别, UsernamePasswordAuthenticationFilter 提取请求中的用户名和密码来创建 UsernamePasswordAuthenticationToken 对象.
3.把组装好的 AuthenticationToken 传递给 AuthenticationManagager
组装好的 UsernamePasswordAuthenticationToken 对象被传递给 AuthenticationManagager 的 authenticate 方法进行认证决策.AuthenticationManager 只是一个接口, 实际的实现是 ProviderManager
ProviderManager 有一个配置好的认证提供者列表(AuthenticationProvider), ProviderManager 会把收到的 UsernamePasswordAuthenticationToken 对象传递给列表中的每一个 AuthenticationProvider 进行认证.
4.进行认证处理
public interface AuthenticationProvider {Authentication authenticate(Authentication authentication) throws AuthenticationException;boolean supports(Class<?> authentication);
}
AuthenticationProvider提供了以下的实现类:
CasAuthenticationProvider
JaasAuthenticationProvider
DaoAuthenticationProvider
OpenIDAuthenticationProvider
RememberMeAuthenticationProvider
LdapAuthenticationProvider
上面我们说了, ProviderManager 会把收到的 UsernamePasswordAuthenticationToken 对象传递给列表中的每一个 AuthenticationProvider 进行认证.那到底 UsernamePasswordAuthenticationToken 会被哪一个接收和处理呢?是由supports方法来决定的。
5.UserDetailsService获取用户信息
UserDetailsService 获取的对象是一个 UserDetails. 框架中自带一个 User 实现, 但是一般我们需要对 UserDetails 进行定制, 内置的 User 太过简单实际项目无法满足需要.案例说明(基于jpa实现):
@Service
public class JpaReactiveUserDetailsService implements ReactiveUserDetailsService {private UserRepository userRepository;@Autowiredpublic void setUserRepository(UserRepository userRepository) {this.userRepository = userRepository;}/*** @param s 用户名* @return Mono<UserDetails>*/@Overridepublic Mono<UserDetails> findByUsername(String s) {// 从用户Repository中获取一个User Jpa实体对象Optional<User> optionalUser = userRepository.findByUsername(s);if (!optionalUser.isPresent()) {return Mono.empty();}User user = optionalUser.get();// 填充权限List<SimpleGrantedAuthority> authorities = new ArrayList<>();for (Role role : user.getRoles()) {authorities.add(new SimpleGrantedAuthority(role.getName()));}// 返回 UserDetailsreturn Mono.just(new org.springframework.security.core.userdetails.User(user.getUsername(), user.getPassword(), authorities));}
}
@Repository
public interface UserRepository extends JpaRepository<User, Long> {User findByEmail(String email);@Overridevoid delete(User user);Optional<User> findByUsername(String username);
}
6.认证结果处理
如果认证成功(用户名,密码完全正确), AuthenticationProvider 将会返回一个完全有效的 Authentication 对象(UsernamePasswordAuthenticationToken). 否则抛出 AuthenticationException 异常.完全有效的 Authentication 对象定义如下:
authenticated属性为 true
已授权的权限列表(GrantedAuthority列表)
用户凭证(仅用户名)
7.认证完成
认证完成后, AuthenticationManager 将会返回该认证对象(UsernamePasswordAuthenticationToken)返回给过滤器
8.存储认证对象
相关的过滤器获得一个认证对象后, 把它存储在安全上下文中(SecurityContext) 用于后续的授权判断(比如查询,修改等操作).
SecurityContextHolder.getContext().setAuthentication(authentication);

自定义验证
实际上真正来做验证操作的是一个个的AuthenticationProvider,所以如果要自定义验证方法,只需要实现一个自己的AuthenticationProvider然后再将其添加进ProviderManager里就行了。
自定义AuthenticationProvider
@Component
public class CustomAuthenticationProviderimplements AuthenticationProvider {@Overridepublic Authentication authenticate(Authentication authentication) throws AuthenticationException {String name = authentication.getName();String password = authentication.getCredentials().toString();if (shouldAuthenticateAgainstThirdPartySystem()) {// use the credentials// and authenticate against the third-party systemreturn new UsernamePasswordAuthenticationToken(name, password, new ArrayList<>());} else {return null;}}@Overridepublic boolean supports(Class<?> authentication) {return authentication.equals(UsernamePasswordAuthenticationToken.class);}
}
其中的supports()方法接受一个authentication参数,用来判断传进来的authentication是不是该AuthenticationProvider能够处理的类型。
注册AuthenticationProvider
现在再将刚创建的AuthenticationProvider在与ProviderManager里注册,所有操作就完成了。
@Configuration
@EnableWebSecurity
@ComponentScan("org.baeldung.security")
public class SecurityConfig extends WebSecurityConfigurerAdapter {@Autowiredprivate CustomAuthenticationProvider authProvider;@Overrideprotected void configure(AuthenticationManagerBuilder auth) throws Exception {auth.authenticationProvider(authProvider);}@Overrideprotected void configure(HttpSecurity http) throws Exception {http.authorizeRequests().anyRequest().authenticated().and().httpBasic();}
}
授权流程
一旦认证成功,我们可以继续进行授权,授权是通过AccessDecisionManager来实现的。框架有三种实现,默认是AffirmativeBased,通过AccessDecisionVoter决策,有点像ProviderManager委托给AuthenticationProviders来认证。
用户可以享受哪一种权限可以自己配置或者读取数据库设置
Security认证流程原理:

-
请求过来会被过滤器链中的UsernamePasswordAuthenticationFilter拦截到,请求中的用户名和密码被封装成UsernamePasswordAuthenticationToken(Authentication的实现类)
-
过滤器将UsernamePasswordAuthenticationToken提交给认证管理器(AuthenticationManager)进行认证.
-
AuthenticationManager委托AuthenticationProvider(DaoAuthenticationProvider)进行认证,AuthenticationProvider通过调用UserDetailsService获取到数据库中存储的用户信息(UserDetails),然后调用passwordEncoder密码编码器对UsernamePasswordAuthenticationToken中的密码和UserDetails中的密码进行比较
-
AuthenticationProvider认证成功后封装Authentication并设置好用户的信息(用户名,密码,权限等)返回
-
Authentication被返回到UsernamePasswordAuthenticationFilter,通过调用SecurityContextHolder工具把Authentication封装成SecurityContext中存储起来。然后UsernamePasswordAuthenticationFilter调用AuthenticationSuccessHandler.onAuthenticationSuccess做认证成功后续处理操作
-
最后SecurityContextPersistenceFilter通过SecurityContextHolder.getContext()获取到SecurityContext对象然后调用SecurityContextRepository将SecurityContext存储起来,然后调用SecurityContextHolder.clearContext方法清理SecurityContext。
注意:SecurityContext是一个和当前线程绑定的工具,在代码的任何地方都可以通过SecurityContextHolder.getContext()获取到登陆信息。
什么是Spring Security验证?
让我们考虑一个大家都很熟悉的标准的验证场景。
- 提示用户输入用户名和密码进行登录。
- 该系统 (成功) 验证该用户名的密码正确。
- 获取该用户的环境信息 (他们的角色列表等).
- 为用户建立安全的环境。
- 用户进行,可能执行一些操作,这是潜在的保护的访问控制机制,检查所需权限,对当前的安全的环境信息的操作。
而对于Spring Security来说,假设是用户名密码登陆,那执行顺序就是:
- 用户通过url:/login 登录,该过滤器接收表单用户名密码
- 判断用户名密码是否为空
- 生成 UsernamePasswordAuthenticationToken
- 将 Authentiction 传给 AuthenticationManager#authenticate 方法进行认证处理
- AuthenticationManager 默认是实现类为 ProviderManager ,ProviderManager 委托给 AuthenticationProvider 进行处理
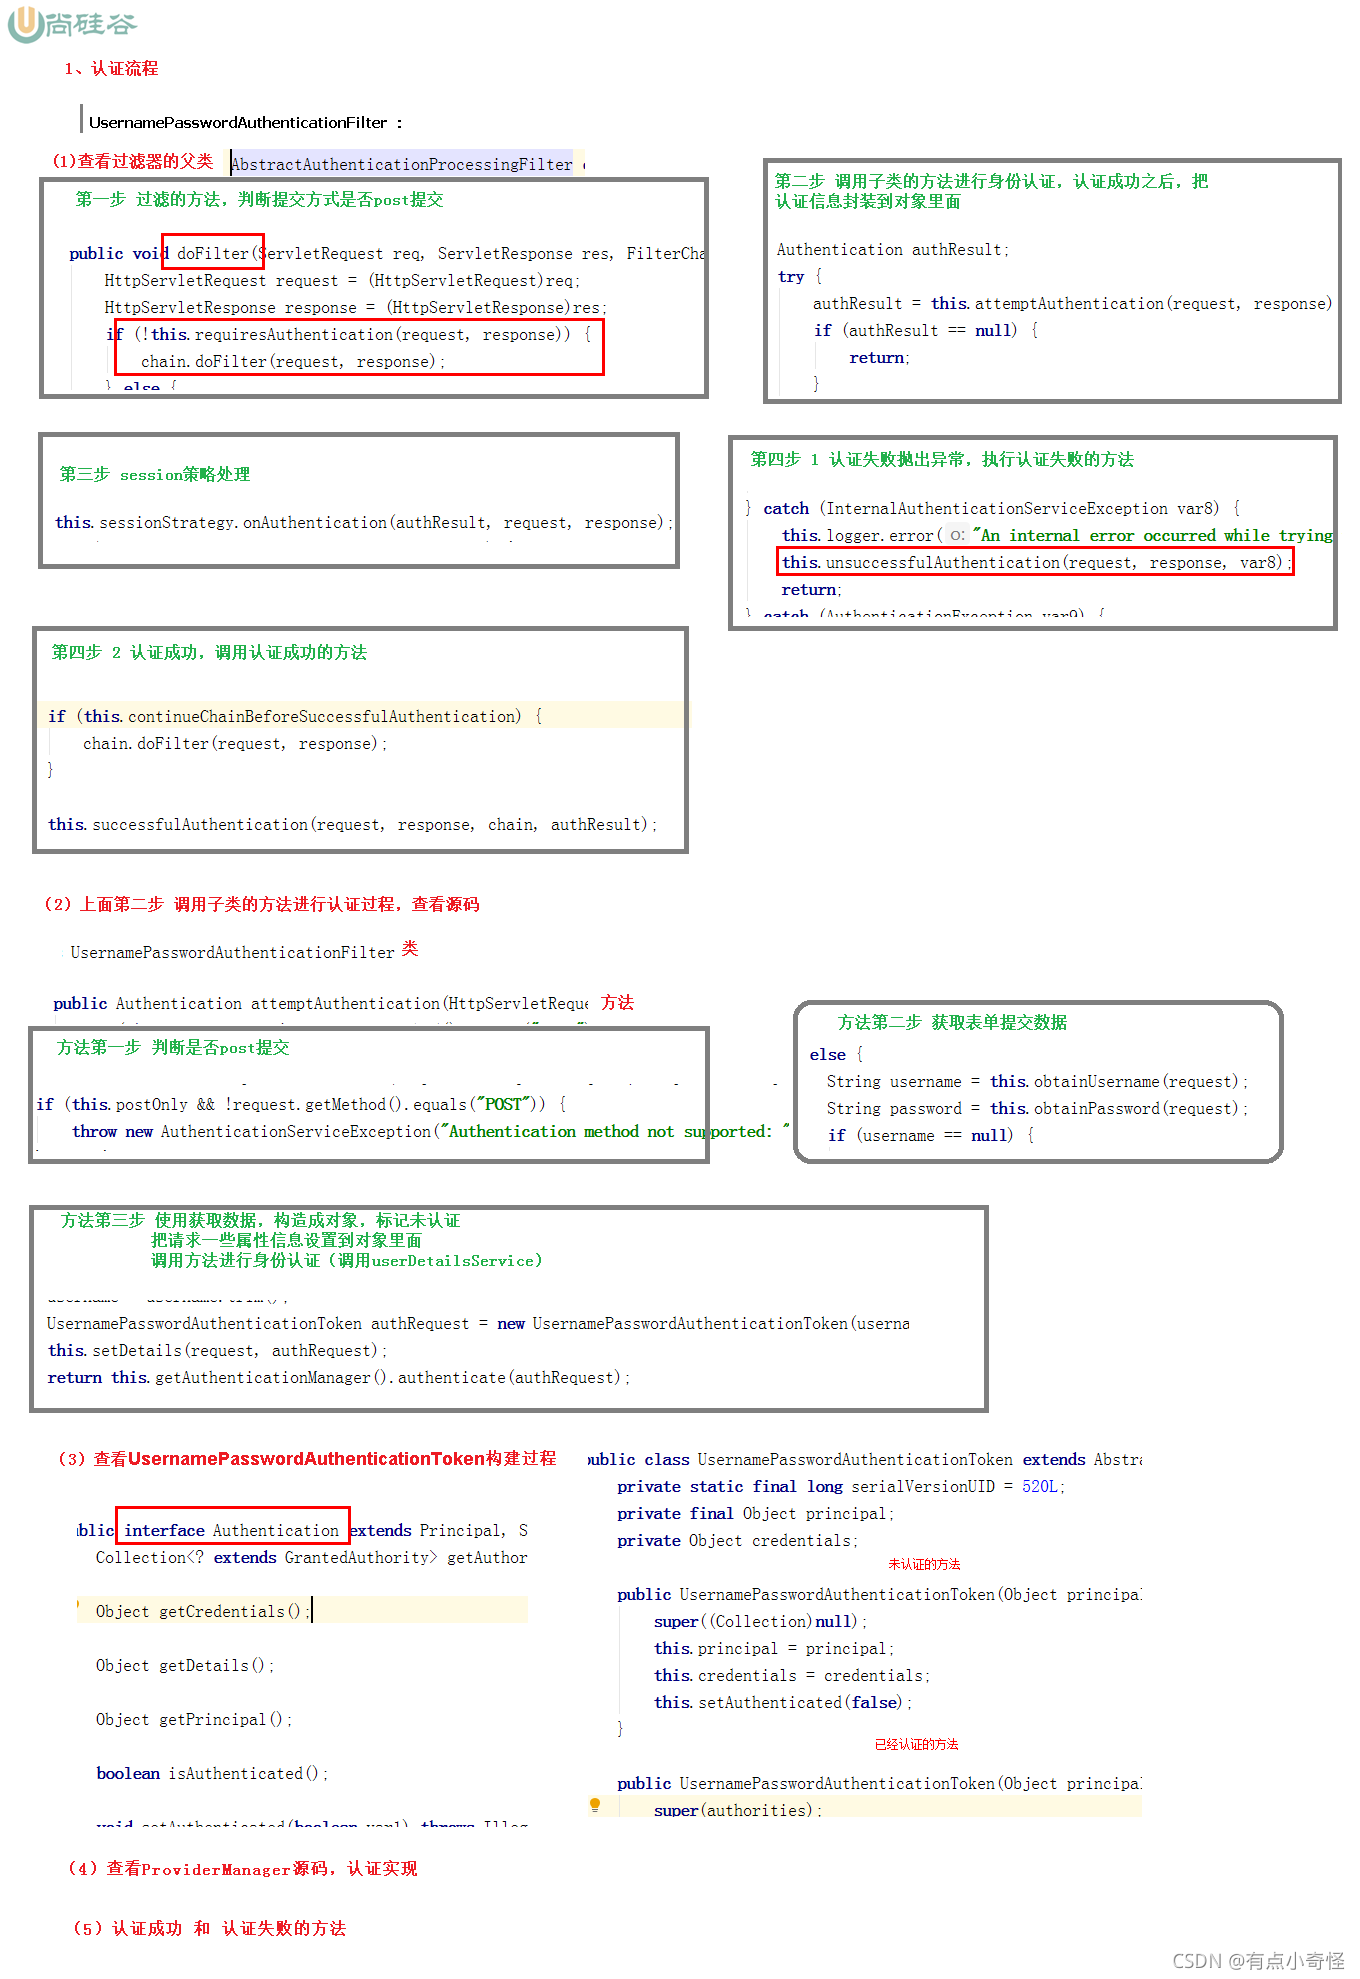
- UsernamePasswordAuthenticationFilter 继承了 AbstractAuthenticationProcessingFilter 抽象类,AbstractAuthenticationProcessingFilter 在 successfulAuthentication 方法中对登录成功进行了处理,通过 SecurityContextHolder.getContext().setAuthentication() 方法将 Authentication 认证信息对象绑定到 SecurityContext
- 下次请求时,在过滤器链头的 SecurityContextPersistenceFilter 会从 Session 中取出用户信息并生成 Authentication(默认为 UsernamePasswordAuthenticationToken),并通过 SecurityContextHolder.getContext().setAuthentication() 方法将 Authentication 认证信息对象绑定到 SecurityContext
- 需要权限才能访问的请求会从 SecurityContext 中获取用户的权限进行验证
下面来逐个分析一下每个类。
1.核心组件
这一节主要介绍一些Spring Security中核心的java类,他们之间的依赖,构建起了整个框架。
1.1 SecurityContextHolder
SecurityContextHolder 是最基本的对象,它负责存储当前安全上下文信息。即保存着当前用户是什么,是否已经通过认证,拥有哪些权限。。。等等。SecurityContextHolder默认使用ThreadLocal策略来存储认证信息,意味着这是一种与线程绑定的策略。在Web场景下的使用Spring Security,在用户登录时自动绑定认证信息到当前线程,在用户退出时,自动清除当前线程的认证信息。而在非Web场景下,比如Swing环境下,Spring提供在启动时使用策略配置SecurityContextHolder。这部分具体的配置请自行翻阅官方文档。我就不在此赘述了,之后的讲解也将基于Web场景。
获取有关当前用户的信息
Spring Security使用一个Authentication对象来表示这些信息。通常不需要自己创建一个Authentication对象,但可以在程序的任何一个地方获取到用户信息,下面时官方提供的获取用户信息:
Object principal = SecurityContextHolder.getContext().getAuthentication().getPrincipal();if (principal instanceof UserDetails) {String username = ((UserDetails)principal).getUsername();
} else {String username = principal.toString();
}
1.2 Authentication
首先看一下源码:
package org.springframework.security.core;public interface Authentication extends Principal, Serializable { Collection<? extends GrantedAuthority> getAuthorities();  Object getCredentials();Object getDetails();Object getPrincipal();boolean isAuthenticated(); void setAuthenticated(boolean var1) throws IllegalArgumentException;
}
从这个接口中,我们可以得到用户身份信息,密码,细节信息,认证信息,以及权限列表,具体的详细解读如下:
- getAuthorities(),权限列表,通常是代表权限的字符串列表;
- getCredentials(),密码信息,由用户输入的密码凭证,认证之后会移出,来保证安全性;
- getDetails(),细节信息,Web应用中一般是访问者的ip地址和sessionId;
- getPrincipal(), 最重要的身份信息,一般返回UserDetails的实现类;
官方文档里说过,当用户提交登陆信息时,会将用户名和密码进行组合成一个实例UsernamePasswordAuthenticationToken,而这个类是Authentication的一个常用的实现类,用来进行用户名和密码的认证,类似的还有RememberMeAuthenticationToken,它用于记住我功能。
1.3 UserDetails
上文提到了UserDetails接口,它代表了最详细的用户信息,这个接口涵盖了一些必要的用户信息字段,具体的实现类对它进行了扩展,首先来看一下源码:
public interface UserDetails extends Serializable {Collection<? extends GrantedAuthority> getAuthorities();String getPassword();String getUsername();boolean isAccountNonExpired();boolean isAccountNonLocked();boolean isCredentialsNonExpired();boolean isEnabled();
}
它和Authentication接口类似,都包含了用户名,密码以及权限信息,而区别就是Authentication中的getCredentials来源于用户提交的密码凭证,而UserDetails中的getPassword取到的则是用户正确的密码信息,认证的第一步就是比较两者是否相同,除此之外,Authentication#getAuthorities是认证用户名和密码成功之后,由UserDetails#getAuthorities传递而来。而Authentication中的getDetails信息是经过了AuthenticationProvider认证之后填充的。
1.4 UserDetailsService
public interface UserDetailsService {UserDetails loadUserByUsername(String username) throws UsernameNotFoundException;
}
UserDetailsService 只有一个方法,就是从特定的地方(一般是从数据库中)加载用户信息。
1.5 AuthenticationManager
public interface AuthenticationManager {Authentication authenticate(Authentication authentication)throws AuthenticationException;
}
AuthenticationManager接口只包含一个方法,那就是认证,它是认证相关的核心接口,也是发起认证的出发点。实际业务中可能根据不同的信息进行认证,所以Spring推荐通过实现AuthenticationManager接口来自定义自己的认证方式.Spring提供了一个默认的实现,ProviderManager。
ProviderManager与认证相关的源码:
public class ProviderManager implements AuthenticationManager, MessageSourceAware,InitializingBean {// 维护一个AuthenticationProvider列表private List<AuthenticationProvider> providers = Collections.emptyList();public Authentication authenticate(Authentication authentication)throws AuthenticationException {Class<? extends Authentication> toTest = authentication.getClass();AuthenticationException lastException = null;Authentication result = null;// 依次认证for (AuthenticationProvider provider : getProviders()) {if (!provider.supports(toTest)) {continue;}try {result = provider.authenticate(authentication);if (result != null) {copyDetails(authentication, result);break;}}...catch (AuthenticationException e) {lastException = e;}}// 如果有Authentication信息,则直接返回if (result != null) {if (eraseCredentialsAfterAuthentication&& (result instanceof CredentialsContainer)) {//移除密码((CredentialsContainer) result).eraseCredentials();}//发布登录成功事件eventPublisher.publishAuthenticationSuccess(result);return result;}...//执行到此,说明没有认证成功,包装异常信息if (lastException == null) {lastException = new ProviderNotFoundException(messages.getMessage("ProviderManager.providerNotFound",new Object[] { toTest.getName() },"No AuthenticationProvider found for {0}"));}prepareException(lastException, authentication);throw lastException;}
}
其实ProviderManager不是自己处理身份验证请求,它将委托给配置的AuthenticationProvider列表,按照顺序进行依次认证,每个provider都会尝试认证,或者通过简单地返回null来跳过验证。如果所有实现都返回null,那么ProviderManager将抛出一个ProviderNotFoundException。
1.6 AuthenticationProvider
public interface AuthenticationProvider {Authentication authenticate(Authentication authentication)throws AuthenticationException;boolean supports(Class<?> authentication);
}
AuthenticationProvider接口提供了两个方法,一个是真正的认证,另一个是满足什么样的身份信息才进行如上认证。
Spring 提供了几种AuthenticationProvider的实现:
- DaoAuthenticationProvider从数据库中读取用户信息验证身份
- AnonymousAuthenticationProvider匿名用户身份认证
- RememberMeAuthenticationProvider已存cookie中的用户信息身份认证
- AuthByAdapterProvider使用容器的适配器验证身份
- CasAuthenticationProvider根据Yale中心认证服务验证身份,用于实现单点登陆
- JaasAuthenticationProvider从JASS登陆配置中获取用户信息验证身份
- RemoteAuthenticationProvider根据远程服务验证用户身份
- RunAsImplAuthenticationProvider对身份已被管理器替换的用户进行验证
- X509AuthenticationProvider从X509认证中获取用户信息验证身份
- TestingAuthenticationProvider单元测试时使用
当然也可以自己实现AuthenticationProvider接口来自定义认证。
这里我们基于最常用的DaoAuthenticationProvider来详细解释一下:
public class DaoAuthenticationProvider extends AbstractUserDetailsAuthenticationProvider {//密码加解密算法private PasswordEncoder passwordEncoder;//用户信息daoprivate UserDetailsService userDetailsService;//检查用户名和密码是否匹配protected void additionalAuthenticationChecks(UserDetails userDetails,UsernamePasswordAuthenticationToken authentication)throws AuthenticationException {if (authentication.getCredentials() == null) {throw new BadCredentialsException(messages.getMessage("AbstractUserDetailsAuthenticationProvider.badCredentials","Bad credentials"));}//用户提交的密码凭证String presentedPassword = authentication.getCredentials().toString();//比较两个密码if (!passwordEncoder.matches(presentedPassword, userDetails.getPassword())) {throw new BadCredentialsException(messages.getMessage("AbstractUserDetailsAuthenticationProvider.badCredentials","Bad credentials"));}}//获取用户信息protected final UserDetails retrieveUser(String username,UsernamePasswordAuthenticationToken authentication)throws AuthenticationException {UserDetails loadedUser = this.getUserDetailsService().loadUserByUsername(username);}
}
在Spring Security中。提交的用户名和密码,被封装成了UsernamePasswordAuthenticationToken,而根据用户名加载用户的任务则是交给了UserDetailsService,在DaoAuthenticationProvider中,对应的方法便是retrieveUser,虽然有两个参数,但是retrieveUser只有第一个参数起主要作用,返回一个UserDetails。还需要完成UsernamePasswordAuthenticationToken和UserDetails密码的比对,这便是交给additionalAuthenticationChecks方法完成的,如果这个void方法没有抛异常,则认为比对成功。
1.7 总结
为了方便理解,放上我画的uml图。
以及整个认证过程的:

Spring Security: 认证架构(流程)

1.Http Request
Spring security 定义了一个过滤器链, 当认证请求到达这个链时, 该请求将会穿过这个链条用于认证和授权. 这个链上的可以定义1…N个过滤器, 过滤器的用途是获取请求中的认证信息, 根据认证方式进行路由, 把认证信息传递给对应的认证处理程序进行处理. 下面的示例图显示了Spring security中常用的认证过滤器.(有关Spring Security过滤链的知识参考:https://segmentfault.com/a/1190000012668936)

不同的过滤器处理不同的认证信息. 例如:
- HTTP Basic 认证请通过过滤器链, 到达 BasicAuthenticationFilter
- HTTP Digest 认证被 DigestAuthenticationFilter 识别,拦截并处理.
- 表单登录认证被 UsernamePasswordAuthenticationFilter 识别,拦截并处理.
2.基于用户凭证创建 AuthenticationToken

这里我们以最常用表单登录为例子, 用户在登录表单中输入用户名和密码, 并点击确定, 浏览器提交POST请求到服务器, 穿过过滤器链, 被 UsernamePasswordAuthenticationFilter 识别, UsernamePasswordAuthenticationFilter 提取请求中的用户名和密码来创建 UsernamePasswordAuthenticationToken 对象.
3.把组装好的 AuthenticationToken 传递给 AuthenticationManagager
组装好的 UsernamePasswordAuthenticationToken 对象被传递给 AuthenticationManagager 的 authenticate 方法进行认证决策.AuthenticationManager 只是一个接口, 实际的实现是 ProviderManager
ProviderManager 有一个配置好的认证提供者列表(AuthenticationProvider), ProviderManager 会把收到的 UsernamePasswordAuthenticationToken 对象传递给列表中的每一个 AuthenticationProvider 进行认证.
4.进行认证处理
public interface AuthenticationProvider {Authentication authenticate(Authentication authentication) throws AuthenticationException;boolean supports(Class<?> authentication);
}
CasAuthenticationProvider
JaasAuthenticationProvider
DaoAuthenticationProvider
OpenIDAuthenticationProvider
RememberMeAuthenticationProvider
LdapAuthenticationProvider
上面我们说了, ProviderManager 会把收到的 UsernamePasswordAuthenticationToken 对象传递给列表中的每一个 AuthenticationProvider 进行认证.那到底 UsernamePasswordAuthenticationToken 会被哪一个接收和处理呢?是由supports方法来决定的。
5.UserDetailsService获取用户信息
UserDetailsService 获取的对象是一个 UserDetails. 框架中自带一个 User 实现, 但是一般我们需要对 UserDetails 进行定制, 内置的 User 太过简单实际项目无法满足需要.案例说明(基于jpa实现):
@Service
public class JpaReactiveUserDetailsService implements ReactiveUserDetailsService {private UserRepository userRepository;@Autowiredpublic void setUserRepository(UserRepository userRepository) {this.userRepository = userRepository;}/*** @param s 用户名* @return Mono<UserDetails>*/@Overridepublic Mono<UserDetails> findByUsername(String s) {// 从用户Repository中获取一个User Jpa实体对象Optional<User> optionalUser = userRepository.findByUsername(s);if (!optionalUser.isPresent()) {return Mono.empty();}User user = optionalUser.get();// 填充权限List<SimpleGrantedAuthority> authorities = new ArrayList<>();for (Role role : user.getRoles()) {authorities.add(new SimpleGrantedAuthority(role.getName()));}// 返回 UserDetailsreturn Mono.just(new org.springframework.security.core.userdetails.User(user.getUsername(), user.getPassword(), authorities));}
}
@Repository
public interface UserRepository extends JpaRepository<User, Long> {User findByEmail(String email);@Overridevoid delete(User user);Optional<User> findByUsername(String username);
}
6.认证结果处理
如果认证成功(用户名,密码完全正确), AuthenticationProvider 将会返回一个完全有效的 Authentication 对象(UsernamePasswordAuthenticationToken). 否则抛出 AuthenticationException 异常.完全有效的 Authentication 对象定义如下:
authenticated属性为 true
已授权的权限列表(GrantedAuthority列表)
用户凭证(仅用户名)
7.认证完成
认证完成后, AuthenticationManager 将会返回该认证对象(UsernamePasswordAuthenticationToken)返回给过滤器
8.存储认证对象
相关的过滤器获得一个认证对象后, 把它存储在安全上下文中(SecurityContext) 用于后续的授权判断(比如查询,修改等操作).
SecurityContextHolder.getContext().setAuthentication(authentication);

Spring Security授权架构(流程)
- 一旦认证成功,我们可以继续进行授权,授权是通过AccessDecisionManager来实现的。框架有三种实现,默认是AffirmativeBased,通过AccessDecisionVoter决策,有点像ProviderManager委托给AuthenticationProviders来认证。
- 用户可以享受哪一种权限可以自己配置或者读取数据库设置
认证流程源码跟踪:
UserDetialService
简介: UserDetailService只单纯地负责存取用户信息,用于查询数据库中的用户信息。
-
UserDetails => Spring Security基础接口,包含某个用户的账号,密码,权限,状态(是否锁定)等信息。只有getter方法。
-
Authentication => 认证对象,认证开始时创建,认证成功后存储于SecurityContext
-
principal => 用户信息对象,是一个Object,通常可转为UserDetails

UserDetails接口:
UserDetails中是用户信息
用于表示一个principal,但是一般情况下是作为(你所使用的用户数据库)和(Spring Security 的安全上下文需要保留的信息)之间的适配器。
实际上就是相当于定义一个规范,Security这个框架不管你的应用时怎么存储用户和权限信息的。只要你取出来的时候把它包装成一个UserDetails对象给我用就可以了
package org.springframework.security.core.userdetails;import java.io.Serializable;
import java.util.Collection;
import org.springframework.security.core.GrantedAuthority;public interface UserDetails extends Serializable {	/*** 返回授予用户的权限。无法返回<code>null</code>。.* @返回按自然键排序的权限(从不<code>null</code>)*/Collection<? extends GrantedAuthority> getAuthorities();/*** 返回用于验证用户身份的密码.* @返回密码*/String getPassword();/*** 返回用于验证用户身份的用户名。无法返回<code>null</code>* @返回用户名(从不<code>null</code>)*/String getUsername();/*** 指示用户的帐户是否已过期。无法对过期的帐户进行身份验证。* @如果用户的帐户有效(即未过期),则返回<code>true</code>;如果不再有效(即过期),则返回<code>false</code>*/boolean isAccountNonExpired();/*** 指示用户是锁定还是解锁。无法对锁定的用户进行身份验证.* 指示用户是锁定还是解锁。无法对锁定的用户进行身份验证*/boolean isAccountNonLocked();/*** 指示用户的凭据(密码)是否已过期。过期的凭据阻止身份验证* @如果用户的凭据有效(即未过期),则返回<code>true</code>;如果不再有效(即过期),则返回<code>false</code>*/boolean isCredentialsNonExpired();/*** 指示用户是启用还是禁用。无法对禁用的用户进行身份验证。* @如果用户已启用,则返回<code>true</code>,否则返回<code>false</code>*/boolean isEnabled();
}
UserDetails用来做什么?为什么还要带上权限集合?
如果我们不用认证框架,我们是怎么手动实现登录认证的?
基本上就是根据前端提交上来的用户名从数据库中查找这个账号的信息,然后比对密码。再进一步,可能还会添加一个字段来判断,当前用户是否已被锁定。这个接口就是这么用的。即把这些信息取出来,然后包装成一个对象交由框架去认证。
为什么还要带上权限?
因为登录成功后也不是什么都能访问的,还要根据你所拥有的权限进行判断。有权限你才能访问特定的对象。Security框架是这样设计的,即认证成功后,就把用户信息和拥有的权限都存储在SecurityContext中,当访问受保护资源(某个对象/方法)的时候,就把权限拿出来比对,看看是否满足。
框架提供的UserDetails默认实现
UserDetails有一个默认实现(框架提供的),User。用户可以从自己的数据库中取出此用户的账号,密码,以及相关权限,然后用构造方法填充创建一个User对象即可。
注:实现CredentialsContainer接口是为了在登录成功后,清除用户信息中的密码。(登录成功后会将用户信息存储在SecurityContext中)
public class User implements UserDetails, CredentialsContainer {private static final long serialVersionUID = 500L;private static final Log logger = LogFactory.getLog(User.class);private String password;private final String username;private final Set<GrantedAuthority> authorities;private final boolean accountNonExpired;private final boolean accountNonLocked;private final boolean credentialsNonExpired;private final boolean enabled;public User(String username, String password, Collection<? extends GrantedAuthority> authorities) {this(username, password, true, true, true, true, authorities);}public User(String username, String password, boolean enabled, boolean accountNonExpired, boolean credentialsNonExpired, boolean accountNonLocked, Collection<? extends GrantedAuthority> authorities) {if (username != null && !"".equals(username) && password != null) {this.username = username;this.password = password;this.enabled = enabled;this.accountNonExpired = accountNonExpired;this.credentialsNonExpired = credentialsNonExpired;this.accountNonLocked = accountNonLocked;this.authorities = Collections.unmodifiableSet(sortAuthorities(authorities));} else {throw new IllegalArgumentException("Cannot pass null or empty values to constructor");}}//省略部分代码
}
什么时候提供UserDetails信息,怎么提供?
UserDetailsService接口
那肯定是认证的时候。其实认证的操作,框架都已经帮你实现了,它所需要的只是,你给我提供获取信息的方式。所以它就定义一个接口,然后让你去实现,实现好了之后再注入给它。
框架提供一个UserDetailsService接口用来加载用户信息。如果要自定义实现的话,用户可以实现一个CustomUserDetailsService的类,然后把你的应用中的UserService和AuthorityService注入到这个类中,用户获取用户信息和权限信息,然后在loadUserByUsername方法中,构造一个User对象(框架的类)返回即可。
package org.springframework.security.core.userdetails;public interface UserDetailsService {UserDetails loadUserByUsername(String var1) throws UsernameNotFoundException;
}
框架提供的UserDetailsService接口默认实现
- InMemoryDaoImpl => 存储于内存
- JdbcDaoImpl => 存储于数据库(磁盘)
其中,如果你的数据库设计符合JdbcDaoImpl中的规范,你也就不用自己去实现UserDetailsService了。但是大多数情况是不符合的,因为你用户表不一定就叫users,可能还有其他前缀什么的,比如叫tb_users。或者字段名也跟它不一样。如果你一定要使用这个JdbcDaoImpl,你可以通过它的setter方法修改它的数据库查询语句。
注:它是利用Spring框架的JdbcTemplate来查询数据库的
public class JdbcDaoImpl extends JdbcDaoSupport implements UserDetailsService, MessageSourceAware {public static final String DEF_USERS_BY_USERNAME_QUERY = "select username,password,enabled from users where username = ?";public static final String DEF_AUTHORITIES_BY_USERNAME_QUERY = "select username,authority from authorities where username = ?";public static final String DEF_GROUP_AUTHORITIES_BY_USERNAME_QUERY = "select g.id, g.group_name, ga.authority from groups g, group_members gm, group_authorities ga where gm.username = ? and g.id = ga.group_id and g.id = gm.group_id";protected MessageSourceAccessor messages = SpringSecurityMessageSource.getAccessor();private String authoritiesByUsernameQuery = "select username,authority from authorities where username = ?";private String groupAuthoritiesByUsernameQuery = "select g.id, g.group_name, ga.authority from groups g, group_members gm, group_authorities ga where gm.username = ? and g.id = ga.group_id and g.id = gm.group_id";private String usersByUsernameQuery = "select username,password,enabled from users where username = ?";private String rolePrefix = "";private boolean usernameBasedPrimaryKey = true;private boolean enableAuthorities = true;private boolean enableGroups;//省略方法
}
注入到哪里去呢?
那肯定是注入到认证处理类中的,框架利用AuthenticationManager(接口)来进行认证。而Security为了支持多种方式认证,它提供ProviderManager类,这个实现了AuthenticationManager接口。它拥有多种认证方式,可以根据认证的类型委托给对应的认证处理类进行处理,这个处理类实现了AuthenticationProvider接口。
所以,最终UserDetailsService是注入到AuthenticationProvider的实现类中。
误解
UserDetailService 负责认证用户?
实际上:UserDetailService只单纯地负责存取用户信息,除了给框架内的其他组件提供数据外没有其他功能。而认证过程是由AuthenticationManager来完成的。(大多数情况下,可以通过实现AuthenticationProvider接口来自定义认证过程)
它和Authentication接口很类似,比如它们都拥有username、authorities、Authentication的getCredentials()与UserDetails中的getPassword()需要被区分对待,前者是用户提交的密码凭证,后者是用户实际存储的密码,认证其实就是对这两者的比对。Authentication中的getAuthorities()实际是由UserDetails的getAuthorites()传递而形成的,还记得Authentication接口中的getDetails()方法吗?其中的UserDetails用户详细信息便是经过了AuthenticationProvider认证之后被填充的。
通过实现UserDetailsService和UserDetails,我们可以完成对用户信息获取方式以及用户信息字段的扩展。
Spring Security 提供的InMemoryUserDetailsManager(内存认证),jdbcUserDetailsManager(jdbc认证)就是UserDetailsService的实现类,主要区别无非就是从内存还是从数据库加载用户。

SecurityContextPersistenceFilter
Persistence(泼C4 ten 思)
这个filter是整个filter链的入口和出口,请求开始会从SecurityContextRepository中 获取SecurityContext对象并设置给SecurityContextHolder。在请求完成后将
SecurityContextHolder持有的SecurityContext再保存到配置好的
DecurityContextRepository中,同时清除SecurityContextHolder中的SecurityContext
总结一下:SecurityContextPersistenceFilter它的作用就是请求来的时候将包含了认证授权信息的SecurityContext对象从SecurityContextRepository中取出交给SecurityContextHolder工具类,方便我们通过SecurityContextHolder获取SecurityContext从而获取到认证授权信息,请求走的时候又把SecurityContextHolder清空,源码如下:
public class SecurityContextPersistenceFilter extends GenericFilterBean {...省略...public void doFilter(ServletRequest req, ServletResponse res, FilterChain chain) throws IOException, ServletException {...省略部分代码...HttpRequestResponseHolder holder = new HttpRequestResponseHolder(request,response);//从SecurityContextRepository获取到SecurityContext SecurityContext contextBeforeChainExecution = repo.loadContext(holder);try {//把 securityContext设置到SecurityContextHolder,如果没认证通过,这个SecurtyContext就是空的SecurityContextHolder.setContext(contextBeforeChainExecution);//调用后面的filter,比如掉用usernamepasswordAuthenticationFilter实现认证chain.doFilter(holder.getRequest(), holder.getResponse());}finally {//如果认证通过了,这里可以从SecurityContextHolder.getContext();中获取到SecurityContextSecurityContext contextAfterChainExecution = SecurityContextHolder.getContext();// Crucial removal of SecurityContextHolder contents - do this before anything// else.//删除SecurityContextHolder中的SecurityContext SecurityContextHolder.clearContext();//把SecurityContext 存储到SecurityContextRepositoryrepo.saveContext(contextAfterChainExecution, holder.getRequest(),holder.getResponse());request.removeAttribute(FILTER_APPLIED);if (debug) {logger.debug("SecurityContextHolder now cleared, as request processing completed");}}
...省略...
UsernamePasswordAuthenticationFilter
它的重用是,拦截“/login”登录请求,处理表单提交的登录认证,将请求中的认证信息包括username,password等封装成UsernamePasswordAuthenticationToken,然后调用
AuthenticationManager的认证方法进行认证。
public class UsernamePasswordAuthenticationFilter extendsAbstractAuthenticationProcessingFilter {// ~ Static fields/initializers// =====================================================================================//从登录请求中获取参数:username,password的名字public static final String SPRING_SECURITY_FORM_USERNAME_KEY = "username";public static final String SPRING_SECURITY_FORM_PASSWORD_KEY = "password";private String usernameParameter = SPRING_SECURITY_FORM_USERNAME_KEY;private String passwordParameter = SPRING_SECURITY_FORM_PASSWORD_KEY;//默认支持POST登录private boolean postOnly = true;//默认拦截/login请求,Post方式public UsernamePasswordAuthenticationFilter() {super(new AntPathRequestMatcher("/login", "POST"));}// ~ Methods// ========================================================================================================public Authentication attemptAuthentication(HttpServletRequest request,HttpServletResponse response) throws AuthenticationException {//判断请求是否是POSTif (postOnly && !request.getMethod().equals("POST")) {throw new AuthenticationServiceException("Authentication method not supported: " + request.getMethod());}//获取到用户名和密码String username = obtainUsername(request);String password = obtainPassword(request);if (username == null) {username = "";}if (password == null) {password = "";}username = username.trim();//用户名和密码封装TokenUsernamePasswordAuthenticationToken authRequest = new UsernamePasswordAuthenticationToken(username, password);//设置details属性// Allow subclasses to set the "details" propertysetDetails(request, authRequest);//调用AuthenticationManager().authenticate进行认证,参数就是Token对象return this.getAuthenticationManager().authenticate(authRequest);}AuthenticationManager
(奥凡提kei神 买嫩者)
请求通过UsernamePasswordAuthenticationFilter调用AuthenticationManager,默认走的实现类是ProviderManager,它会找到能支持当前认证的AuthenticationProvider实现类调用器authenticate方法执行认证,认证成功后会清除密码,然后抛出AuthenticationSuccessEvent事件
public class ProviderManager implements AuthenticationManager, MessageSourceAware,InitializingBean {...省略...//这里authentication 是封装了登录请求的认证参数,//即:UsernamePasswordAuthenticationFilter传入的Token对象public Authentication authenticate(Authentication authentication)throws AuthenticationException {Class<? extends Authentication> toTest = authentication.getClass();AuthenticationException lastException = null;AuthenticationException parentException = null;Authentication result = null;Authentication parentResult = null;boolean debug = logger.isDebugEnabled();//找到所有的AuthenticationProvider ,选择合适的进行认证for (AuthenticationProvider provider : getProviders()) {//是否支持当前认证if (!provider.supports(toTest)) {continue;}if (debug) {logger.debug("Authentication attempt using "+ provider.getClass().getName());}try {//调用provider执行认证result = provider.authenticate(authentication);if (result != null) {copyDetails(authentication, result);break;}}...省略...}...省略...//result就是Authentication ,使用的实现类依然是UsernamepasswordAuthenticationToken,//封装了认证成功后的用户的认证信息和授权信息if (result != null) {if (eraseCredentialsAfterAuthentication&& (result instanceof CredentialsContainer)) {// Authentication is complete. Remove credentials and other secret data// from authentication//这里在擦除登录密码((CredentialsContainer) result).eraseCredentials();}// If the parent AuthenticationManager was attempted and successful than it will publish an AuthenticationSuccessEvent// This check prevents a duplicate AuthenticationSuccessEvent if the parent AuthenticationManager already published itif (parentResult == null) {//发布事件eventPublisher.publishAuthenticationSuccess(result);}return result;}
DaoAuthenticationProvider
请求到达AuthenticationProvider,默认实现是DaoAuthenticationProvider,它的作用是根据传入的Token中的username调用UserDetailService加载数据库中的认证授权信息(UserDetails),然后使用PasswordEncoder对比用户登录密码是否正确
public class DaoAuthenticationProvider extends AbstractUserDetailsAuthenticationProvider {//密码编码器private PasswordEncoder passwordEncoder;//UserDetailsService ,根据用户名加载UserDetails对象,从数据库加载的认证授权信息private UserDetailsService userDetailsService;//认证检查方法protected void additionalAuthenticationChecks(UserDetails userDetails,UsernamePasswordAuthenticationToken authentication)throws AuthenticationException {if (authentication.getCredentials() == null) {logger.debug("Authentication failed: no credentials provided");throw new BadCredentialsException(messages.getMessage("AbstractUserDetailsAuthenticationProvider.badCredentials","Bad credentials"));}//获取密码String presentedPassword = authentication.getCredentials().toString();//通过passwordEncoder比较密码,presentedPassword是用户传入的密码,userDetails.getPassword()是从数据库加载到的密码//passwordEncoder编码器不一样比较密码的方式也不一样if (!passwordEncoder.matches(presentedPassword, userDetails.getPassword())) {logger.debug("Authentication failed: password does not match stored value");throw new BadCredentialsException(messages.getMessage("AbstractUserDetailsAuthenticationProvider.badCredentials","Bad credentials"));}}//检索用户,参数为用户名和Token对象protected final UserDetails retrieveUser(String username,UsernamePasswordAuthenticationToken authentication)throws AuthenticationException {prepareTimingAttackProtection();try {//调用UserDetailsService的loadUserByUsername方法,//根据用户名检索数据库中的用户,封装成UserDetails UserDetails loadedUser = this.getUserDetailsService().loadUserByUsername(username);if (loadedUser == null) {throw new InternalAuthenticationServiceException("UserDetailsService returned null, which is an interface contract violation");}return loadedUser;}catch (UsernameNotFoundException ex) {mitigateAgainstTimingAttack(authentication);throw ex;}catch (InternalAuthenticationServiceException ex) {throw ex;}catch (Exception ex) {throw new InternalAuthenticationServiceException(ex.getMessage(), ex);}}//创建认证成功的认证对象Authentication,使用的实现是UsernamepasswordAuthenticationToken,//封装了认证成功后的认证信息和授权信息,以及账户的状态等@Overrideprotected Authentication createSuccessAuthentication(Object principal,Authentication authentication, UserDetails user) {boolean upgradeEncoding = this.userDetailsPasswordService != null&& this.passwordEncoder.upgradeEncoding(user.getPassword());if (upgradeEncoding) {String presentedPassword = authentication.getCredentials().toString();String newPassword = this.passwordEncoder.encode(presentedPassword);user = this.userDetailsPasswordService.updatePassword(user, newPassword);}return super.createSuccessAuthentication(principal, authentication, user);}...省略...
这里提供了三个方法
- additionalAuthenticationChecks:通过passwordEncoder比对密码
- retrieveUser:根据用户名调用UserDetailsService加载用户认证授权信息
- createSuccessAuthentication:登录成功,创建认证对象Authentication
然而你发现 DaoAuthenticationProvider 中并没有authenticate认证方法,真正的认证逻辑是通过父类AbstractUserDetailsAuthenticationProvider.authenticate方法完成的
AbstractUserDetailsAuthenticationProvider
Abstract(啊扑思转可他)
public abstract class AbstractUserDetailsAuthenticationProvider implementsAuthenticationProvider, InitializingBean, MessageSourceAware {//认证逻辑public Authentication authenticate(Authentication authentication)throws AuthenticationException {//得到传入的用户名String username = (authentication.getPrincipal() == null) ? "NONE_PROVIDED": authentication.getName();//从缓存中得到UserDetailsboolean cacheWasUsed = true;UserDetails user = this.userCache.getUserFromCache(username);if (user == null) {cacheWasUsed = false;try {//检索用户,底层会调用UserDetailsService加载数据库中的UserDetails对象,保护认证信息和授权信息user = retrieveUser(username,(UsernamePasswordAuthenticationToken) authentication);}catch (UsernameNotFoundException notFound) {...省略...}try {//前置检查,主要检查账户是否锁定,账户是否过期等preAuthenticationChecks.check(user);//比对密码在这个方法里面比对的additionalAuthenticationChecks(user,(UsernamePasswordAuthenticationToken) authentication);}catch (AuthenticationException exception) {...省略...}//后置检查postAuthenticationChecks.check(user);if (!cacheWasUsed) {//设置UserDetails缓存this.userCache.putUserInCache(user);}Object principalToReturn = user;if (forcePrincipalAsString) {principalToReturn = user.getUsername();}//认证成功,创建Auhentication认证对象return createSuccessAuthentication(principalToReturn, authentication, user);
}
UsernamePasswordAuthenticationFilter
认证成功,请求会重新回到UsernamePasswordAuthenticationFilter,然后会通过其父类AbstractAuthenticationProcessingFilter.successfulAuthentication方法将认证对象封装成SecurityContext设置到SecurityContextHolder中
protected void successfulAuthentication(HttpServletRequest request,HttpServletResponse response, FilterChain chain, Authentication authResult)throws IOException, ServletException {if (logger.isDebugEnabled()) {logger.debug("Authentication success. Updating SecurityContextHolder to contain: "+ authResult);}//认证成功,吧Authentication 设置到SecurityContextHolderSecurityContextHolder.getContext().setAuthentication(authResult);//处理记住我业务逻辑rememberMeServices.loginSuccess(request, response, authResult);// Fire eventif (this.eventPublisher != null) {eventPublisher.publishEvent(new InteractiveAuthenticationSuccessEvent(authResult, this.getClass()));}//重定向登录成功地址successHandler.onAuthenticationSuccess(request, response, authResult);}
然后后续请求又会回到SecurityContextPersistenceFilter,它就可以从SecurityContextHolder获取到SecurityContext持久到SecurityContextRepository(默认实现是HttpSessionSecurityContextRepository基于Session存储)
Token、Session、Cookie:
cookie、session与token之间的关系:
cookie与session区别:
cookie中存放着一个sessionID,请求时会发送这个ID;
cookie数据存放在客户端上,session数据放在服务器上;
cookie不是很安全,且保存数据有限;
session一定时间内保存在服务器上,当访问增多,占用服务器性能。
session与token:
作为身份认证,token安全行比session好;
Session 认证只是简单的把User 信息存储到Session 里,因为SID 的不可预测性,暂且认为是安全的。这是一种认证手段。 而Token ,如果指的是OAuth Token 或类似的机制的话,提供的是 认证 和 授权 ,认证是针对用户,授权是针对App 。其目的是让 某App有权利访问 某用户 的信息。
token与cookie:
Cookie是不允许垮域访问的,但是token是支持的, 前提是传输的用户认证信息通过HTTP头传输;
token就是令牌,比如你授权(登录)一个程序时,他就是个依据,判断你是否已经授权该软件;cookie就是写在客户端的一个txt文件,里面包括你登录信息之类的,这样你下次在登录某个网站,就会自动调用cookie自动登录用户名;session和cookie差不多,只是session是写在服务器端的文件,也需要在客户端写入cookie文件,但是文件里是你的浏览器编号.Session的状态是存储在服务器端,客户端只有session id;而Token的状态是存储在客户端。
如果没有Cookie、Session还能进行身份验证吗?
当服务器tomcat第一次接收到客户端的请求时,会开辟一块独立的session空间,建立一个session对象,同时会生成一个session id,通过响应头的方式保存到客户端浏览器的cookie当中。以后客户端的每次请求,都会在请求头部带上这个session id,这样就可以对应上服务端的一些会话的相关信息,比如用户的登录状态。
如果没有客户端的Cookie,Session是无法进行身份验证的。
当服务端从单体应用升级为分布式之后,cookie+session这种机制要怎么扩展?
1、session黏贴,在负载均均衡中,通过一个机制保证同一个客户端的所有请求都会转发到同一个tomcat实例当中。问题:当这个tomcat实例出现问题之后,请求就会被转发到其他实例,这时候用户的session信息就丢了。
2、session复制,当一个tomcat实例上保存了session信息后,主动将session复制到集群中的其他实例。问题:复制是需要时间的,在复制过程中,容易产生session信息丢失。
3、session共享:就是将服务端的session信息保存到一个第三方中,比如Redis。
Cookie 和 Session 有什么区别?如何使用Seesion进行身份验证?
Session的主要作用就是通过服务端记录用户的状态。
Cookie 数据保存在客户端(浏览器端),Session数据保存在服务器端。相对来说Session安全性更高。如果使用Cookie 的话,一些敏感信息不要写入Cookie中,最好能将Cookie信息加密然后使用到的时候再去服务器端解密。
那么,如何使用Session进行身份验证?
很多时候我们都是通过SeesionID来指定特定的用户,SeesionID一般会选择存放在服务端。举个例子:用户成功登录系统,然后返回给客户端具有SessionID的Cookie,当用户向后端发起请求的时候会把SessionID带上,这样后端就知道你的身份状态了。关于这种认证方式更详细的过程如下:

用户向服务器发送用户名和密码用于登录系统。
服务器验证通过后,服务器为用户创建一个Session,并将Session信息存储起来。
服务器向用户返回一个SessionID,写入用户的Cookie。
当用户保持登录状态时,Cookie将与每个后续请求一起被发送出去。
服务器可以将存储在Cookie上的SessionID与存储在内存中或者数据库中的Session信息进行比较,以验证用户的身份,返回给用户客户端响应信息的时候会附带用户当前的状态。
使用Session的时候需要注意下面几个点:
- 使用Seesion的关键业务一定要确保客户端开启了Cookie
- 注意Session的过期时间
为什么Cookie无法防止CSRF攻击,而Token可以?
CSRF(Cross Site Request Forgery)一般被翻译为:跨站请求伪造。那么什么是跨站请求伪造呢?说简单一点用你的身份去发送一些对你不友好的请求。举个简单的例子:
小壮登录了某网上银行,他来到了网上银行的帖子区,看到一个帖子下面有一个链接写着"科学理财,年收益率70%",小壮好奇的点开了这个链接,结果发现自己的账户少了10000元。这是怎么回事呢?原来黑客在链接中藏了一个请求,这个请求直接利用小壮的身份给银行发送了一个转账请求,也就是通过你的Cookie 向银行发出请求。
<a src=“http://www.mybank.com/Transfer?bankId=11&10000”> 科学理财,年收益率70%</a>,原因是进行Session认证的时候,我们一般使用Cookie来存储SessionId,当我们登录后后端生成一个SessionId放在Cookie中返回给客户端,服务端通过Redis或者其它存储工具记录保存着这个Sessionid,客户端登录以后每次请求都会带上这个Sessionid,服务端通过这个Sessionid来标识你这个人。如果别人通过 cookie 拿到了Seesionid后就可以代替你的身份访问系统了。
Session 认证中 Cookie中的Sessionid是由浏览器发送到服务端的,借助这个特性,攻击者就可以通过让用户误点攻击连接,达到攻击效果。
但是,我们使用token的话就不会存在这个问题,在我们登录成功获得token之后,一般会选择存放在localStorage中。然后我们在前端通过某些方式会给每个发到后端的请求加上这个token,这样就不会出现 CSRF漏洞的问题。因为,即使有个你点击了非法链接发送了请求到服务端,这个非法请求是不会携带token的,所以这个请求将是非法的。
Session:
Session解析:
tomcat中的session默认时间是30分钟。
session因为请求(request对象)而产生;
session是一个容器,可以存放会话过程中的任何对象;
session的创建与使用总是在服务端,浏览器从来都没有得到过session对象;
session是一种http存储机制,目的是为武装的http提供持久机制。
当用户第一次通过浏览器使用用户名和密码访问服务器时,服务器会验证用户数据,验证成功后在服务器端写入session数据,向客户端浏览器返回sessionid,浏览器将sessionid保存在cookie中,当用户再次访问服务器时,会携带sessionid,服务器会拿着sessionid从数据库获取session数据,然后进行用户信息查询,查询到,就会将查询到的用户信息返回,从而实现状态保持。

弊端:
1、服务器压力增大
通常session是存储在内存中的,每个用户通过认证之后都会将session数据保存在服务器的内存中,而当用户量增大时,服务器的压力增大。
2、CSRF跨站伪造请求攻击
session是基于cookie进行用户识别的, cookie如果被截获,用户就会很容易受到跨站请求伪造的攻击。
3、扩展性不强(微服务Session共享问题)
如果将来搭建了多个服务器,虽然每个服务器都执行的是同样的业务逻辑,但是session数据是保存在内存中的(不是共享的),用户第一次访问的是服务器1,当用户再次请求时可能访问的是另外一台服务器2,服务器2获取不到session信息,就判定用户没有登陆过。(热门的Session共享问题)
微服务下使用Session,通常的做法有下面几种:
**Session复制:**多台应用服务器之间同步Session,使Session保持一致,对外透明。
**Session粘贴:**当用户访问集群中某台服务器后,强制指定后续所有请求均落到此机器上。
**Session集中存储:**将Session存入分布式缓存中,所有服务器应用实例统一从分布式缓存中存取Session。
总体来讲,基于session认证的认证方式,可以更好的在服务端对会话进行控制,且安全性较高。但是,session机制方式基于cookie,在复杂多样的移动客户端上不能有效的使用,并且无法跨域,另外随着系统的扩展需提高session的复制、粘贴及存储的容错性。
Session共享问题(解决):
1、使用模拟spring-session+ redis【可靠】
2、使用token重写session【可靠】
3、使用cookie,不安全
4、使用nginx负载均衡策略,ip_hash绑定,不存在session共享问题
5、使用数据库同步session,对数据库有压力
6、tomcat配置session共享
利用cookie同步session数据原理图如下

缺点:安全性差、http请求都需要带参数增加了带宽消耗
session的分布式方案:
1、采用无状态服务,抛弃session
2、存入cookie(有安全风险)
3、服务器之间进行Session同步,这样可以保证每个服务器上都有全部的Session信息,不过当服务器数量比较多的时候,同步是会有延迟甚至同步失败;
4、IP绑定策略,使用Nginx(或其他复杂均衡软硬件)中的IP绑定策略,同一个IP只能在指定的同一个机器访问,但是这样做失去了负载均衡的意义,当挂掉一台服务器的时候,会影响一批用户的使用,风险很大;
5、使用Redis存储,把Session放到Redis中存储,虽然架构上变得复杂,并且需要多访问一次Redis,但是这种方案带来的好处也是很大的:
- 实现了Session共享;
- 可以水平扩展(增加Redis服务器);
- 服务器重启Session不丢失(不过也要注意Session在Redis中的刷新/失效机制)
- 不仅可以跨服务器Session共享,甚至可以跨平台(例如网页端和APP端)。
servlet和JSP之间能共享session对象吗?
当然可以,session作用域中的内容,可以在多个请求中共享数据。例如可以在Servlet中通过request.getession()来得到HttpSession对象,然后将相应的数据存储到该session对象中,在其他jsp页面上都可以通过内置对象session来获取存入的值,即使这些页面是通过重定向方式跳转过去的,也可以得到值。Session本来就是用来保障在同一客户端和服务器之间多次请求。
关于servlet和jsp中的session对象:
在servlet中,要得到session并设值,要用request.getSession().setAttribute();在jsp页面中<%request.getSession().setAttribute(“name”,“zzc”);%>
分布式架构下,Session共享有什么方案?
1、不要有session:但是确实在某些场景下,是可以没有session的,其实在很多接口类系统当中,都提倡【API无状态服务】;也就是每一次的接口访问,都不依赖session、不依赖前一次的接口访问,用 JWT的token;
2、存储cookie中:将session存储到cookie中,但是缺点也很明显,例如每次请求都得带着session,数据存储在客户端本地,是有风险的;
3、session同步:对个服务器之间同步session,这样可以保证每个服务器上都有全部的session信息,不过当服务器数量比较多的时候,同步是会有延迟甚至同步失败;
4、我们现在的系统会把session放到Redis中存储,虽然架构上变得复杂,并且需要多访问一次Redis,但是这种方案带来的好处也是很大的:实现session共享,可以水平扩展(增加Redis服务器),服务器重启session不丢失(不过也要注意session在Redis中的刷新/失效机制),不仅可以跨服务器session共享,甚至可以跨平台(例如网页端和APP端)进行共享。
5、使用Nginx(或其他负载均衡组件)中的ip绑定策略,同一个ip只能在指定的同一个机制访问,但是这样做风险也比较大,而且也失去了负载均衡的意义。
Session工作原理:
执行流程:
1、第一次请求,请求头中没有jsessionid的cookie,当访问到对应的servlet资源时,执行到getSession()会创建HttpSession对象;进而响应时就将session的id作为cookie的value,响应到浏览器 Set-cookie:jsessionid=xxxx;
2、再一次请求时,http请求中就有一个cookie:jsessionid=xxxx信息,那么该servlet就可以通过getSession()获取到jsessionid在服务器内查找对应的session对象,有就使用,无就创建。

Session的创建、获取、销毁:
// 获取session对象,服务器底层创建Session
HttpSession session = request.getSession();
// 获取session对象的唯一标识:sessionID (JSESSIONID=E925DE1EF00F7944537C01A3BC0E2688)
String jsessionid = session.getId();
// 销毁session对象中的jsessionid
session.invalidate();
Session共享范围:
http域对象之一,服务器中可跨共享数据。
// 往 session 中存储 msg
HttpSession session = request.getSession();
session.setAttribute("msg", "helloSession");
// 获取 msg
HttpSession session = request.getSession();
Object msg = session.getAttribute("msg");
// 删除域对象中的数据
session.removeAttribute("msg");
Session生命周期:
一般都是默认值30分钟,无需更改。
取决于Tomcat中web.xml默认配置:
<session-config><session-timeout>30</session-timeout>
</session-config>
Session生命周期结束时机:
- 浏览器关闭:销毁Cookie中的jsessionid=xxx,原session对象会保留默认30min后才销毁,30分钟后为新的session;
- session销毁:主动调用 session.invalidate() 方法后,立即将session对象销毁,再次访问时会创建新的session。
HTTP请求中4大共享数据方式对比:
-
ServletContext:生命周期为服务器开启和关闭,而且所有用户都会共享,范围过大,保密性不高。
-
request:生命周期太短,一次请求就丢失,无法再重定向后再次获取内容
-
cookie:存储在客户端浏览器,不安全!客户端浏览器可对cookie进行查看或修改,而且cookie无法定义特殊符号
-
session:存储在服务器,默认30分钟才销毁更新,或者服务器中主动销毁,适合用户登录信息的共享。
三大域对象:
-
request1个用户可有多个;
-
session1个用户1个;
-
servletContext所有用户公用1个。
为了节省空间,提高效率,ServletContext中要放必须的、重要的、所有用户需要共享的线程安全的一些信息。
Session应用:
使用验证码登陆和共享用户信息
<form action="/demo/login" method="post">账户:<input type="text" name="username"  /> <br>密码:<input type="password" name="password" /> <br>验证:<input type="text" name="validateCode" />< img src="/demo/createCode"><br><button type="submit">登陆</button>
</form>
验证码图片生成:
@WebServlet(name = "CreateCodeServlet", urlPatterns = "/createCode")
public class CreateCodeServlet extends HttpServlet {@Overrideprotected void doPost(HttpServletRequest request, HttpServletResponse response) throws ServletException, IOException {int width = 60;//定义图片宽度int height = 32;//定义图片高度//创建图片对象BufferedImage image = new BufferedImage(width, height, BufferedImage.TYPE_INT_RGB);//创建画笔对象Graphics g = image.getGraphics();//设置背景颜色g.setColor(new Color(0xDCDCDC));g.fillRect(0, 0, width, height);//实心矩形//设置边框g.setColor(Color.black);g.drawRect(0, 0, width - 1, height - 1);//空心矩形Random rdm = new Random();//画干扰椭圆for (int i = 0; i < 50; i++) {int x = rdm.nextInt(width);int y = rdm.nextInt(height);g.drawOval(x, y, 0, 0);}//产生随机字符串String hash1 = Integer.toHexString(rdm.nextInt());//生成四位随机验证码String capstr = hash1.substring(0, 4);//将产生的验证码存储到session域中,方便以后进行验证码校验!request.getSession().setAttribute("existCode", capstr);System.out.println(capstr);g.setColor(new Color(0, 100, 0));g.setFont(new Font("Candara", Font.BOLD, 24));g.drawString(capstr, 8, 24);g.dispose();//将图片响应到浏览器response.setContentType("image/jpeg");OutputStream strm = response.getOutputStream();ImageIO.write(image, "jpeg", strm);strm.close();}@Overrideprotected void doGet(HttpServletRequest request, HttpServletResponse response) throws ServletException, IOException {doPost(request, response);}
}
登陆Servlet:
@WebServlet(name = "LoginServlet", urlPatterns = "/login")
public class LoginServlet extends HttpServlet {@Overrideprotected void doPost(HttpServletRequest request, HttpServletResponse response) throws ServletException, IOException {request.setCharacterEncoding("utf-8");response.setContentType("text/html;charset=utf-8");// 获取输入的验证码String validateCode = request.getParameter("validateCode");// 将输入的验证码和产生的随机验证码进行校验String existCode = (String) request.getSession().getAttribute("existCode");if (validateCode.equals(existCode)) {String username = request.getParameter("username");String password = request.getParameter("password");UserDao userDao = new UserDaoImpl();Userinfo inputUserinfo = new Userinfo();inputUserinfo.setUsername(username);inputUserinfo.setPassword(password);try {Userinfo existUserinfo = userDao.login(inputUserinfo);System.out.println(existUserinfo);if (null == existUserinfo) {// 登陆失败,跳转登陆页面,转发request.getRequestDispatcher("/login.html").forward(request, response);} else {// 登陆成功,跳转到首页,重定向request.getSession().setAttribute("existUser", existUserinfo);response.sendRedirect("/demo/show");}} catch (SQLException e) {e.printStackTrace();}} else {// 校验不通过,跳转到登陆页面request.getRequestDispatcher("/login.html").forward(request, response);}}@Overrideprotected void doGet(HttpServletRequest request, HttpServletResponse response) throws ServletException, IOException {doPost(request, response);}
}
展示Servlet:
@WebServlet(name = "ShowIndexServlet", urlPatterns = "/show")
public class ShowIndexServlet extends HttpServlet {@Overrideprotected void doPost(HttpServletRequest request, HttpServletResponse response) throws ServletException, IOException {response.setContentType("text/html;charset=utf-8");Userinfo existUserinfo = (Userinfo) request.getSession().getAttribute("existUser");if (null != existUserinfo) {// 在登陆状态response.getWriter().write("欢迎回来," + existUserinfo.getUsername());} else {// 不在登陆状态,根据需求:①提示 ②跳转到登陆页//response.getWriter().write("您还未登陆,< a href=' '>请登陆</ a>");response.sendRedirect("/demo/login.html");}}@Overrideprotected void doGet(HttpServletRequest request, HttpServletResponse response) throws ServletException, IOException {doPost(request, response);}
}
使用spring-session把session存放在Redis
1、创建一个springboot项目
2、引入maven依赖
<!--spring boot 与redis应用基本环境配置 --><dependency><groupId>org.springframework.boot</groupId><artifactId>spring-boot-starter-redis</artifactId></dependency><!--spring session 与redis应用基本环境配置,需要开启redis后才可以使用,不然启动Spring boot会报错 --><dependency><groupId>org.springframework.session</groupId><artifactId>spring-session-data-redis</artifactId></dependency>
3、创建SessionConfig.java
import org.springframework.beans.factory.annotation.Value;
import org.springframework.context.annotation.Bean;
import org.springframework.data.redis.connection.jedis.JedisConnectionFactory;
import org.springframework.session.data.redis.config.annotation.web.http.EnableRedisHttpSession;//这个类用配置redis服务器的连接
//maxInactiveIntervalInSeconds为SpringSession的过期时间(单位:秒)
@EnableRedisHttpSession(maxInactiveIntervalInSeconds = 1800)
public class SessionConfig {// 冒号后的值为没有配置文件时,自动装载的默认值@Value("${redis.hostname:localhost}")String HostName;@Value("${redis.port:6379}")int Port;@Value("${redis.password}")String password;@Beanpublic JedisConnectionFactory connectionFactory() {JedisConnectionFactory connection = new JedisConnectionFactory();connection.setPort(Port);connection.setHostName(HostName);connection.setPassword(password);return connection;}
}
4、初始化Session
//初始化Session配置
public class SessionInitializer extends AbstractHttpSessionApplicationInitializer{public SessionInitializer() {super(SessionConfig.class);}
}
5、控制器层代码
import javax.servlet.http.HttpServletRequest;
import javax.servlet.http.HttpSession;import org.springframework.beans.factory.annotation.Value;
import org.springframework.boot.SpringApplication;
import org.springframework.web.bind.annotation.RequestMapping;
import org.springframework.web.bind.annotation.RestController;@RestController
public class SessionController {@Value("${server.port}")private String PORT;public static void main(String[] args) {SpringApplication.run(SessionController.class, args);}@RequestMapping("/index")public String index() {return "index:" + PORT;}@RequestMapping("/setSession")public String setSession(HttpServletRequest request, String sessionKey, String sessionValue) {HttpSession session = request.getSession(true);session.setAttribute(sessionKey, sessionValue);return "success,port:" + PORT;}@RequestMapping("/getSession")public String getSession(HttpServletRequest request, String sessionKey) {HttpSession session =null;try {session = request.getSession(false);} catch (Exception e) {e.printStackTrace();}String value=null;if(session!=null){value = (String) session.getAttribute(sessionKey);}return "sessionValue:" + value + ",port:" + PORT;}}
6、配置application.properties
//Redis (RedisConfiguration)
spring.redis.database=0
spring.redis.host=10.37.129.3
spring.redis.port=6379
spring.redis.password=123456
spring.redis.pool.max-idle=8
spring.redis.pool.min-idle=0
spring.redis.pool.max-active=8
spring.redis.pool.max-wait=-1
spring.redis.timeout=5000redis.hostname=10.37.129.3
redis.port=6379
redis.password=123456#path
server.context-path=/
分布式Session解决方案:
cookie和session的区别和联系
cookie是本地客户端用来存储少量数据信息的,保存在客户端,用户能够很容易的获取,安全性不高,存储的数据量小
session是服务器用来存储部分数据信息,保存在服务器,用户不容易获取,安全性高,储存的数据量相对大,存储在服务器,会占用一些服务器资源,但是对于它的优点来说,这个缺点可以忽略了
session有什么用
在一次客户端和服务器为之间的会话中,客户端(浏览器)向服务器发送请求,首先cookie会自动携带上次请求存储的数据(JSESSIONID)到服务器,服务器根据请求参数中的JSESSIONID到服务器中的session库中查询是否存在此JSESSIONID的信息,如果存在,那么服务器就知道此用户是谁,如果不存在,就会创建一个JSESSIONID,并在本次请求结束后将JSESSIONID返回给客户端,同时将此JSESSIONID在客户端cookie中进行保存
客户端和服务器之间是通过http协议进行通信,但是http协议是无状态的,不同次请求会话是没有任何关联的,但是优点是处理速度快
session是一次浏览器和服务器的交互的会话,当浏览器关闭的时候,会话就结束了,但是会话session还在,默认session是还保留30分钟的
分布式session一致性
客户端发送一个请求,经过负载均衡后该请求会被分配到服务器中的其中一个,由于不同服务器含有不同的web服务器(例如Tomcat),不同的web服务器中并不能发现之前web服务器保存的session信息,就会再次生成一个JSESSIONID,之前的状态就会丢失
4种分布式session解决方案
方案一:客户端存储
直接将信息存储在cookie中
cookie是存储在客户端上的一小段数据,客户端通过http协议和服务器进行cookie交互,通常用来存储一些不敏感信息
缺点:
数据存储在客户端,存在安全隐患
cookie存储大小、类型存在限制
数据存储在cookie中,如果一次请求cookie过大,会给网络增加更大的开销
方案二:session复制
session复制是小型企业应用使用较多的一种服务器集群session管理机制,在真正的开发使用的并不是很多,通过对web服务器(例如Tomcat)进行搭建集群。
存在的问题:
session同步的原理是在同一个局域网里面通过发送广播来异步同步session的,一旦服务器多了,并发上来了,session需要同步的数据量就大了,需要将其他服务器上的session全部同步到本服务器上,会带来一定的网路开销,在用户量特别大的时候,会出现内存不足的情况
优点:
服务器之间的session信息都是同步的,任何一台服务器宕机的时候不会影响另外服务器中session的状态,配置相对简单
Tomcat内部已经支持分布式架构开发管理机制,可以对tomcat修改配置来支持session复制,在集群中的几台服务器之间同步session对象,使每台服务器上都保存了所有用户的session信息,这样任何一台本机宕机都不会导致session数据的丢失,而服务器使用session时,也只需要在本机获取即可
如何配置:
在Tomcat安装目录下的config目录中的server.xml文件中,将注释打开,tomcat必须在同一个网关内,要不然收不到广播,同步不了session
在web.xml中开启session复制:
方案三:session绑定:
Nginx介绍:
Nginx是一款自由的、开源的、高性能的http服务器和反向代理服务器
Nginx能做什么:
反向代理、负载均衡、http服务器(动静代理)、正向代理
如何使用nginx进行session绑定
我们利用nginx的反向代理和负载均衡,之前是客户端会被分配到其中一台服务器进行处理,具体分配到哪台服务器进行处理还得看服务器的负载均衡算法(轮询、随机、ip-hash、权重等),但是我们可以基于nginx的ip-hash策略,可以对客户端和服务器进行绑定,同一个客户端就只能访问该服务器,无论客户端发送多少次请求都被同一个服务器处理
在nginx安装目录下的conf目录中的nginx.conf文件
upstream aaa {Ip_hash;server 39.105.59.4:8080;Server 39.105.59.4:8081;
}
server {listen 80;server_name www.wanyingjing.cn;#root /usr/local/nginx/html;#index index.html index.htm;location / {proxy_pass http:39.105.59.4;index index.html index.htm;}
}
缺点:
- 容易造成单点故障,如果有一台服务器宕机,那么该台服务器上的session信息将会丢失
- 前端不能有负载均衡,如果有,session绑定将会出问题
优点:
- 配置简单
方案四:基于redis存储session方案
基于redis存储session方案流程示意图
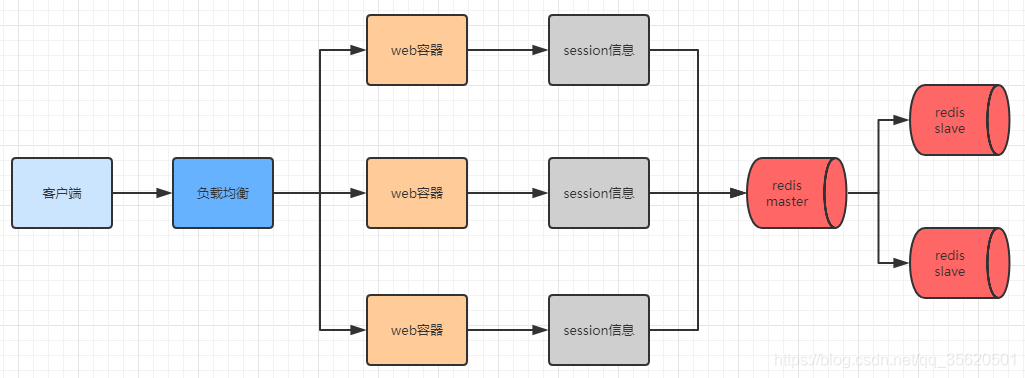
引入pom依赖:
<dependency><groupId>org.springframework.boot</groupId><artifactId>spring-session-data-redis</artifactId>
</dependency>
<dependency><groupId>org.springframework.boot</groupId><artifactId>spring-boot-data-starter-redis</artifactId>
</dependency>
配置redis
#redis数据库索引(默认是0)
spring.redis.database=0
spring.redis.host=127.0.0.1
spring.redis.port=6379
#默认密码为空
spring.redis.password=
#连接池最大连接数(负数表示没有限制)
spring.redis.jedis.pool.max-active=1000
#连接池最大阻塞等待时间(负数表示没有限制)
spring.redis.jedis.pool.max-wait=-1ms
#连接池中的最大空闲连接
spring.redis.jedis.pool.max-idle=10
#连接池中的最小空闲连接
spring.redis.jedis.pool.min-idle=2
#连接超时时间(毫秒)
spring.redis.timeout=500ms
优点:
这是企业中使用的最多的一种方式
spring为我们封装好了spring-session,直接引入依赖即可
数据保存在redis中,无缝接入,不存在任何安全隐患
redis自身可做集群,搭建主从,同时方便管理
缺点:
多了一次网络调用,web容器需要向redis访问
总结:
一般会将web容器所在的服务器和redis所在的服务器放在同一个机房,减少网络开销,走内网进行连接
分布式session处理策略
在搭建完集群环境后,不得不考虑的一个问题就是用户访问产生的session如何处理。如果不做任何处理的话,用户将出现频繁登录的现象,比如集群中存在A、B两台服务器,用户在第一次访问网站时,Nginx通过其负载均衡机制将用户请求转发到A服务器,这时A服务器就会给用户创建一个Session。当用户第二次发送请求时,Nginx将其负载均衡到B服务器,而这时候B服务器并不存在Session,所以就会将用户踢到登录页面。这将大大降低用户体验度,导致用户的流失,这种情况是项目绝不应该出现的。
我们应当对产生的Session进行处理,通过粘性Session,Session复制或Session共享等方式保证用户的体验度。
以下我将说明5种Session处理策略,并分析其优劣性。
1)粘性session
原理:粘性Session是指将用户锁定到某一个服务器上,比如上面说的例子,用户第一次请求时,负载均衡器将用户的请求转发到了A服务器上,如果负载均衡器设置了粘性Session的话,那么用户以后的每次请求都会转发到A服务器上,相当于把用户和A服务器粘到了一块,这就是粘性Session机制。
优点:简单,不需要对session做任何处理。
缺点:缺乏容错性,如果当前访问的服务器发生故障,用户被转移到第二个服务器上时,他的session信息都将失效。
适用场景:发生故障对客户产生的影响较小;服务器发生故障是低概率事件。
实现方式:以Nginx为例,在upstream模块配置ip_hash属性即可实现粘性Session。
upstream mycluster{#这里添加的是上面启动好的两台Tomcat服务器ip_hash;#粘性Sessionserver 192.168.22.229:8080 weight=1;server 192.168.22.230:8080 weight=1;
}
2)服务器session复制
原理:任何一个服务器上的session发生改变(增删改),该节点会把这个 session的所有内容序列化,然后广播给所有其它节点,不管其他服务器需不需要session,以此来保证Session同步。
优点:可容错,各个服务器间session能够实时响应。
缺点:会对网络负荷造成一定压力,如果session量大的话可能会造成网络堵塞,拖慢服务器性能。
实现方式:
① 设置tomcat ,server.xml 开启tomcat集群功能
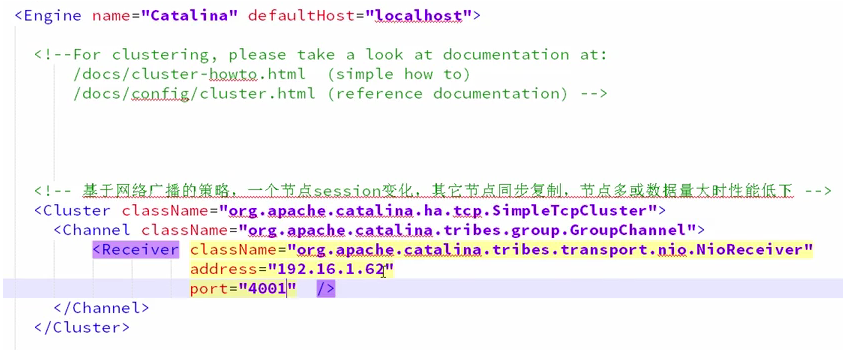
Address:填写本机ip即可,设置端口号,预防端口冲突。
② 在应用里增加信息:通知应用当前处于集群环境中,支持分布式
在web.xml中添加选项
3)session共享机制
使用分布式缓存方案比如memcached、redis,但是要求Memcached或Redis必须是集群。
使用Session共享也分两种机制,两种情况如下:
① 粘性session处理方式
原理:不同的 tomcat指定访问不同的主memcached。多个Memcached之间信息是同步的,能主从备份和高可用。用户访问时首先在tomcat中创建session,然后将session复制一份放到它对应的memcahed上。memcache只起备份作用,读写都在tomcat上。当某一个tomcat挂掉后,集群将用户的访问定位到备tomcat上,然后根据cookie中存储的SessionId找session,找不到时,再去相应的memcached上去session,找到之后将其复制到备tomcat上。
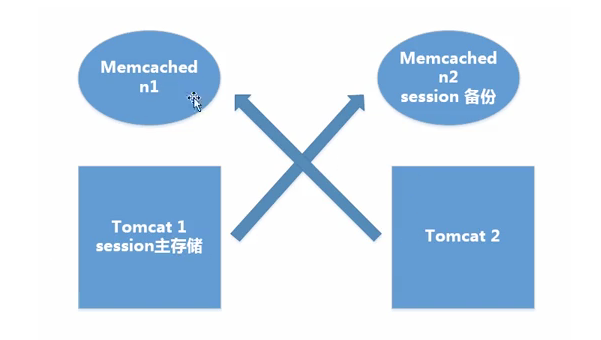
② 非粘性session处理方式
原理:memcached做主从复制,写入session都往从memcached服务上写,读取都从主memcached读取,tomcat本身不存储session
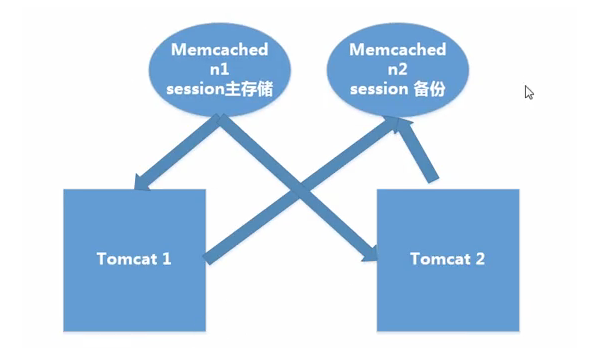
优点:可容错,session实时响应。
实现方式:用开源的msm插件解决tomcat之间的session共享:Memcached_Session_Manager(MSM)
a. 复制相关jar包到tomcat/lib 目录下
JAVA memcached客户端:spymemcached.jarmsm项目相关的jar包:
1. 核心包,memcached-session-manager-{version}.jar
2. Tomcat版本对应的jar包:memcached-session-manager-tc{tomcat-version}-{version}.jar序列化工具包:可选kryo,javolution,xstream等,不设置时使用jdk默认序列化。
b. 配置Context.xml ,加入处理Session的Manager
粘性模式配置:

非粘性配置:
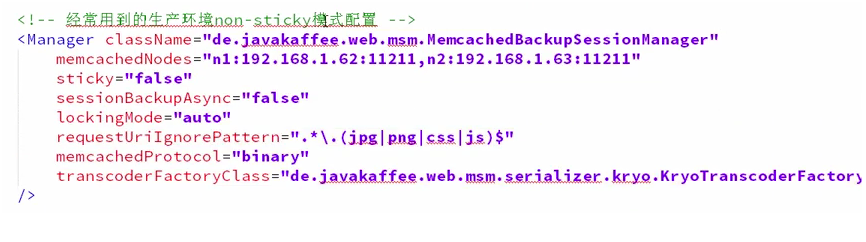
4)session持久化到数据库
原理:就不用多说了吧,拿出一个数据库,专门用来存储session信息。保证session的持久化。
优点:服务器出现问题,session不会丢失
缺点:如果网站的访问量很大,把session存储到数据库中,会对数据库造成很大压力,还需要增加额外的开销维护数据库。
第五种terracotta实现session复制
原理:Terracotta的基本原理是对于集群间共享的数据,当在一个节点发生变化的时候,Terracotta只把变化的部分发送给Terracotta服务器,然后由服务器把它转发给真正需要这个数据的节点。可以看成是对第二种方案的优化。
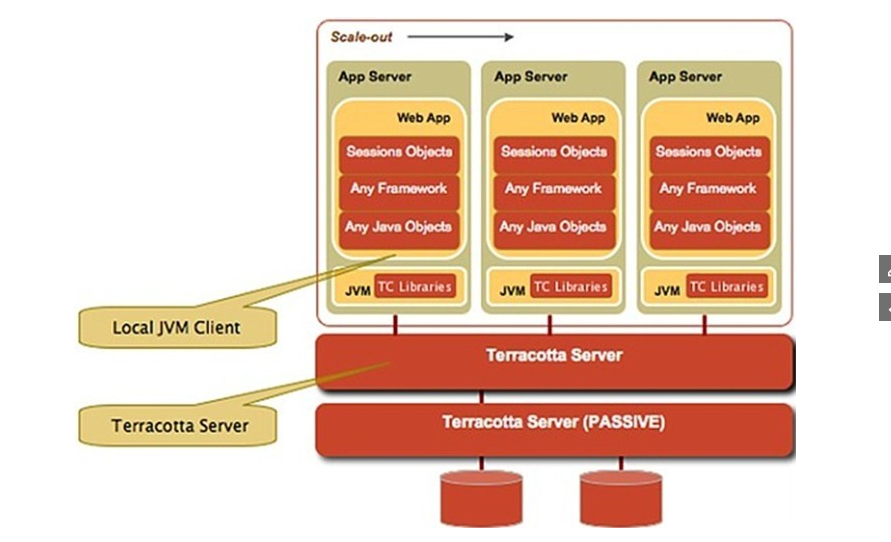
优点:这样对网络的压力就非常小,各个节点也不必浪费CPU时间和内存进行大量的序列化操作。把这种集群间数据共享的机制应用在session同步上,既避免了对数据库的依赖,又能达到负载均衡和灾难恢复的效果。
小结
以上讲述的就是集群或分布式环境下,session的5种处理策略。其中就应用广泛性而言,第三种方式,也就是基于第三方缓存框架共享session,应用的最为广泛,无论是效率还是扩展性都很好。而Terracotta作为一个JVM级的开源群集框架,不仅提供HTTP Session复制,它还能做分布式缓存,POJO群集,跨越群集的JVM来实现分布式应用程序协调等,也值得学习一下。
Token:
令牌,是用户身份的验证方式。
最简单的token组成:uid(用户唯一的身份标识)、time(当前时间的时间戳)、sign(签名)。
对Token认证的五点认识:
-
一个Token就是一些信息的集合;
-
在Token中包含足够多的信息,以便在后续请求中减少查询数据库的几率;
-
服务端需要对cookie和HTTP Authrorization Header进行Token信息的检查;
-
基于上一点,你可以用一套token认证代码来面对浏览器类客户端和非浏览器类客户端;
-
因为token是被签名的,所以我们可以认为一个可以解码认证通过的token是由我们系统发放的,其中带的信息是合法有效的;
采用Token认证方式的优点:
- 适合统一认证的机制,客户端、一方应用、三方应用都遵循一致的认证机制。
- token认证方式对第三方应用接入更适合,因为它更开放,可使用当前有流行的开放协议OAuth2.0、JWT等。
- 一般情况服务端无需存储会话信息,减轻了服务端的压力。
基于token的认证方式,服务端不用存储认证数据,易维护扩展性强,客户端可以把token存在任意地方,并且可以实现web和app统一认证机制。其缺点也很明显,token由于自包含信息,因此一般数据量较大,而且每次请求都需要传递,因此比较占带宽。另外,token的签名验签操作也会给cpu带来额外的处理负担。
Token与session的不同:
①认证成功后,会对当前用户数据进行加密,生成一个加密字符串token,返还给客户端(服务器端并不进行保存)
②浏览器会将接收到的token值存储在Local Storage(本地存储)中,(通过js代码写入Local Storage,通过js获取,并不会像cookie一样自动携带)
③再次访问时服务器端对token值的处理:服务器对浏览器传来的token值进行解密,解密完成后进行用户数据的查询,如果查询成功,则通过认证,实现状态保持,所以,即时有了多台服务器,服务器也只是做了token的解密和用户数据的查询,它不需要在服务端去保留用户的认证信息或者会话信息,这就意味着基于token认证机制的应用不需要去考虑用户在哪一台服务器登录了,这就为应用的扩展提供了便利,解决了session扩展性的弊端。
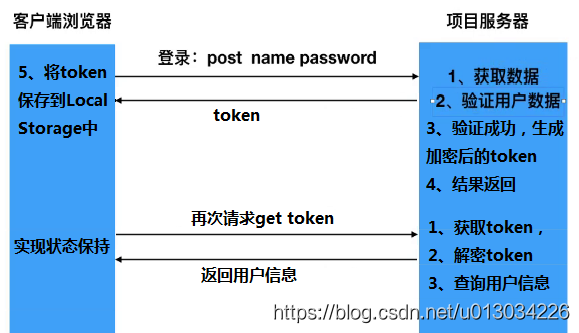
Cookie:
储存在用户本地终端上的数据,服务器生成,发送给浏览器,下次请求统一网站给服务器。
会话(Session)跟踪是Web程序中常用的技术,用来跟踪用户的整个会话。常用的会话跟踪技术是Cookie与Session。Cookie通过在客户端记录信息确定用户身份,Session通过在服务器端记录信息确定用户身份。
本章将系统地讲述Cookie与Session机制,并比较说明什么时候不能用Cookie,什么时候不能用Session。
什么是Cookie
Cookie意为“甜饼”,是由W3C组织提出,最早由Netscape社区发展的一种机制。目前Cookie已经成为标准,所有的主流浏览器如IE、Netscape、Firefox、Opera等都支持Cookie。
由于HTTP是一种无状态的协议,服务器单从网络连接上无从知道客户身份。怎么办呢?就给客户端们颁发一个通行证吧,每人一个,无论谁访问都必须携带自己通行证。这样服务器就能从通行证上确认客户身份了。这就是Cookie的工作原理。
Cookie实际上是一小段的文本信息。客户端请求服务器,如果服务器需要记录该用户状态,就使用response向客户端浏览器颁发一个Cookie。客户端浏览器会把Cookie保存起来。当浏览器再请求该网站时,浏览器把请求的网址连同该Cookie一同提交给服务器。服务器检查该Cookie,以此来辨认用户状态。服务器还可以根据需要修改Cookie的内容。
查看某个网站颁发的Cookie很简单。在浏览器地址栏输入javascript:alert (document. cookie)就可以了(需要有网才能查看)。JavaScript脚本会弹出一个对话框显示本网站颁发的所有Cookie的内容,如图所示。
上图中弹出的对话框中显示的为Baidu网站的Cookie。其中第一行BAIDUID记录的就是笔者的身份helloweenvsfei,只是Baidu使用特殊的方法将Cookie信息加密了。
注意:Cookie功能需要浏览器的支持。如果浏览器不支持Cookie(如大部分手机中的浏览器)或者把Cookie禁用了,Cookie功能就会失效。不同的浏览器采用不同的方式保存Cookie。IE浏览器会在“C:\Documents and Settings\你的用户名\Cookies”文件夹下以文本文件形式保存,一个文本文件保存一个Cookie。
Cookie的工作原理:
1、浏览器端第一次发送请求到服务器端
2、服务器端创建Cookie,该Cookie中包含用户的信息,然后将该Cookie发送到浏览器端
3、浏览器端再次访问服务器端时会携带服务器端创建的Cookie
4、服务器端通过Cookie中携带的数据区分不同的用户

Cookie机制
Cookie技术是客户端的解决方案,Cookie就是由服务器发给客户端的特殊信息,而这些信息以文本文件的方式存放在客户端,然后客户端每次向服务器发送请求的时候都会带上这些特殊的信息。让我们说得更具体一些:当用户使用浏览器访问一个支持Cookie的网站的时候,用户会提供包括用户名在内的个人信息并且提交至服务器;接着,服务器在向客户端回传相应的超文本的同时也会发回这些个人信息,当然这些信息并不是存放在HTTP响应体(Response Body)中的,而是存放于HTTP响应头(Response Header);当客户端浏览器接收到来自服务器的响应之后,浏览器会将这些信息存放在一个统一的位置,对于Windows操作系统而言,我们可以从: [系统盘]:\Documents and Settings[用户名]\Cookies目录中找到存储的Cookie;自此,客户端再向服务器发送请求的时候,都会把相应的Cookie再次发回至服务器。而这次,Cookie信息则存放在HTTP请求头(Request Header)了。有了Cookie这样的技术实现,服务器在接收到来自客户端浏览器的请求之后,就能够通过分析存放于请求头的Cookie得到客户端特有的信息,从而动态生成与该客户端相对应的内容。通常,我们可以从很多网站的登录界面中看到“请记住我”这样的选项,如果你勾选了它之后再登录,那么在下一次访问该网站的时候就不需要进行重复而繁琐的登录动作了,而这个功能就是通过Cookie实现的。
在程序中,会话跟踪是很重要的事情。理论上,一个用户的所有请求操作都应该属于同一个会话,而另一个用户的所有请求操作则应该属于另一个会话,二者不能混淆。例如,用户A在超市购买的任何商品都应该放在A的购物车内,不论是用户A什么时间购买的,这都是属于同一个会话的,不能放入用户B或用户C的购物车内,这不属于同一个会话。
而Web应用程序是使用HTTP协议传输数据的。HTTP协议是无状态的协议。一旦数据交换完毕,客户端与服务器端的连接就会关闭,再次交换数据需要建立新的连接。这就意味着服务器无法从连接上跟踪会话。即用户A购买了一件商品放入购物车内,当再次购买商品时服务器已经无法判断该购买行为是属于用户A的会话还是用户B的会话了。要跟踪该会话,必须引入一种机制。
Cookie就是这样的一种机制。它可以弥补HTTP协议无状态的不足。在Session出现之前,基本上所有的网站都采用Cookie来跟踪会话。
如果你把Cookies看成为http协议的一个扩展的话,理解起来就容易的多了,其实本质上cookies就是http的一个扩展。有两个http头部是专门负责设置以及发送cookie的,它们分别是Set-Cookie以及Cookie。当服务器返回给客户端一个http响应信息时,其中如果包含Set-Cookie这个头部时,意思就是指示客户端建立一个cookie,并且在后续的http请求中自动发送这个cookie到服务器端,直到这个cookie过期。如果cookie的生存时间是整个会话期间的话,那么浏览器会将cookie保存在内存中,浏览器关闭时就会自动清除这个cookie。另外一种情况就是保存在客户端的硬盘中,浏览器关闭的话,该cookie也不会被清除,下次打开浏览器访问对应网站时,这个cookie就会自动再次发送到服务器端。一个cookie的设置以及发送过程分为以下四步:
客户端发送一个http请求到服务器端 服务器端发送一个http响应到客户端,其中包含Set-Cookie头部 客户端发送一个http请求到服务器端,其中包含Cookie头部 服务器端发送一个http响应到客户端
这个通讯过程也可以用以下下示意图来描述:
在客户端的第二次请求中包含的Cookie头部中,提供给了服务器端可以用来唯一标识客户端身份的信息。这时,服务器端也就可以判断客户端是否启用了cookies。尽管,用户可能在和应用程序交互的过程中突然禁用cookies的使用,但是,这个情况基本是不太可能发生的,所以可以不加以考虑,这在实践中也被证明是对的。
除了cookies,客户端还可以将发送给服务器的数据包含在请求的url中,比如请求的参数或者请求的路径中。 我们来看一个常规的http get 请求例子:
GET /index.php?foo=bar HTTP/1.1 Host: example.org
另外一种客户端传递数据到服务器端的方式是将数据包含在http请求的内容区域内。 这种方式需要请求的类型是POST的,看下面一个例子:
POST /index.php HTTP/1.1 Host: example.org Content-Type: application/x-www-form-urlencoded Content-Length: 7
foo=bar
在一个请求中,可以同时包含这两种形式的数据:
POST /index.php?myget=foo HTTP/1.1 Host: example.orgContent-Type: application/x-www-form-urlencoded Content-Length: 11
mypost=bar
这两种传递数据的方式,比起用cookies来传递数据更稳定,因为cookie可能被禁用,但是以GET以及POST方式传递数据时,不存在这种情况。我们可以将PHPSESSID包含在http请求的url中,就像下面的例子一样:
GET /index.php?PHPSESSID=12345 HTTP/1.1 Host: example.org
获取用户信息:
/*** 由security上下文环境中获取当前用户名* @return 当前用户名*/public static String getName() {//获取用户信息Authentication authentication = SecurityContextHolder.getContext().getAuthentication();//获取用户名return authentication == null ? "anonymous" : authentication.getName();}
在程序中获得当前登陆用户对应的对象
@GetMapping({"","/","/index"})public String index(Model model) {Object principal = SecurityContextHolder.getContext().getAuthentication().getPrincipal();if("anonymousUser".equals(principal)) {model.addAttribute("name","anonymous");}else {User user = (User)principal;model.addAttribute("name",user.getUsername());}return "/index";}
代码获取用户对象
如果想在程序中获得当前登陆用户对应的对象。
UserDetails userDetails = (UserDetails) SecurityContextHolder.getContext().getAuthentication().getPrincipal();
代码获取权限
如果想获得当前登陆用户所拥有的所有权限。
GrantedAuthority[] authorities = userDetails.getAuthorities();
Security 的使用:
首先创建spring boot项目HelloSecurity,其pom主要依赖如下:
<dependencies><dependency><groupId>org.springframework.boot</groupId><artifactId>spring-boot-starter-thymeleaf</artifactId></dependency><dependency><groupId>org.springframework.boot</groupId><artifactId>spring-boot-starter-test</artifactId><scope>test</scope></dependency><dependency><groupId>org.springframework.security</groupId><artifactId>spring-security-test</artifactId><scope>test</scope></dependency>
</dependencies>
然后在src/main/resources/templates/目录下创建页面:
home.html
<!DOCTYPE html>
<html xmlns="http://www.w3.org/1999/xhtml" xmlns:th="http://www.thymeleaf.org" xmlns:sec="http://www.thymeleaf.org/thymeleaf-extras-springsecurity3"><head><title>Spring Security Example</title></head><body><h1>Welcome!</h1><p>Click <a th:href="@{/hello}">here</a> to see a greeting.</p></body>
</html>
我们可以看到, 在这个简单的视图中包含了一个链接: “/hello”. 链接到了如下的页面,Thymeleaf模板如下:
hello.html
<!DOCTYPE html>
<html xmlns="http://www.w3.org/1999/xhtml" xmlns:th="http://www.thymeleaf.org"xmlns:sec="http://www.thymeleaf.org/thymeleaf-extras-springsecurity3"><head><title>Hello World!</title></head><body><h1>Hello world!</h1></body>
</html>
Web应用程序基于Spring MVC。 因此,你需要配置Spring MVC并设置视图控制器来暴露这些模板。 如下是一个典型的Spring MVC配置类。在src/main/java/hello目录下(所以java都在这里):
@Configuration
public class MvcConfig extends WebMvcConfigurerAdapter {@Overridepublic void addViewControllers(ViewControllerRegistry registry) {registry.addViewController("/home").setViewName("home");registry.addViewController("/").setViewName("home");registry.addViewController("/hello").setViewName("hello");registry.addViewController("/login").setViewName("login");}
}
addViewControllers()方法(覆盖WebMvcConfigurerAdapter中同名的方法)添加了四个视图控制器。 两个视图控制器引用名称为“home”的视图(在home.html中定义),另一个引用名为“hello”的视图(在hello.html中定义)。 第四个视图控制器引用另一个名为“login”的视图。 将在下一部分中创建该视图。此时,可以跳过来使应用程序可执行并运行应用程序,而无需登录任何内容。然后启动程序如下:
@SpringBootApplication
public class Application {public static void main(String[] args) throws Throwable {SpringApplication.run(Application.class, args);}
}
加入Spring Security:
假设你希望防止未经授权的用户访问“/ hello”。 此时,如果用户点击主页上的链接,他们会看到问候语,请求被没有被拦截。 你需要添加一个障碍,使得用户在看到该页面之前登录。您可以通过在应用程序中配置Spring Security来实现。 如果Spring Security在类路径上,则Spring Boot会使用“Basic认证”来自动保护所有HTTP端点。 同时,你可以进一步自定义安全设置。首先在pom文件中引入:
<dependencies>...<dependency><groupId>org.springframework.boot</groupId><artifactId>spring-boot-starter-security</artifactId></dependency>...
</dependencies>
如下是安全配置,使得只有认证过的用户才可以访问到问候页面:
@Configuration
@EnableWebSecurity
public class WebSecurityConfig extends WebSecurityConfigurerAdapter {@Overrideprotected void configure(HttpSecurity http) throws Exception {http.authorizeRequests().antMatchers("/", "/home").permitAll().anyRequest().authenticated().and().formLogin().loginPage("/login").permitAll().and().logout().permitAll();}@Autowiredpublic void configureGlobal(AuthenticationManagerBuilder auth) throws Exception {auth.inMemoryAuthentication().withUser("user").password("password").roles("USER");}
}
WebSecurityConfig类使用了@EnableWebSecurity注解 ,以启用Spring Security的Web安全支持,并提供Spring MVC集成。它还扩展了WebSecurityConfigurerAdapter,并覆盖了一些方法来设置Web安全配置的一些细节。
configure(HttpSecurity)方法定义了哪些URL路径应该被保护,哪些不应该。具体来说,“/”和“/ home”路径被配置为不需要任何身份验证。所有其他路径必须经过身份验证。
当用户成功登录时,它们将被重定向到先前请求的需要身份认证的页面。有一个由 loginPage()指定的自定义“/登录”页面,每个人都可以查看它。
对于configureGlobal(AuthenticationManagerBuilder) 方法,它将单个用户设置在内存中。该用户的用户名为“user”,密码为“password”,角色为“USER”。
现在我们需要创建登录页面。前面我们已经配置了“login”的视图控制器,因此现在只需要创建登录页面即可:
login.html
<!DOCTYPE html>
<html xmlns="http://www.w3.org/1999/xhtml" xmlns:th="http://www.thymeleaf.org"xmlns:sec="http://www.thymeleaf.org/thymeleaf-extras-springsecurity3"><head><title>Spring Security Example </title></head><body><div th:if="${param.error}">Invalid username and password.</div><div th:if="${param.logout}">You have been logged out.</div><form th:action="@{/login}" method="post"><div><label> User Name : <input type="text" name="username"/> </label></div><div><label> Password: <input type="password" name="password"/> </label></div><div><input type="submit" value="Sign In"/></div></form></body>
</html>
你可以看到,这个Thymeleaf模板只是提供一个表单来获取用户名和密码,并将它们提交到“/ login”。 根据配置,Spring Security提供了一个拦截该请求并验证用户的过滤器。 如果用户未通过认证,该页面将重定向到“/ login?error”,并在页面显示相应的错误消息。 注销成功后,我们的应用程序将发送到“/ login?logout”,我们的页面显示相应的登出成功消息。最后,我们需要向用户提供一个显示当前用户名和登出的方法。 更新hello.html 向当前用户打印一句hello,并包含一个“注销”表单,如下所示:
<!DOCTYPE html>
<html xmlns="http://www.w3.org/1999/xhtml" xmlns:th="http://www.thymeleaf.org"xmlns:sec="http://www.thymeleaf.org/thymeleaf-extras-springsecurity3"><head><title>Hello World!</title></head><body><h1 th:inline="text">Hello [[${#httpServletRequest.remoteUser}]]!</h1><form th:action="@{/logout}" method="post"><input type="submit" value="Sign Out"/></form></body>
</html>
认证 (Authentication):
Spring Security提供了很多过滤器,它们拦截Servlet请求,并将这些请求转交给认证处理过滤器和访问决策过滤器进行处理,并强制安全性认证用户身份和用户权限以达到保护WEB资源的目的,Spring Security安全机制包括两个主要的操作,认证和验证,验证也可以称为权限控制,这是Spring Security两个主要的方向,认证是为用户建立一个他所声明的主体的过程,这个主体一般是指用户设备或可以在系统中执行行动的其他系统,验证指用户能否在应用中执行某个操作,在到达授权判断之前身份的主体已经由身份认证过程建立了。下面列出几种常用认证模式,这里不对它们作详细介绍,需要详细了解的老铁们可以自行查查对应的资料。
- Basic:HTTP1.0提出,一种基于challenge/response的认证模式,针对特定的realm需要提供用户名和密码认证后才可访问,其中密码使用明文传输。缺点:①无状态导致每次通信都要带上认证信息,即使是已经认证过的资源;②传输安全性不足,认证信息用Base64编码,基本就是明文传输,很容易对报文截取并盗用认证信息。
- Digest:HTTP1.1提出,它主要是为了解决Basic模式安全问题,用于替代原来的Basic认证模式,Digest认证也是采用challenge/response认证模式,基本的认证流程比较类似。Digest模式避免了密码在网络上明文传输,提高了安全性,但它仍然存在缺点,例如认证报文被攻击者拦截到攻击者可以获取到资源。
- X.509:证书认证,X.509是一种非常通用的证书格式,证书包含版本号、序列号(唯一)、签名、颁发者、有效期、主体、主体公钥。
- LDAP:轻量级目录访问协议(Lightweight Directory Access Protocol)。
- Form:基于表单的认证模式。
认证 (Authentication) 和授权 (Authorization) 的区别:
以前一直分不清 Authentication 和 Authorization,其实很简单,举个例子来说:
你要登机,你需要出示你的身份证和机票,身份证是为了证明你张三确实是你张三,这就是 authentication;而机票是为了证明你张三确实买了票可以上飞机,这就是 authorization。
在 computer science 领域再举个例子:
你要登陆论坛,输入用户名张三,密码1234,密码正确,证明你张三确实是张三,这就是 authentication;再一check用户张三是个版主,所以有权限加精删别人帖,这就是 authorization。
package org.springframework.security.core;// <1>public interface Authentication extends Principal, Serializable { // <1>Collection<? extends GrantedAuthority> getAuthorities(); // <2>Object getCredentials();// <2>Object getDetails();// <2>Object getPrincipal();// <2>boolean isAuthenticated();// <2>void setAuthenticated(boolean var1) throws IllegalArgumentException;
}
<1> Authentication是spring security包中的接口,直接继承自Principal类,而Principal是位于java.security包中的。可以见得,Authentication在spring security中是最高级别的身份/认证的抽象。
<2>由这个顶级接口,我们可以得到用户拥有的权限信息列表,密码,用户细节信息,用户身份信息,认证信息。
authentication.getPrincipal()返回了一个Object,我们将Principal强转成了Spring Security中最常用的UserDetails,这在Spring Security中非常常见,接口返回Object,使用instanceof判断类型,强转成对应的具体实现类。
接口详细解读如下:
getAuthorities(),权限信息列表,默认是GrantedAuthority接口的一些实现类,通常是代表权限信息的一系列字符串。
getCredentials(),密码信息,用户输入的密码字符串,在认证过后通常会被移除,用于保障安全。
getDetails(),细节信息,web应用中的实现接口通常为 WebAuthenticationDetails,它记录了访问者的ip地址和sessionId的值。
getPrincipal(),最重要的身份信息,大部分情况下返回的是UserDetails接口的实现类,也是框架中的常用接口之一。
授权 (Authorization):
授权前提
所有的认证令牌对象Authentication保存了一组GrantedAuthority对象,表示授予访问者(当事人principal)的权限。
- GrantedAuthority对象是被AuthenticationManager在认证访问者期间插入到Authentication中的。这些GrantedAuthority对象会被AccessDecisionManager在对该访问者对于某个安全对象做出授权决定时使用;
- GrantedAuthority是一个接口,仅有一个方法定义String getAuthority(),用于获取所受权限的字符串形式表示;
- Spring Security内置了一个GrantedAuthority具体实现SimpleGrantedAuthority,该实现支持在将权限字符串转成GrantedAuthority类型对象;
- Spring Security内置的AuthenticationProvider都使用SimpleGrantedAuthority往Authentication填充权限信息;
授权过程 (Authorization)
有授权控制的安全对象(secure object)的分类
- 方法调用(method invocation)
- web请求(web request)
授权动作调用者
- 拦截器 AbstractSecurityInterceptor
授权控制阶段:
1、调用前授权处理 (pre-invocation handling) : AccessDecisionManager
AccessDecisionManager被AbstractSecurityInterceptor调用,负责决定是否授权访问者继续访问目标安全对象;
AccessDecisionManager是一个接口,定义了三个方法
void decide(Authentication authentication, Object secureObject,Collection<ConfigAttribute> attrs) throws AccessDeniedException;
该方法是投票过程, 有三个参数 :
Authentication authentication代表访问者当事人,是访问者的认证令牌,包含了访问者的权限
Object secureObject表示目标安全对象,比如是一个方法调用MethodInvocation
Collection<ConfigAttribute> attrs 表示访问目标安全对象所需要的权限
boolean supports(ConfigAttribute attribute);
检测ConfigAttribute attribute是否是当前AccessDecisionManager支持的ConfigAttribute类型。
boolean supports(Class clazz);
检测Class clazz是否是当前AccessDecisionManager支持的secureObject。
开发者可以提供自己的AccessDecisionManager实现
Spring Security内置的AccessDecisionManager实现是基于投票机制的(voting)
AbstractAccessDecisionManager 是Spring Security内置的AccessDecisionManager实现的抽象基类
AbstractAccessDecisionManager使用一组AccessDecisionVoter投票者投票表决进行授权:
AccessDecisionVoter是一个接口,建模投票者这一概念
每个AccessDecisionVoter对每次投票可以给出如下三个结论中的一个
- 否决 : ACCESS_DENIED
- 弃权 : ACCESS_ABSTAIN
- 赞同 : ACCESS_GRANTED
AbstractAccessDecisionManager有三个内置实现:
- AffirmativeBased – 一票通过即可放行
- ConsensusBased – 多数投票通过可放行
- UnanimousBased – 全票通过才放行
2、调用后授权处理 (after-incocation handling) : AfterInvocationManager
通过AfterInvocationManager可以对受保护的安全对象的返回对象做修改
Spring Security提供了AfterInvocationManager的一个内置实现AfterInvocationProviderManager
AfterInvocationProviderManager维护一组AfterInvocationProvider完成指定的任务
对受保护的安全对象的返回对象逐一应用这些
AfterInvocationProvider
引入spring Security:
<!-- spring核心包 --><dependency><groupId>org.springframework</groupId><artifactId>spring-core</artifactId><version>${spring.version}</version></dependency><dependency><groupId>org.springframework</groupId><artifactId>spring-web</artifactId><version>${spring.version}</version></dependency><dependency><groupId>org.springframework</groupId><artifactId>spring-oxm</artifactId><version>${spring.version}</version></dependency><dependency><groupId>org.springframework</groupId><artifactId>spring-tx</artifactId><version>${spring.version}</version></dependency><dependency><groupId>org.springframework</groupId><artifactId>spring-jdbc</artifactId><version>${spring.version}</version></dependency><dependency><groupId>org.springframework</groupId><artifactId>spring-webmvc</artifactId><version>${spring.version}</version></dependency><dependency><groupId>org.springframework</groupId><artifactId>spring-aop</artifactId><version>${spring.version}</version></dependency><dependency><groupId>org.springframework</groupId><artifactId>spring-context-support</artifactId><version>${spring.version}</version></dependency><dependency><groupId>org.springframework</groupId><artifactId>spring-test</artifactId><version>${spring.version}</version></dependency><!-- 解决spring security传递依赖--><dependency><groupId>org.springframework</groupId><artifactId>spring-framework-bom</artifactId><version>5.1.4.RELEASE</version><type>pom</type><scope>import</scope></dependency><!--项目配置,使用spring security 依赖的相关jar包1、按照文档,将可能需要的包都全部添加进来,即使目前有的包,我们暂且没用到(remoting 远程访问的除外)2、包含 core、web、config、LDAP、OAuth、ACL、CAS、OpenID、test--><dependency><groupId>org.springframework.security</groupId><artifactId>spring-security-core</artifactId><version>${spring.security.version}</version></dependency><dependency><groupId>org.springframework.security</groupId><artifactId>spring-security-web</artifactId><version>${spring.security.version}</version></dependency><dependency><groupId>org.springframework.security</groupId><artifactId>spring-security-config</artifactId><version>${spring.security.version}</version></dependency><dependency><groupId>org.springframework.security</groupId><artifactId>spring-security-ldap</artifactId><version>${spring.security.version}</version></dependency><dependency><groupId>org.springframework.security</groupId><artifactId>spring-security-oauth2-core</artifactId><version>5.1.0.RELEASE</version></dependency><dependency><groupId>org.springframework.security</groupId><artifactId>spring-security-oauth2-client</artifactId><version>5.1.0.RELEASE</version></dependency><dependency><groupId>org.springframework.security</groupId><artifactId>spring-security-oauth2-jose</artifactId><version>5.1.0.RELEASE</version></dependency><dependency><groupId>org.springframework.security</groupId><artifactId>spring-security-jwt</artifactId><version>1.0.9.RELEASE</version></dependency><dependency><groupId>org.springframework.security</groupId><artifactId>spring-security-acl</artifactId><version>${spring.security.version}</version></dependency><dependency><groupId>org.springframework.security</groupId><artifactId>spring-security-cas</artifactId><version>${spring.security.version}</version></dependency><dependency><groupId>org.springframework.security</groupId><artifactId>spring-security-openid</artifactId><version>${spring.security.version}</version></dependency><dependency><groupId>org.springframework.security</groupId><artifactId>spring-security-test</artifactId><version>${spring.security.version}</version><scope>test</scope></dependency><!--否则会提示Error:(9, 8) java: 无法访问javax.servlet.ServletException找不到javax.servlet.ServletException的类文件--><dependency><groupId>javax</groupId><artifactId>javaee-api</artifactId><version>7.0</version></dependency>配置 spring Security:
package hello;import org.springframework.context.annotation.Bean;
import org.springframework.context.annotation.Configuration;
import org.springframework.security.config.annotation.web.builders.HttpSecurity;
import org.springframework.security.config.annotation.web.configuration.EnableWebSecurity;
import org.springframework.security.config.annotation.web.configuration.WebSecurityConfigurerAdapter;
import org.springframework.security.core.userdetails.User;
import org.springframework.security.core.userdetails.UserDetails;
import org.springframework.security.core.userdetails.UserDetailsService;
import org.springframework.security.provisioning.InMemoryUserDetailsManager;@Configuration
@EnableWebSecurity
public class WebSecurityConfig extends WebSecurityConfigurerAdapter {@Overrideprotected void configure(HttpSecurity http) throws Exception {http.authorizeRequests().antMatchers("/", "/home").permitAll().anyRequest().authenticated().and().formLogin().loginPage("/login").permitAll().and().logout().permitAll();}@Bean@Overridepublic UserDetailsService userDetailsService() {UserDetails user =User.withDefaultPasswordEncoder().username("user").password("password").roles("USER").build();return new InMemoryUserDetailsManager(user);}
}我们在WebSecurityConfig 类使用了 @EnableWebSecurity 注解 ,该注解提供 spring security的支持以及springMvc的集成支持,配合 @Configuration 注解,即可构成一个 spring security 的配置;
其中我们自己写的WebSecurityConfig 类必须是扩展了 WebSecurityConfigurerAdapter 抽象类的类;我们就是通过它,告诉 spring security ,哪些用户需要经过身份验证,通过何种方式验证;
其中我们选择覆写一些方法,来做一些安全的细节设置,达到上面的目的,比如,配置 :拦截什么URL、设置什么权限,检验表单数据 等 ;
userDetailsService() 方法,在内存中添加了一个用户,并设置了其角色、用户名、密码,不多讲;
configure(HttpSecurity)方法:
其中 configure(HttpSecurity)方法里面定义了哪些路径需要被保护,那些路径不需要被保护。简单而言,只有 / 、/home不需要保护,可以被任何权限、角色查看,其他的路径都需要进行验证;
代码中配置:
protected void configure(HttpSecurity http) throws Exception {http.authorizeRequests().anyRequest().authenticated().and().formLogin().and().httpBasic();
}
其实上面的配置,就是一个 xml 配置:
<http><intercept-url pattern="/**" access="authenticated"/><form-login /><http-basic />
</http>
每个方法或多或少都对应着一个标签,想象成这样以后,就便于我们看懂代码的配置;
配置规则都是使用方法,诸多方法的具体含义如下(图内容来自 spring4All 社区 ):
其中有一个特殊的方法 and() ,类比于 xml 的标签结束符;
自定义URL身份验证:
- 缺省登陆路径
protected void configure(HttpSecurity http) throws Exception {http// 表示允许使用HttpServletRequest限制访问.authorizeRequests()// 对任何请求都进行身份验证.anyRequest().authenticated().and()// 启动基于表单验证.formLogin()// 该路径允许所有人访问到.permitAll();
}
上面的 .formLogin() 没有配置登陆页面,spring security会默认的生成一个页面
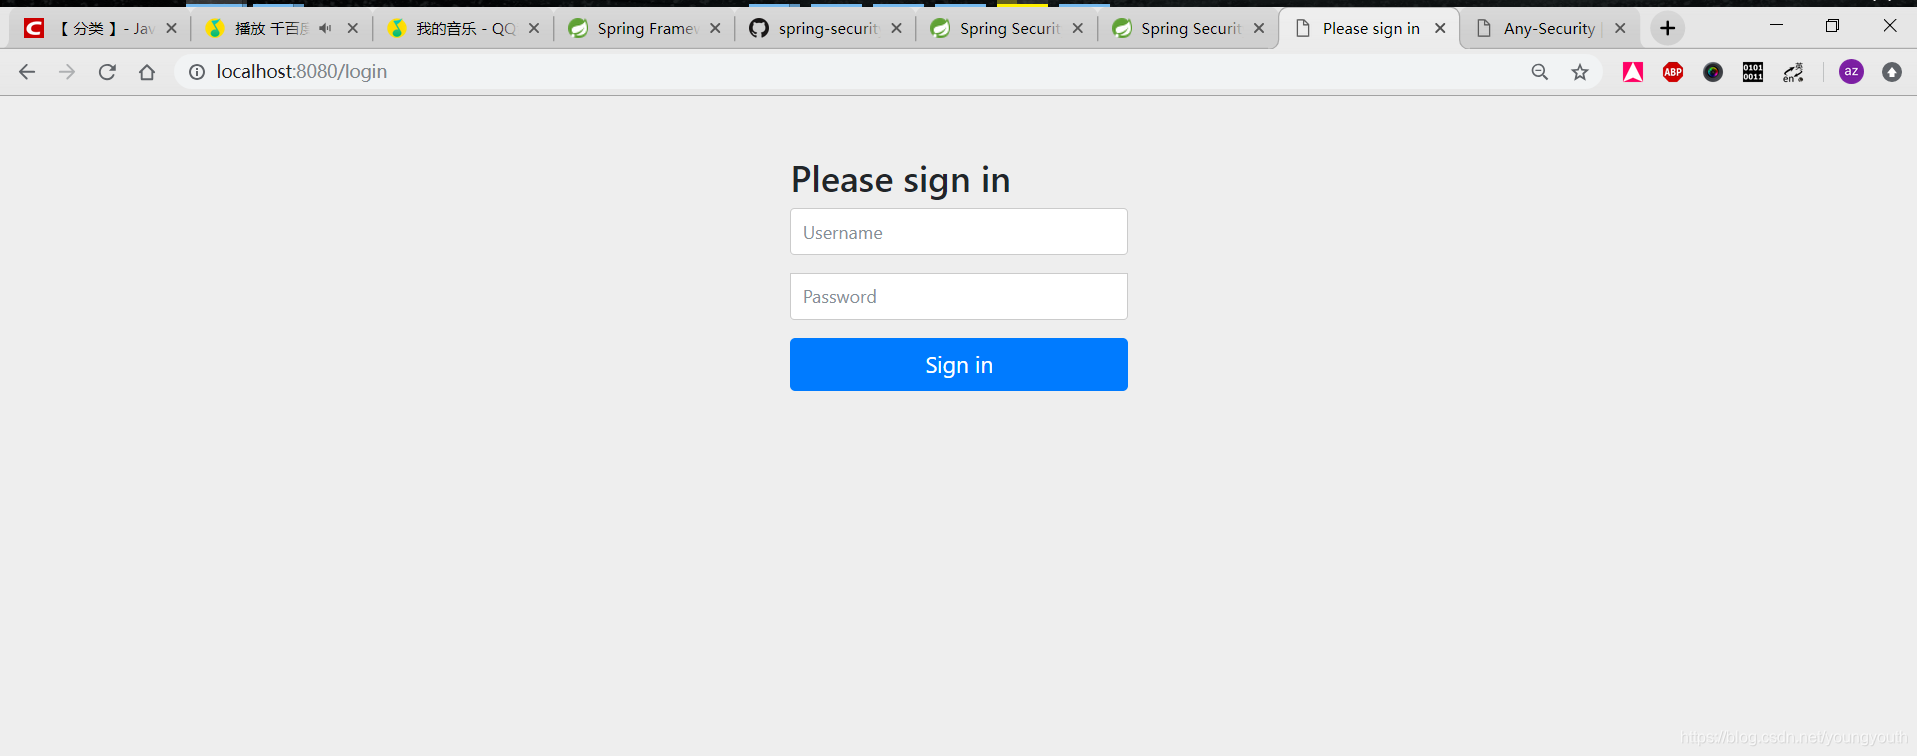
配置自己的登陆页面,使用.loginPage(“路径”):
.formLogin().loginPage("/login").permitAll();
自定义的页面表单中,需要包含下面的代码:
<input type="hidden" name="${_csrf.parameterName}" value="${_csrf.token}"/>
防止 CSRF 攻击;
- 授权请求
上面配置的只是,一刀切,对除了登陆路径的其他任何路径都进行身份验证,实际开发中,我们应该有细粒度的配置,比如权限控制;
protected void configure(HttpSecurity http) throws Exception {http.authorizeRequests()                                                                // 如果URL以 "/resources/**", "/signup", "/about" 开头,则任何用户都可以访问.antMatchers("/resources/**", "/signup", "/about").permitAll()         // 如果访问 "/admin/**" ,则必须具有 ”ADMIN" 角色才可以访问 ;// 其中,因为调用的就是 hasRole 方法,所以 前缀 ROLE_ 可以省略不写;.antMatchers("/admin/**").hasRole("ADMIN")      // 如果访问 /db/** 开头的 URL ,则必须同时拥有 "ADMIN" "DBA" 两个角色;                        // 对于这样多角色判断的,使用 access 连接        .antMatchers("/db/**").access("hasRole('ADMIN') and hasRole('DBA')")            // 任何URL ,经过上面几道工序,如果还没有得到匹配的,则只要求进行身份的验证;// 这里说明下,匹配 URL 的规则是从上到下,按照顺序匹配的,如果前面的已经匹配了,则后面的不再进行匹配;.anyRequest().authenticated()                                                   .and()// ....formLogin();
}
- 注销操作
因为我们使用的是 WebSecurityConfigurerAdapter ,logout 功能默认就有,不需要我们自己编码,只需要访问 /logout 即可,然后 spring security 会自动的帮我们完成注销操作;
并且 spring security 会完成以下几件事:
1、销毁对应的会话 session ;
2、清楚任何已经配置的 记住我 身份验证;
3、清除 SecurityContextHolder ;
4、重定向到 /login?logout ;
上面都是 spring security 默认的行为(前提是使用 WebSecurityConfigurerAdapter),我们还可以自己定制更细节的行为 :
protected void configure(HttpSecurity http) throws Exception {http// 提供注销支持,如果使用 `WebSecurityConfigurerAdapter` 则默认提供支持,不需要显式配置了.logout()       // 触发注销行为的 URL ,默认是 /logout ,如果启用了 CSRF ,则该请求必须是 post ;但是默认就是启用 CSRF ,so 默认就必须使用 post 访问 ;                                                        .logoutUrl("/my/logout")   //  触发注销操作以后,重定到具体的页面,默认是 /login?logout                                             .logoutSuccessUrl("/my/index")   //   我们指定一个自定义的LogoutSuccessHandler。如果指定了此参数,则忽略logoutSuccessUrl 的配置                                              .logoutSuccessHandler(logoutSuccessHandler)    // 指定在注销时是否使HttpSession无效。默认情况下为 真                   .invalidateHttpSession(true)                   //   添加LogoutHandler。默认情况下,SecurityContextLogoutHandler被添加为最后一个LogoutHandler。                       .addLogoutHandler(logoutHandler)    //  指定注销成功以后,要删除的cookie的名字   //  同时这里也是显式添加 CookieClearingLogoutHandler 处理器的快捷方式                     .deleteCookies(cookieNamesToClear)                                      .and()...
}
CSRF 攻击:
**CSRF概念:**CSRF跨站点请求伪造(Cross—Site Request Forgery),跟XSS攻击一样,存在巨大的危害性,你可以这样来理解:
攻击者盗用了你的身份,以你的名义发送恶意请求,对服务器来说这个请求是完全合法的,但是却完成了攻击者所期望的一个操作,比如以你的名义发送邮件、发消息,盗取你的账号,添加系统管理员,甚至于购买商品、虚拟货币转账等。 如下:其中Web A为存在CSRF漏洞的网站,Web B为攻击者构建的恶意网站,User C为Web A网站的合法用户。
CSRF攻击攻击原理及过程如下:
1、用户C打开浏览器,访问受信任网站A,输入用户名和密码请求登录网站A;
2、在用户信息通过验证后,网站A产生Cookie信息并返回给浏览器,此时用户登录网站A成功,可以正常发送请求到网站A;
3、用户未退出网站A之前,在同一浏览器中,打开一个TAB页访问网站B;
4、网站B接收到用户请求后,返回一些攻击性代码,并发出一个请求要求访问第三方站点A;
5、浏览器在接收到这些攻击性代码后,根据网站B的请求,在用户不知情的情况下携带Cookie信息,向网站A发出请求。网站A并不知道该请求其实是由B发起的,所以会根据用户C的Cookie信息以C的权限处理该请求,导致来自网站B的恶意代码被执行。
什么是CSRF攻击?如何防止?
CSRF:Cross Site Requst Forgery 跨站请求伪造
一个正常的请求会将合法用户的session id保存到浏览器cookie。这时候,如何用户在浏览器中打来另一个tab页,那tab也是可以获得浏览器cookie。黑客就可以利用这个cookie信息进行攻击。
攻击过程:
1、某银行网站A可以以GET请求的方式发起转账操作。www.xxx.com/transfor.do?accountNum=100&money=100,accountNum表示目标账户。这个请求肯定是需要登录才可以正常访问的。
2、攻击者在某个论坛或者网站上,上传一个图片,链接地址是 www.xxx.com/transfer.do?accountNum=888&money… 其中这个accountNum就是攻击者自己的银行账户。
3、如果有一个用户,登录了银行网站,然后又打开浏览器的另一个tab页,点击了这个图片。这时,银行就会受理到一个正确的cookie的请求,就会完成转账。用户的钱就被盗了。
CSRF方式:
1、尽量使用POST请求,限制GET请求,POST请求可以带请求体,攻击者就不容易伪造出请求。
2、将cookie设置为HttpOnly:respose.setHeader(“Set-Cookie”,“cookiename=cookievale;HttpOnly”)。
3、增加token;
在请求中放入一个攻击者无法伪造的信息,并且该信息不存在于cookie当中。
<input stype='hidden' value='adfasdf'/>
这也是Spring Security框架中采用的防范方式。
CSRF攻击实例
受害者 Bob 在银行有一笔存款,通过对银行的网站发送请求 http://bank.example/withdraw?account=bob&amount=1000000&for=bob2 可以使 Bob 把 1000000 的存款转到 bob2 的账号下。通常情况下,该请求发送到网站后,服务器会先验证该请求是否来自一个合法的 session,并且该 session 的用户 Bob 已经成功登陆。
黑客 Mallory 自己在该银行也有账户,他知道上文中的 URL 可以把钱进行转帐操作。Mallory 可以自己发送一个请求给银行:http://bank.example/withdraw?account=bob&amount=1000000&for=Mallory。但是这个请求来自 Mallory 而非 Bob,他不能通过安全认证,因此该请求不会起作用。
这时,Mallory 想到使用 CSRF 的攻击方式,他先自己做一个网站,在网站中放入如下代码: src=”http://bank.example/withdraw?account=bob&amount=1000000&for=Mallory ”,并且通过广告等诱使 Bob 来访问他的网站。当 Bob 访问该网站时,上述 url 就会从 Bob 的浏览器发向银行,而这个请求会附带 Bob 浏览器中的 cookie 一起发向银行服务器。大多数情况下,该请求会失败,因为他要求 Bob 的认证信息。但是,如果 Bob 当时恰巧刚访问他的银行后不久,他的浏览器与银行网站之间的 session 尚未过期,浏览器的 cookie 之中含有 Bob 的认证信息。这时,悲剧发生了,这个 url 请求就会得到响应,钱将从 Bob 的账号转移到 Mallory 的账号,而 Bob 当时毫不知情。等以后 Bob 发现账户钱少了,即使他去银行查询日志,他也只能发现确实有一个来自于他本人的合法请求转移了资金,没有任何被攻击的痕迹。而 Mallory 则可以拿到钱后逍遥法外。
CSRF漏洞检测:
检测CSRF漏洞是一项比较繁琐的工作,最简单的方法就是抓取一个正常请求的数据包,去掉Referer字段后再重新提交,如果该提交还有效,那么基本上可以确定存在CSRF漏洞。
随着对CSRF漏洞研究的不断深入,不断涌现出一些专门针对CSRF漏洞进行检测的工具,如CSRFTester,CSRF Request Builder等。
以CSRFTester工具为例,CSRF漏洞检测工具的测试原理如下:使用CSRFTester进行测试时,首先需要抓取我们在浏览器中访问过的所有链接以及所有的表单等信息,然后通过在CSRFTester中修改相应的表单等信息,重新提交,这相当于一次伪造客户端请求。如果修改后的测试请求成功被网站服务器接受,则说明存在CSRF漏洞,当然此款工具也可以被用来进行CSRF攻击。
防御CSRF攻击:
目前防御 CSRF 攻击主要有三种策略:验证 HTTP Referer 字段;在请求地址中添加 token 并验证;在 HTTP 头中自定义属性并验证。
(1)验证 HTTP Referer 字段
根据 HTTP 协议,在 HTTP 头中有一个字段叫 Referer,它记录了该 HTTP 请求的来源地址。在通常情况下,访问一个安全受限页面的请求来自于同一个网站,比如需要访问 http://bank.example/withdraw?account=bob&amount=1000000&for=Mallory,用户必须先登陆 bank.example,然后通过点击页面上的按钮来触发转账事件。这时,该转帐请求的 Referer 值就会是转账按钮所在的页面的 URL,通常是以 bank.example 域名开头的地址。而如果黑客要对银行网站实施 CSRF 攻击,他只能在他自己的网站构造请求,当用户通过黑客的网站发送请求到银行时,该请求的 Referer 是指向黑客自己的网站。因此,要防御 CSRF 攻击,银行网站只需要对于每一个转账请求验证其 Referer 值,如果是以 bank.example 开头的域名,则说明该请求是来自银行网站自己的请求,是合法的。如果 Referer 是其他网站的话,则有可能是黑客的 CSRF 攻击,拒绝该请求。
这种方法的显而易见的好处就是简单易行,网站的普通开发人员不需要操心 CSRF 的漏洞,只需要在最后给所有安全敏感的请求统一增加一个拦截器来检查 Referer 的值就可以。特别是对于当前现有的系统,不需要改变当前系统的任何已有代码和逻辑,没有风险,非常便捷。
然而,这种方法并非万无一失。Referer 的值是由浏览器提供的,虽然 HTTP 协议上有明确的要求,但是每个浏览器对于 Referer 的具体实现可能有差别,并不能保证浏览器自身没有安全漏洞。使用验证 Referer 值的方法,就是把安全性都依赖于第三方(即浏览器)来保障,从理论上来讲,这样并不安全。事实上,对于某些浏览器,比如 IE6 或 FF2,目前已经有一些方法可以篡改 Referer 值。如果 bank.example 网站支持 IE6 浏览器,黑客完全可以把用户浏览器的 Referer 值设为以 bank.example 域名开头的地址,这样就可以通过验证,从而进行 CSRF 攻击。
即便是使用最新的浏览器,黑客无法篡改 Referer 值,这种方法仍然有问题。因为 Referer 值会记录下用户的访问来源,有些用户认为这样会侵犯到他们自己的隐私权,特别是有些组织担心 Referer 值会把组织内网中的某些信息泄露到外网中。因此,用户自己可以设置浏览器使其在发送请求时不再提供 Referer。当他们正常访问银行网站时,网站会因为请求没有 Referer 值而认为是 CSRF 攻击,拒绝合法用户的访问。
(2)在请求地址中添加 token 并验证
CSRF 攻击之所以能够成功,是因为黑客可以完全伪造用户的请求,该请求中所有的用户验证信息都是存在于 cookie 中,因此黑客可以在不知道这些验证信息的情况下直接利用用户自己的 cookie 来通过安全验证。要抵御 CSRF,关键在于在请求中放入黑客所不能伪造的信息,并且该信息不存在于 cookie 之中。可以在 HTTP 请求中以参数的形式加入一个随机产生的 token,并在服务器端建立一个拦截器来验证这个 token,如果请求中没有 token 或者 token 内容不正确,则认为可能是 CSRF 攻击而拒绝该请求。
这种方法要比检查 Referer 要安全一些,token 可以在用户登陆后产生并放于 session 之中,然后在每次请求时把 token 从 session 中拿出,与请求中的 token 进行比对,但这种方法的难点在于如何把 token 以参数的形式加入请求。对于 GET 请求,token 将附在请求地址之后,这样 URL 就变成 http://url?csrftoken=tokenvalue。 而对于 POST 请求来说,要在 form 的最后加上 <input type=“hidden” name=“csrftoken” value=“tokenvalue”/>,这样就把 token 以参数的形式加入请求了。但是,在一个网站中,可以接受请求的地方非常多,要对于每一个请求都加上 token 是很麻烦的,并且很容易漏掉,通常使用的方法就是在每次页面加载时,使用 javascript 遍历整个 dom 树,对于 dom 中所有的 a 和 form 标签后加入 token。这样可以解决大部分的请求,但是对于在页面加载之后动态生成的 html 代码,这种方法就没有作用,还需要程序员在编码时手动添加 token。
该方法还有一个缺点是难以保证 token 本身的安全。特别是在一些论坛之类支持用户自己发表内容的网站,黑客可以在上面发布自己个人网站的地址。由于系统也会在这个地址后面加上 token,黑客可以在自己的网站上得到这个 token,并马上就可以发动 CSRF 攻击。为了避免这一点,系统可以在添加 token 的时候增加一个判断,如果这个链接是链到自己本站的,就在后面添加 token,如果是通向外网则不加。不过,即使这个 csrftoken 不以参数的形式附加在请求之中,黑客的网站也同样可以通过 Referer 来得到这个 token 值以发动 CSRF 攻击。这也是一些用户喜欢手动关闭浏览器 Referer 功能的原因。
(3)在 HTTP 头中自定义属性并验证
这种方法也是使用 token 并进行验证,和上一种方法不同的是,这里并不是把 token 以参数的形式置于 HTTP 请求之中,而是把它放到 HTTP 头中自定义的属性里。通过 XMLHttpRequest 这个类,可以一次性给所有该类请求加上 csrftoken 这个 HTTP 头属性,并把 token 值放入其中。这样解决了上种方法在请求中加入 token 的不便,同时,通过 XMLHttpRequest 请求的地址不会被记录到浏览器的地址栏,也不用担心 token 会透过 Referer 泄露到其他网站中去。
然而这种方法的局限性非常大。XMLHttpRequest 请求通常用于 Ajax 方法中对于页面局部的异步刷新,并非所有的请求都适合用这个类来发起,而且通过该类请求得到的页面不能被浏览器所记录下,从而进行前进,后退,刷新,收藏等操作,给用户带来不便。另外,对于没有进行 CSRF 防护的遗留系统来说,要采用这种方法来进行防护,要把所有请求都改为 XMLHttpRequest 请求,这样几乎是要重写整个网站,这代价无疑是不能接受的。
Session并发控制:
Session的并发控制主要通过sessionManagement来进行控制的。
设置session并发为1
只要在WebSecurityConfig进行配置即可:
.and().formLogin().loginPage("/login")
.and().sessionManagement().maximumSessions(1)
MD5 对称加密 非对称加密:
一、md5加密
md5是一种不可逆的加密,一定记住是不可逆的。虽然现在很多算法也可以将md5解密出来但是md5还是具有很大程度上的不可逆,而且加大解密难道使用双重加密,很多登录的地方用到md5加密,那么有些人会问我用md5加密了服务器怎么解密呢,你要是这么想就错了。登录时输入用户的密码这个密码被md5加密后在服务器也存的是这个md5的字符格式,也就是说服务器的数据库存的就是这个格式的字符串,所以服务器那边为什么要解密呢,只要比较你客户端发送的md5字符串和它数据库字符串进行比较就行了,而且现在APP运营商也很多都不敢保存用户的明文密码这是对用户信息的不负责。所以在这里一定记住md5加密是不可逆的。很多网上的解密也只是简单的解密,比如你解密得到9,你知道是1+8=9还是2+7=9还是3+6=9呢,想解密也就不用md5了,现在md5也只是用于数据库存储数据。
二、对称加密
对称加密是最快速、最简单的一种加密方式,加密(encryption)与解密(decryption)用的是同样的密钥(secret key)。对称加密有很多种算法,由于它效率很高,所以被广泛使用在很多加密协议的核心当中。现在大多用的是AES和DES等,因为不管服务端还是客户端都用的是一个相同的密钥所以可以说是对称加密,比如客户端用这个密钥给一段文字加密服务端收到这段字符串后会用同样的密钥进行解密
对称加密通常使用的是相对较小的密钥,一般小于256 bit。因为密钥越大,加密越强,但加密与解密的过程越慢。如果你只用1 bit来做这个密钥,那黑客们可以先试着用0来解密,不行的话就再用1解;但如果你的密钥有1 MB大,黑客们可能永远也无法破解,但加密和解密的过程要花费很长的时间。密钥的大小既要照顾到安全性,也要照顾到效率,是一个trade-off。
2000年10月2日,美国国家标准与技术研究所(NIST–American National Institute of Standards and Technology)选择了Rijndael算法作为新的高级加密标准(AES–Advanced Encryption Standard)。.NET中包含了Rijndael算法,类名叫RijndaelManaged。
对称加密的一大缺点是密钥的管理与分配,换句话说,如何把密钥发送到需要解密你的消息的人的手里是一个问题。在发送密钥的过程中,密钥有很大的风险会被黑客们拦截。现实中通常的做法是将对称加密的密钥进行非对称加密,然后传送给需要它的人。
三、非对称加密
非对称加密为数据的加密与解密提供了一个非常安全的方法,它使用了一对密钥,公钥(public key)和私钥(private key)。私钥只能由一方安全保管,不能外泄,而公钥则可以发给任何请求它的人。非对称加密使用这对密钥中的一个进行加密,而解密则需要另一个密钥。比如,你向银行请求公钥,银行将公钥发给你,你使用公钥对消息加密,那么只有私钥的持有人–银行才能对你的消息解密。与对称加密不同的是,银行不需要将私钥通过网络发送出去,因此安全性大大提高。
目前最常用的非对称加密算法是RSA算法,是Rivest, Shamir, 和Adleman于1978年发明,他们那时都是在MIT。.NET中也有RSA算法
虽然非对称加密很安全,但是和对称加密比起来,它非常的慢,所以我们还是要用对称加密来传送消息,但对称加密所使用的密钥我们可以通过非对称加密的方式发送出去。为了解释这个过程,请看下面的例子:
(1) Alice需要在银行的网站做一笔交易,她的浏览器首先生成了一个随机数作为对称密钥。
(2) Alice的浏览器向银行的网站请求公钥。
(3) 银行将公钥发送给Alice。
(4) Alice的浏览器使用银行的公钥将自己的对称密钥加密。
(5) Alice的浏览器将加密后的对称密钥发送给银行。
(6) 银行使用私钥解密得到Alice浏览器的对称密钥。
(7) Alice与银行可以使用对称密钥来对沟通的内容进行加密与解密了。
四、总结
(1) 对称加密加密与解密使用的是同样的密钥,所以速度快,但由于需要将密钥在网络传输,所以安全性不高。
(2) 非对称加密使用了一对密钥,公钥与私钥,所以安全性高,但加密与解密速度慢。
(3) 解决的办法是将对称加密的密钥使用非对称加密的公钥进行加密,然后发送出去,接收方使用私钥进行解密得到对称加密的密钥,然后双方可以使用对称加密来进行沟通。
密码加密:
在 WebSecurityConfig 增加如下代码:
@Overrideprotected void configure(AuthenticationManagerBuilder auth) throws Exception {auth//配置 UserDetailsService 实现类,实现自定义登录校验.userDetailsService(dbUserDetailService)//配置密码加密规则.passwordEncoder(passwordEncoder());}/*** 密码加密,必须为 @Bean ,否则报错* 作用:实例化密码加密规则,该规则首先会校验数据库中存储的密码是否符合其规则(经过 BCryptPasswordEncoder 加密的密码* 的字符串符合一定的规则):* 1.若不符合,直接报错;* 2.若符合,则会将前端传递的密码经过 BCryptPasswordEncoder 加密,再和数据库中的密码进行比对,一样则通过* 所以,这里要求,我们存入进数据库的密码不能是明文,而必须是经过 BCryptPasswordEncoder 加密后,才能存入数据库*/@Beanpublic BCryptPasswordEncoder passwordEncoder() {return new BCryptPasswordEncoder();}BCryptPasswordEncoder相关知识:
用户表的密码通常使用MD5等不可逆算法加密后存储,为防止彩虹表破解更会先使用一个特定的字符串(如域名)加密,然后再使用一个随机的salt(盐值)加密。
特定字符串是程序代码中固定的,salt是每个密码单独随机,一般给用户表加一个字段单独存储,比较麻烦。
BCrypt算法将salt随机并混入最终加密后的密码,验证时也无需单独提供之前的salt,从而无需单独处理salt问题。
BCryptPasswordEncoder 是在哪里使用的?
登录时用到了 DaoAuthenticationProvider ,它有一个方法
#additionalAuthenticationChecks(UserDetails userDetails, UsernamePasswordAuthenticationToken authentication),此方法用来校验从数据库取得的用户信息和用户输入的信息是否匹配。
在注册时,需要对用户密码加密
应用 BCryptPasswordEncoder 之后,明文密码是无法被识别的,就会校验失败,只有存入密文密码才能被正常识别。所以,应该在注册时对用户密码进行加密。
private String encryptPassword(String password) {// BCryptPasswordEncoder 加密return new BCryptPasswordEncoder().encode(password);}
新用户注册后,数据库中就会存入密文密码,示例:

补充说明:即使不同的用户注册时输入相同的密码,存入数据库的密文密码也会不同。
Security中的加密可以理解为,加了盐的MD5加密。
自定义身份验证器:
spring security 提供了配置帮助程序,用于快速获取程序中设置的身份管理;其中,最常用的是 AuthenticationManagerBuilder ,它很适用于 内存、JDBC、LDAP ,或者增加一个 UserDetailsService;
配置全局的 AuthenticationManager:
@Configuration
public class ApplicationSecurity extends WebSecurityConfigurerAdapter {... // web stuff here@Autowiredpublic initialize(AuthenticationManagerBuilder builder, DataSource dataSource) {builder.jdbcAuthentication().dataSource(dataSource).withUser("dave").password("secret").roles("USER");}}
上面的配置中,关于 AuthenticationManagerBuilder 的用法是一种广泛的使用方式;它被使用 @Autowired 注入到方法中,这将导致它可以构建全局的 AuthenticationManager ;
当然也有另外一种写法:
@Configuration
public class ApplicationSecurity extends WebSecurityConfigurerAdapter {@AutowiredDataSource dataSource;... // web stuff here@Overridepublic configure(AuthenticationManagerBuilder builder) {builder.jdbcAuthentication().dataSource(dataSource).withUser("dave").password("secret").roles("USER");}}
这里是覆盖父类方法,这样的 AuthenticationManagerBuilder 只能被用来构建局部的 AuthenticationManager ,构建出的 AuthenticationManager 将是全局 AuthenticationManager 的小弟;
在 springBoot 中可以使用 @Autowired 将一个全局的 bean 直接注入到另外一个 bean 里面 ,但是不能对局部的 bean 使用这种操作;
springBoot 中,如果自己没有全局的自定义身份验证,它默认提供一个全局的 AuthenticationManager,默认的 AuthenticationManager的安全性不需要我们去担心;我们可以在局部的 AuthenticationManager 里面做配置,从而不去影响到全局的 AuthenticationManager ;
授权:
身份认证成功以后,就需要我们进行授权了;
在 spring Security 中的对应的核心类是 AccessDecisionManager (啊可赛思 dei C真 买嫩者),框架本身有三个默认实现,并且这三个实现都委托给 AccessDecisionVoter(啊可赛思 dei C真 屋他) 管理,跟身份验证的 AuthenticationProvider 委托给 ProviderManager;
AccessDecisionVoter如下:
public interface AccessDecisionVoter<S> {int ACCESS_GRANTED = 1;int ACCESS_ABSTAIN = 0;int ACCESS_DENIED = -1;boolean supports(ConfigAttribute attribute);boolean supports(Class<?> clazz);int vote(Authentication authentication, S object,Collection<ConfigAttribute> attributes);
}
其中 S object 的Object 对象,在 AccessDecisionManager 、AccessDecisionVoter 中是通用的,代表用户想访问的东西,大部分时候都代表一个 web 资源,或者一个 java 类的方法 ;
ConfigAttribute 接口也是通用的,是安全对象的封装,里面封装一些元数据,用于确定访问 Object 所需要的权限 ;它只有一个方法,返回 String ,代表开发者制定的规则,谁可以访问 Object ;其中返回的字符串格式,一般都是以 ROLE_ 为前缀的角色名称,比如 ROLE_ADMIN 、ROLE_AUDIT 等;
使用 SPEL 表达式 的 ConfigAttribute 是很常见的,比如 isFullyAuthenticated()&& hasRole(‘FOO’) ,这些表达式被 AccessDecisionVoter 所支持,它可以处理这些表达式,并且创建对应的上下文;
如果你想扩展 SPEL 的表达式范围,需要自定义实现 SecurityExpressionRoot,有时还需要SecurityExpressionHandler。
大部分人都使用默认的 AccessDecisionManager — AffirmativeBased,它的内部是只要有一个投票通过,即可进行授权访问,要想进行细致的投票定制,可以自定义实现 AccessDecisionManager ;
会话:
用户认证通过后,为了避免用户的每次操作都进行热证可将用户的信息保存在会话中。会话就是系统为了保持当前用户的登录状态所提供的机制,常见的有基于session方式、基于token方式等。
基于Session的认证方式如下:
它的交互流程是,用户认证成功后,在服务端生成用户相关的数据保存session(当前会话)中,发给客户端的session_id存放到cookie中,这样用户客户端请求时带上session_id 就可以验证服务器端是否存在session数据,以此完成用户的合法校验,当用户退出系统或session过期销毁时,客户端的session_id也就无效了。
Security 线程问题:
- SecurityContext
Spring Security是线程绑定的,最基本的组件是 SecurityContext里面包含 Authentication,可以通过下面的方式,获取和修改 SecurityContext;
SecurityContext context = SecurityContextHolder.getContext();
Authentication authentication = context.getAuthentication();
assert(authentication.isAuthenticated);
- @AuthenticationPrincipal 注解
@RequestMapping("/foo")
public String foo(@AuthenticationPrincipal User user) {... // do stuff with user
}
此注解可以将当前的 Authentication 从 SecurityContext 中抽取出来,然后调用 getPrincipal() 填充方法参数;至于调用 getPrincipal() 获取的 Principal 类型,取决于 AuthenticationManager 使用什么类型来进行验证 Authentication ;
如果使用 Spring Security 的 HttpServletRequest中的 Principal ,那么 Principal 将是Authentication类型,我们可以向下面这样操作,获取 User :
@RequestMapping("/foo")
public String foo(Principal principal) {Authentication authentication = (Authentication) principal;User = (User) authentication.getPrincipal();... // do stuff with user
}
- 异步处理安全方法
由于SecurityContext 是线程绑定的,因此如果要进行任何调用安全方法的后台处理,例如使用 @Async (Runnable, Callable等等异步执行方法),需要确保传播上下文。
要将SecurityContext传播到@Async方法,需要提供AsyncConfigurer并确保Executor的类型正确:
@Configuration
public class ApplicationConfiguration extends AsyncConfigurerSupport {@Overridepublic Executor getAsyncExecutor() {return new DelegatingSecurityContextExecutorService(Executors.newFixedThreadPool(5));}}
OAuth2认证:
OAuth(开放授权)是一个开发标准,允许用户授权第三方应用访问他们存储在另外的服务提供者上的信息,而不需要将用户名和密码提供给第三方应用或分享他们数据的所有内容。OAuth2.0是OAuth协议的延续版本,但不向后兼容Oauth1.0即完成废止了OAuth1.0。很多大公司如Google,Yahoo,Microsoft等都提供了OAuth认证服务,这些都足以说明OAuth标准逐渐成为开放资源授权的标准。
OAuth协议目前发展到2.0版本,1.0版本过于复杂,2.0版本已得到广泛应用。
OAuth协议:https://tools.ietf.org/html/rfc6749
网管整合OAuth2.0有两种思路,一种是认证服务器生成JWT令牌,所有请求统一在网关层验证,判断权限等操作;另一种是由各资源服务处理,网关只做请求转发。
我们选用第一种。我们把API网关作为OAuth2.0的资源服务器角色,实现接入客户端权限拦截、令牌解析并转发当前登录用户信息(jsonToken)给微服务,这样下游微服务就不需要关心令牌格式解析以及OAuth2.0相关机制了。
API网关在认证授权体系里主要负责两件事:
(1)作为OAuth2.0的资源服务器角色,实现接入方权限拦截。
(2)令牌解析并转发当前登录用户信息(明文token)给微服务
微服务拿到明文token(明文token中包含登录用户的身份和权限信息)后也需要做两件事;
(1)用户授权拦截(看当前用户是否有权访问该资源)
(2)将用户信息存储进当前线程上下文(有利于后续业务逻辑随时获取当前用户信息)
什么是SSO?与OAuth2.0有什么关系?
OAuth2.0的使用场景通常称为联合登录。一处注册,多处使用。
SSO Single Sign On 单点登录。一处登录,多处同时登录。
SSO的实现关键是将Session信息集成存储。Spring Security
在梳理OAuth2.0协议流程的过程中,其实有一个主线,就是三方参与者之家的信息程度。
普通令牌:b9f2eaa1-8715-4f03-86c7-06bf757a5f7c
普通令牌只是一个随机的字符串,没有特殊的意义。这就意味着,当客户带上令牌去访问应用的接口时,应用本身无法判断这个令牌是否正确,他就需要到授权服务器上去判断令牌是否有效。在高并发场景下,检查令牌的网络请求就有可能成为一个性能瓶颈。
改良的方式就是JWT令牌。将令牌对应的相关信息全部冗余到令牌本身,这样资源服务器就不再需要发送请求给授权服务器去检查令牌了,他自己就可以读取到令牌的授权信息。JWT令牌的本质就是一个加密的字符串!!
JWT令牌:

下边分析一个OAuth2认证的例子,通过例子去理解OAuth2.0协议的认证流程,本例子是黑马程序员使用微信认证的过程,这个过程的简要描述如下:
用户借助微信认证登录黑马程序员网站,用户就不用单独在黑马程序员注册用户,怎么样算认证成功吗?黑马程序员网站需要成功从微信获取用户的身份信息则认为用户认证成功,那如何从微信获取用户的身份信息?用户信息的拥有者是用户本人,微信需要经过用户的同意方可为黑马程序员网站生成令牌,黑马程序员网站拿此令牌方可从微信获取用户的信息。


OA包括以下角色:
1、客户端
本身不存储资源,需要通过资源拥有者的授权去请求资源服务器的资源,比如:Android客户端、Web客户端(浏览器端)、微信客户端等。
2、资源拥有者
通常为用户,也可以是应用程序,即改资源的拥有者。
3、授权服务器(也称认证服务器)
用于服务提供商对资源拥有的身份进行认证、对访问资源进行授权,认证成功后会给客户端发放令牌(access_token),作为客户端访问资源服务器的凭据。本例为微信的认证服务器。
4、资源服务器
存储资源的服务器,本例子为微信存储的用户信息。
现在还要一个问题,服务提供商能允许随便一个客户端就接入到它的授权服务器吗?答案是否定的,服务提供商会给准入的接入方一个身份,用于接入时的凭据:
clien_id:客户端标识
client_secret:客户端秘钥。
因此,准确来说,授权服务器对两种OAuth2.0中的两个角色进行认证授权,分别是资源拥有者、客户端。
Spring Cloud Security OAuth2:
Spring-Security-OAuth2是对OAuth2的一种实现,并且跟我们之前学习的Spring Security相辅相成,与Spring Cloud体系的集成也非常便利,接下来,我们需要对它进行学习,最终使用它来实现我们设计的分布式认证授权解决方案。
OAuth2.0的服务提供方涵盖两个服务,即授权服务(Authorization Server,也叫认证服务)和资源服务(Resource Server),使用Spring Security OAuth2的时候你可以把它们在同一个应用程序中实现,也可以选择建立使用同一个授权服务的多个资源服务。
**授权服务(Authorization Server)**应包含对接入端以及登入用户的合法性进行验证并颁发token等功能,对令牌的请求端点由Spring MVC控制器进行实现,下面是配置一个认证服务必须要实现endpoints;
- AuthorizationEndpiont 服务于认证请求,默认URL:/oauth/authorize。
- TokenEndpoint 服务于访问令牌的请求,默认URL:/oauth/token。资源服务(Resource Server),应包含对资源的保护功能,对非法请求进行拦截,对请求找那个token进行解析鉴权等,下面的过滤器用于实现 OAuth 2.0 资源服务;
- OAuth2AuthenticationProcessingFilter 用来对请求给出的身份令牌解析鉴权。

AuthorizationServerConfigurerAdapter: 要求配置以下几个类,这几个类是由Spring创建的独立配置对象,它们会被Spring传入AuthorizationServerConfigurer中配置。
- ClientDetailsServiceConfigurer:用来配置客户端详情服务(ClientDetailsService),客户端详情信息在这里进行初始化,你能够把客户端详情信息写死在这里或者是通过数据库来存储调取详情信息。
- AuthorizationServerEndpointsConfigurer:用来配置令牌(token)的访问端点和令牌服务(token services)。
- AuthorizationServerSecurityConfigurer:用来配置令牌端点的安全约束。
配置客户端详细信息:
ClientDetailsServiceConfigurer 能够使用内存或者JDBC来实现客户端详情服务(ClientDetailsService),ClientDetailsService负责查找ClientDetails,而ClientDetails有几个重要的属性如下列表:
- clientId:(必须的)用来标识客户的id。
- secret:(需要值得信任的客户端)客户端安全码,如果有的话。
- scope:用来限制客户端的访问范围,如果为空(默认)的话,那么客户端拥有全部的访问范围。
- authorizedGrantTypes:此客户端可以使用的授权类型,默认为空。
- authorities:此客户可以使用的权限(基于Spring Security authorities)。
客户端详情(Client Details)能够在应用程序运行的时候进行更新,可以通过访问底层的存储服务(例如将客户端详情存储在一个关系数据库的表中,就可以使用JdbcClientDetailsService)或者通过自己实现ClientRegistrationService接口(同时你也可以实现 ClientDetailsService接口)来进行管理。
我们暂时使用内存方式存储客户端详情信息,配置如下:
@Overridepublic void configure(ClientDetailsServiceConfigurer clients)throws Exception{// clients.withClientDetails(clientDetailsService);clients.inMemory() // 使用in-memory存储.withClient("c1") // client_id.secret(new BCryptPasswordEncoder().encode("secret")).resourceIds("res1").authorizedGrantTypes("authorization_code","password","client_credentials","implicit","refresh_token") // 该client允许的授权类型:authorization_code,password,refresh_token,implicit,client_credentials.scopes("all") // 允许的授权范围.autoApprove(false)// 加上验证回调地址.redirectUris("http://www.baidu.com")}

管理令牌:
AuthorizationServerTokenServices 接口定义了一些操作使得你可以对令牌进行一些必要的管理,令牌可以被用来加载身份信息,里面包含了这个令牌的相关权限。
自己可以创建 AuthorizationServerTokenServices 这个接口的实现,则需要继承 DefaultTokenService 这个类,里面包含了一些有用实现,你可以使用它来修改令牌的格式和令牌的存储。默认的,当它尝试创建一个令牌的时候,是使用随机值来进行填充的,除了持久化令牌是委托一个TokenStore 接口来实现以外,这个类几乎帮你做了所有的事情。并且TokenStore 这个接口有一个默认的实现,它就是InMemoryTokenStore,如其命名,所有的令牌是被保存在了内存中,除了使用这个类以外,你还可以使用一些其他的预定义实现,下面有几个版本,它们都实现了TokenStore接口:
- InMemoryTokenStore:这个版本的实现是被默认采用的,它可以完美的工作在但服务器上(即访问并发量压力不打的情况下,并且它在失败的时候不会进行备份),大多数的项目都可以使用这个版本的实现来进行尝试,你可以在开发的时候使用它来进行管理,因为不会被保存到磁盘中,所以更易于调试。
- JdbcTokenStore:这是一个基于JDBC的实现版本,令牌会被保存进关系型数据库。使用这个版本的实现时,你可以在不同的服务器之间共享令牌信息,使用这个版本的时候请注意把"spring-jdbc"这个依赖加入到你的classpath当中。
- JwtTokenStore:这个版本的全称是 JSON Web Token(JWT),它可以把令牌相关的数据进行编码(因此对于后端服务来说,它不需要进行存储,这将是一个重大优势),但是它有一个缺点,那就是撤销一个已经授权令牌将会非常困难,所以它通常用来处理一个生命周期较短的令牌以及撤销刷新令牌(refresh_token)。另外一个缺点就是这个令牌占用的空间会比较大,如果你加入了比较多用户凭证信息。JwtTokenStore 不会保存任何数据,但是它在转换令牌值以及授权信息方面 DefaultTokenServices 所扮演的角色是一样的。
令牌访问端点配置:
AuthorizationServerEndpointsConfigurer 这个对象的实例可以完成令牌服务以及令牌endpiont配置。
配置授权类型(Grant Types)
AuthorizationServerEndpointsConfigurer 通过设定以下属性决定支持的授权类型(Grant Types);
- authenticationManager:认证管理器,当你选择了资源所有者密码(password)授权类型的时候,请设置这个属性注入一个 AuthenticationManager对象。
- userDetailsService:如果你设置了这个属性的话,那说明你有一个自己的 UserDetailsService 接口的实现,或者你可以把这个东西设置到全局域上面去(例如GlobalAuthenticationManagerConfigurer 这个配置对象),当你设置了这个之后,那么"refresh_token"即刷新令牌授权类型模式的流程宗就会包含一个检查,用来确保这个账号是否仍然有效,假如说你禁用了这个账户的话。
- authorizationCodeServices:这个属性是用来设置授权码服务的(即 AuthorizationCodeServices 的实例对象),主要用于"authorization_code"授权码类型模式。
- implicitGrantService:这个属性用于设置隐式授权模式,用来管理隐式授权模式的状态。
- tokenGranter:当你设置了这个东西(即 TokenGranter 接口实现),那么授权将会交由你来完全掌控,并且会忽略掉上面的这几个属性,这个属性一般是用作拓展用途的,即标准的四种授权模式已经满足不了你的需求的时候,才会考虑使用这个。
配置授权端点的URL(Endpoint URLs):
AuthorizationServerEndpointsConfigurer 这个配置对象有一个叫做 pathMapping() 的方法用来配置端点URL链接,它有两个参数:
- 第一个参数:String类型的,这个端点URL的默认链接。
- 第二个参数:String类型的,你要进行替代的URL链接。
以上的参数都将以"/"字符为开始的字符串,框架的默认URL链接如下列表,可以作为这个 pathMapping() 方法的第一个参数:
- /oauth/authorize:授权端点。
- /oauth/token:令牌端点。
- /oauth/confirm_access:用户确认授权提交端点。
- /oauth/error:授权服务错误信息端点。
- /oauth/check_token:用于资源服务访问的令牌解析端点。
- /oauth/token_key:提供公有密钥的端点,如果你使用 JWT 令牌的话。
需要注意的是授权端点这个URL应该被Spring Security保护起来只供授权用户访问。
令牌端点的安全约束:
AuthorizationServerSecurityConfigurer:用来配置令牌端点(Token Endpoint)的安全约束,在AuthorizationServer 中配置如下:
@Overridepublcic void configure(AuthorizationServerSecurityConfigurer security){security.tokenKeyAccess("permitAll()") (1).checkTokenAccess("permintAll()") (2).allowFormAuthenticationForClients(); (3)}
(1)tokenkey这个endpoint当使用 jwtToken 且使用非对称加密时,资源服务用于获取公钥而开放的,这里指这个endpoint完全公开。
(2)checkToken这个endpoint完全公开
(3)允许表单认证
**授权服务配置总结:**授权服务配置分成三大块,可以关联记忆。
既然要完成认证,它首先得知道客户端信息从哪儿读取,因此要进行客户端详情配置。
既然要颁发token,那必须得定义token的相关endpoint,以及token如何存取,以及客户端支持哪些类型的token。
既然暴露除了一些endpoint,那对这些endpoint可以定义一些安全上的约束等。
资源服务器配置:
@EnableResourceServer 注解到一个@Configuration配置类上,并且必须使用 ResourceServerConfigurer 这个配置对象来进行配置(可以选择继承子 ResourceServerConfigurerAdapter 然后覆盖其中的方法,参数就是这个对象的实例),下面是一些可以配置的属性:
ResourceServerSecurityConfigurer中主要包括:
- tokenServices:ResourceServerTokenService 类的实例,用来实现令牌服务。
- tokenStore:TokenStore 类的实例,指定令牌如何访问,与tokenServices配置可选
- resourceId:这个资源服务的ID,这个属性是可选的,但是推荐设置并在授权服务中进行验证。
- 其他的拓展属性例如 tokenExtractor 令牌提取器用来提取请求中的令牌。
HttpSecurity配置这个与Spring Securiry类似:
- 请求匹配器,用来设置需要进行保护的资源路径,默认的情况下是保护资源服务的全部路径。
- 通过http.authorizeRequests()来设置受保护资源的访问规则。
- 其他的自定义权限保护规则通过 HttpSecurity 来进行配置。
@EnableResourceServer 注解自动增加了一个类型为 OAuth2AuthenticationProcessingFilter 的过滤器链。
OAuth2四种认证模式:
OAuth2.0是一个开放标准,允许用户授权第三方应用程序访问他们存储在另外的服务提供者上的信息,而不需要将用户名和密码提供给第三方应用或分享他们数据的所有内容。
OAuth2.0协议的认证流程,简单理解,就是允许我们将之前的授权和认证过程交给一个独立的第三方进行担保。
整体流程
流程图
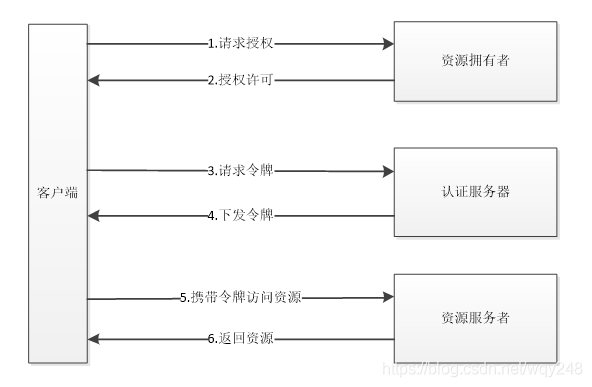
整体流程说明
- 用户打开客户端,客户端要求向资源所有者(即用户)给予授权;
- 用户同意授权;
- 客户端得知用户同意授权后,向授权服务器获取授权;
- 授权服务器给予客户端授权,并将授权码(Access Token)即为令牌下发给客户端;
- 客户端携带授权码去请求资源服务器;
- 资源服务器将受限的资源开放给客户端。
大多数情况下,认证服务器和资源服务者在一台机器上,但是逻辑上属于两个概念,很多系统将其作为单独的微服务和其他资源服务区分开来。
OAuth2协议规定的4种授权类型:
授权许可是表示客户用来获取访问令牌的资源所有者授权的凭证。此规范协议规定了4种授权类型:
- authorization code(授权码模式)
- implicit(简化模式)
- resource owner password credentials(密码模式)
- client credentials(客户端模式)
授权码模式:


流程图:

授权码模式流程说明:
- 用户访问客户端,客户端通过用户代理向认证服务器请求授权码;
- 用户同意授权;
- 认证服务器通过用户代理返回授权码给客户端;
- 客户端携带授权码向认证服务器请求访问令牌(AccessToken);
- 认证服务器返回访问令牌;
- 客户端携带访问令牌向资源服务器请求资源;
- 资源服务器返回资源。
简化模式
流程图


简化模式流程说明:
- 用户访问客户端,客户端通过用户代理向认证服务器请求授权码;
- 用户同意授权;
- 认证服务器返回一个重定向地址,该地址的url的Hash部分包含了令牌;
- 用户代理向资源服务器发送请求,其中不带令牌信息;
- 资源服务器返回一个网页,其中包含的脚本可以获取Hash中的令牌;
- 用户代理执行脚本提取令牌;
- 用户代理将令牌返回给客户端;
- 客户端携带令牌向资源服务器请求资源;
- 资源服务器返回资源。
密码模式
流程图


密码模式流程说明:
- 用户向客户端提供用户名密码;
- 客户端将用户名和密码发给认证服务器请求令牌;
- 认证服务器确认无误后,向客户端提供访问令牌;
- 客户端携带令牌向资源服务器请求访问资源;
- 资源服务器返回资源。
客户端模式
流程图


客户端模式流程说明:
- 客户端向认证服务器进行身份认证,并要求一个访问令牌;
- 认证服务器确认无误后,向客户端提供访问令牌;
- 客户端携带令牌向资源服务器请求访问资源;
- 资源服务器返回资源。
认证的相关请求:
注:所有请求均为post请求。
-
获取access_token请求(/oauth/token)
请求所需参数:client_id、client_secret、grant_type、username、password
http://localhost/oauth/token?client_id=demoClientId&client_secret=demoClientSecret&grant_type=password&username=demoUser&password=50575tyL86xp29O380t1 -
检查头肯是否有效请求(/oauth/check_token)
请求所需参数:tokenhttp://localhost/oauth/check_token?token=f57ce129-2d4d-4bd7-1111-f31ccc69d4d1 -
刷新token请求(/oauth/token)
请求所需参数:grant_type、refresh_token、client_id、client_secret
其中grant_type为固定值:grant_type=refresh_tokenhttp://localhost/oauth/token?grant_type=refresh_token&refresh_token=fbde81ee-f419-42b1-1234-9191f1f95be9&client_id=demoClientId&client_secret=demoClientSecret
三方登录的 access_token 过期时间,默认是三个月。


认证核心流程:
注:文中介绍的认证服务器端token存储在Reids,用户信息存储使用数据库,文中会包含相关的部分代码。
获取token的主要流程:
加粗内容为每一步的重点,不想细看的可以只看加粗内容:
-
用户发起获取token的请求。
-
过滤器会验证path是否是认证的请求/oauth/token,如果为false,则直接返回没有后续操作。
-
过滤器通过clientId查询生成一个Authentication对象。
-
然后会通过username和生成的Authentication对象生成一个UserDetails对象,并检查用户是否存在。
-
以上全部通过会进入地址/oauth/token,即TokenEndpoint的postAccessToken方法中。
-
postAccessToken方法中会验证Scope,然后验证是否是refreshToken请求等。
-
之后调用AbstractTokenGranter中的grant方法。
-
grant方法中调用AbstractUserDetailsAuthenticationProvider的authenticate方法,通过username和Authentication对象来检索用户是否存在。
-
然后通过DefaultTokenServices类从tokenStore中获取OAuth2AccessToken对象。
-
然后将OAuth2AccessToken对象包装进响应流返回。
刷新token(refresh token)的流程
刷新token(refresh token)的流程与获取token的流程只有⑨有所区别:
- 获取token调用的是AbstractTokenGranter中的getAccessToken方法,然后调用tokenStore中的getAccessToken方法获取token。
- 刷新token调用的是RefreshTokenGranter中的getAccessToken方法,然后使用tokenStore中的refreshAccessToken方法获取token。
tokenStore的特点
tokenStore通常情况为自定义实现,一般放置在缓存或者数据库中。此处可以利用自定义tokenStore来实现多种需求,如:
-
同已用户每次获取token,获取到的都是同一个token,只有token失效后才会获取新token。
-
同一用户每次获取token都生成一个完成周期的token并且保证每次生成的token都能够使用(多点登录)。
-
同一用户每次获取token都保证只有最后一个token能够使用,之前的token都设为无效(单点token)。
获取token的详细流程:
代码截图梳理流程
1.一个比较重要的过滤器
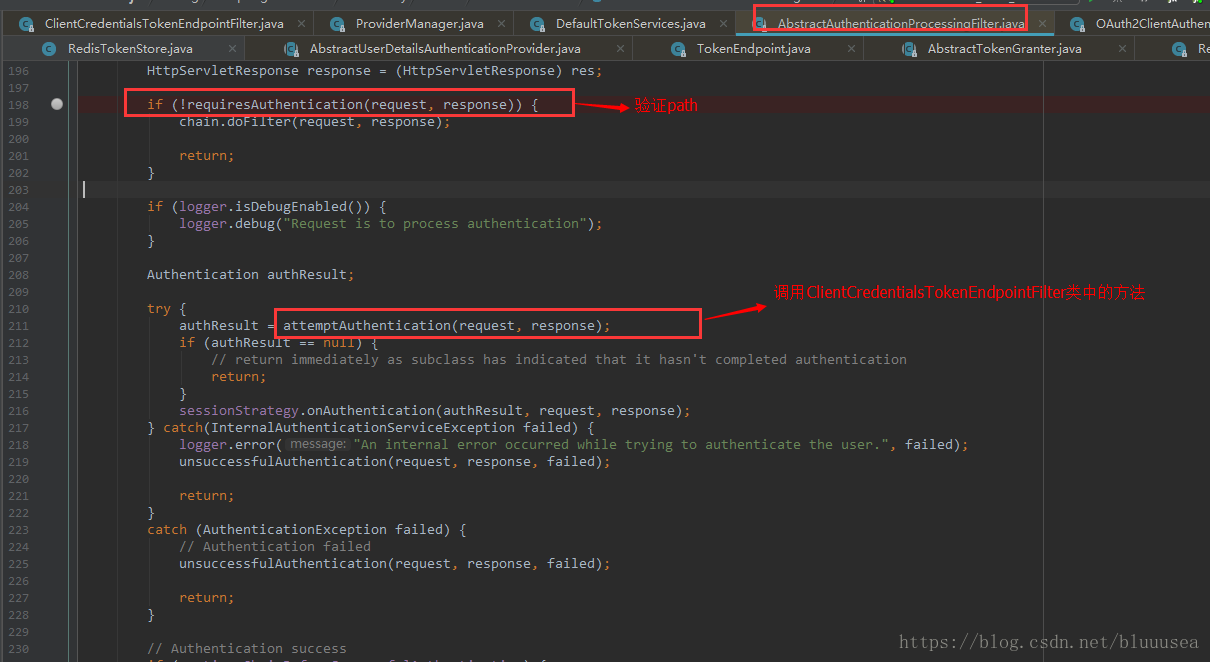
2.此处是①中的attemptAuthentication方法
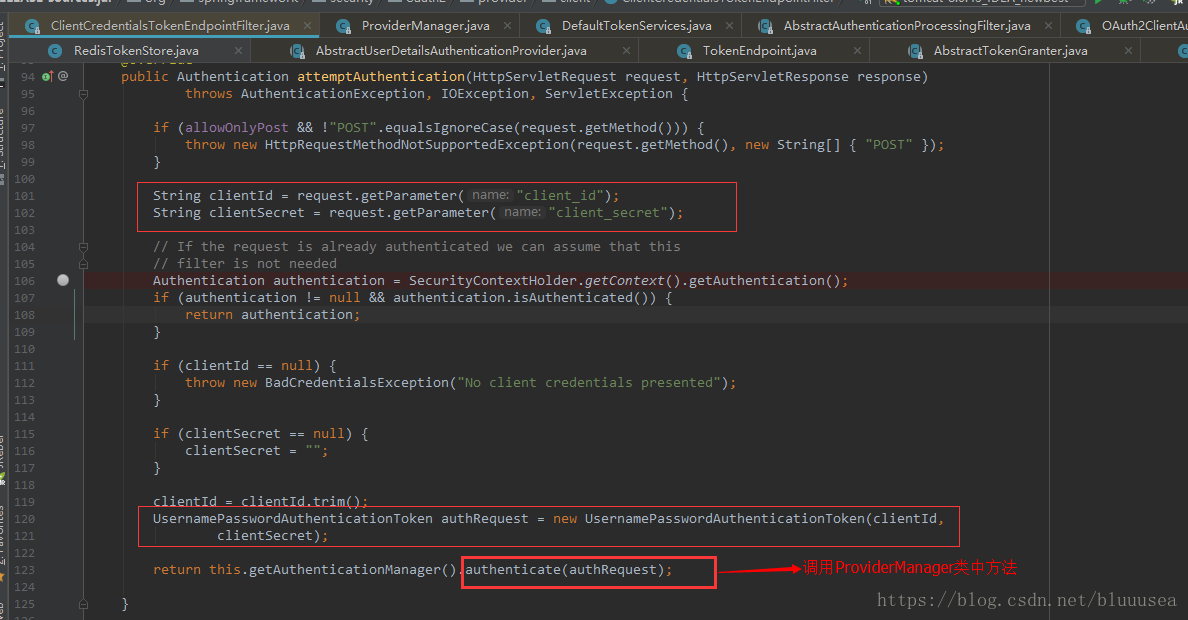
3.此处是②中调用的authenticate方法
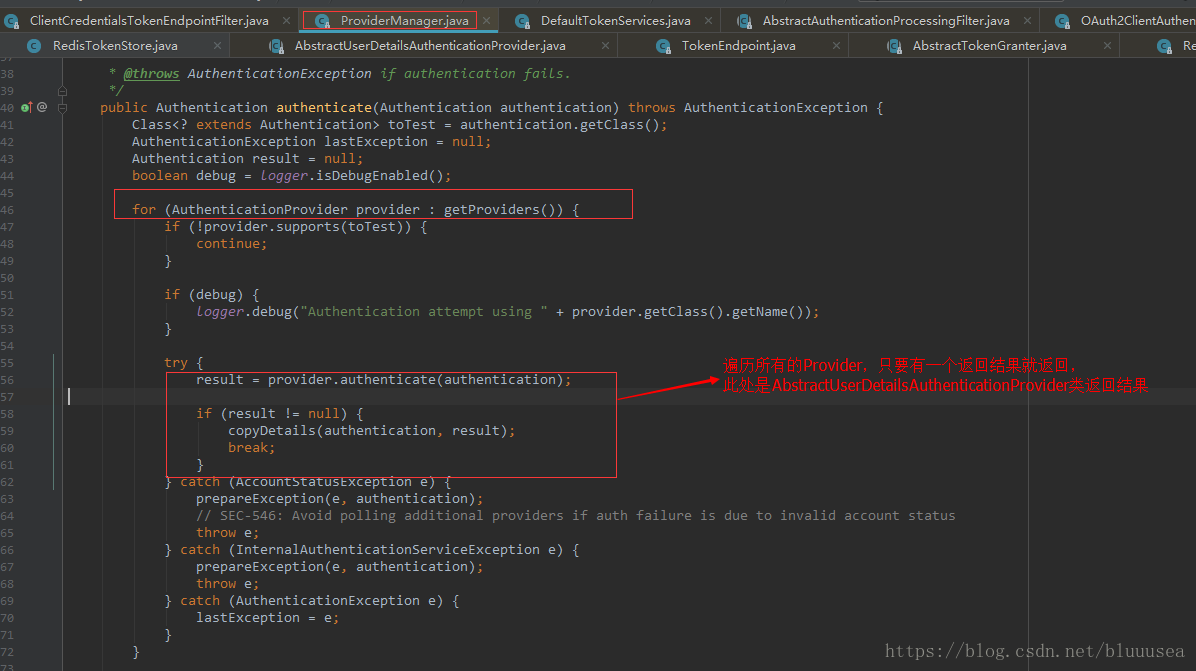
4.此处是③中调用的AbstractUserDetailsAuthenticationProvider类的authenticate方法
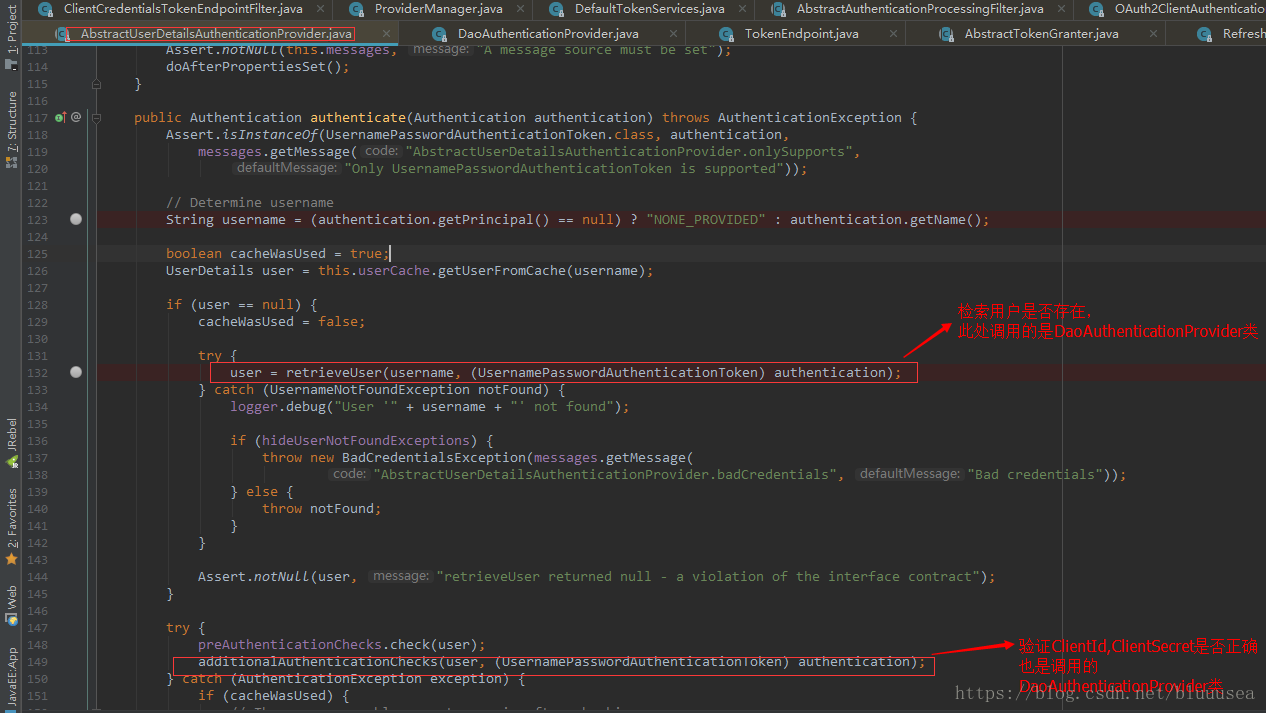
5.此处是④中调用的DaoAuthenticationProvider类的retrieveUser方法

6.此处为⑤中调用的ClientDetailsUserDetailsService类的loadUserByUsername方法,执行完后接着返回执行④之后的方法
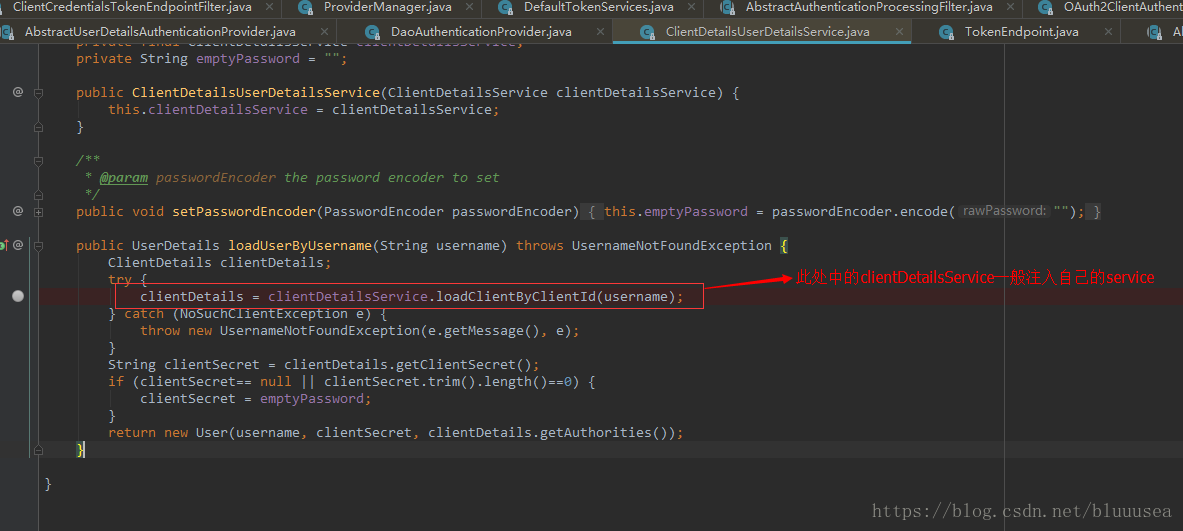
7.此处为④中调用的DaoAuthenticationProvider类的additionalAuthenticationChecks方法,此处执行完则主要过滤器执行完毕,后续会进入/oauth/token映射的方法。
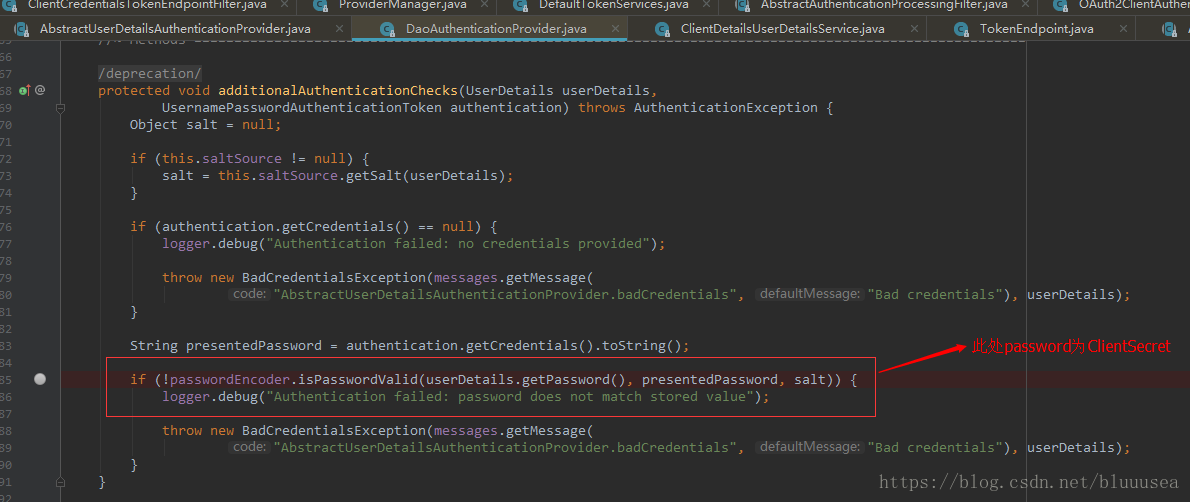
8.此处进入/oauth/token映射的TokenEndpoint类的postAccessToken方法
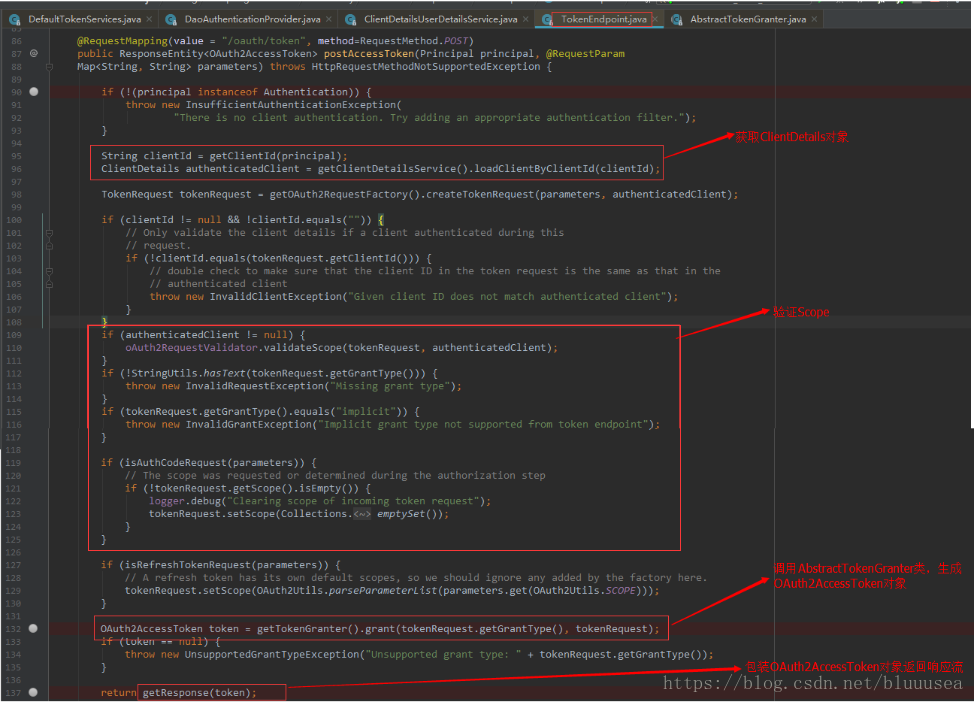
9.此处为⑧中调用的AbstractTokenGranter类的grant方法
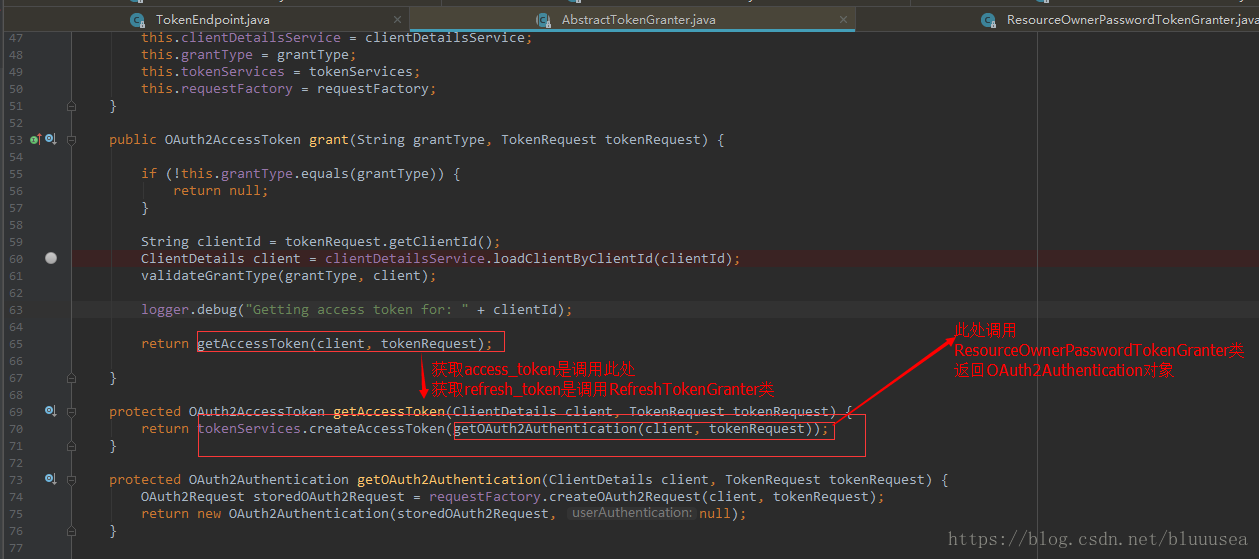
10.此处为⑨中调用的ResourceOwnerPasswordTokenGranter类中的getOAuth2Authentication方法
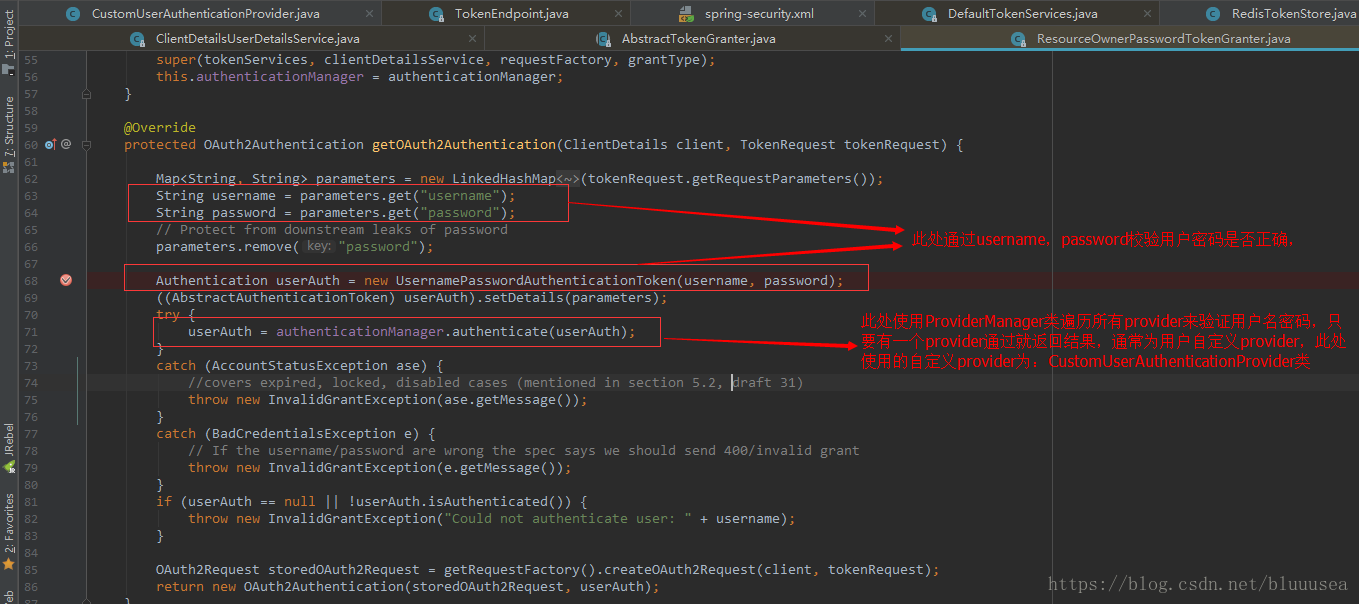
11.此处为⑩中调用的自定义的CustomUserAuthenticationProvider类中的authenticate方法,此处校验用户密码是否正确,此处执行完则返回⑨执行后续方法。
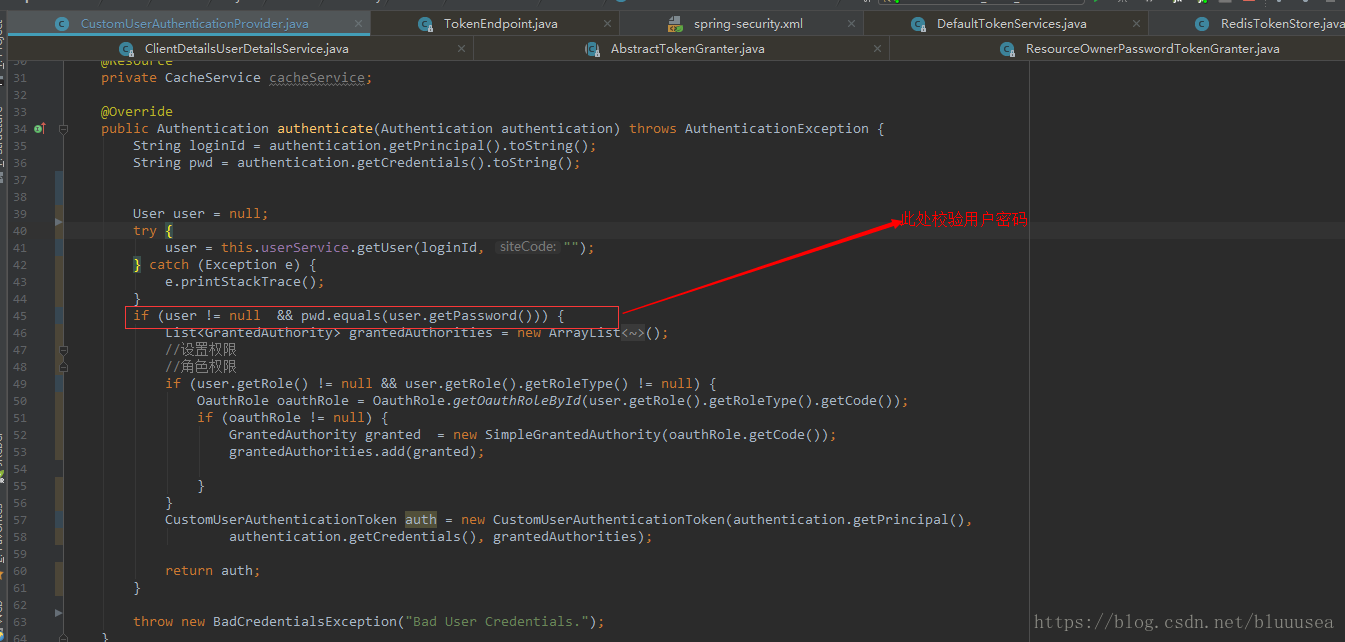
12.此处为⑨中调用的DefaultTokenServices中的createAccessToken方法
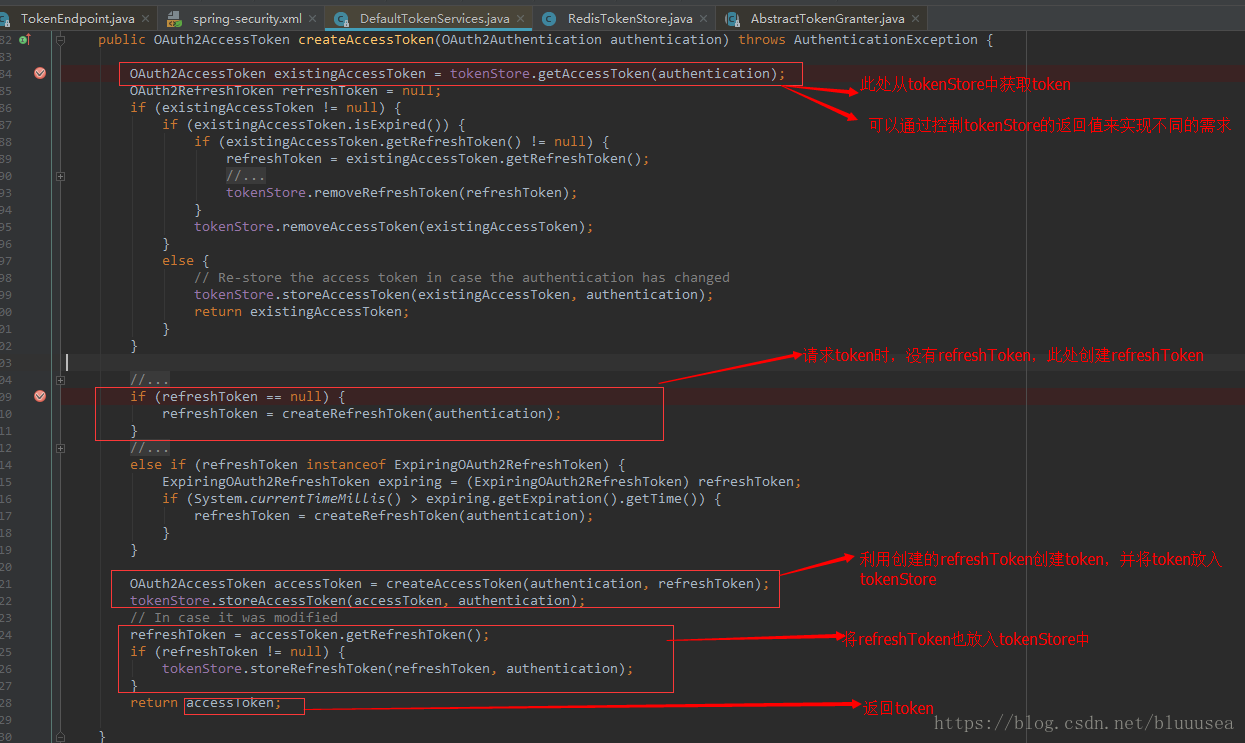
13.此处为12中调用的RedisTokenStore中的getAccessToken方法等,此处执行完,则一直向上返回到⑧中执行后续方法。
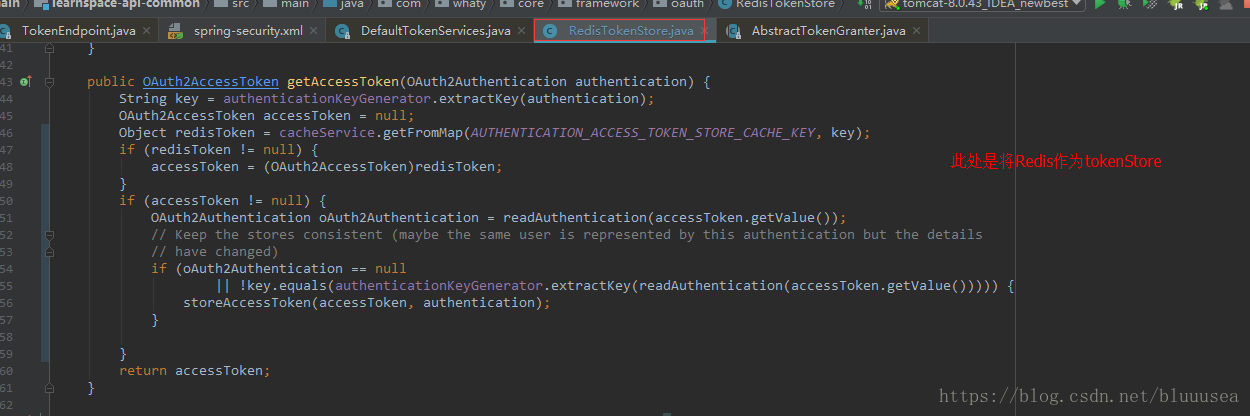
14.此处为⑧中获取到token后需要包装返回流操作
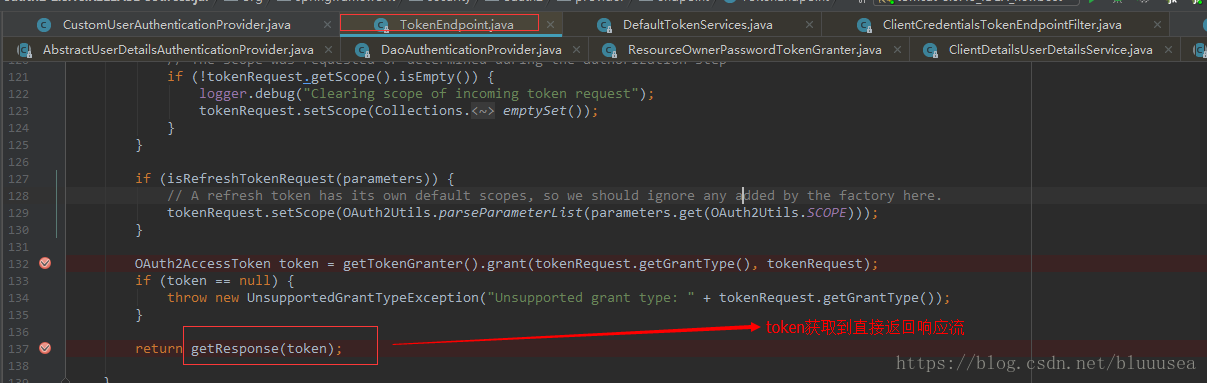
Spring-security.xml配置
<!-- 认证地址 -->
<sec:http pattern="/oauth/token" create-session="stateless"authentication-manager-ref="authenticationManager" ><sec:intercept-url pattern="/oauth/token" access="IS_AUTHENTICATED_FULLY" /><sec:anonymous enabled="false" /><sec:http-basic entry-point-ref="clientAuthenticationEntryPoint" /><sec:custom-filter ref="clientCredentialsTokenEndpointFilter" before="BASIC_AUTH_FILTER" /><sec:access-denied-handler ref="oauthAccessDeniedHandler" />
</sec:http><bean id="clientAuthenticationEntryPoint"class="org.springframework.security.oauth2.provider.error.OAuth2AuthenticationEntryPoint"><property name="realmName" value="springsec/client" /><property name="typeName" value="Basic" />
</bean><bean id="clientCredentialsTokenEndpointFilter"class="org.springframework.security.oauth2.provider.client.ClientCredentialsTokenEndpointFilter"><property name="authenticationManager" ref="authenticationManager" />
</bean><bean id="oauthAccessDeniedHandler"class="org.springframework.security.oauth2.provider.error.OAuth2AccessDeniedHandler">
</bean><!-- 认证管理器-->
<sec:authentication-manager alias="authenticationManager"><sec:authentication-provider user-service-ref="clientDetailsUserService" />
</sec:authentication-manager><!-- 注入自定义clientDetails-->
<bean id="clientDetailsUserService"class="org.springframework.security.oauth2.provider.client.ClientDetailsUserDetailsService"><constructor-arg ref="clientDetails" />
</bean><!-- 自定义clientDetails-->
<bean id="clientDetails" class="com.xxx.core.framework.oauth.CustomClientDetailsServiceImpl">
</bean>
<!-- 注入自定义provider-->
<sec:authentication-manager id="userAuthenticationManager"><sec:authentication-provider ref="customUserAuthenticationProvider" />
</sec:authentication-manager>
<!--自定义用户认证provider-->
<bean id="customUserAuthenticationProvider"class="com.xxx.core.framework.oauth.CustomUserAuthenticationProvider">
</bean><oauth:authorization-serverclient-details-service-ref="clientDetails" token-services-ref="tokenServices" check-token-enabled="true" ><oauth:authorization-code /><oauth:implicit/><oauth:refresh-token/><oauth:client-credentials /><oauth:password authentication-manager-ref="userAuthenticationManager"/>
</oauth:authorization-server><!-- 自定义tokenStore-->
<bean id="tokenStore"class="com.xxx.core.framework.oauth.RedisTokenStore" /><!-- 设置access_token有效期,设置支持refresh_token,refresh_token有效期默认为30天-->
<bean id="tokenServices"class="org.springframework.security.oauth2.provider.token.DefaultTokenServices"><property name="tokenStore" ref="tokenStore" /><property name="supportRefreshToken" value="true" /><property name="accessTokenValiditySeconds" value="43200"></property><property name="clientDetailsService" ref="clientDetails" />
</bean>
OAuth2使用:
案例一:
前言
今天来聊聊一个接口对接的场景,A厂家有一套HTTP接口需要提供给B厂家使用,由于是外网环境,所以需要有一套安全机制保障,这个时候oauth2就可以作为一个方案。
关于oauth2,其实是一个规范,本文重点讲解spring对他进行的实现,如果你还不清楚授权服务器,资源服务器,认证授权等基础概念,可以移步理解OAuth 2.0 - 阮一峰,这是一篇对于oauth2很好的科普文章。
需要对spring security有一定的配置使用经验,用户认证这一块,spring security oauth2建立在spring security的基础之上。第一篇文章主要是讲解使用springboot搭建一个简易的授权,资源服务器,在文末会给出具体代码的github地址。后续文章会进行spring security oauth2的相关源码分析。java中的安全框架如shrio,已经有跟我学shiro - 开涛,非常成体系地,深入浅出地讲解了apache的这个开源安全框架,但是spring security包括oauth2一直没有成体系的文章,学习它们大多依赖于较少的官方文档,理解一下基本的使用配置;通过零散的博客,了解一下他人的使用经验;打断点,分析内部的工作流程;看源码中的接口设计,以及注释,了解设计者的用意。spring的各个框架都运用了很多的设计模式,在学习源码的过程中,也大概了解了一些套路。spring也在必要的地方添加了适当的注释,避免了源码阅读者对于一些细节设计的理解产生偏差,让我更加感叹,spring不仅仅是一个工具框架,更像是一个艺术品。
概述
使用oauth2保护你的应用,可以分为简易的分为三个步骤
- 配置资源服务器
- 配置认证服务器
- 配置spring security
前两点是oauth2的主体内容,但前面我已经描述过了,spring security oauth2是建立在spring security基础之上的,所以有一些体系是公用的。
oauth2根据使用场景不同,分成了4种模式
- 授权码模式(authorization code)
- 简化模式(implicit)
- 密码模式(resource owner password credentials)
- 客户端模式(client credentials)
本文重点讲解接口对接中常使用的密码模式(以下简称password模式)和客户端模式(以下简称client模式)。授权码模式使用到了回调地址,是最为复杂的方式,通常网站中经常出现的微博,qq第三方登录,都会采用这个形式。简化模式不常用。
项目准备
主要的maven依赖如下
<!-- 注意是starter,自动配置 -->
<dependency><groupId>org.springframework.boot</groupId><artifactId>spring-boot-starter-security</artifactId>
</dependency>
<!-- 不是starter,手动配置 -->
<dependency><groupId>org.springframework.security.oauth</groupId><artifactId>spring-security-oauth2</artifactId>
</dependency>
<dependency><groupId>org.springframework.boot</groupId><artifactId>spring-boot-starter-web</artifactId>
</dependency>
<!-- 将token存储在redis中 -->
<dependency><groupId>org.springframework.boot</groupId><artifactId>spring-boot-starter-data-redis</artifactId>
</dependency>
我们给自己先定个目标,要干什么事?既然说到保护应用,那必须得先有一些资源,我们创建一个endpoint作为提供给外部的接口:
@RestController
public class TestEndpoints {@GetMapping("/product/{id}")public String getProduct(@PathVariable String id) {//for debugAuthentication authentication = SecurityContextHolder.getContext().getAuthentication();return "product id : " + id;}@GetMapping("/order/{id}")public String getOrder(@PathVariable String id) {//for debugAuthentication authentication = SecurityContextHolder.getContext().getAuthentication();return "order id : " + id;}}
暴露一个商品查询接口,后续不做安全限制,一个订单查询接口,后续添加访问控制。
配置资源服务器和授权服务器
由于是两个oauth2的核心配置,我们放到一个配置类中。
为了方便下载代码直接运行,我这里将客户端信息放到了内存中,生产中可以配置到数据库中。token的存储一般选择使用redis,一是性能比较好,二是自动过期的机制,符合token的特性。
@Configuration
public class OAuth2ServerConfig {private static final String DEMO_RESOURCE_ID = "order";@Configuration@EnableResourceServerprotected static class ResourceServerConfiguration extends ResourceServerConfigurerAdapter {@Overridepublic void configure(ResourceServerSecurityConfigurer resources) {resources.resourceId(DEMO_RESOURCE_ID).stateless(true);}@Overridepublic void configure(HttpSecurity http) throws Exception {// @formatter:offhttp// Since we want the protected resources to be accessible in the UI as well we need// session creation to be allowed (it's disabled by default in 2.0.6).sessionManagement().sessionCreationPolicy(SessionCreationPolicy.IF_REQUIRED).and().requestMatchers().anyRequest().and().anonymous().and().authorizeRequests()
//                    .antMatchers("/product/**").access("#oauth2.hasScope('select') and hasRole('ROLE_USER')").antMatchers("/order/**").authenticated();//配置order访问控制,必须认证过后才可以访问// @formatter:on}}@Configuration@EnableAuthorizationServerprotected static class AuthorizationServerConfiguration extends AuthorizationServerConfigurerAdapter {@AutowiredAuthenticationManager authenticationManager;@AutowiredRedisConnectionFactory redisConnectionFactory;@Overridepublic void configure(ClientDetailsServiceConfigurer clients) throws Exception {//配置两个客户端,一个用于password认证一个用于client认证clients.inMemory().withClient("client_1").resourceIds(DEMO_RESOURCE_ID).authorizedGrantTypes("client_credentials", "refresh_token").scopes("select").authorities("client").secret("123456").and().withClient("client_2").resourceIds(DEMO_RESOURCE_ID).authorizedGrantTypes("password", "refresh_token").scopes("select").authorities("client").secret("123456");}@Overridepublic void configure(AuthorizationServerEndpointsConfigurer endpoints) throws Exception {endpoints.tokenStore(new RedisTokenStore(redisConnectionFactory)).authenticationManager(authenticationManager);}@Overridepublic void configure(AuthorizationServerSecurityConfigurer oauthServer) throws Exception {//允许表单认证oauthServer.allowFormAuthenticationForClients();}}}
简单说下spring security oauth2的认证思路。
-
client模式,没有用户的概念,直接与认证服务器交互,用配置中的客户端信息去申请accessToken,客户端有自己的client_id,client_secret对应于用户的username,password,而客户端也拥有自己的authorities,当采取client模式认证时,对应的权限也就是客户端自己的authorities。
-
password模式,自己本身有一套用户体系,在认证时需要带上自己的用户名和密码,以及客户端的client_id,client_secret。此时,accessToken所包含的权限是用户本身的权限,而不是客户端的权限。
我对于两种模式的理解便是,如果你的系统已经有了一套用户体系,每个用户也有了一定的权限,可以采用password模式;如果仅仅是接口的对接,不考虑用户,则可以使用client模式。
配置spring security
在spring security的版本迭代中,产生了多种配置方式,建造者模式,适配器模式等等设计模式的使用,spring security内部的认证flow也是错综复杂,在我一开始学习ss也产生了不少困惑,总结了一下配置经验:使用了springboot之后,spring security其实是有不少自动配置的,我们可以仅仅修改自己需要的那一部分,并且遵循一个原则,直接覆盖最需要的那一部分。这一说法比较抽象,举个例子。比如配置内存中的用户认证器。有两种配置方式
planA:
@Bean
protected UserDetailsService userDetailsService(){InMemoryUserDetailsManager manager = new InMemoryUserDetailsManager();manager.createUser(User.withUsername("user_1").password("123456").authorities("USER").build());manager.createUser(User.withUsername("user_2").password("123456").authorities("USER").build());return manager;
}
planB:
@Configuration
@EnableWebSecurity
public class SecurityConfiguration extends WebSecurityConfigurerAdapter {@Overrideprotected void configure(AuthenticationManagerBuilder auth) throws Exception {auth.inMemoryAuthentication().withUser("user_1").password("123456").authorities("USER").and().withUser("user_2").password("123456").authorities("USER");}@Bean@Overridepublic AuthenticationManager authenticationManagerBean() throws Exception {AuthenticationManager manager = super.authenticationManagerBean();return manager;}
}
你最终都能得到配置在内存中的两个用户,前者是直接替换掉了容器中的UserDetailsService,这么做比较直观;后者是替换了AuthenticationManager,当然你还会在SecurityConfiguration 复写其他配置,这么配置最终会由一个委托者去认证。如果你熟悉spring security,会知道AuthenticationManager和AuthenticationProvider以及UserDetailsService的关系,他们都是顶级的接口,实现类之间错综复杂的聚合关系…配置方式千差万别,但理解清楚认证流程,知道各个实现类对应的职责才是掌握spring security的关键。
下面给出我最终的配置:
@Configuration
@EnableWebSecurity
public class SecurityConfiguration extends WebSecurityConfigurerAdapter {@Bean@Overrideprotected UserDetailsService userDetailsService(){InMemoryUserDetailsManager manager = new InMemoryUserDetailsManager();manager.createUser(User.withUsername("user_1").password("123456").authorities("USER").build());manager.createUser(User.withUsername("user_2").password("123456").authorities("USER").build());return manager;}@Overrideprotected void configure(HttpSecurity http) throws Exception {// @formatter:offhttp.requestMatchers().anyRequest().and().authorizeRequests().antMatchers("/oauth/*").permitAll();// @formatter:on}
}
重点就是配置了一个UserDetailsService,和ClientDetailsService一样,为了方便运行,使用内存中的用户,实际项目中,一般使用的是数据库保存用户,具体的实现类可以使用JdbcDaoImpl或者JdbcUserDetailsManager。
获取token
进行如上配置之后,启动springboot应用就可以发现多了一些自动创建的endpoints:
{[/oauth/authorize]}
{[/oauth/authorize],methods=[POST]
{[/oauth/token],methods=[GET]}
{[/oauth/token],methods=[POST]}
{[/oauth/check_token]}
{[/oauth/error]}
重点关注一下/oauth/token,它是获取的token的endpoint。启动springboot应用之后,使用http工具访问
password模式:http://localhost:8080/oauth/token?username=user_1&password=123456&grant_type=password&scope=select&client_id=client_2&client_secret=123456响应如下:
{"access_token":"950a7cc9-5a8a-42c9-a693-40e817b1a4b0","token_type":"bearer","refresh_token":"773a0fcd-6023-45f8-8848-e141296cb3cb","expires_in":27036,"scope":"select"}client模式:http://localhost:8080/oauth/token?grant_type=client_credentials&scope=select&client_id=client_1&client_secret=123456响应如下:
{"access_token":"56465b41-429d-436c-ad8d-613d476ff322","token_type":"bearer","expires_in":25074,"scope":"select"}在配置中,我们已经配置了对order资源的保护,如果直接访问:
http://localhost:8080/order/1
会得到这样的响应:
{"error":"unauthorized","error_description":"Full authentication is required to access this resource"}
(这样的错误响应可以通过重写配置来修改)
而对于未受保护的product资源
http://localhost:8080/product/1
则可以直接访问,得到响应
product id : 1携带accessToken参数访问受保护的资源:
使用password模式获得的token:
http://localhost:8080/order/1?access_token=950a7cc9-5a8a-42c9-a693-40e817b1a4b0
得到了之前匿名访问无法获取的资源:
order id : 1使用client模式获得的token:
http://localhost:8080/order/1?access_token=56465b41-429d-436c-ad8d-613d476ff322
同上的响应
order id : 1
我们重点关注一下debug后,对资源访问时系统记录的用户认证信息,可以看到如下的debug信息
password模式:
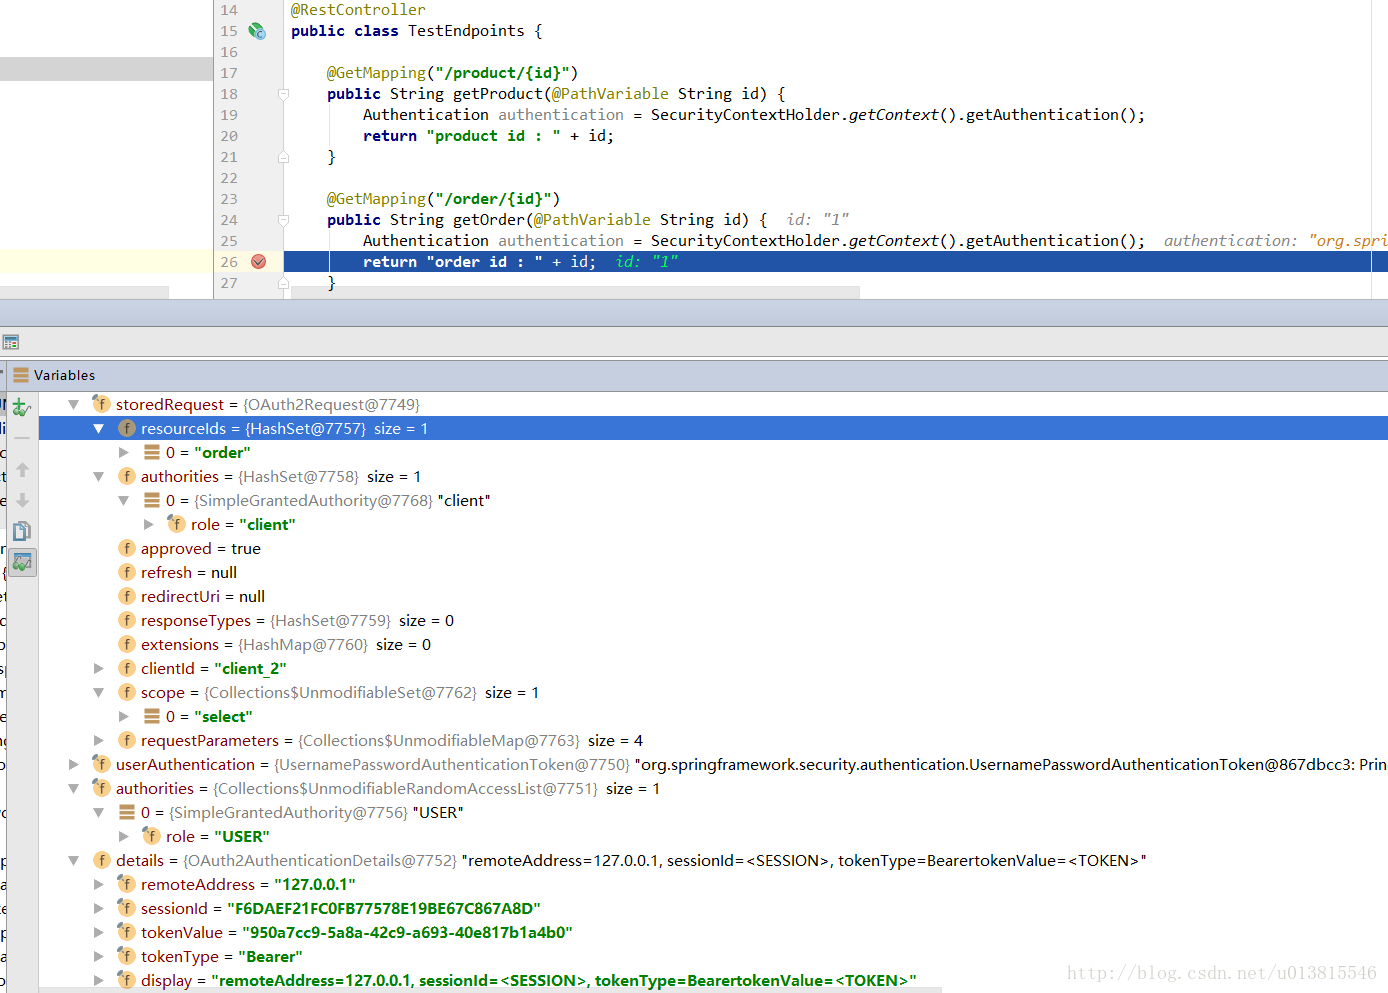
client模式:
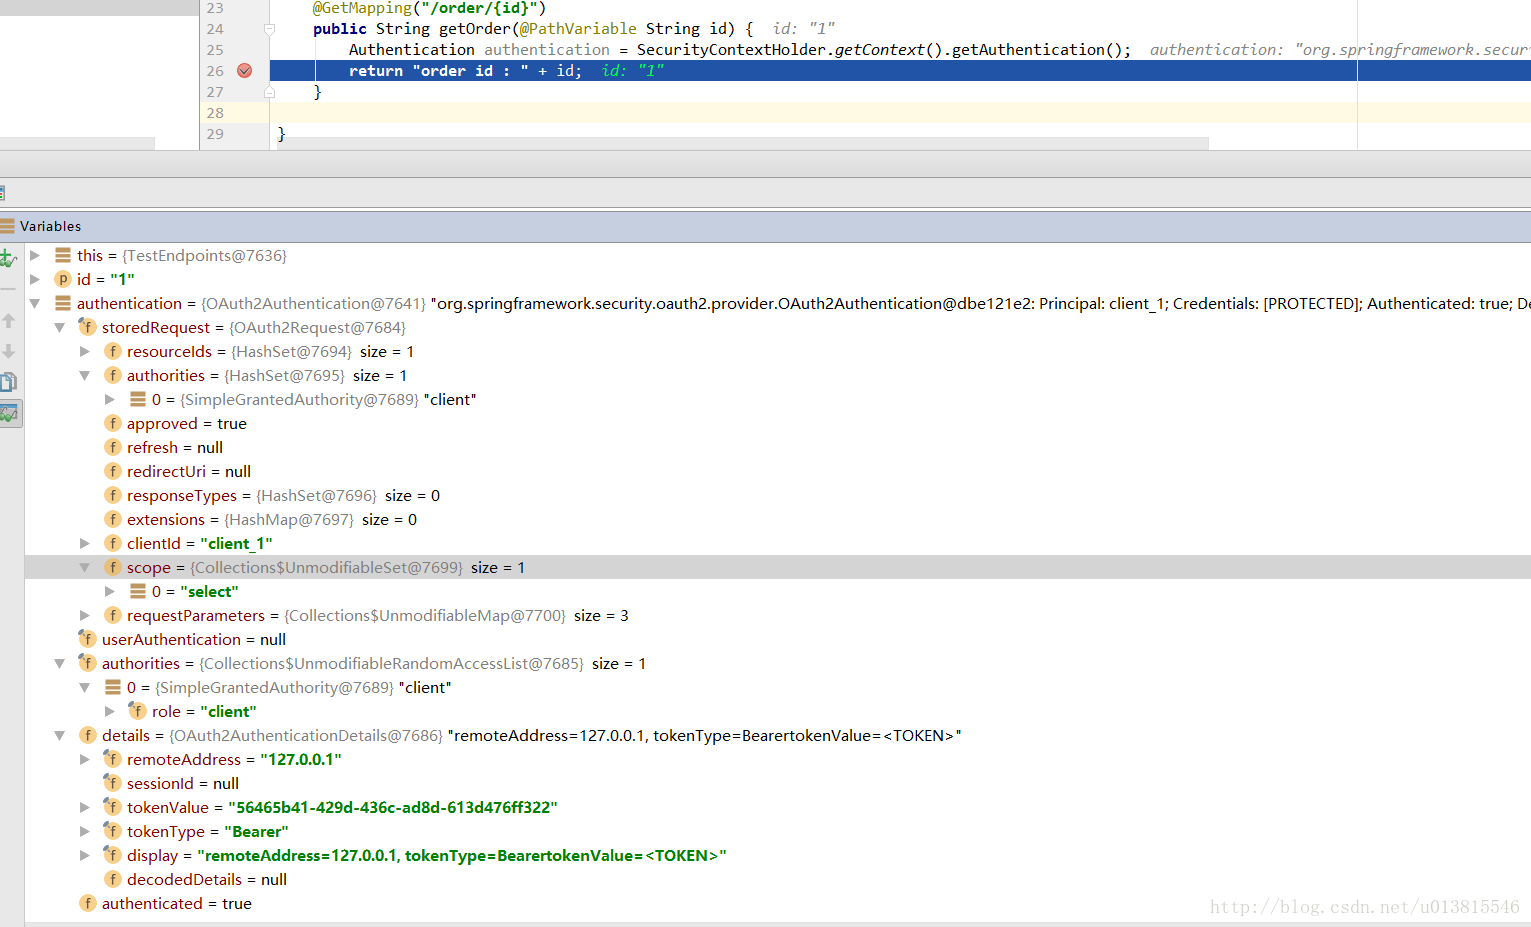
和我们的配置是一致的,仔细看可以发现两者的身份有些许的不同。想要查看更多的debug信息,可以选择下载demo代码自己查看,为了方便读者调试和验证,我去除了很多复杂的特性,基本实现了一个最简配置,涉及到数据库的地方也尽量配置到了内存中,这点记住在实际使用时一定要修改。
到这儿,一个简单的oauth2入门示例就完成了,一个简单的配置教程。token的工作原理是什么,它包含了哪些信息?spring内部如何对身份信息进行验证?以及上述的配置到底影响了什么?这些内容会放到后面的文章中去分析。
案例二:
SpringBoot + Spring Security OAuth2基本使用
基本配置
这里依然使用maven来做管理
<dependency><groupId>org.springframework.security.oauth</groupId><artifactId>spring-security-oauth2</artifactId>
</dependency><dependency><groupId>org.springframework.boot</groupId><artifactId>spring-boot-starter-security</artifactId>
</dependency><dependency><groupId>org.springframework.boot</groupId><artifactId>spring-boot-starter-web</artifactId>
</dependency>
认证服务器
Authorization Server
在过OAuth2.0有了基本概念后,我们会知道其中有一个服务提供商,我们就先来完成它。
这里只需要新建一个类,并添加相应的注释就可以了
@Configuration
@EnableAuthorizationServer
public class MyAuthorizationServerConfig {
}
随后我们启动项目,就会发现控制台有如下的语句打印:

这就表明Authorization Server已经建立起来了。 我们可根据OAuth的规则来访问相应的接口。
第三方应用 User authenticates
在有了服务提供商之后,我们就可以根据OAuth的规则,来要求用户给予授权。 这里我们以code模式为例。
所以这里需要第三方应用去调用接口
http://localhost:8080/oauth/authorize?response_type=code&client_id=3aa1f466-c67d-4f72-a8a8-62ed94d7d638&redirect_uri=http://www.baidu.com&scope=all
这里对接口参数做一个简单的介绍。
- localhost:8080这里是我服务的地址以及端口,根据每个人的情况是不同的
- /oauth/authorize这个是Spring Security OAuth2默认提供的接口
- response_type:表示授权类型,必选项,此处的值固定为”code”
- client_id:表示客户端的ID,必选项。这里使用的是项目启动时,控制台输出的security.oauth2.client.clientId,当然该值可以在配置文件中自定义
- redirect_uri:表示重定向URI,可选项。即用户授权成功后,会跳转的地方,通常是第三方应用自己的地址
- scope:表示申请的权限范围,可选项。这一项用于服务提供商区分提供哪些服务数据
- state:表示客户端的当前状态,可以指定任意值,认证服务器会原封不动地返回这个值。这里没有使用到该值
这里我们访问到接口后,会出现如下的界面
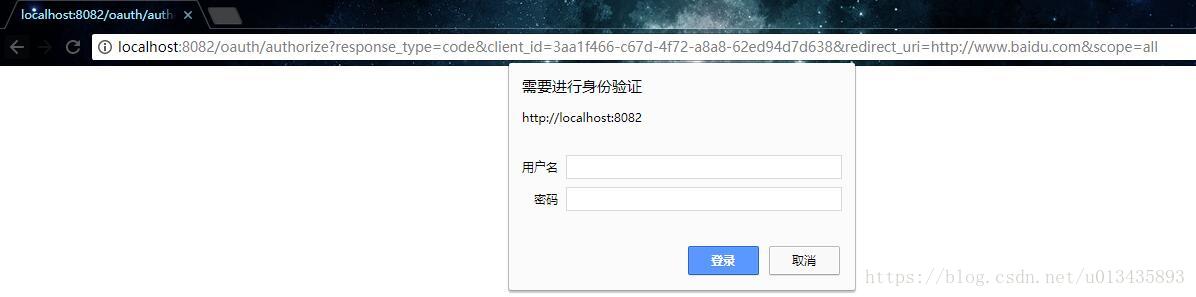
该界面主要是用于用户登录的,不然怎么知道想要哪个用户的数据呢?
在登录成功后,来到如下界面
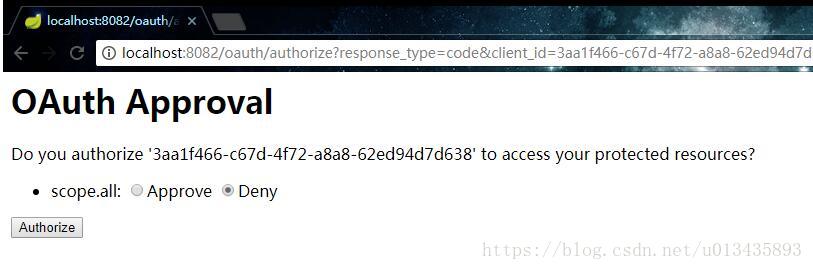
这里就是要求用户授权的界面了,有点类似于我们使用QQ进行第三方登录时候的界面。上面写有了是哪一个第三方应用需要哪些数据。
我们这里就点确认授权,这里就会根据配置的redirect_uri进行跳转,并且是带有一个参数的。
这里我们跳转到了:https://www.baidu.com/?code=XKxYIx。
这个code就是下一步第三方应用向服务器申请令牌使用的
请求Token
这里我们拿着上一步获取到的code,以及项目初始化时打印的clientId和secret去获取Token。
这里需要使用POST方法,
POST /oauth/token HTTP/1.1
Host: localhost:8082
Authorization: Basic czZCaGRSa3F0MzpnWDFmQmF0M2JW
Content-Type: application/x-www-form-urlencoded
grant_type=authorization_code&code=SplxlOBeZQQYbYS6WxSbIA
&redirect_uri=https%3A%2F%2Fclient%2Eexample%2Ecom%2Fcb
请求的Header中有一个Authorization参数,该参数的值是Basic + (clientId:secret Base64值)
- grant_type:表示使用的授权模式,必选项,此处的值固定为”authorization_code”。
- code:表示上一步获得的授权码,必选项。
- redirect_uri:表示重定向URI,必选项,且必须与A步骤中的该参数值保持一致。
- client_id:表示客户端ID,必选项。
如果请求成功,就可以顺利的拿到Token
获取到Token
请求Token成功后,认证服务器发送的HTTP回复
HTTP/1.1 200 OK
Content-Type: application/json;charset=UTF-8
Cache-Control: no-store
Pragma: no-cache
{"access_token":"2YotnFZFEjr1zCsicMWpAA","token_type":"example","expires_in":3600,"refresh_token":"tGzv3JOkF0XG5Qx2TlKWIA","example_parameter":"example_value"}
- access_token:表示访问令牌,必选项。
- token_type:表示令牌类型,该值大小写不敏感,必选项,可以是bearer类型或mac类型。
- expires_in:表示过期时间,单位为秒。如果省略该参数,必须其他方式设置过期时间。
- refresh_token:表示更新令牌,用来获取下一次的访问令牌,可选项。
- scope:表示权限范围,如果与客户端申请的范围一致,此项可省略。
资源服务器
和认证服务器一样,这里实现资源服务器就很容易了
@Configuration
@EnableResourceServer
public class MyResourceServerConfig {
}
这样我们就可以用Token来访问接口了。
例如:
GET /user HTTP/1.1
Host: localhost:8082
Authorization: bearer 9b2aaea4-d161-4636-8883-6756a372e735
这里Authorization中,bearer 是上一步返回的token_type。
遗留问题
目前基本功能是实现了,但是还有两个遗留问题需要解决:
1、现在的Token是存在Session中的,服务器重启后原来客户端的Token就失效了。
2、Token现在是自动生成的,是否可以用JWT来自定义生成呢?
Security 过滤器:
Spring Security是基于 Filter进行实现的;
Security底层是过滤器链
当客户端向应用程序发送请求,Spring Security 根据请求URI的路径决定哪些过滤器和哪个servlet处理它 ;一个servlet处理一个请求,所有的 Filter 构建成一个 拦截链 ,它们是有序的,其中的任何一个都可以中断请求,或者修改掉 request、response;
Spring Security 本身是在 Spring 容器中是作为作为一个 Filter的,其类型是 FilterChainProxy,但是其本身之中,又包含多个Filter ;
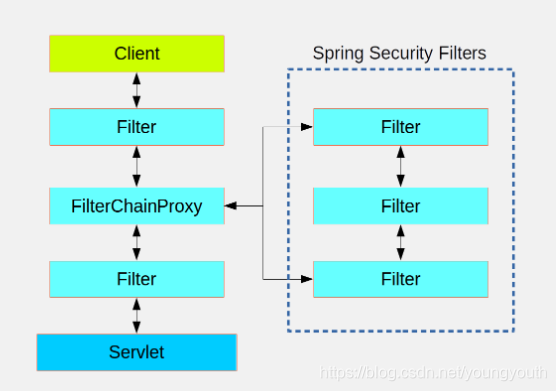
Spring Security 在 Spring 容器中仅仅是一个物理的过滤器,也就是它本身其实不进行任何拦截,都是交给它背后的过滤器;
实际上在 Spring Security 的内部还有一个间接层,它通常作为 DelegatingFilterProxy安装在 Spring Security 容器中,它不需要在 Spring 中进行注册,这个间接层最后委托 FilterChainProxy 在 spring 容器中进行注册,并且名字必须是 springSecurityFilterChain;
DelegatingFilterProxy背后的那一堆 Filter 都实现了相同接口,只是具体逻辑不同,并且都可以决定后续的 Filter 是否进行拦截 ;
Spring Security 背后可以管理多个过滤器,但是这些过滤器对 Spring 都是不可见的,并且这些过滤器可以进行分组,然后 Spring Security将 request 进行派发给第一个匹配的分组;
如图所示:
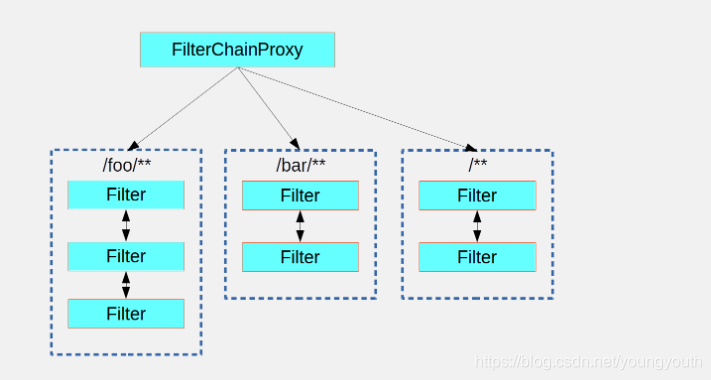
这只是 Spring Security 分配请求的一种方法,用此种方法分配时,只有一组拦截链可以处理请求 ;
创建和自定义 拦截链
在 SpringBoot中有一个默认的最低级别的拦截器 ,它拦截 /**请求,预定义的顺序为SecurityProperties.BASIC_AUTH_ORDER,如果不想使用它的话,设置 SecurityProperties.BASIC_AUTH_ORDER = false 即可 ;
但是一般都将其作为一个基准,便于我们自己创建拦截器的时候,定义顺序 ;
比如新建一个拦截器,只需要继承 WebSecurityConfigurerAdapter 或 WebSecurityConfigurer 即可,然后定义一个顺序,这时候就可以使用 SecurityProperties.BASIC_AUTH_ORDER 作为基准;
使用@Order(SecurityProperties.BASIC_AUTH_ORDER - 10) 定义顺序,数值越少,级别越高 ;
@Configuration
@Order(SecurityProperties.BASIC_AUTH_ORDER - 10)
public class ApplicationConfigurerAdapter extends WebSecurityConfigurerAdapter {@Overrideprotected void configure(HttpSecurity http) throws Exception {http.antMatcher("/foo/**")...;}
}
其中对于同一组资源可能有多个拦截器设置匹配规则,此时匹配规则重叠,则哪一个拦截器的优先级高,就使用谁 ;
请求匹配调度和授权
一个 WebSecurityConfigurerAdapter就是一组拦截链,使用 http.antMatcher(“/foo/**”) 决定匹配什么请求;
然后再使用antMatchers(“/foo/bar”).hasRole(“BAR”) ,设置访问该组拦截链拦截的URL的角色 ;
方法安全:
前面讲的都是基于 url 级别的授权,下面说的授权,粒度更细,是基于方法的 ;
对于 Spring Security 来说,方法也是一种受保护的资源类型 ;
在应用程序的顶级配置中,启动方法安全性 @EnableGlobalMethodSecurity(securedEnabled = true);
@SpringBootApplication
@EnableGlobalMethodSecurity(securedEnabled = true)
public class SampleSecureApplication {
}
然后在需要保护的方法上配置:
@Service
public class MyService {@Secured("ROLE_USER")public String secure() {return "Hello Security";}}
这样配置以后,如果Spring创建了这种类型的 Bean 对象,那么它将被代理,并且调用者必须在实际执行该方法之前通过安全拦截器。如果访问被拒绝,则调用者将获得AccessDeniedException而不是实际的方法结果 ;
还有其他注释可用于强制执行安全约束的方法,特别是@PreAuthorize和@PostAuthorize,它们允许您编写包含对方法参数和返回值的引用的表达式。
FilterChainProxy的创建过程
-
框架的核心是一个过滤器,这个过滤器名字叫springSecurityFilterChain,类型是FilterChainProxy
-
WebSecurity和HttpSecurity都是建造者
-
WebSecurity构建目标是FilterChainProxy对象
-
HttpSecurity的构建目标仅仅是FilterChainProxy中的一个SecurityFilterChain。
-
@EnableWebSecurity注解,导入了WebSecurityConfiguration类
-
WebSecurityConfiguration中创建了建造者对象WebSecurity,和核心过滤器FilterChainProxy
WebSecurityConfiguration中需要关注两个方法:
-
setFilterChainProxySecurityConfigurer()方法
创建了WebSecurity建造者对象,用于后面建造FilterChainProxy过滤器 -
SpringSecurityFilterChain()方法
调用WebSecurity.build(),建造出FilterChainProxy过滤器对象
WebSecurity的创建过程:setFilterChainProxySecurityConfigurer()方法
该方法负责收集配置类对象列表webSecurityConfigurers,并创建WebSecurity:
-
@Value(“#{}”) 是SpEl表达式通常用来获取bean的属性或者调用bean的某个方法。
-
方法执行时,会先得到webSecurityConfigurers并排序(所有实现了WebSecurityConfigurerAdapter的配置类实例)
-
new出websecurity对象,并使用Spring的容器工具初始化
-
判断webSecurityConfigurers内元素的@Order是否有相同,相同的 Order 会抛异常。默认order等于LOWEST_PRECEDENCE = 2147483647(参考Integer order = AnnotationAwareOrderComparator.lookupOrder(config))
-
将WebSecurityConfigurerAdapter的子类apply()放入websecurity的List<SecurityConfigurer<O, B>> configurersAddedInInitializing中。
下图是通过AutowiredWebSecurityConfigurersIgnoreParents的getWebSecurityConfigurers()方法,获取所有实现WebSecurityConfigurer的配置类
FilterChainProxy的创建过程:springSecurityFilterChain()方法
在SpringSecurityFilterChain()方法中调用webSecurity.build()创建FilterChainProxy。
PS:根据下面代码,我们可以知道如果创建的MySecurityConfig类没有被sping扫描到,
框架会新new 出一个 WebSecurityConfigureAdapter 对象,这会导致我们配置的用户名和密码失效。
我们继续看FilterChainProxy的创建过程:
WebSecurity是一个建造者,所以我们去看这些方法build(); doBuild(); init(); configure(); performBuild();
build()方法定义在WebSecurity对象的父类AbstractSecurityBuilder中:
build()方法会调用WebSecurity对象的父类AbstractConfiguredSecurityBuilder#doBuild() :
doBuild() 先调用init();configure();等方法
我们上面已经得知了configurersAddedInInitializing里是所有的配置类对象
如下图,这里会依次执行配置类的configure();init()方法
doBuild()最后调用了WebSecurity对象的perfomBuild(),来创建了FilterChainProxy对象,
performBuild()里遍历SecurityFilterChainBuilders建造者列表,把每个SecurityBuilder建造者对象构建成SecurityFilterChain实例
最后创建并返回FilterChainProxy
securityFilterChainBuilders建造者列表是什么时候初始化的呢
这时候要注意到 WebSecurityConfigurerAdapter,这个类的创建了HttpSecurity并放入了SecurityFilterChainBuilders
WebSecurityConfigurerAdapter是一个安全配置器,我们知道建造者在performBuild()之前都会把循环调用安全配置器的init();configure();方法,然后创建HttpSecurity并放入自己的securityFilterChainBuilders里。
PS: 前面已经提到了,在WebSecurity初始化时,会依次将WebSecurityConfigurerAdapter的子类放入WebSecurity。
public abstract class WebSecurityConfigurerAdapter implementsWebSecurityConfigurer<WebSecurity> {
}
public interface WebSecurityConfigurer<T extends SecurityBuilder<Filter>> extendsSecurityConfigurer<Filter, T> {
}
FilterChainProxy的运行过程
我们已经知道了Spring Security的核心过滤器的创建和原理,本文主要介绍核心过滤器FilterChainProxy是如何在tomcat的ServletContext中生效的。
ServletContext如何拿到FilterChainProxy的过滤器对象
我们都知道,Bean都是存在Spring的Bean工厂里的,
而且在Web项目中Servlet、 Filter 、Listener都要放入ServletContext中。
看下面这张图,ServletContainerInitializer接口提供了一个onStartup()方法,用于在Servlet容器启动时动态注册一些对象到ServletContext中。
官方的解释是:为了支持可以不使用web.xml。提供了ServletContainerInitializer,它可以通过SPI机制,当启动web容器的时候,会自动到添加的相应jar包下找到META-INF/services下以ServletContainerInitializer的全路径名称命名的文件,它的内容为ServletContainerInitializer实现类的全路径,将它们实例化。
通过下图可知,Spring框架通过META-INF配置了SpringServletContainerInitializer类
SpringServletContainerInitializer实现了ServletContainerInitializer接口。
请注意该类上的@HandlesTypes(WebApplicationInitializer.class)注解.
根据Sevlet3.0规范,Servlet容器在调用onStartup()方法时,会以Set集合的方式注入WebApplicationInitializer的子类(包括接口,抽象类)。然后会依次调用WebApplicationInitializer的实现类的onStartup方法,从而起到启动web.xml相同的作用(添加servlet,listener实例到ServletContext中)。
Spring Security中的AbstractSecurityWebApplicationInitializer就是WebApplicationInitializer的抽象子类.
当执行到下面的onStartup()方法时,会调用insertSpringSecurityFilterChain()
将类型为FilterChainProxy名称为springSecurityFilterChain的过滤器对象用DelegatingFilterProxy包装,然后注入ServletContext
运行过程:
请求到达的时候,FilterChainProxy的dofilter()方法内部,会遍历所有的SecurityFilterChain,对匹配到的url,则一一调用SecurityFilterChain中的filter做认证或授权。
public class FilterChainProxy extends GenericFilterBean {private final static String FILTER_APPLIED = FilterChainProxy.class.getName().concat(".APPLIED");private List<SecurityFilterChain> filterChains;private FilterChainValidator filterChainValidator = new NullFilterChainValidator();private HttpFirewall firewall = new StrictHttpFirewall();public FilterChainProxy() {}public FilterChainProxy(SecurityFilterChain chain) {this(Arrays.asList(chain));}public FilterChainProxy(List<SecurityFilterChain> filterChains) {this.filterChains = filterChains;}@Overridepublic void afterPropertiesSet() {filterChainValidator.validate(this);}@Overridepublic void doFilter(ServletRequest request, ServletResponse response,FilterChain chain) throws IOException, ServletException {boolean clearContext = request.getAttribute(FILTER_APPLIED) == null;if (clearContext) {try {request.setAttribute(FILTER_APPLIED, Boolean.TRUE);doFilterInternal(request, response, chain);}finally {SecurityContextHolder.clearContext();request.removeAttribute(FILTER_APPLIED);}}else {doFilterInternal(request, response, chain);}}private void doFilterInternal(ServletRequest request, ServletResponse response,FilterChain chain) throws IOException, ServletException {FirewalledRequest fwRequest = firewall.getFirewalledRequest((HttpServletRequest) request);HttpServletResponse fwResponse = firewall.getFirewalledResponse((HttpServletResponse) response);// 根据当前请求,获得一组过滤器链List<Filter> filters = getFilters(fwRequest);if (filters == null || filters.size() == 0) {if (logger.isDebugEnabled()) {logger.debug(UrlUtils.buildRequestUrl(fwRequest)+ (filters == null ? " has no matching filters": " has an empty filter list"));}fwRequest.reset();chain.doFilter(fwRequest, fwResponse);return;}VirtualFilterChain vfc = new VirtualFilterChain(fwRequest, chain, filters);// 请求依次经过这组滤器链vfc.doFilter(fwRequest, fwResponse);}/*** 根据Request请求获得一个过滤器链*/private List<Filter> getFilters(HttpServletRequest request) {for (SecurityFilterChain chain : filterChains) {if (chain.matches(request)) {return chain.getFilters();}}return null;}/*** 根据URL获得一个过滤器链*/public List<Filter> getFilters(String url) {return getFilters(firewall.getFirewalledRequest((new FilterInvocation(url, null).getRequest())));}/*** 返回一个过滤器链*/public List<SecurityFilterChain> getFilterChains() {return Collections.unmodifiableList(filterChains);}// 过滤器链内部类private static class VirtualFilterChain implements FilterChain {private final FilterChain originalChain;private final List<Filter> additionalFilters;private final FirewalledRequest firewalledRequest;private final int size;private int currentPosition = 0;private VirtualFilterChain(FirewalledRequest firewalledRequest,FilterChain chain, List<Filter> additionalFilters) {this.originalChain = chain;this.additionalFilters = additionalFilters;this.size = additionalFilters.size();this.firewalledRequest = firewalledRequest;}@Overridepublic void doFilter(ServletRequest request, ServletResponse response)throws IOException, ServletException {if (currentPosition == size) {if (logger.isDebugEnabled()) {logger.debug(UrlUtils.buildRequestUrl(firewalledRequest)+ " reached end of additional filter chain; proceeding with original chain");}// Deactivate path stripping as we exit the security filter chainthis.firewalledRequest.reset();originalChain.doFilter(request, response);}else {currentPosition++;Filter nextFilter = additionalFilters.get(currentPosition - 1);if (logger.isDebugEnabled()) {logger.debug(UrlUtils.buildRequestUrl(firewalledRequest)+ " at position " + currentPosition + " of " + size+ " in additional filter chain; firing Filter: '"+ nextFilter.getClass().getSimpleName() + "'");}nextFilter.doFilter(request, response, this);}}}public interface FilterChainValidator {void validate(FilterChainProxy filterChainProxy);}private static class NullFilterChainValidator implements FilterChainValidator {@Overridepublic void validate(FilterChainProxy filterChainProxy) {}}}
WebSecurity与HttpSecurity
前面我们已经分析了 Spring Security 的核心过滤器FilterChainProxy的创建和运行过程,认识了建造者和配置器的作用。
现在我们知道WebSecurity作为一个建造者就是用来创建核心过滤器FilterChainProxy实例的。
WebSecurity在初始化的时候会扫描WebSecurityConfigurerAdapter配置器适配器的子类(即生成HttpSecurity配置器)。
所有的配置器会被调用init();configure();初始化配置,其中生成的每个HttpSecurity配置器都代表了一个过滤器链。
本篇要说的就是HttpSecurity作为一个建造者,是如何去建造出SecurityFilterChain过滤器链实例的!
PS:如果有多个WebSecurityConfigurerAdapter配置器适配器的子类,会产生多个SecurityFilterChain过滤器链实例。Spring Security Oauth2的拓展就是这么做的,有机会再介绍
Security 怎么创建过滤器的
我们已经知道了springSecurityFilterChain(类型为FilterChainProxy)是实际起作用的过滤器链,DelegatingFilterProxy起到代理作用。
我们创建的MySecurityConfig继承了WebSecurityConfigurerAdapter。WebSecurityConfigurerAdapter就是用来创建过滤器链,重写的configure(HttpSecurity http)的方法就是用来配置HttpSecurity的。
protected void configure(HttpSecurity http) throws Exception {http.requestMatchers() // 指定当前`SecurityFilterChain`实例匹配哪些请求.anyRequest().and().authorizeRequests() // 拦截请求,创建FilterSecurityInterceptor.anyRequest().authenticated() // 在创建过滤器的基础上的一些自定义配置.and() // 用and来表示配置过滤器结束,以便进行下一个过滤器的创建和配置.formLogin().and() // 设置表单登录,创建UsernamePasswordAuthenticationFilter.httpBasic(); // basic验证,创建BasicAuthenticationFilter
}
上面的configure(HttpSecurity http)方法内的配置最终内容主要是Filter的创建。
http.authorizeRequests()、http.formLogin()、http.httpBasic()分别创建了ExpressionUrlAuthorizationConfigurer,FormLoginConfigurer,HttpBasicConfigurer。在三个类从父级一直往上找,会发现它们都是SecurityConfigurer建造器的子类。SecurityConfigurer中又有configure()方法。该方法被子类实现就用于创建各个过滤器,并将过滤器添加进HttpSecurity中维护的装有Filter的List中,比如HttpBasicConfigurer中的configure方法,源码如下:
HttpSecurity作为建造者会把根据api把这些配置器添加到实例中
这些配置器中大都是创建了相应的过滤器,并进行配置,最终在HttpSecurity建造SecurityFilterChain实例时放入过滤器链
过滤器类型:
所有的过滤器都会实现SpringSecurityFilter安全过滤器

HttpSessionContextIntegrationFilter:
位于过滤器顶端,第一个起作用的过滤器。用途一,在执行其他过滤器之前,率先判断用户的session中是否已经存在一个SecurityContext了。如果存在,就把SecurityContext拿出来,放到SecurityContextHolder中,供Spring Security的其他部分使用。如果不存在,就创建一个SecurityContext出来,还是放到SecurityContextHolder中,供Spring Security的其他部分使用。用途二,在所有过滤器执行完毕后,清空SecurityContextHolder,因为SecurityContextHolder是基于ThreadLocal的,如果在操作完成后清空ThreadLocal,会受到服务器的线程池机制的影响。
LogoutFilter:
只处理注销请求,默认为/j_spring_security_logout。用途是在用户发送注销请求时,销毁用户session,清空SecurityContextHolder,然后重定向到注销成功页面。可以与rememberMe之类的机制结合,在注销的同时清空用户cookie。
AuthenticationProcessingFilter:
处理form登陆的过滤器,与form登陆有关的所有操作都是在此进行的。默认情况下只处理/j_spring_security_check请求,这个请求应该是用户使用form登陆后的提交地址此过滤器执行的基本操作时,通过用户名和密码判断用户是否有效,如果登录成功就跳转到成功页面(可能是登陆之前访问的受保护页面,也可能是默认的成功页面),如果登录失败,就跳转到失败页面。
DefaultLoginPageGeneratingFilter:
此过滤器用来生成一个默认的登录页面,默认的访问地址为/spring_security_login,这个默认的登录页面虽然支持用户输入用户名,密码,也支持rememberMe功能,但是因为太难看了,只能是在演示时做个样子,不可能直接用在实际项目中。
BasicProcessingFilter:
此过滤器用于进行basic验证,功能与AuthenticationProcessingFilter类似,只是验证的方式不同。
SecurityContextHolderAwareRequestFilter:
此过滤器用来包装客户的请求。目的是在原始请求的基础上,为后续程序提供一些额外的数据。比如getRemoteUser()时直接返回当前登陆的用户名之类的。
RememberMeProcessingFilter:
此过滤器实现RememberMe功能,当用户cookie中存在rememberMe的标记,此过滤器会根据标记自动实现用户登陆,并创建SecurityContext,授予对应的权限。
AnonymousProcessingFilter:
为了保证操作统一性,当用户没有登陆时,默认为用户分配匿名用户的权限。
ExceptionTranslationFilter:
此过滤器的作用是处理中FilterSecurityInterceptor抛出的异常,然后将请求重定向到对应页面,或返回对应的响应错误代码
SessionFixationProtectionFilter:
防御会话伪造攻击。有关防御会话伪造的详细信息
FilterSecurityInterceptor:
用户的权限控制都包含在这个过滤器中。功能一:如果用户尚未登陆,则抛出AuthenticationCredentialsNotFoundException“尚未认证异常”。功能二:如果用户已登录,但是没有访问当前资源的权限,则抛出AccessDeniedException“拒绝访问异常”。功能三:如果用户已登录,也具有访问当前资源的权限,则放行。我们可以通过配置方式来自定义拦截规则
认证过滤器 UsernamePasswordAuthenticationFilter
参数有username,password的,走UsernamePasswordAuthenticationFilter,提取参数构造UsernamePasswordAuthenticationToken进行认证,成功则填充SecurityContextHolder的Authentication
UsernamePasswordAuthenticationFilter实现了其父类AbstractAuthenticationProcessingFilter中的attemptAuthentication方法。这个方法会调用认证管理器AuthenticationManager去认证。
AbstractAuthenticationProcessingFilter中的doFilter()方法,会判断每个请求是否需要认证。
不需要认证的请求直接放行,需要的认证的会被拦下。
判断是否需要认证是怎么做的呢?
其实是我们在调用httpSecurity.formLogin().permitAll()时设置的。
ProviderManager是认证管理器AuthenticationManager的默认实现
通过提供不同的AuthenticationProvider实现类,可以通过多种方式进行认证
其内部会调用authenticate(Authentication authentication)遍历providers,调用provider.authenticate()来尝试认证
我们可以实现AuthenticationProvider接口,重写authenticate()方法,来查询数据库对用户名密码做认证
PS: 上面的parent其实就是存放的我们自定义编写的provider的认证管理器。这里就不贴出来了
认证过滤器 BasicAuthenticationFilter
Basic(被C)
header里头有Authorization,而且value是以Basic开头的,则走BasicAuthenticationFilter,提取参数构造UsernamePasswordAuthenticationToken进行认证,成功则填充SecurityContextHolder的Authentication
认证过滤器 AnonymousAuthenticationFilter
Anonymous(俺拿呢门思)
给没有登陆的用户,填充AnonymousAuthenticationToken到SecurityContextHolder的Authentication
授权过滤器 AbstractSecurityInterceptor
Abstract(啊扑思转可他)
默认的过滤器是FilterSecurityInterceptor,继承了AbstractSecurityInterceptor实现了Filter接口
我们一般直接继承这个过滤器或者继承他的父类,自定义一个AuthorizeSecurityInterceptor。
目的是为了注入自定义的授权管理器AccessDecisionManager、和权限元数据FilterInvocationSecurityMetadataSource
FilterSecurityInterceptor是在WebSecurityConfigurerAdapter的init()里配置的
FilterSecurityInterceptor中的doFilter()会调用super.beforeInvocation(fi)方法,内部调用授权管理器做授权
自定义的AuthorizeSecurityMetadataSource实现了FilterInvocationSecurityMetadataSource的getAttributes()方法,可以根据url获取对应的角色列表
自定义的AuthorizeAccessDecisionManager实现了AccessDecisionManager,实现了decide()方法来判断当前用户是否有此url的权限
框架默认的AccessDecisionManager通过投票决策的方式来授权
-
AffirmativeBased(spring security默认使用)
只要有投通过(ACCESS_GRANTED=1)票,则直接判为通过。如果没有投通过票且反对(ACCESS_DENIED=-1)票在1个及其以上的,则直接判为不通过。
- ConsensusBased(少数服从多数)
通过的票数大于反对的票数则判为通过;通过的票数小于反对的票数则判为不通过;通过的票数和反对的票数相等,则可根据配置allowIfEqualGrantedDeniedDecisions(默认为true)进行判断是否通过。
- UnanimousBased(反对票优先)
无论多少投票者投了多少通过(ACCESS_GRANTED)票,只要有反对票(ACCESS_DENIED),那都判为不通过;如果没有反对票且有投票者投了通过票,那么就判为通过.
其他过滤器
ExceptionTranslationFilter:
该过滤器主要用来捕获处理spring security抛出的异常,异常主要来源于FilterSecurityInterceptor
JWT:
什么是JWT:
JWT(JSON Web Token)是为了在网络应用环境间传递声明而执行的一种基于JSON的开放标准。
它将用户信息加密到token里,服务器不保存任何用户信息。服务器通过使用保存的密钥验证token的正确性,只要正确即通过验证;应用场景如用户登录。
官网:https://jwt.io/
标准:https://tools.ietf.org/html/rfc7519
JWT详细讲解请见 github:https://github.com/jwtk/jjwt
什么是Token?什么是JWT?如何基于Token进行身份验证?
我们知道Session信息需要保存一份在服务器端。这种方式会带来一些麻烦,比如需要我们保证保存Session信息服务器的可用性、不适合移动端(不依赖Cookie)等。
有没有一种不需要自己存放Session信息就能实现身份验证的方式呢?使用Token即可!JWT(JSON Web Token)就是这种方式的实现,通过这种方式服务器端就不需要保存 Session数据了,只用在客户端保存服务端返回给客户的Token就可以了,扩展性得到提升。
JWT 本质上就一段签名的 JSON 格式的数据。由于它是带签名的,因此接受者便可以验证它的真实性。
下面是 RFC 7519 对 JWT 做的较为正式的定义:
JSON Web令牌(JWT)是一种紧凑的、url安全的方法,用于表示在双方之间转移的声明。索赔在JWT编码为一个JSON对象作为有效载荷的一个JSON Web签名(jw)结构或JSON网络加密的明文(JWE)结构,使自称是数字签名或完整性保护消息身份验证代码(MAC)和/或加密。
—JSON Web Token(JWT)
为什么使用JWT?
随着技术的发展,分布式web应用的普及,通过session管理用户登录状态成本越来越高,因此慢慢发展成为token的方式做登录身份校验,然后通过token去取redis中的缓存的用户信息,随着之后jwt的出现,校验方式更加简单便捷化,无需通过redis缓存,而是直接根据token取出保存的用户信息,以及对token可用性校验,单点登录更为简单。
传统Cookie+Session与JWT对比
① 在传统的用户登录认证中,因为http是无状态的,所以都是采用session方式。用户登录成功,服务端会保证一个session,当然会给客户端一个sessionId,客户端会把sessionId保存在cookie中,每次请求都会携带这个sessionId。
cookie+session这种模式通常是保存在内存中,而且服务从单服务到多服务会面临的session共享问题,随着用户量的增多,开销就会越大。而JWT不是这样的,只需要服务端生成token,客户端保存这个token,每次请求携带这个token,服务端认证解析就可。
② JWT方式校验方式更加简单便捷化,无需通过redis缓存,而是直接根据token取出保存的用户信息,以及对token可用性校验,单点登录,验证token更为简单。
JWT令牌的优缺点:
优点:
1)jwt基于json,非常方便解析。
2)可以在令牌中自定义丰富的内容,易扩展。
3)通过非对称加密算法及数字签名技术,JWT防止篡改,安全性高。
4)资源服务使用JWT可不依赖认证服务即可完成授权。
5)可扩展性好应用程序分布式部署的情况下,Session需要做多机数据共享,通常可以存在数据库或者Redis里面。而JWT不需要。
6)无状态:JWT不在服务端存储任何状态。RESTful API的原则之一是无状态,发出请求时,总会返回带有参数的响应,不会产生附加影响。用户的认证状态引入这种附加影响,这破坏了这一原则。另外JWT的载荷中可以存储一些常用信息,用于交换信息,有效地使用 JWT,可以降低服务器查询数据库的次数。
**缺点:**JWT令牌较长,占存储空间较大。
① 安全性:由于JWT的payload是使用Base64编码的,并没有加密,因此JWT中不能存储敏感数据。而Session的信息是存在服务端的,相对来说更安全。
② 性能:JWT太长。由于是无状态使用JWT,所有的数据都被放到JWT里,如果还要进行一些数据交换,那载荷会更大,经过编码之后导致JWT非常长,Cookie的限制大小一般是4k,cookie很可能放不下,所以JWT一般放在LocalStorage里面。并且用户在系统中的每一次Http请求都会把JWT携带在Header里面,Http请求的Header可能比Body还要大。而SessionId只是很短的一个字符串,因此使用JWT的Http请求比使用Session的开销大得多。
③ 一次性:无状态是JWT的特点,但也导致了这个问题,JWT是一次性的。想修改里面的内容,就必须签发一个新的JWT。即缺陷是一旦下发,服务后台无法拒绝携带该jwt的请求(如踢除用户)
(1)无法废弃:通过JWT的验证机制可以看出来,一旦签发一个JWT,在到期之前就会始终有效,无法中途废弃。例如你在payload中存储了一些信息,当信息需要更新时,则重新签发一个JWT,但是由于旧的jwt还没过期,拿着这个旧的JWT依旧可以登录,那登录后服务端从JWT中拿到的信息就是过时的。为了解决这个问题,我们就需要在服务端部署额外的逻辑,例如设置一个黑名单,一旦签发了新的JWT,那么旧的就加入黑名单(比如存到redis里面),避免被再次使用。
(2)续签:如果你使用jwt做会话管理,传统的Cookie续签方案一般都是框架自带的,Session有效期30分钟,30分钟内如果有访问,有效期被刷新至30分钟。一样的道理,要改变JWT的有效时间,就要签发新的JWT。最简单的一种方式是每次请求刷新JWT,即每个HTTP请求都返回一个新的JWT。这个方法不仅暴力不优雅,而且每次请求都要做JWT的加密解密,会带来性能问题。另一种方法是在Redis中单独为每个JWT设置过期时间,每次访问时刷新JWT的过期时间。
可以看出想要破解JWT一次性的特性,就需要在服务端存储jwt的状态。但是引入 redis 之后,就把无状态的jwt硬生生变成了有状态了,违背了JWT的初衷。而且这个方案和Session都差不多了。
JWT由3部分构成:
Header:描述JWT的元数据。定义了生成签名的算法以及Token的类型。
Payload(负载):用来存放实际需要传递的数据。
Signature(签名):服务器通过P碍眼load、Header和一个秘钥(secret)使用Header里面指定的签名算法(默认是 HMAC SHA256)生成。
在基于Token进行身份验证的应用程序中,服务器通过Payload、Header和一个秘钥(secret)创建令牌(Token)并将Token发送个客户端,客户端将Token保存在Cookie或者localStorage(本地存储)里面,以后客户端发出的所有请求都会携带这个令牌。你可以把它放在Cookie里面自动发送,但是这样不能跨域,所以更好的做法是放在HTTP Header的 Authorization字段中:Authorization: Bearer Token

用户向服务器发送用户名和密码用于登录系统。
身份验证服务响应并返回了签名的 JWT,上面包含了用户是谁的内容。
用户以后每次向后端发请求都在Header中带上 JWT。
服务端检查 JWT并从中获取用户相关信息。
JWT的组成(3部分)
第一部分为头部(header),第二部分我们称其为载荷(payload),第三部分是签证(signature)。【中间用 . 分隔】
一个标准的JWT生成的token格式如下:eyJ0eXAiOiJKV1QiLCJhbGciOiJIUzUxMiJ9.eyJzdWIiOiI1IiwiaWF0IjoxNTY1NTk3MDUzLCJleHAiOjE1NjU2MDA2NTN9.qesdk6aeFEcNafw5WFm-TwZltGWb1Xs6oBEk5QdaLzlHxDM73IOyeKPF_iN1bLvDAlB7UnSu-Z-Zsgl_dIlPiw
先来讲讲头部:
Jwt的头部承载两部分信息:
- 声明类型,这里是jwt
- 声明加密的算法,通常直接使用HMACSHA256,就是HS256了
{"alg": "HS256","typ": "JWT"
}
然后将头部进行base64编码构成了第一部分:
eyJhbGciOiJIU