网络安全设备配置与管理-实验5-p150虚拟防火墙配置
实验5-p150虚拟防火墙配置
做不出来可以把项目删掉再新建。
实验六多加几步配置静态路由表就行。
文章目录
- 实验5-p150虚拟防火墙配置
- 1. 实验目的
- 2. 实验任务
- 3. 实验设备
- 4. 实验拓扑图和设备接口
- 5. 实验命令与步骤
- 1. 连线与配置
- 2. 实验验证
- 思考题
1. 实验目的
通过该实验掌握PIX虚拟防火墙的配置。
2. 实验任务
- 配置两个虚拟防火墙。
- 验证防火墙的不同安全策略。
3. 实验设备
防火墙一台,CISCO交换机、路由器c3725若干台,控制线若干,网络连接线若干。
4. 实验拓扑图和设备接口
根据实验任务设计以下网络拓扑图
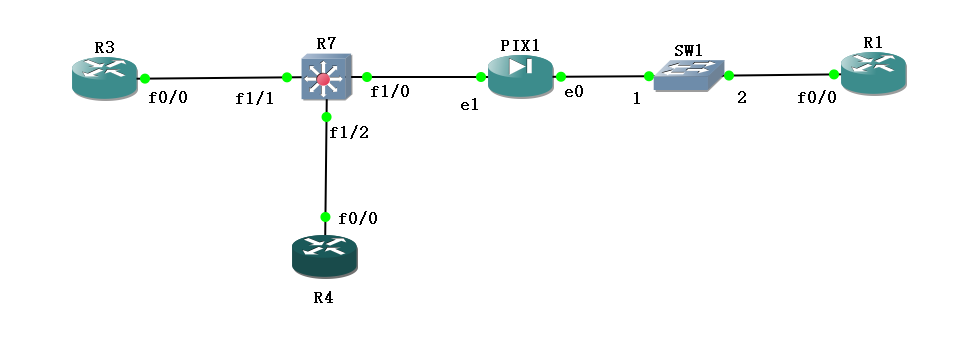
防火墙接口信息
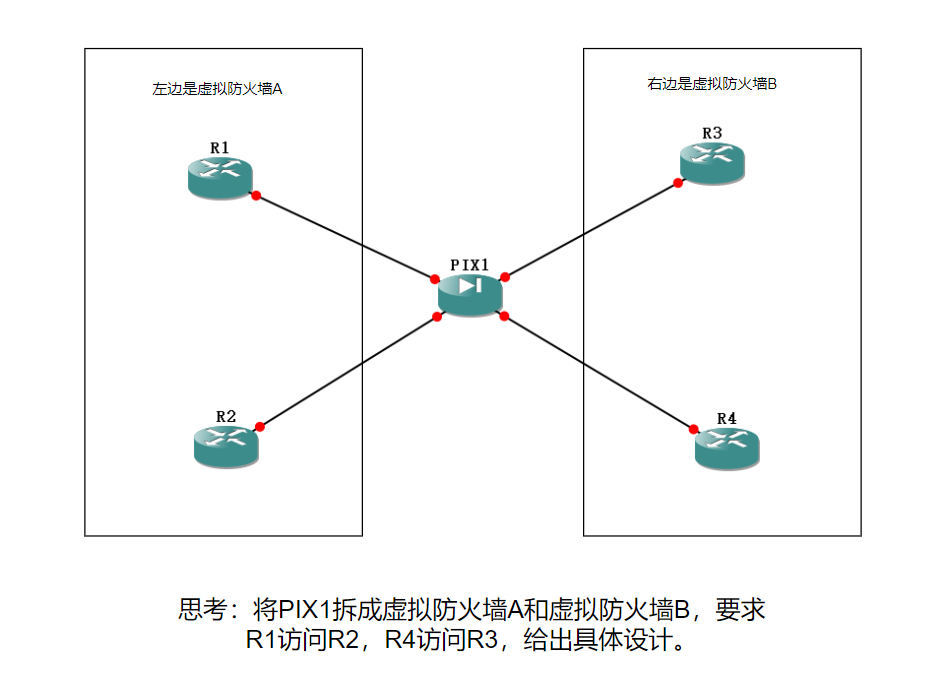
可以理解为把一个防火墙拆成了管理上下文,负责监控R4流量的CXTA防火墙和负责监控R3流量的CXTB防火墙。
| 名称 | outside(e0) | inside(e1) | VLAN | R7接入口 | 检测 |
|---|---|---|---|---|---|
| admin | 192.168.9.5 | 10.9.1.3 | 20 | ||
| CXTA | 192.168.9.3 | 10.9.9.3 | 30 | f1/2 | R4流量 |
| CXTB | 192.168.9.13 | 10.9.5.3 | 40 | f1/1 | R3流量 |
本实验构建了三个安全上下文:一个管理上下文和两个用户上下文。防火墙安全上下文的配置信息
| 序号 | 上下文 | interface | Type | nameif | Security level | IP address |
|---|---|---|---|---|---|---|
| 1 | admin | e0 | physical | outside | 0 | 192.168.9.5 |
| 2 | CXTB | e0 | physical | outside | 0 | 192.168.9.13 |
| 3 | CXTA | e0 | physical | outside | 0 | 192.168.9.3 |
| 4 | admin | e1.2 | logical | inside | 100 | 10.9.1.3 |
| 5 | CXTB | e1.4 | logical | inside | 100 | 10.9.5.3 |
| 6 | CXTA | e1.3 | logical | inside | 100 | 10.9.9.3 |
以太交换路由器R7是用来模拟交换机实现VLAN,位于防火墙内部区域的路由器R7的配置如下
| 序号 | interface | VLAN |
|---|---|---|
| 1 | f1/0 | trunk |
| 2 | f1/1 | VLAN 40 |
| 3 | f1/2 | VLAN 30 |
位于防火墙外部区域的路由器R1的配置如下
| 序号 | interface | IP Address |
|---|---|---|
| 1 | f0/0 | 192.168.9.1 |
位于防火墙内部区域的路由器R3的配置如下
| 序号 | interface | IP Address |
|---|---|---|
| 1 | f0/0 | 10.9.5.1 |
位于防火墙内部区域的路由器R4的配置如下
| 序号 | interface | IP Address |
|---|---|---|
| 1 | f0/0 | 10.9.9.1 |
5. 实验命令与步骤
1. 连线与配置
完成连线

路由器R1配置
R1#conf t
Enter configuration commands, one per line.  End with CNTL/Z.
R1(config)#line vty 0 4
R1(config-line)#no login
R1(config-line)#exit
R1(config)#int f0/0
R1(config-if)#ip add 192.168.9.1 255.255.255.0
R1(config-if)#no sh
R1(config-if)#ip route 10.9.5.0 255.255.255.0 192.168.9.3
R1(config)#ip route 10.9.5.0 255.255.255.0 192.168.9.3
R1(config)#end
R1#wr
路由器R3配置
R3#conf  t
Enter configuration commands, one per line.  End with CNTL/Z.
R3(config)#line vty 0 4
R3(config-line)#no login
R3(config-line)#exit
R3(config)#int f0/0
R3(config-if)#ip add 10.9.5.1 255.255.255.0
R3(config-if)#no sh
R3(config-if)#ip route 192.168.9.0 255.255.255.0 10.9.5.3
R3(config)#end
R3#wr
路由器R4配置
R4#conf t
Enter configuration commands, one per line.  End with CNTL/Z.
R4(config)#line vty 0 4
R4(config-line)#no login
R4(config-line)#exit
R4(config)#int f0/0
R4(config-if)#ip add 10.9.9.1 255.255.255.0
R4(config-if)#no sh
R4(config-if)#ip route 192.168.9.0 255.255.255.0 10.9.9.3
R4(config)#exit
R4#wr
路由器R7配置
R7-SW#conf t
Enter configuration commands, one per line.  End with CNTL/Z.
R7-SW(config)#int f1/0
R7-SW(config-if)#switchport mode trunk#将接口 f1/0 配置为 Trunk 模式,允许该接口传输多个 VLAN 的流量
R7-SW(config-if)#exit
R7-SW(config)#int f1/1
R7-SW(config-if)#switchport access vlan 40
% Access VLAN does not exist. Creating vlan 40#尝试将接口 f1/1 分配到 VLAN 40。由于 VLAN 40 不存在,系统自动创建了 VLAN 40
R7-SW(config-if)#switchport access vlan 40#再次确认将接口 f1/1 分配到 VLAN 40
R7-SW#conf t
Enter configuration commands, one per line.  End with CNTL/Z.
R7-SW(config)#int f1/2
R7-SW(config-if)#switchport access vlan 30
% Access VLAN does not exist. Creating vlan 30
R7-SW(config-if)#switchport access vlan 30
R7-SW(config-if)#end
R7-SW#conf t
Enter configuration commands, one per line.  End with CNTL/Z.
R7-SW(config)#vlan 20,30,40#创建 VLAN 20、30 和 40
R7-SW(config-vlan)#ex#退出 VLAN 配置模式
R7-SW(config)#int f1/1
R7-SW(config-if)#sw mo acc#switchport mode access的缩写,将接口 f1/1 配置为 Access 模式
R7-SW(config-if)#switchport access vlan 40
R7-SW(config-if)#int f1/2
R7-SW(config-if)#switchport mode access
R7-SW(config-if)#switchport access vlan 30
R7-SW(config-if)#int f1/0
R7-SW(config-if)#switchport mode trunk
R7-SW(config-if)#switchport trunk encap
R7-SW(config-if)#switchport trunk encapsulation dot1q#配置 Trunk 封装的封装类型为 dot1q(IEEE 802.1Q)
R7-SW(config-if)#end
R7-SW#wr
Building configuration...
[OK]
防火墙配置
#1.先激活防火墙高级功能
pixfirewall> en
Password:
pixfirewall# activation-key 0xa94b7db5 0x17d768ea 0x63f6e081 0x6d9fadd5
The following features available in flash activation key are NOT
available in new activation key:
Failover is different.flash activation key: Restricted(R)new activation key: Unrestricted(UR)
Proceed with update flash activation key? [confirm]
The following features available in running activation key are NOT
available in new activation key:
Failover is different.running activation key: Restricted(R)new activation key: Unrestricted(UR)
WARNING: The running activation key was not updated with the requested key.
The flash activation key was updated with the requested key, and will
become active after the next reload.#2.然后手动关闭再重启防火墙
pixfirewall> show verCisco PIX Security Appliance Software Version 8.0(2)Compiled on Fri 15-Jun-07 18:25 by builders
System image file is "Unknown, monitor mode tftp booted image"
Config file at boot was "startup-config"pixfirewall up 16 secsHardware:   PIX-525, 128 MB RAM, CPU Pentium II 1 MHz
Flash E28F128J3 @ 0xfff00000, 16MB
BIOS Flash AM29F400B @ 0xfffd8000, 32KB0: Ext: Ethernet0           : address is 00ab.bffb.c400, irq 91: Ext: Ethernet1           : address is 00ab.bffb.c401, irq 112: Ext: Ethernet2           : address is 0000.abb6.c002, irq 113: Ext: Ethernet3           : address is 0000.ab80.0c03, irq 114: Ext: Ethernet4           : address is 0000.ab75.9304, irq 11Licensed features for this platform:
Maximum Physical Interfaces  : 10
Maximum VLANs                : 100
Inside Hosts                 : Unlimited
Failover                     : Active/Active
VPN-DES                      : Disabled
VPN-3DES-AES                 : Disabled
Cut-through Proxy            : Enabled
Guards                       : Enabled
URL Filtering                : Enabled
Security Contexts            : 2
GTP/GPRS                     : Disabled
VPN Peers                    : UnlimitedThis platform has an Unrestricted (UR) license.Serial Number: 480220956
Running Activation Key: 0xa94b7db5 0x17d768ea 0x63f6e081 0x6d9fadd5
Configuration has not been modified since last system restart.#3.切换防火墙模式为多模式
pixfirewall> en
Password:
pixfirewall# conf t
pixfirewall(config)# mode multiple
WARNING: This command will change the behavior of the device
WARNING: This command will initiate a Reboot
Proceed with change mode? [confirm]
Convert the system configuration? [confirm]
!
The old running configuration file will be written to flashThe admin context configuration will be written to flashThe new running configuration file was written to flash
Security context mode: multiple***
*** --- SHUTDOWN NOW ---
***
*** Message to all terminals:
***
***   change modeRebooting....#4.通常会重启失败,我们手动关一下防火墙再启动
pixfirewall(config)# dirDirectory of flash:/9      -rw-  1337        14:53:29 Mar 20 2025  old_running.cfg
10     -rw-  732         14:53:29 Mar 20 2025  admin.cfg16128000 bytes total (16121344 bytes free)
pixfirewall(config)# show run context #查看当前安全上下文admin-context admin
context adminconfig-url flash:/admin.cfg
!
#5.现在配置一下防火墙接口VLAN
pixfirewall(config)# changeto context system#切换到系统上下文
pixfirewall(config)# int  e1
pixfirewall(config-if)# int e1.2#创建并进入子接口e1.2的配置模式
pixfirewall(config-subif)# vlan 20#将子接口e1.2与VLAN 20关联。这意味着该子接口将处理VLAN 20的流量
pixfirewall(config-subif)# exit
pixfirewall(config)# int e1
pixfirewall(config-if)# int e1.3
pixfirewall(config-subif)# vlan 30
pixfirewall(config-subif)# exit
pixfirewall(config)# int e1
pixfirewall(config-if)# int e1.4
pixfirewall(config-subif)# vlan 40
pixfirewall(config-subif)# exit#6.创建用户上下文A
pixfirewall(config)# context CXTA#创建一个名为CXTA的用户上下文。
Creating context 'CXTA'... Done. (2)
pixfirewall(config-ctx)# allocate-interface E0 INTF0#将物理接口E0分配给用户上下文CXTA,并在该上下文中将其命名为INTF0
pixfirewall(config-ctx)# allocate-interface E1.3 INTF1#将子接口E1.3(之前配置为VLAN 30)分配给用户上下文CXTA,并在该上下文中将其命名为INTF1
pixfirewall(config-ctx)# config-url flash:/CXTA.cfg#指定用户上下文CXTA的配置文件路径为flash:/CXTA.cfgWARNING: Could not fetch the URL flash:/CXTA.cfg
INFO: Creating context with default config
pixfirewall(config-ctx)# show run contextadmin-context admin
context adminconfig-url flash:/admin.cfg
!context CXTAallocate-interface Ethernet0 INTF0allocate-interface Ethernet1.3 INTF1config-url flash:/CXTA.cfg
!#7.创建用户上下文B和admin
pixfirewall(config-ctx)# exit
pixfirewall(config)# context CXTB
Creating context 'CXTB'... Done. (3)
pixfirewall(config-ctx)# allocate-interface E0 INTF0
pixfirewall(config-ctx)# allocate-interface E1.4 INTF1
pixfirewall(config-ctx)# config-url flash:/CXTB.cfgWARNING: Could not fetch the URL flash:/CXTB.cfg
INFO: Creating context with default config
pixfirewall(config-ctx)# exit
pixfirewall(config)# context admin#创建一个名为 admin 的安全上下文(Security Context)
pixfirewall(config-ctx)# allocate-interface Ethernet0#将物理接口 Ethernet0 分配给 admin 上下文
pixfirewall(config-ctx)# allocate-interface Ethernet1.2
pixfirewall(config-ctx)# show run contextadmin-context admin
context adminallocate-interface Ethernet0allocate-interface Ethernet1.2config-url flash:/admin.cfg
!context CXTAallocate-interface Ethernet0 INTF0allocate-interface Ethernet1.3 INTF1config-url flash:/CXTA.cfg
!context CXTBallocate-interface Ethernet0 INTF0allocate-interface Ethernet1.4 INTF1config-url flash:/CXTB.cfg
!#8.创建用户上下文C
#会失败,因为用户的上下文个数超过了license支持的数量。
pixfirewall(config)# context CXTC
Creating context 'CXTC'...
Cannot create context 'CXTC': Exceeded licensed limit on maximum number of security contexts...
ERROR: Creation for context 'CXTC' failed#9.配置用户上下文A
pixfirewall(config)# changeto context CXTA
pixfirewall/CXTA(config)# int intf0
pixfirewall/CXTA(config-if)# ip add 192.168.9.3 255.255.255.0
pixfirewall/CXTA(config-if)# no sh
pixfirewall/CXTA(config-if)# nameif outside
INFO: Security level for "outside" set to 0 by default.
pixfirewall/CXTA(config-if)# exit
pixfirewall/CXTA(config)# int intf1
pixfirewall/CXTA(config-if)# ip add 10.9.9.3 255.255.255.0
pixfirewall/CXTA(config-if)# no sh
pixfirewall/CXTA(config-if)# nameif inside
INFO: Security level for "inside" set to 100 by default.
pixfirewall/CXTA(config-if)# exit
pixfirewall/CXTA(config)# nat (inside) 11 0.0.0.0 0.0.0.0
pixfirewall/CXTA(config)# global (outside) 11 192.168.9.111
INFO: Global 192.168.9.111 will be Port Address Translated
pixfirewall/CXTA(config)# wr
Building configuration...
Cryptochecksum: 32e0b6f6 402b26c6 0e7cb5f1 c235917a1517 bytes copied in 0.220 secs
[OK]#10.配置用户上下文B
pixfirewall/CXTA(config)# changeto context CXTB
pixfirewall/CXTB(config)# int intf0
pixfirewall/CXTB(config-if)# ip add 192.168.9.13 255.255.255.0
pixfirewall/CXTB(config-if)# no sh
pixfirewall/CXTB(config-if)# nameif outside
INFO: Security level for "outside" set to 0 by default.
pixfirewall/CXTB(config-if)# exit
pixfirewall/CXTB(config)# int intf1
pixfirewall/CXTB(config-if)# ip add 10.9.5.3 255.255.255.0
pixfirewall/CXTB(config-if)# no sh
pixfirewall/CXTB(config-if)# nameif inside
INFO: Security level for "inside" set to 100 by default.
pixfirewall/CXTB(config-if)# exit
pixfirewall/CXTB(config)# nat (inside) 1 0 0
pixfirewall/CXTB(config)# global (outside) 1 192.168.9.11
INFO: Global 192.168.9.11 will be Port Address Translated
pixfirewall/CXTB(config)# exit
pixfirewall/CXTB# conf t
pixfirewall/CXTB(config)# wr
Building configuration...
Cryptochecksum: c620349b 58e45f58 291a613a 18d450131515 bytes copied in 0.240 secs
[OK]
pixfirewall/CXTB(config)# exit
pixfirewall/CXTB# changeto context system
#可以检查一下配置more CXTA.cfg
pixfirewall# conf t
pixfirewall(config)# int e0
pixfirewall(config-if)# no sh
pixfirewall(config-if)# exit
pixfirewall(config)# int e1
pixfirewall(config-if)# no sh
pixfirewall(config-if)# exit
pixfirewall(config)# write memory all
2. 实验验证
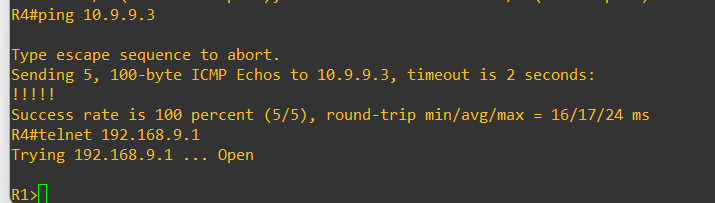
R4测试虚拟防火墙CXTA配置
R4#ping 10.9.9.3
R4#telnet 192.168.9.1
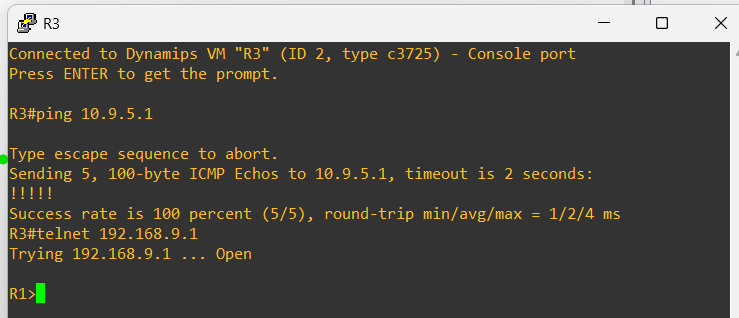
R3测试虚拟防火墙CXTB配置
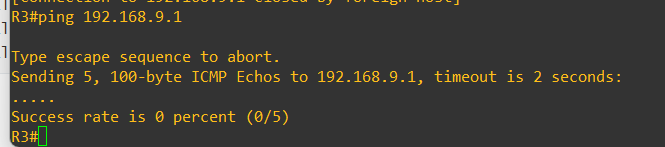
R3#ping 10.9.5.1
R3#telnet 192.168.9.1
查看上下文接口信息
pixfirewall# show run
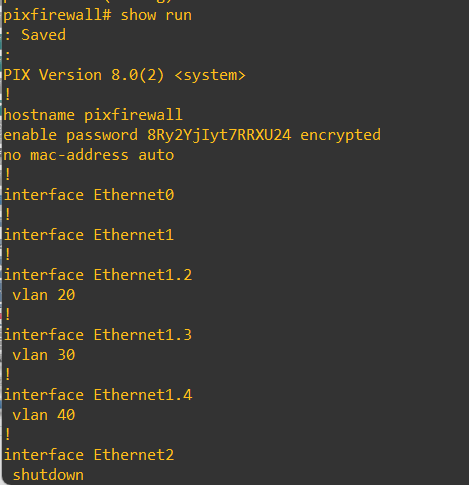
查看CXTA和CXTB接口信息
pixfirewall# changeto context CXTA
pixfirewall/CXTA# show int ip br
pixfirewall/CXTA# changeto context CXTB
pixfirewall/CXTB# show int ip br

虚拟防火墙CXTA配置ACL策略
pixfirewall/CXTB# changeto context CXTA
pixfirewall/CXTA# conf t
pixfirewall/CXTA(config)# access-list 101 permit icmp any any echo-reply
pixfirewall/CXTA(config)# access-group 101 in interface outside
pixfirewall/CXTA(config)# wr
R3执行ping命令,访问R1,属于VLAN 40流量,由防火墙CXTB处理,出站流量默认放行,由于没配置入站的ACL策略,R1发送的ICMP回显数据包无法穿越CXTB,所以R3无法ping通R1。
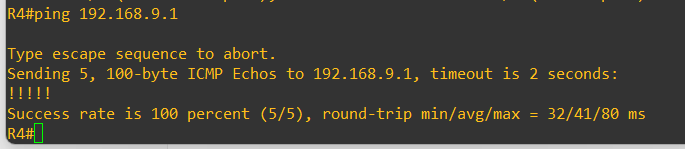
R4执行ping命令,访问R1,属于VLAN 30流量,由防火墙CXTA处理,出站流量默认放行,由于CXTA的outside接口做了放行echo-reply的ACL策略,路由器R1发送的ICMP回显数据包可以入站,所以R4可以ping通R1。
思考题