Flutter之页面布局
目录:
- 1、页面布局一
- 2、无状态组件StatelessWidget和有状态组件StatefulWidget
- 2.1、无状态组件示例
- 2.2、有状态组件示例
- 2.3、在 widget 之间共享状态
- 1、使用 widget 构造函数
- 2、使用 InheritedWidget
- 3、使用回调
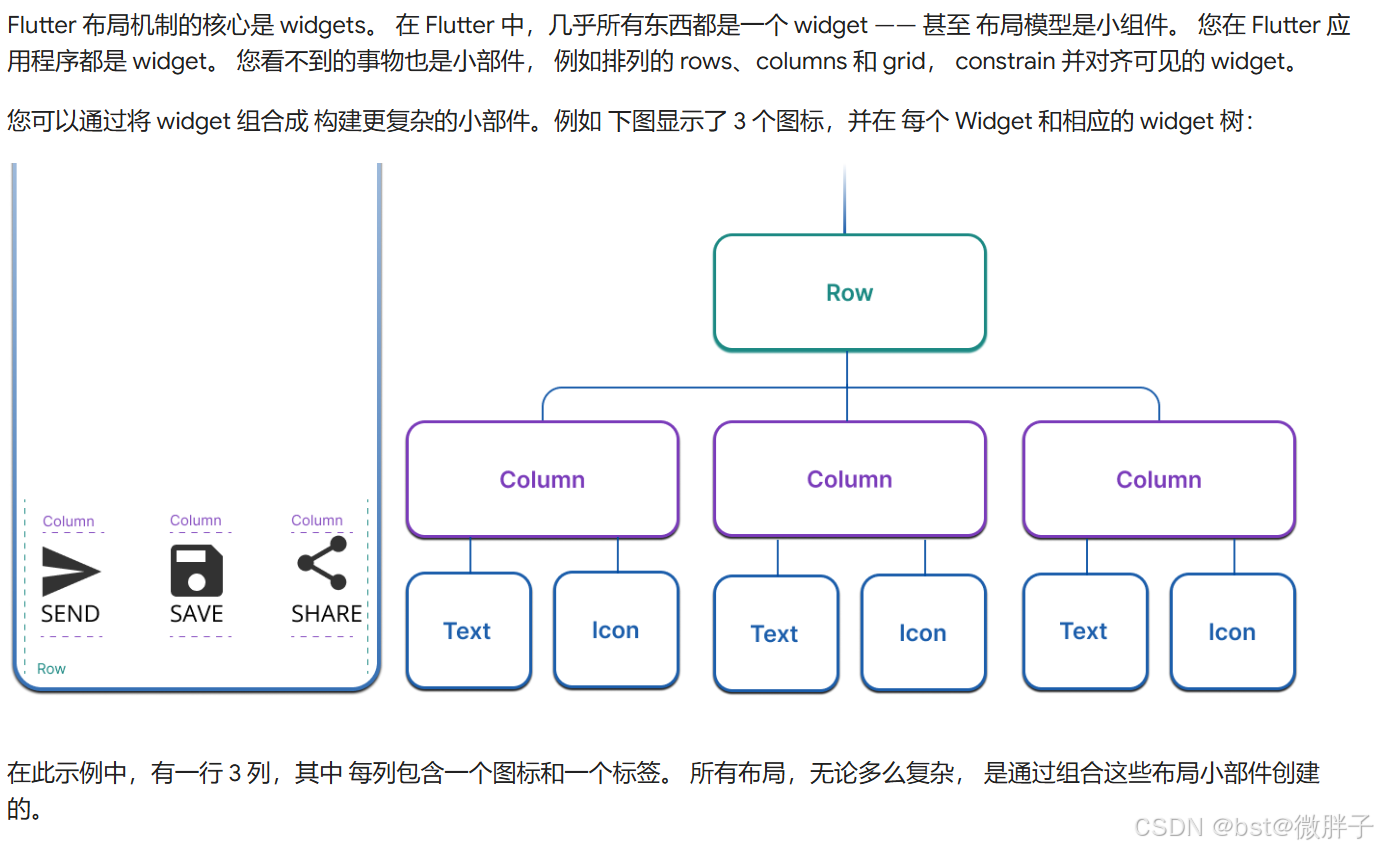
- 3、布局小组件
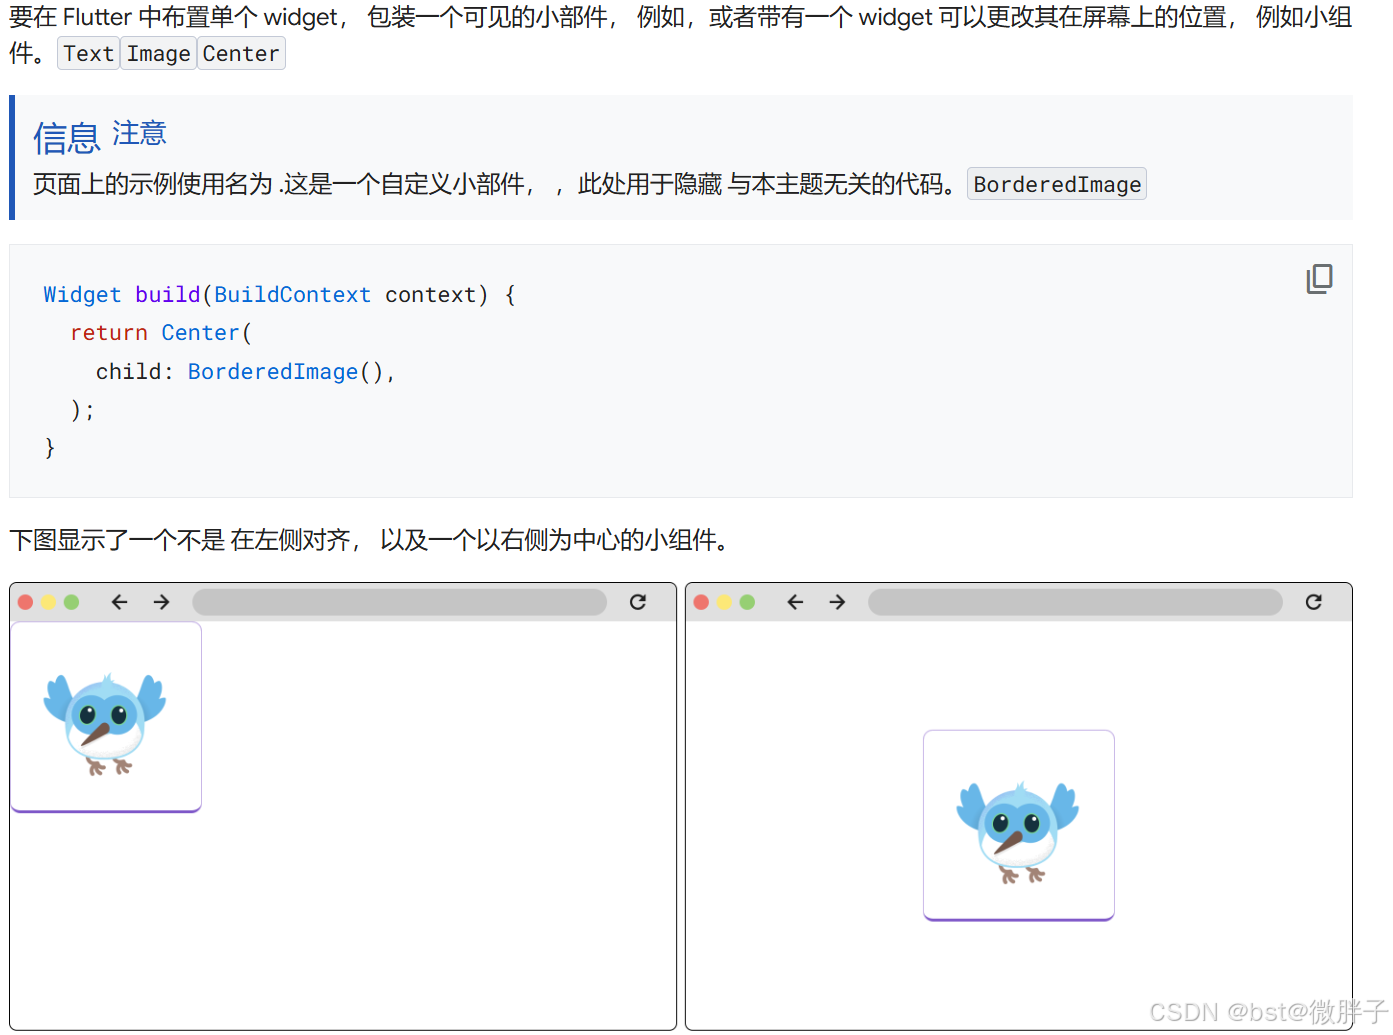
- 3.1、布置单个 Widget
- 3.2、容器
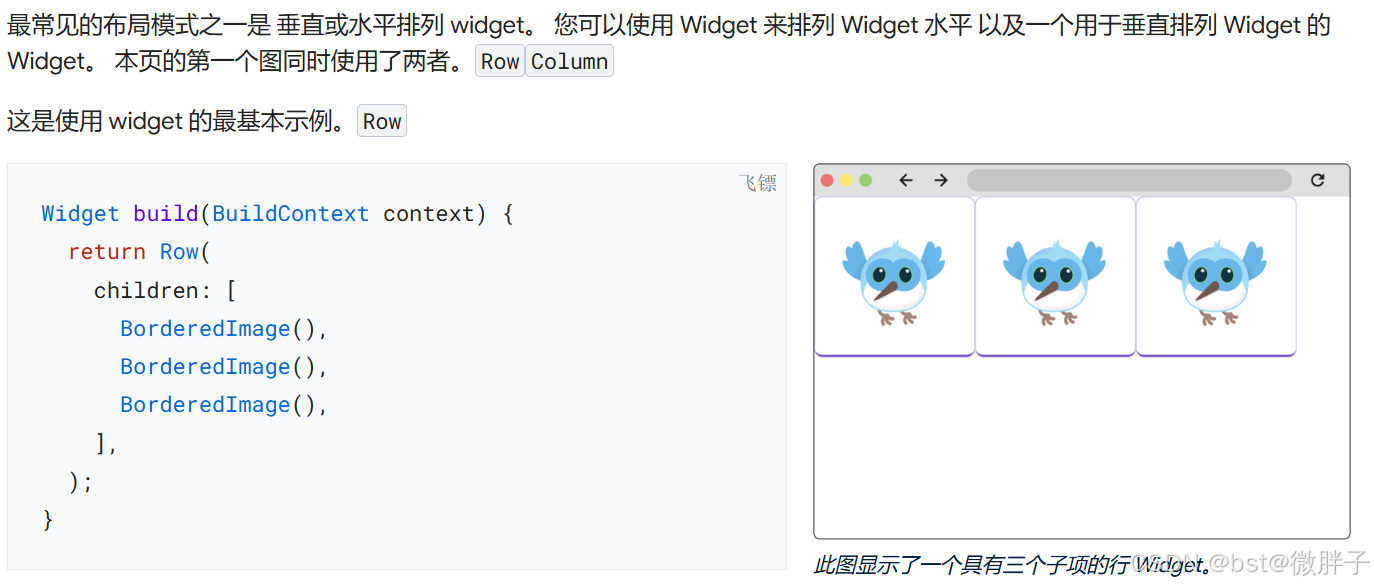
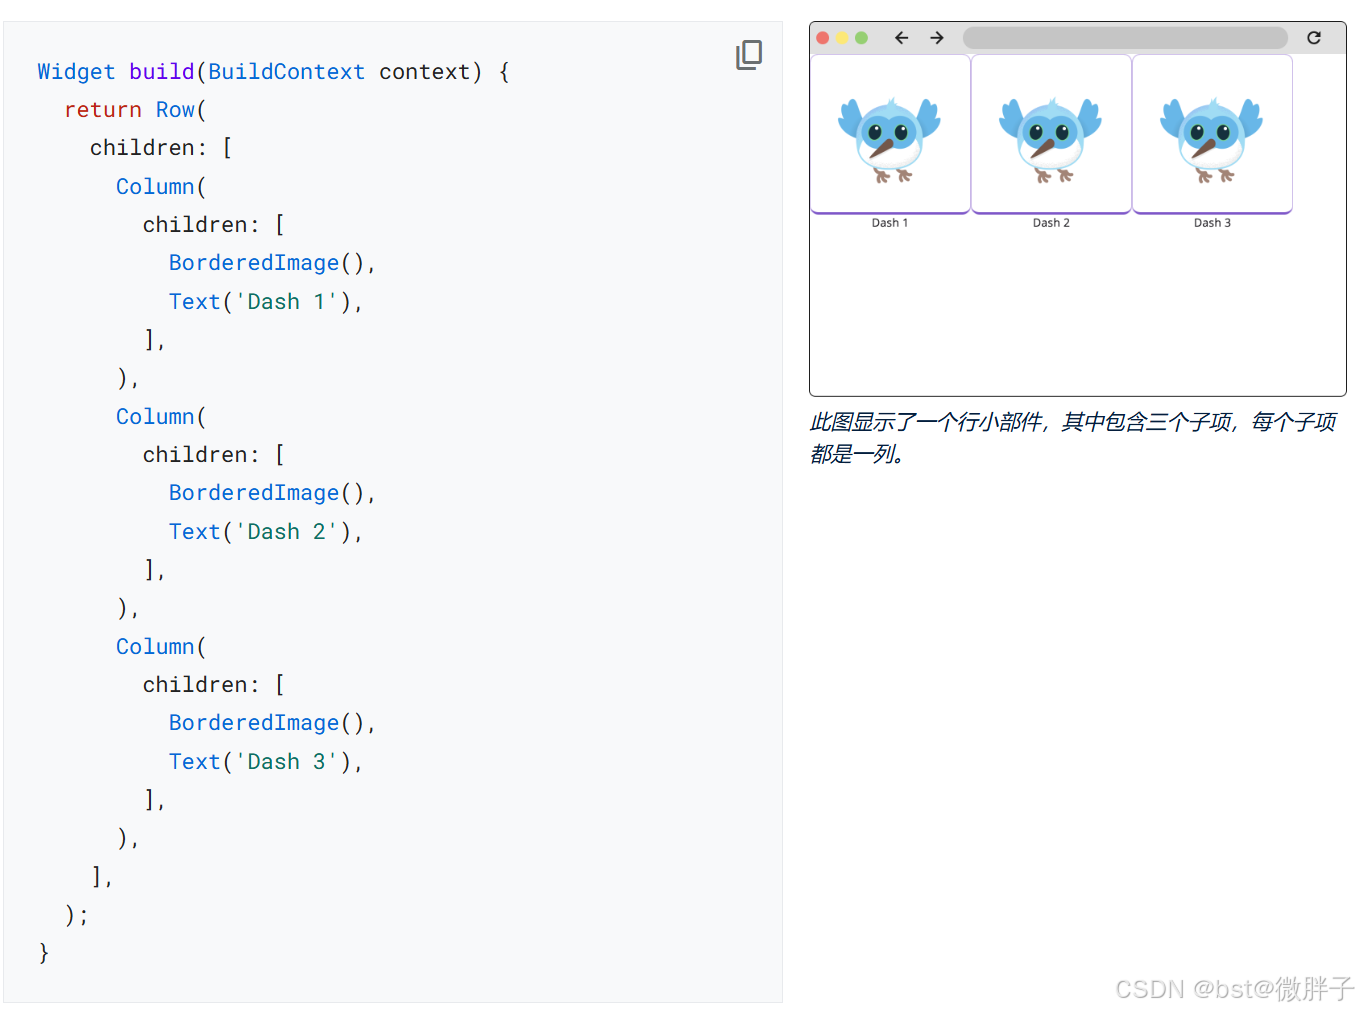
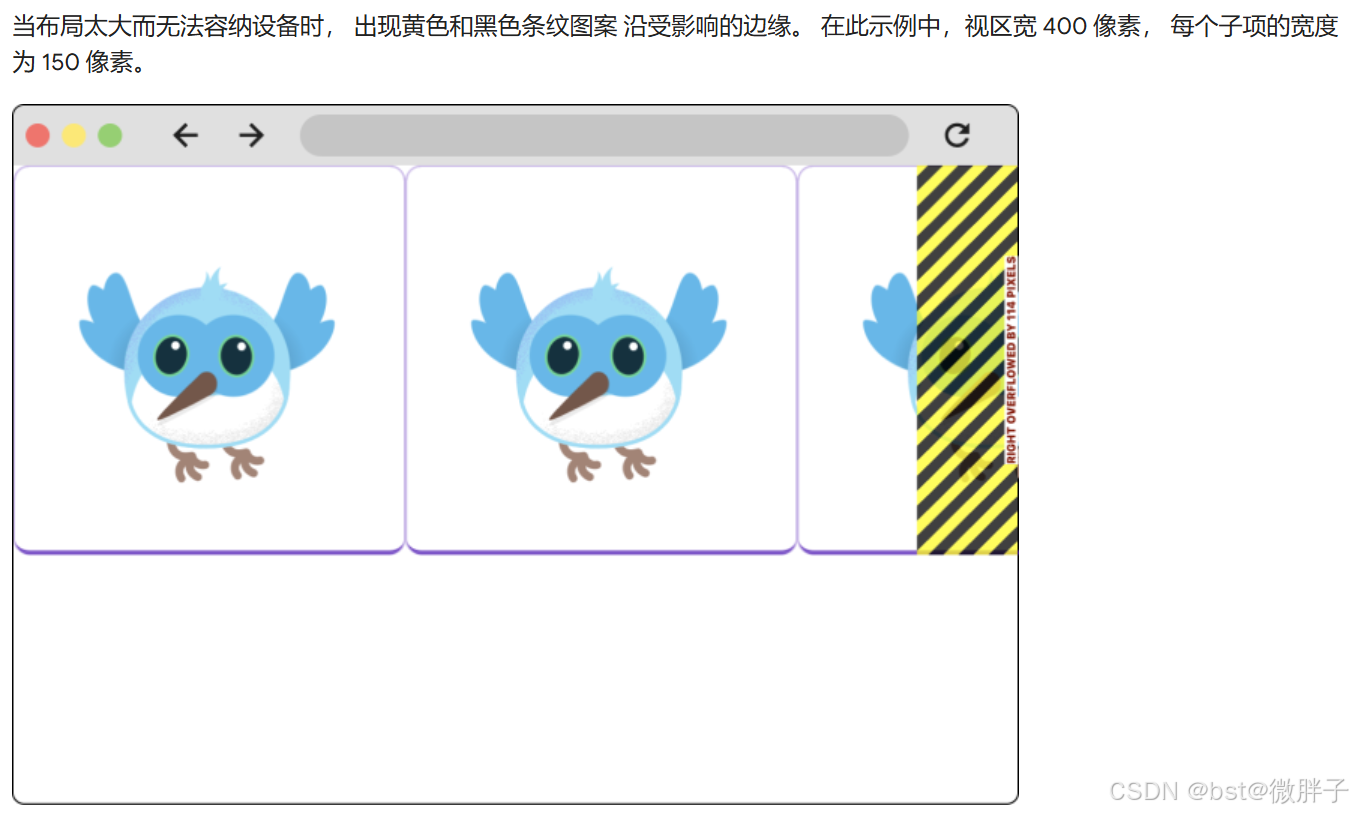
- 3.3、垂直或水平布局多个 widget
- 3.4、在行和列内对齐 Widget
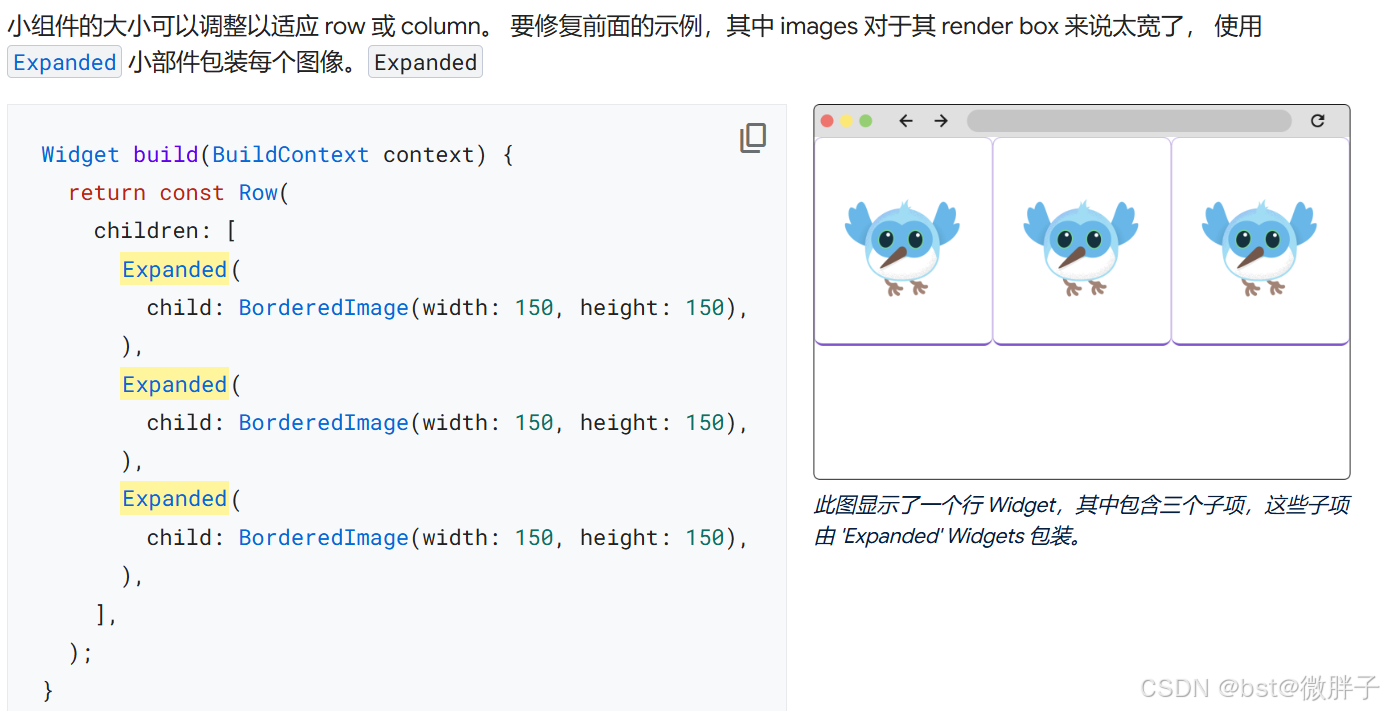
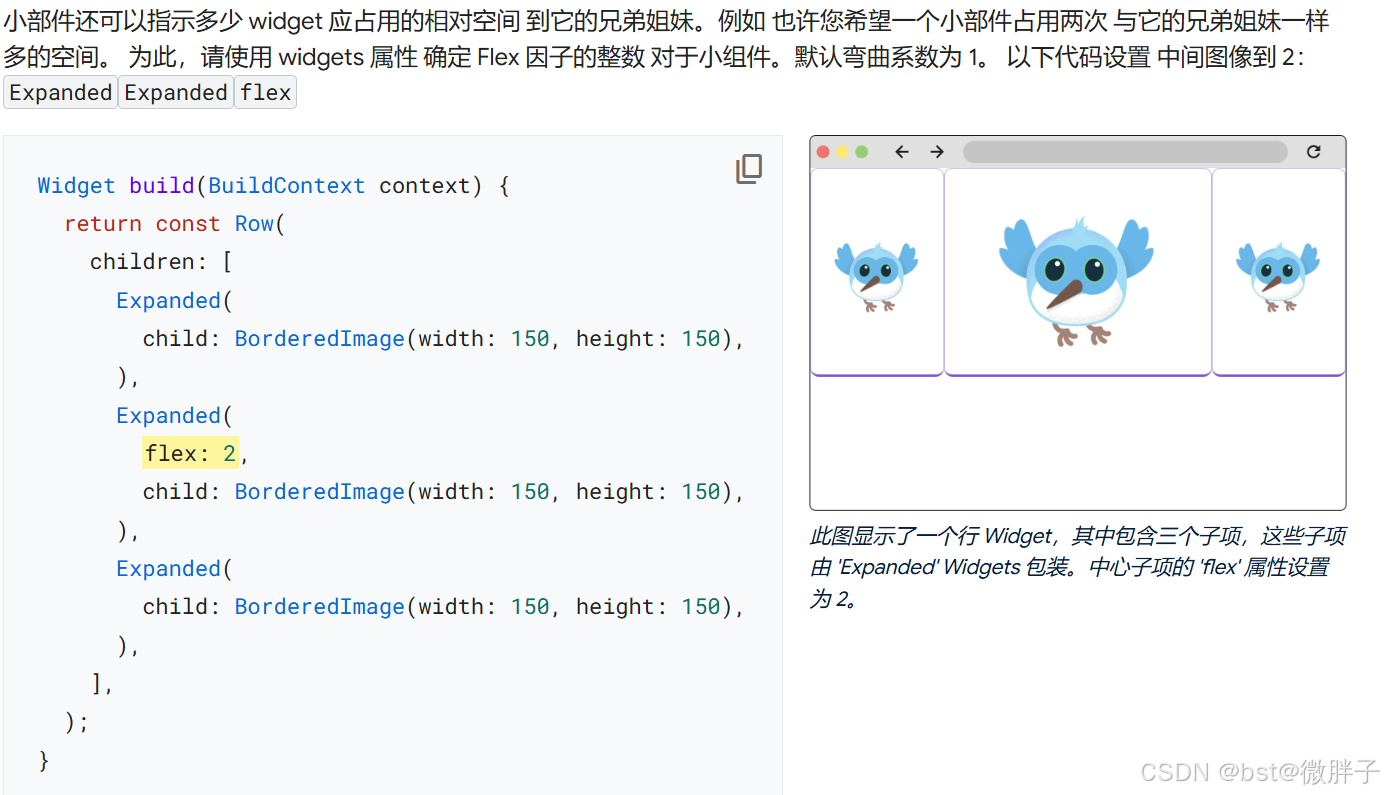
- 3.5、在行和列中调整小组件的大小
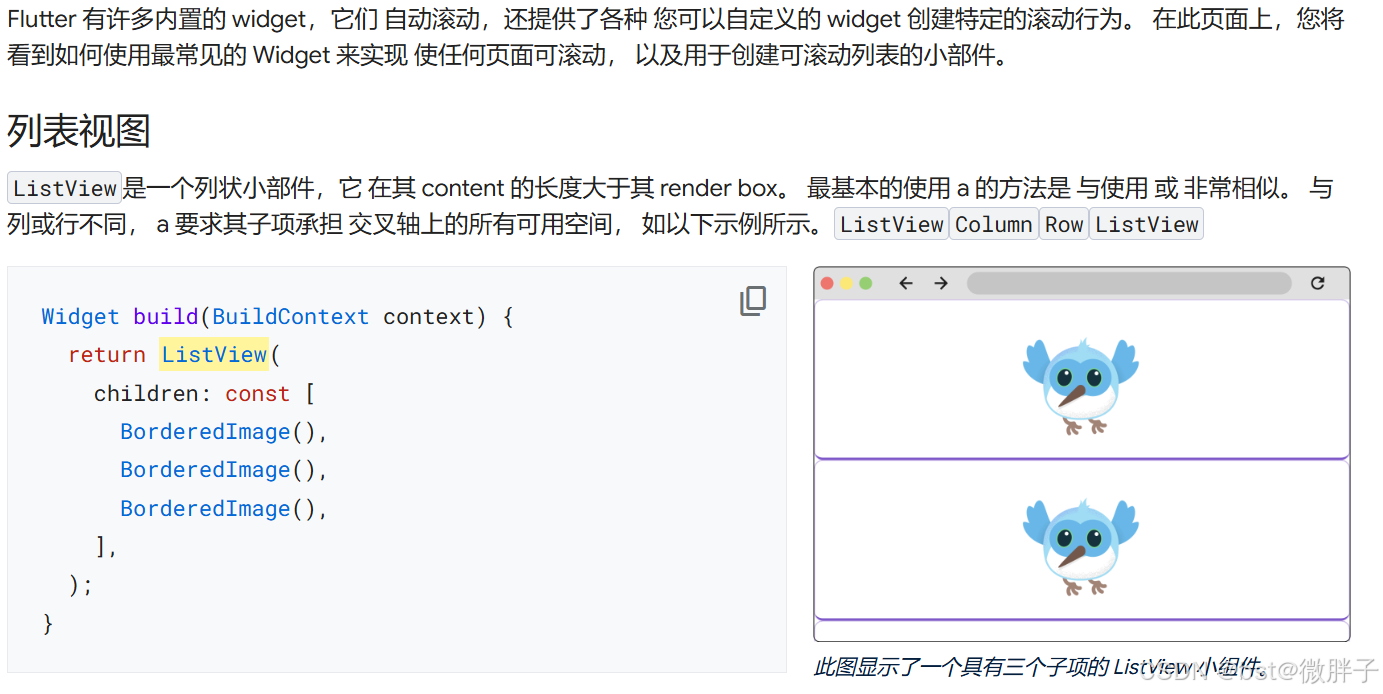
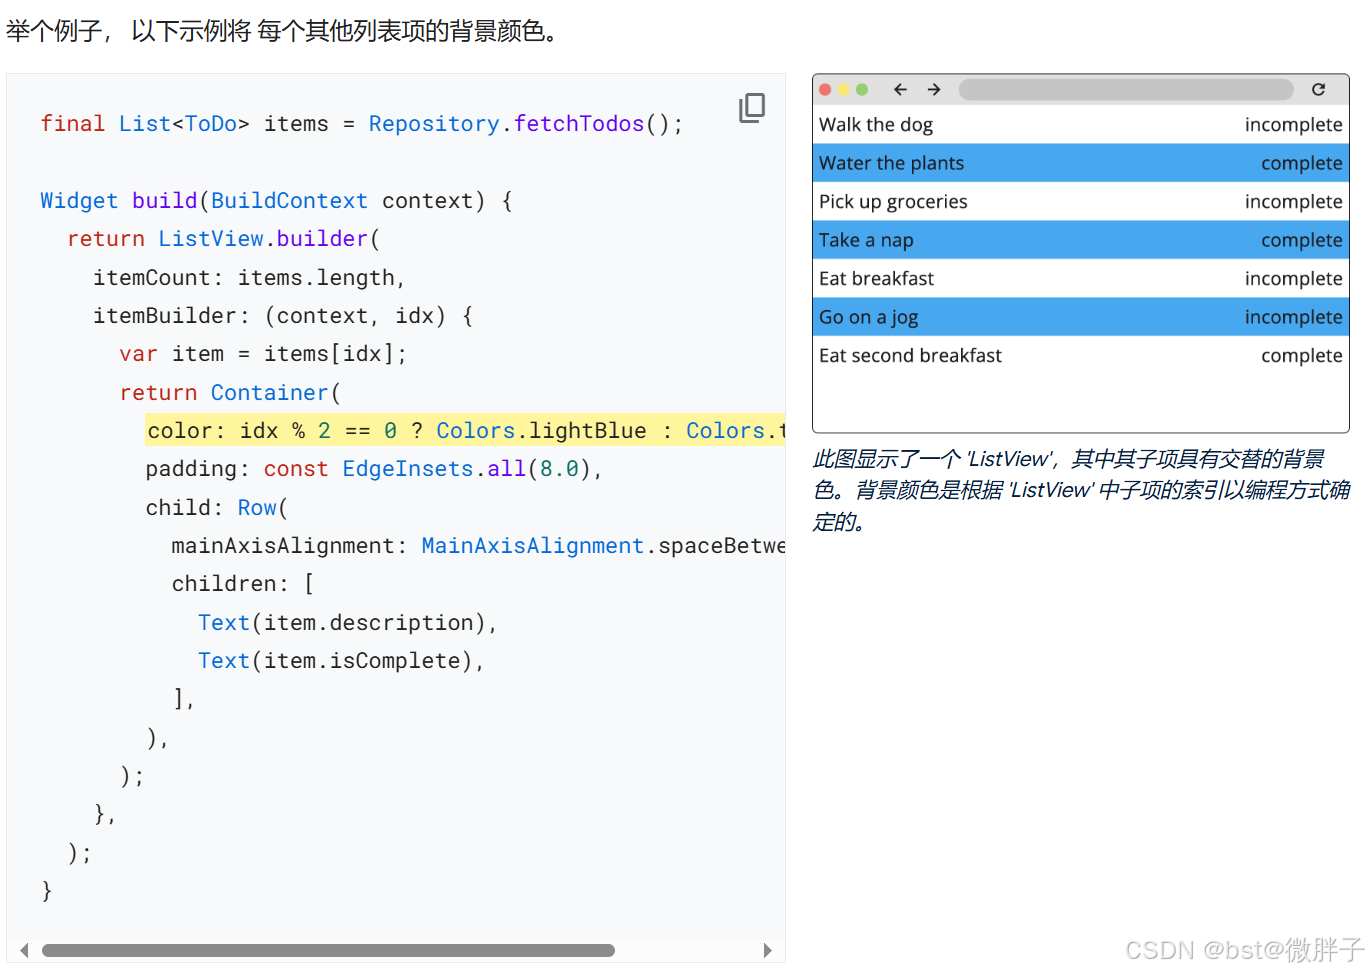
- 3.6、滚动 Widget
- 3.7、自适应布局
- 4、center和container的区别
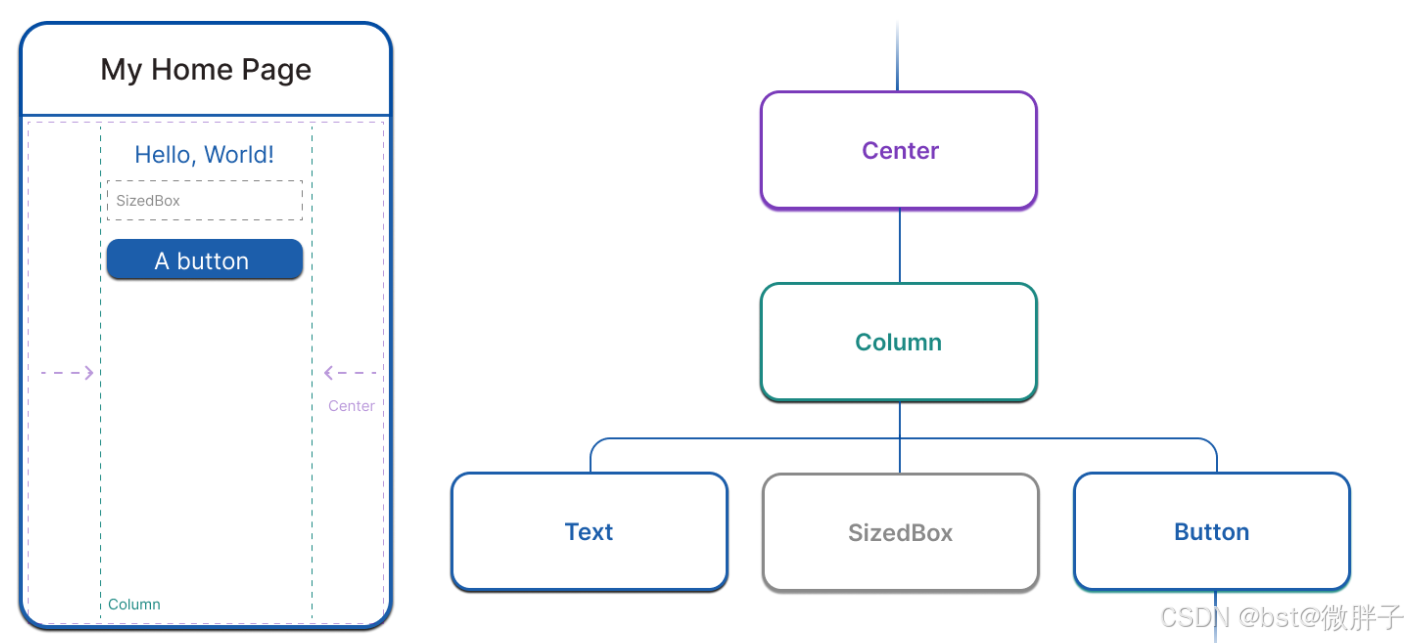
1、页面布局一
import 'package:flutter/material.dart';
import 'package:flutter/services.dart';
void main() => runApp(const MyApp());
class MyApp extends StatelessWidget {
const MyApp({super.key});
Widget build(BuildContext context) {
return MaterialApp( // Root widget
//展示的是顶部区域部分
home: Scaffold(
appBar: AppBar(
title: const Text('My Home Page'),
),
body: Center(
child: Builder(
builder: (context) {
//纵向展示文本,盒子,以及按钮等
return Column(
children: [
const Text('Hello, World!'),
const SizedBox(height: 20),
ElevatedButton(
onPressed: () {
print('Click!');
},
child: const Text('A button'),
),
],
);
},
),
),
),
);
}
}
2、无状态组件StatelessWidget和有状态组件StatefulWidget
2.1、无状态组件示例
import 'package:flutter/material.dart';
import 'package:flutter_haoke/pages/home/info/data.dart';
import 'package:flutter_haoke/pages/home/info/index_widget.dart';
class Info extends StatelessWidget {
final bool showTitle;
final List<InfoItem> dataList;
const Info({Key? key, this.showTitle = false, this.dataList = infoData})
: super(key: key);
Widget build(BuildContext context) {
return Container(
child: Column(
children: [
if (showTitle)
Container(
padding: EdgeInsets.all(10),
alignment: Alignment.centerLeft,
child: Text(
"更多资讯",
style: TextStyle(fontSize: 14.0, fontWeight: FontWeight.w600),
),
),
Column(
children: dataList.map((e) {
return InfoItemWidget(e);
}).toList(),
)
],
),
);
}
}
2.2、有状态组件示例
class CounterWidget extends StatefulWidget {
State<CounterWidget> createState() => _CounterWidgetState();
}
class _CounterWidgetState extends State<CounterWidget> {
int _counter = 0;
void _incrementCounter() {
setState(() {
_counter++;
});
}
Widget build(BuildContext context) {
return Text('$_counter');
}
}
有状态组件通过State对象来存储可变状态。
2.3、在 widget 之间共享状态
1、使用 widget 构造函数
由于 Dart 对象是通过引用传递的,因此 widget 定义 对象。 你传递给 widget 的构造函数的任何状态 可用于构建其 UI:
class MyCounter extends StatelessWidget {
final int count;
const MyCounter({super.key, required this.count});
Widget build(BuildContext context) {
return Text('$count');
}
}
这使得您的小部件的其他用户很明显知道 他们需要提供什么才能使用它:
Column(
  children: [
    //使用构造函数来传递值
    MyCounter(
      count: count,
    ),
    MyCounter(
      count: count,
    ),
    TextButton(
      child: Text('Increment'),
      onPressed: () {
        setState(() {
          count++;
        });
      },
    )
  ],
)
2、使用 InheritedWidget
手动将数据向下传递 widget 树可能很详细 并导致不需要的样板代码, 所以 Flutter 提供了 InheritedWidget, 它提供了一种在父 widget 中高效托管数据的方法 这样子 widget 就可以访问它们,而无需将它们存储为 field。
要使用 ,请扩展类 并使用 . 在 build 方法中调用的 widget 创建由 Flutter 框架管理的依赖项, 以便任何依赖于此 rebuild 的 widget 当此小组件使用新数据重新构建时 并返回 true。
class MyState extends InheritedWidget {
const MyState({
super.key,
required this.data,
required super.child,
});
final String data;
static MyState of(BuildContext context) {
// This method looks for the nearest `MyState` widget ancestor.
final result = context.dependOnInheritedWidgetOfExactType<MyState>();
assert(result != null, 'No MyState found in context');
return result!;
}
// This method should return true if the old widget's data is different
// from this widget's data. If true, any widgets that depend on this widget
// by calling `of()` will be re-built.
bool updateShouldNotify(MyState oldWidget) => data != oldWidget.data;
}
接下来,调用 从小部件的方法 需要访问 shared 状态:of()build()
class HomeScreen extends StatelessWidget {
const HomeScreen({super.key});
Widget build(BuildContext context) {
var data = MyState.of(context).data;
return Scaffold(
body: Center(
child: Text(data),
),
);
}
}
3、使用回调
class MyWidget extends StatefulWidget {
_MyWidgetState createState() => _MyWidgetState();
}
class _MyWidgetState extends State<MyWidget> {
//初始值为false
bool _value = false;
void _handleValueChanged(bool value) {
setState(() {
_value = value;
});
// 在这里执行值发生变化时的操作
}
Widget build(BuildContext context) {
return Switch(
//监听switch发生改变,_value赋值给value时触发 _handleValueChanged(value)
value: _value,
onChanged: _handleValueChanged,
);
}
}
在上面的示例中,我们创建了一个Switch小部件,并将_value变量作为其值传递。当Switch的值发生变化时,会调用_handleValueChanged函数,并在函数中更新_value的值。通过调用setState函数,我们告诉Flutter框架重新构建小部件以反映新的值。
3、布局小组件
3.1、布置单个 Widget
3.2、容器

3.3、垂直或水平布局多个 widget
3.4、在行和列内对齐 Widget


3.5、在行和列中调整小组件的大小
3.6、滚动 Widget

3.7、自适应布局

4、center和container的区别
Center组件:
Center组件继承自Align,主要用于将子组件居中显示。它通过设置alignment属性为Alignment.center来实现这一点。Center组件的代码示例如下:
class MyHomeBody extends StatelessWidget {
Widget build(BuildContext context) {
return Center(
child: Icon(Icons.pets, size: 36, color: Colors.red),
);
}
}
在这个例子中,Icon组件会被居中显示。Center组件的主要特点是它会自动调整其父容器的尺寸以适应子组件的尺寸,并将其居中。
Container组件:
Container组件则更加通用,主要用于创建一个矩形容器,可以包含其他组件,并提供多种定制化属性,如背景色、边框、圆角、阴影等。Container可以调整其内部子组件的对齐方式、边距、填充等。Container的代码示例如下:
class MyApp extends StatelessWidget {
Widget build(BuildContext context) {
return MaterialApp(
title: 'Container Learn',
home: Scaffold(
body: Center(
child: Container(
child: Text('Alignment center', style: TextStyle(fontSize: 40.0),),
alignment: Alignment.center,
width: 500.0,
height: 400.0,
color: Colors.lightBlue,
),
),
),
);
}
}
在这个例子中,Text组件被包含在一个Container中,并通过alignment属性设置为居中对齐。Container提供了更多的布局和样式控制选项。