链表相关知识总结
1、数据结构
基本概念:
- 数据项:一个数据元素可以由若干个数据项组成
- 数据对象:有相同性质的数据元素的集合,是数据的子集
- 数据结构:是相互之间存在一种或多种特定关系的数据元素的集合
逻辑结构和物理结构:
- 逻辑结构:是指数据对象中数据元素之间的相互关系。比如集合结构、线性结构、树形结构、图形结构
- 物理结构:是指数据的逻辑结构在计算机中的存储形式。比如顺序存储结构、链式存储结构
数据结构研究的内容:
- 线性表:零个或多个数据元素的有序序列
- 队列:只允许在一端插入,而在另一端进行删除操作的线性表
- 堆栈:栈是限定仅在表尾进行插入和删除操作的线性表
- 树:树是 n 个节点的有序集。节点可以像树一样越向叶子节点就没有交集
- 图:由顶点的又穷空集合和顶点之间边的集合组成
- 排序和查找算法:排序是对数据进行顺序排列,查找是在大量数据中寻找我们需要的数据的过程
本系列的源码如无特殊说明均来自 JDK 1.8
2、线性表
2.1 基本概念
先来看数组,数组的特点:
- 简单:数组是一种最简单的数据结构
- 占据连续内存:数组空间连续,按照申请的顺序存储,但是必须制定数组大小
- 数组空间效率低:数组中经常有空闲的区域没有得到充分的应用
- 操作麻烦:数组的增加和删除操作很麻烦(需要移动被操作位置后续的元素)
线性表是零个或多个数据元素的有序序列,它有两种存储结构:
- 顺序存储结构(顺序表),内部实际上还是数组
- 链式存储结构(链表),物理地址不是连续的,但是通过指针保存了下一个内存单元的首地址,形成了逻辑上的连续
Java 中对顺序表的实现主要是 ArrayList,对链表的实现主要是 LinkedList。
2.2 顺序表的增删改查
Java 中对顺序表的典型实现就是 ArrayList,我们先看如何向 ArrayList 添加数据。
增
	public boolean add(E e) {
        // 至少要保证容量为 size + 1 才能添加一个新元素
        ensureCapacityInternal(size + 1);  // Increments modCount!!
        // 在尾部添加新元素
        elementData[size++] = e;
        return true;
    }

	private void ensureCapacityInternal(int minCapacity) {
        ensureExplicitCapacity(calculateCapacity(elementData, minCapacity));
    }
add(E) 会在顺序表尾部添加元素,添加前需要通过 ensureCapacityInternal() 保证顺序表的容量充足,具体做法是计算出添加元素后所需要的容量,如果容量不足就计算后进行扩容:
	private static final Object[] DEFAULTCAPACITY_EMPTY_ELEMENTDATA = {};
	private static final int DEFAULT_CAPACITY = 10;

	private static int calculateCapacity(Object[] elementData, int minCapacity) {
        // 如果是初始状态,顺序表是空的,那么就在 10 和 minCapacity 选大的作为初始容量
        if (elementData == DEFAULTCAPACITY_EMPTY_ELEMENTDATA) {
            return Math.max(DEFAULT_CAPACITY, minCapacity);
        }
        return minCapacity;
    }

	private void ensureExplicitCapacity(int minCapacity) {
        // 更新对当前 ArrayList 对象的修改次数
        modCount++;

        // 计算出需要增加的容量并扩容
        if (minCapacity - elementData.length > 0)
            grow(minCapacity);
    }

	private void grow(int minCapacity) {
        // overflow-conscious code
        int oldCapacity = elementData.length;
        // 扩容是增加原来容量的一半
        int newCapacity = oldCapacity + (oldCapacity >> 1);
        // 如果扩容后还是比需要的最小容量 minCapacity 要小,就直接扩容到 minCapacity
        if (newCapacity - minCapacity < 0)
            newCapacity = minCapacity;
        // MAX_ARRAY_SIZE = Integer.MAX_VALUE - 8;
        if (newCapacity - MAX_ARRAY_SIZE > 0)
            newCapacity = hugeCapacity(minCapacity);
        // minCapacity is usually close to size, so this is a win:
        elementData = Arrays.copyOf(elementData, newCapacity);
    }

	private static int hugeCapacity(int minCapacity) {
        if (minCapacity < 0) // overflow
            throw new OutOfMemoryError();
        return (minCapacity > MAX_ARRAY_SIZE) ?
            Integer.MAX_VALUE :
            MAX_ARRAY_SIZE;
    }
计算好了扩容后的容量 newCapacity 之后,通过 Arrays.copyOf() 将原来的 ArrayList 的所有元素拷贝到扩容后的新的 ArrayList 中。
此外还可以进行指定位置的添加:
	public void add(int index, E element) {
        // 检查 index 是否越界
        rangeCheckForAdd(index);

        ensureCapacityInternal(size + 1);  // Increments modCount!!
        // 把 index 位置空出来,需要将原本 [index,size-1] 位置上的元素向后挪一位
        // 在 JDK 1.8 中是一个 Native 方法,参数含义是(源表,起始位置,目标表,目标位置,拷贝个数)
        // 即从哪个表的哪个起始位置开始拷贝,拷贝到哪个表的哪个位置,拷贝多少个元素
        System.arraycopy(elementData, index, elementData, index + 1,
                         size - index);
        // 空出的 index 位置保存新添加的元素
        elementData[index] = element;
        size++;
    }
在 ArrayList 的中间位置插入元素,需要通过 System.arraycopy() 将 index 这个位置开始到后面的元素都向后移动一位,空出的 elementData[index] 才能保存新插入的元素。这就是 ArrayList 在中间进行添加/删除元素效率低的主要原因。
其余的添加方法,如 addAll 之类的也是类似的,就不多赘述。
删
remove() 可以传索引,也可以传对象。先看传 index 的:
	public E remove(int index) {
        rangeCheck(index);

        modCount++;
        E oldValue = elementData(index);

        // 如果需要移动的元素个数大于 0 就需要通过 arraycopy 将元素前移一位
        // 只有当 index = size - 1,即 index 在表尾部删除元素时才不用移位
        int numMoved = size - index - 1;
        if (numMoved > 0)
            System.arraycopy(elementData, index+1, elementData, index,
                             numMoved);
        // 将原本最后一个位置的对象置为 null,因为它不再是 ArrayList 使用的一员,
        // 需要触发 GC 尽快回收它
        elementData[--size] = null; // clear to let GC do its work

        return oldValue;
    }
与 add(index) 类似,也是在尾部删除元素时才不用移动后续数据,否则都要用 System.arraycopy() 将数据前移,影响执行效率。
如果是直接移除对象的话,需要从前至后遍历 ArrayList,找到第一个与传入的参数 o 相同的对象并移除掉它:
	public boolean remove(Object o) {
        // 如果 o 是 null 则移除掉第一个 null 元素
        if (o == null) {
            for (int index = 0; index < size; index++)
                if (elementData[index] == null) {
                    fastRemove(index);
                    return true;
                }
        } else {
            // 如果 o 不是 null 则移除掉第一个与 o 值相同的元素
            for (int index = 0; index < size; index++)
                if (o.equals(elementData[index])) {
                    fastRemove(index);
                    return true;
                }
        }
        return false;
    }

	private void fastRemove(int index) {
        modCount++;
        int numMoved = size - index - 1;
        if (numMoved > 0)
            System.arraycopy(elementData, index+1, elementData, index,
                             numMoved);
        elementData[--size] = null; // clear to let GC do its work
    }
改
由于是顺序表可以很容易的根据 index 获取到对应的元素,直接去改:
	public E set(int index, E element) {
        rangeCheck(index);

        E oldValue = elementData(index);
        elementData[index] = element;
        return oldValue;
    }
2.3 ArrayList 继承关系
ArrayList 是一个容器,它通过继承抽象类 AbstractCollection 实现了容器接口 Collection,还直接实现了 List 接口。
既然 ArrayList 实现了那么多接口,肯定会具有相应接口的特性,我们主要看对 Iterator 的实现。
Iterator
Iterator 接口内容如下:
public interface Iterator<E> {

    // 是否还有下一个元素
    boolean hasNext();

    // 获取下一个元素
    E next();

    // 默认方法,移除(下一个)元素
    default void remove() {
        throw new UnsupportedOperationException("remove");
    }

    // 默认方法,对元素内剩余的每一个元素执行 action 操作
    default void forEachRemaining(Consumer<? super E> action) {
        Objects.requireNonNull(action);
        while (hasNext())
            action.accept(next());
    }
}
迭代器接口主要是用于向后遍历元素,即快速轮询容器,方法功能已经在注释上标出。
ArrayList 通过内部类 Itr 实现 Iterator 接口:
	private class Itr implements Iterator<E> {
        int cursor;       // index of next element to return
        int lastRet = -1; // index of last element returned; -1 if no such
        int expectedModCount = modCount;

        Itr() {}

        public boolean hasNext() {
            return cursor != size;
        }

        @SuppressWarnings("unchecked")
        public E next() {
            checkForComodification();
            int i = cursor;
            if (i >= size)
                throw new NoSuchElementException();
            Object[] elementData = ArrayList.this.elementData;
            if (i >= elementData.length)
                throw new ConcurrentModificationException();
            cursor = i + 1;
            return (E) elementData[lastRet = i];
        }

        public void remove() {
            if (lastRet < 0)
                throw new IllegalStateException();
            checkForComodification();

            try {
                ArrayList.this.remove(lastRet);
                cursor = lastRet;
                lastRet = -1;
                expectedModCount = modCount;
            } catch (IndexOutOfBoundsException ex) {
                throw new ConcurrentModificationException();
            }
        }

        @Override
        @SuppressWarnings("unchecked")
        public void forEachRemaining(Consumer<? super E> consumer) {
            Objects.requireNonNull(consumer);
            final int size = ArrayList.this.size;
            int i = cursor;
            if (i >= size) {
                return;
            }
            final Object[] elementData = ArrayList.this.elementData;
            if (i >= elementData.length) {
                throw new ConcurrentModificationException();
            }
            while (i != size && modCount == expectedModCount) {
                consumer.accept((E) elementData[i++]);
            }
            // update once at end of iteration to reduce heap write traffic
            cursor = i;
            lastRet = i - 1;
            checkForComodification();
        }

        final void checkForComodification() {
            if (modCount != expectedModCount)
                throw new ConcurrentModificationException();
        }
    }
next() 和 remove() 操作的都是 elementData[lastRet],在 next() 内将 lastRet 指向下一个元素,而 remove() 删除的也正是 next() 返回的下一个元素。
面试常问问题
都是些简单问题:
- ArrayList 的大小是如何自动增加的?
- 在 add() 时检查容量是否足以再添加一个元素,如果不够就进行扩容,增加元容量的一半(oldCapacity + oldCapacity >> 1)
- 什么情况下你会使用 ArrayList?
- 考察应用场景:在尾部插入或删除元素时,需要随机访问或修改容器内元素时(在 ArrayList 中间插入或删除节点需要通过 System.arrayCopy() 移动元素,会影响效率,此时应该使用链表而不是顺序表)
- 在索引中 ArrayList 的增加或者删除某个对象的运行过程的效率很低吗?解释一下为什么?
- 在最后一个位置增删效率还是高的,但是在中间增删效率就低了,因为需要通过 System.arrayCopy() 移动因为被增加/删除元素所影响到的元素,该方法是一个很耗时的操作
- ArrayList 如何顺序删除节点?
- 从尾部向头部删除效率高,因为删除 ArrayList 的最后一个元素时不用进行 System.arrayCopy() 操作;如果从头删除,删除掉第一个元素之后,需要把第二个元素到最后一个元素通过 System.arrayCopy() 向前移一位
- ArrayList 的遍历方法?
- 推荐用迭代器提供的 hasNext() 和 next() 方法进行遍历
- 使用 for 循环(或 forEach)遍历也是可行的,但是尽量就只使用 get(i) 去获取元素,不要进行增删改操作,容易出问题
2.4 链表
定义:线性表的链式存储结构的特点是用一组任意的存储单元存储线性表的数据元素,这组存储单元可以是连续的,也可以是不连续的(扯犊子定义,这是特点):
// 单向链表
class Node {
    // 保存数据
    Object data;
    // 保存下一个元素的引用(地址)
    Node next;
}

// 双向链表(使用了泛型的形式)
class Node<E> {
    // 保存数据
    E data;
    // 下一个元素的引用
    Node<E> next;
    // 前一个元素的引用
    Node<E> prev;
}
链表又分为单向链表和双向链表,我们着重看看两种链表的增删改查。
单向链表的增删改查

简单描述一下上述过程:
- 增:一定是先执行 s.next = p.next,如果先执行了 p.next = s,那么原本的 p.next 就和整个链表断开了,无法指定 s.next,因为此时 p.next 已经是 s 了
- 删:比增简单一些,直接让待删的前驱结点的 next 指向待删的后继节点即可
- 改:直接修改链表节点的数据即可
- 查:要从链表头部开始遍历去找目标节点,因此在查找上的效率要低于支持随机访问的顺序表(但是增删效率高)
单链表的主要应用在源码中就是 JDK 1.7 之前的 HashMap,用于解决哈希冲突(当然从 JDK 1.8 开始就不用单链表改用红黑树进一步提升性能)。
双向链表的增删改查
双向链表的增删改查会结合 LinkedList 的源码来看,因为 JDK 的 LinkedList 就是通过双向链表实现的。
首先是增:

在双向链表中增加一个节点需要四步:
- s.next = p.next
- p.next.prev = s
- s.prev = p
- p.next = s
注意第 2 步与第 4 步的顺序不能颠倒,否则会出现 a1.next 指向 a2,而 a2.prev 指向 a1 的循环关系。
在具体的代码实现上,看 LinkedList 的 add 方法:
	public void add(int index, E element) {
        // 检查 index 的合法性 —— 是否超出边界
        checkPositionIndex(index);

        // 如果 index 在链表尾部,则在尾部插入
        if (index == size)
            linkLast(element);
        else
            linkBefore(element, node(index));
    }
如果在尾部插入,通过 linkLast() 执行尾插:
	/**
     * Links e as last element.
     */
    void linkLast(E e) {
        // last 是当前的尾节点
        final Node<E> l = last;
        // 为 e 创建 Node 对象,prev 指向当前链表的尾节点
        final Node<E> newNode = new Node<>(l, e, null);
        // 更新尾节点引用
        last = newNode;
        // 如果原来的尾节点为空,说明队列为空,需要把头节点引用也指向 newNode
        if (l == null)
            first = newNode;
        else
            // 将原本尾节点的 next 指向 newNode 完成双向互指
            l.next = newNode;
        size++;
        modCount++;
    }
如果不是在链表尾部插入,通过 linkBefore(element, node(index)) 来完成插入。首先要看 node(index) 如何生成 index 指定的 Node 节点:
	/**
     * Returns the (non-null) Node at the specified element index.
     */
    Node<E> node(int index) {
        // assert isElementIndex(index);

        // 如果 index 在队列的前一半(离队头近),就从队头向后遍历找 index 指定的 Node
        if (index < (size >> 1)) {
            Node<E> x = first;
            for (int i = 0; i < index; i++)
                x = x.next;
            return x;
        } else {
            // 否则(离队尾近)从队尾开始向前遍历找 index 指定的 Node
            Node<E> x = last;
            for (int i = size - 1; i > index; i--)
                x = x.prev;
            return x;
        }
    }
找到 index 指定的 Node 后才由 linkBefore() 将 Node(e) 插入到 Node(index) 的前面:
	/**
     * Inserts element e before non-null Node succ.
     */
    void linkBefore(E e, Node<E> succ) {
        // assert succ != null;
        final Node<E> pred = succ.prev;
        final Node<E> newNode = new Node<>(pred, e, succ);
        succ.prev = newNode;
        if (pred == null)
            first = newNode;
        else
            pred.next = newNode;
        size++;
        modCount++;
    }
以上是双向链表增加元素的分析,删除元素相对要简单一点,只需要被删除元素的一个引用即可:

源码实现看 LinkedList 的 remove(),该方法有多个重载方法,看核心的 remove(index):
	public E remove(int index) {
        checkElementIndex(index);
        return unlink(node(index));
    }

    E unlink(Node<E> x) {
        // assert x != null;
        final E element = x.item;
        final Node<E> next = x.next;
        final Node<E> prev = x.prev;

        // x 前驱节点处理
        // 如果 prev 为空说明 x 是队头,删除队头直接将 first 指向 next 即可
        if (prev == null) {
            first = next;
        } else {
            // prev 存在,将 prev 的 next 指向 next,并断开 x 的 prev
            prev.next = next;
            x.prev = null;
        }

        // x 后继节点处理
        // next 为空说明 x 是队尾,删除 x 需要让 last 指向 x 的前驱节点
        if (next == null) {
            last = prev;
        } else {
            // next 存在,让 next 的 prev 指向前驱节点,并断开 x 的 next
            next.prev = prev;
            x.next = null;
        }

        x.item = null;
        size--;
        modCount++;
        return element;
    }
2.5 线性表总结
首先是三种表的知识总结与应用场景:

访问和尾插可以用顺序表(ArrayList),涉及到数据的增删改则使用链表,双向链表(LinkedList)的效率比单向链表更高。
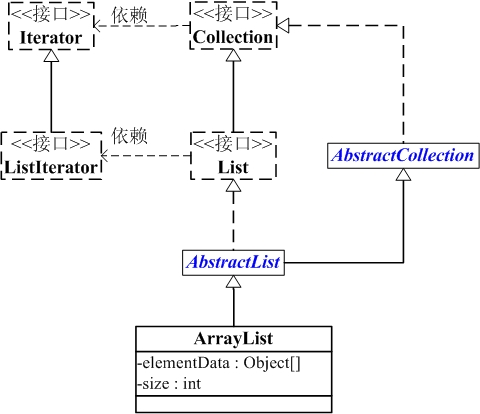
List 总结图:

大致总结:
- Iterator 迭代器接口定义了向后迭代的接口方法 hasNext() 和 next(),一个容器想要拥有迭代功能都应该实现该接口
- ListIterator 继承了 Iterator 接口,又额外定义了 hasPrevious()、previous() 这两个向前迭代的方法,此外还定义了 nextIndex() 与 previousIndex() 这两个用于获取前后索引值的方法,再就是对集合的增删改操作 add()、remove() 和 set(),其中 remove() 是将父接口的默认方法覆盖为接口方法,另外两个是新增的接口方法。可以看到 ListIterator 就是为了针对 List 这种结构而设计的接口方法
- Collection 作为所有容器的接口,通过返回 Iterator 实例的接口方法 iterator() 依赖于 Iterator 接口,同时还提供了容器通用操作的 size()、isEmpty()、contains()、toArray()、add()、remove()、containsAll()、addAll() 等接口方法
- List 接口继承自 Collection 接口,同时通过
ListIterator<E> listIterator()接口方法依赖 ListIterator - AbstractCollection 为 Collection 接口的部分方法提供了实现,如 contains()、isEmpty() 等,但是像 iterator()、size() 这种需要子类实现的方法就覆盖为抽象方法了
- AbstractList 继承 AbstractCollection 且实现 List 接口,它还是在父类(接口)的前提下,实现了部分方法,比如 add(E)、indexOf()、lastIndexOf() 等,但是仍有一个抽象方法 get() 等待子类去实现,另外像 set()、add(int, E)、remove() 等方法提供的默认实现都是抛出 UnsupportedOperationException,还是需要子类重写的
- ArrayList 继承 AbstractList 同时也实现了 List 和 Serializable 接口(为什么父类 AbstractList 已经实现了 List,ArrayList 还要再实现一次呢?是不是因为父类的实现不满足使用需求呢?)
- LinkedList 继承自 AbstractSequentialList,还实现了 List、Deque、Serializable 接口
- Vector 是 JDK 1.0 版本就有的容器,但是后来继承了 JDK 1.2 版本才诞生的 AbstractList,此外还实现了 List、RandomAccess、Serializable 接口,这一支的容器用的就很少了
3、链表与 LRU 算法
3.1 缓存与 LRU 算法
缓存分为硬件缓存和软件缓存,最早诞生的是硬件缓存:
- 硬件缓存:位于 CPU 与内存之间的临时存储器,解决 CPU 和内存之间的速度差异问题
- 软件缓存:一般用三级缓存,速度依次递减:内存缓存、数据库缓存、网络缓存
内存缓存是指预先将数据写到了容器(List、Map、Set)等数据存储单元中,就是软件内存缓存。
内存空间有限,因此内存缓存也有限,这就涉及到内存缓存的淘汰策略算法:
- FIFO(First In First Out):先进先出
- LFU(Least Frequently Used):最低使用频率
- LRU(Least Recently Used):最近最少使用
LRU 算法步骤:
- 新数据插入到链表头部
- 当缓存命中(即缓存数据被访问),数据要移到表头
- 当链表满的时候,将链表尾部的数据丢弃

3.2 算法实现
单链表实现:
public class LinkedList<T> {

    private Node head;
    private int size;

    public LinkedList() {
        head = null;
        size = 0;
    }

    /**
     * 在链表头部添加元素
     */
    public void add(T data) {
        head = new Node(data, head);
        size++;
    }

    /**
     * 在指定位置添加元素
     */
    public void add(T data, int index) {
        checkPositionIndex(index);

        if (index == 0) {
            add(data);
        } else {
            Node node = head;
            // 从链表头部开始遍历,找到指定位置的前一个节点
            for (int i = 0; i < index - 1; i++) {
                node = node.next;
            }
            // 添加节点
            node.next = new Node(data, node.next);
            size++;
        }
    }

    private void checkPositionIndex(int index) {
        // 边界判断
        if (index < 0 || index > size) {
            throw new IndexOutOfBoundsException();
        }
    }

    /**
     * 删除头部节点
     */
    public T remove() {
        Node deletedNode = head;
        if (deletedNode != null) {
            head = deletedNode.next;
            size--;
            T data = deletedNode.data;
            // 促进 GC 回收该对象,不置为 null 的话可能会因为指向其他节点而无法回收造成内存泄漏
            deletedNode = null;
            return data;
        }
        return null;
    }

    /**
     * 删除指定位置的节点
     */
    public T removeAt(int index) {
        checkPositionIndex(index);

        Node curNode = head;
        // 找到指定位置的前一个节点
        for (int i = 0; i < index - 1; i++) {
            curNode = curNode.next;
        }
        Node deletedNode = curNode.next;
        curNode.next = curNode.next.next;
        T data = deletedNode.data;
        // GC
        deletedNode = null;
        size--;
        return data;
    }

    /**
     * 删除尾部节点
     */
    public T removeLast() {
        return removeAt(size - 1);
    }

    /**
     * 修改指定位置的元素
     */
    public void set(T data, int index) {
        checkPositionIndex(index);

        Node curNode = head;
        for (int i = 0; i < index; i++) {
            curNode = curNode.next;
        }
        curNode.data = data;
    }

    /**
     * 获取头部节点数据
     */
    public T get() {
        return head != null ? head.data : null;
    }

    /**
     * 获取指定位置的元素
     */
    public T get(int index) {
        checkPositionIndex(index);

        Node curNode = head;
        for (int i = 0; i < index; i++) {
            curNode = curNode.next;
        }
        return curNode.data;
    }

    @Override
    public String toString() {
        Node node = head;
        StringBuilder sb = new StringBuilder();
        while (node != null) {
            sb.append(node.data).append(" ");
            node = node.next;
        }
        sb.append("\n");
        return sb.toString();
    }

    class Node {
        T data;
        Node next;

        public Node(T data, Node next) {
            this.data = data;
            this.next = next;
        }
    }

    public static void main(String[] args) {
        LinkedList<Integer> linkedList = new LinkedList<>();
        for (int i = 0; i < 10; i++) {
            linkedList.add(i);
        }
        System.out.println(linkedList);
    }
}
LRU 算法实现,继承 LinkedList 在其基础上扩展:
public class LruLinkedList<T> extends LinkedList<T> {

    private static final int DEFAULT_CAPACITY = 10;

    private int capacity;

    public LruLinkedList() {
        this(DEFAULT_CAPACITY);
    }

    public LruLinkedList(int capacity) {
        this.capacity = capacity;
    }

    public void put(T data) {
        if (size >= capacity) {
            removeLast();
        }
        // 无论 size >= capacity 是否成立,都要将 data 加到链表头
        add(data);
    }

    public T delete() {
        return removeLast();
    }

    /**
     * 获取指定索引的元素,并将该元素移到链表的头部
     * 访问元素也要将该元素移到链表的头部
     */
    public T get(int index) {
        checkPositionIndex(index);

        // 目标节点
        Node curNode = head;
        // 目标节点的前驱结点
        Node preNode = head;
        for (int i = 0; i < index; i++) {
            preNode = curNode;
            curNode = curNode.next;
        }
        // 目标节点的前驱节点的 next 指向目标节点的下一个节点
        preNode.next = curNode.next;
        // 将目标节点插入到链表的头部
        curNode.next = head;
        // 更新头部
        head = curNode;
        // 返回目标节点的数据
        return curNode.data;
    }

    public static void main(String[] args) {
        LruLinkedList<Integer> lruLinkedList = new LruLinkedList<>(5);
        for (int i = 0; i < 5; i++) {
            lruLinkedList.put(i);
        }
        System.out.println(lruLinkedList); // 4 3 2 1 0
        lruLinkedList.get(3);
        System.out.println(lruLinkedList); // 1 4 3 2 0
        lruLinkedList.put(10);
        lruLinkedList.put(20);
        System.out.println(lruLinkedList); // 20 10 1 4 3
        lruLinkedList.delete();
        System.out.println(lruLinkedList); // 20 10 1 4
    }
}