【JavaEE】SpringIoC与SpringDI
目录
- 一、IoC与DI
- 1.1 IoC
- 1.2 DI
- 二、IoC与DI的使用
- 三、IoC详解
- 3.1 Bean的存储
- 3.2 @Controller(控制器存储)
- 3.3 获取Bean对象
- 3.4 @Service(服务存储)
- 3.5 @Repository(仓库存储)
- 3.6 @Component(组件存储)
- 3.7 @Configuration(配置存储)
- 3.8 五大注解区别
- 3.9 ⽅法注解@Bean
- 四、Spring扫描路径
- 五、DI详解
- 5.1属性注入@Autowired
- 5.2 构造方法注入
- 5.3 setter方法注入
- 5.4 @Autowired注解问题及解决

一、IoC与DI
名词解释:
- spring是一个装了众多工具对象的IoC容器。
- IoC思想:对象交给Spring管理,就是IoC思想。
- IoC:Inversion of Control,控制反转。
控制权反转,需要某个对象时, 传统开发模式中需要⾃⼰通过 new 创建对象, 现在不需要再进⾏创建, 把创建对象的任务交给容器(IoC容器. Spring是⼀个IoC容器, 所以有时Spring 也称为Spring容器), 程序中只需要依赖注⼊ (Dependency Injection, DI)就可以了.
1.1 IoC
实现下面的需求:

在传统的实现中,我们将每个模块当成一个类:
public class NewCarExample {
	 public static void main(String[] args) {
	 	Car car = new Car();
	 	car.run();
	 }
 /**
 * 汽⻋对象
 */
 static class Car {
 	private Framework framework;
 	public Car() {
	 	 framework = new Framework();
		 System.out.println("Car init....");
	 }
	 public void run(){
	 	System.out.println("Car run...");
	 }
 }
 /**
 * ⻋⾝类
 */
 static class Framework {
	 private Bottom bottom;
	 public Framework() {
		 bottom = new Bottom();
		 System.out.println("Framework init...");
	 }
 }
 /**
 * 底盘类
 */
 static class Bottom {
 	private Tire tire;
	public Bottom() {
		this.tire = new Tire();
		System.out.println("Bottom init...");
	 }
 }
 /**
 * 轮胎类
 */
 static class Tire {
 // 尺⼨
	 private int size;
	 public Tire(){
	 	this.size = 17;
	 	System.out.println("轮胎尺⼨:" + size);
	 }
	 }
}
但是如上面的代码,如果我们要修改一个参数,会导致整个调用链都跟着修改。
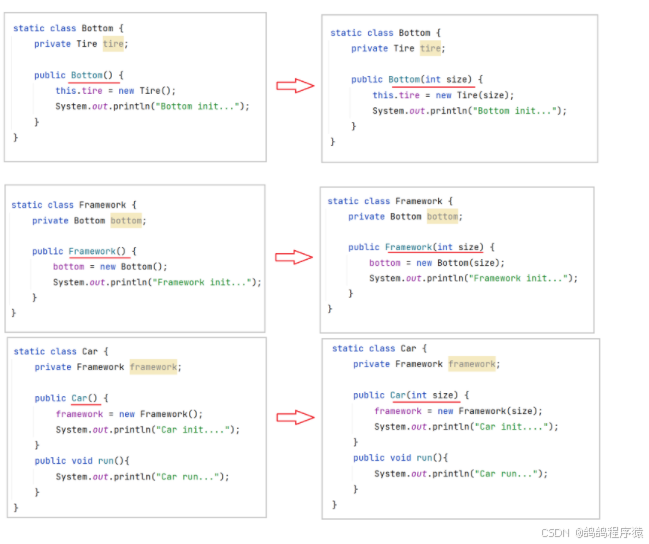
我们为解决上面耦合度过高,可以采取:
把由⾃⼰创建的下级类,改为传递的⽅式(也就是注⼊的⽅式),
每次调整只需要调整对应那个类的代码即可。
这样⽆论底层类如何变化,整个调⽤链是不⽤做任何改变的。
public class IocCarExample {
	 public static void main(String[] args) {
		 Tire tire = new Tire(20);
		 Bottom bottom = new Bottom(tire);
		 Framework framework = new Framework(bottom);
		 Car car = new Car(framework);
		 car.run();
 	}
	 static class Car {
		 private Framework framework;
		 public Car(Framework framework) {
		 	this.framework = framework;
			System.out.println("Car init....");
	 	}
		 public void run() {
		 	System.out.println("Car run...");
		 }
 	}
	 static class Framework {
		 private Bottom bottom;
		 public Framework(Bottom bottom) {
			this.bottom = bottom;
		 	System.out.println("Framework init...");
		 }
 	}
	 static class Bottom {
		 private Tire tire;
		 public Bottom(Tire tire) {
			 this.tire = tire;
			 System.out.println("Bottom init...");
		 }
	 }
	 static class Tire {
		 private int size;
		 public Tire(int size) {
		 	this.size = size;
		 	System.out.println("轮胎尺⼨:" + size);
		 }
	 }
}
1.2 DI
DI: Dependency Injection(依赖注⼊)
容器在运⾏期间, 动态的为应⽤程序提供运⾏时所依赖的资源,称之为依赖注⼊。
就像上面调用关系中:

二、IoC与DI的使用
Spring 是⼀个 IoC(控制反转)容器,作为容器, 那么它就具备两个最基础的功能:
• 存
• 取
Spring 容器 管理的主要是对象, 这些对象, 我们称之为"Bean". 我们把这些对象交由Spring管理, 由 Spring来负责对象的创建和销毁. 我们程序只需要告诉Spring, 哪些需要存, 以及如何从Spring中取出对象
我们实现这样的功能,主要靠两个注解:
- Service层及Dao层的实现类,交给Spring管理: 使⽤注解: @Component
- 在Controller层 和Service层 注⼊运⾏时依赖的对象: 使⽤注解 @Autowired
像把前面的图书管理系统的BookController重构。
BookController类:
package com.example.project.controller;

import com.example.project.model.BookInfo;
import com.example.project.service.BookService;
import org.springframework.beans.factory.annotation.Autowired;
import org.springframework.stereotype.Component;
import org.springframework.web.bind.annotation.RequestMapping;
import org.springframework.web.bind.annotation.RestController;

import java.util.List;

@RequestMapping("/book")
@RestController
@Component
public class BookController {

    @Autowired
    private BookService bookService;
    @RequestMapping("/getList")
    public List<BookInfo> getList() {
        return bookService.getList();
    }
}
BookService类:
package com.example.project.service;

import com.example.project.dao.BookDao;
import com.example.project.model.BookInfo;
import org.springframework.beans.factory.annotation.Autowired;
import org.springframework.stereotype.Component;

import java.util.ArrayList;
import java.util.List;
@Component
public class BookService {
    @Autowired
    BookDao bookDao ;

    public List<BookInfo> getList() {
        List<BookInfo> books = new ArrayList<>();
        books = bookDao.mockData();
        for (BookInfo book:
                books) {
            if(book.getStatus() == 1) {
                book.setStatusCN("可借阅");
            } else {
                book.setStatusCN("不可借阅");
            }
        }
        return books;
    }
}
BookDao类:
package com.example.project.dao;

import com.example.project.model.BookInfo;
import org.springframework.stereotype.Component;

import java.math.BigDecimal;
import java.util.ArrayList;
import java.util.List;
import java.util.Random;
@Component
public class BookDao {
    public List<BookInfo> mockData() {
        List<BookInfo> books = new ArrayList<>();
        for (int i = 0; i < 5; i++) {
            BookInfo book = new BookInfo();
            book.setId(i);
            book.setBookName("书籍" + i);
            book.setAuthor("作者" + i);
            book.setCount(i * 5 + 3);
            book.setPrice(new BigDecimal(new Random().nextInt(100)));
            book.setPublish("出版社" + i);
            book.setStatus(1);
            books.add(book);
        }
        return books;
    }
}
可以看到在类的调用之间,我们是使用的注解,将类作为另一个类的成员。不用自己去new实例。
三、IoC详解
3.1 Bean的存储
Bean在上面我们也说了,就是Spring管理起来的对象。
实现将对象交给Spring管理,
共有两类注解类型可以:
- 类注解:@Controller、@Service、@Repository、@Component、@Configuration.
- ⽅法注解:@Bean.
3.2 @Controller(控制器存储)
先使用@Controller将类存储:
package com.example.springioc.controller;

import org.springframework.stereotype.Controller;

@Controller
public class UserController {
    public void hello() {
        System.out.println("Hello");
    }
}
从Spring容器中获取对象:
- 先获取Spring上下⽂对象
- 从Spring上下⽂中获取对象
package com.example.springioc.controller;

import org.springframework.boot.SpringApplication;
import org.springframework.boot.autoconfigure.SpringBootApplication;
import org.springframework.context.ApplicationContext;

@SpringBootApplication
public class SpringIocDemoApplication {
    public static void main(String[] args) {
    //先获取Spring上下⽂对象
        ApplicationContext context = SpringApplication.run(SpringIocDemoApplication.class,args);
        //从Spring上下⽂中获取对象
        UserController userController = context.getBean(UserController.class);
        userController.hello();
    }
}
3.3 获取Bean对象
获取Bean对象主要是ApplicationContext 类下的getBean方法,有下图中重载。

使用五大类注解让Spring管理Bean对象的默认取名方式如下官方文档:
- 将类名转换为小驼峰形式。
UserController -》 userController - 当前面是两个即多个大写字母连在一起,Bean对象名就是类名。
USController -》 USController
Bean对象名也可以使用注解指定名称,在使用五大注解加上括号即可。栗子: @Controller("name")
使用如下:
package com.example.springioc.controller;

import org.springframework.boot.SpringApplication;
import org.springframework.boot.autoconfigure.SpringBootApplication;
import org.springframework.context.ApplicationContext;

@SpringBootApplication
public class SpringIocDemoApplication {
    public static void main(String[] args) {
        ApplicationContext context = SpringApplication.run(SpringIocDemoApplication.class,args);
        UserController bean1 = context.getBean(UserController.class);
        bean1.hello();
        UserController bean2 = (UserController) context.getBean("userController");
        bean2.hello();
        UserController bean3 =  context.getBean("userController", UserController.class);
        bean3.hello();

    }
}
3.4 @Service(服务存储)
使用就加上@Service注解,拿到Bean对象方法不变。
package com.example.springioc.service;

import org.springframework.stereotype.Service;

@Service
public class UserService {
    void print() {
        System.out.println("do Service");
    }
}
3.5 @Repository(仓库存储)
使用就加上@Repository 注解,拿到Bean对象方法不变。
package com.example.springioc.service;

import org.springframework.stereotype.Repository;

@Repository
public class UserRepository {
    void print() {
        System.out.println("do Repository");
    }
}
3.6 @Component(组件存储)
使用就加上@Component 注解,拿到Bean对象方法不变。
package com.example.springioc.service;

import org.springframework.stereotype.Component;

@Component
public class UserComponent {
    void print() {
        System.out.println("do Component");
    }
}
3.7 @Configuration(配置存储)
使用就加上@Configuration注解,拿到Bean对象方法不变。
package com.example.springioc.service;

import org.springframework.context.annotation.Configuration;

@Configuration
public class UserConfiguration {
    void print() {
        System.out.println("do Configuration");
    }
}
3.8 五大注解区别
@Controller @Service @Repository @Configuration这四个注解都是@Component注解的衍生注解。
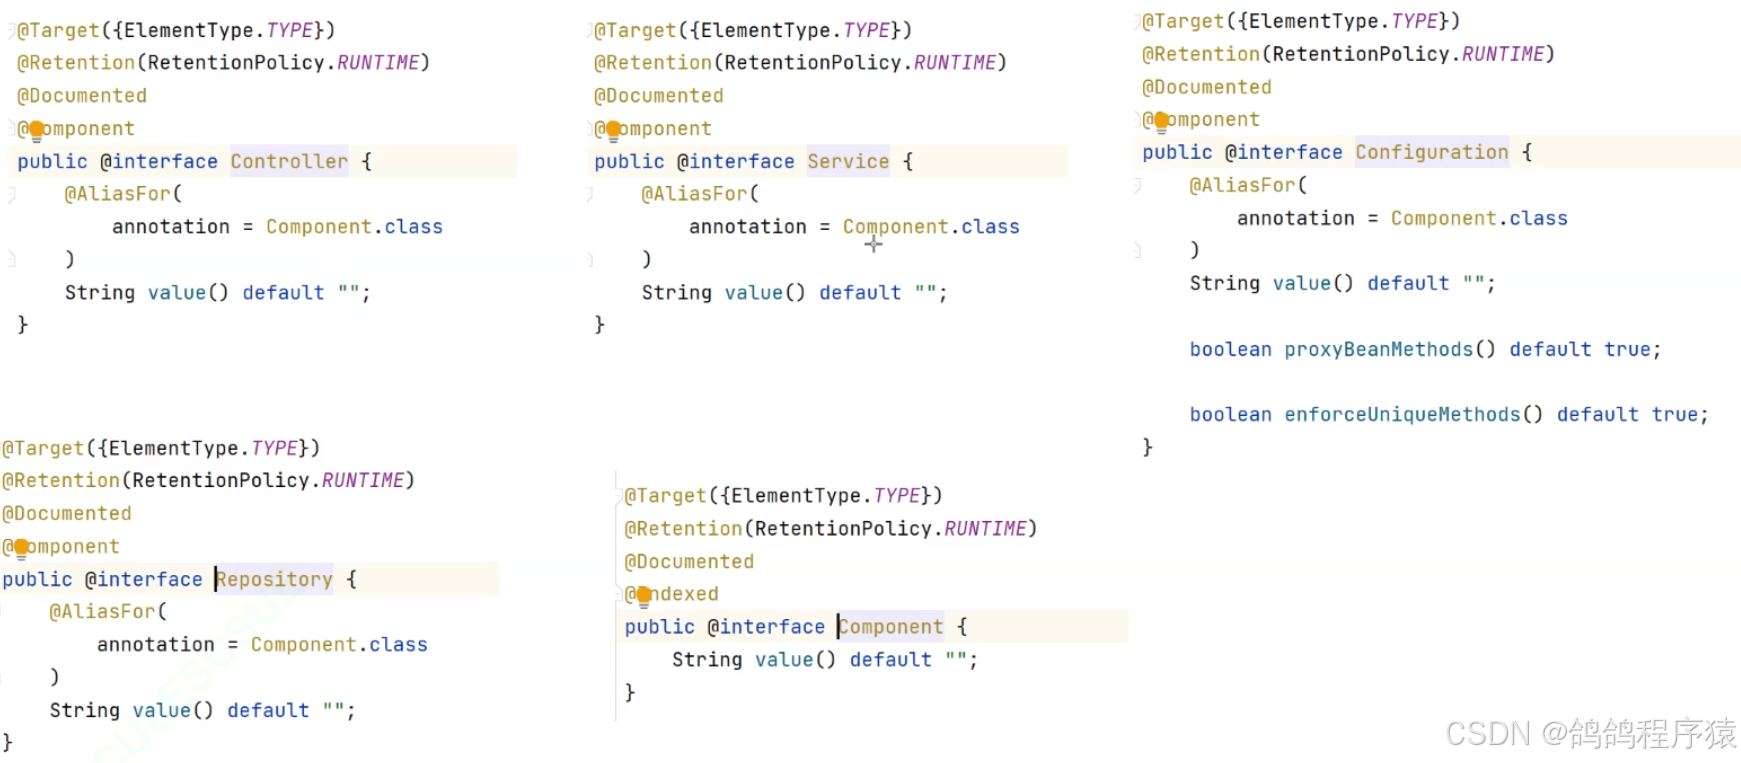
分这么多注解就是为了更好地分层(边界在使用中也没非常清晰):
- @Controller代表控制层。接收参数返回响应,控制层一定要使用@Controller
- @Service代表服务层
- @Repository代表数据层
- @Configuration代表配置层
- @Component代表组件层
3.9 ⽅法注解@Bean
使用:
package com.example.springioc.controller;

import com.example.springioc.model.User;
import org.springframework.context.annotation.Bean;
import org.springframework.stereotype.Controller;

@Controller
public class UserController {
    @Bean
    public User user() {
        return new User("zhangsan",11);
    }
    public void hello() {
        System.out.println("Hello");
    }
}
package com.example.springioc.controller;

import com.example.springioc.model.User;
import org.springframework.boot.SpringApplication;
import org.springframework.boot.autoconfigure.SpringBootApplication;
import org.springframework.context.ApplicationContext;

@SpringBootApplication
public class SpringIocDemoApplication {
    public static void main(String[] args) {
        ApplicationContext context = SpringApplication.run(SpringIocDemoApplication.class,args);
        User bean1 = (User) context.getBean("user");
        System.out.println(bean1.getName());

    }
}
注意事项:
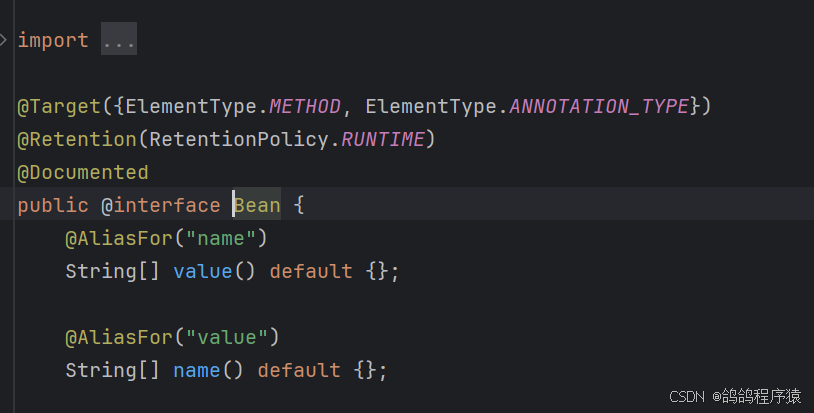
- 使用@Bean注解默认方法名就是管理的Bean对象名。
- @Bean对象重命名可以直接加括号
@Bean("name1"),还可以使用name属性@Bean(name = "name1"),还可以使用value属性@Bean(value = "name1"),并且可以传String数组。
- @Bean注解必须搭配五大类注解使用。
- 当方法有参数的时候,Spring会从容器中根据参数类型去找,是否有这个类型的对象,如果没有,或者有多个不唯一都会报错,有唯一一个就会拿这个对象赋值。
四、Spring扫描路径
Spring默认的扫描路径是启动类所在路径及其子路径。
当我们要扫描其它路径的时候,可以使用注解@ComponentScan("需要扫描路径"),可以传数组。
其实不怎么用这个注解,直接启动类放在所有需要扫描的路径的最上层包下即可。

五、DI详解
依赖注⼊是⼀个过程,是指IoC容器在创建Bean时, 去提供运⾏时所依赖的资源,⽽资源指的就是对象。
依赖注⼊, Spring给我们提供了三种⽅式:
- 属性注⼊(Field Injection)
- 构造⽅法注⼊(Constructor Injection)
- Setter 注⼊(Setter Injection)
5.1属性注入@Autowired
属性注⼊是使⽤ @Autowired 注解实现的
注意事项:
- 注入的对象必须是容器中已经有的,也就是使用五大类注解交给Spring管理的。
- @Autowired不能修饰final修饰的成员。
使用:
package com.example.springioc.controller;

import com.example.springioc.service.UserService;
import org.springframework.beans.factory.annotation.Autowired;
import org.springframework.stereotype.Controller;

@Controller
public class UserController {
    @Autowired
    private UserService us;

    public void hello() {
        System.out.println("Hello");
        us.print();
    }
}
package com.example.springioc;

import com.example.springioc.controller.UserController;
import org.springframework.boot.SpringApplication;
import org.springframework.boot.autoconfigure.SpringBootApplication;
import org.springframework.context.ApplicationContext;

@SpringBootApplication
public class SpringIocDemoApplication {
    public static void main(String[] args) {
        ApplicationContext context = SpringApplication.run(SpringIocDemoApplication.class,args);
        UserController bean = context.getBean(UserController.class);
        bean.hello();

    }
}
打印结果为
Hello
do Service、
5.2 构造方法注入
直接使用构造函数,将上面代码改成如下也可以使用。
package com.example.springioc.controller;

import com.example.springioc.service.UserService;
import org.springframework.stereotype.Controller;

@Controller
public class UserController {

    private UserService us;
    public UserController(UserService us) {
        this.userService = us;
    }

    public void hello() {
        System.out.println("Hello");
        us.print();
    }
}
注意事项:
- 当只有一个构造函数的时候,直接可以注入。
- 当有两个及以上构造函数的时候,Spring无法辨别使用哪一个构造函数注入,需要在使用的构造函数前加上@Autowired注解。
- 只能在一个构造方法上加上@Autowired注解。
5.3 setter方法注入
直接加上set方法,加上@Autowired注解,将上面代码改成如下也可以使用。
package com.example.springioc.controller;

import com.example.springioc.service.UserService;
import org.springframework.stereotype.Controller;

@Controller
public class UserController {

    private UserService us;
    @Autowired
    public void setUserService(UserService us) {
        this.us = us;
    }

    public void hello() {
        System.out.println("Hello");
        us.print();
    }
}
注意事项:
- set方法必须加上@Autowired注解,可以给多个set方法使用注解。
- 不能修饰final修饰的成员的set方法。
优缺点比较:
- 属性注⼊
-
- 优点:简洁,使⽤⽅便;
-
- 缺点:
-
-
- 只能⽤于 IoC 容器,如果是⾮ IoC 容器不可⽤,并且只有在使⽤的时候才会出现NPE(空指针异常)
-
-
-
- 不能注⼊⼀个Final修饰的属性
-
- 构造函数注⼊(Spring 4.X推荐)
-
- 优点:
-
-
- 可以注⼊final修饰的属性
-
-
-
- 注⼊的对象不会被修改
-
-
-
- 依赖对象在使⽤前⼀定会被完全初始化,因为依赖是在类的构造⽅法中执⾏的,⽽构造⽅法是在类加载阶段就会执⾏的⽅法.
-
-
-
- 通⽤性好,构造⽅法是JDK⽀持的, 所以更换任何框架,他都是适⽤的
-
-
- 缺点:
-
-
- 注⼊多个对象时, 代码会⽐较繁琐
-
- Setter注⼊(Spring 3.X推荐)
-
- 优点:⽅便在类实例之后, 重新对该对象进⾏配置或者注⼊
-
- 缺点:
-
-
- 不能注⼊⼀个Final修饰的属性
-
-
-
- 注⼊对象可能会被改变, 因为setter⽅法可能会被多次调⽤,就有被修改的⻛险
-
5.4 @Autowired注解问题及解决
当一个类交给Spring多个对象后,使用@Autowired注解,会无法分辨。
package com.example.springioc.service;

import com.example.springioc.model.User;
import org.springframework.beans.factory.annotation.Autowired;
import org.springframework.context.annotation.Bean;
import org.springframework.context.annotation.Primary;
import org.springframework.stereotype.Service;

@Service
public class UserService {
    @Bean
    public User u1(String name) {
        return new User(name,11);
    }
    @Bean
    public User u2() {
        return new User("lisi",18);
    }
    @Bean
    public String name () {
        return "zhangsan";
    }
    public void print() {
        System.out.println("do Service");
    }
}
package com.example.springioc.controller;

import com.example.springioc.model.User;
import jakarta.annotation.Resource;
import org.springframework.stereotype.Controller;

@Controller
public class UserController {

    @Resource(name = "u1")
    private User user;
    public void hello() {
        System.out.println("Hello");
        System.out.println(user.toString());
    }

}
报错信息:

解决方法:
提供了以下⼏种注解解决:
- @Primary
- @Qualifier
- @Resource
- 使⽤@Primary注解:当存在多个相同类型的Bean注⼊时,加上@Primary注解,来确定默认的实现。例如上面代码:
 @Bean
 @Primary
    public String name () {
        return "zhangsan";
    }
- 使⽤@Qualifier注解:指定当前要注⼊的bean对象。在@Qualifier的value属性中,指定注⼊的bean的名称,必须与@Autowired一起用。例如上面代码:
@Autowired
@Qualifier("u1")
    private User user;
- 使⽤@Resource注解:是按照bean的名称进⾏注⼊。通过name属性指定要注⼊的bean的名称。@Resource是JDK提供的注解。
例如上面代码:
@Resource(name = "u2")
    private User user;
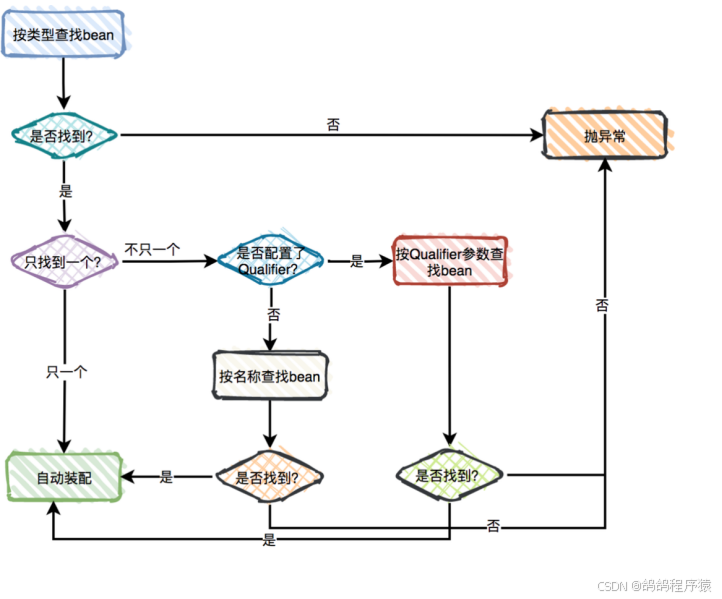
@Autowired工作流程