大模型应用开发5-SpringAIalibaba实战
1.介绍
Spring AI Alibaba 开源项目基于 Spring AI 构建,是阿里云通义系列模型及服务在 Java AI 应用开发领域的最佳实践,提供高层次的 AI API 抽象与云原生基础设施集成方案和企业级 AI 应用生态集成。
2.基础使用
2.1 前置
所有调用均基于 OpenAI协议标准或者SpringAI Aalibaba官方推荐模型服务灵积(DashScope)整合规则,实现一致的接口设计与规范,确保多模型切换的便利性,提供高度可扩展的开发支持.
版本兼容性:
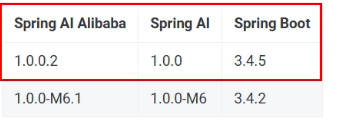
接入阿里百炼平台的通义模型
https://bailian.console.aliyun.com/
2.2 调用实例
依赖引入:
<!--spring-ai-alibaba dashscope--><dependency><groupId>com.alibaba.cloud.ai</groupId><artifactId>spring-ai-alibaba-starter-dashscope</artifactId></dependency>配置文件:
application配置文件配置beseURL,模型名,api-key
server.port=8001#大模型对话中文乱码UTF8编码处理
server.servlet.encoding.enabled=true
server.servlet.encoding.force=true
server.servlet.encoding.charset=UTF-8spring.application.name=SAA-01HelloWorld# ====SpringAIAlibaba Config=============
spring.ai.dashscope.api-key=sk-ea422ccad9354bc0afb3784e46154364
spring.ai.dashscope.base-url=https://dashscope.aliyuncs.com/compatible-mode/v1
spring.ai.dashscope.chat.options.model=deepseek-v3
配置类:
注册DashScopeApi为Bean,这是灵积平台的规范接口实现,是 ChatModel 接口的一个具体实现类,专门用于对接阿里云。
import com.alibaba.cloud.ai.dashscope.api.DashScopeApi;
import com.alibaba.cloud.ai.dashscope.chat.DashScopeChatModel;
import org.springframework.beans.factory.annotation.Value;
import org.springframework.context.annotation.Bean;
import org.springframework.context.annotation.Configuration;@Configuration
public class SaaLLMConfig
{/*** 方式1:${}* 持有yml文件配置:spring.ai.dashscope.api-key=${aliQwen-api}*/
//    @Value("${spring.ai.dashscope.api-key}")
//    private String apiKey;
//
//    @Bean
//    public DashScopeApi dashScopeApi()
//    {
//        return DashScopeApi.builder().apiKey(apiKey).build();
//    }/*** 方式2:System.getenv("环境变量")* 持有yml文件配置:spring.ai.dashscope.api-key=${aliQwen-api}* @return*/@Beanpublic DashScopeApi dashScopeApi(){return DashScopeApi.builder().apiKey(System.getenv("aliQwen-api")).build();}}
模型调用实现:
分别实现通用调用和流式调用
import com.alibaba.cloud.ai.dashscope.api.DashScopeApi;
import jakarta.annotation.Resource;
import org.springframework.ai.chat.client.ChatClient;
import org.springframework.ai.chat.messages.UserMessage;
import org.springframework.ai.chat.model.ChatModel;
import org.springframework.boot.context.properties.bind.DefaultValue;
import org.springframework.web.bind.annotation.GetMapping;
import org.springframework.web.bind.annotation.RequestParam;
import org.springframework.web.bind.annotation.RestController;
import reactor.core.publisher.Flux;@RestController
public class ChatHelloController
{@Resource // 对话模型,调用阿里云百炼平台private ChatModel chatModel;/*** 通用调用* @param msg* @return*/@GetMapping(value = "/hello/dochat")public String doChat(@RequestParam(name = "msg",defaultValue="你是谁") String msg){String result = chatModel.call(msg);return result;}/*** 流式返回调用* @param msg* @return*/@GetMapping(value = "/hello/streamchat")public Flux<String> stream(@RequestParam(name = "msg",defaultValue="你是谁") String msg){return chatModel.stream(msg);}
}
3.Ollama本地对接
Ollama使用在大模型应用专栏其他博客已说明,现不再赘述。
Ollama对接:
依赖引入:
<!--ollama--><dependency><groupId>org.springframework.ai</groupId><artifactId>spring-ai-starter-model-ollama</artifactId><version>1.0.0</version></dependency>配置文件:
server.port=8002server.servlet.encoding.enabled=true
server.servlet.encoding.force=true
server.servlet.encoding.charset=UTF-8spring.application.name=SAA-02Ollama# ====ollama Config=============
spring.ai.dashscope.api-key=${aliQwen-api}
spring.ai.ollama.base-url=http://localhost:11434
spring.ai.ollama.chat.model=qwen2.5:latest
调用:
import jakarta.annotation.Resource;
import org.springframework.ai.chat.model.ChatModel;
import org.springframework.beans.factory.annotation.Qualifier;
import org.springframework.web.bind.annotation.GetMapping;
import org.springframework.web.bind.annotation.RequestParam;
import org.springframework.web.bind.annotation.RestController;
import reactor.core.publisher.Flux;@RestController
public class OllamaController
{/*@Resource(name = "ollamaChatModel")private ChatModel chatModel;*///方式2@Resource@Qualifier("ollamaChatModel")private ChatModel chatModel;/**auther zzyybs@126.com* http://localhost:8002/ollama/chat?msg=你是谁* @param msg* @return*/@GetMapping("/ollama/chat")public String chat(@RequestParam(name = "msg") String msg){String result = chatModel.call(msg);System.out.println("---结果:" + result);return result;}@GetMapping("/ollama/streamchat")public Flux<String> streamchat(@RequestParam(name = "msg",defaultValue = "你是谁") String msg){return chatModel.stream(msg);}
}
4.ChatClient与ChatModel对比
4.1 基础介绍
ChatClient 提供了与 AI 模型通信的 Fluent API,它支持同步和反应式(Reactive)编程模型。与 ChatModel、Message、ChatMemory 等原子 API 相比,使用 ChatClient 可以将与 LLM 及其他组件交互的复杂性隐藏在背后。ChatClient 类似于应用程序开发中的服务层,它为应用程序直接提供 AI 服务,开发者可以使用 ChatClient Fluent API 快速完成一整套 AI 交互流程的组装。
包括一些基础功能,如:
- 定制和组装模型的输入(Prompt)
- 格式化解析模型的输出(Structured Output)
- 调整模型交互参数(ChatOptions)
还支持更多高级功能:
- 聊天记忆(Chat Memory)
- 工具/函数调用(Function Calling)
- RAG
4.2基础使用
配置文件:
配置ChatClient为Bean
import com.alibaba.cloud.ai.dashscope.api.DashScopeApi;
import org.springframework.ai.chat.model.ChatModel;
import org.springframework.ai.chat.client.ChatClient;
import org.springframework.context.annotation.Bean;
import org.springframework.context.annotation.Configuration;@Configuration
public class SaaLLMConfig
{@Beanpublic DashScopeApi dashScopeApi(){return DashScopeApi.builder().apiKey(System.getenv("aliQwen-api")).build();}/*** 知识出处:* https://java2ai.com/docs/1.0.0.2/tutorials/basics/chat-client/?spm=5176.29160081.0.0.2856aa5cmUTyXC#%E5%88%9B%E5%BB%BA-chatclient* @param dashscopeChatModel* @return*/@Beanpublic ChatClient chatClient(ChatModel dashscopeChatModel){return ChatClient.builder(dashscopeChatModel).build();}
}
调用:
import jakarta.annotation.Resource;
import org.springframework.ai.chat.client.ChatClient;
import org.springframework.ai.chat.model.ChatModel;
import org.springframework.beans.factory.annotation.Autowired;
import org.springframework.web.bind.annotation.GetMapping;
import org.springframework.web.bind.annotation.RequestParam;
import org.springframework.web.bind.annotation.RestController;/*** @auther zzyybs@126.com* @create 2025-07-23 19:22* 知识出处:* https://java2ai.com/docs/1.0.0.2/tutorials/basics/chat-client/?spm=5176.29160081.0.0.2856aa5cmUTyXC#%E5%88%9B%E5%BB%BA-chatclient*/
@RestController
public class ChatClientController
{private final ChatClient dashScopeChatClient;/** zzyybs@126.com* ChatClient不支持自动输入,依赖ChatModel对象接口,ChatClient.builder(dashScopeChatModel).build();* @param dashScopeChatModel*/public ChatClientController(ChatModel dashScopeChatModel){this.dashScopeChatClient = ChatClient.builder(dashScopeChatModel).build();}@GetMapping("/chatclient/dochat")public String doChat(@RequestParam(name = "msg",defaultValue = "2加9等于几") String msg){return dashScopeChatClient.prompt().user(msg).call().content();}
}
import com.alibaba.cloud.ai.dashscope.api.DashScopeApi;
import jakarta.annotation.Resource;
import org.springframework.ai.chat.client.ChatClient;
import org.springframework.ai.chat.model.ChatModel;
import org.springframework.web.bind.annotation.GetMapping;
import org.springframework.web.bind.annotation.RequestParam;
import org.springframework.web.bind.annotation.RestController;/*** @auther zzyy* @create 2025-07-23 19:31*/
@RestController
public class ChatClientControllerV2
{@Resourceprivate ChatModel chatModel;@Resourceprivate ChatClient dashScopechatClientv2;/*** http://localhost:8003/chatclientv2/dochat* @param msg* @return*/@GetMapping("/chatclientv2/dochat")public String doChat(@RequestParam(name = "msg",defaultValue = "你是谁") String msg){String result = dashScopechatClientv2.prompt().user(msg).call().content();System.out.println("ChatClient响应:" + result);return result;}/*** http://localhost:8003/chatmodelv2/dochat* @param msg* @return*/@GetMapping("/chatmodelv2/dochat")public String doChat2(@RequestParam(name = "msg",defaultValue = "你是谁") String msg){String result = chatModel.call(msg);System.out.println("ChatModel响应:" + result);return result;}}
5.流式调用
5.1 SSE介绍
流式输出是一种逐步返回大模型生成结果的技术,生成一点返回一点,允许服务器将响应内容分批次实时传输给客户端,而不是等待全部内容生成完毕后再一次性返回。这种机制能显著提升用户体验,尤其适用于大模型响应较慢的场景。
SSE是一种允许服务端可以持续推送数据片段到前端的Web技术。通过单向的HTTP长连接,使用一个长期存在的链接,让服务器可以主动将数据推给客户端,SSE是轻量级的单项通信协议,适合AI对话这类服务端主导的场景。
SSE的核心思想是:客户端发起一个请求,服务端保持这个连接打开并在有新数据时,通过这个连接将数据发送给客户端。
Server-Sent:由服务器发送。
Events:事件,指服务器主动推送给客户端的数据或消息
Server-SentEvents(SSE)服务器发送事件实现流式输出,是一种让服务器能够主动、持续地向客户端(比如你的网页浏览器)推送数据的技术。
SSE与WS区别:
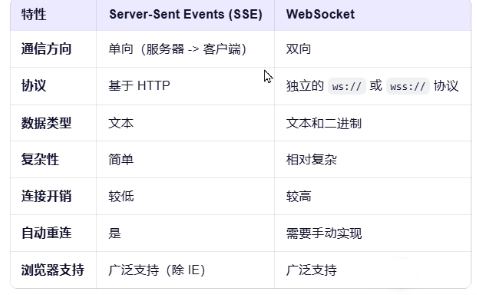
SSE下一代(Stream able Http)可以实现双向连接。
5.2 SSE实现流式输出
配置多模型的ChatModel以及ChatClient的Bean:
import com.alibaba.cloud.ai.dashscope.api.DashScopeApi;
import com.alibaba.cloud.ai.dashscope.chat.DashScopeChatModel;
import com.alibaba.cloud.ai.dashscope.chat.DashScopeChatOptions;
import org.springframework.ai.chat.client.ChatClient;
import org.springframework.ai.chat.model.ChatModel;
import org.springframework.ai.chat.prompt.ChatOptions;
import org.springframework.beans.factory.annotation.Qualifier;
import org.springframework.context.annotation.Bean;
import org.springframework.context.annotation.Configuration;/*** @auther zzyybs@126.com* @create 2025-07-25 18:53* @Description ChatModel+ChatClient+多模型共存*/
@Configuration
public class SaaLLMConfig
{// 模型名称常量定义,一套系统多模型共存private final String DEEPSEEK_MODEL = "deepseek-v3";private final String QWEN_MODEL = "qwen-max";@Bean(name = "deepseek")public ChatModel deepSeek(){return DashScopeChatModel.builder().dashScopeApi(DashScopeApi.builder().apiKey(System.getenv("aliQwen-api")).build()).defaultOptions(DashScopeChatOptions.builder().withModel(DEEPSEEK_MODEL).build()).build();}@Bean(name = "qwen")public ChatModel qwen(){return DashScopeChatModel.builder().dashScopeApi(DashScopeApi.builder().apiKey(System.getenv("aliQwen-api")).build()).defaultOptions(DashScopeChatOptions.builder().withModel(QWEN_MODEL).build()).build();}@Bean(name = "deepseekChatClient")public ChatClient deepseekChatClient(@Qualifier("deepseek") ChatModel deepseek){returnChatClient.builder(deepseek).defaultOptions(ChatOptions.builder().model(DEEPSEEK_MODEL).build()).build();}@Bean(name = "qwenChatClient")public ChatClient qwenChatClient(@Qualifier("qwen") ChatModel qwen){returnChatClient.builder(qwen).defaultOptions(ChatOptions.builder().model(QWEN_MODEL).build()).build();}
}
分别实现多模型的流式输出:
import jakarta.annotation.Resource;
import org.springframework.ai.chat.client.ChatClient;
import org.springframework.ai.chat.model.ChatModel;
import org.springframework.web.bind.annotation.GetMapping;
import org.springframework.web.bind.annotation.RequestParam;
import org.springframework.web.bind.annotation.RestController;
import reactor.core.publisher.Flux;/*** @auther zzyybs@126.com* @create 2025-07-25 18:53* @Description 流式输出*/
@RestController
public class StreamOutputController
{//V1 通过ChatModel实现stream实现流式输出@Resource(name = "deepseek")private ChatModel deepseekChatModel;@Resource(name = "qwen")private ChatModel qwenChatModel;@GetMapping(value = "/stream/chatflux1")public Flux<String> chatflux(@RequestParam(name = "question",defaultValue = "你是谁") String question){return deepseekChatModel.stream(question);}@GetMapping(value = "/stream/chatflux2")public Flux<String> chatflux2(@RequestParam(name = "question",defaultValue = "你是谁") String question){return qwenChatModel.stream(question);}//V2 通过ChatClient实现stream实现流式输出@Resource(name = "deepseekChatClient")private ChatClient deepseekChatClient;@Resource(name = "qwenChatClient")private ChatClient qwenChatClient;@GetMapping(value = "/stream/chatflux3")public Flux<String> chatflux3(@RequestParam(name = "question",defaultValue = "你是谁") String question){return deepseekChatClient.prompt(question).stream().content();}@GetMapping(value = "/stream/chatflux4")public Flux<String> chatflux4(@RequestParam(name = "question",defaultValue = "你是谁") String question){return qwenChatClient.prompt(question).stream().content();}
}
前端测试:
<!DOCTYPE html>
<html>
<head><title>SSE流式ChatModel+ChatClient+多模型共存</title><style>body {font-family: Arial, sans-serif;background-color: #f4f4f4;margin: 0;padding: 20px;}#messageInput {width: 90%;padding: 10px;font-size: 16px;border: 1px solid #ccc;border-radius: 4px;margin-bottom: 10px;}button {padding: 10px 20px;font-size: 16px;background-color: #007bff;color: white;border: none;border-radius: 4px;cursor: pointer;}button:hover {background-color: #0056b3;}#messages {margin-top: 20px;padding: 15px;background-color: #f9f9f9;border: 1px solid #ddd;border-radius: 8px;max-height: 300px;overflow-y: auto;box-shadow: 0 2px 4px rgba(0, 0, 0, 0.1);}#messages div {padding: 8px 0;border-bottom: 1px solid #eee;font-size: 14px;color: #333;}#messages div:last-child {border-bottom: none;}</style>
</head><body><textarea id="messageInput" rows="4" cols="50" placeholder="请输入你的问题..."></textarea><br><button onclick="sendMsg()">发送提问</button><div id="messages"></div><script>function sendMsg(){// 获取用户输入的消息const message = document.getElementById('messageInput').value;if (message == "") return false;//1 客户端使用 JavaScript 的 EventSource 对象连接到服务器上的一个特定端点(URL)const eventSource = new EventSource('stream/chatflux2?question='+message);//2 监听消息事件eventSource.onmessage = function (event){//2.1 获得流式返回的数据const data = event.data;//2.2 将收获到的数据展示到页面回答窗口上const messagesDiv = document.getElementById('messages');//2.3 类似java里面append追加的形式将数据批次的显示messagesDiv.innerHTML += data;}//3 监听错误事件,当连接发生错误(包括断开)时触发。eventSource.onerror = function (error){console.error('EventSource发生了错误: ',error);eventSource.close();//关闭链接}}</script>
</body>
</html>
6.Prompt
6.1 基础示例
配置ChatClient和ChatModel实现多模型:
import com.alibaba.cloud.ai.dashscope.api.DashScopeApi;
import com.alibaba.cloud.ai.dashscope.chat.DashScopeChatModel;
import com.alibaba.cloud.ai.dashscope.chat.DashScopeChatOptions;
import org.springframework.ai.chat.client.ChatClient;
import org.springframework.ai.chat.model.ChatModel;
import org.springframework.ai.chat.prompt.ChatOptions;
import org.springframework.beans.factory.annotation.Qualifier;
import org.springframework.context.annotation.Bean;
import org.springframework.context.annotation.Configuration;/*** @auther zzyybs@126.com* @create 2025-07-25 18:53* @Description ChatModel+ChatClient+多模型共存*/
@Configuration
public class SaaLLMConfig
{// 模型名称常量定义private final String DEEPSEEK_MODEL = "deepseek-v3";private final String QWEN_MODEL = "qwen-plus";@Bean(name = "deepseek")public ChatModel deepSeek(){return DashScopeChatModel.builder().dashScopeApi(DashScopeApi.builder().apiKey(System.getenv("aliQwen-api")).build()).defaultOptions(DashScopeChatOptions.builder().withModel(DEEPSEEK_MODEL).build()).build();}@Bean(name = "qwen")public ChatModel qwen(){return DashScopeChatModel.builder().dashScopeApi(DashScopeApi.builder().apiKey(System.getenv("aliQwen-api")).build()).defaultOptions(DashScopeChatOptions.builder().withModel(QWEN_MODEL).build()).build();}@Bean(name = "deepseekChatClient")public ChatClient deepseekChatClient(@Qualifier("deepseek") ChatModel deepSeek){return ChatClient.builder(deepSeek).defaultOptions(ChatOptions.builder().model(DEEPSEEK_MODEL).build()).build();}@Bean(name = "qwenChatClient")public ChatClient qwenChatClient(@Qualifier("qwen") ChatModel qwen){return ChatClient.builder(qwen).defaultOptions(ChatOptions.builder().model(QWEN_MODEL).build()).build();}
}
系统提示词配置:
import jakarta.annotation.Resource;
import org.springframework.ai.chat.client.ChatClient;
import org.springframework.ai.chat.messages.AssistantMessage;
import org.springframework.ai.chat.messages.SystemMessage;
import org.springframework.ai.chat.messages.ToolResponseMessage;
import org.springframework.ai.chat.messages.UserMessage;
import org.springframework.ai.chat.model.ChatModel;
import org.springframework.ai.chat.model.ChatResponse;
import org.springframework.ai.chat.prompt.Prompt;
import org.springframework.web.bind.annotation.GetMapping;
import org.springframework.web.bind.annotation.RestController;
import reactor.core.publisher.Flux;import java.util.List;/*** @auther zzyybs@126.com* @create 2025-07-25 21:25* @Description 知识出处,https://java2ai.com/docs/1.0.0.2/tutorials/basics/prompt/?spm=5176.29160081.0.0.2856aa5cdeol7a*/
@RestController
public class PromptController
{@Resource(name = "deepseek")private ChatModel deepseekChatModel;@Resource(name = "qwen")private ChatModel qwenChatModel;@Resource(name = "deepseekChatClient")private ChatClient deepseekChatClient;@Resource(name = "qwenChatClient")private ChatClient qwenChatClient;// http://localhost:8005/prompt/chat?question=火锅介绍下@GetMapping("/prompt/chat")public Flux<String> chat(String question){return deepseekChatClient.prompt()// AI 能力边界.system("你是一个法律助手,只回答法律问题,其它问题回复,我只能回答法律相关问题,其它无可奉告").user(question).stream().content();}/*** http://localhost:8005/prompt/chat2?question=葫芦娃* @param question* @return*/@GetMapping("/prompt/chat2")public Flux<ChatResponse> chat2(String question){// 系统消息SystemMessage systemMessage = new SystemMessage("你是一个讲故事的助手,每个故事控制在300字以内");// 用户消息UserMessage userMessage = new UserMessage(question);Prompt prompt = new Prompt(userMessage, systemMessage);return deepseekChatModel.stream(prompt);}/*** http://localhost:8005/prompt/chat3?question=葫芦娃* @param question* @return*/@GetMapping("/prompt/chat3")public Flux<String> chat3(String question){// 系统消息SystemMessage systemMessage = new SystemMessage("你是一个讲故事的助手," +"每个故事控制在600字以内且以HTML格式返回");// 用户消息UserMessage userMessage = new UserMessage(question);Prompt prompt = new Prompt(userMessage, systemMessage);return deepseekChatModel.stream(prompt).map(response -> response.getResults().get(0).getOutput().getText());}/*** http://localhost:8005/prompt/chat4?question=葫芦娃* @param question* @return*/@GetMapping("/prompt/chat4")public String chat4(String question){AssistantMessage assistantMessage = deepseekChatClient.prompt().user(question).call().chatResponse().getResult().getOutput();return assistantMessage.getText();}/*** http://localhost:8005/prompt/chat5?city=北京* 近似理解Tool后面章节讲解......* @param city* @return*/@GetMapping("/prompt/chat5")public String chat5(String city){String answer = deepseekChatClient.prompt().user(city + "未来3天天气情况如何?").call().chatResponse().getResult().getOutput().getText();ToolResponseMessage toolResponseMessage =new ToolResponseMessage(List.of(new ToolResponseMessage.ToolResponse("1","获得天气",city)));String toolResponse = toolResponseMessage.getText();String result = answer + toolResponse;return result;}
}
6.2 提示词模板引入
讲一个关于{topic}的故事,并以{output_format}格式输出。
import jakarta.annotation.Resource;
import org.springframework.ai.chat.client.ChatClient;
import org.springframework.ai.chat.messages.Message;
import org.springframework.ai.chat.messages.SystemMessage;
import org.springframework.ai.chat.messages.UserMessage;
import org.springframework.ai.chat.model.ChatModel;
import org.springframework.ai.chat.prompt.Prompt;
import org.springframework.ai.chat.prompt.PromptTemplate;
import org.springframework.ai.chat.prompt.SystemPromptTemplate;
import org.springframework.web.bind.annotation.GetMapping;
import org.springframework.web.bind.annotation.RestController;
import reactor.core.publisher.Flux;
import org.springframework.beans.factory.annotation.Value;import java.util.List;
import java.util.Map;/*** @auther zzyybs@126.com* @create 2025-07-26 16:25* @Description TODO*/
@RestController
public class PromptTemplateController
{@Resource(name = "deepseek")private ChatModel deepseekChatModel;@Resource(name = "qwen")private ChatModel qwenChatModel;@Resource(name = "deepseekChatClient")private ChatClient deepseekChatClient;@Resource(name = "qwenChatClient")private ChatClient qwenChatClient;@Value("classpath:/prompttemplate/atguigu-template.txt")private org.springframework.core.io.Resource userTemplate;/*** @Description: PromptTemplate基本使用,使用占位符设置模版 PromptTemplate* @Auther: zzyybs@126.com* 测试地址* http://localhost:8006/prompttemplate/chat?topic=java&output_format=html&wordCount=200*/@GetMapping("/prompttemplate/chat")public Flux<String> chat(String topic, String output_format, String wordCount){PromptTemplate promptTemplate = new PromptTemplate("" +"讲一个关于{topic}的故事" +"并以{output_format}格式输出," +"字数在{wordCount}左右");// PromptTempate -> PromptPrompt prompt = promptTemplate.create(Map.of("topic", topic,"output_format",output_format,"wordCount",wordCount));return deepseekChatClient.prompt(prompt).stream().content();}/*** @Description: PromptTemplate读取模版文件实现模版功能* @Auther: zzyybs@126.com* 测试地址* http://localhost:8006/prompttemplate/chat2?topic=java&output_format=html*/@GetMapping("/prompttemplate/chat2")public String chat2(String topic,String output_format){PromptTemplate promptTemplate = new PromptTemplate(userTemplate);Prompt prompt = promptTemplate.create(Map.of("topic", topic, "output_format", output_format));return deepseekChatClient.prompt(prompt).call().content();}/***  @Auther: zzyybs@126.com* @Description:* 系统消息(SystemMessage):设定AI的行为规则和功能边界(xxx助手/什么格式返回/字数控制多少)。* 用户消息(UserMessage):用户的提问/主题* http://localhost:8006/prompttemplate/chat3?sysTopic=法律&userTopic=知识产权法** http://localhost:8006/prompttemplate/chat3?sysTopic=法律&userTopic=夫妻肺片*/@GetMapping("/prompttemplate/chat3")public String chat3(String sysTopic, String userTopic){// 1.SystemPromptTemplateSystemPromptTemplate systemPromptTemplate = new SystemPromptTemplate("你是{systemTopic}助手,只回答{systemTopic}其它无可奉告,以HTML格式的结果。");Message sysMessage = systemPromptTemplate.createMessage(Map.of("systemTopic", sysTopic));// 2.PromptTemplatePromptTemplate userPromptTemplate = new PromptTemplate("解释一下{userTopic}");Message userMessage = userPromptTemplate.createMessage(Map.of("userTopic", userTopic));// 3.组合【关键】 多个 Message -> PromptPrompt prompt = new Prompt(List.of(sysMessage, userMessage));// 4.调用 LLMreturn deepseekChatClient.prompt(prompt).call().content();}/*** @Description: 人物角色设定,通过SystemMessage来实现人物设定,本案例用ChatModel实现* 设定AI为”医疗专家”时,仅回答医学相关问题* 设定AI为编程助手”时,专注于技术问题解答* @Auther: zzyybs@126.com* http://localhost:8006/prompttemplate/chat4?question=牡丹花*/@GetMapping("/prompttemplate/chat4")public String chat4(String question){//1 系统消息SystemMessage systemMessage = new SystemMessage("你是一个Java编程助手,拒绝回答非技术问题。");//2 用户消息UserMessage userMessage = new UserMessage(question);//3 系统消息+用户消息=完整提示词//Prompt prompt = new Prompt(systemMessage, userMessage);Prompt prompt = new Prompt(List.of(systemMessage, userMessage));//4 调用LLMString result = deepseekChatModel.call(prompt).getResult().getOutput().getText();System.out.println(result);return result;}/*** @Description: 人物角色设定,通过SystemMessage来实现人物设定,本案例用ChatClient实现* 设定AI为”医疗专家”时,仅回答医学相关问题* 设定AI为编程助手”时,专注于技术问题解答* @Auther: zzyybs@126.com* http://localhost:8006/prompttemplate/chat5?question=火锅*/@GetMapping("/prompttemplate/chat5")public Flux<String> chat5(String question){return deepseekChatClient.prompt().system("你是一个Java编程助手,拒绝回答非技术问题。").user(question).stream().content();}
}
7.格式化输出
Structured Output可以协助将ChatModel/ChatClient方法的返回类型从String更改为其他类型,SpringAI的结构化输出转换器有助于将LLM输出转化为结构化格式。
多模型配置:
import com.alibaba.cloud.ai.dashscope.api.DashScopeApi;
import com.alibaba.cloud.ai.dashscope.chat.DashScopeChatModel;
import com.alibaba.cloud.ai.dashscope.chat.DashScopeChatOptions;
import org.springframework.ai.chat.client.ChatClient;
import org.springframework.ai.chat.model.ChatModel;
import org.springframework.ai.chat.prompt.ChatOptions;
import org.springframework.beans.factory.annotation.Qualifier;
import org.springframework.context.annotation.Bean;
import org.springframework.context.annotation.Configuration;/*** @auther zzyybs@126.com* @create 2025-07-25 18:53* @Description ChatModel+ChatClient+多模型共存*/
@Configuration
public class SaaLLMConfig
{// 模型名称常量定义private final String DEEPSEEK_MODEL = "deepseek-v3";private final String QWEN_MODEL = "qwen-plus";@Bean(name = "deepseek")public ChatModel deepSeek(){return DashScopeChatModel.builder().dashScopeApi(DashScopeApi.builder().apiKey(System.getenv("aliQwen-api")).build()).defaultOptions(DashScopeChatOptions.builder().withModel(DEEPSEEK_MODEL).build()).build();}@Bean(name = "qwen")public ChatModel qwen(){return DashScopeChatModel.builder().dashScopeApi(DashScopeApi.builder().apiKey(System.getenv("aliQwen-api")).build()).defaultOptions(DashScopeChatOptions.builder().withModel(QWEN_MODEL).build()).build();}@Bean(name = "qwenChatClient")public ChatClient qwenChatClient(@Qualifier("qwen") ChatModel qwen){return ChatClient.builder(qwen).defaultOptions(ChatOptions.builder().model(QWEN_MODEL).build()).build();}@Bean(name = "deepseekChatClient")public ChatClient deepseekChatClient(@Qualifier("deepseek") ChatModel deepSeek){return ChatClient.builder(deepSeek).defaultOptions(ChatOptions.builder().model(DEEPSEEK_MODEL).build()).build();}}
定义实体类:
/*** @auther zzyybs@126.com* @create 2025-09-08 16:53* @Description jdk14以后的新特性,记录类record = entity + lombok*/
public record StudentRecord(String id, String sname,String major,String email) { }
import lombok.Data;import java.util.Objects;/*** @auther zzyybs@126.com* @create 2025-07-27 21:01* @Description 传统entity*/
@Data
public class Book
{//Fieldint id;String bookName;public Book(){}public Book(int id, String bookName){this.id = id;this.bookName = bookName;}public int getId(){return id;}public void setId(int id){this.id = id;}@Overridepublic boolean equals(Object o){if (this == o) return true;if (o == null || getClass() != o.getClass()) return false;Book book = (Book) o;return id == book.id && Objects.equals(bookName, book.bookName);}@Overridepublic int hashCode(){return Objects.hash(id, bookName);}@Overridepublic String toString(){return "Book{" +"id=" + id +", bookName='" + bookName + '\'' +'}';}
}
结构化输出:
import com.atguigu.study.records.StudentRecord;
import jakarta.annotation.Resource;
import org.springframework.ai.chat.client.ChatClient;
import org.springframework.web.bind.annotation.GetMapping;
import org.springframework.web.bind.annotation.RequestParam;
import org.springframework.web.bind.annotation.RestController;import java.util.function.Consumer;/*** @auther zzyybs@126.com* @create 2025-07-26 17:16* @Description TODO*/
@RestController
public class StructuredOutputController
{@Resource(name = "qwenChatClient")private ChatClient qwenChatClient;/*** http://localhost:8007/structuredoutput/chat?sname=李四&email=zzyybs@126.com* @param sname* @return*/@GetMapping("/structuredoutput/chat")public StudentRecord chat(@RequestParam(name = "sname") String sname,@RequestParam(name = "email") String email) {return qwenChatClient.prompt().user(new Consumer<ChatClient.PromptUserSpec>(){@Overridepublic void accept(ChatClient.PromptUserSpec promptUserSpec){promptUserSpec.text("学号1001,我叫{sname},大学专业计算机科学与技术,邮箱{email}").param("sname",sname).param("email",email);}}).call().entity(StudentRecord.class);}/*** http://localhost:8007/structuredoutput/chat2?sname=孙伟&email=zzyybs@126.com* @param sname* @return*/@GetMapping("/structuredoutput/chat2")public StudentRecord chat2(@RequestParam(name = "sname") String sname,@RequestParam(name = "email") String email) {String stringTemplate = """学号1002,我叫{sname},大学专业软件工程,邮箱{email}            """;return qwenChatClient.prompt().user(promptUserSpec -> promptUserSpec.text(stringTemplate).param("sname",sname).param("email",email)).call().entity(StudentRecord.class);}
}
8.Memory
依赖引入:
<!--spring-ai-alibaba memory-redis--><dependency><groupId>com.alibaba.cloud.ai</groupId><artifactId>spring-ai-alibaba-starter-memory-redis</artifactId></dependency><!--jedis--><dependency><groupId>redis.clients</groupId><artifactId>jedis</artifactId></dependency>配置文件:
server.port=8008# 设置响应的字符编码
server.servlet.encoding.charset=utf-8
server.servlet.encoding.enabled=true
server.servlet.encoding.force=truespring.application.name=SAA-08Persistent# ====SpringAIAlibaba Config=============
spring.ai.dashscope.api-key=${aliQwen-api}# ==========redis config ===============
spring.data.redis.host=localhost
spring.data.redis.port=6379
spring.data.redis.database=0
spring.data.redis.connect-timeout=3
spring.data.redis.timeout=2
RedisMemory配置:
import com.alibaba.cloud.ai.memory.redis.RedisChatMemoryRepository;
import org.springframework.ai.chat.memory.ChatMemory;
import org.springframework.beans.factory.annotation.Value;
import org.springframework.context.annotation.Bean;
import org.springframework.context.annotation.Configuration;/*** @auther zzyybs@126.com* @create 2025-07-28 18:24* @Description TODO*/
@Configuration
public class RedisMemoryConfig
{@Value("${spring.data.redis.host}")private String host;@Value("${spring.data.redis.port}")private int port;@Beanpublic RedisChatMemoryRepository redisChatMemoryRepository(){return RedisChatMemoryRepository.builder().host(host).port(port).build();}
}
ChatModel/ChatClient配置:
import com.alibaba.cloud.ai.dashscope.api.DashScopeApi;
import com.alibaba.cloud.ai.dashscope.chat.DashScopeChatModel;
import com.alibaba.cloud.ai.dashscope.chat.DashScopeChatOptions;
import com.alibaba.cloud.ai.memory.redis.RedisChatMemoryRepository;
import jakarta.annotation.Resource;
import org.springframework.ai.chat.client.ChatClient;
import org.springframework.ai.chat.client.advisor.MessageChatMemoryAdvisor;
import org.springframework.ai.chat.memory.MessageWindowChatMemory;
import org.springframework.ai.chat.model.ChatModel;
import org.springframework.ai.chat.prompt.ChatOptions;
import org.springframework.beans.factory.annotation.Qualifier;
import org.springframework.context.annotation.Bean;
import org.springframework.context.annotation.Configuration;/*** @auther zzyybs@126.com* @create 2025-07-25 18:53* @Description ChatModel+ChatClient+多模型共存*/
@Configuration
public class SaaLLMConfig
{// 模型名称常量定义private final String DEEPSEEK_MODEL = "deepseek-v3";private final String QWEN_MODEL = "qwen-plus";@Bean(name = "deepseek")public ChatModel deepSeek(){return DashScopeChatModel.builder().dashScopeApi(DashScopeApi.builder().apiKey(System.getenv("aliQwen-api")).build()).defaultOptions(DashScopeChatOptions.builder().withModel(DEEPSEEK_MODEL).build()).build();}@Bean(name = "qwen")public ChatModel qwen(){return DashScopeChatModel.builder().dashScopeApi(DashScopeApi.builder().apiKey(System.getenv("aliQwen-api")).build()).defaultOptions(DashScopeChatOptions.builder().withModel(QWEN_MODEL).build()).build();}@Bean(name = "qwenChatClient")public ChatClient qwenChatClient(@Qualifier("qwen") ChatModel qwen,RedisChatMemoryRepository redisChatMemoryRepository){MessageWindowChatMemory windowChatMemory = MessageWindowChatMemory.builder().chatMemoryRepository(redisChatMemoryRepository).maxMessages(10).build();return ChatClient.builder(qwen).defaultOptions(ChatOptions.builder().model(QWEN_MODEL).build()).defaultAdvisors(MessageChatMemoryAdvisor.builder(windowChatMemory).build()).build();}/*** 家庭作业,按照上述模范qwen完成基于deepseek的模型存储* @param deepSeek* @return*/@Bean(name = "deepseekChatClient")public ChatClient deepseekChatClient(@Qualifier("deepseek") ChatModel deepSeek){return ChatClient.builder(deepSeek).defaultOptions(ChatOptions.builder().model(DEEPSEEK_MODEL).build()).build();}
}
会话:
import jakarta.annotation.Resource;
import org.springframework.ai.chat.client.ChatClient;
import org.springframework.web.bind.annotation.GetMapping;
import static org.springframework.ai.chat.memory.ChatMemory.CONVERSATION_ID;
import org.springframework.web.bind.annotation.RestController;import java.util.function.Consumer;/*** @auther zzyybs@126.com* @create 2025-07-28 18:40* @Description TODO*/
@RestController
public class ChatMemory4RedisController
{@Resource(name = "qwenChatClient")private ChatClient qwenChatClient;/*** zzyybs@126.com* @param msg* @param userId* @return*/@GetMapping("/chatmemory/chat")public String chat(String msg, String userId){/*return qwenChatClient.prompt(msg).advisors(new Consumer<ChatClient.AdvisorSpec>(){@Overridepublic void accept(ChatClient.AdvisorSpec advisorSpec){advisorSpec.param(CONVERSATION_ID, userId);}}).call().content();*/return qwenChatClient.prompt(msg).advisors(advisorSpec -> advisorSpec.param(CONVERSATION_ID, userId)).call().content();}
}
9.文生图实例
配置文件:
server.port=8009# 设置响应的字符编码
server.servlet.encoding.charset=utf-8
server.servlet.encoding.enabled=true
server.servlet.encoding.force=truespring.application.name=SAA-09Text2image# ====SpringAIAlibaba Config=============
spring.ai.dashscope.api-key=
接口调用:
import com.alibaba.cloud.ai.dashscope.audio.DashScopeSpeechSynthesisModel;
import com.alibaba.cloud.ai.dashscope.audio.DashScopeSpeechSynthesisOptions;
import com.alibaba.cloud.ai.dashscope.audio.synthesis.SpeechSynthesisModel;
import com.alibaba.cloud.ai.dashscope.audio.synthesis.SpeechSynthesisOptions;
import com.alibaba.cloud.ai.dashscope.audio.synthesis.SpeechSynthesisPrompt;
import com.alibaba.cloud.ai.dashscope.audio.synthesis.SpeechSynthesisResponse;
import com.alibaba.cloud.ai.dashscope.image.DashScopeImageOptions;
import jakarta.annotation.Resource;
import org.springframework.ai.chat.model.ChatModel;
import org.springframework.ai.image.ImageModel;
import org.springframework.ai.image.ImagePrompt;
import org.springframework.web.bind.annotation.GetMapping;
import org.springframework.web.bind.annotation.RequestParam;
import org.springframework.web.bind.annotation.RestController;import java.io.File;
import java.io.FileOutputStream;
import java.nio.ByteBuffer;
import java.util.UUID;/*** @auther zzyybs@126.com* @create 2025-07-28 20:10* @Description 知识出处* https://help.aliyun.com/zh/model-studio/text-to-image?spm=a2c4g.11186623.help-menu-2400256.d_0_5_0.1a457d9dv6o7Kc&accounttraceid=6ec3bf09599f424a91a2a88b27b31570nrdd*/
@RestController
public class Text2ImageController
{// img modelpublic static final String IMAGE_MODEL = "wanx2.1-t2i-turbo";@Resourceprivate ImageModel imageModel;/*** zzyybs@126.com* http://localhost:8009/t2i/image* @param prompt* @return*/@GetMapping(value = "/t2i/image")public String image(@RequestParam(name = "prompt",defaultValue = "刺猬") String prompt){return imageModel.call(new ImagePrompt(prompt, DashScopeImageOptions.builder().withModel(IMAGE_MODEL).build())).getResult().getOutput().getUrl();}
}
10.文生音实例
import com.alibaba.cloud.ai.dashscope.audio.DashScopeSpeechSynthesisOptions;
import com.alibaba.cloud.ai.dashscope.audio.synthesis.SpeechSynthesisModel;
import com.alibaba.cloud.ai.dashscope.audio.synthesis.SpeechSynthesisPrompt;
import com.alibaba.cloud.ai.dashscope.audio.synthesis.SpeechSynthesisResponse;
import jakarta.annotation.Resource;
import org.springframework.web.bind.annotation.GetMapping;
import org.springframework.web.bind.annotation.RequestParam;
import org.springframework.web.bind.annotation.RestController;import java.io.FileOutputStream;
import java.nio.ByteBuffer;
import java.util.UUID;/*** @auther zzyybs@126.com* @create 2025-07-29 18:35* @Description TODO*/
@RestController
public class Text2VoiceController
{@Resourceprivate SpeechSynthesisModel speechSynthesisModel;// voice modelpublic static final String BAILIAN_VOICE_MODEL = "cosyvoice-v2";// voice timber 音色列表:https://help.aliyun.com/zh/model-studio/cosyvoice-java-sdk#722dd7ca66a6xpublic static final String BAILIAN_VOICE_TIMBER = "longyingcui";//龙应催/*** http://localhost:8010/t2v/voice* @param msg* @return*/@GetMapping("/t2v/voice")public String voice(@RequestParam(name = "msg",defaultValue = "温馨提醒,支付宝到账100元请注意查收") String msg){String filePath = "d:\\" + UUID.randomUUID() + ".mp3";//1 语音参数设置DashScopeSpeechSynthesisOptions options = DashScopeSpeechSynthesisOptions.builder().model(BAILIAN_VOICE_MODEL).voice(BAILIAN_VOICE_TIMBER).build();//2 调用大模型语音生成对象SpeechSynthesisResponse response = speechSynthesisModel.call(new SpeechSynthesisPrompt(msg, options));//3 字节流语音转换ByteBuffer byteBuffer = response.getResult().getOutput().getAudio();//4 文件生成try (FileOutputStream fileOutputStream = new FileOutputStream(filePath)){fileOutputStream.write(byteBuffer.array());} catch (Exception e) {System.out.println(e.getMessage());}//5 生成路径OKreturn filePath;}
}
11.向量化
向量数据库依赖:
<!-- 添加 Redis 向量数据库依赖 --><dependency><groupId>org.springframework.ai</groupId><artifactId>spring-ai-starter-vector-store-redis</artifactId></dependency>配置文件:
server.port=8011# 设置响应的字符编码
server.servlet.encoding.charset=utf-8
server.servlet.encoding.enabled=true
server.servlet.encoding.force=truespring.application.name=SAA-11Embed2vector# ====SpringAIAlibaba Config=============
spring.ai.dashscope.api-key=
spring.ai.dashscope.chat.options.model=qwen-plus
spring.ai.dashscope.embedding.options.model=text-embedding-v3# =======Redis Stack==========
spring.data.redis.host=localhost
spring.data.redis.port=6379
spring.data.redis.username=default
spring.data.redis.password=
spring.ai.vectorstore.redis.initialize-schema=true
spring.ai.vectorstore.redis.index-name=custom-index
spring.ai.vectorstore.redis.prefix=custom-prefix
使用:
import com.alibaba.cloud.ai.dashscope.embedding.DashScopeEmbeddingOptions;
import jakarta.annotation.Resource;
import lombok.extern.slf4j.Slf4j;
import org.springframework.ai.document.Document;
import org.springframework.ai.embedding.EmbeddingModel;
import org.springframework.ai.embedding.EmbeddingRequest;
import org.springframework.ai.embedding.EmbeddingResponse;
import org.springframework.ai.vectorstore.SearchRequest;
import org.springframework.ai.vectorstore.VectorStore;
import org.springframework.web.bind.annotation.GetMapping;
import org.springframework.web.bind.annotation.RequestParam;
import org.springframework.web.bind.annotation.RestController;import java.util.Arrays;
import java.util.List;/*** @auther zzyybs@126.com* @create 2025-07-29 19:54* @Description TODO*/
@RestController
@Slf4j
public class Embed2VectorController
{@Resourceprivate EmbeddingModel embeddingModel;@Resourceprivate VectorStore vectorStore;/*** 文本向量化* http://localhost:8011/text2embed?msg=射雕英雄传** @param msg* @return*/@GetMapping("/text2embed")public EmbeddingResponse text2Embed(String msg){//EmbeddingResponse embeddingResponse = embeddingModel.call(new EmbeddingRequest(List.of(msg), null));EmbeddingResponse embeddingResponse = embeddingModel.call(new EmbeddingRequest(List.of(msg),DashScopeEmbeddingOptions.builder().withModel("text-embedding-v3").build()));System.out.println(Arrays.toString(embeddingResponse.getResult().getOutput()));return embeddingResponse;}/*** 文本向量化 后存入向量数据库RedisStack*/@GetMapping("/embed2vector/add")public void add(){List<Document> documents = List.of(new Document("i study LLM"),new Document("i love java"));vectorStore.add(documents);}/*** 从向量数据库RedisStack查找,进行相似度查找* http://localhost:8011/embed2vector/get?msg=LLM* @param msg* @return*/@GetMapping("/embed2vector/get")public List getAll(@RequestParam(name = "msg") String msg){SearchRequest searchRequest = SearchRequest.builder().query(msg).topK(2).build();List<Document> list = vectorStore.similaritySearch(searchRequest);System.out.println(list);return list;}
}
12.RAG
配置文件:
server.port=8012# 设置全局编码格式
server.servlet.encoding.enabled=true
server.servlet.encoding.force=true
server.servlet.encoding.charset=UTF-8spring.application.name=SAA-12RAG4AiDatabase# ====SpringAIAlibaba Config=============
spring.ai.dashscope.api-key=${aliQwen-api}
spring.ai.dashscope.chat.options.model=deepseek-r1
spring.ai.dashscope.embedding.options.model=text-embedding-v3# =======Redis Stack==========
spring.data.redis.host=localhost
spring.data.redis.port=6379
spring.data.redis.username=default
spring.data.redis.password=
spring.ai.vectorstore.redis.initialize-schema=true
spring.ai.vectorstore.redis.index-name=atguigu-index
spring.ai.vectorstore.redis.prefix=atguigu-prefix
Redis配置类:
import lombok.extern.slf4j.Slf4j;
import org.springframework.context.annotation.Bean;
import org.springframework.context.annotation.Configuration;
import org.springframework.data.redis.connection.RedisConnectionFactory;
import org.springframework.data.redis.core.RedisTemplate;
import org.springframework.data.redis.serializer.GenericJackson2JsonRedisSerializer;
import org.springframework.data.redis.serializer.StringRedisSerializer;/*** @auther zzyybs@126.com* @create 2025-07-30 14:06* @Description TODO*/@Configuration
@Slf4j
public class RedisConfig
{/*** RedisTemplate配置* redis序列化的工具配置类,下面这个请一定开启配置* 127.0.0.1:6379> keys ** 1) "ord:102"  序列化过* 2) "\xac\xed\x00\x05t\x00\aord:102"   野生,没有序列化过* this.redisTemplate.opsForValue(); //提供了操作string类型的所有方法* this.redisTemplate.opsForList(); // 提供了操作list类型的所有方法* this.redisTemplate.opsForSet(); //提供了操作set的所有方法* this.redisTemplate.opsForHash(); //提供了操作hash表的所有方法* this.redisTemplate.opsForZSet(); //提供了操作zset的所有方法* @param redisConnectionFactor* @return*/@Beanpublic RedisTemplate<String, Object> redisTemplate(RedisConnectionFactory redisConnectionFactor){RedisTemplate<String,Object> redisTemplate = new RedisTemplate<>();redisTemplate.setConnectionFactory(redisConnectionFactor);//设置key序列化方式stringredisTemplate.setKeySerializer(new StringRedisSerializer());//设置value的序列化方式json,使用GenericJackson2JsonRedisSerializer替换默认序列化redisTemplate.setValueSerializer(new GenericJackson2JsonRedisSerializer());redisTemplate.setHashKeySerializer(new StringRedisSerializer());redisTemplate.setHashValueSerializer(new GenericJackson2JsonRedisSerializer());redisTemplate.afterPropertiesSet();return redisTemplate;}
}
向量知识库初始化:
import cn.hutool.crypto.SecureUtil;
import jakarta.annotation.PostConstruct;
import org.springframework.ai.document.Document;
import org.springframework.ai.reader.TextReader;
import org.springframework.ai.transformer.splitter.TokenTextSplitter;
import org.springframework.ai.vectorstore.AbstractVectorStoreBuilder;
import org.springframework.ai.vectorstore.VectorStore;
import org.springframework.beans.factory.annotation.Autowired;
import org.springframework.beans.factory.annotation.Qualifier;
import org.springframework.beans.factory.annotation.Value;
import org.springframework.context.annotation.Configuration;
import org.springframework.core.io.Resource;
import org.springframework.data.redis.core.RedisTemplate;import java.nio.charset.Charset;
import java.util.List;/*** @auther zzyybs@126.com* @create 2025-07-30 12:16* @Description TODO*/
@Configuration
public class InitVectorDatabaseConfig
{@Autowiredprivate VectorStore vectorStore;@Autowiredprivate RedisTemplate<String,String> redisTemplate;@Value("classpath:ops.txt")private Resource opsFile;@PostConstructpublic void init(){//1 读取文件TextReader textReader = new TextReader(opsFile);textReader.setCharset(Charset.defaultCharset());//2 文件转换为向量(开启分词)List<Document> list = new TokenTextSplitter().transform(textReader.read());//3 写入向量数据库RedisStack//vectorStore.add(list);// 解决上面第3步,向量数据重复问题,使用redis setnx命令处理//4 去重复版本String sourceMetadata = (String)textReader.getCustomMetadata().get("source");String textHash = SecureUtil.md5(sourceMetadata);String redisKey = "vector-xxx:" + textHash;// 判断是否存入过,redisKey如果可以成功插入表示以前没有过,可以假如向量数据Boolean retFlag = redisTemplate.opsForValue().setIfAbsent(redisKey, "1");System.out.println("****retFlag : "+retFlag);if(Boolean.TRUE.equals(retFlag)){//键不存在,首次插入,可以保存进向量数据库vectorStore.add(list);}else {//键已存在,跳过或者报错//throw new RuntimeException("---重复操作");System.out.println("------向量初始化数据已经加载过,请不要重复操作");}}}
模型配置:
import com.alibaba.cloud.ai.dashscope.api.DashScopeApi;
import com.alibaba.cloud.ai.dashscope.chat.DashScopeChatModel;
import com.alibaba.cloud.ai.dashscope.chat.DashScopeChatOptions;
import org.springframework.ai.chat.client.ChatClient;
import org.springframework.ai.chat.model.ChatModel;
import org.springframework.ai.chat.prompt.ChatOptions;
import org.springframework.ai.rag.advisor.RetrievalAugmentationAdvisor;
import org.springframework.ai.rag.retrieval.search.VectorStoreDocumentRetriever;
import org.springframework.ai.vectorstore.VectorStore;
import org.springframework.beans.factory.annotation.Autowired;
import org.springframework.beans.factory.annotation.Qualifier;
import org.springframework.context.annotation.Bean;
import org.springframework.context.annotation.Configuration;/*** @auther zzyybs@126.com* @create 2025-07-25 18:53* @Description ChatModel+ChatClient+多模型共存*/
@Configuration
public class SaaLLMConfig
{// 模型名称常量定义private final String DEEPSEEK_MODEL = "deepseek-v3";private final String QWEN_MODEL = "qwen-plus";@Bean(name = "deepseek")public ChatModel deepSeek(){return DashScopeChatModel.builder().dashScopeApi(DashScopeApi.builder().apiKey(System.getenv("aliQwen-api")).build()).defaultOptions(DashScopeChatOptions.builder().withModel(DEEPSEEK_MODEL).build()).build();}@Bean(name = "qwen")public ChatModel qwen(){return DashScopeChatModel.builder().dashScopeApi(DashScopeApi.builder().apiKey(System.getenv("aliQwen-api")).build()).defaultOptions(DashScopeChatOptions.builder().withModel(QWEN_MODEL).build()).build();}@Bean(name = "deepseekChatClient")public ChatClient deepseekChatClient(@Qualifier("deepseek") ChatModel deepSeek){return ChatClient.builder(deepSeek).defaultOptions(ChatOptions.builder().model(DEEPSEEK_MODEL).build()).build();}@Bean(name = "qwenChatClient")public ChatClient qwenChatClient(@Qualifier("qwen") ChatModel qwen){return ChatClient.builder(qwen).defaultOptions(ChatOptions.builder().model(QWEN_MODEL).build()).build();}
}
模型调用:
/*** @auther zzyybs@126.com* @create 2025-07-30 12:21* @Description 知识出处:* https://docs.spring.io/spring-ai/reference/api/retrieval-augmented-generation.html#_advanced_rag*/
@RestController
public class RagController
{@Resource(name = "qwenChatClient")private ChatClient chatClient;@Resourceprivate VectorStore vectorStore;/*** http://localhost:8012/rag4aiops?msg=00000* http://localhost:8012/rag4aiops?msg=C2222* @param msg* @return*/@GetMapping("/rag4aiops")public Flux<String> rag(String msg){String systemInfo = """你是一个运维工程师,按照给出的编码给出对应故障解释,否则回复找不到信息。""";RetrievalAugmentationAdvisor advisor = RetrievalAugmentationAdvisor.builder().documentRetriever(VectorStoreDocumentRetriever.builder().vectorStore(vectorStore).build()).build();return chatClient.prompt().system(systemInfo).user(msg).advisors(advisor).stream().content();}
}
13.ToolCalling
模型配置:
import org.springframework.ai.chat.client.ChatClient;
import org.springframework.ai.chat.model.ChatModel;
import org.springframework.context.annotation.Bean;
import org.springframework.context.annotation.Configuration;/*** @auther zzyybs@126.com* @create 2025-07-31 20:47* @Description TODO*/
@Configuration
public class SaaLLMConfig
{@Beanpublic ChatClient chatClient(ChatModel chatModel){return ChatClient.builder(chatModel).build();}
}
回调工具:
import org.springframework.ai.tool.annotation.Tool;import java.time.LocalDateTime;/*** @auther zzyybs@126.com* @create 2025-07-31 20:39* @Description TODO*/
public class DateTimeTools
{/*** 1.定义 function call(tool call)* 2. returnDirect*    true = tool直接返回不走大模型,直接给客户*    false = 默认值,拿到tool返回的结果,给大模型,最后由大模型回复*/@Tool(description = "获取当前时间", returnDirect = false)public String getCurrentTime(){return LocalDateTime.now().toString();}
}
调用:
import com.alibaba.cloud.ai.dashscope.api.DashScopeApi;
import jakarta.annotation.Resource;
import org.springframework.ai.chat.model.ChatModel;
import org.springframework.web.bind.annotation.GetMapping;
import org.springframework.web.bind.annotation.RequestParam;
import org.springframework.web.bind.annotation.RestController;
import reactor.core.publisher.Flux;/*** @auther zzyybs@126.com* @create 2025-07-31 20:26* @Description TODO*/
@RestController
public class NoToolCallingController
{@Resourceprivate ChatModel chatModel;/*** http://localhost:8013/notoolcall/chat* @param msg* @return*/@GetMapping("/notoolcall/chat")public Flux<String> chat(@RequestParam(name = "msg",defaultValue = "你是谁现在几点") String msg){return chatModel.stream(msg);}
}
import com.atguigu.study.utils.DateTimeTools;
import jakarta.annotation.Resource;
import org.springframework.ai.chat.client.ChatClient;
import org.springframework.ai.chat.model.ChatModel;
import org.springframework.ai.chat.prompt.ChatOptions;
import org.springframework.ai.chat.prompt.Prompt;
import org.springframework.ai.model.tool.ToolCallingChatOptions;
import org.springframework.ai.support.ToolCallbacks;
import org.springframework.ai.tool.ToolCallback;
import org.springframework.web.bind.annotation.GetMapping;
import org.springframework.web.bind.annotation.RequestParam;
import org.springframework.web.bind.annotation.RestController;
import reactor.core.publisher.Flux;/*** @auther zzyybs@126.com* @create 2025-07-31 20:40* @Description TODO*/@RestController
public class ToolCallingController
{@Resourceprivate ChatModel chatModel;@GetMapping("/toolcall/chat")public String chat(@RequestParam(name = "msg",defaultValue = "你是谁现在几点") String msg){// 1.工具注册到工具集合里ToolCallback[] tools = ToolCallbacks.from(new DateTimeTools());// 2.将工具集配置进ChatOptions对象ChatOptions options = ToolCallingChatOptions.builder().toolCallbacks(tools).build();// 3.构建提示词Prompt prompt = new Prompt(msg, options);// 4.调用大模型return chatModel.call(prompt).getResult().getOutput().getText();}@Resourceprivate ChatClient chatClient;@GetMapping("/toolcall/chat2")public Flux<String> chat2(@RequestParam(name = "msg",defaultValue = "你是谁现在几点") String msg){return chatClient.prompt(msg).tools(new DateTimeTools()).stream().content();}
}
14.MCP
14.1 MCP介绍
之前每个大模型(如DeepSeek、ChatGPT)需要为每个工具单独开发接口(FunctionCalling),导致重复劳动。开发者只需写一次MCP服务端,所有兼容MCP协议的模型都能调用,MCP让大模型从"被动应答”变为”主动调用工具”。我调用一个MCP服务器就等价调用一个带有多个功能的Utils工具类,自己还不用受累携带。
MCP是Java界的SpringCloud Openfeign,只不过Openfeign是用于微服务通讯的,而MCP用于大模型通讯的,但它们都是为了通讯获取某项数据的一种机制。MCP提供了一种标准化的方式来连接 LLMs 需要的上下文,MCP 就类似于一个 Agent 时代的 Type-C协议,希望能将不同来源的数据、工具、服务统一起来供大模型调用。
MCP核心组成部分:
MCP 主机(MCP Hosts):发起请求的 AI 应用程序,比如聊天机器人、AI 驱动的 IDE 等。
MCP 客户端(MCP Clients):在主机程序内部,与 MCP 服务器保持 1:1 的连接。
MCP 服务器(MCP Servers):为 MCP 客户端提供上下文、工具和提示信息。
本地资源(Local Resources):本地计算机中可供 MCP 服务器安全访问的资源,如文件、数据库。
远程资源(Remote Resources):MCP 服务器可以连接到的远程资源,如通过 API 提供的数据
在MCP通信协议中,一般有两种模式:
STDIO(标准输入/输出):支持标准输入和输出流进行通信,主要用于本地集成、命令行工具等场景
SSE (Server-Sent Events):支持使用 HTTP POST 请求进行服务器到客户端流式处理,以实现客户端到服务器的通信。
14.2 MCP基础案例
14.2.1 服务端
依赖引入:
        <dependency><groupId>org.springframework.boot</groupId><artifactId>spring-boot-starter</artifactId></dependency><!--注意事项(重要)spring-ai-starter-mcp-server-webflux不能和<artifactId>spring-boot-starter-web</artifactId>依赖并存,否则会使用tomcat启动,而不是netty启动,从而导致mcpserver启动失败,但程序运行是正常的,mcp客户端连接不上。
--><!--mcp-server-webflux--><dependency><groupId>org.springframework.ai</groupId><artifactId>spring-ai-starter-mcp-server-webflux</artifactId></dependency>
配置文件:
server.port=8014# 设置全局编码格式
server.servlet.encoding.enabled=true
server.servlet.encoding.force=true
server.servlet.encoding.charset=UTF-8spring.application.name=SAA-14LocalMcpServer# ====mcp-server Config=============
spring.ai.mcp.server.type=async
spring.ai.mcp.server.name=customer-define-mcp-server
spring.ai.mcp.server.version=1.0.0
定义工具:
import org.springframework.ai.tool.annotation.Tool;
import org.springframework.stereotype.Service;import java.util.Map;/*** @auther bs@126.com* @create 2025-07-31 21:07* @Description TODO*/@Service
public class WeatherService
{@Tool(description = "根据城市名称获取天气预报")public String getWeatherByCity(String city){Map<String, String> map = Map.of("北京", "11111降雨频繁,其中今天和后天雨势较强,部分地区有暴雨并伴强对流天气,需注意","上海", "22222多云,15℃~27℃,南风3级,当前温度27℃。","深圳", "333333多云40天,阴16天,雨30天,晴3天");return map.getOrDefault(city, "抱歉:未查询到对应城市!");}
}
配置工具:
import com.atguigu.study.service.WeatherService;
import org.springframework.ai.tool.ToolCallbackProvider;
import org.springframework.ai.tool.method.MethodToolCallbackProvider;
import org.springframework.context.annotation.Bean;
import org.springframework.context.annotation.Configuration;/*** @auther zzyybs@126.com* @create 2025-07-31 21:08* @Description TODO*/@Configuration
public class McpServerConfig
{/*** 将工具方法暴露给外部 mcp client 调用* @param weatherService* @return*/@Beanpublic ToolCallbackProvider weatherTools(WeatherService weatherService){return MethodToolCallbackProvider.builder().toolObjects(weatherService).build();}
}
14.2.2 客户端
依赖引入:
<!-- 2.mcp-clent 依赖 --><dependency><groupId>org.springframework.ai</groupId><artifactId>spring-ai-starter-mcp-client</artifactId></dependency>配置文件:
server.port=8015# 设置全局编码格式
server.servlet.encoding.enabled=true
server.servlet.encoding.force=true
server.servlet.encoding.charset=UTF-8spring.application.name=SAA-15LocalMcpClient# ====SpringAIAlibaba Config=============
spring.ai.dashscope.api-key=${aliQwen-api}# ====mcp-client Config=============
spring.ai.mcp.client.type=async
spring.ai.mcp.client.request-timeout=60s
spring.ai.mcp.client.toolcallback.enabled=true
spring.ai.mcp.client.sse.connections.mcp-server1.url=http://localhost:8014
配置类:
import org.springframework.ai.chat.client.ChatClient;
import org.springframework.ai.chat.model.ChatModel;
import org.springframework.ai.tool.ToolCallbackProvider;
import org.springframework.context.annotation.Bean;
import org.springframework.context.annotation.Configuration;/*** @auther zzyybs@126.com* @create 2025-07-31 20:47* @Description TODO*/
@Configuration
public class SaaLLMConfig
{@Beanpublic ChatClient chatClient(ChatModel chatModel, ToolCallbackProvider tools){return ChatClient.builder(chatModel).defaultToolCallbacks(tools.getToolCallbacks())  //mcp协议,配置见yml文件.build();}
}
调用:
import jakarta.annotation.Resource;
import org.springframework.ai.chat.client.ChatClient;
import org.springframework.ai.chat.model.ChatModel;
import org.springframework.web.bind.annotation.GetMapping;
import org.springframework.web.bind.annotation.RequestMapping;
import org.springframework.web.bind.annotation.RequestParam;
import org.springframework.web.bind.annotation.RestController;
import reactor.core.publisher.Flux;/*** @auther zzyybs@126.com* @create 2025-07-31 21:14* @Description TODO*/@RestController
public class McpClientController
{@Resourceprivate ChatClient chatClient;//使用mcp支持@Resourceprivate ChatModel chatModel;//没有纳入tool支持,普通调用// http://localhost:8015/mcpclient/chat?msg=上海@GetMapping("/mcpclient/chat")public Flux<String> chat(@RequestParam(name = "msg",defaultValue = "北京") String msg){System.out.println("使用了mcp");return chatClient.prompt(msg).stream().content();}@RequestMapping("/mcpclient/chat2")public Flux<String> chat2(@RequestParam(name = "msg",defaultValue = "北京") String msg){System.out.println("未使用mcp");return chatModel.stream(msg);}
}
14.3 MCP实现案例
完整依赖引入:
<?xml version="1.0" encoding="UTF-8"?>
<project xmlns="http://maven.apache.org/POM/4.0.0" xmlns:xsi="http://www.w3.org/2001/XMLSchema-instance"xsi:schemaLocation="http://maven.apache.org/POM/4.0.0 https://maven.apache.org/xsd/maven-4.0.0.xsd"><modelVersion>4.0.0</modelVersion><parent><groupId>com.atguigu.study</groupId><artifactId>SpringAIAlibaba-atguiguV1</artifactId><version>1.0-SNAPSHOT</version></parent><artifactId>SAA-16ClientCallBaiduMcpServer</artifactId><dependencies><dependency><groupId>org.springframework.boot</groupId><artifactId>spring-boot-starter-web</artifactId></dependency><!--spring-ai-alibaba dashscope--><dependency><groupId>com.alibaba.cloud.ai</groupId><artifactId>spring-ai-alibaba-starter-dashscope</artifactId></dependency><!-- 2.mcp-clent 依赖 --><dependency><groupId>org.springframework.ai</groupId><artifactId>spring-ai-starter-mcp-client</artifactId></dependency><!--lombok--><dependency><groupId>org.projectlombok</groupId><artifactId>lombok</artifactId><version>1.18.38</version></dependency><!--hutool--><dependency><groupId>cn.hutool</groupId><artifactId>hutool-all</artifactId><version>5.8.22</version></dependency><dependency><groupId>org.springframework.boot</groupId><artifactId>spring-boot-starter-test</artifactId><scope>test</scope></dependency></dependencies><build><plugins><plugin><groupId>org.springframework.boot</groupId><artifactId>spring-boot-maven-plugin</artifactId></plugin><plugin><groupId>org.apache.maven.plugins</groupId><artifactId>maven-compiler-plugin</artifactId><version>3.11.0</version><configuration><compilerArgs><arg>-parameters</arg></compilerArgs><source>21</source><target>21</target></configuration></plugin></plugins></build><repositories><repository><id>spring-milestones</id><name>Spring Milestones</name><url>https://repo.spring.io/milestone</url><snapshots><enabled>false</enabled></snapshots></repository></repositories></project>
配置文件:
server.port=8016# 设置全局编码格式
server.servlet.encoding.enabled=true
server.servlet.encoding.force=true
server.servlet.encoding.charset=UTF-8spring.application.name=SAA-16ClientCallBaiduMcpServer# ====SpringAIAlibaba Config=============
spring.ai.dashscope.api-key=${aliQwen-api}# ====mcp-client Config=============
spring.ai.mcp.client.request-timeout=20s
spring.ai.mcp.client.toolcallback.enabled=true
spring.ai.mcp.client.stdio.servers-configuration=classpath:/mcp-server.json5
{"mcpServers":{"baidu-map":{"command": "cmd","args": ["/c", "npx", "-y", "@baidumap/mcp-server-baidu-map"],"env": {"BAIDU_MAP_API_KEY": "yHWFqCBXiiwVrk4psrl7IvqE7IsiBgQ6"}}}
}// 构建McpTransport协议//cmd:启动 Windows 命令行解释器。
///c:告诉 cmd 执行完后面的命令后关闭自身。
//npx:npx = npm execute package,Node.js 的一个工具,用于执行 npm 包中的可执行文件。
//-y 或 --yes:自动确认操作(类似于默认接受所有提示)。
//@baidumap/mcp-server-baidu-map:要通过 npx 执行的 npm 包名
//BAIDU_MAP_API_KEY 是访问百度地图开放平台API的AK配置类:
import org.springframework.ai.chat.client.ChatClient;
import org.springframework.ai.chat.model.ChatModel;
import org.springframework.ai.tool.ToolCallbackProvider;
import org.springframework.context.annotation.Bean;
import org.springframework.context.annotation.Configuration;/*** @auther zzyybs@126.com* @create 2025-07-31 20:47* @Description TODO*/
@Configuration
public class SaaLLMConfig
{@Beanpublic ChatClient chatClient(ChatModel chatModel, ToolCallbackProvider tools){return ChatClient.builder(chatModel)//mcp协议,配置见yml文件,此处只赋能给ChatClient对象.defaultToolCallbacks(tools.getToolCallbacks()).build();}
}
服务调用:
import jakarta.annotation.Resource;
import org.springframework.ai.chat.client.ChatClient;
import org.springframework.ai.chat.model.ChatModel;
import org.springframework.web.bind.annotation.GetMapping;
import org.springframework.web.bind.annotation.RequestMapping;
import org.springframework.web.bind.annotation.RestController;
import reactor.core.publisher.Flux;/*** @auther zzyybs@126.com* @create 2025-08-01 15:57* @Description TODO*/
@RestController
public class McpClientCallBaiDuMcpController
{@Resourceprivate ChatClient chatClient; //添加了MCP调用能力@Resourceprivate ChatModel chatModel; //没有添加MCP调用能力/*** 添加了MCP调用能力* http://localhost:8016/mcp/chat?msg=查询北纬39.9042东经116.4074天气* http://localhost:8016/mcp/chat?msg=查询61.149.121.66归属地* http://localhost:8016/mcp/chat?msg=查询昌平到天安门路线规划* @param msg* @return*/@GetMapping("/mcp/chat")public Flux<String> chat(String msg){return chatClient.prompt(msg).stream().content();}/*** 没有添加MCP调用能力* http://localhost:8016/mcp/chat2?msg=查询北纬39.9042东经116.4074天气* @param msg* @return*/@RequestMapping("/mcp/chat2")public Flux<String> chat2(String msg){return chatModel.stream(msg);}
}
15.SpringAIalibaba生态
15.1 云上RAG
导入知识库:
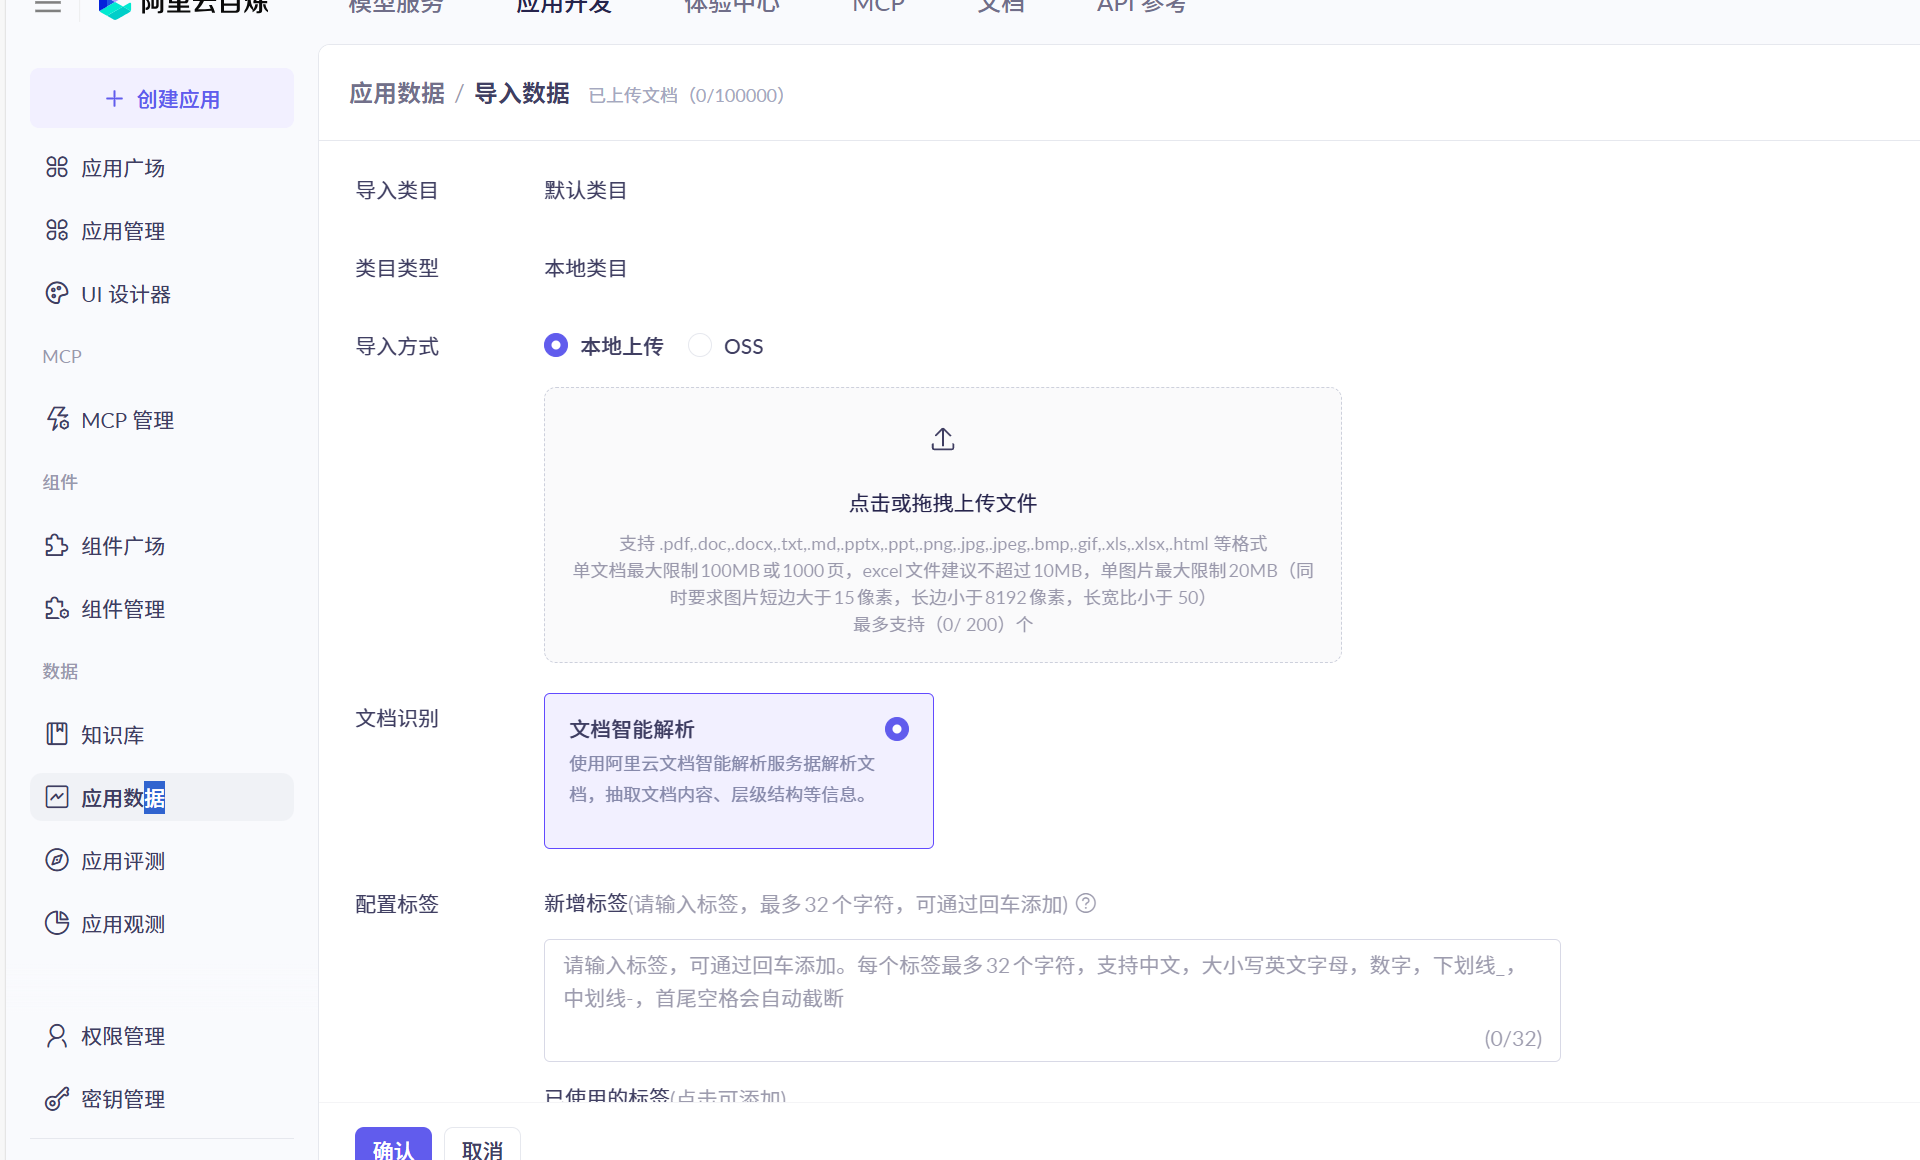
创建数据库:
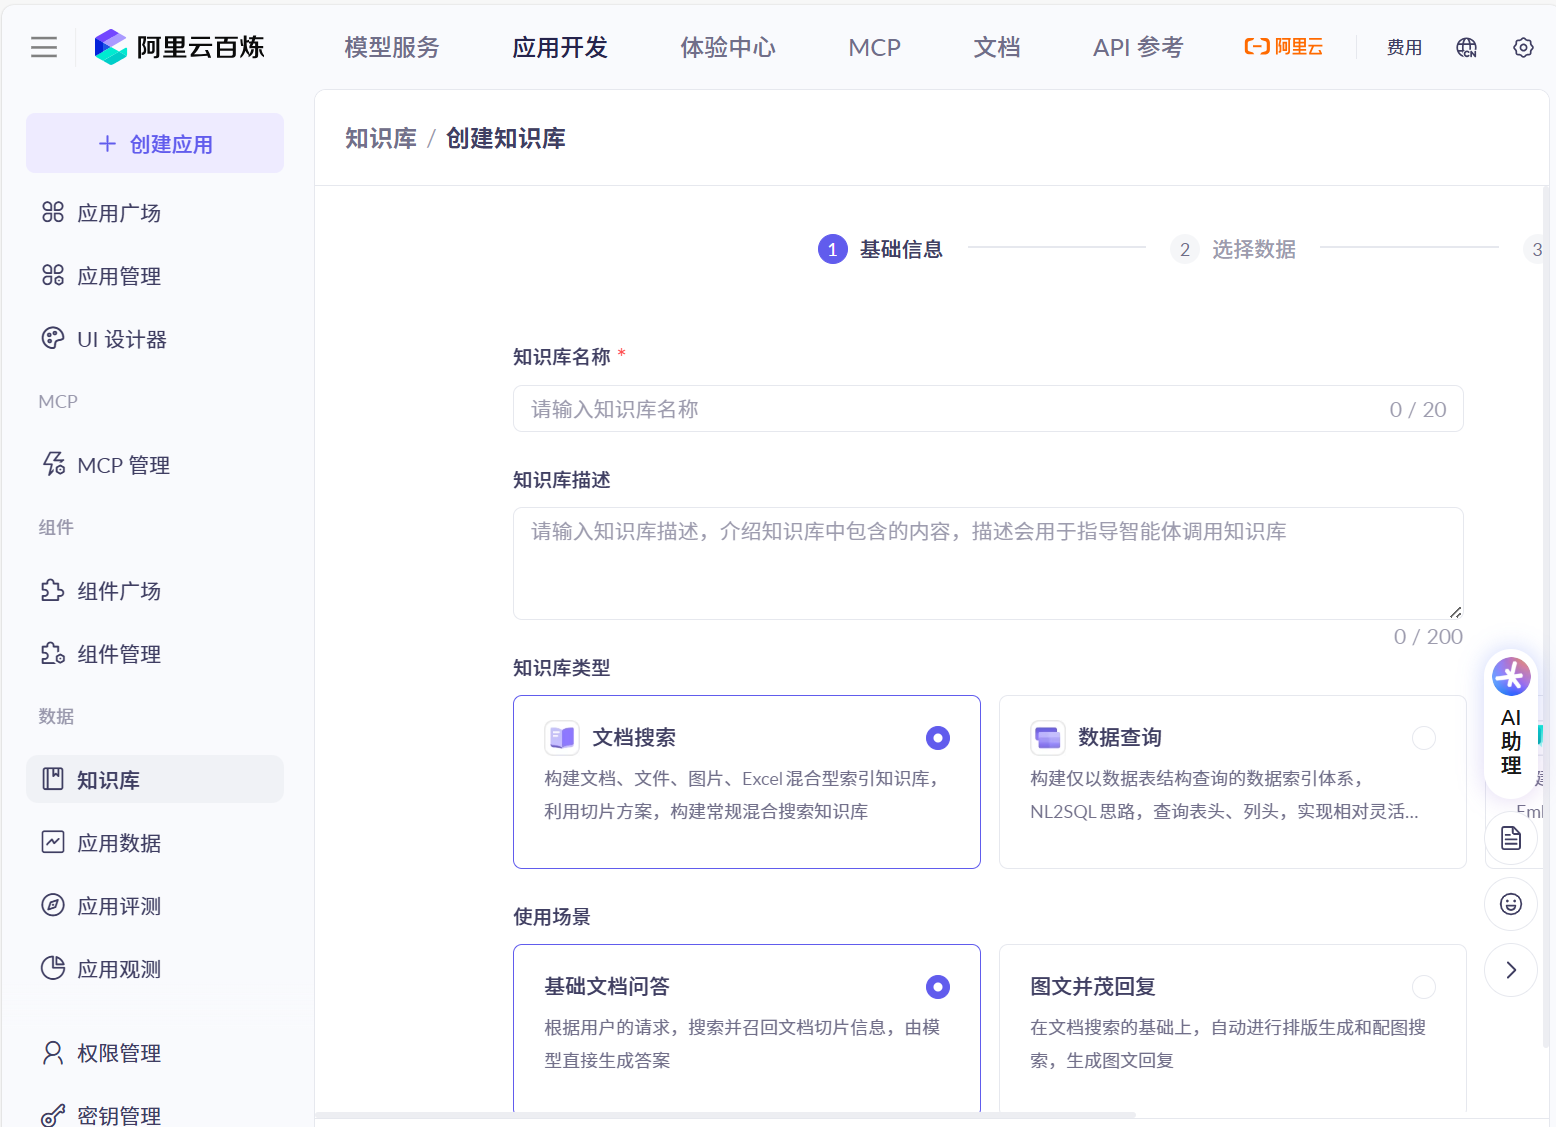
配置:
import com.alibaba.cloud.ai.dashscope.api.DashScopeApi;
import org.springframework.ai.chat.client.ChatClient;
import org.springframework.ai.chat.model.ChatModel;
import org.springframework.beans.factory.annotation.Value;
import org.springframework.context.annotation.Bean;
import org.springframework.context.annotation.Configuration;@Configuration
public class DashScopeConfig
{@Value("${spring.ai.dashscope.api-key}")private String apiKey;@Beanpublic DashScopeApi dashScopeApi() {return DashScopeApi.builder().apiKey(apiKey).workSpaceId("llm-3as714s6flm80yc1").build();}@Beanpublic ChatClient chatClient(ChatModel dashscopeChatModel) {return ChatClient.builder(dashscopeChatModel).build();}
}
调用:
import com.alibaba.cloud.ai.advisor.DocumentRetrievalAdvisor;
import com.alibaba.cloud.ai.dashscope.api.DashScopeApi;
import com.alibaba.cloud.ai.dashscope.rag.DashScopeDocumentRetriever;
import com.alibaba.cloud.ai.dashscope.rag.DashScopeDocumentRetrieverOptions;
import jakarta.annotation.Resource;
import org.springframework.ai.chat.client.ChatClient;
import org.springframework.ai.rag.retrieval.search.DocumentRetriever;
import org.springframework.web.bind.annotation.GetMapping;
import org.springframework.web.bind.annotation.RequestParam;
import org.springframework.web.bind.annotation.RestController;
import reactor.core.publisher.Flux;/*** @auther zzyybs@126.com* @create 2025-08-01 16:51* @Description TODO*/
@RestController
public class BailianRagController
{@Resourceprivate ChatClient chatClient;@Resourceprivate DashScopeApi dashScopeApi;/*** http://localhost:8017/bailian/rag/chat* http://localhost:8017/bailian/rag/chat?msg=A0001* @param msg* @return*/@GetMapping("/bailian/rag/chat")public Flux<String> chat(@RequestParam(name = "msg",defaultValue = "00000错误信息") String msg){// 百炼 RAG 构建器DocumentRetriever retriever = new DashScopeDocumentRetriever(dashScopeApi,DashScopeDocumentRetrieverOptions.builder().withIndexName("ops") // 知识库名称.build());return chatClient.prompt().user(msg).advisors(new DocumentRetrievalAdvisor(retriever)).stream().content();}}
15.2 工作流
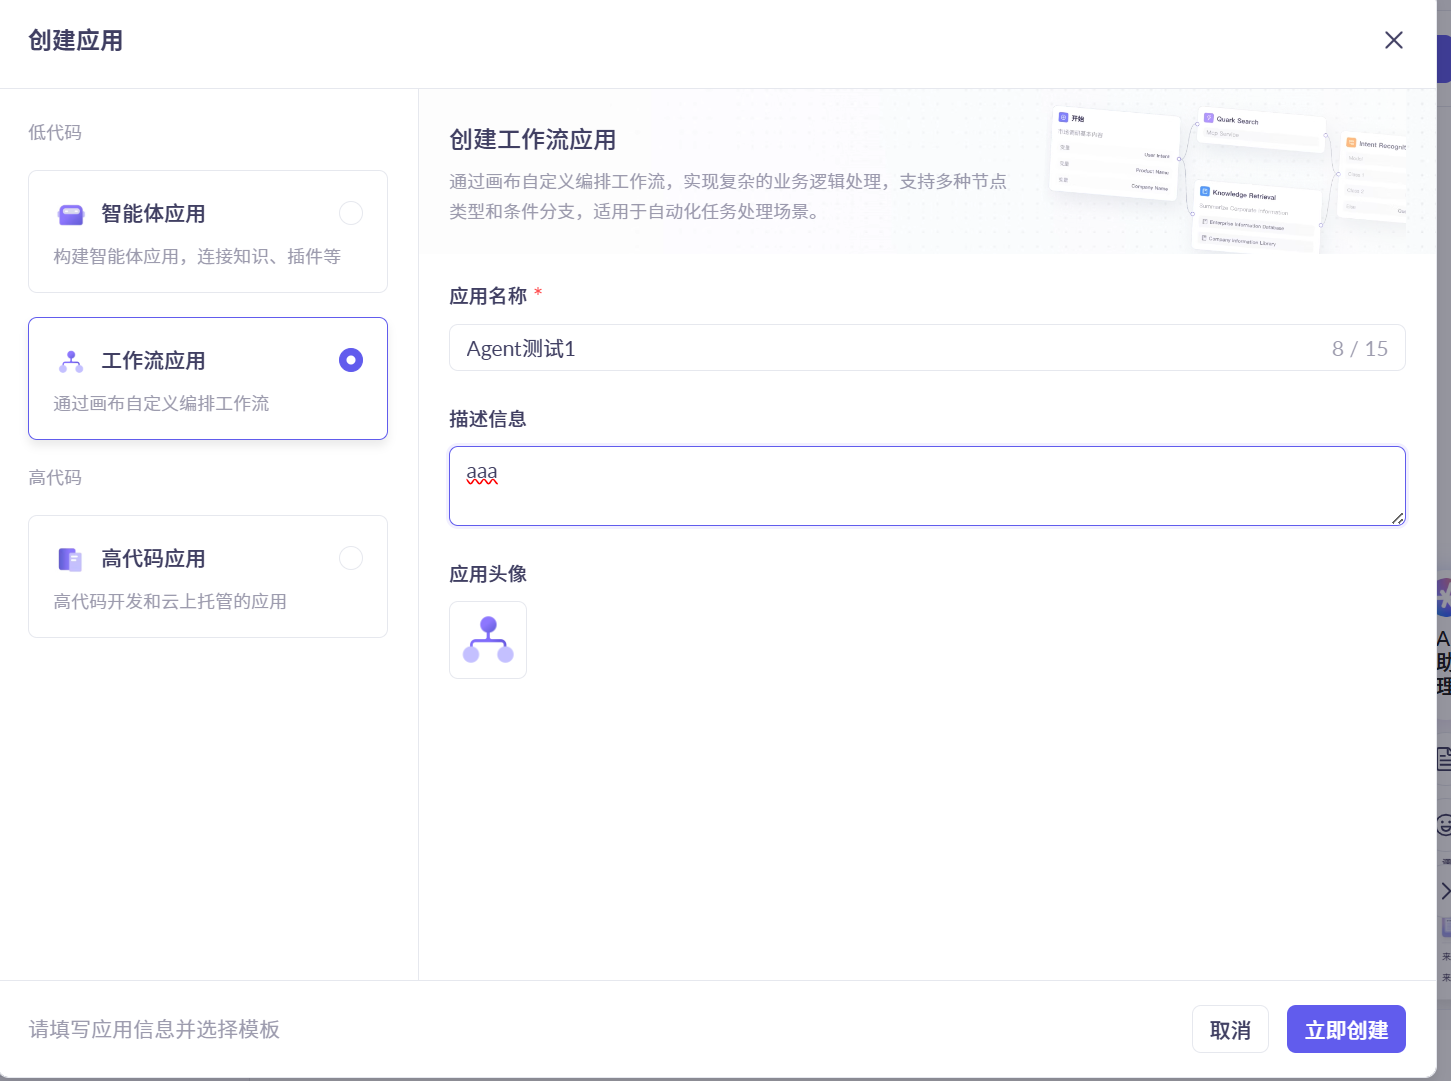
创建工作流应用:
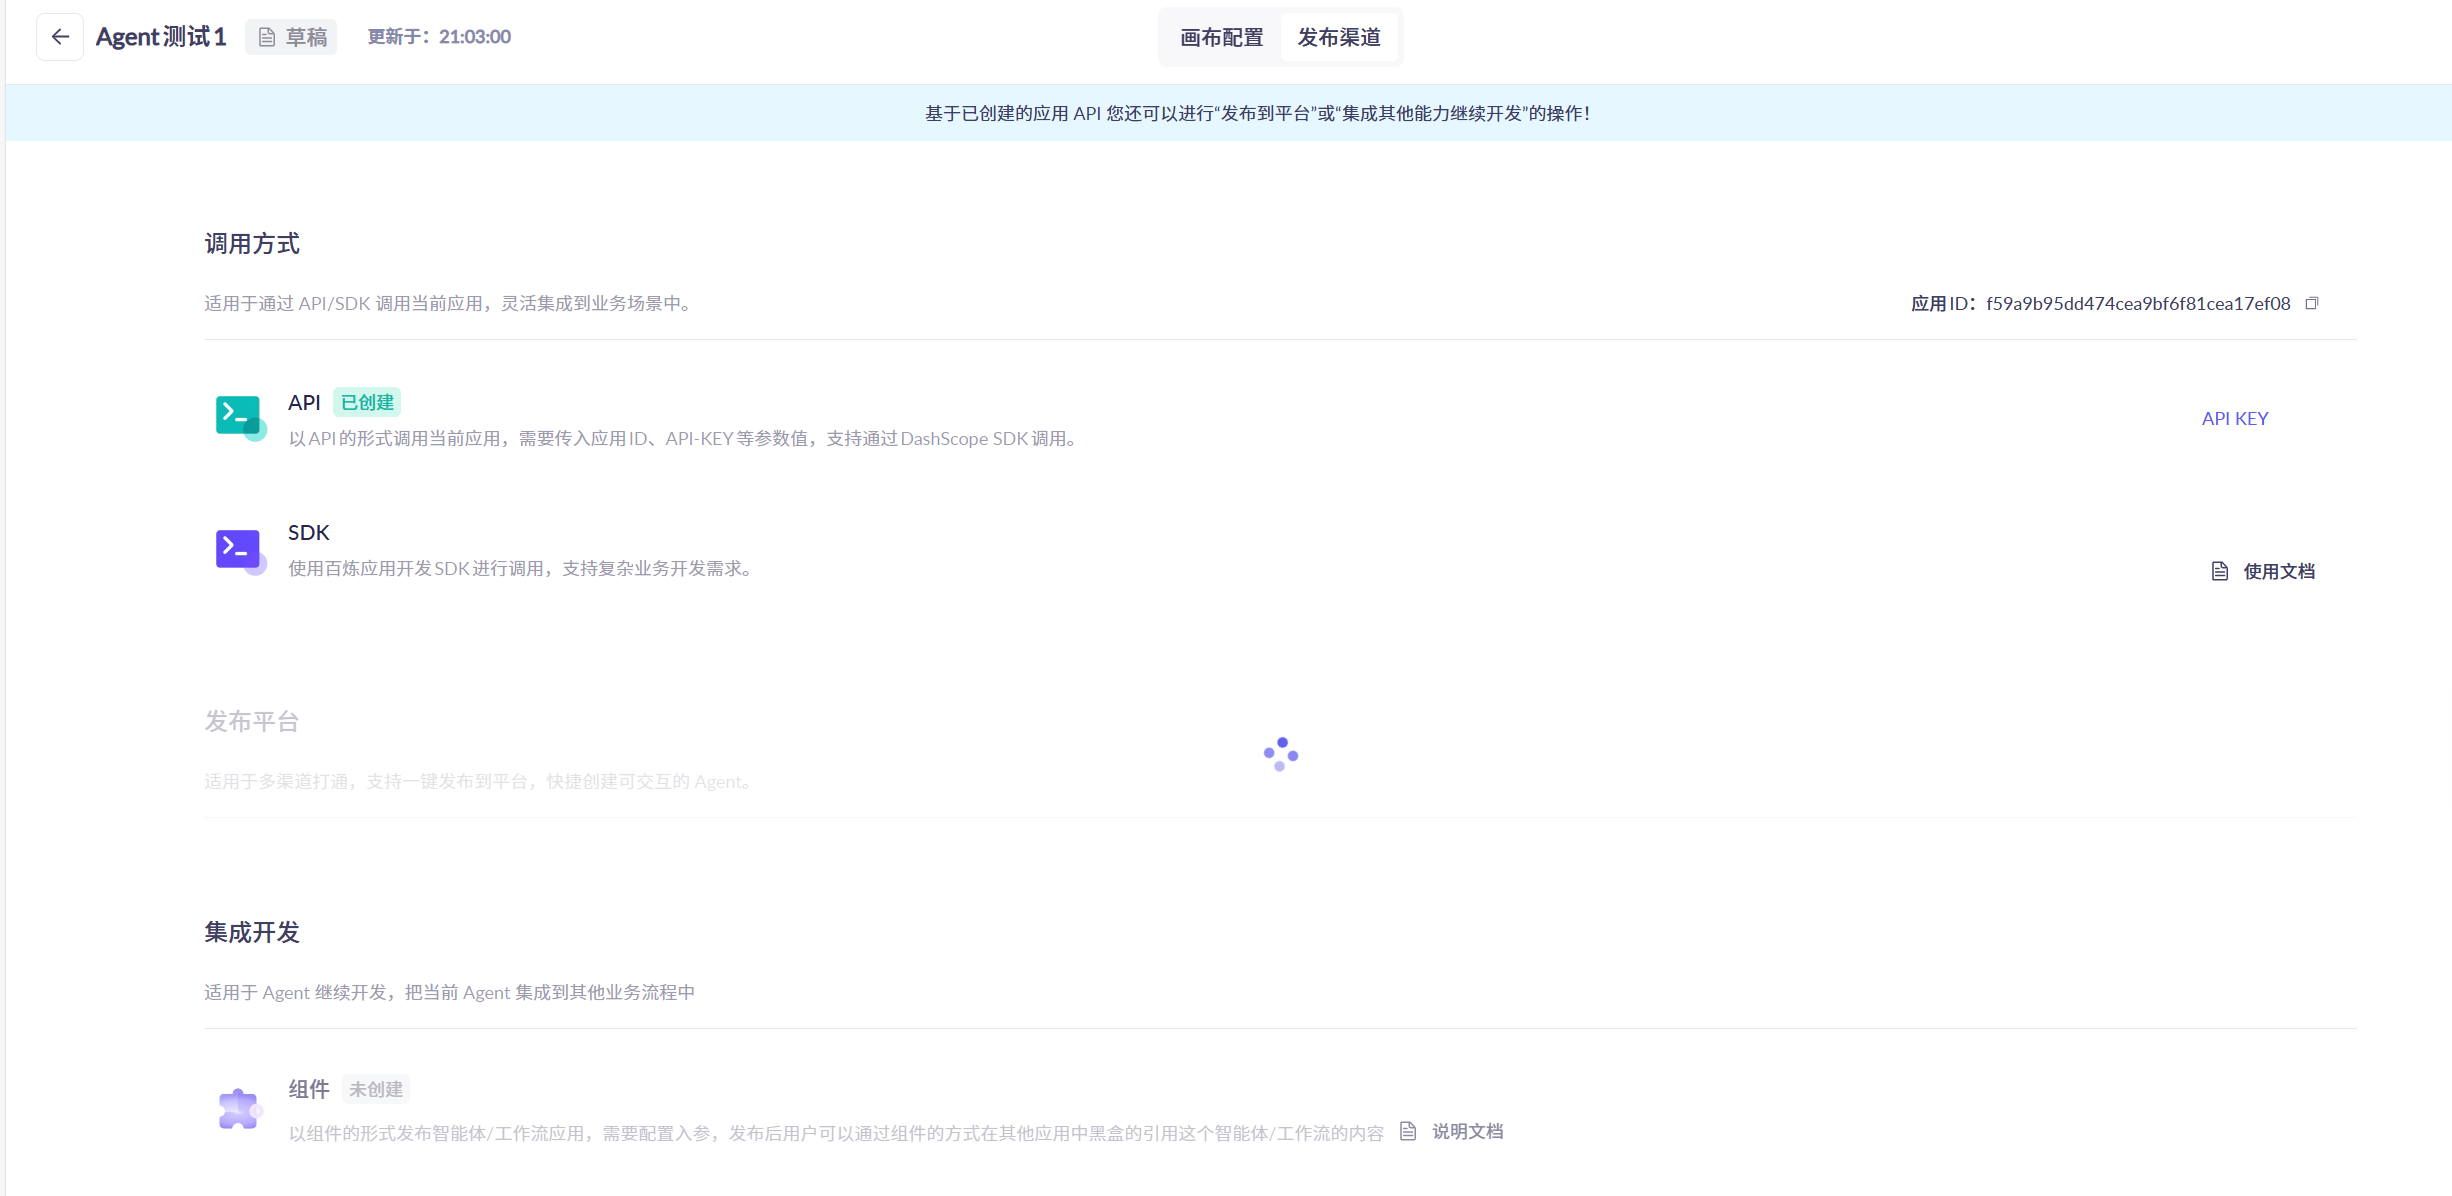
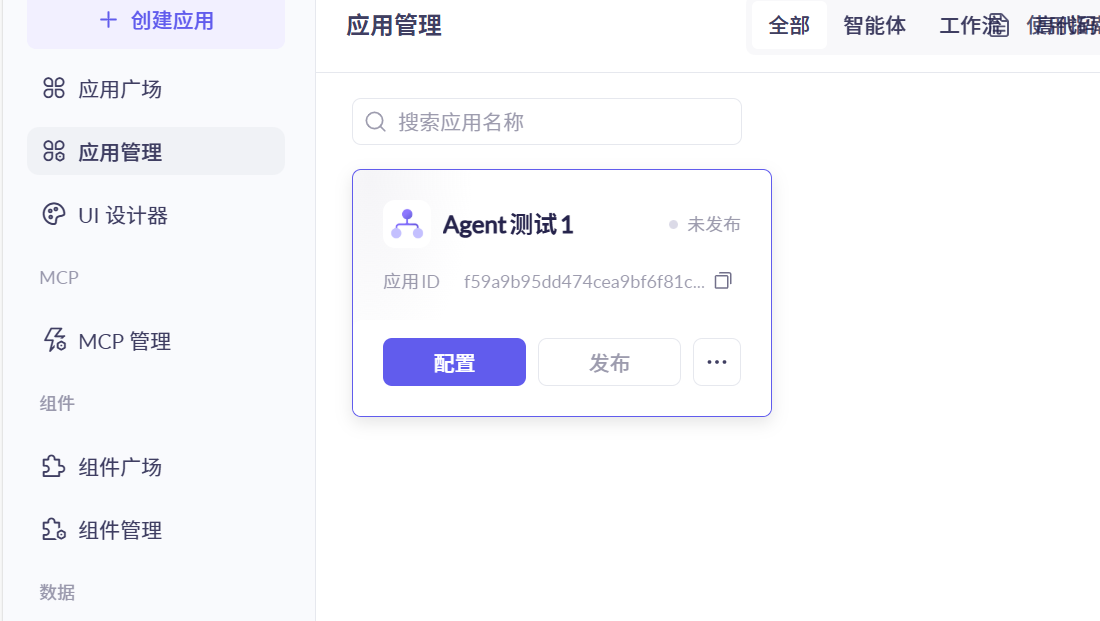
创建完毕后发布:
本地调用配置:
server.port=8018# 设置全局编码格式
server.servlet.encoding.enabled=true
server.servlet.encoding.force=true
server.servlet.encoding.charset=UTF-8spring.application.name=SAA-18TodayMenu# ====SpringAIAlibaba Config=============
spring.ai.dashscope.api-key=${aliQwen-api}
# SAA PlatForm today's menu Agent app-id
spring.ai.dashscope.agent.options.app-id=5b642a2c4abb45e3bd83d14eeb5fc5d2
配置类:
import com.alibaba.cloud.ai.dashscope.api.DashScopeApi;
import org.springframework.ai.chat.client.ChatClient;
import org.springframework.ai.chat.model.ChatModel;
import org.springframework.beans.factory.annotation.Value;
import org.springframework.context.annotation.Bean;
import org.springframework.context.annotation.Configuration;@Configuration
public class DashScopeConfig
{@Value("${spring.ai.dashscope.api-key}")private String apiKey;@Beanpublic DashScopeApi dashScopeApi() {return DashScopeApi.builder().apiKey(apiKey).workSpaceId("llm-3as714s6flm80yc1").build();}@Beanpublic ChatClient chatClient(ChatModel dashscopeChatModel) {return ChatClient.builder(dashscopeChatModel).build();}
}
调用:
import com.alibaba.cloud.ai.dashscope.agent.DashScopeAgent;
import com.alibaba.cloud.ai.dashscope.agent.DashScopeAgentOptions;
import com.alibaba.cloud.ai.dashscope.api.DashScopeAgentApi;
import org.springframework.ai.chat.prompt.Prompt;
import org.springframework.beans.factory.annotation.Value;
import org.springframework.web.bind.annotation.GetMapping;
import org.springframework.web.bind.annotation.RequestParam;
import org.springframework.web.bind.annotation.RestController;/*** @auther zzyybs@126.com* @create 2025-09-11 19:04* @Description TODO*/
@RestController
public class MenuCallAgentController
{// 百炼平台的appid@Value("${spring.ai.dashscope.agent.options.app-id}")private String appId;// 百炼云平台的智能体接口对象private DashScopeAgent dashScopeAgent;public MenuCallAgentController(DashScopeAgentApi dashScopeAgentApi){this.dashScopeAgent = new DashScopeAgent(dashScopeAgentApi);}@GetMapping(value = "/eatAgent")public String eatAgent(@RequestParam(name = "msg",defaultValue = "今天吃什么") String msg){DashScopeAgentOptions options = DashScopeAgentOptions.builder().withAppId(appId).build();Prompt prompt = new Prompt(msg, options);return dashScopeAgent.call(prompt).getResult().getOutput().getText();}
}
