RabbitMQ应用(2)
1.Spring Boot整合RabbitMQ
对于RabbitMQ开发, Spring 也提供了⼀些便利. Spring 和RabbitMQ的官⽅⽂档对此均有介绍
Spring官⽅: Spring AMQP
RabbitMQ 官⽅: RabbitMQ tutorial - "Hello World!" | RabbitMQ
下⾯来看如何基于SpringBoot 进⾏RabbitMQ的开发.
只演⽰部分常⽤的⼯作模式
1.1工作队列模式
步骤:
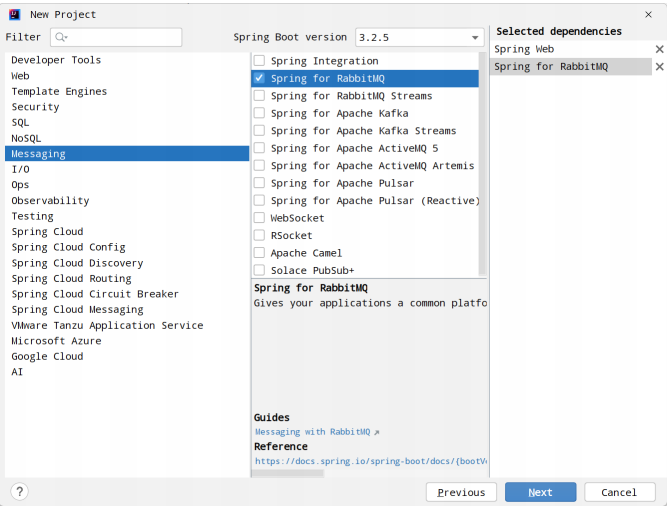
1. 引⼊依赖
2. 编写yml配置,基本信息配置
3. 编写⽣产者代码
4. 编写消费者代码
a. 定义监听类, 使⽤@RabbitListener注解完成队列监听
5. 运⾏观察结果
引⼊依赖
<!--Spring MVC相关依赖-->
<dependency>  <groupId>org.springframework.boot</groupId>  <artifactId>spring-boot-starter-web</artifactId>
</dependency>
<dependency>  <groupId>org.springframework.boot</groupId>  <artifactId>spring-boot-starter-test</artifactId>  <scope>test</scope>
</dependency>
<!--RabbitMQ相关依赖-->
<dependency>  <groupId>org.springframework.boot</groupId>  <artifactId>spring-boot-starter-amqp</artifactId>
</dependency>
也可以通过创建项⽬时, 加⼊依赖
添加配置
#配置RabbitMQ的基本信息
spring:rabbitmq:host: 110.41.51.65port: 5672 #默认为5672username: studypassword: studyvirtual-host: bite #默认值为 /
或以下配置
#amap://username:password@fp:port/virtual-host
spring:rabbitmq:addresses: amap://study:study@110.41.51.65:15673/bite
编写生产者代码
为⽅便测试, 我们通过接⼝来发送消息
//work模式队列名称
public static final String WORK_QUEUE = "work_queue";
声明队列
import com.bite.rabbitmq.constant.Constants;
import org.springframework.amqp.core.*;
import org.springframework.context.annotation.Bean;
import org.springframework.context.annotation.Configuration;@Configuration
public class RabbitMQCConfig {//1. 工作模式队列@Bean("workQueue")public Queue workQueue() {return QueueBuilder.durable(Constants.WORK_QUEUE).build();}
}@RequestMapping("/producer")
@RestController
public class ProducerController {@Autowiredprivate RabbitTemplate rabbitTemplate;@RequestMapping("/work")public String work(){for (int i = 0; i < 10; i++) {//使用内置交换机发送消息,routingKey和队列名称保持一致rabbitTemplate.convertAndSend("", Constants.WORK_QUEUE, "hello spring amqp: work...");}return "发送成功";}
}
编写消费者代码
定义监听类
import com.bite.rabbitmq.constant.Constants;
import org.springframework.amqp.core.Message;
import org.springframework.amqp.rabbit.annotation.RabbitListener;
import org.springframework.stereotype.Component;@Component
public class WorkListener {@RabbitListener(queues = Constants.WORK_QUEUE)public void listenerQueue(Message message) {System.out.println("Listener 1["+Constants.WORK_QUEUE+"]收到消息:" + message);}@RabbitListener(queues = Constants.WORK_QUEUE)public void listenerQueue2(Message message) {System.out.println("Listener 2["+Constants.WORK_QUEUE+"]收到消息:" + message);}
}
@RabbitListener 是Spring框架中⽤于监听RabbitMQ队列的注解, 通过使⽤这个注解,可以定义⼀个⽅法, 以便从RabbitMQ队列中接收消息. 该注解⽀持多种参数类型,这些参数类型代表了从RabbitMQ接收到的消息和相关信息.
以下是⼀些常⽤的参数类型:
- String :返回消息的内容
- Message ( org.springframework.amqp.core.Message ): Spring AMQP的Message 类,返回原始的消息体以及消息的属性, 如消息ID, 内容, 队列信息等.
- Channel ( com.rabbitmq.client.Channel ):RabbitMQ的通道对象, 可以⽤于进⾏更⾼级的操作,如⼿动确认消息.
运行程序,观察结果
⽣产者测试(测试时需要把监听先注掉, 不然会⽴⻢被消费掉)

点进去可以看到消息的内容
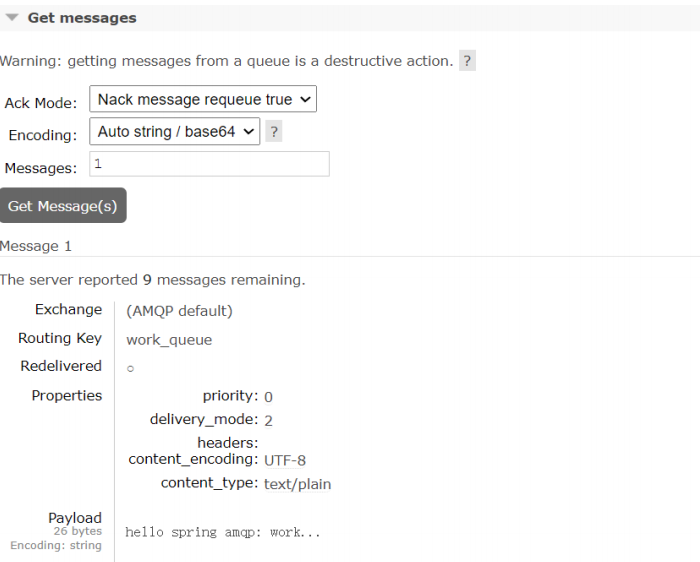
消费者测试, 打印消息内容
listener 1[work_queue]接收到消息:(Body:'hello spring amqp: work...'MessageProperties [headers={}, contentType=text/plain, contentEncoding=UTF-8,
contentLength=0, receivedDeliveryMode=PERSISTENT, priority=0, redelivered=true,
receivedExchange=, receivedRoutingKey=work_queue, deliveryTag=1,
consumerTag=amq.ctag-pNYVOTLX7zeFmmD7sL9NXw, consumerQueue=work_queue])listener 2[work_queue]接收到消息:(Body:'hello spring amqp: work...'
MessageProperties [headers={}, contentType=text/plain, contentEncoding=UTF-8,
contentLength=0, receivedDeliveryMode=PERSISTENT, priority=0, redelivered=true,
receivedExchange=, receivedRoutingKey=work_queue, deliveryTag=1,
consumerTag=amq.ctag-gh1FZQoXLpDBD_BXedIBdQ, consumerQueue=work_queue])...
1.2Publish/Subscribe(发布订阅模式)
在发布/订阅模型中,多了⼀个Exchange⻆⾊.
Exchange 常⻅有三种类型, 分别代表不同的路由规则
a) Fanout:⼴播,将消息交给所有绑定到交换机的队列(Publish/Subscribe模式)
b) Direct:定向,把消息交给符合指定routing key的队列(Routing模式)
c) Topic:通配符,把消息交给符合routing pattern(路由模式)的队列(Topics模式)
步骤:
1. 引⼊依赖
2. 编写⽣产者代码
3. 编写消费者代码
引⼊依赖
<!--Spring MVC相关依赖-->
<dependency><groupId>org.springframework.boot</groupId><artifactId>spring-boot-starter-web</artifactId>
</dependency>
<dependency><groupId>org.springframework.boot</groupId><artifactId>spring-boot-starter-test</artifactId><scope>test</scope>
</dependency>
<!--RabbitMQ相关依赖-->
<dependency><groupId>org.springframework.boot</groupId><artifactId>spring-boot-starter-amp</artifactId>
</dependency>
编写生产者代码
和简单模式的区别是: 需要创建交换机, 并且绑定队列和交换机
声明队列, 交换机, 绑定队列和交换机
//发布/订阅模式
public static final String FANOUT_QUEUE1 = "fanout_queue1";
public static final String FANOUT_QUEUE2 = "fanout_queue2";
public static final String FANOUT_EXCHANGE_NAME = "fanout_exchange";
//声明2个队列,观察是否两个队列都收到了消息
@Bean("fanoutQueue1")
public Queue fanoutQueue1() {return QueueBuilder.durable(Constants.FANOUT_QUEUE1).build();
}
@Bean("fanoutQueue2")
public Queue fanoutQueue2() {return QueueBuilder.durable(Constants.FANOUT_QUEUE2).build();
}
//声明交换机
@Bean("fanoutExchange")
public FanoutExchange fanoutExchange() {return ExchangeBuilder.fanoutExchange(Constants.FANOUT_EXCHANGE_NAME).durable(true).build();
}
//队列和交换机绑定
@Bean
public Binding fanoutBinding(@Qualifier("fanoutExchange") FanoutExchange exchange, @Qualifier("fanoutQueue1") Queue queue) {return BindingBuilder.bind(queue).to(exchange);
}
@Bean
public Binding fanoutBinding2(@Qualifier("fanoutExchange") FanoutExchange exchange, @Qualifier("fanoutQueue2") Queue queue) {return BindingBuilder.bind(queue).to(exchange);
}使用接口发送消息
@RequestMapping("/fanout")
public String fanoutProduct() {//routingKey为空,表示所有队列都可以收到消息rabbitTemplate.convertAndSend(Constants.FANOUT_EXCHANGE_NAME, "", "hello spring boot: fanout");return "发送成功";
}
编写消费者代码
交换机和队列的绑定关系及声明已经在⽣产⽅写完, 所以消费者不需要再写了
定义监听类, 处理接收到的消息即可.
import com.bite.rabbitmq.constant.Constants;
import org.springframework.amqp.core.Message;
import org.springframework.amqp.rabbit.annotation.RabbitListener;
import org.springframework.stereotype.Component;@Component
public class FanoutListener {//指定监听队列的名称@RabbitListener(queues = Constants.FANOUT_QUEUE1)public void ListenerQueue(String message){System.out.println("["+Constants.FANOUT_QUEUE1+ "]接收到消息:"+ message);}@RabbitListener(queues = Constants.FANOUT_QUEUE2)public void ListenerQueue2(String message){System.out.println("["+Constants.FANOUT_QUEUE2+ "]接收到消息:"+ message);}
}
运行程序,观察结果
1. 运⾏项⽬, 调⽤接⼝发送消息
http://127.0.0.1:8080/producer/fanout

也可以把监听类注释掉, 观察两个队列的信息

2. 监听类收到消息, 并打印
[fanout_queue1]接收到消息:hello spring boot: fanout
[fanout_queue2]接收到消息:hello spring boot: fanout
1.3Routing(路由模式)
交换机类型为Direct时, 会把消息交给符合指定routing key的队列.
队列和交换机的绑定, 不是任意的绑定了, ⽽是要指定⼀个RoutingKey(路由key)
消息的发送⽅在向Exchange发送消息时, 也需要指定消息的RoutingKey
Exchange也不再把消息交给每⼀个绑定的key, ⽽是根据消息的RoutingKey进⾏判断, 只有队列的
RoutingKey 和消息的RoutingKey 完全⼀致, 才会接收到消息
步骤:
1. 引⼊依赖(同上)
2. 编写⽣产者代码
3. 编写消费者代码
编写⽣产者代码
和发布订阅模式的区别就是: 交换机类型不同, 绑定队列的RoutingKey不同
声明队列, 交换机, 绑定队列和交换机
//routing模式
public static final String DIRECT_QUEUE1 = "direct_queue1";
public static final String DIRECT_QUEUE2 = "direct_queue2";
public static final String DIRECT_EXCHANGE_NAME = "direct_exchange";//Routing模式
@Bean("directQueue1")
public Queue routingQueue1() {return QueueBuilder.durable(Constants.DIRECT_QUEUE1).build();
}
@Bean("directQueue2")
public Queue routingQueue2() {return QueueBuilder.durable(Constants.DIRECT_QUEUE2).build();
}
//声明交换机
@Bean("directExchange")
public DirectExchange directExchange() {return ExchangeBuilder.directExchange(Constants.DIRECT_EXCHANGE_NAME).durable(true).build();
}
//队列和交换机绑定
//队列1绑定orange
@Bean
public Binding directing(@Qualifier("directExchange") DirectExchange exchange, @Qualifier("directQueue1") Queue queue) {return BindingBuilder.bind(queue).to(exchange).with("orange");
}
//队列2绑定black, green
@Bean
public Binding directBinding2(@Qualifier("directExchange") DirectExchange exchange, @Qualifier("directQueue2") Queue queue) {return BindingBuilder.bind(queue).to(exchange).with("black");
}
@Bean
public Binding directBinding3(@Qualifier("directExchange") DirectExchange exchange, @Qualifier("directQueue2") Queue queue) {return BindingBuilder.bind(queue).to(exchange).with("green");
}
使用接口发送消息
@RequestMapping("/direct")
public String directProduct(String routingKey){//routingKey作为参数传递rabbitTemplate.convertAndSend(Constants.DIRECT_EXCHANGE_NAME, routingKey,"hello spring boot: direct "+routingKey);return "发送成功";
}
编写消费者代码
交换机和队列的绑定关系及声明已经在⽣产⽅写完, 所以消费者不需要再写了
定义监听类, 处理接收到的消息即可。
import com.bite.rabbitmq.constant.Constants;
import org.springframework.amap.rabbit.annotation.RabbitListener;
import org.springframework.stereotype.Component;@Component
public class DirectListener {//指定监听队列的名称@RabbitListener(queues = Constants.DIRECT_QUEUEL)public void listenerQueue(String message){System.out.println("["+Constants.DIRECT_QUEUE1+ "]接收到消息:"+ message);}@RabbitListener(queues = Constants.DIRECT_QUEUE2)public void listenerQueue2(String message){System.out.println("["+Constants.DIRECT_QUEUE2+ "]接收到消息:"+ message);}
}
运⾏程序, 观察结果
1. 运⾏项⽬
2. 调⽤接⼝发送routingkey为orange的消息
http://127.0.0.1:8080/producer/direct?routingKey=orange
观察后端⽇志, 队列1收到消息
[direct_queue1]接收到消息:hello spring boot: direct orange
2. 调⽤接⼝发送routingkey为black的消息
http://127.0.0.1:8080/producer/direct?routingKey=black
观察后端⽇志, 队列2收到消息
[direct_queue2]接收到消息:hello spring boot: direct black
3. 调⽤接⼝发送routingkey为green的消息
http://127.0.0.1:8080/producer/direct?routingKey=green
观察后端⽇志, 队列2收到消息
[direct_queue2]接收到消息:hello spring boot: direct green
1.4Topics(通配符模式)
Topics 和Routing模式的区别是:
1. topics 模式使⽤的交换机类型为topic(Routing模式使⽤的交换机类型为direct)
2. topic 类型的交换机在匹配规则上进⾏了扩展, Binding Key⽀持通配符匹配
步骤:
1. 引⼊依赖(同上)
2. 编写⽣产者代码
3. 编写消费者代码
编写⽣产者代码
和发布订阅模式的区别就是: 交换机类型不同, 绑定队列的RoutingKey不同
声明队列, 交换机, 绑定队列和交换机
//topics模式
public static final String TOPICS_QUEUE1 = "topics_queue1";
public static final String TOPICS_QUEUE2 = "topics_queue2";
public static final String TOPICS_EXCHANGE_NAME = "topics_exchange";//topic模式
@Bean("topicsQueue1")
public Queue topicsQueue1() {return QueueBuilder.durable(Constants.TOPICS_QUEUE1).build();
}
@Bean("topicsQueue2")
public Queue topicsQueue2() {return QueueBuilder.durable(Constants.TOPICS_QUEUE2).build();
}
//声明交换机
@Bean("topicsChange")
public TopicExchange topicExchange() {return ExchangeBuilder.topicExchange(Constants.TOPICS_EXCHANGE_NAME).durable(true).build();
}
//队列和交换机绑定
//队列绑定error,仅接收error信息
@Bean
public Binding topicBinding(@Qualifier("topicExchange") TopicExchange exchange, @Qualifier("topicsQueue1") Queue queue) {return BindingBuilder.bind(queue).to(exchange).with("*.error");
}
//队列绑定info, error: error, info信息都接收
@Bean
public Binding topicBinding2(@Qualifier("topicExchange") TopicExchange exchange, @Qualifier("topicsQueue2") Queue queue) {return BindingBuilder.bind(queue).to(exchange).with("#.info");
}
@Bean
public Binding topicBinding3(@Qualifier("topicExchange") TopicExchange exchange, @Qualifier("topicsQueue2") Queue queue) {return BindingBuilder.bind(queue).to(exchange).with("*.error");
}
使用接口发送消息
@RequestMapping("/topics")
public String topicProduct(String routingKey){//routingKey为空,表示所有队列都可以收到消息rabbitTemplate.convertAndSend(Constants.TOPICS_EXCHANGE_NAME, routingKey,"hello spring boot: topics "+routingKey);return "发送成功";
}
编写消费者代码
定义监听类, 处理接收到的消息.
import com.bite.rabbitmq.constant.Constants;
import org.springframework.amap.rabbit.annotation.RabbitListener;
import org.springframework.stereotype.Component;@Component
public class TopicListener {//指定监听队列的名称@RabbitListener(queues = Constants.TOPICS_QUEUE1)public void listenerQueue(String message){System.out.println("["+Constants.TOPICS_QUEUE1+ "]接收到消息:"+ message);}@RabbitListener(queues = Constants.TOPICS_QUEUE2)public void listenerQueue2(String message){System.out.println("["+Constants.TOPICS_QUEUE2+ "]接收到消息:"+ message);}
}
运⾏程序, 观察结果
1. 运⾏项⽬
2. 调⽤接⼝发送routingkey为order.error的消息
http://127.0.0.1:8080/producer/topics?routingKey=order.error
观察后端⽇志, 队列1和队列2均收到消息
[topics_queue2]接收到消息:hello spring boot: topics order.error
[topics_queue1]接收到消息:hello spring boot: topics order.error
2. 调⽤接⼝发送routingkey为order.pay.info的消息
http://127.0.0.1:8080/producer/topics?routingKey=order.pay.info
观察后端⽇志, 队列2收到消息
[topics_queue2]接收到消息:hello spring boot: topics order.pay.info
2.基于SpringBoot+RabbitMQ完成应用通信
作为⼀个消息队列, RabbitMQ也可以⽤作应⽤程序之间的通信. 上述代码⽣产者和消费者代码放在不同的应⽤中即可完成不同应⽤程序的通信.
接下来我们来看, 基于SpringBoot+RabbitMQ完成应⽤间的通信.
需求描述:
⽤⼾下单成功之后, 通知物流系统, 进⾏发货. (只讲应⽤通信, 不做具体功能实现)
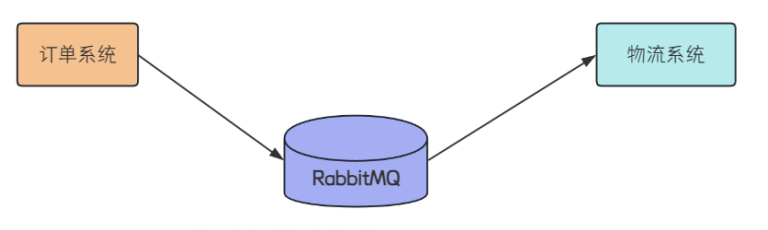
订单系统作为⼀个⽣产者, 物流系统作为⼀个消费者
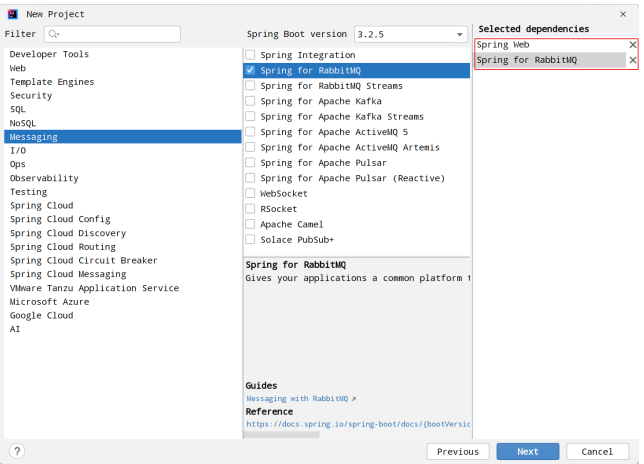
2.1创建项目
为⽅便讲解, 把两个项⽬放在⼀个项⽬中(也可独⽴创建)
1. 创建⼀个空的项⽬ rabbitmq-communication(其实就是⼀个空的⽂件夹)

2. 在这个项⽬⾥, 创建Module
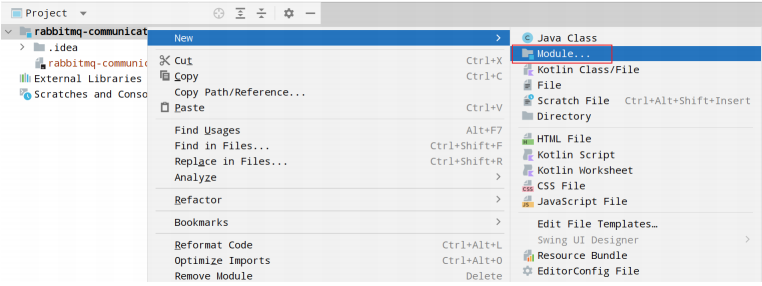
3. 后续流程和创建SpringBoot项⽬⼀样
添加对应依赖
创建两个项⽬
1) logistics-service
2) order-service
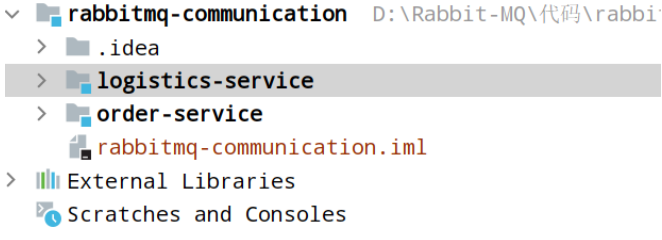
4. 最终结构如下
2.2订单系统(生产者)
1. 完善配置信息
server.port=8080
#amap://username:password@IP:port/virtual-host
spring.rabbitmq.addresses=amap://study:study@110.41.51.65:15673/bite //换成自己的虚拟机地址
2. 声明队列
import org.springframework.amqp.core.Queue;
import org.springframework.amqp.core.QueueBuilder;
import org.springframework.context.annotation.Bean;
import org.springframework.context.annotation.Configuration;@Configuration
public class RabbitConfig {//1. 工作模式队列@Bean("workQueue")public Queue workQueue() {return QueueBuilder.durable("order.create").build();}
}
3. 编写下单接⼝, 下单成功之后,发送订单消息
import org.springframework.amqp.rabbit.core.RabbitTemplate;
import org.springframework.beans.factory.annotation.Autowired;
import org.springframework.web.bind.annotation.RequestMapping;
import org.springframework.web.bind.annotation.RestController;import java.util.UUID;@RequestMapping("/order")
@RestController
public class OrderController {@Autowiredprivate RabbitTemplate rabbitTemplate;@RequestMapping("/createOrder")public String createOrder() {//下单相关操作,比如参数校验,操作数据库等,代码省略//发送消息通知String orderId = UUID.randomUUID().toString();rabbitTemplate.convertAndSend("", "order.create", "下单成功,订单ID:"+orderId);return "下单成功";}
}
4. 启动服务, 观察结果
1) 访问接⼝, 模拟下单请求: http://127.0.0.1:8080/order/createOrder
可以观察到消息发送成功
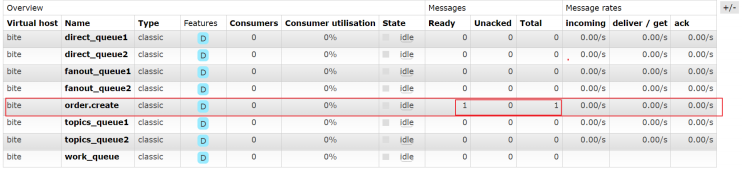
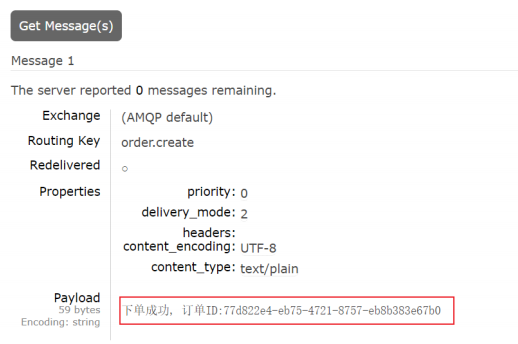
查看消息
2.3物流系统(消费者)
1. 完善配置信息
8080端⼝已经被订单系统占⽤了, 修改物流系统的端⼝号为9090
server.port=9090
#amap://username:password@IP:port/virtual-host
spring.rabbitmq.addresses=amap://study:study@110.41.51.65:15673/bite
2.监听队列
import org.springframework.amap.rabbit.annotation.RabbitListener;
import org.springframework.stereotype.Component;@Component
public class OrderCreateListener {//指定监听队列的名称@RabbitListener(queues = "order.create")public void ListenerQueue(String message){System.out.println("接收到消息:"+ message);//收到消息后的处理,代码省略}
}
2.4启动服务,观察结果
访问订单系统的接⼝, 模拟下单请求: http://127.0.0.1:8080/order/createOrder
在物流系统的⽇志中, 可以观察到, 通过RabbitMQ, 成功把下单信息传递给了物流系统
接收到消息:下单成功, 订单ID:c0c25851-6fe0-49dd-bf93-074667732432
2.5发送消息格式为对象
如果通过 RabbitTemplate 发送⼀个对象作为消息, 我们需要对该对象进⾏序列化. Spring AMQP推荐使⽤JSON序列化,Spring AMQP提供了 Jackson2JsonMessageConverter 和MappingJackson2MessageConverter 等转换器, 我们需要把⼀个 MessageConverter 设置到 RabbitTemplate 中.
@Bean
public Jackson2JsonMessageConverter jackson2JsonMessageConverter() {return new Jackson2JsonMessageConverter();
}@Bean
public RabbitTemplate rabbitTemplate(ConnectionFactory connectionFactory) {RabbitTemplate template = new RabbitTemplate(connectionFactory);template.setMessageConverter(jackson2JsonMessageConverter()); // 设置消息转换器return template;
}
定义一个对象
@AllArgsConstructor
@NoArgsConstructor
@Data
public class OrderInfo {private String orderId;private String name;private long price;
}
生产者代码:
@RequestMapping("/createOrder")
public String createOrder(){//下单相关操作,比如参数校验,操作数据库等,代码省略//发送消息通知String orderId = UUID.randomUUID().toString();OrderInfo orderInfo = new OrderInfo(orderId, "商品", 536);rabbitTemplate.convertAndSend("", "order.create",orderInfo);return "下单成功";
}
消费者代码:
@Component
public class OrderCreateListener {@RabbitHandler@RabbitListener(queues = "order.create")public void ListenerQueue(OrderInfo message){System.out.println("接收到消息:"+ message);//收到消息后的处理,代码省略}
}
@RabbitListener(queues = "order.create") 可以加在类上, 也可以加在⽅法上, ⽤于定于⼀个类或者⽅法作为消息的监听器.
@RabbitHandler 是⼀个⽅法级别的注解, 当使⽤ @RabbitHandler 注解时, 这个⽅法将被调⽤处理特定的消息.