【Three.js--manual script】4.光照
先调整相机的设置
const fov = 45;
const aspect = 2;  // canvas 的默认宽高 300:150
const near = 0.1;
const far = 100;
const camera = new THREE.PerspectiveCamera(fov, aspect, near, far);
在基础场景下,移动相机位置
camera.position.set(0, 10, 20);
添加一个 OrbitControls。OrbitControls 让我们可以围绕某一个点旋转控制相机。OrbitControls 是 three.js 的可选模块,所以我们首先需要引入这个模块
import * as THREE from 'three';
import {OrbitControls} from 'three/addons/controls/OrbitControls.js';
创建 OrbitControls 时传入两个参数,一个是要控制的相机对象,第二个是检测事件的 DOM 元素
将 OrbitControls 的观察点设置为 (0, 5, 0) 的位置,设置完调用 controls.update真正更新观察点位置
const controls = new OrbitControls(camera, canvas);
controls.target.set(0, 5, 0);
controls.update();
创建一些东西来打光。首先,创建一个地平面,并用下方展示的 2x2 像素的黑白格图片来作为纹理。
首先加载这个纹理,设置重复模式(wrapS, wrapT),采样模式(magFilter)以及重复的次数。因为贴图是 2x2 大小,通过设置成平铺模式,并且重复次数是边长的一半,就可以让每个格子正好是1个单位的大小
const planeSize = 40;const loader = new THREE.TextureLoader();
const texture = loader.load('resources/images/checker.png');
texture.wrapS = THREE.RepeatWrapping;
texture.wrapT = THREE.RepeatWrapping;
texture.magFilter = THREE.NearestFilter;
texture.colorSpace = THREE.SRGBColorSpace;
const repeats = planeSize / 2;
texture.repeat.set(repeats, repeats);
接着我们创建一个平面几何体,一个材质,再用这两个作为参数,创建一个 Mesh 对象并且添加到场景中。因为创建的平面默认是在 XY 平面上(竖直平面),我们希望得到一个 XZ 平面(水平平面),所以我们将他旋转 90°。
const planeGeo = new THREE.PlaneGeometry(planeSize, planeSize);
const planeMat = new THREE.MeshPhongMaterial({map: texture,side: THREE.DoubleSide,
});
const mesh = new THREE.Mesh(planeGeo, planeMat);
mesh.rotation.x = Math.PI * -.5;
scene.add(mesh);
添加一个立方体和一个球体,这样有三个物体可以打光
{const cubeSize = 4;const cubeGeo = new THREE.BoxGeometry(cubeSize, cubeSize, cubeSize);const cubeMat = new THREE.MeshPhongMaterial({color: '#8AC'});const mesh = new THREE.Mesh(cubeGeo, cubeMat);mesh.position.set(cubeSize + 1, cubeSize / 2, 0);scene.add(mesh);
}
{const sphereRadius = 3;const sphereWidthDivisions = 32;const sphereHeightDivisions = 16;const sphereGeo = new THREE.SphereGeometry(sphereRadius, sphereWidthDivisions, sphereHeightDivisions);const sphereMat = new THREE.MeshPhongMaterial({color: '#CA8'});const mesh = new THREE.Mesh(sphereGeo, sphereMat);mesh.position.set(-sphereRadius - 1, sphereRadius + 2, 0);scene.add(mesh);
}
添加光源
const color = 0xFFFFFF;
const intensity = 1;
const light = new THREE.AmbientLight(color, intensity);
scene.add(light);
在gui上改变光照参数
const gui = new GUI();
gui.addColor(new ColorGUIHelper(light, 'color'), 'value').name('color');
gui.add(light, 'intensity', 0, 5, 0.01);
class ColorGUIHelper {constructor(object, prop) {this.object = object;this.prop = prop;}get value() {return
#${this.object[this.prop].getHexString()}
;}set value(hexString) {this.object[this.prop].set(hexString);}
}
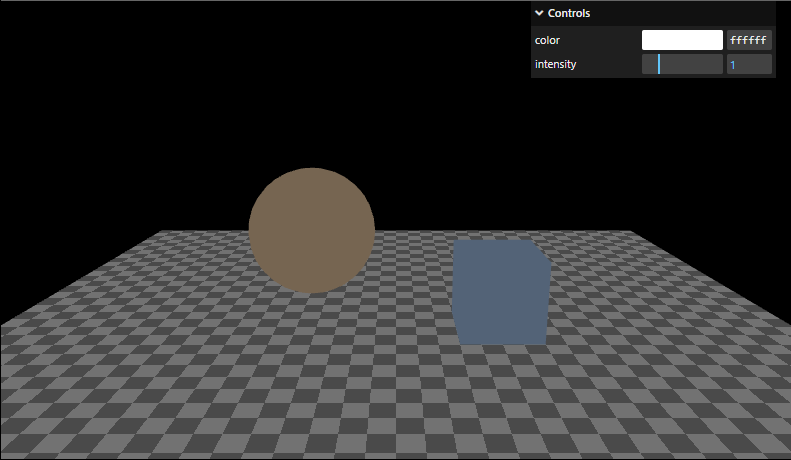
环境光没有方向,无法产生阴影,场景内任何一点受到的光照强度都是相同的,除了改变场景内所有物体的颜色以外,不会使物体产生明暗的变化,看起来并不像真正意义上的光照。通常的作用是提亮场景,让暗部不要太暗
// 这里的颜色计算是 RBG 通道上的值分别对应相乘
// 例: rgb(0.64,0.64,0.64) = rgb(0.8,0.8,0.8) * rgb(0.8,0.8,0.8) * 1
color = materialColor * light.color * light.intensity;
半球光
//const color = 0xFFFFFF;
const skyColor = 0xB1E1FF;  // light blue
const groundColor = 0xB97A20;  // brownish orange
const intensity = 1;
//const light = new THREE.AmbientLight(color, intensity);
const light = new THREE.HemisphereLight(skyColor, groundColor, intensity);
scene.add(light);
gui部分的修改
const gui = new GUI();
//gui.addColor(new ColorGUIHelper(light, 'color'), 'value').name('color');
gui.addColor(new ColorGUIHelper(light, 'color'), 'value').name('skyColor');
gui.addColor(new ColorGUIHelper(light, 'groundColor'), 'value').name('groundColor');
gui.add(light, 'intensity', 0, 5, 0.01);
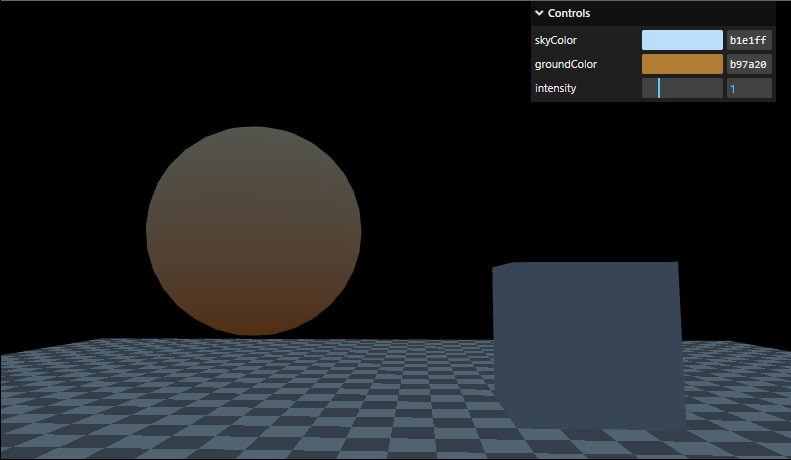
场景基本上也没有太大的立体感。半球光 (HemisphereLight) 与其他类型光照结合使用,可以很好地表现天空和地面颜色照射到物体上时的效果。所以最好的使用场景就是与其他光照结合使用,或者作为环境光(AmbientLight)的一种替代方案