【云运维】Zabbix 6.0 基于 LNMP 架构部署指南
Zabbix 6.0 基于 LNMP 架构部署指南
一、部署环境说明
- 操作系统:CentOS 7(64 位)
- 架构:LNMP(Linux + Nginx + MariaDB 10.5 + PHP 7.2)
- Zabbix 版本:6.0.6(服务端)(192.168.100.110)、Zabbix Agent2(被监控端)(192.168.100.111)
- 核心要求:Zabbix 6.0 需依赖 MariaDB 10.5+,低版本数据库不支持
二、LNMP 基础环境部署
2.1 安装 Nginx
先上传nginx-release-centos-7-0.el7.ngx.noarch.rpm软件包到根目录
步骤 1:配置 Nginx YUM 源
# 创建 Nginx 专属 YUM 源文件
[root@zabbix-server ~]# vim /etc/yum.repos.d/nginx.repo
[nginx]
name=nginx repo
baseurl=http://nginx.org/packages/centos/7/$basearch/
gpgcheck=0
enabled=1
步骤 2:安装并启动 Nginx
# 安装 Nginx
[root@zabbix-server ~]# yum install nginx -y# 启动服务并设置开机自启
[root@zabbix-server ~]# systemctl start nginx
[root@zabbix-server ~]# systemctl enable nginx --now# 防火墙开放 HTTP 端口(80)(一般已经默认关闭,不用执行)
[root@zabbix-server ~]# firewall-cmd --permanent --add-service=http --zone=public
[root@zabbix-server ~]# firewall-cmd --reload
2.2 安装 MariaDB 10.5
步骤 1:配置 MariaDB YUM 源(推荐备用源,稳定性更高)
[root@zabbix-server ~]# cat > /etc/yum.repos.d/mariadb.repo << EOF
[mariadb]
name = MariaDB
baseurl = https://archive.mariadb.org/mariadb-10.5.23/yum/centos7-amd64/
gpgkey = https://archive.mariadb.org/mariadb-10.5.23/yum/centos7-amd64/RPM-GPG-KEY-MariaDB
gpgcheck = 0
enabled = 1
EOF
步骤 2:安装并初始化数据库
# 安装 MariaDB 服务端和客户端
[root@zabbix-server yum.repos.d]# yum install mariadb-server mariadb -y# 启动服务并设置开机自启
[root@zabbix-server yum.repos.d]# systemctl enable mariadb --now
Created symlink from /etc/systemd/system/multi-user.target.wants/mariadb.service to /usr/lib/systemd/system/mariadb.service.# 初始化数据库(设置 root 密码,密码为'123')
[root@zabbix-server yum.repos.d]# mysql_secure_installationNOTE: RUNNING ALL PARTS OF THIS SCRIPT IS RECOMMENDED FOR ALL MariaDBSERVERS IN PRODUCTION USE!  PLEASE READ EACH STEP CAREFULLY!In order to log into MariaDB to secure it, we'll need the current
password for the root user. If you've just installed MariaDB, and
haven't set the root password yet, you should just press enter here.Enter current password for root (enter for none):
OK, successfully used password, moving on...Setting the root password or using the unix_socket ensures that nobody
can log into the MariaDB root user without the proper authorisation.You already have your root account protected, so you can safely answer 'n'.Switch to unix_socket authentication [Y/n] y
Enabled successfully!
Reloading privilege tables..... Success!You already have your root account protected, so you can safely answer 'n'.Change the root password? [Y/n] y
New password: '123'
Re-enter new password: '123'
Password updated successfully!
Reloading privilege tables..... Success!By default, a MariaDB installation has an anonymous user, allowing anyone
to log into MariaDB without having to have a user account created for
them.  This is intended only for testing, and to make the installation
go a bit smoother.  You should remove them before moving into a
production environment.Remove anonymous users? [Y/n] n... skipping.Normally, root should only be allowed to connect from 'localhost'.  This
ensures that someone cannot guess at the root password from the network.Disallow root login remotely? [Y/n] n... skipping.By default, MariaDB comes with a database named 'test' that anyone can
access.  This is also intended only for testing, and should be removed
before moving into a production environment.Remove test database and access to it? [Y/n] n... skipping.Reloading the privilege tables will ensure that all changes made so far
will take effect immediately.Reload privilege tables now? [Y/n] y... Success!Cleaning up...All done!  If you've completed all of the above steps, your MariaDB
installation should now be secure.Thanks for using MariaDB!# 测试数据库能否正常运行
[root@zabbix-server yum.repos.d]# mysql -uroot -p
Enter password:'123'
Welcome to the MariaDB monitor.  Commands end with ; or \g.
Your MariaDB connection id is 9
Server version: 10.5.23-MariaDB MariaDB ServerCopyright (c) 2000, 2018, Oracle, MariaDB Corporation Ab and others.Type 'help;' or '\h' for help. Type '\c' to clear the current input statement.MariaDB [(none)]> show databases;
+--------------------+
| Database           |
+--------------------+
| information_schema |
| mysql              |
| performance_schema |
| test               |
+--------------------+
4 rows in set (0.000 sec)MariaDB [(none)]> exit
Bye
常见问题:重置数据库 root 密码
若忘记 root 密码,执行以下命令重置:
# 1. 停止 MariaDB 服务
[root@zabbix-server yum.repos.d]# systemctl stop mariadb# 2. 跳过权限验证启动数据库
[root@zabbix-server yum.repos.d]# mysqld_safe --skip-grant-tables &# 3. 无密码登录并重置密码
MariaDB [(none)]> mysql -u root
MariaDB [(none)]> FLUSH PRIVILEGES;
MariaDB [(none)]> ALTER USER 'root'@'localhost' IDENTIFIED BY '123';  # 新密码 123
MariaDB [(none)]> EXIT;# 4. 正常重启服务
[root@zabbix-server yum.repos.d]# pkill mysqld_safe
[root@zabbix-server yum.repos.d]# systemctl start mariadb# ------------------如果启动失败---------------------
[root@zabbix-server yum.repos.d]# ps aux | grep mysql[root@zabbix-server yum.repos.d]# kill -9 进程号
2.3 安装 PHP 7.2
步骤 1:配置 PHP YUM 源
[root@zabbix-server yum.repos.d]# cd ~
# 安装 EPEL 源
[root@zabbix-server ~]# yum -y install epel-release# 安装 Webtatic 源(提供 PHP 7.2 包)
[root@zabbix-server ~]# rpm -Uvh https://mirror.webtatic.com/yum/el7/webtatic-release.rpm
获取https://mirror.webtatic.com/yum/el7/webtatic-release.rpm
警告:/var/tmp/rpm-tmp.UmtXta: 头V4 RSA/SHA1 Signature, 密钥 ID 62e74ca5: NOKEY
准备中...                          ################################# [100%]
正在升级/安装...1:webtatic-release-7-3             ################################# [100%]
步骤 2:安装 PHP 及依赖扩展
[root@zabbix-server ~]# yum -y install php72w php72w-cli php72w-common php72w-devel php72w-embedded php72w-gd php72w-mbstring php72w-pdo php72w-xml php72w-fpm php72w-mysqlnd php72w-opcache php72w-ldap php72w-bcmath
步骤 3:配置 PHP 环境
3.1 修改 PHP-FPM 运行用户
[root@zabbix-server ~]# vim /etc/php-fpm.d/www.conf
# 第 8 行:user = nginx
# 第 10 行:group = nginx
3.2 配置 Nginx 支持 PHP
[root@zabbix-server ~]# vim /etc/nginx/conf.d/default.conf
# 1. 第9行: index.php:index index.php index.html index.htm;
# 2. 配置php请求被传送到后端的php-fpm模块,默认情况下php配置块是被注释的,此时去掉注释并修改把fastcgi_param中的/scripts改为$document_root。root是配置php程序放置的根目录。
# 第29~35行:
location ~ \.php$ {root           /usr/share/nginx/html;fastcgi_pass   127.0.0.1:9000;fastcgi_index  index.php;fastcgi_param  SCRIPT_FILENAME  $document_root$fastcgi_script_name;  # 关键修改include        fastcgi_params;
}
3.3 优化 PHP 配置(满足 Zabbix 要求)
[root@zabbix-server ~]# vim /etc/php.ini
# 核心配置修改:
expose_php = Off                  # 359行:隐藏 PHP 版本
short_open_tag = On               # 202行:支持 PHP 短标签
max_execution_time = 300          # 368行:脚本最大执行时间(Zabbix 要求)
max_input_time = 300              # 378行:接收数据最大等待时间
memory_limit = 128M               # 389行:脚本最大占用内存
post_max_size = 16M               # 656行:POST 数据最大尺寸
upload_max_filesize = 2M          # 799行:上传文件最大尺寸
always_populate_raw_post_data = -1# 800行:支持接收原始 POST 数据
date.timezone = Asia/Shanghai     # 877行:设置时区为上海
步骤 4:启动服务并测试
# 启动 PHP-FPM 并设置开机自启
[root@zabbix-server ~]# systemctl enable php-fpm --now
Created symlink from /etc/systemd/system/multi-user.target.wants/php-fpm.service to /usr/lib/systemd/system/php-fpm.service.# 重启 Nginx 使配置生效
[root@zabbix-server ~]# systemctl restart nginx
测试 1:PHP 环境是否正常
[root@zabbix-server ~]# echo "<?php phpinfo(); ?>" > /usr/share/nginx/html/info.php[root@zabbix-server ~]# netstat -ntap | grep 9000
tcp        0      0 127.0.0.1:9000          0.0.0.0:*               LISTEN      12781/php-fpm: mast
访问 http://192.168.100.110/info.php,若显示 PHP 信息则正常。

测试 2:PHP 连接数据库是否正常
# 创建测试文件(先关闭防火墙,再测试连接数据库)
[root@zabbix-server html]# vim index.php
<?php$link=mysqli_connect('127.0.0.1','root','123');if ($link) echo "连接成功 !!!";else echo "连接失败 !!!";
?># 注:mysql_connect扩展自 PHP 5.5.0 起已废弃,改用mysqli或pdo_mysql
访问 http://192.168.100.110/index.php,显示「连接成功」则正常。

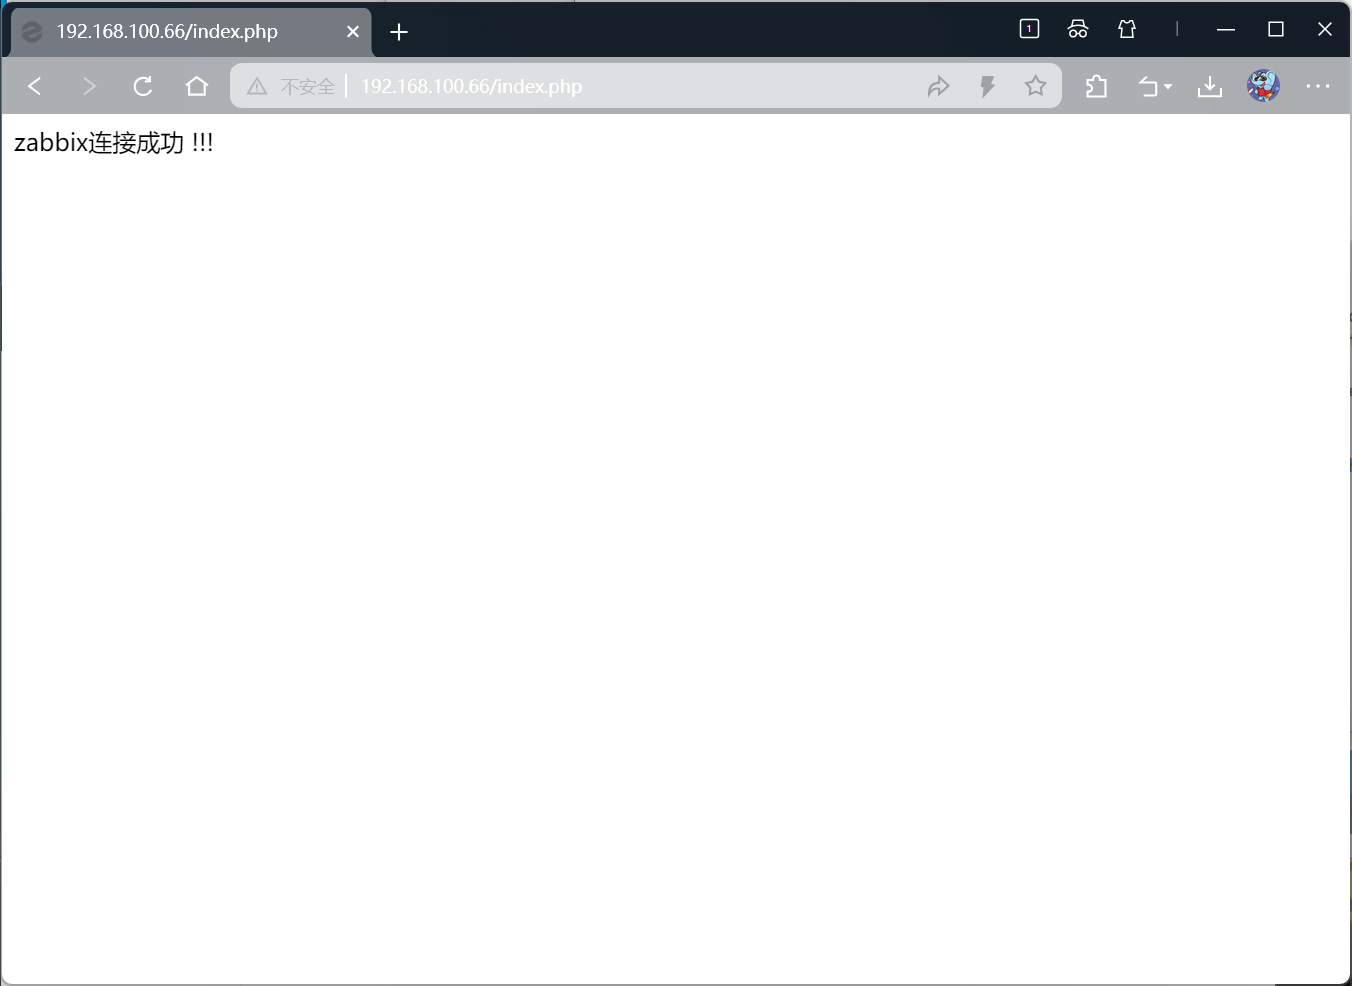
测试 3:PHP 连接Zabbix数据库是否正常
[root@zabbix-server ~]# cd /usr/share/nginx/html/
# 先创建 Zabbix 数据库和用户(后续 Zabbix 会用到)
[root@zabbix-server html]# mysql -uroot -p123
Welcome to the MariaDB monitor.  Commands end with ; or \g.
Your MariaDB connection id is 4
Server version: 10.5.23-MariaDB MariaDB ServerCopyright (c) 2000, 2018, Oracle, MariaDB Corporation Ab and others.Type 'help;' or '\h' for help. Type '\c' to clear the current input statement.MariaDB [(none)]> show databases;
+--------------------+
| Database           |
+--------------------+
| information_schema |
| mysql              |
| performance_schema |
| test               |
+--------------------+
4 rows in set (0.002 sec)# 注:`collate utf8_bin` 作用:指定字符排序规则,影响查询排序、筛选、分组等结果,确保中文处理正常。
MariaDB [(none)]> create database zabbix character set utf8 collate utf8_bin;
Query OK, 1 row affected (0.000 sec)MariaDB [(none)]> show databases;
+--------------------+
| Database           |
+--------------------+
| information_schema |
| mysql              |
| performance_schema |
| test               |
| zabbix             |
+--------------------+
5 rows in set (0.000 sec)MariaDB [(none)]> grant all privileges on *.* to 'zabbix'@'%' identified by 'admin123';
Query OK, 0 rows affected (0.001 sec)MariaDB [(none)]> grant all privileges on *.* to 'zabbix'@'localhost' identified by 'admin123';
Query OK, 0 rows affected (0.000 sec)MariaDB [(none)]> flush privileges;
Query OK, 0 rows affected (0.000 sec)MariaDB [(none)]> exit
Bye# collate的作用
# 对于mysql中那些字符类型的列,如VARCHAR,CHAR,TEXT类型的列,都需要有一个COLLATE类型来告知mysql如何对该列进行排序和比较。COLLATE会影响到ORDER BY语句的顺序,会影响到WHERE条件中大于小于号筛选出来的结果,会影响**DISTINCT**、**GROUP BY**、**HAVING**语句的查询结果。另外,mysql建索引的时候,如果索引列是字符类型,也会影响索引创建,只不过这种影响我们感知不到。凡是涉及到字符类型比较或排序的地方,都会和COLLATE有关。# 创建测试文件(先关闭防火墙,再测试连接数据库)
[root@zabbix-server html]# vim index.php
<?php$link=mysqli_connect('127.0.0.1','zabbix','admin123');if ($link) echo "Zabbix数据库连接成功!";else echo "Zabbix数据库连接失败!";
?>
访问 http://192.168.100.110/index.php,显示「连接成功」则正常。
常见问题:本地无法登录数据库
若出现空用户占用导致登录失败,执行以下命令清理:
[root@zabbix-server html]# mysql -u root -pabc123
MariaDB [(none)]> SELECT user, host FROM mysql.user;  # 查看空用户
MariaDB [(none)]> DROP USER ''@localhost;
MariaDB [(none)]> DROP USER ''@cacti;  # 若存在其他空用户,同理删除
MariaDB [(none)]> FLUSH PRIVILEGES;
三、Zabbix Server 部署
3.1 准备 Zabbix 安装包
# 下载 Zabbix 6.0.6 源码包(也可手动下载上传)
# wget https://cdn.zabbix.com/zabbix/sources/stable/6.0/zabbix-6.0.6.tar.gz
# 我本地有直接导入进来zabbix-6.0.6.tar.gz软件包即可
[root@zabbix-server ~]# rz -E
rz waiting to receive.# 解压
[root@zabbix-server ~]# tar zxvf zabbix-6.0.6.tar.gz
3.2 导入 Zabbix 数据库脚本
[root@zabbix-server ~]# cd zabbix-6.0.6/
[root@zabbix-server zabbix-6.0.6]# cd database/
[root@zabbix-server database]# cd mysql/# 按顺序导入脚本(依赖关系:schema → images → data → 其他)
[root@zabbix-server mysql]# mysql -uroot -p123 zabbix < schema.sql
[root@zabbix-server mysql]# mysql -uroot -p123 zabbix < images.sql
[root@zabbix-server mysql]# mysql -uroot -p123 zabbix < data.sql
[root@zabbix-server mysql]# mysql -uroot -p123 zabbix < double.sql
[root@zabbix-server mysql]# mysql -uroot -p123 zabbix < history_pk_prepare.sql# 验证:进入数据库查看表数量(共 178 张表)
[root@zabbix-server mysql]# mysql -uroot -p123
Welcome to the MariaDB monitor.  Commands end with ; or \g.
Your MariaDB connection id is 11
Server version: 10.5.23-MariaDB MariaDB ServerCopyright (c) 2000, 2018, Oracle, MariaDB Corporation Ab and others.Type 'help;' or '\h' for help. Type '\c' to clear the current input statement.MariaDB [(none)]> show databases;
+--------------------+
| Database           |
+--------------------+
| information_schema |
| mysql              |
| performance_schema |
| test               |
| zabbix             |
+--------------------+
5 rows in set (0.000 sec)MariaDB [(none)]> use zabbix;
Reading table information for completion of table and column names
You can turn off this feature to get a quicker startup with -ADatabase changed
MariaDB [zabbix]> show tables;
+----------------------------+
| Tables_in_zabbix           |
+----------------------------+
| acknowledges               |
| actions                    |
| alerts                     |
| auditlog                   |
| autoreg_host               |
| conditions                 |
| config                     |
| config_autoreg_tls         |
| corr_condition             |
| corr_condition_group       |
| corr_condition_tag         |
| corr_condition_tagpair     |
| corr_condition_tagvalue    |
| corr_operation             |
| correlation                |
| dashboard                  |
| dashboard_page             |
| dashboard_user             |
| dashboard_usrgrp           |
| dbversion                  |
| dchecks                    |
| dhosts                     |
| drules                     |
| dservices                  |
| escalations                |
| event_recovery             |
| event_suppress             |
| event_tag                  |
| events                     |
| expressions                |
| functions                  |
| globalmacro                |
| globalvars                 |
| graph_discovery            |
| graph_theme                |
| graphs                     |
| graphs_items               |
| group_discovery            |
| group_prototype            |
| ha_node                    |
| history                    |
| history_log                |
| history_log_old            |
| history_old                |
| history_str                |
| history_str_old            |
| history_text               |
| history_text_old           |
| history_uint               |
| history_uint_old           |
| host_discovery             |
| host_inventory             |
| host_tag                   |
| hostmacro                  |
| hosts                      |
| hosts_groups               |
| hosts_templates            |
| housekeeper                |
| hstgrp                     |
| httpstep                   |
| httpstep_field             |
| httpstepitem               |
| httptest                   |
| httptest_field             |
| httptest_tag               |
| httptestitem               |
| icon_map                   |
| icon_mapping               |
| ids                        |
| images                     |
| interface                  |
| interface_discovery        |
| interface_snmp             |
| item_condition             |
| item_discovery             |
| item_parameter             |
| item_preproc               |
| item_rtdata                |
| item_tag                   |
| items                      |
| lld_macro_path             |
| lld_override               |
| lld_override_condition     |
| lld_override_opdiscover    |
| lld_override_operation     |
| lld_override_ophistory     |
| lld_override_opinventory   |
| lld_override_opperiod      |
| lld_override_opseverity    |
| lld_override_opstatus      |
| lld_override_optag         |
| lld_override_optemplate    |
| lld_override_optrends      |
| maintenance_tag            |
| maintenances               |
| maintenances_groups        |
| maintenances_hosts         |
| maintenances_windows       |
| media                      |
| media_type                 |
| media_type_message         |
| media_type_param           |
| module                     |
| opcommand                  |
| opcommand_grp              |
| opcommand_hst              |
| opconditions               |
| operations                 |
| opgroup                    |
| opinventory                |
| opmessage                  |
| opmessage_grp              |
| opmessage_usr              |
| optemplate                 |
| problem                    |
| problem_tag                |
| profiles                   |
| proxy_autoreg_host         |
| proxy_dhistory             |
| proxy_history              |
| regexps                    |
| report                     |
| report_param               |
| report_user                |
| report_usrgrp              |
| rights                     |
| role                       |
| role_rule                  |
| script_param               |
| scripts                    |
| service_alarms             |
| service_problem            |
| service_problem_tag        |
| service_status_rule        |
| service_tag                |
| services                   |
| services_links             |
| sessions                   |
| sla                        |
| sla_excluded_downtime      |
| sla_schedule               |
| sla_service_tag            |
| sysmap_element_trigger     |
| sysmap_element_url         |
| sysmap_shape               |
| sysmap_url                 |
| sysmap_user                |
| sysmap_usrgrp              |
| sysmaps                    |
| sysmaps_element_tag        |
| sysmaps_elements           |
| sysmaps_link_triggers      |
| sysmaps_links              |
| tag_filter                 |
| task                       |
| task_acknowledge           |
| task_check_now             |
| task_close_problem         |
| task_data                  |
| task_remote_command        |
| task_remote_command_result |
| task_result                |
| timeperiods                |
| token                      |
| trends                     |
| trends_uint                |
| trigger_depends            |
| trigger_discovery          |
| trigger_queue              |
| trigger_tag                |
| triggers                   |
| users                      |
| users_groups               |
| usrgrp                     |
| valuemap                   |
| valuemap_mapping           |
| widget                     |
| widget_field               |
+----------------------------+
178 rows in set (0.002 sec)MariaDB [zabbix]> exit
Bye
3.3 安装 Zabbix Server 依赖
[root@zabbix-server mysql]# yum install -y mysql-devel pcre-devel openssl-devel zlib-devel libxml2-devel net-snmp-devel net-snmp libssh2-devel OpenIPMI-devel libevent-devel openldap-devel libcurl-devel fping gcc gcc-c++ make
3.4 编译安装 Zabbix Server
# 创建 Zabbix 系统用户(无登录权限)
[root@zabbix-server mysql]# useradd -s /sbin/nologin -M zabbix
[root@zabbix-server mysql]# id zabbix
uid=1001(zabbix) gid=1001(zabbix) 组=1001(zabbix)# 进入源码目录
[root@zabbix-server mysql]# cd ~
[root@zabbix-server ~]# cd zabbix-6.0.6/# 指定编译标准(C99)
[root@zabbix-server zabbix-6.0.6]# export CFLAGS="-std=gnu99"# 配置编译参数(指定配置文件路径、启用核心模块)(时间较长,耐心等待)
[root@zabbix-server zabbix-6.0.6]# ./configure --sysconfdir=/etc/zabbix/ --enable-server --with-mysql --with-net-snmp --with-libxml2 --with-ssh2 --with-openipmi --with-zlib --with-libpthread --with-libevent --with-openssl --with-ldap --with-libcurl --with-libpcre# 编译安装(时间较长,耐心等待)
[root@zabbix-server zabbix-6.0.6]# make install# 验证版本
[root@zabbix-server zabbix-6.0.6]# zabbix_server --version
zabbix_server (Zabbix) 6.0.6
Revision 3f7597e3ea3 27 June 2022, compilation time: Nov  5 2025 15:17:38Copyright (C) 2022 Zabbix SIA
License GPLv2+: GNU GPL version 2 or later <http://gnu.org/licenses/gpl.html>.
This is free software: you are free to change and redistribute it according to
the license. There is NO WARRANTY, to the extent permitted by law.This product includes software developed by the OpenSSL Project
for use in the OpenSSL Toolkit (http://www.openssl.org/).Compiled with OpenSSL 1.0.2k-fips  26 Jan 2017
Running with OpenSSL 1.0.2k-fips  26 Jan 2017
3.5 配置 Zabbix Server
步骤 1:修改核心配置文件
[root@zabbix-server zabbix-6.0.6]# vim /etc/zabbix/zabbix_server.conf
# 关键配置(其他默认即可)
LogFile=/var/log/zabbix_server.log  # 38行:日志文件路径
DBPassword=admin123                 # 123行:Zabbix 数据库密码(与之前创建的一致)
步骤 2:创建日志文件并授权
# 创建日志文件并修改属组和属主
[root@zabbix-server zabbix-6.0.6]# touch /var/log/zabbix_server.log
[root@zabbix-server zabbix-6.0.6]# chown zabbix:zabbix /var/log/zabbix_server.log  # 赋予 Zabbix 用户权限
步骤 3:配置 Systemd 服务管理
[root@zabbix-server zabbix-6.0.6]# vim /usr/lib/systemd/system/zabbix-server.service
[Unit]
Description=Zabbix Server with MySQL DB
After=syslog.target network.target mysqld.service[Service]
Type=simple
ExecStart=/usr/local/sbin/zabbix_server -f
User=zabbix[Install]
WantedBy=multi-user.target[root@zabbix-server zabbix-6.0.6]# id zabbix
uid=1001(zabbix) gid=1001(zabbix) 组=1001(zabbix)
步骤 4:启动 Zabbix Server
# 重载 Systemd 配置
[root@zabbix-server zabbix-6.0.6]# systemctl daemon-reload# 启动服务并设置开机自启
[root@zabbix-server zabbix-6.0.6]# systemctl start zabbix-server
[root@zabbix-server zabbix-6.0.6]# systemctl enable zabbix-server# 验证端口(Zabbix Server 默认端口 10051)
[root@zabbix-server zabbix-6.0.6]# netstat -ntap | grep 10051
tcp        0      0 0.0.0.0:10051           0.0.0.0:*               LISTEN      12877/zabbix_server
3.6 部署 Zabbix 前端页面
# 复制前端文件到 Nginx 网站根目录
[root@zabbix-server zabbix-6.0.6]# cp -r /root/zabbix-6.0.6/ui/* /usr/share/nginx/html/# 授权(Nginx 用户需读写权限)
[root@zabbix-server zabbix-6.0.6]# chown -R nginx:nginx /usr/share/nginx/html/
3.7 访问 Zabbix 前端
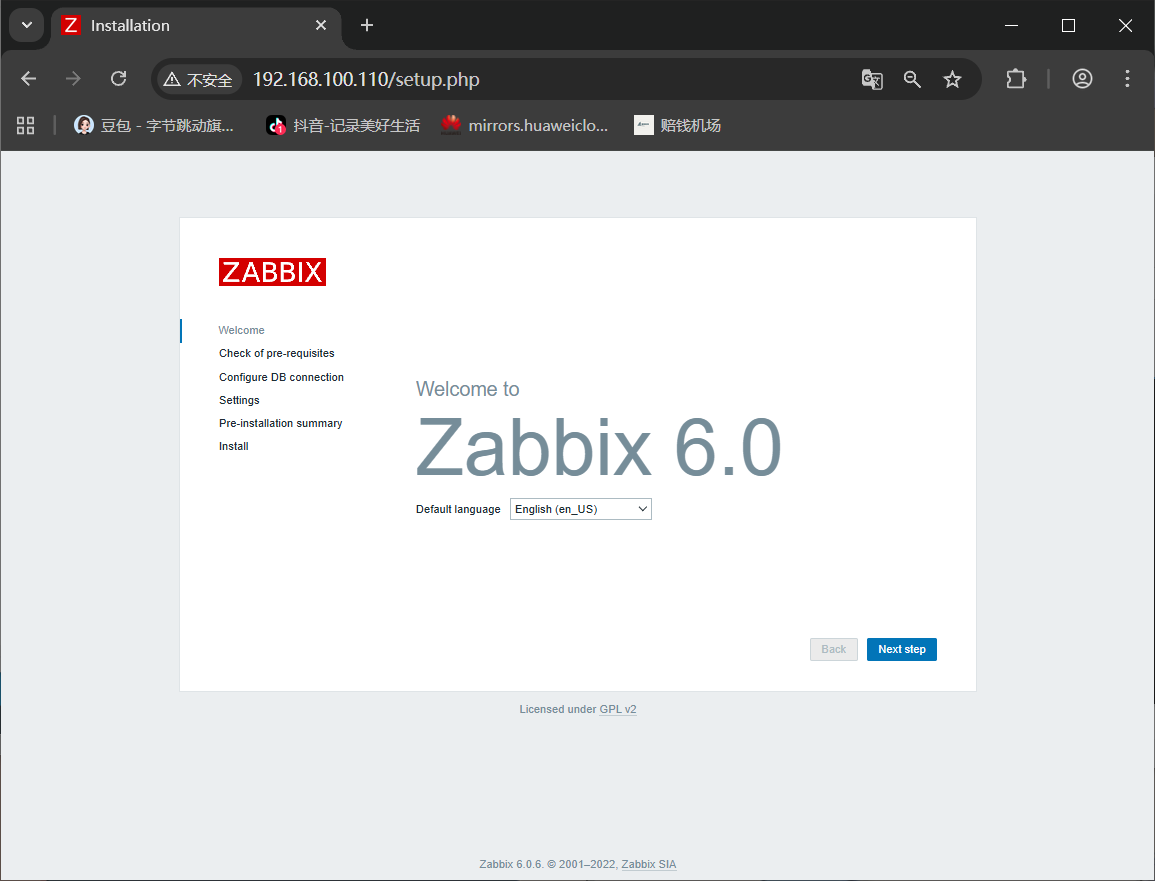
- 浏览器访问:
http://192.168.100.110/ - 按向导完成初始化(所有检查项均为 OK 即可)
- 数据库配置:填写
zabbix数据库、用户名zabbix、密码admin123 - 登录账号:
Admin(首字母大写),默认密码:zabbix
四、被监控端部署 Zabbix Agent2
4.1 配置 Zabbix YUM 源
# 更新 CA 证书(避免下载失败)
[root@centos7 ~]# yum update ca-certificates -y# 安装 Zabbix 官方源
[root@centos7 ~]# rpm -ivh https://repo.zabbix.com/zabbix/6.0/rhel/7/x86_64/zabbix-release-6.0-4.el7.noarch.rpm
获取https://repo.zabbix.com/zabbix/6.0/rhel/7/x86_64/zabbix-release-6.0-4.el7.noarch.rpm
警告:/var/tmp/rpm-tmp.hzRlXL: 头V4 RSA/SHA512 Signature, 密钥 ID a14fe591: NOKEY
准备中...                          ################################# [100%]
正在升级/安装...1:zabbix-release-6.0-4.el7         ################################# [100%]
4.2 安装并配置 Agent2
# 安装 Zabbix Agent2
[root@centos7 ~]# yum install zabbix-agent2 -y# 修改配置文件
[root@centos7 ~]# vim /etc/zabbix/zabbix_agent2.conf
# 关键配置:
PidFile=/var/run/zabbix/zabbix_agent2.pid    # 13行:PID 文件路径
LogFile=/var/log/zabbix/zabbix_agent2.log    # 32行:日志文件路径
LogFileSize=0                                # 43行:日志不轮转(按系统日志策略)
Server=192.168.100.110                       # 82行:Zabbix Server IP(必填)
ServerActive=192.168.100.110                 # 135行:主动模式 Server IP(必填)
Hostname=test                                # 146行:被监控端主机名(需与 Server 配置一致)
Include=/etc/zabbix/zabbix_agent2.d/*.conf   # 283行:扩展配置目录
4.3 启动 Agent2 服务
# 启动服务并设置开机自启
[root@centos7 ~]# systemctl enable zabbix-agent2 --now
Created symlink from /etc/systemd/system/multi-user.target.wants/zabbix-agent2.service to /usr/lib/systemd/system/zabbix-agent2.service.# 验证端口(Agent2 默认端口 10050)
[root@centos7 ~]# netstat -ntap | grep 10050
五、常见问题排查
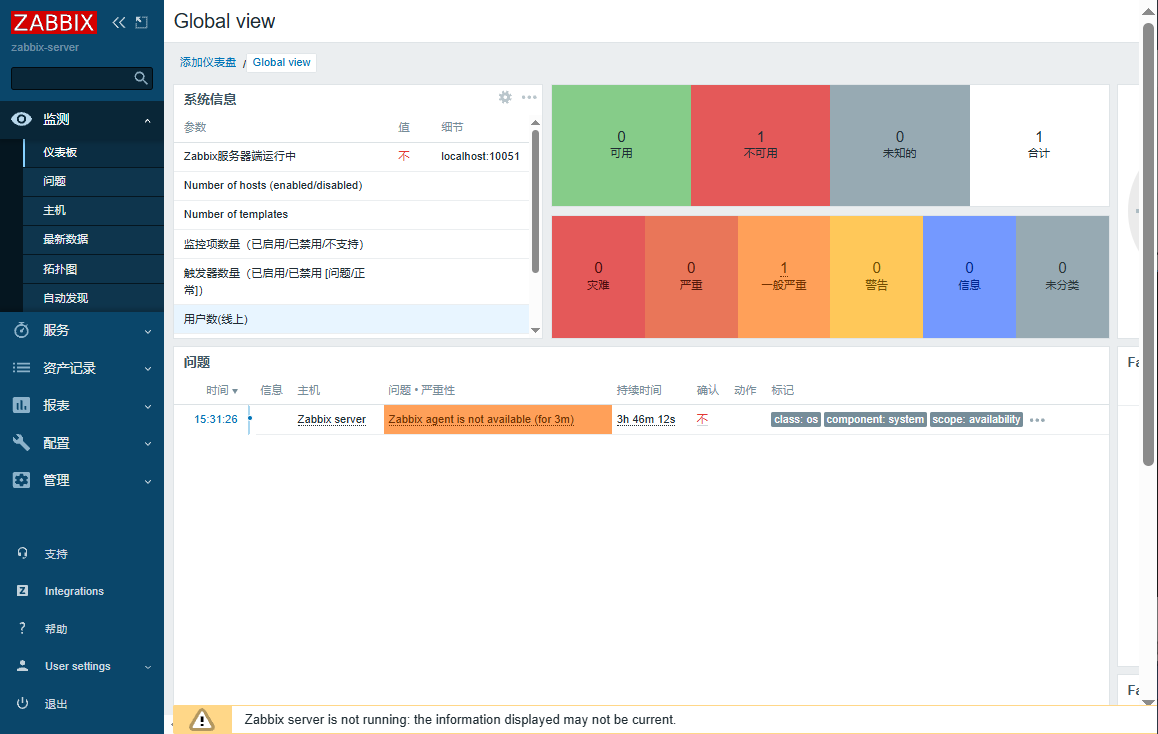
- Zabbix Server 启动失败:查看日志
tail -f /var/log/zabbix_server.log,常见原因:数据库密码错误、日志文件权限不足。 - 前端访问空白:检查 Nginx/PHP-FPM 服务状态,查看
tail -f /var/log/nginx/error.log。 - Agent2 无法连接 Server:检查防火墙是否开放 10050/10051 端口,
Server配置是否正确。 - 监控数据不显示:检查 Agent2 日志
tail -f /var/log/zabbix/zabbix_agent2.log,确认主机模板关联正确。
六、总结
本教程基于 LNMP 架构完成 Zabbix 6.0 服务端和 Agent2 客户端部署,核心要点:
- 数据库必须使用 MariaDB 10.5+,否则 Zabbix 无法正常运行
- PHP 配置需满足 Zabbix 性能要求(执行时间、内存等)
- Agent2 与 Server 需确保网络互通,配置文件中的
Server和Hostname是关键 - 部署完成后可根据需求扩展监控模板、自定义监控项等功能