云计算——虚拟化介绍
一、云计算的起源
1.AWS 简介
- 亚马逊的技术团队最早于2002年开始探索云计算的潜力,推出了亚马逊简单存储服务(S3),允许开发者在互联网上存储数据,并通过HTTP访问。2006年,亚马逊正式推出了Amazon Web Services。这一创新打破了传统IT基础设施的成本与管理局限,允许企业按需租用计算能力。
- AWS的成功激发了更多公司进入云计算市场不仅促进了云计算的发展,也使得更多企业开始转向云服务,减少了传统IT基础设施的投资和运维成本,推动了“云优先”的发展趋势。通过AWS,亚马逊将云计算转变为一种标准化的商业服务,极大地推动了技术创新,改变了企业如何使用计算资源的方式。
2.什么是云计算
- 云计算(Cloud Computing)是一种通过互联网提供计算资源的模式。它允许用户按需访问共享的计算资源(如服务器、存储、网络、数据库等),而不需要像传统方式那样拥有、维护或管理这些硬件和软件资源。
3.云计算的特征
-
按需自服务(On-demand self-service)
用户可以根据需要动态地获得计算资源,如存储空间、计算能力等,而无需人工干预。用户可以随时、根据需求进行资源的扩展或缩减。 -
广泛的网络访问(Broad network access)
云计算服务通过互联网提供,可以从任何支持网络的设备(如智能手机、笔记本电脑、桌面计算机等)访问。这种灵活性使得用户能够随时随地使用服务。 -
资源池化(Resource pooling)
云服务商将多个用户的计算资源集中在共享的数据中心,通过虚拟化技术实现资源池化。资源可以根据需求动态分配给不同的客户,形成多租户模式。 -
弹性(Elasticity)
云计算平台可以根据实际需求自动扩展或缩减计算资源。例如,某个网站在流量突然增加时,云平台可以自动增加计算和存储资源,反之则减少,从而提高效率,降低成本。 -
计量服务(Measured service)
用户根据使用的资源量(如存储空间、计算时间等)付费。这种按需付费模式使得云计算非常具有成本效益,用户可以避免不必要的支出。
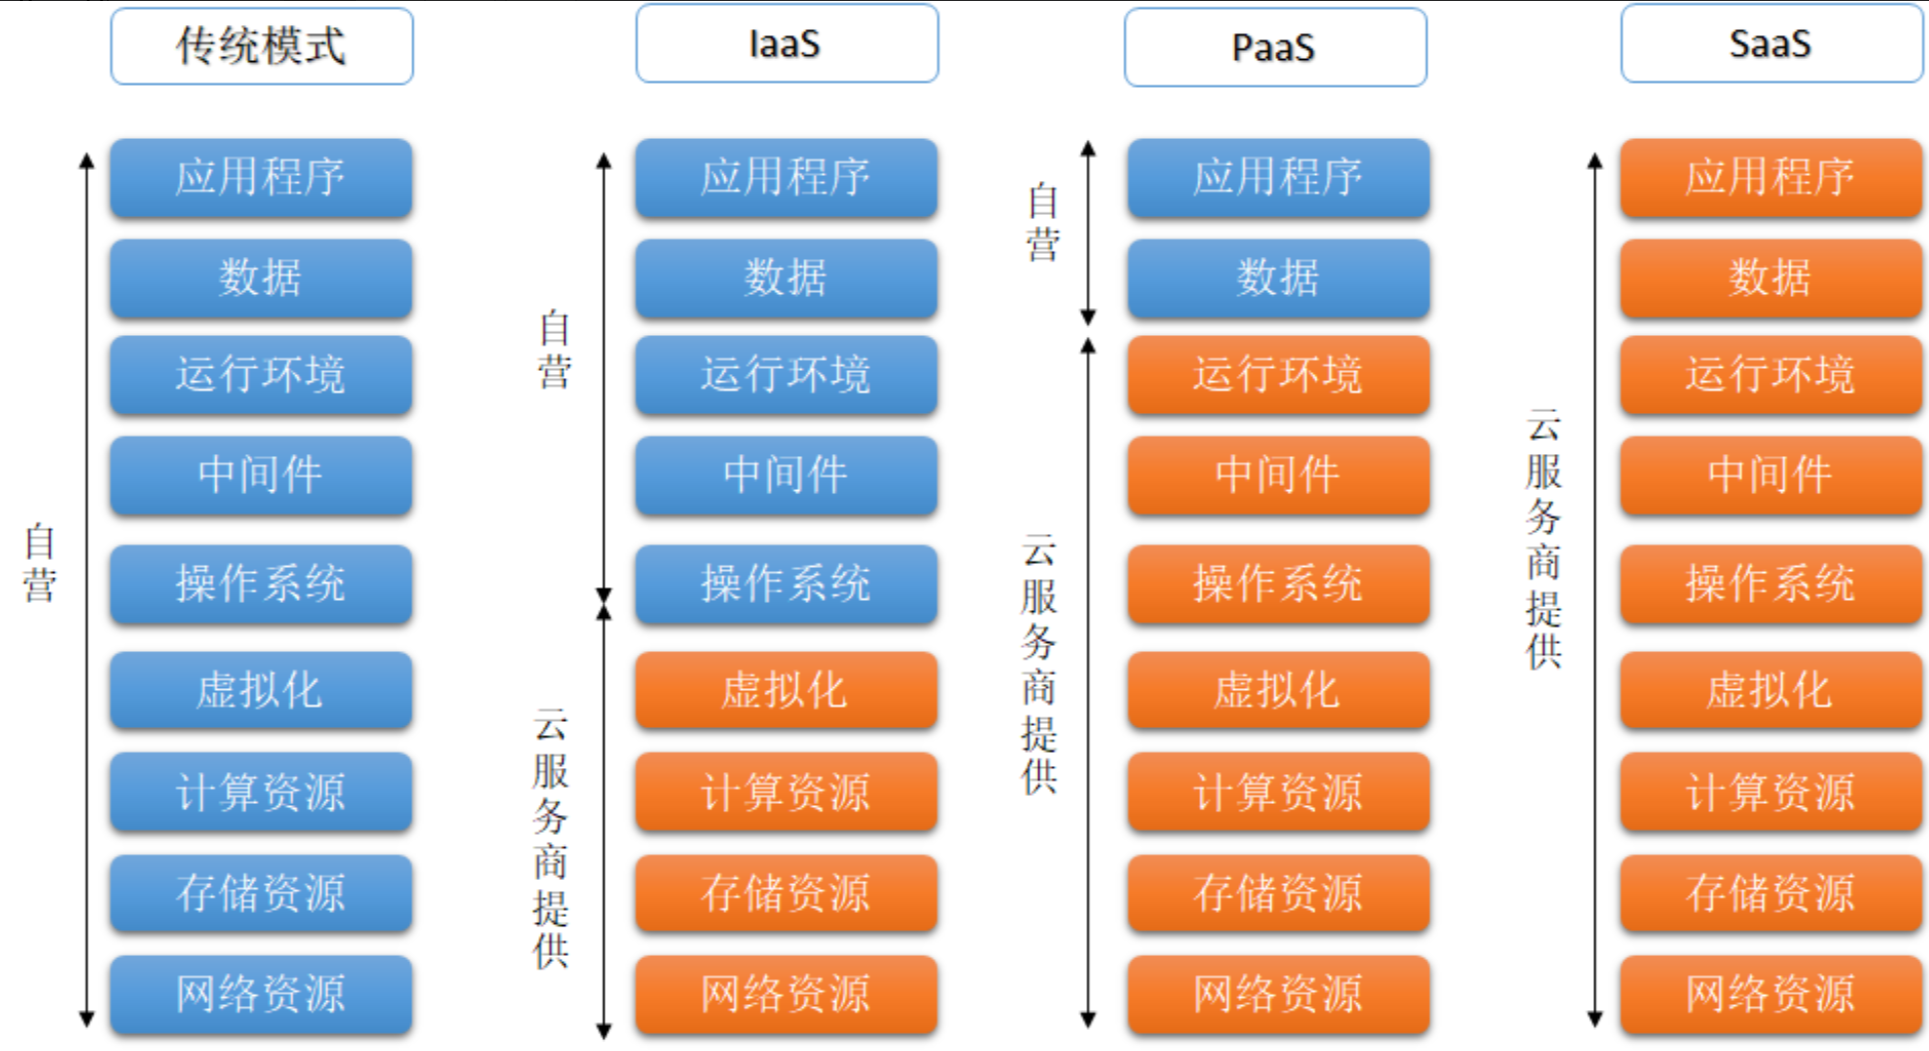
4.云计算的服务模型
云计算通常分为三个主要的服务模型:
- 基础设施即服务(IaaS, Infrastructure as a Service)
- 平台即服务(PaaS, Platform as a Service)
- 软件即服务(SaaS, Software as a Service)
具体图解:
二、Docker 简介
1.服务模型的特征
IAAS服务
- 使用KVM(kernel-based virtual machine)创建和管理虚拟机——虚拟机个数较少
- 使用openstack(VM管理平台)管理虚拟机——虚拟机较多
PAAS服务
-
单个容器使用docker去实现
-
多个容器使用容器编排(kubernetes[k8s]/ACK[阿里云])
SAAS服务
- 开箱即用,注册后就可以使用
2.Docker容器化技术
注:在容器化技术出现之前,应用部署通常需要部署在不同的环境中(开发、测试、语法、生产),容易产生各种各样的报错
(1)名词解释
- 容器:应用在容器中运行(类似于虚拟机,是一个轻量级虚拟化)
- 镜像:应用+依赖
- 关联:做好镜像,让镜像运行起来,变成容器,使其可以运行在不同的环境中
(2)容器的特征和优点
- 快速部署应用,快速启动,高效利用系统资源
- 应用部署时不需要依赖底层操作系统环境,运行环境一致
- 应用所有的依赖都被放在镜像中,迁移、维护和扩展更轻松
- 方便持续交付和部署
(3)Docker基本实现原理
- 资源隔离(name space):命名空间,提供容器间的隔离
- 资源限额(cgroup):限制容器资源的使用上限
- 分层存储(UFS):联合文件系统,提供文件和镜像的存储
3.容器与虚拟机的区别
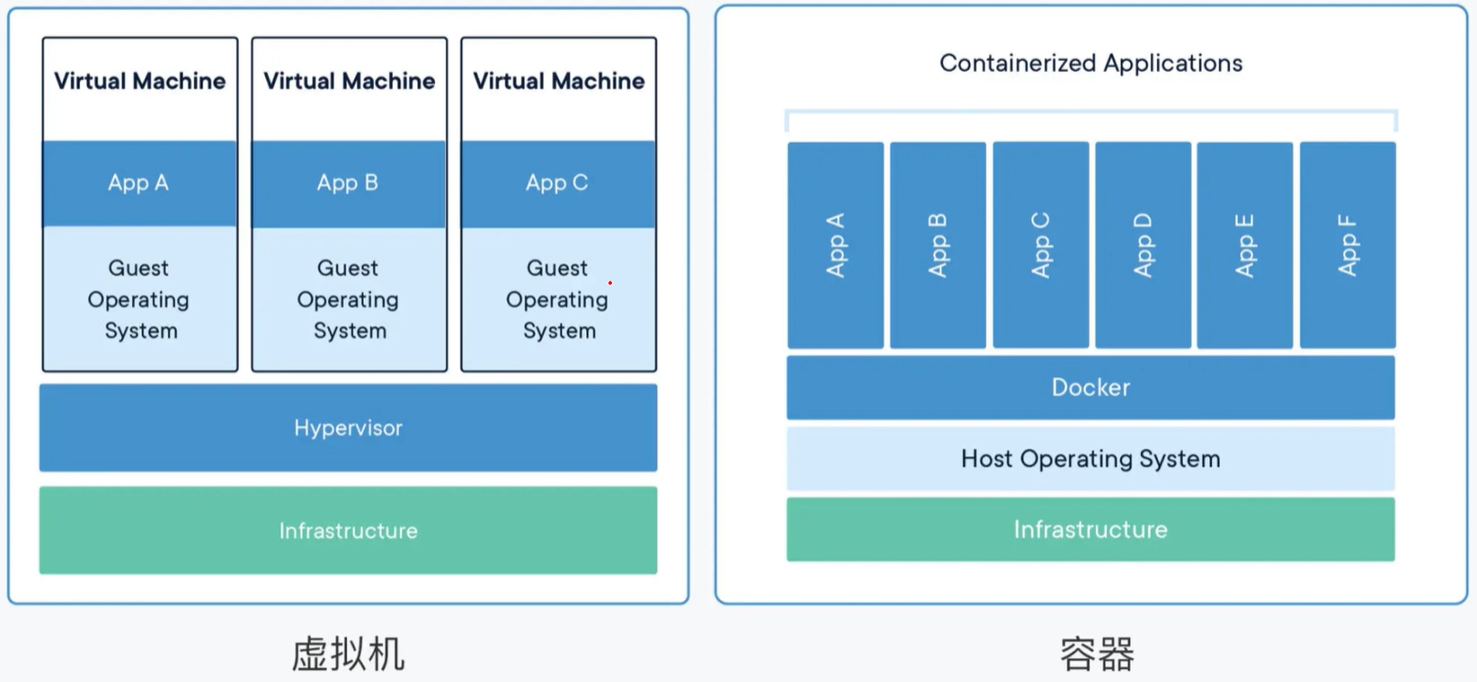
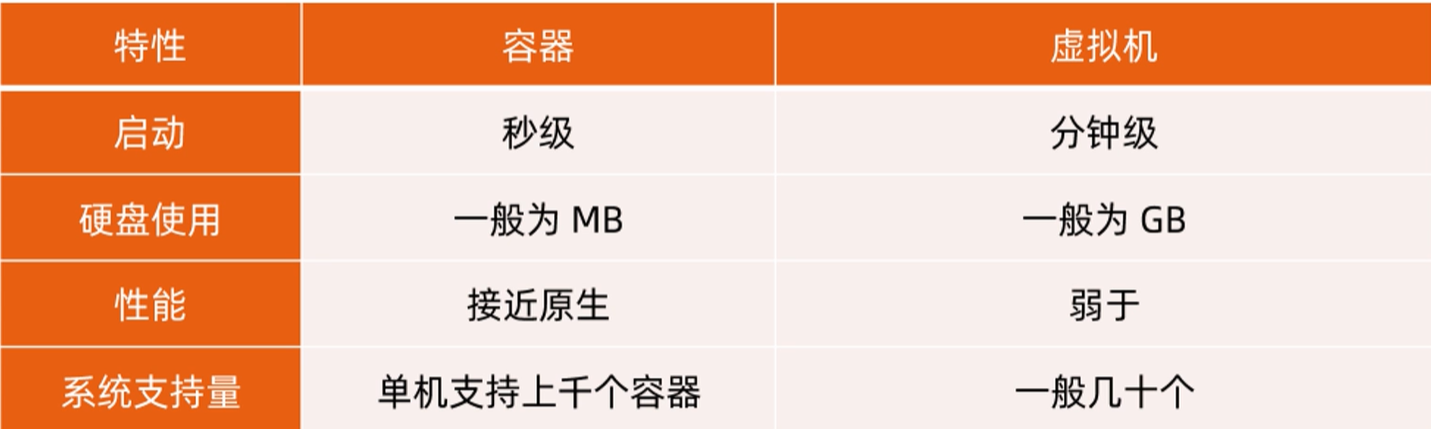
注:容器虚拟化的是操作系统而不是硬件,容器之间是共享同一套操作系统资源的。虚拟机技术是虚拟出一套硬件后,在其上运行一个完整操作系统。因此容器的隔离级别会稍低一些
4.Docker容器三要素
- 镜像(image)—— 特殊的文件系统
- 容器(container)—— 镜像运行时的实体
- 仓库(repo)—— 集中存放镜像文件的地方
注:从仓库中下载镜像,运行镜像后得到容器,再将容器部署到操作系统环境当中
5.Docker架构
Docker 使用客户端-服务器 (C/S) 架构模式,即可使用远程 API 来管理服务端和创建容器
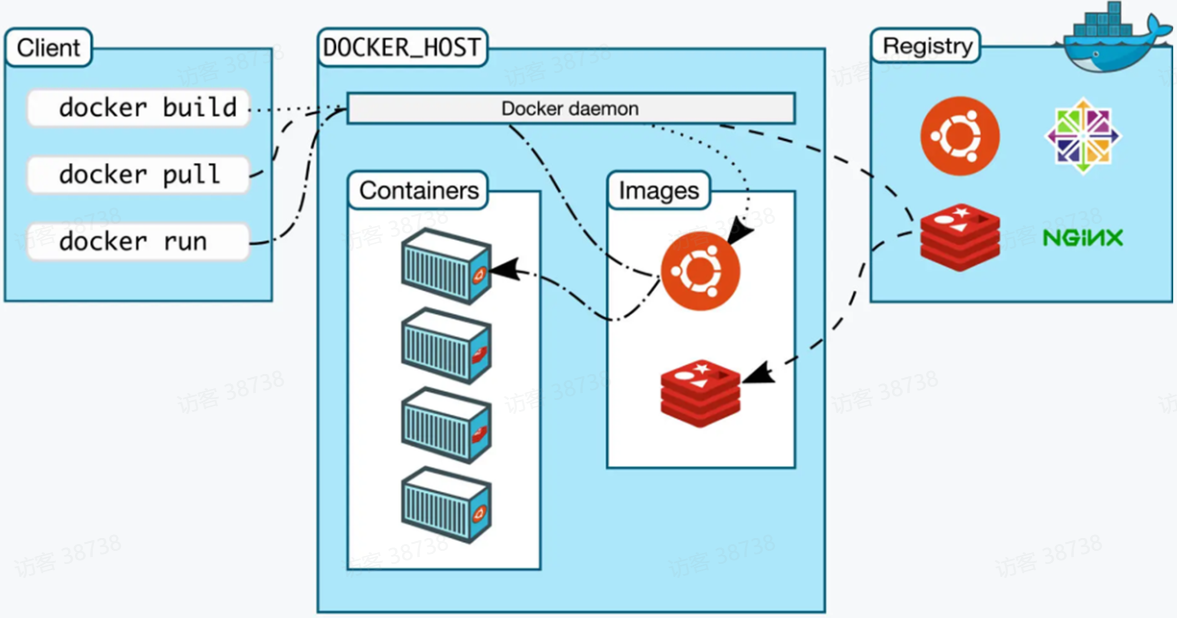
6.Docker 常用命令
- docker rm 删除容器 = docker container rm
- docker rmi 删除镜像 = docker image rm
- docker info 守护进程的系统资源设置
- docker search Docker仓库的查询
- docker pull Docker仓库的下载
- docker ps 容器的查询
- docker run 容器的创建启动
- docker start/stop 容器的启动/停止
- docker images 查看镜像
三、Docker 安装
注:Docker是用go语言写的,编译完成后的二进制文件
1.添加Docker仓库
# 安装 dnf-utils
[root@localhost ~]# dnf -y install dnf-utils
# 添加阿里云 Docker CE 仓库
[root@localhost ~]# dnf config-manager --add-repo http://mirrors.aliyun.com/docker-ce/linux/centos/docker-ce.repo
注:docker发行版本,docker-ce是社区版,docker-ee是企业版
2.指定安装版本
注:在企业中经常指定安装版本
在线安装
# 查看所有版本
[root@localhost ~]# dnf list docker-ce --showduplicates | sort -r
# 安装
[root@localhost ~]# dnf install docker-ce-3:27.5.1 docker-ce-cli-1:27.5.1 containerd.io docker-buildx-plugin docker-compose-plugin# docker-ce       服务端  docker daemon
# docker-ce-cli   客户端
# containerd.io   服务端 依赖
# docker-buildx-plugin  插件
# docker-compose-plugin 插件
离线安装
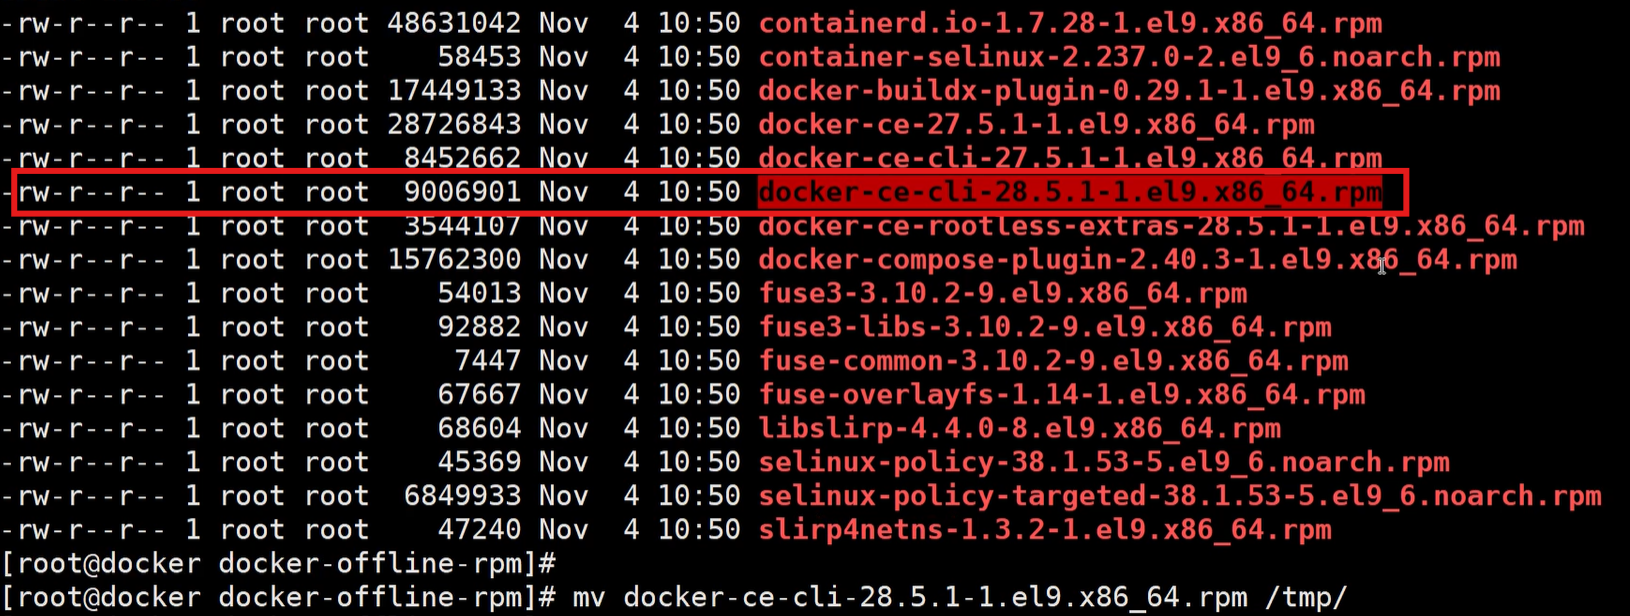
# 下载离线rpm包,不执行安装步骤
[root@localhost ~]# dnf download --resolve docker-ce-3:27.5.1 docker-ce-cli-1:27.5.1 containerd.io docker-buildx-plugin docker-compose-plugin
# 在没有互联网的环境下安装rpm包
[root@localhost ~]# dnf localinstall *.rpm
注:在安装的时候容易出现两个客户端包,需要删掉其中一个
启动Docker
[root@localhost ~]# systemctl enable --now docker
# 查看当前版本
[root@localhost ~]# docker version
Client: Docker Engine - CommunityVersion:           27.5.1API version:       1.47Go version:        go1.22.11Git commit:        9f9e405Built:             Wed Jan 22 13:42:47 2025OS/Arch:           linux/amd64Context:           default
补充:二进制安装(仅限了解)
# 访问官网仓库 https://download.docker.com/linux/static/stable/x86_64/ 下载二进制文件
$ wget https://download.docker.com/linux/static/stable/x86_64/docker-27.5.1.tgz
$ tar xvf docker-27.5.1.tgz
$ mv docker/* /usr/bin/# 启动Docker服务
$ cat << EOF > /usr/lib/systemd/system/containerd.service
[Unit]
Description=containerd container runtime
Documentation=https://containerd.io
After=network.target local-fs.target[Service]
ExecStartPre=-/sbin/modprobe overlay
ExecStart=/usr/bin/containerdType=notify
Delegate=yes
KillMode=process
Restart=always
RestartSec=5
# Having non-zero Limit*s causes performance problems due to accounting overhead
# in the kernel. We recommend using cgroups to do container-local accounting.
LimitNPROC=infinity
LimitCORE=infinity
LimitNOFILE=infinity
# Comment TasksMax if your systemd version does not supports it.
# Only systemd 226 and above support this version.
TasksMax=infinity
OOMScoreAdjust=-999[Install]
WantedBy=multi-user.target
EOF$ cat << EOF > /usr/lib/systemd/system/docker.service
[Unit]
Description=Docker Application Container Engine
Documentation=https://docs.docker.com
After=network-online.target firewalld.service containerd.service
Wants=network-online.target
Requires=containerd.service[Service]
Type=notify
# the default is not to use systemd for cgroups because the delegate issues still
# exists and systemd currently does not support the cgroup feature set required
# for containers run by docker
ExecStart=/usr/bin/dockerd
ExecReload=/bin/kill -s HUP
TimeoutSec=0
RestartSec=2
Restart=always# Note that StartLimit* options were moved from "Service" to "Unit" in systemd 229.
# Both the old, and new location are accepted by systemd 229 and up, so using the old location
# to make them work for either version of systemd.
StartLimitBurst=3# Note that StartLimitInterval was renamed to StartLimitIntervalSec in systemd 230.
# Both the old, and new name are accepted by systemd 230 and up, so using the old name to make
# this option work for either version of systemd.
StartLimitInterval=60s# Having non-zero Limit*s causes performance problems due to accounting overhead
# in the kernel. We recommend using cgroups to do container-local accounting.
LimitNOFILE=infinity
LimitNPROC=infinity
LimitCORE=infinity# Comment TasksMax if your systemd version does not support it.
# Only systemd 226 and above support this option.
TasksMax=infinity# set delegate yes so that systemd does not reset the cgroups of docker containers
Delegate=yes# kill only the docker process, not all processes in the cgroup
KillMode=process
OOMScoreAdjust=-500[Install]
WantedBy=multi-user.target
EOF$ systemctl daemon-reload
$ systemctl start containerd
$ systemctl start docker
$ systemctl enable containerd
$ systemctl enable docker
$ docker info
3.验证是否正确安装
[root@localhost ~]# docker run  ccr.ccs.tencentyun.com/chijinjing/hello-world:latest
[root@localhost ~]# docker run -it ccr.ccs.tencentyun.com/chijinjing/ubuntu:24.04 bash# 若使用以下两条拉取命令,需要镜像加速器
$ docker run hello-world
$ docker run -it ubuntu bash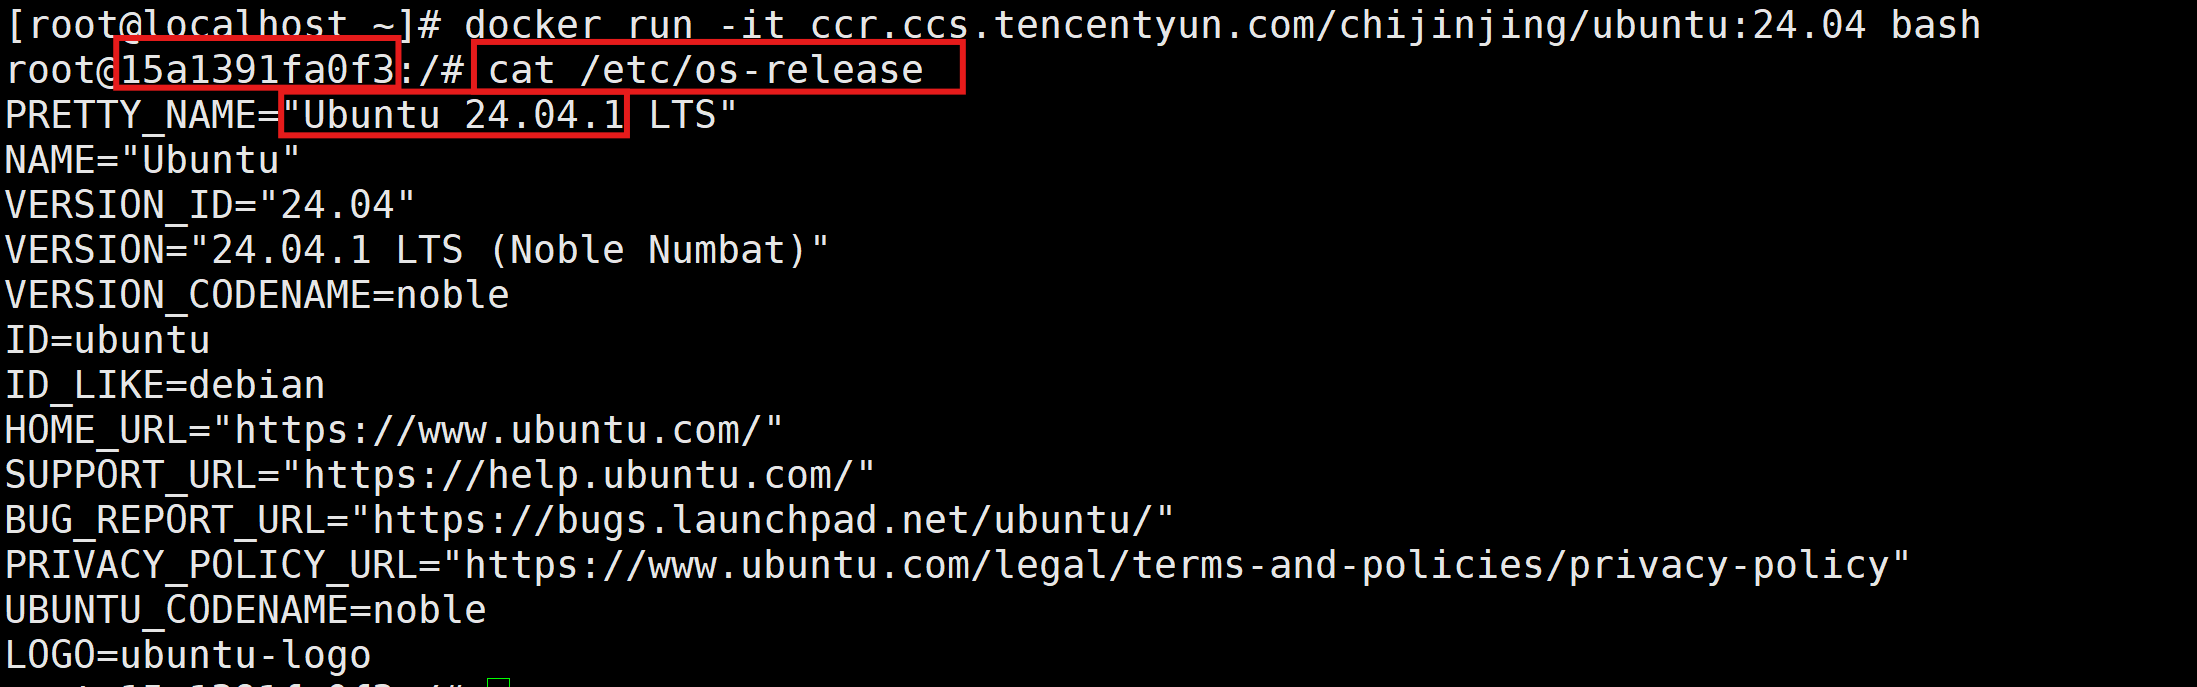
补充:hello-world和ubuntu这两个镜像的地址(一个是阿里云,一个是腾讯云)
Hello-world:
registry.cn-beijing.aliyuncs.com/xxhf/hello-world:latest
ccr.ccs.tencentyun.com/chijinjing/hello-world:latestUbuntu:
ccr.ccs.tencentyun.com/chijinjing/ubuntu:24.04
registry.cn-beijing.aliyuncs.com/xxhf/ubuntu:22.04
4.配置镜像加速器
[root@localhost ~]# tee /etc/docker/daemon.json << 'EOF'
{"registry-mirrors": ["https://docker.1ms.run","https://docker.mybacc.com", "https://docker.m.daocloud.io","https://bkr5wo56.mirror.aliyuncs.com"]
}
EOF
[root@localhost ~]# systemctl daemon-reload
[root@localhost ~]# systemctl restart docker
5.添加Docker镜像
语法:docker run [选项] 镜像 [命令] [参数...]
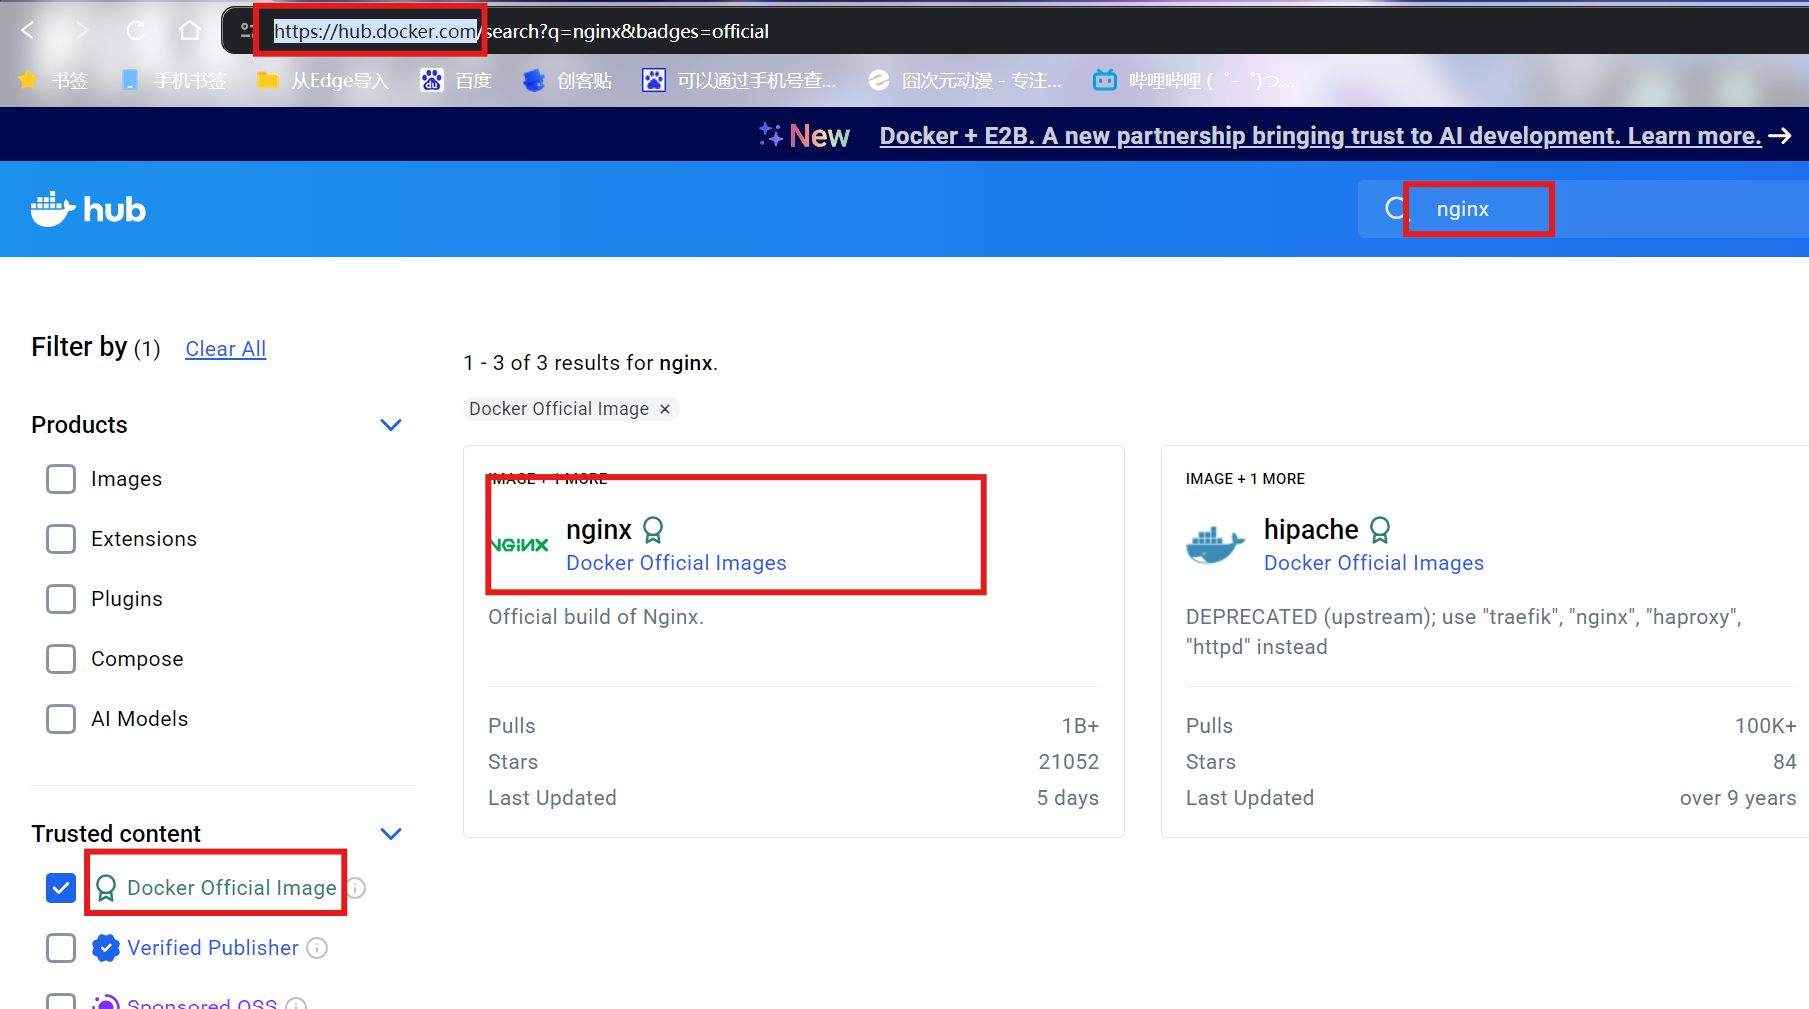
Docker镜像官网:https://hub.docker.com/(需要外网才能进去)
# 配置好镜像加速器
# 添加busybox工具箱
[root@localhost ~]# docker pull busybox
# 添加alpine,一个很小的Linux发行版本
[root@localhost ~]# docker pull alpine:3.22.2
# 添加rockylinux
[root@localhost ~]# docker pull rockylinux/rockylinux:9.4
6.基于镜像启动容器
# 在前台运行
[root@localhost ~]# docker run  -it rockylinux/rockylinux:9.4 bash
# 在后台运行
[root@localhost ~]# docker run  -d  nginx:1.22.1
[root@localhost ~]# docker run -d nginx:1.22.1
10e9001f1f45def17ee442df416b6ea15cf9600b075ba372f2d0c3088f760fbc[root@localhost ~]# docker ps
CONTAINER ID IMAGE COMMAND CREATED STATUS PORTS NAMES
10e9001f1f45 nginx:1.22.1 "/docker-entrypoint.…" 13 seconds ago Up 12 seconds 80/tcp vigorous_napier