有关于cnb自动化的脚本补全
前言
首先最好你可以看上两篇博客的思想和原理
零成本搭建“半永久”Minecraft服务器:一次对云开发平台规则的自动化探索 - MumuHaha Blog
基于GitHub Action的定时启动cnb脚本 - MumuHaha Blog
这两篇博客中,第一篇负责讲解原理,第二篇则是编写的一个通过Github Action来定时启动环境,实现无需服务器,全自动定时启动服务器。那么接下来我会给出后续你可能会用到的一系列脚本。
首先就是cnb的配置文件
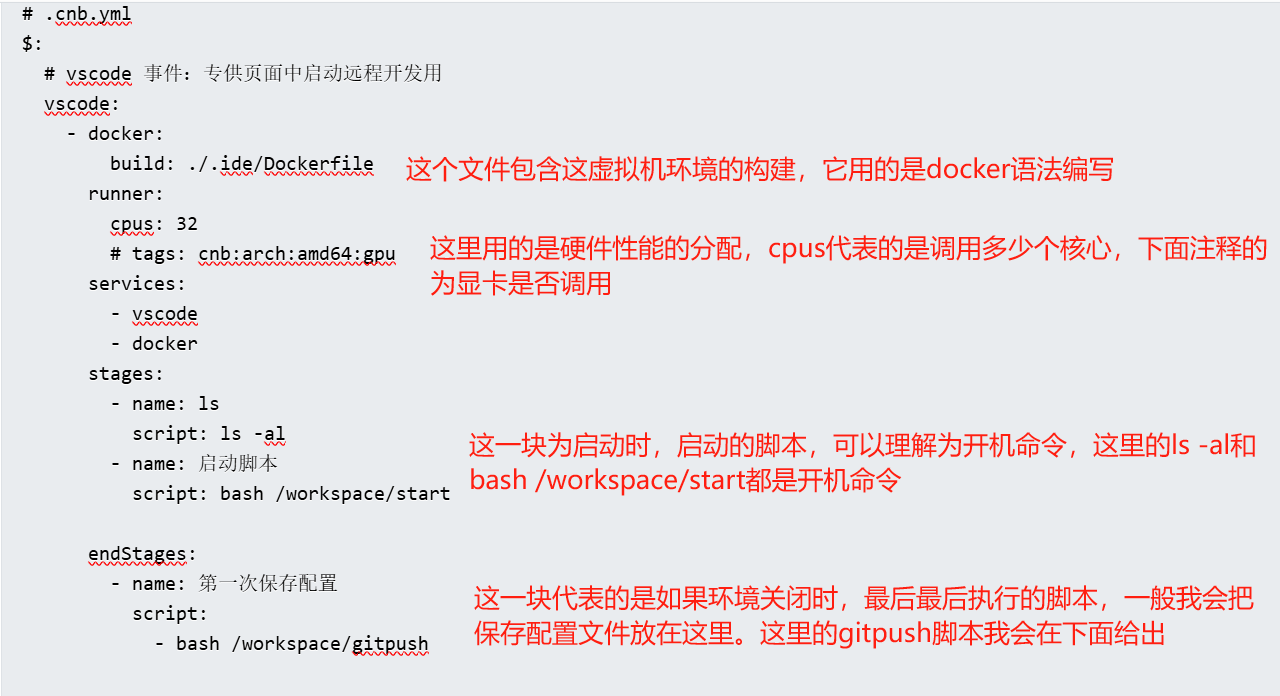
cnb的配置文件命名为.cnb.yml,他是用来标记cnb启动的一些配置文件。当然你不需要记住很多。接下来我会给出一个我服务器的示例文件。
$:# vscode 事件:专供页面中启动远程开发用vscode:- docker:build: ./.ide/Dockerfilerunner:cpus: 32# tags: cnb:arch:amd64:gpuservices:- vscode- dockerstages:- name: lsscript: ls -al- name: 启动脚本script: bash /workspace/startendStages:- name: 第一次保存配置script: - bash /workspace/gitpush如上便是服务器启动的示例文件。顾名思义,很多人看到示例文件就差不多懂了。
如上我已经给出配置文件的语法。接下来就是如何持久化保存文件。
持久化保存原理
由于cnb其实是依赖于git的管理方式,一切的配置文件在重新启动后都会丢失,但是有一个位置比较特殊,那就是/workspace文件夹,这里的文件夹在开发环境开启时和cnb仓库的目录文件夹是一样的。如果我们在这一个文件夹进行修改的话,重新启动环境…
当然还是不能保存(,但是为啥我说这一个文件夹很特殊呢?正式上面我说的这个文件夹,在“开机的时候”和cnb仓库是一样的。那么我们只需要在关机的时候把/workspace文件夹中的内容的修改通过git命令提交上去,那么即使重新开机,我开发环境的/workspace文件夹即使从cnb仓库中拉取,但是由于我已经进行更新了,所以我拉取的就是我更新后的文件。
这里我说的可能比较绕也可能说的不怎么清楚但是你只需要记住所有文件都不能持久化,除了/workspace文件夹的内容!!!
持久化保存的脚本
既然给出了原理那么只需要把修改提交就可以了吧
所以理所当然的一个最简单的脚本
git add .
git commit -m "数据更新,这里写什么都行"
git push origin main
但是这里会有一个问题,如果是用过github的人应该都知道,github不允许在上传超过100M的文件,需要通过git lfs来进行上传。在cnb这个限制是250M所以我们需要找到大于250M的文件把他关联到.gitattributes文件中,这里我给出一键脚本
#!/bin/bash# ====================================================================
# Git 智能推送脚本 (精简修复版)
# 作者: Gemini
# 描述: 修复 LFS 提交流程错误,且不修改 .gitignore。文件大小限制为 256MB。
# ====================================================================# 检查当前目录是否为 Git 仓库
if ! git rev-parse --is-inside-work-tree >/dev/null 2>&1; thenecho "错误:当前目录不是一个 Git 仓库。请在仓库的根目录执行此脚本。"exit 1
fi# 标记是否需要强制推送。默认为不需要。
needs_force_push=false
# 标记 .gitattributes 是否被修改
gitattributes_modified=false# ====================================================================
# 第一步:清理 Git 历史中的大文件
# ====================================================================
echo "正在检查 Git 历史中的大文件..."filter_temp_file=$(mktemp)
# 阈值为 256MB (268435456 bytes)
git rev-list --objects --all | git cat-file --batch-check='%(objectname) %(objecttype) %(objectsize) %(rest)' | awk '$3 >= 268435456 {print $4}' > "$filter_temp_file"if [ -s "$filter_temp_file" ]; thenecho "警告:在 Git 历史中找到了大文件,正在重写历史记录..."echo "此操作会永久性修改你的 Git 历史,请确保你已经备份了项目。"needs_force_push=truegit filter-branch --index-filter "git rm --cached --ignore-unmatch $(cat "$filter_temp_file")" --tag-name-filter cat -- --allif [ $? -ne 0 ]; thenecho "清理历史失败。脚本终止。"rm -f "$filter_temp_file"exit 1figit reflog expire --expire=now --allgit gc --prune=now --aggressiveecho "大文件已从 Git 历史中移除。"
elseecho "没有在 Git 历史中找到需要移除的大文件。"
firm -f "$filter_temp_file"# ====================================================================
# 第二步:检查和配置 Git LFS
# ====================================================================
echo "正在检查当前工作目录中的大文件..."# 阈值为 256MB
find_result=$(find . -not -path "./.git/*" -type f -size +256M 2>/dev/null)if [ -n "$find_result" ]; thenecho "在当前工作目录中找到了大文件,正在添加到 Git LFS 跟踪..."for file in $find_result; doif ! git check-attr -a -- "$file" | grep -q "lfs"; thenecho "正在添加 $file 到 Git LFS 追踪..."git lfs track "$file"gitattributes_modified=trueelseecho "$file 已被 Git LFS 追踪,跳过添加。"fidone
elseecho "没有在当前工作目录中找到需要添加到 Git LFS 的大文件。"
fi# ====================================================================
# 新增步骤:删除子目录中的所有.gitignore文件(保留根目录的.gitignore)
# ====================================================================
echo "正在清理子目录中的.gitignore文件..."
# 查找所有.gitignore文件,但排除根目录的.gitignore
subdir_gitignores=$(find . -mindepth 2 -name ".gitignore" 2>/dev/null)if [ -n "$subdir_gitignores" ]; thenecho "发现以下子目录中的.gitignore文件,将被删除:"echo "$subdir_gitignores"# 删除找到的文件rm -f $subdir_gitignoresecho "子目录中的.gitignore文件已删除"
elseecho "未发现子目录中的.gitignore文件,无需删除"
fi# ====================================================================
# 第三步:提交和推送
# ====================================================================# 将所有更改(包括 .gitattributes 和 LFS 文件)一次性暂存,以修复核心问题
echo "正在暂存所有更改..."
git add .# 检查是否有东西需要提交
if ! git diff --staged --quiet; thenecho "正在提交文件..."if [ "$gitattributes_modified" = true ]; thengit commit -m "Configure Git LFS and commit large files"elsegit commit -m "Update and commit remaining files"fi
elseecho "没有新的更改需要提交。"
fi# 推送
echo "正在推送到远程仓库..."
if [ "$needs_force_push" = true ]; thenecho "由于历史记录被修改,正在执行强制推送..."git push --force
elseecho "无需强制推送,执行正常推送..."git push
fiif [ $? -ne 0 ]; thenecho "Git 推送失败。请手动解决问题。"exit 1
fiecho "脚本执行完毕。"在这个脚本中,脚本会先查找大于250M的文件并且把他写入到.gitattributes中,然后先更新.gitattributes再进行全部更新。
自动链接脚本
这个我在我的b站视频中说过,这里再说一遍,再cnb中超过10分钟不登陆webide或者是ssh会自动回收环境。所以我用python写了一个自动连接的脚本,原理就是自己用ssh链接自己的一个脚本。
脚本如下
#!/usr/bin/env python3
import requests
import json
import re
import subprocess
import time
import threading
import signal
import sys
import os
import shlex# 全局变量
ssh_process = None
stop_flag = Falsedef signal_handler(signum, frame):"""信号处理器,用于优雅退出"""global stop_flag, ssh_processprint("\n收到退出信号,正在关闭SSH连接...")stop_flag = Trueif ssh_process:close_ssh_connection()sys.exit(0)def get_workspace_list():"""获取工作空间列表"""url = "https://api.cnb.cool/workspace/list"params = {'branch': 'main','end': '2100-12-01 00:00:00+0800','page': 1,'pageSize': 20,'slug': '仓库','start': '2024-12-01 00:00:00+0800','status': 'running'}headers = {'accept': 'application/json','Authorization': 'APITOKEN'}try:response = requests.get(url, params=params, headers=headers)response.raise_for_status()return response.json()except requests.exceptions.RequestException as e:print(f"获取工作空间列表失败: {e}")return Nonedef get_workspace_detail(sn):"""获取工作空间详细信息"""url = f"https://api.cnb.cool/仓库/-/workspace/detail/{sn}"headers = {'accept': 'application/json','Authorization': '5Q5MZm1285Efm9udrYEHE50gnoG'}try:response = requests.get(url, headers=headers)response.raise_for_status()return response.json()except requests.exceptions.RequestException as e:print(f"获取工作空间详情失败: {e}")return Nonedef extract_ssh_command(ssh_string):"""从SSH字符串中提取SSH命令"""# 移除可能的引号和多余的空格ssh_command = ssh_string.strip().strip('"')return ssh_commanddef update_config_json(ssh_command):"""更新config.json文件"""try:# 读取现有的config.jsonwith open('config.json', 'r', encoding='utf-8') as f:config = json.load(f)# 添加SSH命令config['ssh_command'] = ssh_command# 写回文件with open('config.json', 'w', encoding='utf-8') as f:json.dump(config, f, indent=2, ensure_ascii=False)print(f"已成功更新config.json,添加SSH命令: {ssh_command}")except Exception as e:print(f"更新config.json失败: {e}")def execute_ssh_command(ssh_command):"""执行SSH命令"""global ssh_processtry:print(f"正在执行SSH命令: {ssh_command}")# 解析SSH命令ssh_parts = shlex.split(ssh_command)# 添加SSH选项以避免主机密钥检查ssh_parts.insert(1, '-o')ssh_parts.insert(2, 'StrictHostKeyChecking=no')ssh_parts.insert(3, '-o')ssh_parts.insert(4, 'UserKnownHostsFile=/dev/null')print(f"完整SSH命令: {' '.join(ssh_parts)}")# 执行SSH连接ssh_process = subprocess.Popen(ssh_parts,stdout=subprocess.PIPE,stderr=subprocess.PIPE,stdin=subprocess.PIPE,text=True,bufsize=1,universal_newlines=True)# 等待一段时间检查连接状态time.sleep(3)if ssh_process.poll() is None:print("SSH连接已建立")return Trueelse:stdout, stderr = ssh_process.communicate()print(f"SSH连接失败")print(f"stdout: {stdout}")print(f"stderr: {stderr}")return Falseexcept Exception as e:print(f"执行SSH命令失败: {e}")return Falsedef close_ssh_connection():"""关闭SSH连接"""global ssh_processif ssh_process:try:print("正在关闭SSH连接...")ssh_process.terminate()ssh_process.wait(timeout=5)print("SSH连接已关闭")except subprocess.TimeoutExpired:print("SSH连接关闭超时,强制终止...")ssh_process.kill()except Exception as e:print(f"关闭SSH连接时出错: {e}")finally:ssh_process = Nonedef check_connection_status():"""检查连接状态"""global ssh_processif ssh_process:return ssh_process.poll() is Nonereturn Falsedef ssh_connection_manager():"""SSH连接管理器,处理自动重连"""global stop_flag, ssh_processreconnect_interval = 300  # 5分钟last_connect_time = time.time()connection_active = Truewhile not stop_flag:current_time = time.time()# 检查是否需要重连if current_time - last_connect_time >= reconnect_interval:print(f"\n[{time.strftime('%Y-%m-%d %H:%M:%S')}] 执行定时重连...")# 关闭现有连接close_ssh_connection()# 获取最新的SSH命令ssh_command = get_ssh_command_from_config()if ssh_command:# 建立新连接if execute_ssh_command(ssh_command):last_connect_time = current_timeconnection_active = Trueprint(f"重连成功,下次重连时间: {time.strftime('%Y-%m-%d %H:%M:%S', time.localtime(current_time + reconnect_interval))}")else:print("重连失败,将在下次循环中重试")connection_active = Falseelse:print("无法获取SSH命令,将在下次循环中重试")connection_active = False# 检查SSH进程是否还在运行if not check_connection_status() and connection_active:print("SSH连接已断开,准备重连...")connection_active = Falselast_connect_time = 0  # 立即重连# 等待一段时间再检查time.sleep(10)def get_ssh_command_from_config():"""从config.json中获取SSH命令"""try:with open('config.json', 'r', encoding='utf-8') as f:config = json.load(f)if 'ssh_command' in config:return config['ssh_command']else:return Noneexcept Exception as e:print(f"读取config.json失败: {e}")return Nonedef main():global stop_flagprint("=" * 60)print("SSH工作空间连接管理器")print("=" * 60)# 设置信号处理器signal.signal(signal.SIGINT, signal_handler)signal.signal(signal.SIGTERM, signal_handler)print("开始获取工作空间信息...")# 第一步:获取工作空间列表workspace_list = get_workspace_list()if not workspace_list:print("无法获取工作空间列表")returnprint("工作空间列表获取成功")# 提取sn值if 'list' in workspace_list and len(workspace_list['list']) > 0:sn = workspace_list['list'][0]['sn']print(f"提取到sn值: {sn}")# 第二步:获取工作空间详情workspace_detail = get_workspace_detail(sn)if not workspace_detail:print("无法获取工作空间详情")returnprint("工作空间详情获取成功")# 提取SSH命令if 'ssh' in workspace_detail:ssh_command = extract_ssh_command(workspace_detail['ssh'])print(f"提取到SSH命令: {ssh_command}")# 更新config.jsonupdate_config_json(ssh_command)print("\n" + "=" * 60)print("SSH信息获取完成,正在建立连接...")print("=" * 60)# 直接建立SSH连接if execute_ssh_command(ssh_command):print("初始SSH连接成功,启动自动重连管理器...")print("=" * 60)# 启动自动重连管理器线程reconnect_thread = threading.Thread(target=ssh_connection_manager, daemon=True)reconnect_thread.start()print("SSH连接管理器已启动")print("连接将每5分钟自动重连一次")print("按Ctrl+C退出")print("=" * 60)# 主线程等待try:while not stop_flag:time.sleep(1)except KeyboardInterrupt:print("\n收到键盘中断信号")stop_flag = Trueclose_ssh_connection()else:print("SSH连接失败")else:print("未找到SSH信息")else:print("工作空间列表为空")if __name__ == "__main__":main()
你需要更新这里的“仓库”(两处),“APITOKEN”(一处),你自己用ctrl+f进行查找和替换即可。
结尾
最后说一句,数据无价,这个方法终究是邪门歪道(但是性能真的太强辣!!)请对数据做好备份(最起码每隔一个星期开几个备份分支吧!!!),然后这个服务器是没有公网的请用内网穿透。最后最后,补药跳脸,邪门歪道不要蹬鼻子上脸。