基于 Qemu 的内核模块开发初体验
在 之前文章 介绍了基于 qemu 的内核(驱动)开发环境的搭建方法,现在基于它来开发第一个内核模块并简单介绍模块开发的基本框架。
1. 第一个模块
1.0 模块源码目录结构
linux 内核编译框架允许开发者在独立的目录中保存模块代码(也可以放内核源码目录),如下所示我们的第一个模块源码目录结构:
yao@vm:~/Desktop/ws/first_module$ tree -L 1
.
├── build.sh   # 编译该模块的脚本
├── first.c    # 源码
├── Makefile   # 编译用的 Makefile
└── make_sdcard_boot.sh # 制作系统盘的脚本(把相应操作放脚本里,提高开发效率)
1.1 模块源码
模块有自己的 “入口函数”、“出口函数”,这两个函数注册后,分别在模块被加载和卸载的时候被调用。并且模块还应该进行协议声明等操作,如下是一个最简单的模块示例代码(first.c):
// [0] 定义一个模块入口函数
static int __init init_1st_module(void) {printk("%s\n", "1st module init");return 0;
}// [0] 定义一个模块出口函数
static void __exit exit_1st_modeule(void) {printk("%s\n", "1st module exit");
}// [1] 注册模块入口、出口函数
module_init(init_1st_module);
module_exit(exit_1st_modeule);// [2] license 等声明
MODULE_LICENSE("GPL");
MODULE_AUTHOR("yao");
MODULE_DESCRIPTION("A hello world Module");
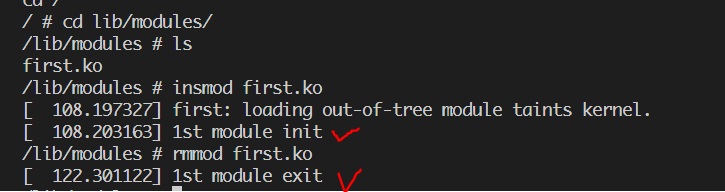
加载、卸载模块时候,打印信息:
1.2 模块 Makefile
要想把源码编译为模块,还要用一个Makefile 指定编译规则(Makefile 编写规则后边细讲):
ifneq ($(KERNELRELEASE),)
$(info "second stage(2)")obj-m += first.oelse
KDIR := /home/yao/Desktop/linux-4.4.232
PWD  := $(shell pwd).PHONY: all cleanall:$(info "first stage(1)")$(MAKE) -C $(KDIR) M=$(PWD) modulesclean:rm -rf *.ko *.o *.mod.c *.mod.o *.symvers *.order .*.cmd .tmp_versions
endif
1.3 编译脚本
准备好 Makefile 和 源码后,就可以用 build.sh 进行编译。
function _run {opt_param=$1if [[ $opt_param == "build" ]]; thenmake ARCH=arm CROSS_COMPILE=arm-linux-gnueabihf- -j4elif [[ $opt_param == "clean" ]]; thenmake ARCH=arm CROSS_COMPILE=arm-linux-gnueabihf- -j4 cleanelseecho "unknow"fi
}echo "Select operator:"
select opt in "build" "clean"
do_run $optbreak
done
~
1.4 采用脚本制作系统镜像
以下是 make_sdcard_boot.sh 的内容,作用是便捷地制作系统镜像和运行 qemu模拟器。需要注意的是编译好 linux 内核、制作好根文件系统、生成模块才可以执行。
#!/usr/bashfunction _make_img {local img_file="$1/rootfs.ext3"local rootfs_dir="$1/rootfs"# 创建镜像文件dd if=/dev/zero of="$img_file" bs=1M count=32# 格式化为 ext3 文件系统mkfs.ext3 "$img_file"# 挂载镜像文件sudo mount -t ext3 "$img_file" /mnt -o loop# 复制根文件系统内容sudo cp -ra "$rootfs_dir/"* /mnt/# 卸载镜像sudo umount /mnt/
}function _make_rootfs {local rootfs_dir="$1/rootfs"local lib_dir dev_dir# 创建根目录mkdir -p "$rootfs_dir"if [ -d "$1/busybox-1.32.0/_install" ]; thencp -ra "$1/busybox-1.32.0/_install/"* "$rootfs_dir" 2>/dev/null || trueelseecho "waring: busybox : $1/busybox-1.32.0/_install"fi# 创建 lib 目录并复制库文件local lib_dir="$rootfs_dir/lib"mkdir -p "$lib_dir"if [ -d "/usr/local/arm/gcc-linaro-4.9.4-2017.01-x86_64_arm-linux-gnueabihf/lib" ]; thencp -ra "/usr/local/arm/gcc-linaro-4.9.4-2017.01-x86_64_arm-linux-gnueabihf/lib/"* \"$lib_dir" 2>/dev/null || trueelseecho "no across build toolchain"filocal module_dir="$lib_dir/modules"mkdir -p "$module_dir"local module_file_dir="$1/ws/first_module"echo "$module_file_dir"if ls "$module_file_dir"/*.ko >/dev/null 2>&1; thencp -ra "$module_file_dir"/*.ko "$module_dir"fidev_dir="$rootfs_dir/dev"mkdir -p "$dev_dir"cd "$dev_dir" || {echo "err canot cd $dev_dir"return 1}# 创建设备节点for i in {1..5}; dosudo mknod -m 666 "tty$i" c 4 "$i"donesudo mknod -m 666 console c 5 1sudo mknod -m 666 null c 1 3sh_dir=$1/ws/first_modulecd "$sh_dir" || {echo "err canot cd $sh_dir"return 1}
}function _run {opt_param=$1root_dir=/home/yao/Desktoptootfs_dir=$root_dir/rootfssd_img=$root_dir/rootfs.ext3if [[ $opt_param == "make_boot_sd_card" ]]; then if [ -e $tootfs_dir ]; thenecho "delect $tootfs_dir"rm -rf $tootfs_dirfiif [ -e $sd_img ]; thenecho "delect $sd_img"rm -rf $sd_imgfiif [ ! -e $sd_img ] && [ ! -e $tootfs_dir ]; then_make_rootfs $root_dir_make_img $root_dirfielif [[ $opt == "run_qemu" ]]; thenkernel_dir="$root_dir/linux-4.4.232"img_file="$root_dir/rootfs.ext3"qemu-system-arm -M mcimx6ul-evk -m 512M \-kernel "$kernel_dir/arch/arm/boot/zImage" \-dtb "$kernel_dir/arch/arm/boot/dts/imx6ul-14x14-evk.dtb" \-nographic \-append "root=/dev/mmcblk0 rw console=ttymxc0" \-sd "$img_file"    else echo "unknow operator" exit 1fi
}echo "Select operator:"
select opt in "make_boot_sd_card" "run_qemu"
do _run $optbreak
done
2. Linux 模块化编程的 Kbuild 规则
可以参考如下文档:
linux kbuild 详细系列1
kbuild 官方教程